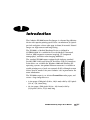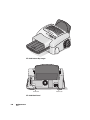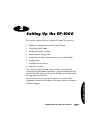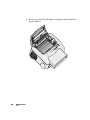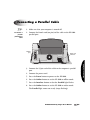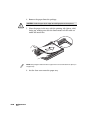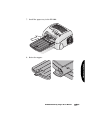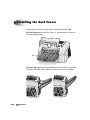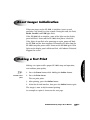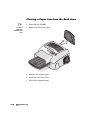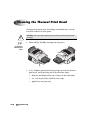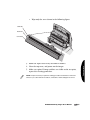
1
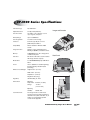
®
EP-1000™
Series
Instant Dry
Imager
User’s Manual
Codonics® Catalog Number 1000-MNLU
December 9, 2004
Version 1.1
Codonics, Inc.
17991 Englewood Drive
Middleburg Heights, OH 44130 USA
440-243-1198 Phone
440-243-1334 Fax
Email [email protected]
www.codonics.com
$PQZSJHIUªCZ$PEPOJDT*OD"MMSJHIUTSFTFSWFEXPSMEXJEF1SJOUFEJOUIF
64"1BSU/VNCFS
/PQBSUPGUIJTEPDVNFOUNBZCFDPQJFEPSSFQSPEVDFEJOBOZGPSNCZBOZNFBOT
XJUIPVUQSJPSXSJUUFODPOTFOUPG$PEPOJDT*OD &OHMFXPPE %S
.JEEMFCVSH )FJHIUT0IJP 64"
"MUIPVHIFWFSZFGGPSUIBTCFFONBEFUPFOTVSFUIFBDDVSBDZPGUIJTEPDVNFOU
$PEPOJDT*ODBTTVNFTOPSFTQPOTJCJMJUZGPSBOZFSSPSTUIBUNBZBQQFBS
$PEPOJDT*ODNBLFTOPDPNNJUNFOUUPVQEBUFOPSUPLFFQDVSSFOUUIF
JOGPSNBUJPODPOUBJOFEJOUIJTEPDVNFOU
$PEPOJDTUIF$PEPOJDTMPHPi8FCSJOHUIFGVUVSFJOUPGPDVTwBOE$ISPNB7JTUB
BSFSFHJTUFSFEUSBEFNBSLTBOE&1.FEJDBM$PMPS.BUDIJOHBOE.$.BSF
USBEFNBSLTPG$PEPOJDT *OD
8JOEPXTBOE8JOEPXT/5BSFSFHJTUFSFEUSBEFNBSLTPG.JDSPTPGU$PSQPSBUJPO
"MMPUIFSSFHJTUFSFEBOEVOSFHJTUFSFEUSBEFNBSLTBSFUIFQSPQFSUZPGUIFJS
SFTQFDUJWFPXOFST
&VSPQFBO"VUIPSJ[FE3FQSFTFOUBUJWF
$&QBSUOFS6
&TEPPSOMBBO
%#.BBSO
5IF/FUIFSMBOET
5FM Contents
Contents
Preface
Manual Conventions ..................................................................................... vii
Bulleted Lists.......................................................................................... vii
Numbered Steps .................................................................................... vii
Display Panel Indicator Lights and Buttons ........................................... viii
Notes and Tips ...................................................................................... viii
Cautions and Warnings ......................................................................... viii
Technical Assistance ..................................................................................... ix
Warnings and Limitations of Use ................................................................... ix
Potential for Radio and Television Interference ....................................... ix
EP-1000 Warnings ................................................................................... x
EP-1000 Precautions ............................................................................. xii
Never Insert Any Foreign Object into the Imager............................. xii
Protect Against Dew Formation ....................................................... xii
Operating Temperature and Humidity Ranges ................................ xii
Unsuitable Locations ....................................................................... xii
Unsuitable Materials for the Imager ................................................ xiii
Thermal Print Head Abrasion ......................................................... xiii
Product Cautions ............................................................................ xiii
Packaging ....................................................................................... xiii
Labeling................................................................................................. xiv
Limitations of Use................................................................................... xv
Overview.......................................................................................... xv
Media ............................................................................................... xv
Grayscale Management................................................................... xv
Error Handling.................................................................................. xv
Hardware Variations ........................................................................ xv
EP-1000 Instant Dry Imager User’s Manual
iii
EP-1000 Series Disposal ...................................................................... xvi
EP-1000 Series Specifications ................................................................... xvii
Chapter 1: Introduction
Chapter 2: Setting Up the EP-1000
Finding a Location for the EP-1000 ............................................................ 2-2
Unpacking the EP-1000.............................................................................. 2-3
Loading the Ribbon Cartridge..................................................................... 2-5
Connecting a Parallel Cable ....................................................................... 2-9
Connecting a USB Cable.......................................................................... 2-10
Loading Paper .......................................................................................... 2-11
Handling Paper................................................................................... 2-11
Storing Paper ..................................................................................... 2-11
Loading the Paper Tray ...................................................................... 2-12
Installing the Dust Covers......................................................................... 2-16
About Imager Initialization ........................................................................ 2-17
Making a Test Print................................................................................... 2-17
Chapter 3: Operating the EP-1000
Indicator Lights and Control Buttons .......................................................... 3-1
Canceling Multiple Copy Printing................................................................ 3-3
Chapter 4: Maintenance
Properly Maintaining the EP-1000 ............................................................................... 4-1
Cleaning the EP-1000...................................................................................................... 4-2
iv
Contents
Chapter 5: Troubleshooting
Interpreting the Indicator Lights .................................................................. 5-1
Contents
Troubleshooting Common Problems .......................................................... 5-3
Clearing a Paper Jam ................................................................................. 5-6
Clearing a Paper Jam from the Ribbon Cartridge Area ....................... 5-7
Clearing a Paper Jam from the Front Area........................................... 5-9
Clearing a Paper Jam from the Back Area ......................................... 5-10
Repairing a Torn Ribbon .......................................................................... 5-11
Cleaning the Thermal Print Head ............................................................. 5-12
Appendix A: Hazardous Material Information
Materials of Construction ............................................................................ A-1
Manufacturing ............................................................................................. A-2
EP-1000 Instant Dry Imager User’s Manual
v
Preface
Manual Conventions
Bulleted Lists
Preface
Bullets are used to display a list of nonprocedural items. For
example:
The control panel contains:
•
A display panel
•
Keys
•
Indicators
Numbered Steps
8
The
icon indicates the beginning of a procedure. The steps
in a procedure are numbered. For example:
8
To unpack the
Imager
1. Open the shipping carton.
2. Carefully remove the top foam with the accessories.
3. Lift the imager out of the carton.
EP-1000 Instant Dry Imager User’s Manual
vii
Display Panel Indicator Lights and Buttons
Display panel indicator light and button names are in bold.
Notes and Tips
Notes contain additional information related to a topic or
procedure. For example:
3
NOTE: Save the packaging in case you need to ship the EP-1000.
Cautions and Warnings
Cautions alert you to actions or situations that could cause harm to
equipment or data. For example:
CAUTION Touching the dye patches could contaminate the ribbon, resulting in
scratches on your prints.
Warnings alert you to actions or situations that could result in
personal injury. For example:
WARNING Before you begin cleaning the EP-1000, turn off the EP-1000 and
unplug it.
viii
Preface
Technical Assistance
For technical assistance with Codonics products, call the Codonics
“On Call” Technical Support System at one of the following
numbers:
Phone:
Toll Free:
440-243-1198
800-444-1198
The “On Call” Technical Support System provides for around-theclock availability of qualified technical support personnel.
You can also e-mail Technical Support at [email protected].
Warnings and Limitations of Use
Potential for Radio and Television
Interference
Preface
This equipment has been tested and found to comply with the limits
for a Class A digital device, pursuant to Part 15 of the FCC rules.
These limits are designed to provide reasonable protection against
harmful interference when the equipment is operated in a
commercial environment. This equipment generates, uses, and can
radiate radiofrequency energy and, if not installed and used in
accordance with the instruction manual, may cause harmful
interference to radio communications. Operation of the equipment
in a residential area is likely to cause harmful interference, in which
case the user will be required to correct the interference at his or
her own expense.
If your imager does cause interference to radio or television
reception, you are encouraged to try to correct the interference by
one or more of the following measures:
EP-1000 Instant Dry Imager User’s Manual
ix
• Reorient the receiving antenna.
• Relocate the imager with respect to the receiver.
• Move the imager away from the receiver.
If necessary, you should consult your sales representative or an
experienced radio/television technician for additional suggestions.
You may find the following booklet prepared by the Federal
Communications Commission helpful: How to Identify and
Resolve Radio-TV Interference Problems. This booklet is available
from the U.S. Government Printing Office, Washington, D.C. 20402,
Stock No. 004-000-00345-4.
EP-1000 Warnings
CAUTION
RISK OF ELECTRIC SHOCK
DO NOT OPEN
The lightning flash with arrowhead symbol, within an equilateral
triangle, is intended to alert the user to the presence of uninsulated
“dangerous voltage” within the product’s enclosure that may be of
sufficient magnitude to constitute a risk of electric shock.
The exclamation point within an equilateral triangle is intended to
alert the user to the presence of important operating and
maintenance (servicing) instructions in the literature accompanying
this imager.
• NO USER-SERVICEABLE PARTS INSIDE. REFER SERVICING TO
QUALIFIED SERVICE PERSONNEL.
• THIS APPARATUS MUST BE EARTHED.
• TO PREVENT FIRE OR SHOCK HAZARD, DO NOT EXPOSE THIS
IMAGER TO RAIN OR MOISTURE.
x
Preface
• EQUIPMENT IS NOT TO BE USED AS A COMPONENT OF A LIFE
SUPPORT SYSTEM. Life support devices or systems are devices
or systems which support or sustain life, and whose failure to
perform, can be reasonably expected to result in a significant
injury or death to a person. A critical component is any
component of a life support device or system whose failure to
perform can be reasonably expected to cause the failure of the
life support device or system, or to affect its safety or
effectiveness.
• EQUIPMENT IS NOT TO BE USED IN A PATIENT VICINITY. The
EP-1000 Series Imagers must be located at least 1.83 m (6 ft) from
the patient treatment or examination area (bed, exam table, etc.)
at all times to avoid inadvertent patient contact with the
apparatus.
• EQUIPMENT IS TO BE USED AS SPECIFIED UNDER THE TOPIC
“EP-1000 PRECAUTIONS.”
• ALWAYS UNPLUG THE ENTIRE SYSTEM FROM THE POWER
SOURCE PRIOR TO CLEANING THE THERMAL PRINT HEAD.
Preface
EP-1000 Instant Dry Imager User’s Manual
xi
EP-1000 Precautions
Never Insert Any Foreign Object into the Imager
Foreign objects of any kind inserted into this imager constitute a
safety hazard and can cause extensive damage. The imager will not
print on materials not specifically designed for it. Feeding standard
office overhead transparency material into the imager will not work
and can damage the print mechanism.
Protect Against Dew Formation
In extremely cold regions, if the imager is moved quickly from an
extremely cold place to a warmer one, dew is likely to form. If dew
has formed, printing is not possible.
Operating Temperature and Humidity Ranges
The imager’s operating intake air temperature range is 59–86°F
(15–30°C), and the operating humidity range is 30–85%
noncondensing.
Unsuitable Locations
Do not place imager in high humidity or high dust areas. Airborne
dirt particles can cause image quality problems. Avoid placing the
imager in areas where ventilation ducts, open doors, or frequent
passers-by might expose the imager and media to high levels of
debris.
Avoid hot-springs areas where hydrogen sulfide and acidic ions are
likely to be generated. Avoid places where imager is likely to
contact oily fumes and vapors. Avoid direct sunlight.
xii
Preface
Unsuitable Materials for the Imager
Many plastic components are used in the imager’s construction.
Coat flecking and deformation is likely to occur if the imager is
wiped with chemical dusters, benzene, thinners, insecticides or
other solvents. Rubber and PVC materials left in contact with the
imager for extended times will cause damage. Never use
petroleum-based solutions or abrasive cleaners.
Thermal Print Head Abrasion
The thermal print head will wear. When it is abraded, it becomes
difficult to print fine details. In such a case it is necessary to replace
the thermal print head. Contact your service representative for
assistance.
Product Cautions
This product will not cause any special health or safety hazard
when used as intended. Spent media can be disposed in accordance
with local, state, or federal regulations.
Packaging
EP-1000 Instant Dry Imager User’s Manual
Preface
Use the original packaging when shipment of the product is
necessary. This packaging has been designed to minimize possible
damage during shipment.
xiii
Labeling
The locations of the EP-1000 labels are shown in the following
illustration.
This device complies with part 15 of the FCC Rules.
Operation is subject to the following two conditions:
(1) This device may not cause harmful interference
(2) This device must accept any interference
received, including interference that may cause
undesired operation.
CODONICS, INC.
17991 ENGLEWOOD DR.
MIDDLEBURG HTS., OH 44130 U.S.A.
MADE IN THE U.S.A.
Patents Pending, All Rights Reserved
This Class A digital apparatus complies with
Canadian ICES-003.
100-120V~, 50 / 60Hz, 2.9A
Cet appareil numerique de la classe A est conforme
a la norme NMB-003 du Canada.
CAUTION: BEFORE CONNECTING READ INSTRUCTIONS
MODEL / MODLE EP-1000
COLOR / DRY MEDICAL IMAGER
LISTED
I.T.E.
9C72
CAUTION
RISK OF ELECTRIC SHOCK
DO NOT OPEN
Date of manufacture
(e.g., "2004-08")
Sequential serial
number
Configuration code
(version)
xiv
Preface
Serial label
Limitations of Use
Overview
This section describes imager and media usage considerations that
can affect output results and quality.
Media
• Media variations between different production lots may produce
subtle differences in image quality.
• Printed images that experience prolonged exposure to heat,
sunlight, or ultraviolet light may degrade in image quality.
Precautions should be used to avoid prolonged direct exposure.
Grayscale Management
Grayscale image management filters—including gamma, contrast,
and film type—are intended to compensate for differences that may
occur between image acquisition and image printing. These filters
allow the user to accurately render the final printed image. Care
should be used when applying these filters to avoid over
compensation.
Error Handling
Preface
The imager will discard invalid, unsupported, and corrupt images
and not print the page.
Hardware Variations
Components used in the imager may vary causing differences in
image quality. The thermal process of producing a print utilizes
many components that are calibrated to provide consistency
between imagers. All imagers contain subtle differences that can
cause print variations. These differences usually apply to thermal
print head calibration. Other factors such as age, usage, heat,
mechanical wear, and shipping can affect image quality.
EP-1000 Instant Dry Imager User’s Manual
xv
EP-1000 Series Disposal
Disposal of this product shall be in accordance with all applicable
laws and regulations in effect at the locality at the time of disposal.
For further information, refer to Appendix A.
xvi
Preface
EP-1000 Series Specifications
Print Technology:
Dye Sublimation.
Spatial Resolution:
314 dpi (12.36 pixels/mm).
Color Resolution:
16.7 million colors. 256 levels each of
cyan, magenta, and yellow.
Density Range:
Up to 2.55 OD Dmax.
Color Registration:
Less than 0.1 mm average.
Interfaces:
Centronics-type 36-pin connector
(IEEE 1284) and USB 1.1.
Imager and Cassette
pow
er
fau
lt
me
dia
ON
LIN
netw
USB ork
par
alle
l
E
PR
INT
INT
ER
FAC
E
Drivers available for Windows 2000
and XP.
Image Correction:
Gamma, contrast, and Medical Color
Matching™ (MCM™) selectable in drivers.
Memory:
23 MB RAM memory, three image planes
of 2508 x 3134 pixels.
Cassettes:
One dual A or A4 media cassette included
with imager, 50-sheet capacity.
Media Sizes:
A or A4 ChromaVista® paper. CMY Donor
ribbon.
Power:
120 V~, 50/60 Hz; 2.7 A/210 W (printing),
0.35 A/21 W (idle), 30-130 W (head
preheating)
Dimensions and Weight:
Height:10.75 in. (27.2 cm).
Width:17.0 in. (43.3 cm).
Back Panel
Connectors
Preface
Compatibility:
Power cord
Depth:28.5 in. (72.0 cm).
Weight:28.7 lbs (13 kg).
Regulatory:
US FDA 510(k), UL, FCC.
Environment:
Operating
Temperature:
Storage:
Operating
Humidity:
Use Environment:
63–86°F (17–30°C)
-8–123°F
(-22.2–51.6°C)
USB port
30-80% R.H.
The imager must be located at least
1.83 m (6 ft) from the patient treatment or
examination area (bed, exam table, etc.) at
all times to avoid inadvertent patient
contact with the apparatus.
Parallel port
EP-1000 Instant Dry Imager User’s Manual
xvii
1
Introduction
The Codonics EP-1000 Instant Dry Imager is a thermal dye-difusion
device with superior printing speed. It has a resolution of 314 pixels
per inch and prints a three-color page in about 90 seconds. Printed
images are high-contrast and long-lasting.
The EP-1000 is a Medical Hardcopy Device as defined in
21CFR892.2040. It is suitable for use with Medical Ultrasound,
Nuclear, MRI (magnetic resonance imaging), CT (computed
tomography), and other color imaging modalities.
Introduction
The standard EP-1000 comes equipped with industry-standard
Parallel (IEEE 1284) and Universal Serial Bus (USB 1.1) interfaces.
Print drivers are available for Windows 2000 and Windows XP
operating systems. An optional Ethernet converter is available to
enable printing over a local area network (LAN), although custom
drivers may be needed. See your Codonics sales representative for
more information.
The EP-1000 accepts A- or A4-size ChromaVista color paper, and
covers a large imageable area:
• A-size paper: 2508 pixels (8.0 in.; 203.2 mm) wide by 2954 pixels
(9.4 in.; 239.3 mm) long
• A4-size paper: 2508 pixels (8.0 in.; 203.2 mm) wide by
3134 pixels (10 in.; 253.9 mm) long
EP-1000 Instant Dry Imager User’s Manual
1-1
po
wer
faul
t
med
ia
ON
LIN
E
pa
PR
IN
ne
tw
or
USB
ralle
l
k
T
IN
TE
RFA
CE
EP-1000 Instant Dry Imager
Connectors
EP-1000 Back Panel
1-2
Introduction
Power cord
2
Setting Up the EP-1000
This section explains how to set up the EP-1000. The steps are:
1. Finding an appropriate location for the EP-1000
2. Unpacking the EP-1000
3. Loading the ribbon cartridge
4. Connecting the imager cable
5. Connecting the power cord and powering on the EP-1000
6. Loading paper
7. Installing the dust covers
8. Making a test print
The software for the EP-1000, which enables you to take full
advantage of the EP-1000’s capabilities, is on the CD-ROM that ships
with the EP-1000. After you set up the EP-1000, you should install
the appropriate print driver.
Special drivers may be provided to interface to certain OEM
equipment. Contact your Codonics sales representative or Codonics
Technical Support.
Setting Up the EP-1000
EP-1000 Instant Dry Imager User’s Manual
2-1
Finding a Location for the EP-1000
Keep the following guidelines in mind when selecting a site for the
EP-1000.
• Allow 2 in. (5 cm) on the left and right sides, and 15.8 in. (40 cm)
above for air flow and cooling. The back of the EP-1000 may be
placed flush against a wall.
• Avoid placing the EP-1000 in areas where ventilation ducts, open
doors, or frequent passers-by might expose it to debris. Airborne
dirt particles can cause image quality problems.
The space requirements for the EP-1000 are shown below.
Allow 15.8 in.
(40 cm) to open
the top door
po
wer
faul
t
med
ia
ON
LI
ne
USB
pa
ralle
l
NE
PR
tw
or
k
IN
T
IN
TE
RFA
CE
21.0 in.
(53.4 cm)
2-2
Introduction
Allow 32.3 in. (82 cm)
to remove the paper tray
Unpacking the EP-1000
8
To unpack the
Imager
1. Open the shipping carton.
2. Carefully remove the top foam with the accessories.
3. Lift the imager out of the carton.
4. Remove the EP-1000 from the plastic sheet, and place the
EP-1000 at the desired location.
3
NOTE: Save the packaging in case you need to ship the EP-1000.
5. Remove the shipping inserts on the paper tray inserting slot.
Setting Up the EP-1000
POW
POW
ER
ER
Hold the tab
Pull the shipping insert
to the center
EP-1000 Instant Dry Imager User’s Manual
2-3
3
NOTE: When you do not use the EP-1000 for a long period, make sure to attach the shipping
inserts on the slot, as shown below, or the rollers may be deformed.
POW
POW
ER
Push toward the inner part
2-4
Introduction
ER
Hook the shipping
insert on the printer
Loading the Ribbon Cartridge
The ribbon cartridge fits easily in the EP-1000. There is only one
way to correctly load the ribbon cartridge.
8
1. Press the Open button to open the top cover.
To load the
ribbon
cartridge
po
wer
faul
t
med
ia
ON
ne
LIN
E
pa
PR
IN
T
USB
ralle
l
tw
or
k
IN
TE
RFA
CE
Setting Up the EP-1000
EP-1000 Instant Dry Imager User’s Manual
2-5
2. If necessary, push the old ribbon cartridge to the left and lift it
up to remove it.
2-6
Introduction
CAUTION Images remain on the ribbon after printing. If you are working with
confidential documents, you may need to consider alternate ways of disposing of the
ribbon to maintain security.
3. Remove the old ribbon from the ribbon carrier.
3
NOTE: Do not discard the ribbon carrier.
4. Remove the new ribbon from its packaging.
CAUTION Touching the dye patches could contaminate the ribbon, resulting in
scratches or artifacts on your prints.
5. Set the new ribbon on the ribbon carrier as shown below.
Spool
Setting Up the EP-1000
Ribbon
Handle
Ribbon carrier
EP-1000 Instant Dry Imager User’s Manual
2-7
6. Grasp the ribbon cartridge by the handle, and slide the spool
onto the two hubs on the left side.
Hubs
7. Push the ribbon cartridge against the hubs on the left until it can
engage the two holders on the right.
Holders
8. Turn the thick spool in the direction shown by the arrow
(above), until the ribbon is taut.
9. Close the top cover.
2-8
Introduction
Connecting a Parallel Cable
8
To connect a
parallel
(Centronics)
cable
1. Make sure that your computer is turned off.
2. Connect the female end (no pins) of the cable to the EP-1000
parallel port.
Parallel
port
Power cord
connector
Setting Up the EP-1000
3. Connect the 25-pin end of the cable to the computer’s parallel
port.
4. Connect the power cord.
5. Press the Power button to power on the EP-1000.
6. Press the Online button to set the EP-1000 to offline mode.
7. Press the Interface button so that the Parallel light flashes.
8. Press the Online button to set the EP-1000 to online mode.
The Parallel light comes on steady (stops flashing).
EP-1000 Instant Dry Imager User’s Manual
2-9
Connecting a USB Cable
8
To connect a
USB cable
1. Make sure that your computer is turned off.
2. Connect and secure the USB cable to the USB port.
USB
port
Power cord
connector
3. Connect the power cord.
4. Press the Power button to power on the EP-1000.
5. Press the Online button to set the EP-1000 to offline mode.
6. Press the Interface button so that the USB light flashes.
7. Press the Online button to set the EP-1000 to online mode.
The USB light comes on steady (stops flashing).
2-10
Introduction
Loading Paper
Handling Paper
Follow these guidelines when you handle the paper:
• Hold the paper by the edges to avoid fingerprints.
• Do not load more than 50 sheets of paper in the paper tray.
• Do not use wet or damaged paper.
Storing Paper
Follow these storage instructions to ensure the highest image
quality:
• Store opened paper at temperatures below 77°F (25°C). Avoid
exposure to temperatures higher than 86°F (30°C).
EP-1000 Instant Dry Imager User’s Manual
Setting Up the EP-1000
• Avoid storing a loose stack of paper out of its wrapper.
2-11
Loading the Paper Tray
The paper tray adjusts to the size of the paper you are loading. Do
not force paper that is too long or too wide into the tray.
3
NOTE: A spacer for protection during transport is attached inside the paper tray when the
EP-1000 is shipped from the factory. Remove this spacer when using the EP-1000.
CAUTION Use only the tray designed for the EP-1000.
8
To load the
paper tray
2-12
Introduction
1. Pull down the plate lever of the paper tray until you hear a click.
2. If necessary, adjust the paper tray to fit the paper you are
loading:
•
Move the paper width adjuster to the correct position for
either A- or A4-size paper.
•
Slide the paper length adjuster to the correct position for the
length of the paper you are loading. Make sure that the
paper length adjuster is locked into position.
Paper length
adjustor
Paper width
adjustor
Setting Up the EP-1000
3. Loosen the paper in the package.
3
NOTE: Paper sheets may become stuck together during storage or shipping. Loosen the
pages well before unpacking.
Loosen the paper
before unpacking
EP-1000 Instant Dry Imager User’s Manual
2-13
4. Remove the paper from the package.
CAUTION Handle the paper by the edges to avoid fingerprints on the top sheet.
5. Place the paper in the tray with the printing side (glossy side)
facing up, making sure that the front corners of the stack are
under the metal tabs.
3
NOTE: One package includes 50 sheets of paper. Do not exceed the 50-sheet capacity of
the paper tray.
6. Set the clear cover onto the paper tray.
2-14
Introduction
7. Install the paper tray in the EP-1000.
po
wer
faul
t
med
ia
ONL
IN
E
pa
PR
IN
T
ne
tw
US
or
k
B
ralle
l
IN
TE
RF
AC
E
8. Raise the stopper.
Setting Up the EP-1000
EP-1000 Instant Dry Imager User’s Manual
2-15
Installing the Dust Covers
Install the dust covers on the front and back of the EP-1000.
For the front cover, install the cover as shown below (insert the
cover into the groove).
Groove
For the back cover, insert the bottom of the dust cover on the back
slit of the EP-1000. Then, hook the dust cover on the EP-1000.
2-16
Introduction
About Imager Initialization
When you power on the EP-1000, it initializes (starts up and
performs a self-check) in a few seconds. During this time, the Fault,
Media, Parallel, and USB lights flash.
If the EP-1000 fails to initialize, none of the lights on the display
panel will flash. Power off the EP-1000, then power it back on.
If the lights do not flash after powering on again, power off both
the EP-1000 and the host computer. Disconnect all cables from the
EP-1000 except the power cable. Power on the EP-1000 again. If the
lights on the display panel still do not flash, call Codonics Technical
Support for service.
Making a Test Print
Setting Up the EP-1000
Making a test print verifies proper EP-1000 setup and operation,
and confirms print quality.
8
To make a test
print
1. Press the Power button while holding the Online button.
2. Press the Print button.
The test print prints.
3. After printing, press the Online button.
4. Select the desired interface, then press the Online button again.
The imager is now ready for normal printing.
An example test print is shown on the next page.
EP-1000 Instant Dry Imager User’s Manual
2-17
2-18
Introduction
Operating the EP-1000
3
Operating the EP-1000
Indicator Lights and Control Buttons
The indicator lights and control buttons on the EP-1000’s display
panel are shown below.
Power
light
Fault
light
Media
light
Online
button
Print
button
Interface
select button
Parallel light
Open top
cover button
USB light
Power button
EP-1000 Instant Dry Imager User’s Manual
3-1
Table 3-1 and Table 3-2 describe the functions of the indicator
lights and control buttons.
Table 3-1. Display Panel Indicator Lights
Indicator Light
Description
Power
Lights green when the EP-1000 is turned on.
Fault
Lights red when a fault occurs. The light remains on until all the
faults are resolved.
When the Fault light comes on steadily, you may be able to
correct the problem yourself.
Media
Lights red when a fault concerning print paper occurs.
Parallel
Lights green when the Parallel port is selected.
USB
Lights green when the USB port is selected.
Table 3-2. Display Panel Control Buttons
Button
Description
Power
Press to turn the power on or off. When power is on, the Power
light comes on.
Online
Press to toggle the imager online and offline. In online mode,
you can control the EP-1000 through the computer.
Print
Press to reprint a valid job that is still in the image buffer. This
button is not available when image data has not been sent or
the EP-1000 is online.
Interface
Press to select either the Parallel or USB port. The indicator
light for the selected interface flashes. This button is disabled
when the EP-1000 is online.
Open
Press to open the top cover. You will need to open the top
cover when loading the ink ribbon or clearing a paper jam.
CAUTION Do not open the top cover during printing. Doing so may cause print faults
or damage the EP-1000.
3-2
Operating the EP-1000
Operating the EP-1000
Canceling Multiple Copy Printing
When printing two or more copies of one image, you can use
continuous printing. The number of the copies can be set by the
print driver.
To cancel continuous printing, press the Print button for a few
seconds until the Fault (in green), Parallel, and USB lights flash.
After completing the current sheet, continuous printing is canceled.
EP-1000 Instant Dry Imager User’s Manual
3-3
4
Maintenance
Maintenance
Properly Maintaining the EP-1000
To keep the EP-1000 in good working condition:
• Keep the EP-1000 clean. Keep the surrounding area vacuumed
and litter-free.
• Protect the EP-1000 from tobacco smoke, dust, sand, and liquid
spills.
EP-1000 Instant Dry Imager User’s Manual
4-1
Cleaning the EP-1000
To help ensure good performance and high-quality output, make
sure the operating environment is clean and dust free.
Clean the EP-1000 regularly as described below.
WARNING Before you begin cleaning the EP-1000, turn off the EP-1000 and
unplug it.
• Wipe the covers, the paper tray area, and the paper tray with
water and a damp, lint-free cloth. This eliminates dust buildup
and prevents dirt from getting into the EP-1000.
CAUTION Never use abrasives or harsh chemicals to clean any part of the EP-1000.
Do not use alcohol cleaning pads to clean the cabinet.
• Clean the area around and under the EP-1000 to prevent dirt from
getting into it.
4-2
Maintenance
5
Troubleshooting
Interpreting the Indicator Lights
The indicator lights become red when a problem has occurred. You
must resolve any problems before you can print. The following
table explains how to interpret the condition of the indicator lights.
Troubleshooting
EP-1000 Instant Dry Imager User’s Manual
5-1
Table 5-1. EP-1000 Indicator Lights Indications
Light Indications
Problem
Status
Power
Fault
Media
Parallel
USB
Power OFF
{
{
{
{
{
Initializing
}
~
~
~
~
Online (USB)
}
{
}
{
}
Online (Parallel)
}
{
}
}
{
Offline (USB)
}
{
{
{
~
Offline (Parallel)
}
{
{
~
{
Transferring data
}
{
}
~
~
Printing
}
{
}
}
}
Cancelling multiple copy printing
}
~
}
~
~
Overheat condition
}
~
{
Door open
}
z
z
Out of media (paper)
}
{
z
Out of media (ink)
}
{
z
Paper illegal
}
z
z
Paper jam or mechanical error
}
z
{
Paper size does not match image size
}
z
z
Normal Status:
Fault Status:
{ = LED off
5-2
Troubleshooting
~ = Green flashing
} = Green on
z = Red on
Troubleshooting Common Problems
Table 5-2 lists common problems you might encounter while
operating the EP-1000, their possible causes, and solutions.
Table 5-2. EP-1000 Troubleshooting Chart
Problem
Possible Causes
Fault light off,
Media light red
The supply spool in the ribbon cartridge Install a new ribbon in the ribbon carrier.
is empty.
Refer to “Loading the Ribbon Cartridge”
on page 2-5.
Fault light red,
Media light off
EP-1000 does not power
on.
The ink ribbon is used up.
Install a new ribbon in the ribbon carrier.
Refer to “Loading the Ribbon Cartridge”
on page 2-5.
The paper tray is empty or the paper
tray is not set
Load the paper tray. Refer to “Loading
the Paper Tray” on page 2-12.
A paper jam occurred.
Clear the paper path. Refer to “Clearing
a Paper Jam” on page 5-6.
A mechanical fault occurred.
Remove the paper tray and ribbon
cartridge. Power off the EP-1000, then
power it on again.
The paper is not loaded properly.
Load the proper paper into the tray.
The top cover is open.
Close the top cover.
The paper size in the tray is not the
same as the size specified by the print
driver.
Set the print driver setting to the paper
size in the tray, or change the paper in
the tray to match the print driver setting.
The power is not on.
Check that the power switch is pressed
securely and that the power cable is
properly connected.
Troubleshooting
Fault light red,
Media light red
Solutions
The cables and the power cord are not Check that the cables and the power
connected securely.
cord are connected securely.
EP-1000 Instant Dry Imager User’s Manual
5-3
Table 5-2. EP-1000 Troubleshooting Chart (Continued)
Problem
Possible Causes
Solutions
Printing takes much
longer than usual.
The image file size may be larger than
usual and, therefore, takes longer to
process.
Wait a few minutes.
The EP-1000 is too warm (the Fault
light flashes green).
Wait until the temperature inside the
EP-1000 falls.
If the temperature does not fall, power
off the EP-1000. Consider moving the
EP-1000 to a location where the
temperature is lower.
Nothing happens when a The job is processing.
print job is sent.
The communication settings may be
incompatible with the host computer.
Wait to see if the job is still processing.
During data transfer, the Parallel and
USB light come on steady.
• Print a file that you successfully
printed previously.
• If that does not work, check the
communication settings to make
sure they are compatible with the
host computer.
• Disconnect the imager cable, then
make a test print.
There may be a problem with the print
connections.
• If the test print works, reconnect the
imager cable, make sure the correct
port is selected at the display panel,
and try printing from the host
computer.
• If the problem persists, contact
Codonics Technical Support.
White or colored lines and Dust or dirt has caused contamination. • Check that the paper in the paper
scratches appear on
tray is clean and streak free.
prints.
• Check that the ribbon is clean.
• Clean the thermal print head. Refer
to “Cleaning the Thermal Print Head”
on page 5-12.
• If the problem persists, contact
Codonics Technical Support.
5-4
Troubleshooting
Table 5-2. EP-1000 Troubleshooting Chart (Continued)
Problem
Possible Causes
Solutions
White or multicolored
spots appear on prints.
Dust or dirt has caused contamination. • Clean the EP-1000 and the
surrounding area.
• Move the EP-1000 away from room
ventilation ducts or open doors.
Smudges, smears,
fingerprints, or other
irregular-shaped and
colored areas appear on
prints.
Fingerprints or other oils have
contaminated the paper or ribbon.
Replace the contaminated paper or
ribbon with a new supply. Handle paper
and ribbon carefully. Refer to “Handling
Paper” on page 2-11 and “Loading the
Ribbon Cartridge” on page 2-5.
Paper does not feed
There is a problem with the paper load • Remove sheets with irregularities.
or tray.
• Check that the tray is correctly
adjusted for the size paper installed.
• Reduce the size of the stack of paper
in the paper tray.
The EP-1000 does not
respond when you press
buttons.
Imager conditions (for example, the
• Make sure that the top cover is
state of the top cover or paper tray) are
closed.
not correct for enabling imager
• Remove and reinstall the paper tray.
operation.
EP-1000 Instant Dry Imager User’s Manual
Troubleshooting
• Restart the EP-1000. Check that the
Power light comes on.
5-5
Clearing a Paper Jam
Paper and ribbon may occasionally jam in the EP-1000. Jams are
typically identified when the Fault light comes on red. Jams may
occur in the following locations:
Ribbon cartridge
area
Back area
Front area
5-6
Troubleshooting
Clearing a Paper Jam from the Ribbon
Cartridge Area
8
To clear a
paper jam
from the
ribbon
cartridge area
1. Power off the EP-1000.
2. Open the top cover.
po
wer
faul
t
med
ia
ON
ne
LIN
E
pa
PR
IN
T
USB
ralle
l
tw
or
k
IN
TE
RFA
CE
Troubleshooting
EP-1000 Instant Dry Imager User’s Manual
5-7
3. Remove the ribbon cartridge. Push the ribbon cartridge to the
left and lift it up to remove it.
4. Pull out the jammed paper.
5. Install the ribbon cartridge, and close the top cover.
6. Discard any partially-fed paper from the paper tray.
5-8
Troubleshooting
Clearing a Paper Jam from the Front Area
8
To clear a
paper jam
from the front
area
1. Power off the EP-1000.
2. Completely remove the paper tray and the front dust cover.
Troubleshooting
3. Reach in and pull out the partially-fed paper.
4. Install the tray and the front dust cover in the imager.
CAUTION Do not put partially-fed paper back into the paper tray.
5. Discard any partially-fed paper from the paper tray.
EP-1000 Instant Dry Imager User’s Manual
5-9
Clearing a Paper Jam from the Back Area
8
To clear a
paper jam
from the back
area
1. Power off the EP-1000.
2. Remove the back dust cover.
3. Remove the jammed paper.
4. Install the back dust cover.
5. Discard the jammed paper.
5-10
Troubleshooting
Repairing a Torn Ribbon
8
To repair a
torn ribbon
1. Position the ribbon cartridge with the torn ribbon on a clean
surface as shown below.
Office tape
Supply spool
Takeup spool
3. Wind the takeup spool counterclockwise so that the office tape
is not seen and the ribbon is straight.
4. Install the repaired ribbon cartridge in the EP-1000.
EP-1000 Instant Dry Imager User’s Manual
5-11
Troubleshooting
2. Place a piece of office tape on the center of the ribbon.
Cleaning the Thermal Print Head
Cleaning the thermal print head helps to eliminate lines, streaks,
and other artifacts on your prints.
CAUTION Never rub or wipe anything across the thermal print head except when
cleaning it.
8
1. Power off the EP-1000, and open the top cover.
To clean the
thermal print
head
pow
er
fau
lt
me
dia
ON
LIN
net
USB wor
k
par
alle
l
E
PR
INT
INT
ER
FAC
E
2. Use a Codonics print head cleaning wipe to clean the thermal
print head, and wipe along the heater line four times:
5-12
Troubleshooting
•
Wipe the full length of the area (always in one direction).
•
Use a clean part of the cloth for each wipe.
•
Apply firm, even pressure.
•
Wipe only the areas shown in the following figure.
Guide bar
Heater line
Cover head
3. Allow the wiped area to dry for about 2 minutes.
5. Make a test print. If image artifacts are visible on the test print,
repeat this cleaning procedure.
3
NOTE: It may be necessary to repeat the cleaning procedure several times to remove all
artifacts. If you cannot remove the artifacts, call Codonics Technical Support for service.
EP-1000 Instant Dry Imager User’s Manual
5-13
Troubleshooting
4. Close the top cover, and power on the imager.
A
Hazardous Material
Information
Materials of Construction
Codonics has set very stringent standards for evaluating products to
ensure the marketing of regulatory compliant products worldwide.
We do not intentionally add, nor are we aware, that the products or
packaging contain the following materials:
• Mercury, except as used in lamp applications (for example,
scanning lamps, Backlit LCDs).
• Cadmium, except as used as thick film inks on printed circuit
boards.
• Hexavalent Chromium, except as used as thick film inks on
printed circuit boards, as chromate conversion coatings on metal
surfaces, and as a photoresist on glass panels of cathode ray
tubes.
• Polybrominated diphenyl ethers and polybrominated biphenyls.
• Bioavailable crystalline silica (small amounts of crystalline silica
are used in certain paints, coatings, and filler materials).
• Polychlorinated biphenyls (PCBs).
EP-1000 Instant Dry Imager User’s Manual
A-1
Hazardous Material
Information
• Bioavailable arsenic (small amounts of arsenic used in glass,
LEDs, and semiconductors are not considered to be bioavailable).
• Asbestos.
• Organic tin (not used in tin lead solder applications).
• Ozone-depleting substances such as chlorofluorocarbons, methyl
chloroform, and carbon tetrachloride.
WARNING This thermal imager contains lead. Disposal of lead may be
regulated due to environmental considerations. For disposal or recycling
information, please contact your local authorities or the Electronics Industry
Alliance (www.eiae.org).
Manufacturing
During manufacturing operations that produce Codonics products
(including packaging), no ozone depleting substances (such as
chlorofluorocarbons, methyl chloroform, and carbon tetrachloride)
are used.
A-2
Hazardous Material Information