1
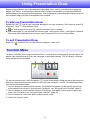
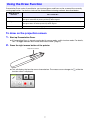
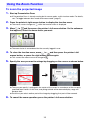
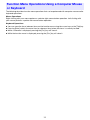
Presentation Draw
User’s Guide
z Be sure to keep all user documentation handy for future reference.
z The term “pointer” in this manual refers the YA-P10 interactive pointer.
z Microsoft, Windows and Windows Vista are registered trademarks or trademarks of Microsoft
Corporation in the United States and other countries.
z Macintosh and Mac OS are registered trademarks of Apple Inc. of the United States.
z Other company and product names may be registered trademarks or trademarks of their
respective owners.
z The contents of this User’s Guide are subject to change without notice.
z Copying of this manual, either in part or its entirety, is forbidden. You are allowed to use this
manual for your own personal use. Any other use is forbidden without the permission of CASIO
COMPUTER CO., LTD.
z CASIO COMPUTER CO., LTD. shall not be held liable for any lost profits or claims from third
parties arising out of the use of this product or this manual.
z CASIO COMPUTER CO., LTD. shall not be held liable for any loss or lost profits due to loss of
data caused by malfunction or maintenance of this product, or any other reason.
z The sample screens shown in this manual are for illustrative purposes only, and may not be
exactly the same as the screens actually produced by the product.
1
E
Contents
Introduction ..................................................................... 3
Installing Presentation Draw...................................................................3
Minimum system requirements.................................................................................... 3
To install Presentation Draw ........................................................................................ 4
About Help .............................................................................................4
Presentation Draw Modes.............................................. 5
To toggle between draw mode and mouse mode....................................................... 5
Using Presentation Draw ............................................... 6
To start up Presentation Draw ..................................................................................... 6
To exit Presentation Draw............................................................................................ 6
Function Menu........................................................................................6
Using the Draw Function ........................................................................7
To draw on the projection screen ................................................................................ 7
To undo the last draw operation.................................................................................. 9
To clear all drawings .................................................................................................... 9
Using the Zoom Function .....................................................................10
To zoom the projected image .................................................................................... 10
Function Menu Operations Using a Computer Mouse
or Keyboard..........................................................................................11
2
Introduction
Presentation Draw is an application that provides you with tools to support the presentations you give
with your projector. Presentation Draw provides the following functions, regardless of the application
you are using on your computer.
z On-screen drawing of figures and lines with a pointer or mouse
z Enlargement of any area on the screen using a pointer or mouse
Installing Presentation Draw
Minimum system requirements
Operating Systems : Microsoft® Windows® 7 (32bit, 64bit), Windows Vista® SP2 (32bit, 64bit),
Windows® XP SP3 (32bit)
Computer
: IBM PC/AT or compatible that conforms to the following conditions.
z
z
z
z
Windows® 7, Windows Vista®, or Windows® XP pre-installed
CPU: Pentium® M 1.6GHz or higher, or CPU recommended for operating system being used
Memory: Amount of memory recommended for operating system being used
Display: Full-color display with resolution of at least 1024 X 768, which is supported by
above operating systems and the computer being used.
z Input device : Keyboard or other pointing device (mouse or equivalent device supported by
above operating systems)
z Any other requirements as recommended by the operating system you are using.
z Normal operation may not be possible under certain hardware configurations.
z Operation is not supported on a computer running Windows® 2000, NT, Me, 98SE, 98, 95, or 3.1, or
on a Macintosh or Mac OS computer.
z Operation on a computer upgraded to Windows® 7, Windows Vista®, Windows® XP from another
operating system is not guaranteed.
3
To install Presentation Draw
1.
Place the Presentation Draw CD-ROM into your computer’s CD-ROM drive.
2.
On the menu that appears, click the [Install] button.
z
z
z
z
Follow the instructions that appear on your computer screen.
Windows 7: When the “User Account Control” message appears, click [Yes].
Windows Vista: When, the “User Account Control” message appears, click [Allow].
Windows XP: When the dialog box shown below appears, click [Continue Anyway].
About Help
For information about using Presentation Draw and its functions, refer to this manual and to help. To
display help, right-click
(which is in the task tray when Presentation Draw is running) and then
select “Help” on the menu that appears.
4
Presentation Draw Modes
Presentation Draw is an application that runs in the background. Starting up Presentation Draw while
you are using another application will cause that application to remain on the display. Mouse
operations, however, are taken over by Presentation Draw. This is called draw mode, which you can
use to draw figures and other objects on the currently displayed (projected) screen. Draw mode is
indicated when mouse cursor looks like this:
.
If you want to perform an operation in the other application while Presentation Draw is running, you
need to switch Presentation Draw to mouse mode. In mouse mode, Presentation Draw functions are
disabled, and both the mouse and pointer return to their normal operations. Mouse mode is indicated
when the mouse cursor looks like
, or when it takes on normal appearance for the application you
are using.
In this mode:
The mouse cursor looks like this:
You can do this:
Draw
Perform Presentation Draw functions with the pointer
or mouse.
Mouse
or normal appearance for the
application you are using.
Perform normal computer mouse operations with the
pointer or mouse. Presentation Draw functions are not
enabled in mouse mode.
To toggle between draw mode and mouse mode
1.
Move the mouse cursor to the top of the screen.
2.
After the mouse cursor switches from
to
or from
the mouse cursor to another location on the screen.
Note
to
, you can move
z You also can switch from mouse mode to draw mode by right-clicking
in the task tray and
then selecting “Draw Mode” on the menu that appears.
z You also can switch from draw mode to mouse mode by using the function menu. For details,
see “Function Menu” (page 6).
z In draw mode, the cursor appearance will change from the normal
to
whenever you are
using the zoom function.
5
Using Presentation Draw
Before trying to perform any of the operations described in this section, you should first charge the
pointer (see “Setup” in the Interactive Pointer User’s Guide), and establish a connection (RGB and
USB) between your computer and the projector. Also, the projector should be projecting the screen of
the computer where you have Presentation Draw installed.
To start up Presentation Draw
Double-click the
icon on your computer desktop or use your computer’s Start menu to select [All
Programs] - [CASIO] - [Presentation Draw].
z
will be displayed in the task tray while Presentation Draw is running.
z Draw mode (page 5) is the initial default startup mode. The functions (Draw 1, Add Figure, Freehand,
Zoom) that were enabled the last time you used Presentation Draw will still be enabled.
To exit Presentation Draw
Right-click
in the task tray. On the menu that appears, select “Exit”.
Function Menu
To select a function while using Presentation Draw, switch to draw mode (page 5) and then press the
pointer right mouse button (or click your computer’s right mouse button). This will display a function
menu like the one shown below.
1
2
3
4
To use the function menu, move the pointer ( ) to one of the buttons along the top of the menu and
then press the pointer left mouse button or click with your computer’s mouse. The following explains
what each of the buttons does.
1 Use this button to select the draw function. The buttons that appear can be used to specify the
draw method, line thickness, and line color. For details, see “Using the Draw Function” (page 7).
2 Use this button to select the zoom function. The buttons that appear can be used to specify the
zoom ratio. For details, see “Using the Zoom Function” (page 10).
3 Use this button to switch from draw mode to mouse mode.
4 Closes the function menu.
6
Using the Draw Function
Presentation Draw makes it possible for you to draw figures and lines on the screen of the currently
running application. You have a choice of the three different drawing methods described below.
With this draw
function:
You can do this:
Draw 1
Draw lines, rectangles, and ovals by dragging the mouse cursor on the screen. Drawing a
new figure automatically clears previously drawn figures.
Add Figure
Draw lines, rectangles, and ovals by dragging the mouse cursor on the screen. Drawing a
new figure does not affect previously drawn figures.
Freehand
Draw a freehand line by dragging the mouse cursor on the screen.
To draw on the projection screen
1.
Start up Presentation Draw.
z If Presentation Draw is already running but in mouse mode, switch to draw mode. For details,
see “To toggle between draw mode and mouse mode” (page 5).
2.
Press the right mouse button of the pointer.
Right mouse button
z This will display the function menu shown below. The mouse cursor changes to
function menu is displayed.
7
while the
3.
Select the draw function you want.
z Move
and press the pointer’s left mouse button in the sequence 1, 2 shown below. On
the submenu (3) that appears, select the draw function you want.
Left mouse button
1
To select this draw
function:
2
Press the left mouse button
while the mouse cursor is
located at this icon:
Draw 1
Add Figure
3
Freehand
z Using this operation to change the selected draw function causes all drawings currently on the
screen to be cleared. Changing the draw function while the screen is zoomed will cancel the
zoom operation.
4.
Select the drawing color and line type.
z Move
to the option you want, and then press the left mouse button.
Line selection
Color selection
z The selected color and line type is remembered for the currently logged in user.
5.
To close the function menu, move
to
and then press the pointer’s left
mouse button, or press the right mouse button again.
z This causes the mouse cursor to change to
6.
Use the pointer to draw on the screen.
8
.
To undo the last draw operation
Press the pointer’s left mouse button twice in succession (double-click) to undo the last draw
operation. You can undo up to five previous draw operations.
To clear all drawings
Press the pointer’s right mouse button to display the function menu, and then move
press the left mouse button.
9
to
. Next,
Using the Zoom Function
To zoom the projected image
1.
Start up Presentation Draw
z If Presentation Draw is already running but in mouse mode, switch to draw mode. For details,
see “To toggle between draw mode and mouse mode” (page 5).
2.
Press the pointer’s right mouse button to display the function menu.
z The mouse cursor changes to
3.
while the function menu is displayed.
Move
to
and then press the pointer’s left mouse button. On the submenu
that appears, select the zoom factor you want.
z The zoom factor is remembered for the currently logged in user.
4.
To close the function menu, move
to
and then press the pointer's left
mouse button, or press the right mouse button again.
z This causes the mouse cursor to change to
5.
.
Specify the area you want to enlarge by dragging on the screen as shown below.
z The area you specify is enlarged in the center of the screen in accordance of the currently
specified zoom factor. At this time, everything outside of the zoomed display range will
become dark.
z Each time you select another part of the image by dragging, that part will be zoomed.
6.
To cancel the zoom operation, press the pointer’s left mouse button.
10
Function Menu Operations Using a Computer Mouse
or Keyboard
The following describes function menu operations that can be performed with computer mouse and/or
keyboard operations.
Mouse Operations
Right-clicking with your mouse performs a pointer right mouse button operation. Left-clicking with
your mouse performs a pointer left mouse button operation.
Keyboard Operations
z You can move the focus between items on the function menu using the cursor keys or the [Tab] key.
z Pressing [Enter] selects the menu item (or submenu item) where the focus is currently located.
z While a submenu is displayed, pressing the [Esc] key will close it.
z While the function menu is displayed, pressing the [Esc] key will close it.
11
MA1103-A