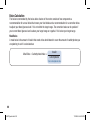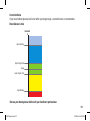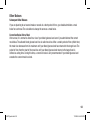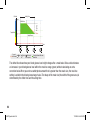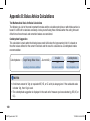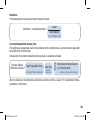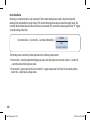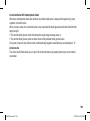
1
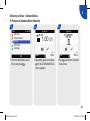
10:02
2 Feb 08
©2009 Roche Diagnostics. All rights reserved.
Roche Diagnostics GmbH
Sandhofer Strasse 116
68305 Mannheim, Germany
00048009695/C-0709
bG Test
Bolus Advice
Pump
My Data
Settings
Aviva Combo
10:02
bG Test
Bolus Advice
Pump
My Data
Settings
2 Feb 08
BLOOD GLUCOSE METER
Advanced Owner’s Booklet
www.accu-chek.com
ACCU-CHEK, ACCU-CHEK AVIVA, ACCU-CHEK AVIVA COMBO, ACCU-CHEK SPIRIT COMBO, and
ACCU-CHEK MULTICLIX are trademarks of Roche.
The Bluetooth® word mark and logos are registered trademarks owned by Bluetooth SIG, Inc.
and any use of such marks by Roche is under license. Other trademarks and
product names are the property of their respective owners.
45676_adv.indb 1
11/3/09 4:45:05 PM
LAST UPDATE: 2009-07
45676_adv.indb 2
11/3/09 4:45:05 PM
Contents
Introduction
1 Bolus Advice
1.1 Overview
1.2 Before Using Bolus Advice
1.3 C
alculating and Delivering a Bolus Using Bolus Advice
2 Administering a Bolus
2.1 Overview
2.2 Choosing Your Bolus Type
2.3 Delivering a Bolus
2.4 U
pdating the Diary with Bolus Information
5
7
8
10
13
25
26
27
29
31
1
45676_adv.indb 1
11/3/09 4:45:05 PM
3 Using the Accu-Chek Aviva Combo Meter with the Accu-Chek Spirit
Combo Pump
3.1 Overview
3.2 The System at a Glance
3.3 C
ontrolling the Pump with the Meter
3.4 M
anaging Pump Errors and Warnings with the Meter
33
34
35
38
53
4 Communication between the Accu-Chek Aviva Combo Meter and Accu-Chek
55
Spirit Combo Pump
4.1 Overview
4.2 Turning Bluetooth® Wireless Technology On/Off
4.3 Using the System While Traveling
4.4 Pairing the Accu-Chek Aviva Combo Meter with the Accu-Chek Spirit Combo Pump
4.5 Cancelling the Pairing of the Meter and Pump Prompt
56
57
60
61
67
5 Troubleshooting
71
72
73
5.1 Overview
5.2 Troubleshooting Communication Between the Meter and Pump
2
45676_adv.indb 2
11/3/09 4:45:05 PM
Appendices
Appendix A: Bolus Advice
Appendix B: Bolus Advice Calculations
Appendix C: Explanation of Symbols
81
81
100
104
Index
105
3
45676_adv.indb 3
11/3/09 4:45:05 PM
4
45676_adv.indb 4
11/3/09 4:45:05 PM
Introduction
Whether the Accu-Chek Aviva Combo Meter is your first blood glucose meter or you have used a meter for
some time, please take the time to read the Getting Started Guide, the Standard Owner’s Booklet, and the
Advanced Owner’s Booklet carefully before you use your new meter. To use it correctly and dependably, you
need to understand its operation, screen displays, and all individual features.
Your new meter includes three booklets:
This booklet includes information about:
• Getting Started Guide:
Use this booklet to set up the meter.
• Taking bolus advice
• Administering a bolus
• Standard Owner’s Booklet:
• Using the Accu-Chek Aviva Combo Meter with the
Use this booklet for instructions on how to operate
Accu-Chek Spirit Combo Pump
the standard features of the meter.
• Communication between the Accu-Chek Aviva
• Advanced Owner’s Booklet:
Combo Meter and the Accu-Chek Spirit Combo
Use this booklet for instructions on how to operate
Pump
the advanced features of the meter.
• Bolus advice calculations
Should you have any questions, please contact one of our customer support and service centres. A listing is
at the back of the Standard Owner’s Booklet.
5
45676_adv.indb 5
11/3/09 4:45:05 PM
6
45676_adv.indb 6
11/3/09 4:45:05 PM
1
1
Bolus Advice
1.1 Overview
1.2 Before Using Bolus Advice
1.3 Calculating and Delivering a Bolus Using Bolus Advice
8
10
13
7
45676_adv.indb 7
11/3/09 4:45:05 PM
1.1 Overview
Important information regarding the use of bolus advice is presented in this chapter. Read it carefully and
completely before you begin using bolus advice.
• It is recommended you discuss your bolus advice settings with your healthcare professional prior to setting
up this feature.
• Bolus advice is intended exclusively for use by well-trained individuals who perform their own insulin
therapy.
• Bolus advice is only available if you have set up bolus advice on your meter. For instructions on how to set
up bolus advice, see the Standard Owner’s Booklet.
• Bolus advice may make delivering a bolus more precise and reduce errors. Bolus advice calculates insulin
doses for you based on many different pieces of information, such as:
• The values you entered in the setup of bolus advice
• Your current blood glucose test result
• The amount of carbohydrates you estimated for a meal
• Your current health event status
• The blood glucose lowering due to prior correction doses
• The blood glucose influence of your most recent meal
8
45676_adv.indb 8
11/3/09 4:45:05 PM
1
i NOTES:
• This booklet shows sample screens. The screens in this booklet may look slightly different from the
screens on your Accu‑Chek Aviva Combo Meter. If you have any questions about the meter screens,
contact Roche.
• Blood glucose and bG are interchangeable and mean the same thing.
9
45676_adv.indb 9
11/3/09 4:45:05 PM
1.2 Before Using Bolus Advice
Intended Users
As with any specialized feature, you need to understand certain information in order to use bolus advice. You
must be completely familiar with your diabetes therapy and be able to judge your current situation as well
as possible. Bolus advice calculates boluses for you. This can help you determine the amount of insulin you
currently require. You provide the information on which the bolus advice calculations are based.
Bolus advice is not able to judge your current situation independently of your own estimation. It cannot
correct possible input errors. This is particularly true for the carbohydrate amount entered. Entries that
exceed possible limits are recognized as such and in this case you are prompted to check the entry and
correct it, if necessary. However, as long as the entries fall within a possible range, the accuracy cannot be
checked by your meter. No warning message is displayed if the data are possible (within the acceptable
ranges) but incorrect. Therefore, it is important to carefully review all of your entries.
10
45676_adv.indb 10
11/3/09 4:45:05 PM
1
Safety Information Regarding Bolus Advice
w WARNINGS:
• It is very important you follow the safety information in this chapter.
• Always compare your result with the way you actually feel and adjust the recommended bolus, if
necessary.
• Always carry out the actions entered into bolus advice in a timely fashion. Eat the carbohydrate
amount you entered and administer the insulin dose.
The following information is not taken into account when bolus advice is used:
• It is possible the values entered when setting up bolus advice do not match the way your body actually
feels. In this case, you can increase or reduce the bolus insulin dose to adjust it to your needs.
• Bolus insulin doses and meals taken before bolus advice is used for the first time cannot be reflected in the
calculation. The same applies for bolus insulin doses and meals that were taken, but not entered into your
meter.
• If you delivered a bolus on your pump without using bolus advice, this information is entered in your diary.
It is important that you enter carbohydrate information into the diary with this bolus in order to obtain
accurate bolus advice recommendations. For information on how to enter information into the diary, see
the Standard Owner’s Booklet.
11
45676_adv.indb 11
11/3/09 4:45:05 PM
Warning messages about your blood glucose result
After performing a blood glucose test, warning messages about your blood glucose result may be displayed.
Please take careful note of these messages. If your blood glucose result is too low, you are prompted to eat a
certain amount of fast acting carbohydrates to prevent the risk of hypoglycemia. A bolus is not calculated in
this situation. Treat your low blood glucose as recommended by your healthcare professional.
Summary
• It is recommended you set up bolus advice with your healthcare professional.
• Carefully check all of your entries.
• Make sure all recent meals and insulin doses are in My Data for accurate bolus advice recommendations.
• If you administer a bolus manually on your pump:
• Take note of all warning messages, especially those regarding high or low blood glucose results.
Immediate action may be necessary.
• Always compare your result with the way you actually feel and adjust the bolus, if necessary.
• Always carry out the actions entered in bolus advice in a timely fashion.
12
45676_adv.indb 12
11/3/09 4:45:05 PM
1
1.3 C
alculating and Delivering a Bolus Using Bolus Advice
bG Test Result
Active Insulin
Carb Entry
Health Event Entry
Bolus Type
Bolus Advice
5.8 mmol/L
--- U
19 g
Exercise 1
Bolus
Type
Cancel
0.0 U
2.1 U
-0.1 U
2U
Standard
Confirm
Recommended Bolus
Amount
13
45676_adv.indb 13
11/3/09 4:45:06 PM
To Deliver a Bolus
Main Menu > Bolus Advice
1.
2.
10:02
2 Feb 08
bG Test
Bolus Advice
Pump
My Data
Settings
j From the Main Menu, select
Bolus Advice and press =.
Bolus Advice
5.8 mmol/L
--- U
19 g
Exercise 1
Bolus
Type
Cancel
0.0 U
2.1 U
-0.1 U
2U
Standard
Confirm
j If you have not completed
a recent blood glucose test
(this is indicated when “bG
Test” is displayed near the
top of the meter screen rather
than an actual bG value), it is
recommended you complete a
blood glucose test. Select bG
Test and press =. See the
Standard Owner’s Booklet for
information on how to perform
a blood glucose test. When
the detailed bG Result screen
appears, select Bolus.
To Enter a Carbs Amount:
j S elect the Carbs entry field
and press =.
j Set the amount of
Carbohydrates and press =.
14
45676_adv.indb 14
11/3/09 4:45:06 PM
3.
To Enter a Health Event:
j Select the Health entry field
and press =.
j Select a Health Event and
press =.
To Adjust the Bolus Amount:
j Select the Bolus entry field
and press =.
j Set the Bolus insulin amount
and press =.
To deliver a …
j Standard Bolus: Step 3
j Multiwave Bolus: Step 6
j Extended Bolus: Step 9
j Bolus manually on the
Pump: Step 12
j Bolus using an Insulin Pen
or Syringe: Step 14
1
4.
To Deliver a Standard Bolus
j Select the Type entry field and
press =.
j Select Standard and press =.
Confirm Bolus
Deliver Bolus?
Standard Bolus
To confirm the entries, select
Confirm.
Back
2U
Deliver
j To deliver the Standard bolus
remotely on your pump, select
Deliver and proceed to the
next step.
j To return to the Bolus Advice
screen, select Back.
15
45676_adv.indb 15
11/3/09 4:45:06 PM
5.
You can choose one of the following:
Deliver Bolus
BOLUS CANCELLED
!
Standard Bolus
W8
Delivery Completed
TO SNOOZE
2U
Stop Bolus
Deliver Bolus
Pump
Pump Delivering
OK
j Select OK and display the Main
Menu. Bolus delivery continues
until it is complete.
Exit
Back
j To stop bolus delivery, select
Stop Bolus. The Pump screen
BOLUS CANCELLED appears.
Menu
If no buttons are pressed, when
the bolus delivery is complete
the Delivery Completed screen
appears.
j Select Menu to go to the Main
Menu.
16
45676_adv.indb 16
11/3/09 4:45:07 PM
6.
To Deliver a Multiwave Bolus
j Select the Type entry field and
press =.
j Select Multiwave and
press =.
To confirm the entries, select
Confirm.
1
7.
Confirm Bolus
Deliver Bolus?
0.5 U
Immediate
4:00
Duration
HH MM
Multiwave Bolus
Back
2U
Deliver
j T o change the immediate
bolus, select Immediate entry
field and press =.
j S et the bolus amount and
press =.
j To change the duration, select
Duration entry field and press
=.
j Set the length of duration and
press =.
j To deliver the Multiwave bolus
remotely on your pump, select
Deliver.
j To return to the Bolus Advice
screen, select Back.
17
45676_adv.indb 17
11/3/09 4:45:08 PM
8.
You can choose one of the following:
Deliver Bolus
BOLUS CANCELLED
!
Multiwave Bolus
W8
Immediate Delivery
Completed
TO SNOOZE
2U
Stop Bolus
Deliver Bolus
Pump
Pump Delivering
Multiwave Bolus Delivery
Continuing
OK
j Select OK and display the Main
Menu. Bolus delivery continues
until it is complete.
Exit
Back
j To stop bolus delivery, select
Stop Bolus. The Pump screen
BOLUS CANCELLED appears.
Menu
If no buttons are pressed, when
the bolus delivery is complete
the Immediate Delivery
Completed screen appears.
j Select Menu to go to the Main
Menu.
18
45676_adv.indb 18
11/3/09 4:45:08 PM
9.
To Deliver an Extended Bolus
j Select the Type entry field and
press =.
j Select Extended and press =.
10.
1
11.
Confirm Bolus
Deliver Bolus
Deliver Bolus?
Duration
4:00
HH MM
Extended Bolus
To confirm the entries, select
Confirm.
Back
2U
Deliver
j To adjust the duration, select
the Duration entry field and
press =.
j Set the length of duration and
press =.
j To deliver the Extended bolus
remotely on your pump, select
Deliver.
j To return to the Bolus Advice
screen, select Back.
Extended Bolus Delivery
Continuing
Menu
j Select Menu to go to the Main
Menu.
19
45676_adv.indb 19
11/3/09 4:45:09 PM
12.
To Deliver a Bolus Manually
on the Pump
j Select the Type entry field and
press =.
j Select Manual Pump and
press =.
To confirm the entries, select
Confirm.
13.
w WARNING:
Confirm Bolus
Start delivery of the exact
bolus amount on the pump
within 10 minutes. See
WARNINGS at end of this
section.
Manual Pump
Set Bolus on Pump
Bolus
Back
2U
OK
The bolus amount is displayed
on the meter screen
jM
anually program the pump
and deliver the bolus, or if
necessary, select Back and
return to the Bolus Advice
screen to adjust the bolus.
j Select OK to go to the Main
Menu.
20
45676_adv.indb 20
11/3/09 4:45:09 PM
14.
To Deliver a Bolus Using an
Insulin Pen or Syringe
j Select the Type entry field and
press =.
j Select Pen/Syringe and
press =.
To confirm the entries, select
Confirm.
1
15.
Confirm Bolus
Pen/Syringe
Inject Insulin
Bolus
Back
2U
OK
The bolus amount is displayed
on the meter screen.
j Inject the recommended bolus
using an insulin pen or syringe
or, if necessary, select Back
and return to the Bolus Advice
screen to adjust the bolus.
j Select OK to go to the Main
Menu.
21
45676_adv.indb 21
11/3/09 4:45:09 PM
w WARNINGS:
• Bolus advice provided by the meter is solely advice. Contact your healthcare professional prior to
changing your diabetes therapy.
• It is important to make the correct selection for the carbohydrate ratio and insulin sensitivity. If you
select the wrong ratio (the basis for all calculations), all future bolus advice recommendations will be
wrong.
• If a pump bolus delivery is stopped, the bolus amount stored in the meter is updated when the next
pump synchronization occurs. Ensure the bolus information in the diary is correct prior to starting a
new bolus advice calculation. For information on how to view and edit diary data, see the Standard
Owner’s Booklet.
• Accuracy of bolus advice may be impacted if the Bluetooth wireless technology is off or the batteries
are low. The bolus advice calculation will not include recent insulin boluses delivered by the pump.
• Reference Step 13: If the Manual Pump screen appears on the meter and you select OK, start delivery
of the exact bolus amount on the pump within 10 minutes. If not, you will get an extra record in My
Data and Bolus Advice. Extra records may influence future bolus advice.
22
45676_adv.indb 22
11/3/09 4:45:10 PM
1
i NOTES:
• Bolus advice can also be accessed after you perform a bG Test (see the Standard Owner’s Booklet).
When the detailed bG Result screen is displayed, press .. This is not available if your bG result is
below your hypo warning limit (red colour bar is displayed).
• For additional information about different bolus types, see Chapter 2, “Administering a Bolus.”
• You can only select one health event and one bolus type for each bolus recommendation.
23
45676_adv.indb 23
11/3/09 4:45:10 PM
24
45676_adv.indb 24
11/3/09 4:45:10 PM
2
2
Administering a Bolus
2.1 Overview
2.2 Choosing Your Bolus Type
2.3 Delivering a Bolus
2.4 Updating the Diary with Bolus Information
26
27
29
31
25
45676_adv.indb 25
11/3/09 4:45:10 PM
2.1 Overview
There are several methods to deliver a bolus. The pump makes it possible to deliver more precise amounts of
insulin than can be injected using an insulin pen or syringe.
26
45676_adv.indb 26
11/3/09 4:45:10 PM
2
2.2 Choosing Your Bolus Type
There are several types of bolus delivery available. The bolus types include:
• Standard
A bolus that delivers an immediate food or correction bolus. When Standard is selected, the bolus is
delivered by the pump. This option is available only when Bluetooth® wireless technology is turned on
and the meter and pump are communicating.
• Multiwave
A bolus designed to better simulate the body’s insulin delivery. It combines an immediate bolus delivery
followed by an Extended Bolus delivery. A Multiwave Bolus can be helpful when you have meals that
include both rapidly and slowly absorbed carbohydrates. This option is available only when Bluetooth
wireless technology is turned on and the meter and pump are communicating.
27
45676_adv.indb 27
11/3/09 4:45:10 PM
• Extended
A bolus delivered over a period of time. It can be helpful during long meals, dinners, or receptions, or
when you have meals that are digested slowly. The Extended Bolus may also be appropriate for people
who have gastroparesis (delayed digestion). This option is available only when Bluetooth wireless
technology is turned on and the meter and pump are communicating.
• Manual Pump
A Manual Pump bolus type is available when using bolus advice. It can be used at anytime, but is
intended for times when the meter and pump are not communicating. You must manually program the
pump to deliver the bolus. For instructions on how to program a bolus on the pump, see the pump User
Guide.
• Pen/Syringe
The Pen/Syringe bolus type is available when using bolus advice. It can be used at anytime, but is
intended for times when the meter and pump are not communicating and/or insulin delivery has been
interrupted on the pump. You must use an insulin pen or syringe to inject the bolus amount.
28
45676_adv.indb 28
11/3/09 4:45:10 PM
2
2.3 Delivering a Bolus
w WarningS:
• Incorrect meter settings may cause inappropriate insulin delivery.
• The meter must be configured with your personal settings prior to administering a bolus. If you are not
sure about your personal settings, talk to your healthcare professional.
• Work with your healthcare professional to determine the timing, amount, and type of bolus you need to
deliver.
• If an intended bolus is unintentionally stopped, it is recommended you administer the remaining bolus
manually with the pump or remotely with the meter. You may also administer the bolus through bolus
advice by entering the remaining bolus amount and then administering it. Check the meter diary or the
pump diary to determine how much insulin has already been delivered. If the bolus was delivered and
stopped using the meter, when the next pump synchronization occurs the amount of insulin delivered is
updated in the meter diary.
29
45676_adv.indb 29
11/3/09 4:45:10 PM
i NOTE:
You can cancel a bolus (including an extended bolus) that is being delivered by the pump directly on the
pump or remotely on the meter (through the Pump Menu on the meter).
Delivering a Bolus Using Bolus Advice
For instructions on how to deliver a bolus using bolus advice, see Chapter 1, “Bolus Advice.”
Delivering a Bolus Using an Insulin Pen or a Syringe
Follow the instructions of your healthcare professional when delivering a bolus using an insulin pen or a
syringe.
Delivering a Bolus Using the Accu-Chek Aviva Combo Meter and the Accu-Chek Spirit Combo Pump
You can remotely deliver a bolus on the pump through bolus advice or through the Pump Menu on the meter.
For instructions on how to deliver a bolus using bolus advice, see Chapter 1, “Bolus Advice.” For instructions
on how to deliver a bolus remotely on the pump, see Chapter 3, “Using the Accu-Chek Aviva Combo Meter
with the Accu-Chek Spirit Combo Pump.”
30
45676_adv.indb 30
11/3/09 4:45:10 PM
2
2.4 Updating the Diary with Bolus Information
When the pump is synchronized with the meter, bolus information from the pump is imported into the meter.
For any manual pump bolus record in the meter database with a time stamp that is older than 10 minutes
and is not confirmed by the pump, the meter does away with the bolus record by changing the bolus
amount to “0.0” on the next meter and pump synchronization. This eliminates the possibility of having a
bolus on the meter that was not delivered on the pump.
If you used the bolus advice feature and delivered a bolus manually on the pump, it is important you update
the information in the diary to reflect the amount of carbohydrates eaten with the bolus to ensure accurate
bolus advice recommendations. If a bolus is delivered using an insulin pen or syringe (not through bolus
advice), it is important to enter this information in the meter diary to ensure accurate bolus advice
recommendations.
For instructions on how to add and edit data in your diary, see the Standard Owner’s Booklet.
31
45676_adv.indb 31
11/3/09 4:45:10 PM
32
45676_adv.indb 32
11/3/09 4:45:10 PM
3
3
Using the Accu-Chek Aviva Combo Meter with
the Accu-Chek Spirit Combo Pump
3.1 Overview
3.2 The System at a Glance
3.3 Controlling the Pump with the Meter
3.4 Managing Pump Errors and Warnings with the Meter
34
35
38
53
33
45676_adv.indb 33
11/3/09 4:45:10 PM
3.1 Overview
The Accu-Chek Aviva Combo Meter can be used to remotely control the Accu-Chek Spirit Combo Insulin
Pump using Bluetooth wireless technology. Before using the meter to control the pump, it is important to
understand how to operate the pump using the meter.
If you experience any communication problems between the pump and meter, it is recommended that
you go directly to the pump and operate the pump manually. For more information on troubleshooting
communication between the meter and pump, see Chapter 5, “Troubleshooting.”
34
45676_adv.indb 34
11/3/09 4:45:10 PM
3
3.2 The System at a Glance
In the meter’s Pump Menu, the meter buttons have different functions. The buttons function as button (key)
presses on the pump.
The pump sends screens
to the meter.
d
f
The meter sends button
presses to the pump.
35
45676_adv.indb 35
11/3/09 4:45:12 PM
Button Functions in the Pump Menu
Meter Button
Pump Key
Function
x
a
j Move forward in an information screen
j Increase a setting
j Program a Quick Bolus
j Cancel a Quick Bolus
j Turn off the STOP-Warning
z
s
j Move backward in an information screen
j Decrease a setting
j Program a Quick Bolus
j Cancel a Quick Bolus
j Turn off the STOP-Warning
<
>
d
f
j Cycles through menus, functions, and information screens
j Selects current settings displayed on screen
j Saves changes
j Exits a screen
j Allows you to view the QUICK INFO screen
36
45676_adv.indb 36
11/3/09 4:45:12 PM
Meter Button
.
,
Pump Key
d
and
None
3
Function
a
j Exits menus, function screens, and information screens
without saving your changes
j Move to the previous screen
j Return to the Main Menu
37
45676_adv.indb 37
11/3/09 4:45:12 PM
3.3 Controlling the Pump with the Meter
When Bluetooth wireless technology is turned on, the pump main screen appears on the meter when you are
in the Pump Menu.
The meter is able to control the following pump functions:
• Standard Bolus
• Extended Bolus
• Multiwave Bolus
• Temporary Basal Rate
• My Data
• Basal Rate Selection
• Basal Rate Programming (1-5 all individual)
• Reminder Settings
• Time and Date Settings
• Pump Settings
• Therapy Settings
• Menu Settings
• Stop Your Pump
If you attempt to access a pump function that is not available through the meter, the meter displays the ONLY
ACCESSIBLE ON PUMP screen.
38
45676_adv.indb 38
11/3/09 4:45:12 PM
The following pump functions cannot be remotely controlled using the meter:
3
• Changing the insulin cartridge
• Priming the infusion set
• Rewinding the piston rod
• Data transfer (to a computer)
• Bluetooth wireless technology menu
• Display orientation and contrast
39
45676_adv.indb 39
11/3/09 4:45:12 PM
i NOTES:
• You can administer a bolus manually on the pump (without using the meter). When the meter and
Bluetooth wireless technology are both turned on, the pump automatically transfers bolus information
to the meter. If bolus advice is used, it is important you enter carbohydrate information into the meter
for boluses delivered manually on the pump so that accurate bolus advice calculations are made.
• In the Pump Menu, the meter beeps and/or vibrates similarly to the pump.
• When the meter and pump are communicating, any button press on the pump disables
communication.
• You can cancel a bolus (including an extended bolus) that is being delivered by the pump directly on
the pump or remotely on the meter (through the Pump Menu on the meter).
40
45676_adv.indb 40
11/3/09 4:45:12 PM
3
Pump Screens on the Meter
Pump Screen
Pump
10:02
Corresponding Meter Buttons
1
1.00 U/h
Return to Main Menu
Exit
Back
Bluetooth Wireless
Technology Icon
Back
Pump double button press
(d and a)
41
45676_adv.indb 41
11/3/09 4:45:13 PM
Pump
10:02
1
1.00 U/h
Exit
Back
In remote control mode, the Bluetooth wireless technology icon appears on the meter screen and on the
pump screen.
To control the pump using the meter, you must be in the Pump Menu. From the Pump Menu, use the
corresponding meter buttons to scroll through the pump menus and submenus (the same as you would
on the pump). Instructions for how to deliver a standard bolus, how to program a temporary basal rate
(TBR), and how to change the basal rate profile using the meter are provided in the following sections. For
information on how to use the pump, see the pump User Guide.
42
45676_adv.indb 42
11/3/09 4:45:13 PM
3
Delivering a Bolus – Standard Bolus
To Program a Standard Bolus Remotely
1.
2.
10:02
3.
Pump
2 Feb 08
bG Test
Bolus Advice
Pump
My Data
Settings
1
Exit
j From the Main Menu, select
Pump and press =.
Pump
STANDARD
BOLUS
10:02
1.00 U/h
Back
j Repeatedly press and release
< until the STANDARD BOLUS
screen appears.
Exit
Back
j P ress > to select the Standard
Bolus menu.
43
45676_adv.indb 43
11/3/09 4:45:14 PM
4.
5.
6.
Pump
Pump
BOLUS AMOUNT
0.0 U
Exit
Back
j Press x to increase or z to
decrease the bolus amount.
Pump
BOLUS AMOUNT
2.5 U
Exit
Back
j When the correct bolus
amount is displayed, press > to
confirm the bolus amount.
BOLUS
B
OLUS AMOUNT
2.5 U
Exit
Back
j The Standard Bolus icon
blinks for five seconds (bolus
delivery start delay). The meter
beeps three times and vibrates
once, then the pump begins
to deliver the bolus amount. A
countdown of the remaining
bolus amount to be delivered
appears on the meter display.
44
45676_adv.indb 44
11/3/09 4:45:14 PM
3
Cancelling a Standard Bolus
You may cancel a Standard bolus delivery.
Time
Cancelling the Bolus
Result
When programming a Standard
j If you do not press any meter
A bolus is not delivered.
bolus (the bolus amount blinks on buttons for approximately
the screen)
20 seconds, the meter returns to
the Pump Run screen.
j Exit the BOLUS AMOUNT screen
and return to the STANDARD
BOLUS screen by pressing
. or by pressing < and x
simultaneously.
j Set the bolus amount to 0.0 units.
Press > to exit the BOLUS
AMOUNT screen.
During the bolus delivery start
delay (Standard bolus icon is
blinking)
j P ress x or z. The meter beeps
and displays the pump warning
W8: BOLUS CANCELLED. Press
> twice to confirm and mute the
warning. The meter then returns
to the Pump Run screen.
A bolus is not delivered.
45
45676_adv.indb 45
11/3/09 4:45:15 PM
Time
Cancelling the Bolus
Result
During bolus delivery (meter is
j Press and hold x or z for three Bolus delivery is interrupted and
counting down the bolus amount) seconds until the meter beeps.
stopped.
The meter displays the pump
warning W8: BOLUS CANCELLED.
Press > twice to confirm and
mute the warning. You can view
the actual bolus amount that
was delivered prior to the bolus
cancellation by viewing the pump
bolus history.
For more information, see the pump User Guide. Ensure the bolus cancellation was intended and
program a new bolus, if necessary.
46
45676_adv.indb 46
11/3/09 4:45:15 PM
3
Programming a Temporary Basal Rate (TBR)
1.
2.
10:02
3.
Pump
2 Feb 08
bG Test
Bolus Advice
Pump
My Data
Settings
1
Exit
j From the Main Menu, select
Pump and press =.
Pump
10:02
1.00 U/h
Back
j Repeatedly press and release
< until the TEMPORARY BASAL
RATE (TBR) screen appears.
TEMPORARY
BASAL RATE (TBR)
%
Exit
Back
j P ress > to select the
Temporary Basal Rate (TBR)
menu.
47
45676_adv.indb 47
11/3/09 4:45:15 PM
4.
5.
6.
Pump
Pump
TBR PERCENTAGE
120 %
02:45
Exit
Back
j Press x or z to increase or
decrease the TBR.
j When the correct TBR
percentage is selected,
press <.
Pump
TBR DURATION
03:00
120%
Exit
Back
The Pump screen TBR
DURATION appears.
j Press x or z to set the
duration time.
j Press > to save the changes.
10:02
02:59
120 %
1
0.600U/h
Exit
Back
The Pump Run screen with the
TBR appears.
The new TBR is activated. The
meter beeps when the activation
occurs.
48
45676_adv.indb 48
11/3/09 4:45:16 PM
3
i NOTES:
• If a TBR is not currently active, the TBR percentage is set to 100 %.
• When a TBR is active, it remains in effect even if the basal rate profile is changed.
• A TBR can only be programmed when the pump is in RUN mode.
• When a TBR is active, the pump beeps and vibrates every hour. The meter beeps and vibrates if the
meter is in the pump mode (in a Pump screen).
• For more information about programming a TBR, see the pump User Guide.
At the end of a TBR, the pump warning W7: TBR OVER appears. For more information about pump warnings
and errors, see the pump User Guide.
49
45676_adv.indb 49
11/3/09 4:45:16 PM
Cancelling a Temporary Basal Rate
Situation
Cancelling the Temporary Basal Rate
When programming a TBR
j If you do not press any meter buttons
The pump continues to
for approximately 20 seconds, the meter
deliver the normal basal
returns to the Pump Run screen.
rate.
j Return to the TEMPORARY BASAL RATE
(TBR) screen by pressing . or by pressing
< and x simultaneously.
j S et the TBR percentage to 100 %. Press >
to exit the TBR PERCENTAGE screen.
Result
During the delivery of the TBR
j P ress .. The meter beeps and returns to The TBR is cancelled and
the Pump Run screen.
the pump delivers the
j Y ou can put the pump in Stop mode.
normal basal rate.
The TBR delivery is cancelled as well as
any Extended or Multiwave bolus that is
currently running. The meter displays the
pump warning W6: TBR CANCELLED. Press
> twice to confirm and dismiss the warning.
For more information, see the pump User Guide.
50
45676_adv.indb 50
11/3/09 4:45:16 PM
3
Changing a Basal Profile
1.
2.
10:02
3.
2 Feb 08
bG Test
Bolus Advice
Pump
My Data
Settings
BASAL RATE
SELECTION
10:02
1
Exit
j From the Main Menu, select
Pump and press =.
Pump
Pump
1.00 U/h
Back
j Repeatedly press and release
< until the BASAL RATE
SELECTION screen appears.
Exit
Back
j P ress > to select the Basal
Rate Selection menu.
51
45676_adv.indb 51
11/3/09 4:45:17 PM
4.
Pump
SELECT PROFILE
42.00 U
Exit
1
Back
j Press x or z to select the
basal rate profile. The basal
rate profile number and the
basal rate total amount appear.
j When the correct basal rate
profile appears, press > to
select it.
For more information, see the pump User Guide.
52
45676_adv.indb 52
11/3/09 4:45:17 PM
3
3.4 Managing Pump Errors and Warnings with the Meter
If the meter is off when a pump error, warning, or reminder occurs and you turn on the meter, after
communication to the pump is established:
• The meter goes directly to the Pump screen.
• Pump errors, warnings, and reminders appear on the meter screen.
• You can mute or confirm the pump error, warning, or reminder on the meter or the pump.
53
45676_adv.indb 53
11/3/09 4:45:17 PM
Cartridge Low Warning
Pump
Follow the instructions in the
pump User Guide for changing
the insulin cartridge.
CARTRIDGE LOW
!
W1
TO SNOOZE
Exit
Cartridge Empty Error
Pump
CARTRIDGE EMPTY
E1
STOP
TO SNOOZE
Back
j When the contents of the
insulin cartridge on the pump
have dropped to 20 units of
insulin, the pump warning
W1: CARTRIDGE LOW appears.
When the warning appears
on the meter Pump screen,
press > twice to snooze and to
confirm the warning. Change
the cartridge before it is empty.
Exit
Back
j When the insulin cartridge
is empty, the pump error
E1: CARTRIDGE EMPTY
appears. You must change
the cartridge immediately.
Press > twice to snooze and
confirm the error. Follow the
instructions in the pump User
Guide for changing the insulin
cartridge.
For more information about pump errors, warnings, and reminders, see the pump User Guide.
54
45676_adv.indb 54
11/3/09 4:45:18 PM
4
4
Communication between the Accu-Chek Aviva
Combo Meter and Accu-Chek Spirit Combo Pump
4.1 Overview
4.2 Turning Bluetooth® Wireless Technology On/Off
4.3 Using the System While Traveling
4.4 Pairing the Accu-Chek Aviva Combo Meter with the Accu-Chek Spirit Combo Pump
4.5 Cancelling the Pairing of the Meter and Pump Prompt
56
57
60
61
67
55
45676_adv.indb 55
11/3/09 4:45:18 PM
4.1 Overview
The meter and pump use Bluetooth wireless technology to communicate. If you are experiencing
communication problems between the meter and pump, it is recommended you go directly to the
pump and operate the pump manually. For more information on troubleshooting communication between
the meter and pump, see Chapter 5, “Troubleshooting.”
56
45676_adv.indb 56
11/3/09 4:45:18 PM
4
4.2 Turning Bluetooth Wireless Technology On/Off
®
You may turn Bluetooth wireless technology on or off at any time using the meter.
Bluetooth Wireless Technology Icon Communication States
Icon
Communication State
Bluetooth wireless technology is on. The meter and pump are communicating.
Bluetooth wireless technology is off. The meter and pump are not communicating.
Bluetooth wireless technology is on. However, the meter and pump are not communicating.
57
45676_adv.indb 57
11/3/09 4:45:18 PM
Turning Pump Communication (Bluetooth Wireless Technology) On or Off
Main Menu > Settings > Meter > Bluetooth
1.
2.
10:02
2 Feb 08
bG Test
Bolus Advice
Pump
My Data
Settings
j From the Main Menu, select
Settings and press =.
10:02
3.
2 Feb 08
Reminders
Bolus Advice
Meter
Sound/Vibrate
Time/Date
Time Blocks
Menu
j Select Meter and press =.
Meter
Warning Limits
Key Lock
Language
Units
Bluetooth
Pair with Pump
Back
j S elect Bluetooth and press =.
58
45676_adv.indb 58
11/3/09 4:45:19 PM
4
4.
i NOTES:
Bluetooth
Press and hold backlight button
until Bluetooth icon changes
Meter Name: METER12345678
Back
j Press and hold * until the
Bluetooth icon changes.
For instructions on how to
turn on or turn off Bluetooth
wireless technology on the
pump, see the pump User
Guide.
• You cannot use the meter to disable Bluetooth wireless
technology on the pump. You must manually turn off Bluetooth
wireless technology on the pump.
• If you change the pump time and date, the meter time and date
will automatically synchronize to match the pump.
• If the meter and pump are out of communication range, the
connection between the meter and pump may be lost.
• If you experience any communication problems, check the pump
to ensure Bluetooth wireless technology is turned on.
• Bluetooth wireless technology is turned off on the meter if the
battery level is low. If you see the battery low icon, you must
replace the batteries in order to turn on Bluetooth wireless
technology. However, you can still perform a blood glucose test.
59
45676_adv.indb 59
11/3/09 4:45:19 PM
4.3 Using the System While Traveling
When traveling on an aircraft, you must ensure Bluetooth wireless technology is turned off on the meter and
on the pump prior to closure of the aircraft door. Electromagnetic emissions from the meter or pump could
interfere with the electronics systems of the aircraft.
60
45676_adv.indb 60
11/3/09 4:45:19 PM
4
4.4 Pairing the Accu-Chek Aviva Combo Meter with the
Accu-Chek Spirit Combo Pump
When obtained as a kit, the meter and pump are paired. If the meter and pump are not paired, see the
instructions below.
Pairing the Meter and Pump
1.
2.
Pump:
j Repeatedly press and release
d until BLUETOOTH
SETTINGS appears.
j Press f to select
BLUETOOTH SETTINGS.
Pump:
j Ensure Bluetooth wireless
technology is turned on. If
turned off, press a to turn
on.
j Press d.
61
45676_adv.indb 61
11/3/09 4:45:19 PM
3.
4.
or
Pump:
j If the PAIRED DEVICE NONE
screen appears, proceed to
Step 6.
Pump:
j If the PAIRED DEVICE screen
appears, press d and
proceed to the next step.
Pump:
j To delete the device so the
pump can be paired with
another meter, press f.
62
45676_adv.indb 62
11/3/09 4:45:19 PM
5.
Pump:
j Press f to confirm deletion
of the paired device.
6.
Pump:
j Press d.
4
7.
Meter:
j E nsure the meter is turned off.
j P ress and hold * and then
press +.
63
45676_adv.indb 63
11/3/09 4:45:19 PM
8.
9.
10.
Pump:
j Press f to initiate the pairing
process.
Pair with Pump
Ensure Pump is in pairing
mode through Bluetooth
menu on Pump
Waiting . . .
METER12345678
Pump:
j If NO DEVICE FOUND screen
appears, see the pump User
Guide for information on
troubleshooting.
j S elect the meter to add. On the
pump, press f.
j Proceed to the next step for
instructions on how to place
the pump in pairing mode.
j To not continue with setting up
pairing, press +.
64
45676_adv.indb 64
11/3/09 4:45:20 PM
11.
4
12.
Pair with Pump
Enter PIN shown on
Pump display
1
Cancel
Pump:
j The ADD DEVICE PAIRING
screen appears followed by
the ADD DEVICE ENTER PIN
CODE screen.
Meter:
The Pair with Pump screen
appears
Enter the PIN Shown on the
Pump Display:
j Press =.
j Set the first number and press
=. Repeat until all of the
numbers have been entered.
Pair with Pump
Enter PIN shown on
Pump display
7 7 1 2 4 2 9 8 3 2
Confirm
j E nsure the PIN entered
matches the numbers on the
pump screen. Select Confirm.
65
45676_adv.indb 65
11/3/09 4:45:20 PM
13.
Pair with Pump
Pairing completed for
PUMP12345678
METER12345678
Turn Meter off
When the correct PIN is
confirmed, the Pairing
Completed for … screen
appears on the meter and then
the DEVICE PAIRED screen
appears on the pump.
j Press + to turn off the meter.
Once the meter has turned
off, the pairing process is
complete. You may turn on the
meter and begin using it.
66
45676_adv.indb 66
11/3/09 4:45:21 PM
4
4.5 Cancelling the Pairing of the Meter and Pump Prompt
If the meter and pump are not paired, the meter prompts you to complete the pairing process each time you
turn on the meter unless you cancel the pairing process.
67
45676_adv.indb 67
11/3/09 4:45:21 PM
1.
2.
3.
Setup
Setup
Pairing setup has not
been completed
Cancelling the Pairing
Process will prevent you
from communicating with
the Pump.
Setup
Setup Completed
Successfully
Cancel Pairing?
Cancel
Next
j Turn on the meter. The Pairing
setup has not been completed
screen appears.
j Select Cancel to cancel the
pairing process prompt.
Proceed to Step 2.
j Select Next to begin the
pairing process. Go to the
section, “Pairing the
Accu-Chek Aviva Combo Meter
with the Accu-Chek Spirit
Combo Pump.”
No
Yes
j Select Yes to cancel the pairing
process.
j Select No to return to the
pairing process. See the
Section, “Pairing the
Accu-Chek Aviva Combo Meter
with the Accu-Chek Spirit
Combo Pump.”
Next
If you selected Yes to cancel
the pairing process, the Setup
Completed Successfully screen
appears.
j S elect Next to go to the Main
Menu.
68
45676_adv.indb 68
11/3/09 4:45:21 PM
4
i NOTES:
• A blood glucose test cannot be performed during the pairing process.
• The meter and pump remain paired when the batteries are removed and replaced.
• Only one meter can be paired with one pump at a time.
• If the meter is paired with a pump, and you pair the meter with another pump, the meter is unpaired
from the first pump.
• If the meter is paired with a pump and an unsuccessful attempt is made to pair the meter to another
pump, the meter is no longer paired with the original pump.
69
45676_adv.indb 69
11/3/09 4:45:22 PM
70
45676_adv.indb 70
11/3/09 4:45:22 PM
5
5
Troubleshooting
5.1 Overview
5.2 Troubleshooting Communication Between the Meter and Pump
72
73
71
45676_adv.indb 71
11/3/09 4:45:22 PM
5.1 Overview
For most communication problems between the meter and pump, the meter displays a message with a
short description of the symptom and, along with it, a proposed solution. This chapter goes into more detail
by describing the symptom, the possible cause, and the possible solution. If the possible solutions do not
fix the problem, contact Roche. For information about troubleshooting the standard meter features, see the
Standard Owner’s Booklet.
w WARNING:
Never make treatment decisions based on a warning or error message. If you have any concerns,
contact Roche.
i NOTE:
If you drop the meter or think it is not giving accurate results, make sure that your test strips and
control solution have not expired, and then perform a control test. For further assistance, contact Roche.
72
45676_adv.indb 72
11/3/09 4:45:22 PM
5
5.2 Troubleshooting Communication Between the Meter and
Pump
Display Shows
Possible Cause(s)
Possible Solution(s)
Bluetooth icon flashing
j Communication ended due to a
button press on the pump.
j Meter and pump are outside
communication range.
j Check the pump and continue operation
of the pump manually.
j Ensure the pump has Bluetooth wireless
technology turned on.
j Ensure the pump is within
communication range.
Bolus Advice
Bolus Advice data deleted
j Bolus advice data integrity cannot
be confirmed.
j Wait 8 hours for accurate bolus advice.
IMPORTANT:
• Insulin doses and meals taken before the Bolus Advice warning are no longer
reflected in the Bolus Advice calculation.
• The meter may not reflect the pump bolus history, however the bolus history
is available on the pump.
73
45676_adv.indb 73
11/3/09 4:45:22 PM
Display Shows
Possible Cause(s)
Bolus Delivery Unavailable j The meter cannot communicate
with the pump.
j The pump is currently in Stop
mode.
Possible Solution(s)
j Retry or set to Manual Pump.
j Ensure the meter and pump have
Bluetooth wireless technology turned on.
j Ensure the meter and pump are within
communication range.
j If the low battery icon is displayed on
the meter, the meter cannot
communicate with the pump. Replace
the batteries.
j Take the pump out of Stop mode.
j The pump is currently delivering a j Allow the current bolus delivery to
bolus.
complete before delivering the next
bolus.
74
45676_adv.indb 74
11/3/09 4:45:22 PM
5
Display Shows
Possible Cause(s)
Possible Solution(s)
Communication Lost
j P ump is out of range of the meter.
j R eview or cancel the bolus on the pump.
j E nsure the meter and pump have
Bluetooth wireless technology turned on.
j E nsure the meter and pump are within
communication range.
j If the low battery icon is displayed on the
meter, the meter cannot communicate
with the pump. Replace the batteries.
Communication Warning
j Communication of bolus data from
the pump was not successful.
Therefore, pump data are not
available and the bolus data may
not be accurate.
j C ommunication of bolus data from
the pump was not successful.
Therefore, pump data are not
available and the active insulin
amount may not be accurate.
j E nsure the meter and pump have
Bluetooth wireless technology turned on.
j E nsure the meter and pump are within
communication range.
j If the low battery icon is displayed on the
meter, the meter cannot communicate
with the pump. Replace the batteries.
75
45676_adv.indb 75
11/3/09 4:45:22 PM
Display Shows
Possible Cause(s)
Connection Lost
j T he connection was lost between
jR
estart the pairing process. See Chapter
the meter and the pump during the
4, “Communication Between the
pairing process. Therefore, the
Accu‑Chek Aviva Combo Meter and
attempt to pair your meter and
Accu‑Chek Spirit Combo Pump.”
pump was unsuccessful.
j E nsure the meter and pump have
Bluetooth wireless technology turned on.
j If the low battery icon is displayed on
the meter, the meter cannot
communicate with the pump. Replace
the batteries.
Incorrect Pump Time/Date
Possible Solution(s)
j P ump is out of range of the meter.
j E nsure the meter and pump are within
communication range.
j P ump time/date is incorrect.
j S et time/date on the pump (see pump
User Guide).
76
45676_adv.indb 76
11/3/09 4:45:22 PM
5
Display Shows
Possible Cause(s)
Possible Solution(s)
Infrequent Pump
Communication
j At least two weeks have passed
since the meter and pump have
communicated.
j It is important to use Bluetooth wireless
technology communication between the
meter and pump regularly if you utilize
bolus advice.
j E nsure the meter and pump have
Bluetooth wireless technology turned on.
j E nsure the meter and pump are within
communication range.
j If the low battery icon is displayed on the
meter, the meter cannot communicate
with the pump. Replace the batteries.
Invalid PIN
j T he wrong PIN was entered.
j S elect OK and re-enter the PIN shown on
the pump display.
77
45676_adv.indb 77
11/3/09 4:45:22 PM
Display Shows
Possible Cause(s)
Possible Solution(s)
Meter and Pump Not Paired j M
eter and pump have not been
j Y ou must pair the meter and pump to use
paired. You cannot use the pump
these features.
functions without pairing the meter j F or instructions on how to pair the meter
and the pump.
and pump, see Chapter 4,
“Communication Between the Accu‑Chek
Aviva Combo Meter and Accu‑Chek Spirit
Combo Pump.”
Pairing Failed
j T he attempt to pair the meter and
pump was unsuccessful.
j R estart the pairing process. See Chapter
4, “Communication Between the
Accu‑Chek Aviva Combo Meter and
Accu‑Chek Spirit Combo Pump.”
78
45676_adv.indb 78
11/3/09 4:45:22 PM
5
Display Shows
Possible Cause(s)
Possible Solution(s)
Pump Not Available
j T he pump is out of the
j E nsure the meter and pump have
communication range of the meter.
Bluetooth wireless technology turned on.
j E nsure the meter and pump are within
communication range.
j If the low battery icon is displayed on the
meter, the meter cannot communicate
with the pump. Replace the batteries.
Time Mismatch
j T he time or date on the meter is
j T he meter time and date were changed to
more than five minutes different
match the pump time. Ensure the time
than the time or date on the pump.
and date are correct. If the time or date
are not correct, change the time and date
on the pump.
79
45676_adv.indb 79
11/3/09 4:45:22 PM
w WARNING:
If you are experiencing communication problems between your meter and pump, it is recommended you
operate the pump manually and not use the meter to remotely control the pump.
i Note:
For additional information on errors and warnings, see the Standard Owner’s Booklet.
80
45676_adv.indb 80
11/3/09 4:45:22 PM
Appendices
Appendix A: Bolus Advice
Bolus advice is only available if you have set up bolus advice on the Accu‑Chek Aviva Combo Meter. For
instructions on how to set up bolus advice, see the Standard Owner’s Booklet.
Along with the basic blood glucose and carbohydrate values, there are several meter settings required to
optimize the bolus advice feature so the recommendations match your insulin needs to the greatest possible
extent. You must set up bolus advice correctly. Bolus advice is not available without these settings. It is
important to discuss the bolus advice settings with your healthcare professional.
i NOTES:
• Blood glucose and bG are interchangeable and mean the same thing.
• Bolus advice factors are items that influence the bolus calculations of the meter.
81
45676_adv.indb 81
11/3/09 4:45:22 PM
Bolus Advice Meter Settings
This section contains an overview of the information that must be entered into the meter for accurate bolus
advice recommendations.
Carbohydrate Units
• Bolus advice recommendations are based on the units of carbohydrates selected.
• The right choice of carb units is important for bolus advice recommendations to be accurate.
• Carbohydrate units must be selected, whether or not you set up bolus advice.
The following carbohydrate units are available on the meter:
Abbreviation
Unit of Measurement
Gram Equivalent
g
j Grams
j 1 gram
KE
j Kohlenhydrateinheit
j 10 grams
BE
j Bread Equivalent
j 12 grams
CC
j Carbohydrate Choice
j 15 grams
82
45676_adv.indb 82
11/3/09 4:45:22 PM
Warning Limits
• You can select hyper (high) and hypo (low) blood glucose limits that best fit your needs.
• Whenever a blood glucose test result is above the hyper warning limit or below the hypo warning limit, the
meter displays a warning.
• Set the hyper warning limit greater than the target range of all time blocks.
• Set the hypo warning limit less than the target range of all time blocks.
• Bolus advice is not available if your blood glucose result is below the hypo warning limit.
Time Blocks
Time blocks allow you to select settings to take into account the fact that your insulin requirement varies
throughout the day. Using the same values and factors for the day would not necessarily match your insulin
needs and could lead to inaccurate bolus advice recommendations.
The meter comes with five preset time blocks. You may set up to eight time blocks (time periods) depending
on your insulin needs. For each time block, you must set the target range, the carb ratio, and the insulin
sensitivity. You can define all of these values separately for each time block. The meter automatically takes
these values into account.
83
45676_adv.indb 83
11/3/09 4:45:22 PM
Target Range
• The range of your blood glucose results considered acceptable.
• The meter automatically calculates the target blood glucose level as the average between the upper and
lower blood glucose target limits.
• Talk with your healthcare professional to determine the appropriate target range.
Upper Blood Glucose Target Limit
• The upper limit of the blood glucose target range for the current time block.
• Blood glucose results within the lower target limit and the upper target limit are considered within the
target range.
Lower Blood Glucose Target Limit
• The lower limit of the blood glucose target range for the current time block.
• Blood glucose results within the lower target limit and the upper target limit are considered within the
target range.
Carb Ratio
• For the current time block, the carb ratio is the amount of insulin necessary to account for a certain number
of carbohydrates.
• Talk with your healthcare professional to determine the appropriate carbohydrate ratio.
84
45676_adv.indb 84
11/3/09 4:45:22 PM
Insulin Sensitivity
• For the current time block, the insulin sensitivity (correction factor) is the amount of insulin necessary to
lower your blood glucose by a certain amount.
• Talk with your healthcare professional to determine the appropriate insulin sensitivity settings.
Your meter comes with the following preset time blocks:
Time Block
24-Hour Format
1
0:00–5:30
2
5:30–11:00
3
11:00–17:00
4
17:00–21:30
5
21:30–0:00
85
45676_adv.indb 85
11/3/09 4:45:22 PM
Talk to your healthcare professional about setting up time blocks to help you manage your diabetes.
Here is a suggested pattern:
Time Block
Start Time
End Time
1. Night time
Midnight
The time you normally wake up
2. Breakfast
The time you normally wake up
1½ hours before you normally eat
lunch
3. Lunch
1½ hours before you normally eat
lunch
1½ hours before you normally eat
dinner
4. Dinner
1½ hours before you normally eat
dinner
1½ hours before you normally go to
bed
5. Bedtime
1½ hours before you normally go to
bed
Midnight
86
45676_adv.indb 86
11/3/09 4:45:22 PM
Setting Up Time Blocks: Important Information
• Time blocks cover a 24-hour time period (from midnight to midnight).
• You can change the time period for any of the preset time blocks.
• When setting up bolus advice, you must complete and save the settings in at least one time block.
• Each time block must be at least 30 minutes long and can only be set in 30-minute increments.
• When you set the end time for a time block, the meter automatically sets this end time as the start time for
the next time block.
• You can set a different target blood glucose range, carb ratio, and insulin sensitivity for each time block.
• The target range for each time block must be within the hypo and hyper warning limits.
• When a time block is edited for the first time, the settings (target range, carb ratio, and insulin sensitivity)
are applied to all of the other time blocks.
Health Events
Health events allow you to select settings to take into account various activities or events that increase or
decrease your insulin need. Health events can be selected to indicate how you are feeling or what you are
doing that might affect your diabetes. The meter allows you the option of setting a percentage for each health
event. Fasting is not adjustable and does not scale bolus advice calculations. When a health event is selected,
the set percentage is used to increase or decrease the bolus insulin amount. Discuss the appropriate
percentage for each health event with your healthcare professional.
87
45676_adv.indb 87
11/3/09 4:45:22 PM
Health events available on the meter are:
• Exercise 1
• Exercise 2
• Stress
• Illness
• Premenstrual
• Fasting
Bolus Advice Options
Meal rise, snack size, acting time, and offset time are bolus advice options. Below are detailed descriptions of
each of these settings.
Meal Rise
• During or after meals, an increase in blood glucose levels is considered normal within a certain range, even
though a meal bolus has been delivered. A meal rise is in effect for a specified time period.
• Enter the maximum increase in your blood glucose result that is to be tolerated without an additional
correction bolus.
88
45676_adv.indb 88
11/3/09 4:45:23 PM
Snack Size
• The snack size is the amount of carbohydrates that is not to be counted as a regular meal with the expected
meal rise.
Acting Time
• The period of time from the start of the meal rise or the delivery of a correction bolus until your blood
glucose level returns to the target level.
• You can adjust the length of the acting time to fit your individual needs, within a specified time interval
(1½ hours to 8 hours).
Offset Time
• Offset time takes into account the expected delay for the blood glucose level to actually fall during the
acting time of insulin in the body. It describes the first time period within the acting time.
Active Insulin
• Bolus insulin that has been given to lower your blood glucose, but has not yet been fully used.
• The meter automatically calculates the active insulin amount and it is displayed on the bolus advice screen.
89
45676_adv.indb 89
11/3/09 4:45:23 PM
Bolus Calculation
The bolus recommended by the bolus advice feature of the meter consists of two components: a
recommendation for a meal bolus that covers your food intake and a recommendation for a correction bolus
to adjust your blood glucose level if it is not within the target range. The correction bolus can be positive if
your current blood glucose level is above your target range or negative if it is below your target range.
Meal Bolus
A meal bolus is the amount of insulin that needs to be administered to cover the amount of carbohydrates you
are planning to eat. It is calculated as:
Meal Bolus = Carbohydrate Intake ×
Insulin
Carbohydrates
from carbohydrate ratio
90
45676_adv.indb 90
11/3/09 4:45:23 PM
Correction Bolus
If your current blood glucose level is not within your target range, a correction bolus is recommended.
Blood Glucose Limits
bG Result
Hyper Warning
Upper Target Limit
Target
Lower Target Limit
Hypo Warning
Discuss your blood glucose limits with your healthcare professional.
91
45676_adv.indb 91
11/3/09 4:45:23 PM
The calculation for the recommended correction bolus depends on your current blood glucose result, your
insulin sensitivity for the current time block, and whether you are planning to eat.
Example Bolus Advice Calculations
Blood Glucose Level
Without Food Intake (No Carbs)
Above Upper Target Limit
(bG –Target bG) x Insulin Sensitivity (bG –Target bG) x Insulin Sensitivity
+ Meal Bolus
Prior to a Meal
Between Upper and Lower
Target Limit
No correction bolus is necessary.
(bG –Target bG) x Insulin Sensitivity
+ Meal Bolus. A correction bolus
can be negative.
Between Lower Target Limit and No bolus recommended. The
Hypo Warning
correction bolus is negative.
(bG –Target bG) x Insulin Sensitivity
+ Meal Bolus. The correction bolus
is negative.
Below Hypo Warning
Hypo warning appears. It is
recommended you eat fast-acting
carbohydrates.
Bolus advice is not available.
Hypo warning appears. It is
recommended you eat fast-acting
carbohydrates.
Bolus advice is not available.
92
45676_adv.indb 92
11/3/09 4:45:23 PM
Other Boluses
Subsequent Meal Boluses
If you are planning to eat several meals or snacks in a short period of time, you should administer a meal
bolus for each meal. The calculation is always the same as a meal bolus.
Correction Bolus After a Meal
After a meal, it is normal to allow for a rise of your blood glucose level even if you administered the correct
meal bolus. The allowed blood glucose level rise is called meal rise. After a certain period of time (offset time)
the meal rise decreases from its maximum until your blood glucose level has returned to the target level. The
period of time from the start of the meal rise until your blood glucose level returns to the target level is
defined as acting time. During this time, a correction bolus is only recommended if your blood glucose level
exceeds the current meal rise level.
93
45676_adv.indb 93
11/3/09 4:45:23 PM
Acting Time
bG Level
Hyper
Offset Time
Meal Rise
Target Value
Target Range
Hypo
Current
bG values
Time
Meal
Bolus
Bolus not
required
Currently allowed bG value:
Meal Rise
The dotted line shows how your blood glucose level might change after a meal bolus. Bolus advice tolerates
an increase in your blood glucose level within the meal rise range (green) without calculating an extra
correction bolus. When you enter a carbohydrate amount that is greater than the snack size, the meal rise
setting is added to the blood glucose target value. The shape of the meal rise (the width of the green area) is
determined by the offset time and the acting time.
94
45676_adv.indb 94
11/3/09 4:45:23 PM
Subsequent Correction Boluses
The difference between your current blood glucose level and your target blood glucose level is called Delta
bG. A correction bolus administered according to the previous conditions covers this difference for a certain
period of time. As the correction bolus starts to take effect, your current blood glucose level should fall and
the covered Delta bG decreases after the Offset Time. At the end of the Acting Time, your blood glucose level
should return to the target limit. You receive a recommendation for another correction bolus only if your
current blood glucose result exceeds the current Delta bG level.
bG Result
Offset
Time
Delta bG
(Correction
Insulin)
2
1
Time
Correction Bolus
Acting Time
Subsequent Correction Boluses: If your blood glucose result is within Section 1 of the graph, a correction
bolus is not recommended. If your blood glucose result is within Section 2 of the graph, a correction bolus is
recommended.
95
45676_adv.indb 95
11/3/09 4:45:23 PM
Examples of Bolus Advice Recommendations
The following graphs provide differing examples of how bolus advice considers different factors when
calculations are made.
The currently allowed blood glucose value considers the following factors:
• Target Range Mean Value
• Meal Rise
• Correction Bolus
96
45676_adv.indb 96
11/3/09 4:45:23 PM
After a Correction Bolus
bG Level
Hyper
Acting Time
Offset Time
Corrected bG
Target Value
Target Range
Hypo
Current
bG values
Time
Bolus
Bolus not
required
Currently allowed bG value:
Corrected bG
The above diagram shows an example of the effect of this rule. The first correction bolus at 12:00 remains
active during the acting time (the width of the blue area). If the blood glucose value at 14:00 falls below the
currently allowed blood glucose value (top of the blue area), another correction bolus is not calculated.
97
45676_adv.indb 97
11/3/09 4:45:24 PM
bG Level
Hyper
Target Value
Target Range
Hypo
Current
bG values
Time
Bolus
When a blood glucose test result is greater than the currently allowed blood glucose value, a bolus is
calculated (light blue) that only considers the difference between the current blood glucose value (orange
dots) and the currently allowed blood glucose value (the top of the blue area).
98
45676_adv.indb 98
11/3/09 4:45:24 PM
bG Level
Hyper
Acting Time
Offset Time
Meal Rise
Target Value
Target Range
Hypo
Current
bG values
Time
Meal
Bolus
Bolus not
required
Currently allowed bG value:
Meal Rise
Subsequent Meals
If you eat several meals in a row, the meal rise is restarted for each new meal bolus.
99
45676_adv.indb 99
11/3/09 4:45:24 PM
Appendix B: Bolus Advice Calculations
The Mathematical Basis for Bolus Calculations
The following is a list of the most important formulas and the calculation principles on which bolus advice is
based. It is difficult to calculate accurately a bolus yourself using these formulas when the acting time and
offset time of recent meals and correction boluses are considered.
Carbohydrate Suggestion
This calculation is made when the blood glucose result falls below the hypo warning limit. It is based on
the other values defined for the current time block and the result is calculated as a carbohydrate intake
recommendation.
Carbohydrates = ( Target Range Mean Value – Current bG) ×
according to time block definition
Insulin
bG
from insulin sensitivity
×
Carbohydrates
Insulin
from carbohydrate ratio
i NOTES:
• A minimum amount of 12g (or equivalent BE, KE, or CC units) is always given. If the calculated value
is below 12g, then 12g is used.
• The carbohydrate suggestion is displayed in the carb unit of measure you have selected (g, BE, KE, or
CC).
100
45676_adv.indb 100
11/3/09 4:45:24 PM
Meal Bolus
The following formula is used to calculate the bolus for meals:
Meal Bolus = Carbohydrate Intake ×
Insulin
Carbohydrates
from carbohydrate ratio
Currently Allowed Blood Glucose Value
The target range average value used in the calculation of the correction bolus, as shown below, changes with
the definition for the time blocks.
Consequently, the currently allowed blood glucose value is calculated as follows:
Currently Allowed
Target Range Mean Value + Meal Rise +
Blood Glucose Value =
according to time block definition
current
active meal
∑
Blood Glucose Range Covered
by Correction Bolus
currently acting correction boluses
When no meal rise or correction bolus acting time is currently in effect, a value of “0” is substituted for these
parameters in the formula.
101
45676_adv.indb 101
11/3/09 4:45:24 PM
Correction Bolus
Generally, a correction bolus is only calculated if the current blood glucose value is above the hypo bG
warning limit and outside the target range. If the current blood glucose value is above the target range, the
currently allowed blood glucose value must also be exceeded. Only correction boluses greater than “0” trigger
a corresponding acting time.
Insulin
bG
Correction Bolus = (Current bG – Currently Allowed bG) ×
from insulin sensitivity
The blood glucose correction portion depends on the following requirements:
• If current bG > currently allowed blood glucose value, then blood glucose correction portion = current bG
– currently allowed blood glucose value
• If current bG > hypo warning limit and current bG < target range lower limit, then bG correction portion =
current bG – target range average value
102
45676_adv.indb 102
11/3/09 4:45:24 PM
Correction Bolus With Carbohydrate Intake
Whenever carbohydrates have been entered, the related meal bolus is always offset against any (even
negative) correction bolus.
When a meal is eaten, the correction bolus is also calculated for blood glucose results that fall within the
target range if:
• The current blood glucose result falls below the target range average value, or
• The current blood glucose result is above the currently allowed blood glucose value.
Since your pump can only deliver insulin, mathematically negative overall boluses are displayed as “0”.
Active Insulin
The active insulin field shows you if a prior bG correction bolus may possibly reduce your current bolus
calculation.
103
45676_adv.indb 103
11/3/09 4:45:24 PM
Appendix C: Explanation of Symbols
You may encounter the following symbols on the packaging, on the type plate, and in the instructions for the
meter, shown here with their meaning.
j Consult the instructions for use.
w
j Warning (refer to accompanying documents). Please refer to safety-related notes
in the owner’s booklets accompanying this instrument.
c
j Caution (refer to accompanying documents). Please refer to safety-related notes
in the owner’s booklets accompanying this instrument.
i
j Note (additional information)
j Store at
j Manufacturer
j Catalogue number
j For in vitro diagnostic use
j This product fulfils the requirements of Directive 98/79/EC on in vitro diagnostic
medical devices.
j 1.5V AAA
104
45676_adv.indb 104
11/3/09 4:45:25 PM
Index
A
acting time, 89
active insulin, 89
aircraft. See Bluetooth wireless technology,
using while traveling
B
basal profile, changing, 51–52
Bluetooth wireless technology,
communication states, 57
turning on or off, 58–59
using while traveling, 60
bolus advice,
intended users, 10
meter screen features, 13
overview, 8–9
bolus advice calculations,
carbohydrate suggestion, 100
correction bolus, 102
correction bolus with carbohydrate intake,
103
currently allowed blood glucose value, 101
meal bolus, 101
bolus advice options, 88–89
bolus advice recommendations, examples,
96–99
bolus amount, adjust, 15
bolus calculation,
correction bolus, 91
examples, 92
meal bolus, 90
bolus, delivery using bolus advice, 14–22
button functions, 36–37
105
45676_adv.indb 105
11/3/09 4:45:25 PM
C
carbohydrate units, 82
carb ratio, 84
carbs amount, 14
communication, meter and pump,
overview, 34, 56
troubleshooting, 73–80
correction bolus, 93–95
H
health events, 15, 87–88
D
deliver a bolus. See bolus, delivery using bolus
advice
diary, updating bolus information, 31
M
manual bolus,
insulin pen/syringe delivery using bolus
advice, 20–22
pump delivery using bolus advice, 20
manual pump bolus, description, 28
meal rise, 88
multiwave bolus,
delivery using bolus advice, 17–18
description, 27
E
errors, pump, 53–54
extended bolus,
delivery using bolus advice, 19
description, 28
I
insulin sensitivity, 85
L
lower blood glucose target limit, 84
106
45676_adv.indb 106
11/3/09 4:45:25 PM
O
offset time, 89
P
pairing, delete device, 62
pairing meter with pump, 61–66
pairing prompt, cancelling, 67–69
pen bolus, description, 28
PIN, enter into meter, 65
pump control using meter, 38–40
pump screens on meter, features, 41–42
S
safety information,
bolus advice, 10–12
bolus delivery, 22–23, 29
snack size, 89
standard bolus,
cancel programmed meter delivery, 45–46
delivery using bolus advice, 15–16
description, 27
program delivery through meter, 43–44,
symbols, explanation, 104
synchronize, meter with pump, 31
syringe bolus, description, 28
T
target range, 84
temporary basal rate (TBR),
cancel programmed TBR, 50
program through meter, 47–49
time blocks, 83, 85–87
troubleshooting. See communication, meter and
pump, troubleshooting
107
45676_adv.indb 107
11/3/09 4:45:26 PM
U
upper blood glucose target limit, 84
W
warning limits, 83
warnings, pump, 53–54
108
45676_adv.indb 108
11/3/09 4:45:26 PM