1
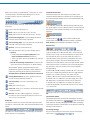
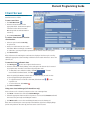
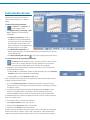
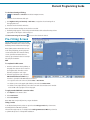
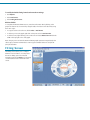
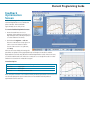
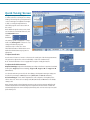
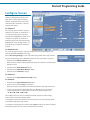
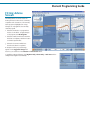
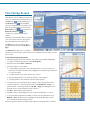
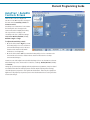
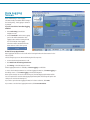
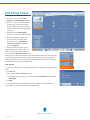
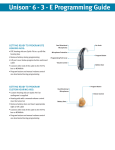
Element Programming Guide
™
GETTING READY TO PROGRAM
BTE HEARING AIDS:
• BTE hearing aids are Quick Fit to a
50 dB flat hearing loss
• Remove battery during programming
• Lift programming port cover and
insert cable
• Connect other end of the cable to the
HI-PRO box or NOAHlink
• Program button, manual volume
control and automatic options are
deactivated during programming
GETTING READY TO PROGRAM
CUSTOM HEARING AIDS:
• Custom hearing aids are Quick Fit if
an audiogram is supplied
• Hearing aids with a manual volume
control must be turned to the ‘on’
position by turning the volume
control wheel
• Remove battery door and insert
appropriate right or left cable
• Connect other end of the cable to the
HI-PRO box or NOAHlink
• Program button, manual volume
control and automatic options are
deactivated during programming
Dual Directional
Microphones
Ear Hook
Microphone Protection
Program Button
Programming Port Cover
Volume Control
Battery Door
Program Button
Dual Directional
Microphones
Volume Control
Battery Door
When you are ready to program Element™, certain sections on the
screen will remain constant during the fitting process. A brief
description of these sections is found below.
Toolbar
The toolbar is available at the top of each screen, just below the
main menu.
The toolbar contains the following icons:
Undo: removes your last action up to 15 steps.
Communication Status
On the left and right side of the bar, the current status of the
selected hearing instrument is indicated. The “X” through the ear
icon indicates that the hearing aid is not communicating with U:fit,
as seen below:
To re-establish communication with the hearing instrument, click
the “X” through the ear icon. U:fit will search for connected hearing
instruments. If successful, the following icon and message will be
displayed:
Redo: performs the last removed action up to 15 steps.
Read from Hearing Aid(s): reads the fitting information
currently saved in the hearing instrument.
Save to Hearing Aid(s): saves/programs the current fitting
information into the hearing instrument.
Mute
The mute buttons
on the status bar indicate the
current state of the hearing instrument: muted or unmuted.
Mute/unmute can be selected individually for each ear.
Reserve Gain
Quick Fit: opens the re-calculate menu.
The recalculate menu gives you the following options:
• Quick Fit:
1. Check/Uncheck the Frequency Response and/or
Inputs and Adaptive Features checkboxes.
2. Select a program option from the For: drop-down list.
3. Press OK.
• Discard Current Fitting and Start Over: If selected, this
option will reset the hearing aid to its default settings.
Note: For Moxi™ fittings, if no feedback test has been
performed, the Quick Fit is limited to a stable condition. To
remove the gain limits for the Quick Fit, uncheck the box
Limit gain when no feedback threshold has been measured.
Hearing Aid Information: provides specification sheets,
tutorials and programming information.
Save to Database: saves the current fitting to the
database.
Print: prints a client report.
In the above illustration, the reserve gain for the right device is
5 dB (on average) and 10 dB for the left device. The reserve gain
indication turns orange once the current fitting no longer provides
the requested amount of reserve gain. It will stay orange as a
reminder that the reserve gain has been changed. If the reserve
gain is locked, and gain is increased until the limit has been
reached, the lock symbol flashes. The reserve gain will then remain
at the requested value. You can click on the reserve gain display in
the status bar to access the volume control set up at any time
during the fitting.
For Element Moxi: All Moxi hearing aids have onBoard™ control. This
allows you to configure the push button either as a toggle between
programs or as a volume control (for more details on how to
configure onBoard control, see the Instruments Screen section).
If onBoard control is configured as a program toggle, the toolbar
will display OFF, to show that the volume control is turned off.
If onBoard control is configured as a volume control (VC), the
toolbar will display ON, to show that the volume control is turned
on, as seen below:
Contact Us: brings you to the Unitron Hearing website with
contact information.
Exit U:fit: exits the software application. You will be
prompted to save your fitting information if you have not
done so before closing U:fit™.
Status Bar
The status bar at the bottom of the U:fit window provides useful
information on the current status of the hearing instruments in the
fitting.
You will also have access to the push button VC setting by clicking
ON.
Current Environment
The current active environment in the instrument is shown in
the middle of the status bar.
This shows which
environment is currently being adjusted. The client is listening
to this environment if communication to the devices is active as
indicated in the status bar.
Processing Strategy
The status bar is clearly divided into a left and right side indicated
by blue and red icons, respectively.
The processing strategy is shown in the box next to the listening
environment.
Element Programming Guide
Client Screen
The client screen is only available in the
Standalone version of U:fit.
To enter a new client:
1. Click Add New Client.
2. Enter the client information in the
appropriate fields. The minimum required
information is the client’s last name.
Mandatory fields are indicated with an
asterisk (*).
3. Press Save to Database.
To retrieve client information from the
client database:
1. Select an option from the Search by
drop-down list.
2. Enter your search terms into the search
field. Note: When searching by “Last Name”
or “Client No.”, you may enter full or partial names or numbers into the search field.
3. Click Start Search.
A list of client records matching the search criteria is displayed. The list may be sorted by
clicking the appropriate column headings. Click the desired result from the list to access the
client record.
To enter the client’s audiometric data:
1. Click Audiogram
at the bottom right of the client screen.
2. Enter the audiometric data by clicking on the audiogram. The data can also be entered
by using the table. The values can be altered by using the + and –.
a. To enter the bone conduction values, click BC
. To enter
uncomfortable loudness levels, click UCL
.
Note: The quick fit for NAL-NL1 and DSL take air conduction (AC), BC and UCL into
account if supported by the fitting formula.
b. To copy the curve from one ear to the next, click the arrows
for the
respective ear.
c. To remove the curve, click Delete
.
3. Click Save to Database.
Fitting menu: Session Manager (U:fit Standalone only)
Once a client record is selected you may access the session manager data:
1. Click View on the menu bar and select Session Manager.
2. Select the appropriate date from the list of previous sessions and click Restore. U:fit will
then restore the previously saved fitting information.
3. Click Write to aid to restore the saved fitting information into the hearing aid.
Note: You can add only one session per day to the database. If you have multiple fittings
for the same patient on the same day, the most recent session is saved.
Instruments Screen
Once the client’s information and audiometric
data has been entered, the next step is to
either detect the hearing aid or simulate a
fitting.
To detect the hearing instrument:
1.
Click Detect or select Detect from
the left navigation menu.
2. Click Right Ear Only, Left Ear Only or Both
Ears to detect the connected hearing
instruments.
• Click Write to Instruments to create a
new fitting based on the audiogram that
you have entered. The connected hearing
aid’s information (model, matrix, serial
number) displays above the graph and the
fitting range appears on the graph.
• Click Read from Instrument(s) if you
want to retrieve data that is stored in the instrument (e.g. if the patient comes back for
a return appointment).
• Click Remove Hearing Aid Selection
to remove the selected hearing aid if desired.
To customize the set-up of the hearing instrument:
1.
Click Setup in the left navigation menu to access the controls for vent correction,
volume control, slim tube, xReceiver unit and coupling choices and onBoard
control. Your new selection might require U:fit to quick fit to the new targets.
2. Depending on the hearing aid options, the Setup screen allows you to customize the
hearing instrument acoustics:
• For Element Moda™ and Element 13 BTE no VC slim tube fittings, turn on the slim tube
checkbox to prepare the software for slim tube fittings.
• For Element Moxi, select the Receiver and Tip option.
Note: The volume control range and reserve gain can be adjusted in the Volume Control
Settings in the Reserve Gain section.
3. Choose the desired reserve gain for this fitting. If the fitting no longer provides the
requested amount of reserve gain, the reserve gain indication on the status bar changes
from white to orange.
4. To prevent reserve gain adjustments during programming, click the Lock icon in the
Volume Control Settings. If the reserve gain is locked and the gain limit has been
reached, the Lock icon flashes and the reserve gain remains at the requested value.
For Element Moxi products, U:fit can configure the onBoard control to be either a program
button or a volume control.
To set onBoard control as a volume control function:
1. Select Volume Control from the drop-down list.
2. Select the desired Step Size from the drop-down list.
3. Select the desired Steps from the drop-down list.
Example: 3 dB step size and the step option 2 Up, 1 Down. For this option the volume cycle
will be heard as follows: ideal VC, +3 dB , +6 dB, +3 dB, ideal VC, -3 dB, and then back to
ideal VC. Every push on the button advances the loudness to the next step in the pattern.
Element Programming Guide
To simulate a hearing aid fitting:
1.
Click Simulate or Simulate from the left navigation menu.
2. Select the desired Element shell style
3. Click Right Ear Only, Left Ear Only or Both Ears to assign the chosen hearing aids to
the appropriate ears.
4. Select the desired model from the list.
Note: Click the column headings to sort the list as needed.
5. The fitting range appears on the audiogram and indicates if the selected hearing aids are
appropriate for the degree of the hearing loss.
Click Remove Hearing Aid Selection
to remove the selection if desired.
Pre-Fitting Screen
The Pre-Fitting screen can be used to enter
ABR, RECD and REUG data as well as change
the fitting formula and the transducer type.
Note: If ABR, RECD or REUG values are not
used during the fitting, you may skip this
screen entirely and move onto the Fitting
screen. If no RECD or REUG values are
entered, age estimated values are used for
the quick fit calculations.
ABR
To complete the ABR screen:
1. Enter the audiometric data by clicking on
the graph. The data can also be entered
by using the table. The values can be
altered by using the + and – signs.
2. Select the appropriate option from the
ABR Threshold Measured With dropdown list to specify how the ABR data was obtained.
• To copy the curve to the other ear, click the Blue or Red Arrows.
• To delete a point on the graph, right-click the point and select Delete Point.
• To delete a curve, right-click any point on the curve and select “Delete Curve” OR click
on the red X on the top right corner of the graph.
To apply standard ABR nHL correction values:
a. Click Options on the menu toolbar.
b. Select Preferences.
c. Select Calculations.
Note: ABR data is only used for DSLv.5 target calculation.
Fitting Formula
To modify the fitting formula, select an option from the Fitting Formula drop-down menu.
U:fit will quick fit to NAL-NL1 by default.
The transducer type may also be changed in the Audiogram Measured With drop-down list
to optimize the precision of the quick fit calculation.
To modify the default fitting formula and transducer settings:
1. Click Options.
2. Select Preferences.
3. Select Fitting Preferences.
RECD and REUG
To complete the RECD and REUG screens, enter the audiometric data by clicking on the
graph. The data can also be entered by using the table. The values can be altered by using
the + and – signs.
• To copy the curve to the other ear, click the Blue or Red Arrows.
• To delete a point on the graph, right-click on the point and select Delete Point.
• To delete a curve, right-click any point on the curve and select Delete Curve OR click the
red X on the top right corner of the graph.
Note: The grey curves on both the RECD and REUG graphs represent average data for the
client’s age. If no RECD or REUG data is entered, age-estimated values are used for the
quick fit calculation.
Fitting Screen
The Fitting screen allows you to configure
Element’s various features. You may select
the various fitting options from the left
navigation menu under Fitting or by hovering
over the Element menu in the center of the
screen.
Element Programming Guide
Feedback
Optimization
Screen
At the initial fitting, the first step is to run the
Feedback Optimization test to activate the
phase canceller. This test will take
approximately 15 seconds per ear.
To run the Feedback Optimization test:
1. Ensure that ambient noise is at a
minimum. If the ambient noise level is too
high during the test, U:fit will prompt you
to reduce ambient noise levels.
2. Click either the Right Ear or Left Ear
button to start the test. Test progression
can be seen on the status bar at the
bottom of the screen. To stop the test,
click Stop.
If the test ran successfully, the hearing aid’s
gain limits are updated on the graph (black line) and the phase canceller is enabled.
High ambient noise levels may affect the Feedback Optimization results. If this is the case,
you will be notified at the end of the test. You may choose to accept the results or reduce
ambient noise levels and conduct the test again.
Curve description:
Black line
Green line
Red or Blue line
Grey line
Feedback threshold (max gain achieved without feedback)
Target gain
Aided gain
Hearing instrument limit
Note: The phase canceller is not enabled until the feedback optimization test has been run.
For slim tube fittings the speech enhancement is not enabled until the feedback
optimization test has been run.
Quick Tuning Screen
The Quick Tuning screen is designed
to address the first sound impression during
a fitting. The hearing aid’s global parameters,
occlusion manager and adaptation manager,
as well as overall gain adjustments for
individual programs can be accessed from
this screen.
Note: Within the Quick Tuning screen, both
ears are linked. To unlink the two ears, click
the Link/Unlink button.
Linked:
Unlinked:
The active program is highlighted in orange.
In this case, All Programs is selected so any
changes will affect all programs
simultaneously. You may also select
individual destinations within autoPro2™ or
within the individual manual programs for
adjustment.
To adjust Overall Gain:
Use the + and – buttons to increase or decrease the overall gain of the hearing instruments.
The gain can be adjusted for each ear individually or both ears simultaneously:
Note: The Ear Link function does not apply when using the overall gain buttons.
To adjust the Global Parameters:
Adaptation Manager adjusts the initial fitting according to the client’s experience level with
hearing aids. Target (Experienced Setting), Target -4 dB, Target -7 dB and Target -10 dB
(New Wearer).
For slim tube and CRT open and closed dome fittings, the adaptation manager settings are
described in percentages: 100% (Experienced), 80%, 65% and 50% (New Wearer).
Occlusion Manager: used to make adjustments for the subjective sound quality of the
client’s own voice. There are four settings: Off, Mild, Moderate and Maximum. The default
setting is Off.
Note: Changes made to the adaptation manager or the occlusion manager will affect all
autoPro2 destinations and manual programs. Adjustments made to these controls will
automatically adjust the current settings of the hearing aids. It is not necessary to re-quick
fit the hearing aid.
Element Programming Guide
Configure Screen
In the Configure screen, you can review the
settings for all adaptive parameters and
input. These settings will automatically
default to suggested values based on the
selected autoPro2 destination or manual
program environment.
For Element 16:
Choose the program you wish to adjust by
selecting one of autoPro2’s destinations or
one of the manual programs. The active
program will be highlighted in orange. If one
of autoPro2’s destinations is linked to a
manual program, both environments will be
highlighted in orange. Changes made to one
program will also be applied to the linked
program.
For Element 8 and 4
Choose the program you wish to adjust by selecting one of the manual programs. The
active program will be highlighted in orange.
Select a Processing Strategy for each of the enabled programs from the drop-down list.
The processing strategy can be individually selected for each environment or program.
• Select the desired Phase Canceller setting.
Note: You must run the Feedback Optimization test first or the phase canceller option
will not be active.
• Select the desired Noise Reduction setting.
• Select the desired Wind Noise Manager setting.
• Select the desired antiShock™ setting.
For Element 16:
• Select the desired Speech Enhancement LD setting.
For Element 8:
• Select the desired Speech Enhancement setting.
• Select an option from the Input drop-down list.
Note: Exact choices will depend on the chosen destination or listening environment.
• For the environments that offer the Mic+Telecoil or Mic+DAI options, the balance
between the microphone and the Telecoil or DAI can be adjusted. Options are:
-12 dB, -9 dB, -6 dB, -3 dB or 0 dB.
The Configure screen also lets you manage the manual programs as well as change
environments in any of the manual programs.
To change the environment, click the drop-down list beside any of the manual programs
and select the appropriate environment.
To deactivate a manual program, select the option None from the drop-down list, starting
with the last program. P2 or P3 cannot be disabled if P4 is enabled.
To change the order of the manual programs at any time during the fitting:
1. Click Fitting on the menu bar.
2. Select Swap Programs.
3. Click the desired swap option (i.e. P2 <> P3).
Additionally U:fit allows you to copy programs from any position into any manual program
and to copy sides between left and right:
1. Click Fitting on the menu bar
2. Select Copy Programs or Copy Sides at any time during the fitting.
To rename any environment or program with a custom name, click the Customize
Environment Names icon. The menu displays the table with the original and customized
names. To enter a customized environment name click on the 3rd column and enter your
new name.
The customized names are only applicable for this fitting.
To customize environment names for all fittings:
1. Click Options from the menu bar.
2. Select Preferences.
3. Select Customize Strings and enter your choices in the table under Fitter Preferences.
4. To delete all customized names click the Clear All Custom Strings icon.
Note: If you have already customized environment names from within the Preferences
menu, these will also appear when clicking the Customize Environment Names icon. You
will still be able to customize environment names, but it would be applicable for that
particular fitting only.
5. Select the desired program from the STARTUP PROGRAM drop-down list. AutoPro2 is
the default for Element 16, AutoMic for Element 8 and Quiet/Match target for Element 4.
Element Programming Guide
Fitting Advice
Screen
The Fitting Advice screen fine tunes the
hearing aid based on the clients’ comments,
complaints and observations. The currently
active program is highlighted in orange.
Changes are only applied to the currently
selected program.
1. Select the destination or program that
needs to be modified. To apply changes
to all programs, click All Programs.
2. Select the situation which best describes
the client’s complaints. Click the + button
to view the expanded list.
3. Select the observation which best
describes the client’s complaints.
A description of the proposed change
appears in the Suggested Change field
based on your selections in the Situation and Observation fields.
To apply the suggested changes, click Right Ear Only, Left Ear Only or Both Ears and the
changes will be applied automatically.
Fine Tuning Screen
U:fit’s Fine Tuning screen modifies the hearing
aid frequency response, MPO and Compression
ratios. You may fine tune the hearing aid using
the Basic view
(one magnifying glass) or
the Advanced view
(two magnifying
glasses) for frequency response changes at all
input levels. Additionally, you can access the
Basic Control view
(one screwdriver) or
Advanced Control view
(two
screwdrivers) to adjust the MPO and CR
settings.
Depending on the Element model you selected,
some or all of the described controls may be
accessible within the Fine Tuning screen.
The Basic view groups all bands into three
predefined frequency regions: Low, Mid and
High.
The Advanced view gives access to all bands.
Six bands are shown at a time. A slider allows you to modify the frequency range covered by
the 6 controls.
To fine tune the hearing instrument:
1. Select the program you wish to fine tune. The active program will be highlighted
in orange. To fine tune all programs, select All Programs.
2. Select the desired view: Basic or Advanced.
3. Select the channels to be modified:
a. To individually group channels, click and drag a channel over to the next desired
channel(s). The selected channels will be highlighted. The individual grouping allows
for easier fine tuning.
b. To adjust channels one at a time, click the + or – button.
c. Note: If a fitting handle is at its maximum, only the – button appears.
d. If a fitting handle is at its minimum, only the + button appears.
4. For frequency response adjustments (gain/output), a range of fitting values can be
selected by either choosing a specific input level (i.e. Soft, Moderate or Loud) or a
specific channel or channel grouping (i.e. Low, Mid, or High). The highlighted area in
the graph shows you which frequency range is affected.
5. Click All to adjust all inputs and all channels.
6. Once All is selected, the highlighted section is adjusted by clicking + or – buttons.
7. To group fine tuning adjustments for MPO or compression ratio adjustments, click
MPO, CR or Gain. The affected area is highlighted in the graph. All changes can be
observed with the changed displayed values.
Only the frequencies which are currently visible in the Fine Tuning table will be modified.
Element Programming Guide
AutoPro2 / AutoMic
Controls Screen
There are two controls to adjust how
autoPro2 or autoMic responds to changes in
the environment: sensitivity control and
transition control.
Sensitivity control determines how sensitive
the hearing aids are to changes in the
environment and how rapidly the hearing
aids respond to those changes. The
sensitivity control has 5 different settings:
Low, Low to Medium, Medium (default),
Medium to High and High.
To adjust the sensitivity control:
• Move the slider towards High if you want
the hearing aid(s) to be more sensitive to
environmental changes and to decrease
detection time. AutoPro2 will switch
destinations more frequently.
• Move the slider towards Low if you want the hearing aid(s) to be less sensitive to the
environment and to increase detection times. AutoPro2 will react more slowly to
environmental changes.
Transition control will adjust how noticeable the change is from one destination to the next
when that change occurs. The transition control has 3 settings: Gradual, Normal (default)
and Instant.
Fitting Tip: If a client reports difficulty with the performance of autoPro2, it may be related
to variables other than the settings of these controls. Before adjusting these settings,
check the frequency response in each of the two destinations. There may be a significant
difference in the frequency response of one or more destinations that is causing the client
to notice the change.
Data Logging
Screen
At the initial fitting, no data logging
information will be available. When saving to
the hearing aid(s), data logging is activated
by default.
If you do not wish to have data logging
enabled:
1. Select End Fitting from the left
navigation menu.
2. Uncheck Enabled from the Data Logging
option. This will deactivate the data
logging feature and the hearing aid will
not record data. No data logging
information will be available when the
client returns for the follow-up visit.
At the Follow-up Appointment:
Data logging information can be read from the hearing aid when the client returns for the
follow-up visit.
The following steps are recommended during the follow-up visit:
1. Connect the hearing instrument to U:fit.
2. Click Read from the Hearing Instruments.
3. Click Fitting on the left navigation menu.
If data logging information is available, the Data Logging icon will flash.
To access the hearing instrument’s stored data logging information, click Data Logging on
the Fitting screen or select Data Logging from the left navigation.
Note: If new settings are saved to the hearing aid, the data logging information will be
lost. It is important to read the data logging information from the hearing aid before new
settings are saved to the hearing aid.
If you wish to print the data logging information for future reference, click Print.
If you want to save the data logging information, click Save to Database.
Element Programming Guide
Understanding the Data Logging Information:
The top of the data logging screen indicates:
• Logging Start: The date the data logging began, which represents the last
time the settings were saved to the hearing instruments.
• Hours of use: The total number of hours of use since the start date.
• Average use: The average number of hours the devices were used.
The pie chart displays the use of each autoPro2 destination or AutoMic program and each
manual program. Each color represents one of the two autoPro2 destinations. Whenever
manual programs (P2/P3/P4) are available, they are displayed as additional slices of the
pie chart.
When you hover the mouse over the pie chart, a tool tip appears, displaying the actual
settings and percentages of each program and destination. The table beside the pie chart
shows how much time the client has spent in autoPro2 (for Element 16), autoMic (for
Element 8) and the assigned manual programs.
For Element 16:
A bar graph at the bottom of the screen provides information about volume control
adjustments while the client was in autoPro2. The 0 dB line represents the ideal volume
indicator setting. Depending on the average used VC position, a bar above or below the 0
dB line indicates if the patient increased or decreased the actual volume level relative to the
ideal VC position.
The table between the volume control information bars shows the percentage of time the
client spent in each autoPro2 destination, as seen below:
Based on the recorded adjustments of the volume control settings, you can choose to
adjust the average volume control setting deviation from the ideal volume control.
The volume control changes can be applied to each autoPro2 program individually, or
simultaneously, in the Apply Indicated Changes to section.
To change the volume control settings:
1. Check the boxes beside the destinations to which volume control changes should be
applied, as seen to the right.
2. To apply the changes, click Right Ear Only, Left Ear Only or Both Ears. This will
automatically correct the overall gain to adjust for the volume control corrections in
autoPro2.
Note: The decision on which adjustments to apply should be based not only on the
recorded hearing aid data but also on discussions with the client.
End Fitting Screen
To configure the End Fitting screen:
1. Use the controls to adjust the Beep
Frequency and Beep Intensity, if required.
2. Check on or off for low battery warnings,
program beeps, ideal volume indicator
beep and OnBoard control VC beeps by
selecting and deselecting the appropriate
check boxes.
3. Select/Deselect the Data Logging
checkbox to enable/disable Data Logging.
4. Activate the Startup Delay option by
moving the slider to the appropriate
position. Choose from: No Delay, 10
seconds or 15 seconds. The default
position is No Delay.
To demonstrate the program beeps, low
battery warning, ideal volume indicator or
OnBoard control beeps, click the musical
notes in the left DEMONSTRATE BEEPS menu.
Note: If Easy-t is selected as a program, there are two different buttons to demonstrate the
signal. The first button demonstrates the signal when the client accesses the telephone
program manually. The second Easy-t button demonstrates the signal that is heard when
the telephone program activates automatically.
Save and Exit
To end the programming session and save the information to the database and the hearing
aid(s):
1. Click Exit U:fit.
2. Select either the Save or Don’t Save options.
a. If the Save option is selected, choose whether to Save to Database and/or Save to
Hearing Aid.
3. Click OK.
To save without exiting U:fit, click Save... in the bottom right corner of the End Fitting
screen. Save... closes the client record without exiting U:fit.
www.unitronhearing.com
A/07-005 028-5210-02