1
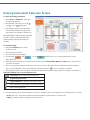
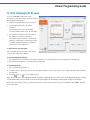
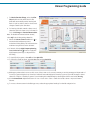
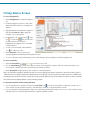
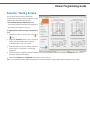
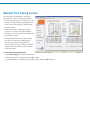
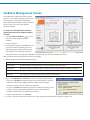
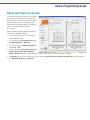
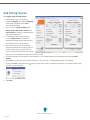
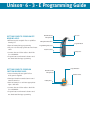
Unison 6 - 3 - E Programming Guide
™
GETTING READY TO PROGRAM BTE
HEARING AIDS:
• BTE hearing aids are Quick Fit to a 40 dB flat
hearing loss
Dual Directional
Microphones
Ear Hook
Microphone Protection
Program Button
• Remove battery during programming
• Lift port cover below program button and insert
cable
Programming Port Cover
Volume Control
Battery Door
• Connect other end of the cable to the Hi-Pro
box or NOAHlink
• Program button and manual volume control
are deactivated during programming
GETTING READY TO PROGRAM
CUSTOM HEARING AIDS:
Program Button
Dual Directional
Microphones
• Custom hearing aids are Quick Fit if an
audiogram is supplied
• Hearing aids with a manual volume control
must be turned on
• Remove battery door and insert appropriate
right or left cable
• Connect other end of the cable to the Hi-Pro
box or NOAHlink
• Program button and manual volume control
are deactivated during programming
Volume Control
Battery Door
Hearing Instrument Selection Screen
To detect the hearing instruments:
1. Select Hi-Pro or NOAHlink to select your
programming interface.
2. Beside Detect, select the icon for left
right
or both
hearing aids.
,
3. Fitting range overlays on the audiogram
indicate if the detected hearing aids are
appropriate for the degree of hearing loss.
Note: When Moda™ 10A BTE or Directional (No
VC) BTE is selected, the overlay alternates
between fitting ranges for slim tube and
earmold.
To simulate a fitting:
1. Select the Simulate button to enter
simulation mode.
2. Select the desired product.
3. Choose the desired shell style(s).
4. Click the right
appropriate ears.
, left
, or both
hearing aids icon to assign the hearing aids to the
5. Select the desired model from the product list provided. Note: The Brand, Model, Matrix and Style buttons can be used to
sort the list as needed.
6. The chosen product will appear below the product list. A note above the selected product will further indicate available
options such as WiFi Mic or slim tube availability. Use the eraser button
to remove a selection if desired.
7. Fitting range overlays on the audiogram indicate if the selected hearing aids are appropriate for the degree of hearing loss.
Select the following icons to access additional tools:
Product Spec data for the selected hearing aid
Programming Information
Support Materials for all Unitron Hearing products
Unitron Hearing’s regional office contact information
Unitron Hearing web site
8. Once the hearing aids have been detected or chosen for simulation, click on the navigation bar to the left and choose either:
• In Situ (optional) – allows pure tone threshold measurement through the Unison™ hearing aid(s).
• Fitting – proceeds directly to the fitting screens for Unison.
Unison Programming Guide
In Situ Audiogram Screen
If you chose In Situ in step 8, the in situ
audiogram screen will load and a pop-up window
will appear reminding you to:
1. Plug the vent in the hearing aid or earmold.
2. Use the appropriate earhook for BTE
products:
• Use a filtered earhook for Moda BTEs.
• Use an unfiltered earhook for all other BTEs.
3. Also be sure the hearing aids fit properly in
the client’s ear. If there is already an
audiogram saved in the Noah or Standalone
database, it will appear on the screen in grey.
The white displayed area will show the test
range for the in situ audiogram.
To perform an in situ audiogram:
The in situ audiogram can be performed in one
of two modes: Autoplay or Manual.
To use Autoplay Mode (default):
1. Move the mouse to the desired point in the audiogram (R or L) and click. The tone will be generated automatically.
2. Repeat at each frequency to obtain all desired in situ data.
To use Manual Mode:
1. Turn off the Autoplay checkbox.
2. Use the mouse to “point and click” on the audiogram display or use the drop down boxes to select the desired test frequency
and intensity.
3. Use the
icon or
icon to present the tone.
Note: To use the new In Situ audiogram data for the fitting calculation, check the box “Use In Situ audiogram for fitting”. Leaving
this checkbox blank will cause Unifit™ to revert to the original Noah (or Standalone) audiogram for the fitting calculations.
When leaving the In Situ screen, you will be prompted to save the new in situ audiogram to the database. Select OK to save the
in situ audiogram.
Quick Fit Screen
To Quick Fit the hearing instrument:
1. Select Quick Fit from the left navigation bar.
Unifit will automatically ask whether to read
the settings from the hearing aid(s).
2. Select Yes for Unifit to read the settings
stored in the Unison hearing aids or select No
for a new fitting or to load a previous fitting
stored in the database.
Note: Selecting No for a new fitting results in
Unifit automatically quick fitting to the default
settings while selecting No for previous fittings
stored in the database prompts Unifit to load
stored settings into the hearing instruments.
3. Select the appropriate setting in the User
Profile based on the client’s hearing aid
history.
4. Under Earhook (BTE fittings only), select
Filtered or Unfiltered.
5. Under Venting, select the appropriate amount for each hearing aid/earmold from the drop-down list.
Note: Occluded represents no vent with average fit and some slit leakage, while Tight represents no vent with tight fit and
virtually no slit leakage.
6. To choose the desired fitting formula, select the NL-1 or DSL icon
from the tool bar or select the desired formula
from the Formula menu. If desired, measured RECDs (NL-1 DSL) or REUGs (NL-1) can be entered into the software using the
DSL or NL-1 data entry tables to further individualize the fitting targets.
Note: The User profile, earhook, venting and formula selections will not automatically adjust the current settings of the hearing
aid(s). It is necessary to re-quick fit if any of these settings are adjusted.
Unison Programming Guide
7. For Moda slim tube fittings, select the Slim
Tube checkboxes below the User Profile.
Unifit will automatically set the Venting and
Earhook options and account for the acoustic
changes caused by the slim tubes.
8. For hearing aids with manual volume control,
select the desired volume control information
for both VC Range and Desired Reserve Gain.
Note: To disable the manual volume control,
select Off in the VC Range drop-down list.
9. Select the Volume Control Lock button
to
ensure the Desired Reserve Gain is
maintained during fitting. This will restrict the
maximum use gain that can be achieved.
10. If desired, click the High Frequency Hearing
Loss Correction Tool
button to apply the
high frequency hearing loss adjustment to
the fitting.
11. To Quick Fit all programs, select All and then Quick Fit.
12. To Quick Fit a single program, select P1, P2 or P3 and then Quick Fit.
13. Make appropriate selections across the bottom of the screen to choose environment, processing strategy and input method
for each program using the drop-down lists. Unifit will automatically Quick Fit each program as you make changes to these
selections. Enable or disable programs for each hearing aid independently by selecting the check boxes beside P2 & P3.
14. Use the Overall Gain adjustment buttons for one or both aids to raise or lower the overall volume or improve binaural
balance.
15. To move to the next screen in the fitting process, select the appropriate heading from the left navigation bar.
Fitting Advice Screen
To access Fitting Advice:
1. Select Fitting Advice from the left navigation
bar.
2. Under the Suggestions section, click on the
applicable folders until a list of suggestions
appears.
3. Highlight the desired adjustment suggestion,
then select P1, P2, P3 or All to apply the
change to one or all programs.
4. Under Apply to: choose the left ear , right
ear , or both ears
button. If the ear or
program buttons are not active or
highlighted, the suggestion is not available
for that selection.
5. To undo your last change, select the Undo
icon
from the top toolbar.
6. Select Reset All to remove all unsaved
changes applied since entering the Fitting Advice screen.
7. To move to the next screen in the fitting process, select the appropriate heading from the left navigation bar.
To access sound files:
1. Select the Sound Files
icon from the top toolbar.
2. Choose Sound Setup
to select the sounds you want to have available for fittings. The drop-down menu allows you to
choose which sound file you wish to play during your hearing aid fitting.
3. Select Play/Pause as appropriate to start or pause a sound file playback.
Note: The sound files should be calibrated so they are set to an appropriate volume. If you have a sound level meter, play the
‘Calibration noise 70 dB(A)’ file from the pull-down menu and adjust the sound level until the volume measures 70 dB(A) at the
listening position. If you do not have a sound level meter, play the ‘Male Speech’ file and adjust the volume so that it is medium
loud (normal conversational loudness) at the listening position.
To adjust the sound file volume during calibration:
1. If your computer has a soundcard, double-click the Volume icon
from the bottom taskbar to adjust the volume or go to
Control Panel > Sounds and Audio Devices > and select the Volume tab to adjust the Device Volume.
2. If your computer has external speakers, adjust the sound level by turning the volume control or go to Control Panel > Sounds
and Audio Devices > and select the Volume tab to adjust the Speaker Volume.
Unison Programming Guide
Acoustic Tuning Screen
The Acoustic Tuning screen is designed to
optimize Unison fittings if there are general sound
quality issues after the initial Quick Fit:
• Ear Canal Resonance Compensation Tool customizes the peak frequency and amplitude of
the hearing aid frequency response.
To apply the Ear Canal Resonance Compensation
Tool:
1. Mute the non-test ear by clicking on the
icon.
or
2. Adjust the Frequency slider control one step at
a time while providing a speech stimulus
to the client (live voice or recorded).
3. Determine which of the four settings the client
prefers based on subjective sound quality
judgments.
4. If further tuning is required, leave the Frequency control at the preferred setting and adjust the Amplitude slider control to
determine the preferred setting.
5. Repeat the Frequency and Amplitude adjustments on the other ear.
Note: It is recommended that adjustments with the ear canal resonance compensation tool be made one ear at a time.
Manual Fine Tuning Screen
Fine tuning allows adjustment of the output
characteristics of Unison hearing instruments.
• To view a different graph or I/O function for the
hearing aid, select the appropriate graph from
the drop-down list at the top of the frequency
response display.
• If you want to select or deselect the HFHL
correction tool, click on the High Frequency
Hearing Loss correction button and re-Quick Fit
the selected program.
• In programs with microphone + telecoil (MT),
microphone + direct audio input (M-DAI) or
microphone + WiFi transmitter (HA-Tx), a
balance slider control is provided to adjust the
output of the hearing aid microphone relative
to the other input.
To fine tune the hearing instrument:
1. Select Fine Tuning from the left navigation bar.
2. Select the program to be adjusted (i.e. P1, P2, or P3).
3. To make changes to both hearing aids simultaneously, select the Link check box.
Unison Programming Guide
4. Depending on the processing strategy selected, controls are offered for:
Parameter
Adjusts
Gain
Gain for all inputs in selected frequency region
TK
Compression threshold for selected frequency region
CR
Compression ratio for selected frequency
MPO
Maximum output of the hearing instrument
ASP strength
Amount of low frequency attenuation as input level increases
ASP range
Frequency range over which ASP strength control has effect (ASP frequency transition point)
Note: With digital WDRC processing, a Basic Fine Tuning view can be selected from the Options menu which provides Soft, Loud
and MPO fitting controls.
5. Click on the parameter to be adjusted. Your selection will appear in dark grey. To adjust the selected parameter, use the
and
buttons.
6. To re-Quick Fit the frequency response for any of the programs, select P1, P2, or P3 and then Quick Fit for either the left or
right hearing aid.
7. To move to the next screen in the fitting process, select the appropriate heading from the left navigation bar.
To conduct real ear measurements with non-speech signals:
1. Select the Real Ear Measurement mode
disabled.
icon from the top toolbar. The adaptive features of the hearing aid will be
2. Use the Manual Fine Tuning screen to make your adjustments with the adaptive features turned off.
3. After finishing adjustments, click the
icon again to disable REM mode and re-enable all adaptive features.
Feedback Management Screen
During fitting, the adaptive feedback canceller
(Unison 6, 3) is enabled by default. Even though
the client may not hear feedback during the
fitting, there may be fit-related feedback present
which is being controlled by the adaptive
feedback canceller.
To check for fit-related feedback and ensure
optimal performance of the adaptive feedback
canceller:
1. Click the Check for Feedback
button.
This turns off the adaptive feedback
canceller.
2. Listen for feedback.
3. If no feedback is present, select No and move
to the next screen in the fitting process by
selecting the appropriate heading from the
left navigation bar. If feedback is present,
instruct the client to sit quietly and select Yes to automatically start the Feedback Optimization test.
Note: The room must be quiet for the test to run successfully.
4. Review results of the Feedback Optimization test:
Curve Description
Represents:
Black curves
Programmed gain of hearing aid prior to performing feedback optimization
Blue curves
Maximum stable gain achieved without feedback when adaptive feedback canceller is disabled
Thick lines
Use-gain settings of the hearing aid
Thin lines
Full-on gain for hearing instruments with manual volume controls
5. Choose to Accept, Re-run or Cancel the results of the Feedback Optimization.
• If you choose Accept, the frequency response of the hearing aid is altered to
reflect the new response suggested by the software and the adaptive
feedback canceller will be re-enabled automatically.
• If you choose Cancel, the frequency response of the hearing aid will go back
to levels set before the Feedback Optimization test, and the adaptive
feedback canceller will be re-enabled automatically.
• If there is still feedback, choose Re-run.
6. To move to the next screen in the fitting process, select the appropriate heading from the left navigation bar.
Unison Programming Guide
Advanced Features Screen
In the Advanced Features screen you can review
the settings for Noise Reduction, Quiet Mode
Expansion, Input, and Directional Roll-Off (when
a directional microphone is selected). These
settings will automatically default to suggested
values based on the selected program
environments.
Note: If you want to apply changes to only one
ear, deselect the Link checkbox.
1. Choose the program you wish to adjust by
selecting P1, P2 or P3.
2. Choose the desired Noise Reduction setting:
Off, Mild, Moderate, or Maximum.
3. Choose the desired Quiet Mode Expansion
setting: On or Off.
4. Choose the desired Input: Omni, Directional,
Telecoil, Mic+Telecoil, DAI or DAI+Mic ,
CROS or BiCROS (exact choices will depend on actual product and the chosen listening environment).
5. If Directional is chosen as the input, you can also adjust the Directional (low frequency) Roll-Off slider. Available choices
are: Minimum, Moderate, or Maximum.
End Fitting Screen
To configure the End Fitting settings:
1. Use the slider controls to adjust the
frequency (Beep Hz) and intensity (Beep dB)
of the beeps if required. Select Test to
demonstrate the beeps.
2. Turn on or turn off program beeps, low
battery beeps, ideal volume indicator and
start up mute by selecting or deselecting the
appropriate check boxes.
3. For hearing aids with a manual volume
control, Volume Control information is
displayed: VC Range, Desired Reserve Gain,
Actual Reserve Gain, and VC Position.
4. Once the hearing aids are disconnected,
match the manual volume control position to
the VC position shown on the End Fitting
screen to achieve the desired amount of gain.
This position is indicated by the ideal volume indicator beep.
5. If desired, hearing aid serial numbers can be entered for record keeping purposes by clicking in the field under Serial
Number.
6. Select Print to print a client report, blank hearing aid order form and/or a Getting Started Guide for the wearer.
7. To exit, select Exit or the green check
aids and/or to the database.
at the top right of the screen. You will be prompted to save settings to the hearing
8. Select OK.
www.unitronhearing.com
05-009 028-5161-02