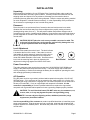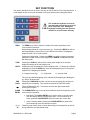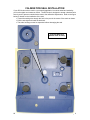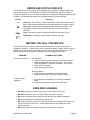
1
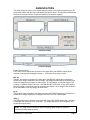
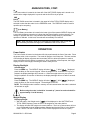
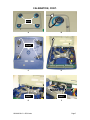
Price Computing Scale DS Series Operation Manual 8529-M635-01 Rev B 04/09 Cardinal Scale Manufacturing Co. PO BOX 151 WEBB CITY, MO 64870 PH (417) 673-4631 - FAX (417) 673-5001 www.detectoscale.com Technical Support: Ph: 866-254-8261 [email protected] 8529-M635-O1 DS-Series Printed in USA Page 1 8529-M635-O1 DS-Series Page 2 INTRODUCTION Thank you for purchasing our Detecto DS Series Price Computing Scale. Your scale has been designed to operate from 115 VAC 50/60 Hz (optional 230 VAC 50/60 Hz) or with the included rechargeable battery pack. The battery pack is able to provide 100 hours continuous operation (with backlight on) or 200 hours continuous operation (with backlight off). This manual will guide you through setup and operation of your scale. Please read it thoroughly before attempting to operate this scale and keep it handy for future reference. FCC COMPLIANCE STATEMENT WARNING! This equipment generates uses and can radiate radio frequency and if not installed and used in accordance with the instruction manual, may cause interference to radio communications. It has been tested and found to comply with the limits for a Class A computing device pursuant to Subpart J of Part 15 of FCC rules, which are designed to provide reasonable protection against such interference when operated in a commercial environment. Operation of this equipment in a residential area may cause interference in which case the user will be responsible to take whatever measures necessary to correct the interference. You may find the booklet "How to Identify and Resolve Radio TV Interference Problems" prepared by the Federal Communications Commission helpful. It is available from the U.S. Government Printing Office, Washington, D.C. 20402. Stock No. 001-000-00315-4. All rights reserved. Reproduction or use, without expressed written permission, of editorial or pictorial content, in any manner, is prohibited. No patent liability is assumed with respect to the use of the information contained herein. While every precaution has been taken in the preparation of this manual, the Seller assumes no responsibility for errors or omissions. Neither is any liability assumed for damages resulting from use of the information contained herein. All instructions and diagrams have been checked for accuracy and ease of application; however, success and safety in working with tools depend to a great extent upon the individual accuracy, skill and caution. For this reason the Seller is not able to guarantee the result of any procedure contained herein. Nor can they assume responsibility for any damage to property or injury to persons occasioned from the procedures. Persons engaging the procedures do so entirely at their own risk. Serial Number_______________________ Date of Purchase ____________________ Purchased From_____________________ PRECAUTIONS Before using this instrument, read this manual and pay special attention to all "WARNING" symbols: ___________________________________ ___________________________________ RETAIN THIS INFORMATION FOR FUTURE USE 8529-M635-O1 DS-Series IMPORTANT ELECTRICAL WARNING Page 3 TABLE OF CONTENTS INSTALLATION 1 Unpacking 1 Placement 1 Level Adjustment 1 Power Connection 1 AC Operation 1 KEY FUNCTIONS 2 ANNUNCIATORS 3 OPERATION 4 Power Switch 4 Display Backlight 4 Weight Display 4 Tare Operation 5 Normal Unit Price 5 PrePack Operation 5 Tare Operation To Obtain Net Weight 5 Metric Conversion 5 CALIBRATION 6 CALIBRATION SEAL INSTALLATION 9 ERROR AND STATUS DISPLAYS 10 BEFORE YOU CALL SERVICE 10 CARE AND CLEANING 10 SPECIFICATIONS Displays: (.75” High LCD, with backlight) Weight = 5 Digits Unit Price = 5 Digits Total Price = 6 Digits Dimensions: 11.75" W x 12.63" D x 4.25" H (298mm x 321mm x 108mm) Platform Size 11.38" W x 8.25" D (289mm x 210mm) Model DS-6 DS-12 DS-30 DS-60 Capacity and Division Value 6 lb x .002 lb (3 kg x .001 kg) 12 lb x .005 lb (6 kg .002 kg) 30 lb x .01 lb (15 kg .005 kg) 60 lb x .02 lb (30 kg .01 kg) Zero Established on power up routine and maintained by auto-zero circuitry Power Built-in rechargeable battery pack or 115 VAC 50/60Hz or 230 VAC 50/60Hz Tare 100% of full scale capacity Operating Temperature 32 ~ 104°F (0° ~ 40°C) Humidity 25% ~ 95% RH 8529-M635-O1 DS-Series Page 4 INSTALLATION Unpacking Before beginning installation of your DS Series Price Computing Scale, make certain the instrument has been received in good condition. Carefully remove the instrument from the shipping carton and inspect it for any evidence of damage (such as exterior dents or scratches) that may have taken place during shipment. Keep the carton and packing material for return shipment if it should become necessary. It is the responsibility of the purchaser to file all claims for any damages or loss incurred during transit. Placement Place the scale in an environment free of excessive dust and moisture and on a stable, vibration-free level surface away from direct sunlight and any rapidly moving air source (heating/cooling vents, fans, etc.). This will prevent sudden temperature changes and air currents that may result in unstable weight readings. Keep the area around the scale clear to provide adequate air circulation and make certain the power cord is routed out of the way of normal traffic. CAUTION! DO NOT place the scale on any unstable cart, stand or table. The scale may fall causing injury to the operator, and seriously damage the unit, or proper operation of the scale may be inhibited. Level Adjustment Check to make certain the scale is level. The level indicator is located at the front of the scale. If the scale is not level (the bubble will not be centered), loosen the locking ring on all four (4) mounting feet and adjust them as required to center the bubble and attain a level scale. Once the scale is level, lock the mounting feet in place by tightening the adjustment locking rings against the bottom of the scale. Not Leveled Leveled Power Connection The scale contains a power supply that converts the 110/120/220/240 VAC 50/60Hz wall supply to the power required by the scale circuitry. The power supply also contains the circuitry necessary to monitor and recharge the battery and is capable of operating the scale and recharging the battery simultaneously. AC Operation Plug the power cord into a grounded, polarized wall receptacle that supplies 110/120 VAC 50/60Hz power. If it is necessary to use an extension cord, make certain it is a 3-wire, fully grounded type using a minimum of 18-gauge wire. Be certain the power cord is routed out of the way of normal traffic. If only an ungrounded wall receptacle is available, it is the customer's responsibility to contact a qualified electrician to replace the ungrounded receptacle with a grounded wall receptacle or have a grounding adapter properly installed. CAUTION! To avoid electrical hazard, DO NOT under any circumstances, cut, remove, alter, or in any way bypass the power cord-grounding prong. NOTE! In areas subject to lightning strikes, additional protection (surge suppressors) should be installed. It is the responsibility of the customer to contact a qualified electrician to install the proper power cord connector. Plug the power cord into a grounded, polarized wall receptacle that supplies 220/240 VAC 50/60Hz power. Be certain the power cord is routed out of the way of normal traffic. 8529-M635-O1 DS-Series Page 1 KEY FUNCTIONS This section describes the use of each of the keys on the DS Series Price Computing Scale. It will be helpful to refer to the scale keyboard or the figure below when reading this section. The membrane keyboard is not to be operated with pointed objects (pencils, pens, fingernails, etc). Damage to keyboard resulting from this practice will NOT be covered under warranty. ZERO The ZERO key is used to perform a variety of functions depending on the current mode of operation: Weight Display Mode (lb or kg annunciator on): Pressing the ZERO key will set the weight display to zero and turn on the ZERO annunciator if the displayed weight is within ± 2% of scale capacity. Operational Setup Mode: Pressing the ZERO key and then pressing the setup parameter number on the numeric keypad while CENTR is displayed will enter that setup mode. TARE Pressing the TARE key will store the current gross weight as the new tare weight and change to the net weight mode. UNITS Pressing this key will display the current weighing units. To change to a different weighing unit, press the UNITS key, then the corresponding key on the numeric keypad for the weighing unit desired. 1 = kilogram mode (kg) 2 = 100g mode 3 = pounds mode The currently selected weighing unit is indicated by illuminating and blinking the kg, 100g or lb annunciator. PRE PACK CLEAR ENTRY 0~9 00 Pressing the PREPACK key after unit price is entered retains the unit price for repetitive price computing. Tare entries are retained in PREPACK mode. This is the Backspace key. It is used to clear the last digit entered when entering the unit price. The CLEAR ENTRY key is used to perform different functions depending on the current mode of operation: Data Entry: The CLEAR ENTRY key is used to clear an incorrect entry from the display without processing the data. If an incorrect entry is made, press the CLEAR ENTRY key and re-enter the correct data. Price Computing Mode: Pressing the CLEAR ENTRY key while in the price-computing mode will clear the unit price. These keys are used to enter numeric data during normal operations as well as during calibration and operational setup. 8529-M635-O1 DS-Series Page 2 ANNUNCIATORS The annunciators are turned on to indicate that the scale is in the mode corresponding to the annunciator label or that the status indicated by the label is active. The following describes the functions of each annunciator on both the operator and customer displays. Operator Display Customer Display Z (Center-of-Zero) The Center-of-Zero annunciator is located in the upper left of the WEIGHT display and is selected to indicate that the weight is within +/- 1/4 division of the center of zero. NET The NET annunciator is located in the lower left of the WEIGHT display and is selected to show that the weight displayed is the net weight. Net weight is determined by subtracting the stored tare weight from the gross or scale weight. The tare weight, usually the weight of the container, is entered using the tare key. Note that the NET annunciator is only active when a zero tare weight or tare weight value is stored and the display is in the weight mode as shown by the illumination of the kg, 100g or lb annunciator. kg The kg annunciator is located in the upper left of the UNIT PRICE display and is turned on to show that the weight displayed is in kilograms and the Unit Price is per kilogram. 100g The 100g annunciator is located in the middle left of the UNIT PRICE display and is turned on to show that the Unit Price is per 100 grams. The weight displayed is still in kilograms, only the Unit Price is per 100g. NOTE! The 100g mode is commonly used for weighing lighter weight or expensive products like flower seeds or caviar. 8529-M635-O1 DS-Series Page 3 ANNUNCIATORS, CONT. lb The lb annunciator is located in the lower left of the UNIT PRICE display and is turned on to show that the weight displayed is in pounds and the Unit Price is per pound. PRE PACK The PRE PACK annunciator is located in the upper left of the TOTAL PRICE display and is selected to show that the scale is in the PREPACK mode. The PREPACK mode is used for repetitive price computing. (Low Battery) The Low Battery annunciator is located in the lower right of the operator WEIGHT display and is used with the battery operation to indicate that the internal battery requires charging. No change in operation will occur until just before the battery voltage drops to a level where operation is affected. At this level, the scale will automatically turn itself off. NOTE! When the battery needs to be recharged, the CHARGING LED will turn Red. After the battery has been recharged, the CHARGING LED will turn Green. OPERATION Power Switch The Power Switch is located on the bottom left side panel towards the front of the scale. Place the power switch in the on position. The scale will perform a brief lamp test. This test consists of illuminating all display segments and annunciator LED's to allow the operator to make a visual verification that the display is operational. After completion of the lamp test, the weight display will show zero weight, indicating the scale is ready for use. Display Backlight Auto Backlight Press the ZERO key. The WEIGHT display will show [ CENTR ]. With [ CENTR ] displayed, press the 4 key on the numeric keypad. When the weight is over 10 divisions or any key is pressed, the display backlight will be turned on. When the weight returns to zero or the weight on platform is less than 10 divisions, the display backlight will turn off after 5 seconds. Backlight Off Press the ZERO key. The WEIGHT display will show [ CENTR ]. With [ CENTR ] displayed, press the 5 key on the numeric keypad. The backlight will be OFF. NOTE! The backlight mode is stored in memory and will restored when the scale is switched off and back on again. Before using the scale, it should be “warmed up” (turned on and unloaded for approximately 15 to 20 minutes). Weight Display Displaying Weight 1. With the scale in the Weight mode ( [ )00 ] will be displayed on the UNIT PRICE and TOTAL PRICE displays), place the item to be weighed on the scale platform. 2. The display will show the weight on the scale platform. The lb or kg annunciators will turn on to indicate which unit of weight has been selected and that the scale is in the Weight mode. NOTE! The UNIT PRICE and TOTAL PRICE displays will remain at 0 (zero). 8529-M635-O1 DS-Series Page 4 OPERATION, CONT. Zero the Weight Display 1. With the scale in the Weight mode ( [ )00 ] will be displayed on the Unit Price and Total Price displays), press the ZERO key. 2. The Weight display will show [ CENTR ]. 3. The weight display will return to zero. The ZERO annunciator will illuminate, indicating a center-of-zero gross weight condition. Tare Operation 1. With the scale in the Weight mode ( [ )00 ] is displayed on all displays), place the empty container on the scale platform. 2. Press the TARE key. The weight display will change to zero and the NET and ZERO annunciators will illuminate, indicating center-of-zero net weight is being displayed. The empty container's weight has been entered as "tare weight". To Clear the Tare To return to a zero tare, simply remove all material from the scale platform and press the TARE key, which will reset the tare weight to zero and return the scale to a center-of-zero gross weight condition. Normal Unit Price 1. 2. 3. 4. Place commodity on scale. Key in unit price (max. 99.99) per pound or kilogram. Read total weight and total price. Remove commodity. Scale will return to zero, ready for next operation. PrePack Operation For repetitive price-computing of commodities with the same unit price: 1. Enter tare if so desired as outlined in Tare Operation. Tare entry will be retained in PREPACK mode. 2. Enter unit price (max. 99.99) and press the PREPACK key. The PREPACK annunciator will illuminate. 3. Place commodities on scale and proceed with operation. 4. When the prepacking operation is ended, press the PREPACK key to clear unit price and turn off PREPACK mode. Tare will then clear automatically. Tare Operation to Obtain Net Weight 1. 2. 3. 4. 5. 6. 7. 8. 9. Place empty container on scale. Press the TARE key. The WEIGHT display will change to zero and the Net weight annunciator will illuminate. Key in unit price (max. 99.99). Place commodity in container. Net weight of commodity will be displayed. Read net weight and total price. Remove container and commodity from scale. Scale will return to zero and clear tare and unit price information. Scale is ready for next operation. Metric Conversion To change weighing units, press the UNITS key, then press the corresponding key on the numeric keypad for the desired weighing unit. 1 = kilogram mode (kg) - Unit Price is per kg 2 = 100g mode (Weight displayed is in kilograms, only the Unit Price is per 100 grams). 3 = pounds mode (lb) - Unit Price is per lb The currently selected weighing unit is indicated by illuminating and blinking the kg, 100g or lb annunciator. 8529-M635-O1 DS-Series Page 5 CALIBRATION Your DS Series Price Computing Scale was calibrated at the factory and should not require adjustment. In the event that the scale should need recalibration, the following describes the Calibration of the DS Series Price Computing Scale. A qualified technician should perform this function to maintain the instrument's high degree of accuracy. Before beginning calibration, the following equipment is required: Calibration test weights: DS6 = 6 lb DS12 = 12 lb DS30 = 30 lb DS60 = 60 lb No. 1 Phillips screwdriver to remove housing screws 1/8 or 3/16 slotted screwdriver (to change calibration switch position) If sealing wires require breaking for purposes of calibration, proper procedures covered under the National Institute of Standards and Technology Handbook 44 must be adhered to. Change Calibration Switch to Calibrate Position Referring to the pictures on the next page, perform the following steps: 1. With the scale power OFF, remove the commodity tray and set it aside. NOTE! If you are operating the scale using AC power, remove the AC power cord also. 2. Referring to pictures “A” and “B”, remove the 4 blue dust shields from the weighbridge posts and turn the scale upside down 3. Using picture “C” as a guide, locate the 4 screws securing the top housing to the bottom housing and remove the screws. 4. Grasping the scale so that you can hold the 2 housings together, turn the scale right side up and with the rear display towards you. 5. Referring to picture “D”, lift the top housing off the bottom and tip the rear of it forward (away from you). To avoid damaging the keypad cable, only lift the housing up enough to clear the internal components. 6. While holding the top housing up with one hand, locate the calibration switch on the front PC board. To locate the calibration switch, look for the black plastic portion of the calibration switch as shown in picture “E”. 7. Referring to picture “F”, use the 1/8 or 3/16 slotted screwdriver to slide the calibration switch to the Calibrate position. NOTE! A slight clicking noise can be heard when the switch position is changed. 8. Lower the top housing onto the lower housing then rotate the scale to the normal position (keypad facing you). 9. If using AC power, grasp the scale so that you can hold the 2 housings together and insert the power cord. 10. Place the commodity tray on the scale. 11. The scale is now ready for setup and calibration. 8529-M635-O1 DS-Series Page 6 CALIBRATION, CONT. Dust Shields A B Housing Screws C D Calibrate Normal Calibration Switch Calibration Switch E F 8529-M635-O1 DS-Series Page 7 CALIBRATION, CONT. To Begin Calibration 1. While holding down the Hidden key, turn the power to the scale ON. The scale will perform a brief lamp test. 2. When the WEIGHT display shows [ f 0 ], release the Hidden key. 3. Press the TARE key until the WEIGHT display shows [ f 3.]. The UNIT PRICE display will show [ GJEit ] and the TOTAL PRICE will show [ CAL ]. Hidden Key 4. Press the 0 key on the numeric keypad. The WEIGHT display will start to flash [ )000 ]. 5. Make certain the commodity tray is empty, and press the Hidden key. 6. The Weight display will start to flash the amount of weight to use. For example, a DS12 requires 12 lb, therefore the Weight display will flash [ 1@000 ]. 7. Place the weight on the commodity tray. 8. When the scale is stable, press the Hidden key. 9. After a few seconds, the WEIGHT display will show [ CAl ] and the UNIT PRICE display will show [ done ]. 10. The scale will then begin a lamp test. While the scale is counting back to zero, remove the weights from the scale. 11. The Calibration procedure is finished. Change Calibration Switch to Normal Position Referring to the pictures on the previous page, perform the following steps: 1. Turn the scale power OFF, remove the commodity tray and set it aside. NOTE! If you are operating the scale using AC power, grasp the scale so that you can hold the 2 housings together and remove the AC power cord also. 2. Turn the scale so that the rear display is towards you. Referring to picture “D”, lift the top housing off the bottom and tip the rear of it forward (away from you). To avoid damaging the keypad cable, only lift the housing up enough to clear the internal components. 3. While holding the top housing up with one hand, locate the calibration switch on the front PC board. To locate the calibration switch, look for the black plastic portion of the calibration switch as shown in picture “E”. 4. Referring to picture “F”, use the 1/8 or 3/16 slotted screwdriver to slide the calibration switch to the Normal position. NOTE! A slight clicking noise can be heard when the switch position is changed. 5. Lower the top housing onto the lower housing. 6. Grasping the scale so that you can hold the 2 housings together, turn the scale up side down and with the rear display towards you. 7. Referring to picture “C” for the hole locations, reinstall the 4 screws securing the top housing to the bottom housing. 8. Turn the scale right side up, and then rotate it to the normal position (keypad facing you). 9. Install the 4 blue dust shields around the weighbridge posts, and then place the commodity tray on the scale. See picture “A”. 10. The scale is now ready for normal operation. 8529-M635-O1 DS-Series Page 8 CALIBRATION SEAL INSTALLATION If your DS Series scale is used in a commercial application it must be tested and sealed by your local weights and measures official. The DS Series is designed to accept a lead and wire security seal to prevent unauthorized access to the calibration adjustments. Refer to the figure below for details on the installation of the seal. Thread the sealing wire through the hole in the post in the center of the scale as shown. Pull the wire tight and install the lead seal. The scale housings cannot be separated without damaging the seal. Lead and Wire Seal (Bottom View of Scale) 8529-M635-O1 DS-Series Page 9 ERROR AND STATUS DISPLAYS The DS Series Price Computing Scale is equipped with a diagnostic software program that tests various portions of the instrument's circuitry and verifies proper operation. Should a problem be detected, an error or status message will be displayed alerting the operator to that condition. The following lists these errors and status displays and their meaning: Display Meaning Left Arrow - This symbol is used by the scale to indicate which annunciator is active. Note that this applies to the annunciator labels on the display overlay. --OL- CENTR Over Load - Indicates the scale weight capacity has been exceeded. The error beeper will also sound on and off until the Over Load condition is corrected. Centr - Indicates the scale is resetting the weight on the scale to zero. Low Battery - Indicates the internal battery requires charging. BEFORE YOU CALL FOR SERVICE Your DS Series Price Computing Scale has been designed to provide you with years of trouble-free operation. In spite of this, troubles sometimes happen. Before calling for service assistance you should make some initial checks to verify that a problem does exist. The following describes several types of symptoms along with suggested remedies. PROBLEM Display does not turn on POSSIBLE SOLUTIONS AC Operation: Is the AC power cord fully inserted into the wall receptacle? Check wall receptacle for proper AC power. Try another electrical appliance in the same receptacle. Does it work? Check the circuit breaker. Has there been power failure Battery operation: Check if battery is installed and installed correctly. Is battery discharged? Recharge or replace battery. Incorrect weight displayed Insure that the scale platform isn't touching an adjacent object. Have proper operation procedures been followed? CARE AND CLEANING DO NOT submerge the scale in water, pour or spray water directly on it. DO NOT use acetone, thinner or other volatile solvents for cleaning. DO clean the indicator with a damp soft cloth and mild non-abrasive detergent. DO remove power before cleaning with a damp cloth. DO clean and store the scale in a plastic bag (in a dry environment) if the scale is not going to be used for some time. A desiccant packet may be included to prevent moisture build up. DO recharge the internal battery every three months while in storage. 8529-M635-O1 DS-Series Page 10 8529-M635-O1 DS-Series Page 11 8529-M635-O1 DS-Series Page 12