1
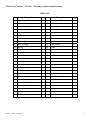
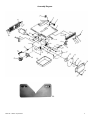
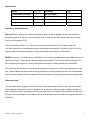
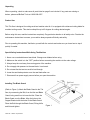
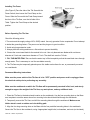
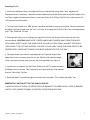
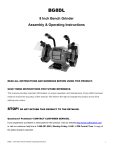
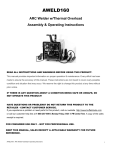
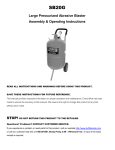
TCUT7UL
7” Bench Top Tile Saw
Assembly & Operating Instructions
READ ALL INSTRUCTIONS AND WARNINGS BEFORE USING THIS PRODUCT.
This manual provides important information on proper operation and maintenance. Every effort has been made to
ensure the accuracy of this manual. We reserve the right to change this product at any time without prior notice.
STOP!
DO NOT RETURN THIS PRODUCT TO THE RETAILER.
Questions? Problems? CONTACT BUFFALO TOOLS.
If you experience a problem or need parts for this product, visit our website http://www.buffalotools.com or call
our customer help line at 1-800-568-6657, Monday-Friday, 8 AM - 4 PM Central Time. A copy of the sales
receipt is required.
070914
7” Bench Top Tile Saw
TCUT7UL
Assembly and Operating Instructions
PARTS LIST
No.
Description
Qty
No.
Description
Qty
1
Base
1
27
Lower Blade Plate
1
2
Nut
1
28
Screw
4
3
Blade Guard
1
29
Spring Washer
4
4
Support Bracket
1
30
Washer
6
5
Bolt
1
31
Plate
1
6
Table
1
32
Nut
1
7
Clamp Rod
1
33
Frame
1
8
Square Spacer
1
34
Screw
2
9
Moving Clamp
1
35
Carry Handle
1
10
Spring
1
36
Screw
2
11
Square Spacer
1
37
Cord Storage
2
12
Hex Screw
2
38
Nut
2
13
Washer
2
39
Adjustment Knob
2
14
Fence
1
40
Bolt
2
15
Fixed Clamp
1
41
Motor
1
16
Flat Washer
1
42
Screw
6
17
Connection Bolt
1
43
Frame
1
18
Cotter Pin
1
44
Star Washer
4
19
Clamp Lever
1
45
Strain Relief
1
20
Screw
2
46
Power Cord & Plug
1
21
Washer
8
47
Power Switch
1
22
Outer Blade Guard
1
48
Plate
1
23
Nut
1
49
Water Tray
1
24
Flange Cap
1
50
Angle Guide
1
25
Blade
1
Hexagonal Wrench
1
26
Flange Seat
1
Arbor Shaft Wrench
1
TCUT7UL 7” Bench Top Tile Saw
2
Assembly Diagram
50
TCUT7UL 7” Bench Top Tile Saw
3
COMMON SENSE AND CAUTION ARE FACTORS WHICH CANNOT BE BUILT INTO ANY PRODUCT.
THESE FACTORS MUST BE SUPPLIED BY THE OPERATOR. PLEASE REMEMBER:
1. Keep the work area clean. A cluttered work area may cause accidents. Make sure the work area is well lit.
2. Never use tools near flammable liquids or gasses.
3. Prevent electrical shock. Keep the power cord away from heat, oil, and sharp edges. Do not operate if
power cord is frayed or damaged.
4. Never allow children to operate tools without responsible adult supervision. When operating this tool,
keep children at a safe distance from the work area.
5. Store tools in a safe place. Tools that are not being used must be stored in a secure dry place. The
storage area should be lockable and out of the reach of children.
6. Do not force tile into the cutting blade. This machine performs better and safer at the rate for which it was
designed. Damage caused by forcing the tool is not covered by the warranty.
7. Use a tool designed for the job being performed. Do not use low-powered tools for heavy-duty
operations. Never use the machine for other than its intended purpose.
8. Wear suitable clothing. Do not wear loose clothing or jewelry. They may get caught in moving parts. Never
wear rings with protruding parts. Wear a hat over long hair. Wear rubber footwear.
9. Always wear safety goggles and ear protection when using the machine. Wear a dust mask when the
work is dusty.
10. Never carry the tool by the power cord. Do not pull the power cord to remove the plug from sockets.
Keep the power cord away from heat, oil and sharp edges.
11. Never hold small pieces of tile with your hand. Always use a jigs, push stick or pliers.
12. Do not reach over the cutter while tool is active. Be sure of your footing and balance at all times.
13. Maintain the tool with care. This tool works best and safest if it is kept clean. Observe the instructions for
maintenance and changing accessories. Keep the tool dry and free of oil and grease.
14. Disconnect the machine when you are not using it, before cleaning it and when changing accessories
or parts.
15. Before starting the machine, be sure to remove wrenches and other tools.
16. Never move the machine while it is plugged into an electrical outlet. Make sure the switch is in the
“OFF” position when the power cord is plugged-in.
17. When working outdoors, use extension cords marked and rated for outdoor use. When using
machines with a ground connection, an extension cord with a grounded connection should be used and
connected to a grounded outlet.
18. Stay alert. Do not use tools when impaired by medicine, drugs, or alcohol. Watch what you are doing and
use common sense for your safety.
TCUT7UL 7” Bench Top Tile Saw
4
19. Before starting the machine check that all safety devices and parts operate smoothly and
efficiently. Make sure that all moving parts are in good working order. Check the machine for any broken
parts. Make sure all parts are fitted properly and any other conditions that might affect the proper functioning of
the machine are correct. If not stated otherwise in this manual, damaged safety devices, switches and machine
parts must be repaired or replaced by a recognized service center. Do not use the machine when it cannot be
switched on or off.
20. For your own safety, use only accessories recommended in this manual.
21. Tool service must be performed by qualified repair personnel. Service or maintenance performed by
unqualified personnel could result in a risk or injury.
22. When servicing a tool, use only identical replacement parts. Use of unauthorized parts or failure to
follow maintenance instructions may create a risk of electric shock or injury.
23. Never attempt to remove material stuck in the moving parts of the Tile Saw while the tool is turned
on, plugged in, or running.
24. Make sure the Tile Saw is located on a flat, level, sturdy surface capable of supporting the weight of
the Tile Saw.
25. Use the Tile Saw only for cutting ceramic tile, quarry tile, marble, terra cotta, and slate with a maximum
thickness on 1 inch, Never use the Tile Saw to cut metal or curves.
26. Before using the Tile Saw, make sure the blade is properly mounted, balanced and not cracked or
bent.
27. The blade will become hot while cutting. Allow the blade to cool completely before handling.
28. Allow the blade to spin to full speed before feeding a work piece into it. When turning off the Tile Saw
allow the blade to spin down and stop on its own. Do not press against the bade to stop it from spinning.
29. Never attempt to cut freehand. Make sure the tile to be cut is pressed firmly against the fence.
30. Always arrange a drip loop in the power cord connecting the Tile Saw to a 120 Volt, grounded,
electrical outlet. A drip loop is that part of the power cord below the level of the outlet, (or the connector if
using an extension cord), to prevent water from traveling along the power cord and coming in contact with the
outlet. If the power plug or electrical outlet does become wet, do not unplug the power cord. Disconnect the
fuse or circuit breaker that supplies power to the outlet. Then unplug and examine the outlet for presence of
water in the outlet.
31. Stand on a dry, insulated surface such as a rubber mat while using the Tile Saw.
IF THERE IS ANY QUESTION ABOUT A CONDITION BEING SAFE OR UNSAFE, DO NOT OPERATE THE
TILE SAW!
SAVE THE RECEIPT, WARRANTY AND THESE INSTRUCTIONS. IT IS IMPORTANT THAT YOU READ
THE ENTIRE MANUAL TO BECOME FAMILIAR WITH THIS PRODUCT BEFORE YOU BEGIN USING IT.
TCUT7UL 7” Bench Top Tile Saw
5
Specifications
Model
TCUT7UL
Frequency
60Hz
Current Draw Full Load
3.75amp
No Load Speed
3600rpm
Current Draw No Load
1.35amp
Motor Isolation Class
Type B
Input Voltage
120V
Maximum Cutting Height
1.34”
Weight
32 LBS
Work Table Dimensions
15 1/2” x 15 1/8”
Grounding / Voltage Warning
Warning: Before using this tool, make sure that the power cord will be plugged into an outlet which has a
three-prong ground, is 120V AC, and is protected by a 15 Amp. Be sure the circuit breaker has a Ground
Fault Circuit Interrupter (GFCI).
Common household current is 110-120V. As long as the outlet used with the Tile Saw is rated from
110-120V there will be no complications using it with household receptacles. Plug the tool into a 110-120V
properly grounded outlet protected by a 15 Amp, dual element time delay or circuit breaker.
NEVER try to plug a 110-120V tool into a 220-240V circuit, or serious complications and possible injury to the
operator may occur. The plugs have different shapes to prevent this. This tool has a three-prong plug. The
third round prong is the ground. Cutting off the ground will result in a safety hazard and void warranty.
If the outlet you are planning to use is the two-prong type, do not remove or alter the grounding prong in any
way. Use an adapter and always connect the ground plug to a known grounding source. It is recommended
that you have a qualified electrician replace the two-prong outlet with a properly grounded three-prong outlet.
Extension Cords
Your tool has a three-prong plug; therefore you must use a three-prong extension cord. Only use rounded
jacket extension cords listed by the UL. Improper use of extension cords may cause inefficient operation of
your tool that can result in overheating. Be sure your extension cord is rated to allow sufficient current flow to
the motor. If you are using the tool outdoors, use an extension cord rated for outdoor use (signified by "WA" on
the jacket).
TCUT7UL 7” Bench Top Tile Saw
6
Unpacking
When unpacking, check to make sure all parts listed on page 2 are included. If any parts are missing or
broken, please call Buffalo Tools at 1-800-568-6657.
Product Use
This Tile Saw is designed for cutting small and medium size tile. It is equipped with a diamond cutting blade for
excellent cutting results. This steel worktop tilts up to 45 degrees for cutting desired angles.
Before using this saw, read the instructions completely. Pay particular attention to all safety rules. Practice the
maintenance instructions to ensure your machine always operate efficiently and safely.
Prior to operating this machine, familiarize yourself with the controls and make sure you know how to stop it
quickly if needed.
Special Safety Instructions While Using The Machine
1. Never use a cracked diamond saw blade. Change worn blades before using.
2. Make sure the switch is in the "OFF” position before connecting the machine to the main voltage.
3. Always keep the cord away from moving parts of the machine.
4. Do not apply side-pressure to the saw blade. It can break.
5. Do not saw tiles that are too small to lead through.
6. Lower the saw blade protector over the saw blade after use.
7. Disconnect from power supply source before you open the machine.
Installing The Blade Guard
(Refer to Figure 1) Attach the Blade Guard to the Tile
Saw, by unscrewing the Bolt, from the Nut and Blade
Guard, being careful not to loose the Nut. Place the
Blade Guard over the Blade. Align the hole on the
Support Bracket with the holes on the Blade Guard.
Place the Bolt through the Blade Guard, Riving Knife,
and Nut and tighten.
TCUT7UL 7” Bench Top Tile Saw
Figure 1
7
Installing The Fence
(See Figure 2) Face the side of the Tile Saw with the
Power Switch, then loosen the Fixed Clamp on the
Fence. Slide the Fence with the Fixed Clamp toward
the front of the Tile Saw, over the left side of the
Table. Tighten the Fixed Clamp at the desired
position.
Figure 2
Before Operating The Tile Saw
Check the following points:
1.The motor and the supply voltage 120V, 60HZ) match. Use only grounded 3 wire receptacles. Do not attempt
to defeat the grounding feature. The power cord and the plug are in good condition.
2. Avoid using long extension cords.
3. Always place the cutting machine on a flat surface to prevent instability.
4. Choose the correct saw blade for the material to be cut. Use only diamond saw blades with a minimum
diameter of 6 inch and a maximum diameter of 7 inch. The shaft hole must be 7/8 inch.
5. FILL THE WATER TRAY. Be sure that the water tray is filled completely so that the saw blade turns through
enough water. This is necessary to cool the saw blade correctly.
6. The Tile Saw may be temporarily placed upon a flat, stable work surface for use, or permanently mounted
on a workbench.
Permanent Mounting Instructions
Make sure the power switch of the Tile Saw is in its "OFF" position and power cord is unplugged from
the electrical outlet prior to performing any assembly.
Make sure the workbench on which the Tile Saw will be permanently mounted is flat, level, and sturdy
enough to support the weight of the Tile Saw, any work pieces, and any additional tools.
1. Place the Tile Saw in the desired work location on the workbench. Use the four mounting slots on the Base
as a template to mark the areas where four mounting holes should be drilled through the workbench.
2. Temporarily remove the Tile Saw, and drill four mounting holes through the workbench. Make sure no
hidden electric cords or cables are in the drilling path.
3. Align the four long-mounting slots on the Base with the four predrilled mounting holes in the workbench.
Secure the Tile Saw to the workbench, using 4 appropriate length bolts, lock washers, and nuts (not included).
TCUT7UL 7” Bench Top Tile Saw
8
Preparing To Cut
1. Loosen the Adjustment Knob, and adjust the Fence to the desired cutting width. Then, retighten the
Adjustment Knob. If necessary, loosen the second Adjustment Knob and tilt the Table to adjust the angle of the
cut. Then, retighten the Adjustment Knob. Connect the Power Cord & Plug of the Tile Saw to the nearest 120
volt, grounded, electrical outlet.
2. Turn the Power Switch to its "ON" position, and allow the Blade to spin up to full speed. Check to make sure
the Blade is picking up water from the Tray. If not, turn off & unplug the Tile Saw, fill the Tray to the appropriate
level. Then, restart the Tile Saw.
3. Place the work piece you are cutting firmly against the Fence, and slowly feed the work piece into the
revolving Blade. CAUTION! MAKE SURE TO KEEP HANDS AND FINGERS AWAY FROM THE BLADE.
ALSO, MAKE SURE TO HOLD THE WORK PIECE YOU ARE CUTTING FIRMLY AGAINST THE FENCE
THROUGHOUT THE CUTTING PROCESS. FAILURE TO DO SO MAY CAUSE THE WORK PIECE TO BE
PROPELLED BY THE BLADE TOWARD YOUR BODY AND/OR INTO THE TILE SAW.
4. The Angle Guide is provided to make diagonal cuts. Place the Angle Guide
against the Fence to create a guide for your tile. Place the tile inside the Angle
Guide, and slowly feed the work piece into the revolving Blade. See Figure 3.
4. Once the cut is complete, turn the Power Switch to its "OFF" position and allow
Figure 3
the Blade to stop on its own. Then, remove the work piece and any scrap material
from the Table of the Tile Saw.
5. Empty the Water Tray and thoroughly rinse with clean, cold water. Then, replace the Water Tray.
IMMEDIATELY SWITCH OFF THE TILE SAW IN CASE OF:
1) MALFUNCTION OF THE PLUG, RECEPTACLE OR DAMAGE TO POWER SUPPLY CORD, 2) BROKEN
SWITCH, OR 3) SMOKE OR SMELL CAUSED BY SCORCHED INSULATION.
TCUT7UL 7” Bench Top Tile Saw
9
Maintenance
CAUTION! Before maintaining and cleaning the machine, disconnect the power supply cord from the
receptacle. Clean with a damp cloth, vacuum or compressed air. Never use water or other corrosive liquids to
clean electrical parts of the machine. Keep the ventilation slots of the cutting machine clean to prevent
overheating of the motor. Store the Tile Saw in a safe, clean, dry location out of reach of children. Tool service
must be performed by qualified repair personnel. Service or maintenance performed by unqualified personnel
could result in injury. Use only identical replacement parts. Use of unauthorized parts or failure to follow
maintenance instructions may create a risk of electric shock or injury.
Trouble Shooting
The cool ventilation slots in the motor are blocked with
The motor gets too hot.
dirt. Clean the cool ventilation slots.
Check power supply cord connection.
The Tile Saw does not work.
Check circuit breaker for power line.
Check the power switch.
Replacing The Saw Blade
YOU WILL NEED A #1 PHILLIPS SCREWDRIVER. Two wrenches are
included for changing the Saw Blade. If the provided wrenches are
unavailable, use an 18MM (7/10”) open ended wrench, and a 6”
adjustable wrench.
CAUTION! Disconnect the power supply cord from the receptacle.
Figure A
1. Remove the Water Tray.
2. Use a #1 Phillips screwdriver to remove the Blade Protection Box to
expose the 18mm (7/10”) Arbor Nut.
3. Place the provided hexagonal wrench on the Nut, then place the smaller
wrench on the tip of the Arbor Shaft. See Figure A.
IF NOT USING PROVIDED TOOLS: Grip the Nut with the 18mm (7/10”) openended wrench. Then grip the tip of the Arbor Shaft with the adjustable wrench.
4. While holding the Arbor Shaft firm, loosen the nut by turning the wrench in a
counter-clockwise direction
Figure B
5. Remove the Nut and the Flange Cap (Figure B).
6. Remove the worn Blade and replace with a new Blade.
7. Replace the Flange Cap, paying attention to the rotating direction.
8. Install and tighten the Nut.
9. Replace the Blade Protection Box.
TCUT7UL 7” Bench Top Tile Saw
10
TCUT7UL 7” Bench Top Tile Saw
11