1
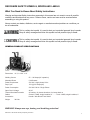
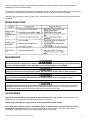
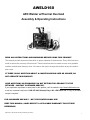
AWELD160
ARC Welder w/Thermal Overload
Assembly & Operating Instructions
READ ALL INSTRUCTIONS AND WARNINGS BEFORE USING THIS PRODUCT.
This manual provides important information on proper operation & maintenance. Every effort has been
made to ensure the accuracy of this manual. These instructions are not meant to cover every possible
condition and situation that may occur. We reserve the right to change this product at any time without
prior notice.
IF THERE IS ANY QUESTION ABOUT A CONDITION BEING SAFE OR UNSAFE, DO
NOT OPERATE THIS PRODUCT!
HAVE QUESTIONS OR PROBLEMS? DO NOT RETURN THIS PRODUCT TO THE
RETAILER - CONTACT CUSTOMER SERVICE.
If you experience a problem or need parts for this product, visit our website http://www.buffalotools.com
or call our customer help line at 1-888-287-6981, Monday-Friday, 8 AM - 4 PM Central Time. A copy of the sales
receipt is required.
FOR CONSUMER USE ONLY – NOT FOR PROFESSIONAL USE.
KEEP THIS MANUAL, SALES RECEIPT & APPLICABLE WARRANTY FOR FUTURE
REFERENCE.
AWELD160 ARC Welder Assembly & Operating Instructions
1
RECOGNIZE SAFETY SYMBOLS, WORDS AND LABELS
What You Need to Know About Safety Instructions
Warning and Important Safety Instructions appearing in this manual are not meant to cover all possible
conditions and situations that may occur. Common sense, caution and care must be exercised when
assembling or using this product.
Always contact your dealer, distributor, service agent or manufacturer about problems or conditions you
do not understand.
This is a safety alert symbol. It is used to alert you to potential personal injury hazards.
Obey all safety messages that follow this symbol to avoid possible injury or death.
This is a safety alert symbol. It is used to alert you to potential personal injury hazards.
Obey all safety messages that follow this symbol to avoid possible injury or death.
GENERAL PRODUCT SPECIFICATIONS
Dimensions
14 ½” x 9 3/4” x 10”
Welding Current
55 ~ 160 Amps (AC operation)
Absorbed Power
Power Requirement
Duty Cycle
5.4 Kilowatts
230 VAC, single phase, 60 hz
10% @ 160 Amps (AC)
Power Consumption
230 VAC/ 60 Hz / Single Phase
Open Circuit Voltage
Thermal Overload Protection
Cables
Accessories
48 VC
AC setting: 10 minutes shutdown; 3 minutes back on
Ground: 4 AWG, single insulation, 6’.........Torch: 4 AWG, single insulation, 6’
Handle / Wire Brush /Face Shield
Weight
39.6 lbs
WARNING! Always wear eye, hearing, and breathing protection!
AWELD160 ARC Welder Assembly & Operating Instructions
2
FEATURES:
• Power switch lights up to tell you the power is on
• Thermal overload protection with yellow indicator light
• 6.5 ft welding cable
• 5 ft. ground cable with clamp
• Easy carry handle
• Duty cycle: 10% @ 160 amps (230 volts)
• Electrode capacity: 5/64" to 5/32" (2-4 mm)
• Weldable materials: mild steel, cast iron, stainless steel
• Material thickness: 18 gauge (1/4" thick)
• Includes face shield, chipping hammer with wire brush
SPECIFICATIONS
• Rated Current
• Rated Voltage
55 Amp-160 Amps
230 V 60 HZ
KEEP THIS MANUAL, SALES RECEIPT & APPLICABLE WARRANTY FOR FUTURE
REFERENCE. READ ALL INSTRUCTIONS AND WARNINGS BEFORE USING THIS
PRODUCT. When unpacking, check to make sure all parts listed are included. If any parts are missing
or broken, please call Customer Service at 1-888-287-6981.
FOR CONSUMER USE ONLY – NOT FOR PROFESSIONAL USE
IMPORTANT SAFETY RULES
COMMON SENSE AND CAUTION ARE FACTORS WHICH CANNOT BE BUILT INTO ANY PRODUCT.
THESE FACTORS MUST BE SUPPLIED BY THE OPERATOR.
Keep your work area clean and well lit. Cluttered work benches and dark work areas may cause accidents or
injury.
Do not operate power tools in explosive areas, such as in the presence of flammable liquids, gases or
dust. Power tools create sparks which may ignite the dust or fumes.
Keep bystanders, children and visitors away while operating a power tool. Distractions can cause you to
lose control.
Wash hands after handling the cord. Touching the cords could expose you to lead, which is known in the
State of California to cause cancer, birth defects and other reproductive harm.
Keep children, and other distractions at a distance while operating power tools.
AWELD160 ARC Welder Assembly & Operating Instructions
3
Double insulated tools are equipped with a polarized plug (one blade is wider than the other.) This plug
will fit in a polarized outlet only one way. If the plug does not fit fully in the outlet, reverse the plug. If it
still does not fit, contact a qualified electrician to install a polarized outlet. Do not change the plug in
any way. Double insulation eliminates the need for the three wire grounded power cord and grounded power
supply system.
Avoid body contact with grounded surfaces such as pipes, radiators, ranges and refrigerators. There is
an increased risk of electric shock if your body is grounded.
Do not abuse the cord. Never use the cord to carry the tool or pull the plug from an outlet. Keep the
cord away from heat, oil, sharp edges, or moving parts. Replace damaged cords immediately. Damaged
cords increase the risk of electric shock.
When operating the tool outside, use an outdoor extension cord marked “WA” or “W.” These cords are
rated for outdoor use and reduce the risk of electric shock. Make sure the extension cord being used is in good
condition. If there are any cuts or nicks (no matter how deep) in the insulation, DO NOT use that cord. Also,
make sure the extension cord is heavy enough to carry the current needed. DO NOT use small "around-thehouse” lamp extension cords. These cords can easily overheat and/or catch fire when used with power tools.
Do not force tool. Use the correct tool for your application. The correct tool will do the job better and safer
at the rate for which it is designed.
Do not use the tool if the power switch does not turn it “ON” or “OFF”. Any tool that cannot be controlled
with the switch is dangerous and must be repaired.
Disconnect the power cord plug from the power source before making any adjustments, changing
accessories or storing the tool. Such preventive safety measures reduce the risk of starting the tool
accidentally.
People with pacemakers or other electronic devices should consult with a physician before operating
this product. Interruption or failure of the pacemaker could occur when electrical equipment is operated within
close proximity of electrical devices.
All work areas should be clean and well lit. Accidents are more likely to occur in poorly lit and cluttered
areas.
Keep the power cord in good condition, and replace damaged cords immediately. Do not use the cord to
pull the plug from the outlet. Keep the cord away from materials and surfaces that could damage cords. The
risk of electric shock increases when the power cord is damaged.
Always use the appropriate extension cord, making sure it is rated for use with power tools. Always be
sure the extension cords are in good condition, free of cuts or nicks in the insulation. If using the power tool in
an outside area with an extension cord, make sure the cord is rated for outdoor use.
AWELD160 ARC Welder Assembly & Operating Instructions
4
Prevent eye injury and burns. Wearing and using ANSI-approved personal safety clothing and safety devices
reduce the risk for injury.
Wear ANSI-approved safety impact eye goggles with a welding helmet with protective lens.
Do not make contact with a grounded surface while using this power tool. Contact with surfaces like
pipes, radiators or major appliances increases your risk of electric shock.
Use common sense while operating this power tool.
Do not use this tool if you are:
Feeling tired or are under the influence of alcohol or drugs.
Wearing loose clothing or jewelry. Keep long hair pulled back and away from moving parts.
Overreaching or have improper footing. Handling the tool in this way could cause serious injury.
When using this power tool always:
• Wear the proper safety equipment, such as safety goggles, dust masks, non-skid shoes, etc.
• Check to be sure all adjusting keys or wrenches have been removed before starting the power tool.
• Check to be sure the power switch is in the “OFF” position before plugging the power tool into an
electrical outlet.
Follow these steps to maintain safe working conditions and good working condition of power tools.
Improper care can result in electric shock or serious injury.
• Secure and support the work piece using clamps. Do not use your hands to hold the piece in place.
• Use the correct tool for the job. Using the correct tool is safer and faster.
• Make sure the power switch is in good working order. If the power switch no longer turns the tool
“ON” or “OFF”, discontinue use, and have the tool replaced or repaired.
• Remove the power cord from the power source before storage, changing accessories, or
moving the tool.
• Keep out of reach of children, or any untrained person. Store tools in a safe and dry place.
• Keep tools clean, and cutting tools sharp. Maintaining tools with proper care will increase the life of
the power tool, and reduce the risk of injury.
• Check to be sure all moving parts are free from binding and are properly aligned.
• Use only accessories that are recommended by the manufacturer for your tool model.
Maintain labels and nameplates on the Welder. These carry important information.
Avoid unintentional starting. Make sure you are prepared to begin work before turning on the Welder.
Do not force the Welder. This tool will do the work better and safer at the speed and capacity for which it was
designed.
Never leave the Welder unattended when it is plugged into an electrical outlet. Turn off the tool, and unplug it from its
electrical outlet before leaving.
Industrial applications must follow OSHA guidelines.
Never stand on the Welder. Serious injury could result if the Welder is tipped or if hot surfaces are accidently
contacted.
Keep construction debris out of vents and power button by blowing with compressed air. If compressed air is
unavailable, use a soft bristle shop brush.
Use only mild soap and a slightly damp cloth to clean the tool.
AWELD160 ARC Welder Assembly & Operating Instructions
5
SERVICE
Tool service must be performed only by qualified repair personnel. Service or maintenance by unqualified
personnel could result in a risk of injury.
When servicing a tool, use only identical replacement parts and follow instructions in the manual. Use of
unauthorized parts or failure to follow Maintenance Instructions may create a risk of shock or injury.
SAVE THESE INSTRUCTIONS FOR FUTURE REFERENCE.
This manual contains important information regarding safety, operation, maintenance and storage of this product.
Before use, read carefully and understand all warnings, cautions, instructions and labels. Failure to do so could result
in serious personal injury, property damage or even death.
Before using this tool, you need to become familiar with its operation. If you are unsure about the
operation of the tool, or have any questions about its proper use, call the Customer Service Department at
1-888-287-6981. Follow these instructions for safe handling of the tool:
• Always secure and support the work piece using clamps. Do not use your hands to hold the
piece in place.
• Be sure your work area is clean and secure before turning the power switch into the “ON”
position. Be sure the area is free from all foreign material, nails, staples, or any other material.
• Turn the tool “OFF” and unplug from the power source before making any changes or
adjustments to the tool.
• Do not use solvents containing carbon tetrachloride, ammonia or acetone to clean the welder.
Never use gasoline, paint thinner, or other caustic chemicals that can damage the plastic parts of the
tool.
• Always use the appropriate safety gear when operating this welder. Including but not limited, to
goggles, dust mask or respirator. Always work in a well-ventilated area to reduce your exposure to
harmful chemicals and dust particles.
SPECIFIC SAFETY RULES AND/OR SYMBOLS
The following symbols may be used on your tool. Be familiar with and learn the symbols to operate the tool safely.
Symbol
V
A
Hz
W
Kg
min
s
…/min
1,2,3…
Name
Volts
Amperes
Hertz
Watt
Kilograms
Alternating Current
Direct Current
Alternating or Direct Current
Earthing Terminal
Description
Voltage (Potential)
Current
Frequency (Cycles per Second)
Power
Weight
Type of Current
Type of Current
Type of Current
Grounding Terminal
Class II Construction
Minutes
Seconds
Diameter
No Load Speed
Denotes Double Insulation
Time
Time
Size of Drill Bits, Grinding Wheels, etc.
No-load Rotational Speed
Revolutions per Minute
Ring Selector Settings
Revolutions, Surface Speed, Strokes, etc. per Minute
Speed, Torque or Position Settings
AWELD160 ARC Welder Assembly & Operating Instructions
6
PACKAGE CONTENTS
Includes Arc Welder, face shield, and chipping hammer with wire brush
2
COMPONENTS
1)
2)
3)
4)
5)
6)
7)
Power Button
Arc Welding Unit
Wheel (Wheel Hub)
Torch Cable
Ground Clamp
Line Cord
Handle
7
1
5
6
Face Shield & Wire Brush Not Shown
Unpack product from package and review contents. Keep all packaging until product has been reviewed.
Use proper size and type extension cord. If an extension cord is required, it must be of the proper size and type to
supply the correct current to the tool without heating up. Otherwise, the extension cord could melt and catch fire, or
cause electrical damage to the tool.
This tool requires use of an extension cord of 20 amps minimum capability (up to 30 feet), with wire size rated at
10 AWG. Longer extension cords require larger size wire. If you are using the tool outdoors, use an extension cord
rated for outdoor use. (signified by "WA" on the jacket).
Note: Performance of this tool may vary depending on variations in local line voltage. Extension cord usage may
also affect tool performance.
Warning: The warnings, cautions, and instructions discussed in this instruction manual, cannot cover all possible
conditions and situations that may occur. It must be understood by the operator that common sense and caution
are factors which cannot be built into this product, but must be supplied by the operator.
This product, when used for welding and similar applications, produces chemicals known to the State of
California to cause cancer and birth defects, (or other reproductive harm). California Health & Safety Code
25249.5, et seq.
Avoid electrical shock. Do not permit electrically live parts, cables, or electrodes to contact skin, clothing, or gloves.
Protective clothing should be hole-free, dry, and ANSl approved.
1. This unit draws enough current to cause serious injury or death. Before turning the welder on, check the
electrode holder to be sure that there are no protruding screw heads, and that all insulation is secure. Do not weld
unless you are insulated from ground and the work piece.
2. Avoid breathing fumes or gases. They can cause serious health problems. Use an active ventilation system
directly above the welding area. Keep your head out of the fumes.
3. Avoid eye and body damage. Arc rays and Infrared radiation can Injure eyes and burn skin. Wear ANSl
approved eye and body protection. Do not allow viewing by visitors without proper eye and body protection. Use
the provided Face Shield with arc shaded filter plate.
4. Know proper arc welding practices. Read and understand the manufacturer's instructions, as well as your
employer's safety practices for arc welding.
5. Connect only to a code approved power source. Connect only to a grounding power source conforming to the
National Electrical Code and Local Codes.
AWELD160 ARC Welder Assembly & Operating Instructions
7
OPERATION
WARNING! Never look at the ignited arc without ANSI-approved, arc-shaded, eye protection in a full face
shield. Permanent eye damage or blindness can occur. Skin burns can occur. Never breathe arc fumes.
Good welding requires a high degree of skill and experience. You should practice a few sample welds on
scrap metal before you begin welding your first project. Additional practice periods are recommended
whenever you weld a different thickness of material, wire, or weld a different type of connection.
1. Attach the Handle to the top of the Arc Welding Unit using the handle screws.
2. Connect an appropriate 220 VAC electrical plug to the line cord. This should be done by a licensec electrician.
3. Place each wheel over the axle and insert the wheel hub.
4. Attach the front foot to the bottom of the Welder using the supplied hardware. Snap the Handle into the Face Shield.
5. Make sure this unit is only for AC Welding.
6. Securely clamp the ground cable clamp as close as possible to the metal object to be welded, or to the metal work
bench where the object is mounted and electrically connected.
7. Place the desired welding elecrode rod securely into the jaws of the Torch Cable clamp.
8. While viewing the Current Setting gauge, turn the Current Control knob to the correct current setting for the
electrode rod being used.
9. Verify that the Power Switch is in the off position, then plug the Welder 220 VAC plug into a dedicated, 40 amp line
with delayed action type circuit breaker for fuses.
10. While holding the Torch Cable Clamp with electrode clearly out of the way of any grounded objects, turn the Power
Switch to the On position.
11. Place the face shield over your eyes. Never look at the ignited arc without ANSI approved arc shaded eye
protection/face shield. Permanent eye damage or blindness can occur. Skin burns can occur. Never breath arc fumes.
12. Stroke the area to be welded with the electrode to ignite the arc. Never tap the electrode into the welding surface to
ignite the arc. This damages its external coating on the electrode which prevents oxygen in the air from coming into
contact with the molten metal, causing it to oxidize.
13. Once the arc is ignited, tilt the electrode forward at an angle of approximately 30 degrees and hold it at a distance
from the welding object equal to the diameter of the electrode. NOTE: If too much current is drawn from the arc welder,
the thermal overload protector will activate, the amber indicator will light, and the arc welder will turn off until it cools
down. If this happens, turn the Power Switch to the off position and wait about 20 minutes.
14. When the weld is complete, lift the electrode clearly away from any grounded object. Set the face shield down and
turn toward the arc welder and turn the power switch to the off position.
15. Remove the electrode from the torch cable clamp.
16. Unplug the power cord from the electrical outlet.
Avoid damage to the Welder by not leaving the unit on for more than the prescribed duty cycle time.
The duty cycle defines the number of minutes, within a 10 minute period, during which a given Welder can safely
produce a particular welding current. For example, this Welder has a 10% duty cycle at 160 Amps.
AWELD160 ARC Welder Assembly & Operating Instructions
8
Failure to carefully observe duty cycle limitations can easily over stress a Welder’s power generation system,
contributing to premature Welder failure.
This Welder is equipped with an internal thermal protection system to help prevent over stressing the unit. When the
unit overheats, it automatically shuts down, then automatically returns to service when it cools down.
Note: Once the unit returns to service, follow a more conservative duty cycle routine to help prevent excess wear to
the Welder.
TROUBLESHOOTING
MAINTENANCE
Disconnect the power supply before cleaning. Wear safety eyewear before cleaning. Used compressed dry
air to blow off dust and debris. Use a soft bristle brush if compressed air is not available.
Applying excessive force can overload the welder, decrease the life and increase the wear on the tool.
Some chemicals can damage the product. Do not use harsh chemicals such as gasoline, carbon
tetrachloride, paint thinner, etc.
A qualified repair technician must perform any tool service or repair. Service or maintenance performed by
unqualified personnel could result in injury. Use only identical replacement parts. Use of unauthorized parts or
failure to follow maintenance instructions may create a risk of electric shock or injury.
ACCESSORIES
Use only accessories that are recommended by the manufacturer for your model. Accessories that may be
suitable for one tool may become hazardous when used on another tool.
Always attach grounded (3-prong) extension cords to grounded (3-prong) outlets.
If you must use an extension cord, be sure that the gauge is large enough to carry the amount of current
necessary for your power tool. If not, your tool may experience a loss of power, excessive voltage drop or
overheating. For example, the smaller the gauge number, the heavier the cord.
AWELD160 ARC Welder Assembly & Operating Instructions
9
(AWELD160 201009)
AWELD160 ARC Welder Assembly & Operating Instructions
10