1
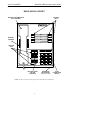
STANDARD AND BASIC DIGITAL KEYSET USER GUIDE Part No. 550.8002 Issue 5, August 1998 ## Inter-Tel AXXESS Standard & Basic Keyset User Guide TABLE OF CONTENTS INTRODUCING THE STANDARD AND BASIC DIGITAL KEYSETS . . . . . . . . . . . . . . . . . . . . . . . . . . . . . . . . . . . . . . . . . . . . . . . . . . . . . . 1 About This Guide . . . . . . . . . . . . . . . . . . . . . . . . . . . . . . . . . . . . . . . . . . . . . . . . . . General System Information . . . . . . . . . . . . . . . . . . . . . . . . . . . . . . . . . . . . . . . . . Feature Keys . . . . . . . . . . . . . . . . . . . . . . . . . . . . . . . . . . . . . . . . . . . . . . . . . . . . . . Standard And Alternate Keymaps . . . . . . . . . . . . . . . . . . . . . . . . . . . . . . . . . . . . User-Programmable Feature Keys . . . . . . . . . . . . . . . . . . . . . . . . . . . . . . . . . . . Secondary Extension Appearances . . . . . . . . . . . . . . . . . . . . . . . . . . . . . . . . . . 1 1 2 3 6 7 INTERCOM CALLS . . . . . . . . . . . . . . . . . . . . . . . . . . . . . . . . . . . . . . . . . . . . . 8 Placing Intercom Calls . . . . . . . . . . . . . . . . . . . . . . . . . . . . . . . . . . . . . . . . . . . . . . 8 Receiving Intercom Calls . . . . . . . . . . . . . . . . . . . . . . . . . . . . . . . . . . . . . . . . . . . 9 OUTSIDE CALLS . . . . . . . . . . . . . . . . . . . . . . . . . . . . . . . . . . . . . . . . . . . . . 10 Placing Outside Calls . . . . . . . . . . . . . . . . . . . . . . . . . . . . . . . . . . . . . . . . . . . . . . 10 Answering Outside Calls . . . . . . . . . . . . . . . . . . . . . . . . . . . . . . . . . . . . . . . . . . . 11 Call Screening . . . . . . . . . . . . . . . . . . . . . . . . . . . . . . . . . . . . . . . . . . . . . . . . . . . . 11 PLACING CALLS ON HOLD . . . . . . . . . . . . . . . . . . . . . . . . . . . . . . . . . . . . 12 MUTING THE MICROPHONE . . . . . . . . . . . . . . . . . . . . . . . . . . . . . . . . . . 12 REQUESTING A CALLBACK . . . . . . . . . . . . . . . . . . . . . . . . . . . . . . . . . . . 13 CALL WAITING . . . . . . . . . . . . . . . . . . . . . . . . . . . . . . . . . . . . . . . . . . . . . . . 13 ACCOUNT CODES . . . . . . . . . . . . . . . . . . . . . . . . . . . . . . . . . . . . . . . . . . . 14 STATION-TO-STATION MESSAGES . . . . . . . . . . . . . . . . . . . . . . . . . . . . 15 Leaving Messages . . . . . . . . . . . . . . . . . . . . . . . . . . . . . . . . . . . . . . . . . . . . . . . . 15 Receiving Messages . . . . . . . . . . . . . . . . . . . . . . . . . . . . . . . . . . . . . . . . . . . . . . 16 REVERSE TRANSFER (CALL PICK-UP) . . . . . . . . . . . . . . . . . . . . . . . . 16 CALL TRANSFER . . . . . . . . . . . . . . . . . . . . . . . . . . . . . . . . . . . . . . . . . . . . . 17 Transferring To Another Extension . . . . . . . . . . . . . . . . . . . . . . . . . . . . . . . . . . 17 Transferring To Voice Mail . . . . . . . . . . . . . . . . . . . . . . . . . . . . . . . . . . . . . . . . . 17 Transferring To An Outside Number . . . . . . . . . . . . . . . . . . . . . . . . . . . . . . . . . 17 CALL FORWARDING . . . . . . . . . . . . . . . . . . . . . . . . . . . . . . . . . . . . . . . . . . 18 Manual Call Forwarding . . . . . . . . . . . . . . . . . . . . . . . . . . . . . . . . . . . . . . . . . . . . 18 Automatic System Forwarding . . . . . . . . . . . . . . . . . . . . . . . . . . . . . . . . . . . . . . 18 Inter-Tel Integrated Systems, Inc. 8/98 Standard & Basic Keyset User Guide Inter-Tel AXXESS STATION SPEED DIALING . . . . . . . . . . . . . . . . . . . . . . . . . . . . . . . . . . . . 19 Storing Station Speed-Dial Numbers . . . . . . . . . . . . . . . . . . . . . . . . . . . . . . . . 19 Dialing Station Speed-Dial Numbers . . . . . . . . . . . . . . . . . . . . . . . . . . . . . . . . . 20 SYSTEM SPEED DIALING . . . . . . . . . . . . . . . . . . . . . . . . . . . . . . . . . . . . . 20 INTERCOM, OUTSIDE, AND FEATURE DIRECTORIES . . . . . . . . . . . 21 REDIALING . . . . . . . . . . . . . . . . . . . . . . . . . . . . . . . . . . . . . . . . . . . . . . . . . . 22 CONFERENCE CALLS . . . . . . . . . . . . . . . . . . . . . . . . . . . . . . . . . . . . . . . . 23 RECORD-A-CALL . . . . . . . . . . . . . . . . . . . . . . . . . . . . . . . . . . . . . . . . . . . . . 24 AGENT HELP . . . . . . . . . . . . . . . . . . . . . . . . . . . . . . . . . . . . . . . . . . . . . . . . 24 DO-NOT-DISTURB . . . . . . . . . . . . . . . . . . . . . . . . . . . . . . . . . . . . . . . . . . . . 25 PAGING . . . . . . . . . . . . . . . . . . . . . . . . . . . . . . . . . . . . . . . . . . . . . . . . . . . . . 27 Making Pages . . . . . . . . . . . . . . . . . . . . . . . . . . . . . . . . . . . . . . . . . . . . . . . . . . . . 27 Page Remove/Replace . . . . . . . . . . . . . . . . . . . . . . . . . . . . . . . . . . . . . . . . . . . . 27 REMINDER MESSAGES . . . . . . . . . . . . . . . . . . . . . . . . . . . . . . . . . . . . . . 28 MISCELLANEOUS FEATURES . . . . . . . . . . . . . . . . . . . . . . . . . . . . . . . . . 29 Enhanced Speakerphones . . . . . . . . . . . . . . . . . . . . . . . . . . . . . . . . . . . . . . . . . Default Station Operation . . . . . . . . . . . . . . . . . . . . . . . . . . . . . . . . . . . . . . . . . . Date, Time, Name, and Extension Number Display . . . . . . . . . . . . . . . . . . . . Background Music . . . . . . . . . . . . . . . . . . . . . . . . . . . . . . . . . . . . . . . . . . . . . . . . Hookflash . . . . . . . . . . . . . . . . . . . . . . . . . . . . . . . . . . . . . . . . . . . . . . . . . . . . . . . . Group Listen . . . . . . . . . . . . . . . . . . . . . . . . . . . . . . . . . . . . . . . . . . . . . . . . . . . . . 29 29 29 30 30 30 SPECIAL PROGRAMMING . . . . . . . . . . . . . . . . . . . . . . . . . . . . . . . . . . . . 31 Ring Tone Selection . . . . . . . . . . . . . . . . . . . . . . . . . . . . . . . . . . . . . . . . . . . . . . . Automatic Call Answer . . . . . . . . . . . . . . . . . . . . . . . . . . . . . . . . . . . . . . . . . . . . Programming for Private Intercom Calls . . . . . . . . . . . . . . . . . . . . . . . . . . . . . . Multilingual Capability . . . . . . . . . . . . . . . . . . . . . . . . . . . . . . . . . . . . . . . . . . . . . Station Password . . . . . . . . . . . . . . . . . . . . . . . . . . . . . . . . . . . . . . . . . . . . . . . . . 31 31 31 32 32 REMOTE PROGRAMMING . . . . . . . . . . . . . . . . . . . . . . . . . . . . . . . . . . . . 33 HUNT GROUP REMOVE/REPLACE . . . . . . . . . . . . . . . . . . . . . . . . . . . . 34 ACD HUNT GROUPS . . . . . . . . . . . . . . . . . . . . . . . . . . . . . . . . . . . . . . . . . 34 ACD Agent IDs . . . . . . . . . . . . . . . . . . . . . . . . . . . . . . . . . . . . . . . . . . . . . . . . . . . ACD Hunt Group Login . . . . . . . . . . . . . . . . . . . . . . . . . . . . . . . . . . . . . . . . . . . . ACD Hunt Group Logout . . . . . . . . . . . . . . . . . . . . . . . . . . . . . . . . . . . . . . . . . . . ACD Agent Wrap-Up Terminate . . . . . . . . . . . . . . . . . . . . . . . . . . . . . . . . . . . . 34 35 36 36 VOLUME CONTROLS . . . . . . . . . . . . . . . . . . . . . . . . . . . . . . . . . . . . . . . . . 37 DEFAULT FEATURE CODES . . . . . . . . . . . . . . . . . . . . . . . . . . . . . . . . . . 38 Inter-Tel AXXESS Standard & Basic Keyset User Guide INTRODUCING THE STANDARD AND BASIC DIGITAL KEYSETS About This Guide This user guide contains simplified instructions for using the Inter-Tel AXXESS Standard and Basic Digital Keysets (also called Standard and Basic Digital Terminals). For more detailed information and expanded procedures, refer to the Inter-Tel AXXESS Owner’s Guide. For quick access to basic instructions, refer to the Inter-Tel AXXESS Keyset Quick Reference Guide. General System Information • Besides the Standard and Basic Digital Keysets, there are other types of phones that can be installed on your telephone system, including: Executive Digital Keysets, various types of analog keysets, and single-line sets. Each type of phone has its own user guide. • Your telephone system may have one dial tone for both intercom calls and outside calls. Or, it may have two dial tones: (1) When you lift the handset or press SPKR , you hear intercom dial tone. (2) When you select an outgoing line, you hear standard outside dial tone. • A keyset is considered to be “off hook” when either the handset is lifted or the speakerphone is on (the SPKR key is lit). When a call is on the speakerphone, the call is in “handsfree” mode. • A keyset is considered to be “on hook” when the handset is in the cradle and the speakerphone is off (the SPKR key is unlit). When a procedure in this user guide instructs you to “hang up,” it means that you should place the handset back on hook or turn off the speakerphone. • Many features “time out” if you wait too long before performing the next step. If this happens, you must start over. • Four fast tones or repeating fast tones signal that you made a mistake, tried to select a restricted line, dialed a restricted or invalid number, dialed too slowly between digits, or waited too long before performing the next step. If you hear this signal, hang up and try again. • Your telephone system may be equipped with an optional AXXESSORY Talk voice processing system. If so, you will be provided with a separate voice mail user guide that explains the voice mail features. 1 Standard & Basic Keyset User Guide Inter-Tel AXXESS • Basic keysets are available in non-display models only. Standard keysets are available in both display and non-display models. The Standard display keysets have two-line displays with 16-characters per line. When the keyset is not in use, the display shows the extension number, user name, time of day, and date. Other displays include: reminder messages, do-not-disturb messages, numbers dialed, call sources, elapsed time of calls, current call costs, error messages, etc. • In this user guide, phone locations are often referred to as “stations.” Each station in your telephone system has an extension number that allows you to place intercom calls to it. Some stations belong to “hunt groups” that have special extension numbers which route your call through the stations in the group. Your customer service representative, trainer, or system administrator can provide you with a list of extension numbers for your telephone system. Feature Keys • The buttons on your phone are called feature “keys,” which is why the phone is called a “keyset.” The telephone system was designed to allow customized feature key layouts called “keymaps.” The locations of the various feature keys on your keyset are determined by its keymap. Your customer service representative, trainer, or system administrator can tell you how your specific keyset is laid out. You can use the diagrams on the following two pages to note any differences between the default feature keys and your keyset’s layout. • If your keyset has been reprogrammed by the installer so that its feature keys do not match the feature keys described in this user guide, refer to the owner’s guide for procedures on using feature codes. Default feature codes are listed on the back of this user guide. • Your keyset may have CALL keys like those shown in the diagrams on the following page. These keys are used for call access. They are not associated with specific lines. Instead, they are assigned to calls in the order that the calls are placed or received. If there are more calls in progress than there are CALL keys, new calls wait until a CALL key becomes available. Pressing an unlit CALL key will enter the programmed Outgoing Call feature code for your phone. • Depending on your keyset model, the Special Key may look like this SPCL or it may look like this ∞ . The instructions in this guide refer to the Special Key with the SPCL symbol. • There is a system-wide option called “SPCL Key Required For Feature Code Entry.” If your customer service representative, trainer, or system administrator tells you that it is enabled in your telephone system, you must always press the SPCL key before dialing a feature code. • Some of the keys on your keyset are equipped with lamps. The flash rates of the lamps indicate the status of the lines, phones, and features assigned to the keys. The flash rates and their meanings are explained throughout this user guide. For more detailed flash rate information, refer to the owner’s guide. 2 Inter-Tel AXXESS Standard & Basic Keyset User Guide • Some keyset models have red/green lamps in the feature keys. If you have one of these keysets, and your telephone system is programmed to use them, the lamps will be green if the associated call is ringing, holding, or active on your phone and will be red if the call is on another station. (An exception to this would be if the programmer has determined that calls that ring in directly to your phone will always have red lamps.) Your customer service representative, trainer, or system administrator can tell you how your specific keyset is programmed. • In this guide, keys equipped with lamps are represented as unlit, lit, or flashing. For example, an unlit conference (CNF) key is represented as CNF , a lit CNF key is CNF , and a flashing CNF key is CNF . Standard And Alternate Keymaps Each keyset is programmed with a standard keymap that determines where each feature key appears on the keyset. Each keyset can also have an alternate keymap. If you have an alternate keymap, you can switch between the keymaps by dialing this feature code. To switch between keymaps when your keyset is idle: — While on hook, dial 3 9 9 . To switch between keymaps during a call: — While on a call, press SPCL and dial 3 3 9 9 . Standard & Basic Keyset User Guide Inter-Tel AXXESS STANDARD DIGITAL KEYSET OPTIONAL DISPLAY WITH TWO 16-CHARACTER LINES HEARING AID-COMPATIBLE (HAC) HANDSET FEATURE KEYS INTERNAL SPEAKER FEATURE KEYS 12-KEY PUSHBUTTON KEYPAD RING AND VOICE VOLUME CONTROLS HANDSFREE MICROPHONE (underneath edge) NOTE: The keys are shown as they appear in the default keymap configuration. 4 Inter-Tel AXXESS Standard & Basic Keyset User Guide BASIC DIGITAL KEYSET HEARING AID-COMPATIBLE (HAC) HANDSET FEATURE KEYS INTERNAL SPEAKER CALL 1 IC CALL 2 DND CALL 3 CNF CALL 4 FEATURE KEYS HOLD TRANSFER SYS SPD REDIAL SPKR MSG MUTE FWD RING AND VOICE VOLUME CONTROLS HANDSFREE MICROPHONE (underneath edge) 12-KEY PUSHBUTTON KEYPAD NOTE: The keys are shown as they appear in the default keymap configuration. 5 Standard & Basic Keyset User Guide Inter-Tel AXXESS User-Programmable Feature Keys Depending on how your system is programmed, some of your feature keys may be designated as “user-programmable.” If so, you can program them with any of the feature codes listed on the back of this user guide. (Station Speed-Dial keys require special programming, as described in the last section below.) To program a user-programmable feature key: — While on hook, dial 3 9 7 . — Press the feature key you want to program. — Dial the feature code you want to store under that key. (Refer to the back of this guide for default feature codes.) To return all feature keys to their original default values: — While on hook, dial 3 9 5 . To display the current feature key values: — While on hook, dial 3 9 6 . — Press the feature key(s) you want displayed. — Press SPKR to hang up. To change a user-programmable feature key into a Station Speed-Dial key: Note: Station Speed-Dial keys created using this procedure are not the same as the STN SPDL feature key found on some keysets. To use the STN SPDL feature key, see page 20. — While on hook, dial 3 9 7 . — Press the feature key you want to change into a Station Speed-Dial key. — Dial 3 8 2 . — When the display asks for a number, dial a digit 0–9. This is the station speeddial number “location.” — Label the corresponding key on your keyset with the station speed-dial location number (0–9) and the extension number or outside telephone number that will be stored there. You can now use the procedure outlined on page 19 to program and use the Station Speed-Dial key. 6 Inter-Tel AXXESS Standard & Basic Keyset User Guide Secondary Extension Appearances The Secondary Extension Appearances feature allows calls that are ringing or on individual hold at one “primary” station to appear on a “secondary extension key” at another keyset. For example, a secretary or assistant can have a secondary extension key for a supervisor’s station, or one keyset can have several secondary extension keys, each associated with a different primary station. If you have a secondary extension key, it functions as follows: • When a call is ringing or holding on any Call key at the primary station, pressing your flashing secondary extension key for that station will answer the call. (This includes recalls, transfers, callbacks, and hunt group calls.) • If your secondary extension key is unlit, pressing the key places an intercom call to the primary station. Note: If the key is flashing, you can still place an intercom call to the primary station without answering the incoming call by pressing the pound (#) key before pressing the flashing secondary extension key. (Or, of course, you can just dial the primary station’s extension number.) After answering a call on the secondary extension key, you can transfer it back to the primary station using one of the following methods: • Transfer to hold: To transfer the call to hold at the primary station, press the secondary extension key, announce the call, if desired, and then hang up. • Transfer to ring: To transfer the call to the primary station, press TRANSand FER then the secondary extension key. You can announce the call, if desired, before hanging up to complete the transfer. There are two ways to make a secondary extension key. The installer or programmer can create a secondary extension key that cannot be changed at your keyset. Or, the installer or programmer can make one of your user-programmable keys a secondary extension key so that you can determine the associated station for the key, as outlined in the second procedure below. In addition, the installer or programmer can program your phone to ring when a given number of calls are waiting at the primary station. To display the current secondary extension key assignment(s): — While on hook, dial 3 9 6 . — Press the secondary extension key(s) you want displayed. To assign a primary station to a secondary extension key (if enabled): — While on hook, dial 3 9 7 . — Press the desired secondary extension key. — Dial the extension number you want to store under that key. 7 Standard & Basic Keyset User Guide Inter-Tel AXXESS INTERCOM CALLS Placing Intercom Calls The Basics To place an intercom call: — While on or off hook, dial an extension number. — If your call goes through handsfree to the called keyset’s speaker, speak after you hear a double tone. If you hear continuous ringing, wait for the call to be answered. — When finished, hang up. Options If you want to place a non-handsfree call that will ring at the other keyset until answered: — Press # before dialing the extension number. (This step is not necessary if you programmed your keyset for the Ring Intercom Always feature described on page 31.) If there is no answer, you can do any of the following: — You can leave a message: Press MSG . Then hang up OR wait for the message center to answer. (See page 15 for more Message options.) — You can stay on the line and wait for the phone to become available: When you hear busy signals, do not hang up. After a system timer expires, you hear music until the phone is available. (You cannot do this if the called phone is in do-notdisturb mode.) — You can use the “Off-Hook Voice Announce” feature (if the called keyset is enabled for it): This allows you to talk to the keyset user on his or her handsfree speakerphone, even though the user already has a call in progress on the handset. Do not hang up. After the busy signals stop, you are automatically connected and may speak. (If you hear music, or if the phone is in do-not-disturb mode, your off-hook voice announce call will not go through.) 8 Inter-Tel AXXESS Standard & Basic Keyset User Guide Receiving Intercom Calls The Basics To receive an intercom call that comes in through your speakerphone: — EITHER, Respond handsfree. OR, Lift the handset for privacy. To receive a ringing (non-handsfree) intercom call: — EITHER, Lift the handset for privacy. OR, Press SPKR or ANSWER to respond handsfree. Options If your keyset is enabled for it, you may receive an “Off-Hook Voice Announce” call (a call through your speaker) while you are on a call using the handset: — When you hear a single tone and see an incoming call display while you are on a call, you can do the following: • Accept the call on the speakerphone without ending your current call: When you hear a double tone, you may talk handsfree with the caller through the speakerphone. (The caller on the handset will be able to hear both you and the party on the speakerphone.) • Block the call from coming through the speaker: Do the following steps. — To cause the incoming intercom call to camp on, press key flashes. SPKR . The IC — Then, if you wish to send do-not-disturb signals to the camped-on call, press DND to place your keyset in do-not-disturb. (See page 25 for more information about do-not-disturb mode.) 9 Standard & Basic Keyset User Guide Inter-Tel AXXESS OUTSIDE CALLS Placing Outside Calls The Basics To place an outside call: — While on or off hook, press OUTGOING . — Dial the desired number. (If you see a request for an account code and hear a single progress tone, you must dial an account code before you can place your call.) — When finished with the call, hang up. To make an emergency call: — Simply dial 9 1 1 to automatically place a call to the preset emergency number. (You do not have to press the OUTGOING key first.) Options Depending on how your system is programmed, you may be able to use one of the following methods instead of pressing the OUTGOING key: — Dial the Outgoing Call feature code — default is 8. — Press an unlit CALL key (if you have one). — Press an unlit LINE key or a LINE GROUP key (if you have one). — Dial a Select Line Group feature code — defaults are 9201–9299 and 93000– 93107. — Dial the Automatic Route Selection (ARS) feature code — default is 9200. When dialing the number, you can use one of the following features: — Outside Directory: To use the speed-dial directory, see page 21. — Station Speed Dial: To use the station speed-dial feature, see page 19. — System Speed Dial: To use the system speed-dial feature, see page 20. — Redial: To redial the last outside number you dialed, see page 22. 10 Inter-Tel AXXESS Standard & Basic Keyset User Guide Answering Outside Calls The Basics — EITHER, Lift the handset OR, Press ANSWER . Options Depending on how your system is programmed, you may be able to use one of the following methods instead of pressing the ANSWER key: — Press the flashing CALL key (if you have one). — Press the flashing LINE or LINE GROUP key (if you have one). To reverse transfer (pick up) a call that is ringing or holding at another phone: — Lift the handset and dial 4 . — Dial the extension number where the call is ringing or holding. Call Screening This feature is available only if your telephone system is equipped with an AXXESSORY Talk voice processing unit. The Transfer Method options can be programmed in the database or by the mailbox user (see your Inter-Tel AXXESSORY Talk Voice Mail User Guide for programming instructions). Depending on the Transfer Method programmed for your phone, transferred calls from AXXESSORY Talk may be unannounced (as usual), or one of the following may occur: • “Announce Only” Calls: Before the Voice Mail system transfers a call to you, a prompt asks the caller to record his or her name before the system completes the transfer. • “Screened” Calls: Before the Voice Mail system transfers a call to you, a prompt asks the caller to record his or her name. When you answer the call from Voice Mail, you hear, “You have a call from (caller’s name),” You then have the following options: — To accept the call, press # . — To replay the announcement, press — To send the call to voice mail, press 1 . 2 . — To forward the call to another extension, press sion number. — To refuse the call, press * . 11 3 and then enter the exten- Standard & Basic Keyset User Guide Inter-Tel AXXESS PLACING CALLS ON HOLD The first procedure places a call on individual hold, the second places it on system hold. Individual hold places the call on hold at one phone. It can then be directly picked up at that phone or it can be picked up at another phone using the reverse transfer (call pick-up) feature. An outside call on system hold can be picked up directly at any keyset that shows a fluttering key for the call, including the keyset that placed it on hold. (Intercom calls cannot be placed on system hold.) To place a call on Individual Hold: — Press HOLD . — Hang up OR place another call. — To return to the call, lift the handset and press the fluttering key. To place an outside call on System Hold: — Press and dial SPCL 3 3 5 . — Hang up OR place another call. — To return to a call on system hold at any keyset with a fluttering key, lift the handset and press the fluttering key. MUTING THE MICROPHONE To mute the microphone so that you can hear the other party but they cannot hear you (this does not put them on hold): — Press MUTE . — To return to the call, press MUTE . 12 Inter-Tel AXXESS Standard & Basic Keyset User Guide REQUESTING A CALLBACK When you call a phone that is busy or try to select an outgoing line that is busy, you can stay on the line and wait for it to become available (this is called “camping on”) or you can request a callback (“queue” on the phone or line). If you request a callback, your phone will ring when the phone or line you are waiting for is available. To camp on to a busy phone or line: — When you hear busy signals, do not hang up. You hear music, if available, until the line or phone is available. To request a callback (queue on to the phone or line): — When you hear busy signals, press SPCL and dial 6 . Then hang up. (You can do this even if your call has “camped on” and you hear music.) — When your keyset rings, lift the handset and wait for the other party to answer. To cancel a queue before the callback: — While on hook, dial 6 . CALL WAITING If you receive a call while you are already on another call, you will hear a “call waiting” tone through your handset and/or you see a display. To respond to a waiting call (you hear a single tone and a key is flashing): — If you wish to end the current call, hang up. The waiting call rings in. Answer as usual. — If you wish to place the current call on hold, press ing call by pressing the flashing key. HOLD . Then answer the wait- — If you wish to have the caller hear do-not-disturb signals, press 25 for more information about do-not-disturb mode.) 13 DND . (See page Standard & Basic Keyset User Guide Inter-Tel AXXESS ACCOUNT CODES If your telephone system is programmed to use the Station Message Detail Recording (SMDR) feature, the system will periodically print out a record of telephone calls placed from the phones within the system. Account codes can be used to add information to these reports. There are three types of account codes: • Standard account codes that are entered into the SMDR report automatically whenever you place a call. • Forced account codes that you must dial before being allowed to place an outside call. • Optional account codes that can be entered at any time during a call. Your customer service representative, trainer, or system administrator can tell you which types of account codes are used on your telephone system. The account code is recorded in the report as soon as the call is completed. If more than one account code is entered during a call, only the last account code that was entered is recorded. To enter an optional account code while on an outside call: — Press SPCL , dial 3 9 0 , and then dial the optional account code. If the account code has fewer than the programmed maximum number of digits and is not immediately accepted, press # . To enable an account code for all calls placed from your keyset: — Dial 3 9 1 and then the account code. If the account code has fewer than the programmed maximum number of digits and is not immediately accepted, press # . This code will be used for all calls made from your keyset until it is disabled. — To disable the code: Dial 3 9 1 14 again and then press # . Inter-Tel AXXESS Standard & Basic Keyset User Guide STATION-TO-STATION MESSAGES Leaving Messages If you call a phone that is busy, does not answer, or is in do-not-disturb, you can use the station-to-station messaging feature to let the other person know you called. There are two messaging options: • Have the called party return your call. When the party you called responds to the message indication, a call is automatically placed to your phone. • Leave a message with the called party’s message center. When the party you called responds to the message indication, a call is automatically placed to his or her message center instead of your phone. Sometimes the voice mail system is programmed as the message center. To signal that a message is waiting, a called keyset’s MSG key flashes and the display shows the number of waiting messages. The Basics To leave a message (while on an intercom call): — Press . MSG — Hang up OR wait for the message center to answer. Options To leave a message without placing an intercom call: — Press 3 6 7 and dial the desired extension number. To cancel a message that you left at another phone: — While on hook at your keyset, dial 3 6 6 . — Dial the extension number of the phone where you left the message. 15 Standard & Basic Keyset User Guide Inter-Tel AXXESS Receiving Messages The Basics When you see a flashing MSG key: — Lift the handset and press flashing MSG . A call is automatically placed to the phone or message center that left the first waiting message. Options To select the message you want to answer first (display keysets only): — If your MSG key is flashing, one or more messages are waiting. While on hook, press MSG repeatedly to view your waiting messages. The display shows MESSAGE RECEIVED FROM (source). — When the desired message is displayed, press and then press # to respond. # OR lift the handset for privacy To cancel a waiting message: Display Keyset: Press MSG repeatedly to view your waiting messages. When the message you wish to cancel is displayed, remain on hook and press * . The message is canceled. Non-Display Keyset: While on hook, dial 3 6 8 . The message is canceled. REVERSE TRANSFER (CALL PICK-UP) To pick up a call that is ringing or holding at another phone or hunt group: — Lift the handset and dial 4 . — Dial the extension or hunt group number where the call is ringing. 16 Inter-Tel AXXESS Standard & Basic Keyset User Guide CALL TRANSFER Transferring To Another Extension To transfer a call to another extension: — To transfer so that the call rings at the other phone: Press To transfer so that the call is on hold at the other phone: Press 3 4 TRANSFER SPCL . and dial 6 — Dial the desired extension number. — Wait for an answer, announce the call, and then hang up to complete the transfer. — If the number is busy, there is no answer, or the transfer is refused, return to the caller being transferred by pressing the fluttering key. NOTE: If the Transfer-To-Connect option is enabled for your phone, an announced transfer call (including an announced transfer from voice mail) connects immediately once the transferring party hangs up. (If the option is disabled, you must press a Call key to answer the transferred call). Transferring To Voice Mail To transfer a call to Voice Mail: — Press TRANSFER . — Dial the voice mail extension number. — If you want to send the call to a specific Voice Mail mailbox, dial the desired mailbox number and then hang up to complete the transfer. If you want to send the call to the Voice Mail main menu (so that the caller can select the mailbox number), hang up to complete the transfer. Transferring To An Outside Number To transfer a call to an outside number: — Press TRANSFER . — Select an outgoing line. — Dial the desired telephone number. — Wait for an answer, announce the call, and then hang up to complete the transfer. — If the number is busy, there is no answer, or the transfer is refused, return to the caller being transferred by pressing the fluttering key. 17 Standard & Basic Keyset User Guide Inter-Tel AXXESS CALL FORWARDING Manual Call Forwarding With manual call forwarding, you can choose to send incoming intercom and outside calls to another extension number. You may also be able to forward calls to outside numbers, if your phone is programmed to allow it. To forward calls: — Press FWD or dial one of the following feature codes: • 3 5 5 (Call Forward All Calls): All incoming calls are forwarded without ringing at your phone. • 3 5 6 (Call Forward If No Answer): All incoming calls are forwarded if they are not answered before a timer expires. (This timer is adjusted by the installer; it cannot be changed at your phone.) • 3 5 7 (Call Forward If Busy): When your phone is busy, all incoming calls are forwarded without ringing at your phone. • 3 5 8 (Call Forward If No Answer or Busy): All incoming calls are forwarded if your phone is busy or if you do not answer, as described above. — Then do one of the following: • To forward to an outside telephone number: Select an outgoing line and dial a telephone number. • To forward to an extension number: Dial the extension number. • To forward to your message center: Press MSG . To cancel any call forward request: — Press FWD , then SPKR . Automatic System Forwarding Your phone may be programmed with the automatic call forwarding feature called “System Forwarding.” If so, you can use the following procedure to turn the System Forwarding feature on and off. To enable or disable System Forwarding: — Dial 3 5 4 to enable or disable System Forwarding. 18 Inter-Tel AXXESS Standard & Basic Keyset User Guide STATION SPEED DIALING Storing Station Speed-Dial Numbers You can store up to 10 personal speed-dial numbers and associated names in station speed-dial “locations” 0–9. These locations are then dialed using a feature key or code plus one of the numbers 0–9 on your keyset dialpad. Or, if you have programmable feature keys, you can create Station Speed-Dial keys (as described on page 6) for one-touch speed dialing. To program your station speed-dial locations: — While on hook, dial 3 8 3 . — Dial the location code 0–9 to be programmed OR press a Station Speed-Dial key that you want to program (if you have one). — Enter the desired name for the speed-dial number to be programmed, as described below: • Remain in alphanumeric mode: Press MSG and then press the keypad keys to enter the desired characters. (Refer to the chart on page 21.) The number of times a key is pressed determines which character is entered. For example, 533266 would enter “JEAN.” When adjoining characters are located under the same key, press FWD once to advance to the next character. For example, 66FWD6667776 would enter “NORM.” (Note that letters correspond to the letters printed on keypad keys 1–9.) Press FWD twice to leave a space. Press MUTE if you need to backspace. • Change to numeric mode (MSG key unlit): Press the keypad keys to enter the desired numbers. Press # for a hyphen (–), press * for a colon (:), press FWD to leave a space, or press MUTE to backspace. — Press # to save the name. — Dial the extension number or telephone number to be stored. If your number includes an asterisk, pound, a hookflash (a quick hangup and release), or a pause, press SPCL once for an asterisk (*), twice for a pound (#), three times for a hookflash, or four times for a pause. (Each pause and/or hookflash counts as one of the 16 digits.) You can enter more than one *, #, or hookflash in a row by pressing FWD to move to the next character. If necessary, press MUTE to backspace and make corrections. Hint: If you want to be able to dial outside telephone numbers without first selecting an outgoing line, enter a line access code (such as the Outgoing Call code “8”) at the beginning of the outside telephone number. — Press # to save the number. 19 Standard & Basic Keyset User Guide Inter-Tel AXXESS To view the current programming of Station Speed-Dial keys: — While on hook, dial 3 9 . 6 — Press the Station Speed-Dial key to be viewed. — Press # to exit. To erase a station speed-dial name and/or number: — While on hook, dial 3 8 . 3 — Dial the location code 0–9 to be erased OR press the Station Speed-Dial key to be erased. — To remove the name, press — Press # to continue. — To remove the number, press — Press # repeatedly until the name is erased. MUTE MUTE repeatedly until the number is erased. to exit. Dialing Station Speed-Dial Numbers — If necessary, select an outgoing line. — EITHER, Press the desired Station Speed-Dial key (if you have one) OR, Dial (0–9). 3 8 2 and then the desired station speed-dial location number OR, Press STN SPDL (if you have one) and then the desired station speed-dial location number (0--9). SYSTEM SPEED DIALING Your system administrator can store up to 1000 speed-dial numbers in system speeddial “locations” 000–999. These speed-dial numbers can then be dialed using a feature code or the SYS SPD feature key, plus one of the location numbers 000–999. To view and/or dial system speed-dial numbers: — Press SYS SPD OR dial 3 8 1 . — Dial the location code (000–999) for the desired number. The number displays. — To dial the number, press # . 20 Inter-Tel AXXESS Standard & Basic Keyset User Guide INTERCOM, OUTSIDE, AND FEATURE DIRECTORIES The optional directories allow display keyset users to “look up” extension numbers, system speed-dial numbers, and feature codes, and their associated names. If searching for a name, you do not need to enter the full name. The system will find the closest match and show the number and its associated name on your display. If desired, you can then dial the displayed number. To perform a directory search: — While on hook, dial 3 0 7 . — Press 1 to select the intercom directory, press 2 to select the outside number directory, or press 3 to select the feature code directory. — Enter letters or numbers (up to 10 characters) as described below: • Remain in alphanumeric mode (MSG key lit): Press the keypad keys to enter the desired characters. (Refer to the following chart.) The number of times a key is pressed determines which character is entered. For example, 77776444844 would enter SMITH. When adjoining characters are located under the same key, press FWD once to advance to the next character. For example, 5666 FWD 66337777 would enter JONES. (Note that letters correspond to the letters printed on keypad keys 1–9.) Press FWD once to advance and twice to leave a space. Press MUTE to backspace. NUMBER OF TIMES KEY IS PRESSED KEY 1 2 3 4 5 6 7 ENGLISH CHARACTERS 8 9 10 11 KATAKANA CHARACTERS 1 – & ( ) 1 A I U E O a 2 A B C ’ 2 KA KI KU KE KO i 3 D E F ! 3 SA SHI SU SE SO u 4 G H I * 4 TA CHI TSU TE TO e 5 J K L / 5 NA NI NU NE NO o 6 M N O # 6 HA HI FU HE HO tsu 7 P Q R S 7 MA MI MU ME MO ya 8 T U V ? 8 YA YU YO . , yu 9 W X Y Z 9 RA RI RU RE RO yo 0 @ : . , 0 WA WO N pa ba long • Change to numeric mode (MSG key unlit): Press the keypad keys to enter an extension number. Press MUTE to backspace. — Press # to begin the search. If desired, press VOL to scroll forward alphabetically through the directory or press VOL to scroll backward. The display will time out if the number is not dialed. — To dial a number or feature code while displayed: Press 21 # . Standard & Basic Keyset User Guide Inter-Tel AXXESS REDIALING If you reach a busy number, are disconnected, or if there is no answer, the number in your redial memory can be redialed easily. An outside line is automatically selected and the telephone number is redialed. Your keyset can be programmed to store, in redial memory, the last outside telephone number that you dialed or an outside telephone number that you saved. (Your customer service representative, trainer, or system administrator can tell you whether your phone is programmed for “Last Number Dialed” or “Last Number Saved” operation.) Choose the appropriate procedure for your phone: To use the Last Number Dialed feature (if enabled): — While on or off hook, press ber is dialed. REDIAL . A line is selected automatically and the num- To use the Last Number Saved feature (if enabled): — To save a number: While the keyset is idle or while listening to intercom dial tone, press REDIAL . — To redial the saved number: While on a call or after selecting a line, press REDIAL . A line is selected automatically and the number is dialed. 22 Inter-Tel AXXESS Standard & Basic Keyset User Guide CONFERENCE CALLS You can establish multi-party conference calls without operator assistance. There can be up to four parties in a conference. In addition to you, the conference can include any combination of up to three intercom and/or outside parties. The Basics — While on the first call, press . CNF — Place an intercom or outside call. To place it on “conference wait hold,” press fluttering CNF . (If necessary, repeat this step to place up to two more calls on conference wait hold.) — Press fluttering CNF to join all of the calls together in the conference. Options During the conference call you can do the following: — Place the conference on hold: Press HOLD . This places the conference on hold (the parties are still connected). To return to the conference, press fluttering CNF . — Drop out of the conference: Press flashing CNF . Then hang up. This removes you from the conference, but leaves the other parties connected. — Add additional parties to the conference: Do the following: • Press CNF . This leaves the conference parties connected. • Place a call to the party to be added to the conference. • Press CNF twice to put yourself and the new party into the conference. — End the conference and place all parties on individual hold: Press flashing CNF and then press HOLD to place all of the parties on individual hold. You can then speak to one party at a time by pressing HOLD or a flashing key. — Mute your keyset microphone: Press MUTE . This turns your keyset microphone on or off during the conference. You can hear the conference parties, but they cannot hear you. and — Transfer the conference to another extension or to voice mail: Press TRANSFER dial the desired extension number. Then hang up when you are ready to complete the transfer. 23 Standard & Basic Keyset User Guide Inter-Tel AXXESS RECORD-A-CALL If your telephone system is equipped with an AXXESSORY Talk voice processing unit, your phone may be programmed to use the Record-A-Call feature. If so, you can dial a feature code whenever you want to record an ongoing call. You can retrieve the message later, just as you would any other mailbox message. To use the Record-A-Call feature while on a call: — Press SPCL and dial 3 8 5 . — If required, dial the desired mailbox number. (Your phone may be programmed to select the mailbox, or you may be required to dial it.) — You hear a confirmation tone when the Record-A-Call feature is activated. — To turn off Record-A-Call: Press SPCL and dial 3 8 5 OR hang up. AGENT HELP Your telephone system may be programmed to support the Agent Help feature, which allows you to request help from a designated “Agent Help Extension” (usually your supervisor) during a call. When your request call rings at the Agent Help Extension, the supervisor can choose to join the call or reject the request. If the Agent Help Extension is a keyset, the keyset’s microphone is muted and the supervisor cannot be heard unless he or she presses the MUTE key. If the Agent Help Extension is a single-line set, the supervisor can be heard as soon as the conference is established. In either case, the supervisor can hear all other parties on the call. To use the Agent Help feature while on a call: — Press SPCL and dial 3 7 5 . If you hear repeating error tones, the Agent Help feature is not available at your phone, you already have four parties in your call, not enough system circuits are currently available, or the Agent Help Extension is in do-not-disturb. — If required, dial the Agent Help Extension number. (Your phone may be programmed to automatically dial the number, or you may be required to dial it.) — If the Agent Help Extension accepts the call, you hear the Agent Help tone, if it is enabled, and the supervisor can monitor or join your call. If the Agent Help Extension rejects the call, you hear a confirmation tone and the display shows AGENT HELP REJECTED. To respond to an Agent Help request at a display keyset — When you receive an Agent Help, your display shows <name> REQUESTS HELP. You can do one of the following: • To accept the call: Answer as usual. • To reject the call: Dial 3 7 24 6 . You hear confirmation tone. Inter-Tel AXXESS Standard & Basic Keyset User Guide DO-NOT-DISTURB Placing your keyset in do-not-disturb halts all pages and calls to your keyset (except for queue callbacks, recalls, and direct ring-in calls). Other users calling your keyset hear a repeating signal of four fast tones. Display keyset users also see the do-not-disturb message you have selected. There can be up to 20 different Do-Not-Disturb messages in your telephone system. They can be changed by the system administrator, installer, or programmer. Your customer service representative, trainer, or system administrator will give you a list of Do-Not-Disturb Messages for your system. You can list them here for your convenience: 01 _______________________ 02 _______________________ 11 _______________________ 12 _______________________ 03 04 05 06 07 08 09 10 13 14 15 16 17 18 19 20 _______________________ _______________________ _______________________ _______________________ _______________________ _______________________ _______________________ _______________________ _______________________ _______________________ _______________________ _______________________ _______________________ _______________________ _______________________ _______________________ To enable do-not-disturb: — Press DND . — Dial the desired 2-digit number for the message you wish to use or press to scroll forward or VOL to scroll backward through the messages. VOL — If desired, customize the second display line by entering the desired numbers or letters as described below: • Remain in numeric mode (MSG key unlit): Press the keypad keys to dial the desired numbers. Press # for a hyphen (–), press * for a colon (:), press FWD to leave a space, or press MUTE to backspace. Continued... 25 Standard & Basic Keyset User Guide Inter-Tel AXXESS • Change to alphanumeric mode: Press MSG and then press the keypad keys to enter the desired characters. (Refer to the chart on the next page.) The number of times a key is pressed determines which character is entered. For example, 33377744432999 would enter “FRIDAY.” When adjoining characters are located under the same key, press FWD once to advance to the next character. For example, 6 FWD 666 FWD 6632999 would enter “MONDAY.” (Note that letters correspond to the letters printed on keypad keys 1–9.) Press FWD twice to leave a space. Press MUTE if you need to backspace. NUMBER OF TIMES KEY IS PRESSED KEY 1 2 3 4 5 6 7 ENGLISH CHARACTERS 8 9 10 11 KATAKANA CHARACTERS 1 – & ( ) 1 A I U E O a 2 A B C ’ 2 KA KI KU KE KO i 3 D E F ! 3 SA SHI SU SE SO u 4 G H I * 4 TA CHI TSU TE TO e 5 J K L / 5 NA NI NU NE NO o 6 M N O # 6 HA HI FU HE HO tsu 7 P Q R S 7 MA MI MU ME MO ya 8 T U V ? 8 YA YU YO . , yu 9 W X Y Z 9 RA RI RU RE RO yo 0 @ : . , 0 WA WO N pa ba long — Press OR lift and replace the handset. SPKR To cancel do-not-disturb: — Press DND . 26 Inter-Tel AXXESS Standard & Basic Keyset User Guide PAGING The Paging feature allows announcements to be made through keyset speakers. If your system is equipped with optional external paging equipment, announcements can also be made through the external speaker(s). There can be up to 10 paging zones. Each paging zone can contain different combinations of keysets and the external paging equipment. Your customer service representative, trainer, or system administrator can tell you how your telephone system is programmed. You can list them here for your convenience: 0 1 2 3 4 _______________________ _______________________ _______________________ _______________________ _______________________ 5 6 7 8 9 _______________________ _______________________ _______________________ _______________________ _______________________ You can prevent your keyset from receiving pages or allow it to receive pages again using the Page Remove/Replace feature code described below. If your keyset is assigned to more than one page zone, all zones are removed or replaced at once; you cannot turn off individual zones. Making Pages To make a page: — Lift the handset. — Dial 7 . — Dial the desired zone number (0–9). — After the tone, make your announcement. — Hang up. Page Remove/Replace To prevent your keyset from receiving pages or to allow it to receive pages again: — Dial 3 2 5 to turn paging on or off. 27 Standard & Basic Keyset User Guide Inter-Tel AXXESS REMINDER MESSAGES Reminder messages are set, like an alarm clock, to signal you at a specified time. You can select the message and time up to 24 hours in advance. There can be up to 20 different Reminder messages in your telephone system. They can be changed by the system adminstrator, installer, or programmer. Your customer service representative, trainer, or system administrator will give you a list of Reminder Messages for your system. You can list them here for your convenience: 01 02 03 04 05 06 07 08 09 10 _______________________ _______________________ _______________________ _______________________ _______________________ _______________________ _______________________ _______________________ _______________________ _______________________ 11 12 13 14 15 16 17 18 19 20 _______________________ _______________________ _______________________ _______________________ _______________________ _______________________ _______________________ _______________________ _______________________ _______________________ At the programmed time, the reminder message signals you with eight short tones and your display shows the message. If your phone is busy, you still hear the tones and the message displays for 10 seconds during the call, then the display returns after you hang up. (Reminder displays interrupt, but do not affect, keyset programming.) To request a reminder message: — While on hook, dial 3 0 5 . — Dial the desired 2-digit number for the message that you want OR view messages to scroll forward or VOL to scroll backward. by pressing VOL — While the desired message is displayed, press # . — Enter the time you wish to receive the message in hours and minutes. For example, 0900 = 9:00. (If you dial three digits, such as 900 for 9:00, press # .) — If your system is set for 12-hour display format, press 1 for AM OR press PM.(If it is set for 24-hour format, you do not need this step.) 2 for To cancel all reminder message requests before they signal you: — While on hook, dial 3 0 6 . To clear a received reminder message (you hear eight short tones and see a reminder message display): — While on hook, press * . 28 Inter-Tel AXXESS Standard & Basic Keyset User Guide MISCELLANEOUS FEATURES Enhanced Speakerphones Each Standard and Basic Digital Keyset has a built-in speaker and microphone that allows handsfree answering of intercom calls, on-hook dialing, call monitoring, and background music. Standard and Basic Digital Keysets can also be programmed to allow the user access to system speakerphone resources for complete handsfree operation. If programmed, the system speakerphone resources are available on a first-come, first-served basis. Each time a Standard or Basic Digital Keyset user presses the SPKR key while on hook, the speakerphone function is activated and the resource is assigned to the keyset for the length of the call. (If no system speakerphone resources are available, the user hears reorder tones and the display shows NO SPKRPHN AVAIL STAY OFF HOOK.) To use a system speakerphone resource (if available): — While on hook, press SPKR . — Dial the desired extension or telephone number. Default Station Operation This feature returns keyset volumes to default levels; cancels do-not-disturb, manual call forwarding, background music, and queue requests; and restores handsfree mode, pages, hunt group calls, and system forwarding all at once. To return your phone to default: — Dial 3 9 4 . Date, Time, Name, and Extension Number Display This feature temporarily displays the system date and time, user name, and extension number during a call or when other displays are shown. To show the date and time display (while on a call, in do-not-disturb, etc.): — Press SPCL and dial 3 0 0 . 29 Standard & Basic Keyset User Guide Inter-Tel AXXESS Background Music If your telephone system is equipped with a music source, you can listen to music through your keyset speaker. To enable or disable background music: — Dial 3 1 3 . Hookflash A timed hookflash (a quick hangup and release) may be required for certain telephone company services. This feature code sends a timed hookflash over the outside line when used. To generate a hookflash while using a line: — Press SPCL and dial 3 3 0 . Group Listen The Group Listen feature allows a keyset user to transmit a conversation over the keyset speaker while using a handset or headset. This allows other people in the room to listen to the conversation. However, the keyset microphone remains disabled so that only the headset or handset user can speak. This feature cannot be used on a handsfree call. The user must be on a call using the handset or a headset before entering the feature code. Group Listen cannot be used on Single-Line sets. To turn the group listen feature on or off during a call: While on a call using the handset or a headset, press ∞ and dial 3 1 2 . You hear a confirmation tone and the display shows GROUP LISTEN ON or GROUP LISTEN OFF. (The other party will not hear the confirmation tone.) NOTE: When the feature is active in handset mode, the Speaker key lamp will remain unlit, even though the speaker is on. This allows you to place the call into handsfree mode at any time during the call by pressing the Speaker key key. When the feature is active in headset mode, the Speaker key lamp is lit. Pressing the key will disconnect the call. 30 Inter-Tel AXXESS Standard & Basic Keyset User Guide SPECIAL PROGRAMMING Ring Tone Selection The tone of your keyset’s ring signals can be changed to create distinctive ringing. If phones are placed close together, changing the tone makes each phone’s ring easier to recognize. To select the type of ring tone for your keyset: — While on hook, dial 3 9 8 . — Do one of the following to select your ring tone: • Press 0 for no ringing. • Dial 1–9 to select a specific tone or use the VOLUME key to scroll through the tones. — When you hear the tone you want, press # . Automatic Call Answer The “Automatic Call Answer” feature determines the method you will use to answer outside calls and intercom calls. You can choose to answer simply by lifting the handset (or pressing the SPKR key). Or, you can answer by first lifting the handset (or pressing the SPKR key) and then pressing the flashing key. To specify how ringing outside calls are answered: — While on hook, dial 3 6 0 to turn on or off automatic line answer (answering outside calls automatically by lifting the handset). To specify how ringing (non-handsfree) intercom calls are answered: — While on hook, dial 3 6 1 to turn on or off automatic intercom answer (answering ringing intercom calls automatically by lifting the handset). Programming for Private Intercom Calls You can place private (non-handsfree) intercom calls whenever you wish by pressing the pound (#) key before dialing the extension number. Or, your phone can be programmed to always send and/or receive private calls using the Ring Intercom Always or Handsfree Disable features described below. To place only private intercom calls (Ring Intercom Always) or to cancel the Ring Intercom Always feature: — While on hook, dial 3 7 7 . To disable or re-enable your keyset’s handsfree answering feature: — While on hook, dial 3 1 9 . 31 Standard & Basic Keyset User Guide Inter-Tel AXXESS Multilingual Capability Your telephone system may provide a choice between English and Japanese prompts and displays. An option in the database determines the language that will be used by each phone. If your keyset is programmed for English, all displays appear in English and all AXXESSORY Talk voice mail prompts are delivered in English (unless changed, as outlined below). If programmed for Japanese, all displays appear in Katakana characters and all voice prompts are played in Japanese (unless changed). By default, all phones are set for English. Keyset-programmed messages can include English or Katakana characters, or a combination. In displayed lists, such as directories, the English characters are alphabetized before the Katakana characters. Therefore, Katakana names will appear after the English names. To change the assigned language for your phone: — Dial 3 0 1 to change between English and Japanese, as desired. Your display shows the current language. Station Password This password is used for the Remote Programming feature described on the next page. To change the station password from your station: — Dial 3 9 2 . — Enter your current password, followed by number.) — Enter the new password followed by # # . (At default it is your extension . You hear a confirmation tone. — Enter the new password again for verification followed by firmation tone. # . You hear a con- To change the station password using remote programming: See next page. 32 Inter-Tel AXXESS Standard & Basic Keyset User Guide REMOTE PROGRAMMING The Remote Programming feature allows a user to place a phone in do-not-disturb mode (DND) or forward the station’s calls, either from another station or through DISA. For your convenience, a pocket-sized Remote Programming guide is attached to the card stapled in the middle of this guide. To access to the Remote Programming feature: — EITHER, Call your AXXESS DISA number (provided by your system administrator). If required, enter your DISA password. OR, use any phone on the system. — Enter 3 5 9 . — Enter extension to be programmed. — Enter the extension’s password followed by following features. # . You can now use any of the To change the station password using Remote Programming: — Enter 3 9 2 . — Enter the new password, followed by # . — Enter the new password again for verification, followed by # . To turn on Do-Not-Disturb: — Enter 3 7 0 . — Enter message number (01--20) and, if desired, enter the optional second-line message text. — Hang up. To turn off Do-Not-Disturb: Enter 3 7 1 and hang up. To turn on Call Forward: — Enter one of the following Call Forward feature codes. $OO &DOOV ,I %XV\ ,I 1R $QVZHU ,I 1R $QVZHU%XV\ — Enter an extension number or enter a trunk access code followed by an outside telephone number. — Hang up. To turn off Call Forward: Enter 3 5 5 and then press # and hang up. 33 Standard & Basic Keyset User Guide Inter-Tel AXXESS HUNT GROUP REMOVE/REPLACE Your system may be programmed with “hunt groups.” These are groups of stations that share a common extension number in addition to having individual extension numbers. (A phone that is part of a hunt group can also be called directly using its individual extension number.) The phone or phones that receive the call when a hunt group extension number is dialed is determined by a list programmed in your telephone system’s software. If you are a member of a hunt group, you can use the following procedure to determine when you will receive hunt group calls. To prevent your keyset from receiving hunt group calls or to allow it to receive hunt group calls again: — Dial 3 2 4 to remove or replace hunt group calls. ACD HUNT GROUPS ACD hunt groups use a special feature called “Automatic Call Distribution” (ACD) that distributes the hunt group calls equally among the available members. ACD hunt group members are referred to as “agents.” Agents can log in to and out of the ACD hunt group at any time. While logged in, the agent will receive calls through the ACD hunt group. When the agent is logged out, calls to that ACD hunt group will bypass the agent. If your phone is in an ACD hunt group, use the following procedures to log in and out. ACD Agent IDs There is an ACD hunt group option that allows the use of Agent ID numbers in place of station extensions in the hunt group list. ACD hunt group members are referred to as “agents.” Agents log in to the ACD hunt group to receive calls and log out to halt ACD hunt group calls. An ACD hunt group can be programmed to circulate calls to agents in two ways: • Agent IDs: If the hunt group is programmed to use ACD Agent IDs, each agent is assigned an Agent ID number to enter during the login procedure (described below). The hunt group calls are routed to logged in agents, according to their Agent ID number instead of their station extension. Because the Agent ID is not associated with any station extension, the agent can use any station in the system to log in and does not have to use the same station every time. • Members: If the hunt group is not programmed to use Agent IDs, it will have a list of stations and will send calls to the stations where agents are logged in. 34 Inter-Tel AXXESS Standard & Basic Keyset User Guide When the ACD Agent ID Automatic Connect flag and headset mode are enabled, ACD hunt group calls will automatically be connected following a short ring burst. When the ACD agent logs in or removes the station from do-not-disturb mode, the first call will ring until the ACD agent answers it. However, every time an ACD hunt group call is received after the first call, the agent will hear the ring burst in the headset and the call will be automatically connected. ACD Hunt Group Login — To log in to all of your ACD hunt groups at once using the ACD Agent Login/ Logout feature code: While on or off hook, dial 3 2 8 . If you were already logged in, the display shows AGENT LOGGED OUT OF ALL ACDS and you hear a confirmation tone. If you were not logged in, continue to the next step. To log in to one or more hunt groups using the ACD Agent Login feature code: While on or off hook (single-line users must lift the handset), dial 3 2 6 . The display shows AGENT LOGIN ACD NUMBER. Enter the pilot number of the desired ACD hunt group. (Or you can press # to log in to several ACD hunt groups at once.) If you entered an invalid hunt group number, the display shows NOT AN ACD HUNT GROUP and you hear reorder tones. — The display shows AGENT LOGIN AGENT ID. Then do one of the following: To log into to ACD hunt group(s) using Agent IDs: Enter your Agent ID. The display shows AGENT LOGGED INTO ALL ACDS. You are logged into the ACD hunt group(s) that you requested above, that use the Agent ID that you entered in this step. If another Agent ID is already logged in at this station, you hear reorder tones and the display shows DIFFERENT AGENT ID ALREADY USED. You must have the other agent log out before you can use that station. To log into to ACD hunt group(s) that do not use Agent IDs: Press # . The display shows AGENT LOGGED INTO ALL ACDS. You are logged into the ACD hunt group(s) that you requested above that do not use Agent IDs. If you were already logged in, the display shows ALREADY LOGGED INTO <hunt group>. If you are not a member of the entered hunt group, the display shows NOT AN AGENT IN THIS HUNT GROUP and you hear reorder tones. Start over. — If off hook, hang up. Repeat this procedure to log into additional ACD groups, if necessary. 35 Standard & Basic Keyset User Guide Inter-Tel AXXESS ACD Hunt Group Logout To log out of one or more ACD hunt group: — EITHER, Dial 3 2 8 to log out of all of your ACD hunt groups at once.The display shows AGENT LOGGED OUT OF ALL ACDS and you hear a confirmation tone. Hang up if off hook. OR, While on or off hook, dial appear: 3 2 7 . One of the following displays will • If you were logged in to only one hunt group, the display shows AGENT LOGGED OUT OF <hunt group>. The procedure is complete. • If you were logged in to more than one hunt group, the display shows AGENT LOGOUT ACD NUMBER. Dial the extension number of the desired ACD hunt group. • If you were not logged in to any hunt group, the display shows NOT LOGGED INTO ANY ACD GROUP. Start over. — If off hook, hang up. ACD Agent Wrap-Up Terminate Each time an agent ends an ACD hunt group call, a timer is started. Until that timer expires, the agent will not receive another call through any ACD hunt group. If an agent wishes to end the wrap-up session before the timer expires, he or she can use the following procedure. To terminate the ACD Agent wrap-up period before the timer expires: — While on hook, dial 3 2 9 . (If you were not logged in to an ACD hunt group, the display shows CANNOT ACCESS RESERVED FEATURE.) ACD Agent ID Automatic Connect Flag When the ACD Agent ID Automatic Connect flag is enabled for your station (by the system programmer), and headset mode is enabled at your station, ACD hunt group calls will automatically be connected following a short ring burst. When the you log in as an ACD Agent or remove your station from do-not-disturb mode while logged in, the first call will ring until you answer it. However, every time an ACD hunt group call is received after the first call, you will hear the ring burst in the headset and the call will be automatically connected. 36 Inter-Tel AXXESS Standard & Basic Keyset User Guide VOLUME CONTROLS Volume levels for various keyset functions can be adjusted by pressing one edge of the VOLUME feature key to adjust the volume up or down. On some keysets there are up and down arrows on the key; on other keysets an illustration on the key (that looks ) represents higher and lower volume levels. Press the lower like this end in place of the down arrow and the higher end in place of the up arrow. To change your keyset volume levels: — To adjust the volume levels of the eight basic functions of your keyset, press VOL to increase the volume or press VOL to decrease the volume while listening to or performing one of the following: • Handset intercom call (changes handset intercom voice volume) • Speakerphone intercom call (changes handsfree intercom voice volume) • Handset outside call (changes handset outside call voice volume) • Speakerphone outside call (changes handsfree outside call voice volume) • Background music through the keyset speaker (changes background music volume) • Ringing through the keyset speaker (changes ringing alert tone volume) Note: To change the ringing alert tone while your keyset is idle, press VOL and VOL at the same time to hear the current volume. Then adjust the volume by pressing VOL or VOL . The selected volume level is automatically saved. • Intercom dial tone through the handset (changes handset progress tone volume) • Intercom dial tone through the keyset speaker (changes speakerphone progress tone volume) — If desired, press VOL and VOL at the same time to save the new volume level for the particular function. If this step is not performed, the keyset will retain the previously saved volume level for that function (except for the ringing alert tone volume, which is automatically saved at the most current volume level). To return your keyset to the default volume levels: — Dial 3 9 4 . (Dialing this feature code also cancels do-not-disturb, manual call forwarding, background music, and queue requests; and restores handsfree mode, pages, hunt group calls, and system forwarding.) 37 Standard & Basic Keyset User Guide Inter-Tel AXXESS DEFAULT FEATURE CODES Use the blank spaces below to enter custom feature codes if your telephone system has been reprogrammed with new codes. Outside Line Access Codes: Select Line Group 1–208 . . . . . . . . . . . . . . . . . . . . 9201–9299, 93000–93107_____ Automatic Route Selection . . . . . . . . . . . . . . . . . . . . . . . . . . . . . . . . . . . 9200_____ Emergency Call . . . . . . . . . . . . . . . . . . . . . . . . . . . . . . . . . . . . . . . . . . . . . 911_____ Outgoing Call . . . . . . . . . . . . . . . . . . . . . . . . . . . . . . . . . . . . . . . . . . . . . . . . . 8_____ Extension Numbers: Stations . . . . . . . . . . . . . . . . . . . . . . . . . . . . . . . . . . . . . . . . . . . . . . 1000–1511_____ Hunt Groups . . . . . . . . . . . . . . . . . . . . . . . . . . . . . . . . . . . . . . . . . . 2000–2074_____ Attendant . . . . . . . . . . . . . . . . . . . . . . . . . . . . . . . . . . . . . . . . . . . . . . . . . . . . 0_____ General Station Feature Codes: Account Code — Following Calls . . . . . . . . . . . . . . . . . . . . . . . . . . . . Account Code — Optional . . . . . . . . . . . . . . . . . . . . . . . . . . . . . . . . . . . . ACD Agent Log In . . . . . . . . . . . . . . . . . . . . . . . . . . . . . . . . . . . . . . . . . . ACD Agent Log Out . . . . . . . . . . . . . . . . . . . . . . . . . . . . . . . . . . . . . . . . . ACD Agent Log In/Out . . . . . . . . . . . . . . . . . . . . . . . . . . . . . . . . . . . . . . . ACD Agent Wrap-Up Terminate . . . . . . . . . . . . . . . . . . . . . . . . . . . . . . . Agent Help Request . . . . . . . . . . . . . . . . . . . . . . . . . . . . . . . . . . . . . . . . . . Agent Help Reject . . . . . . . . . . . . . . . . . . . . . . . . . . . . . . . . . . . . . . . . . . . Answer (Ringing Call) . . . . . . . . . . . . . . . . . . . . . . . . . . . . . . . . . . . . . . . . Automatic Intercom Access On/Off . . . . . . . . . . . . . . . . . . . . . . . . . . . . . Automatic Line Access On/Off . . . . . . . . . . . . . . . . . . . . . . . . . . . . . . . . . Automatic Line Answer . . . . . . . . . . . . . . . . . . . . . . . . . . . . . . . . . . . . . . . Background Music On/Off . . . . . . . . . . . . . . . . . . . . . . . . . . . . . . . . . . . . . Call Forward All Calls . . . . . . . . . . . . . . . . . . . . . . . . . . . . . . . . . . . . . . . . Call Forward If Busy . . . . . . . . . . . . . . . . . . . . . . . . . . . . . . . . . . . . . . . Call Forward If No Answer . . . . . . . . . . . . . . . . . . . . . . . . . . . . . . . . . . Call Forward If No Answer/Busy . . . . . . . . . . . . . . . . . . . . . . . . . . . . . Conference . . . . . . . . . . . . . . . . . . . . . . . . . . . . . . . . . . . . . . . . . . . . . . . . . Change Language . . . . . . . . . . . . . . . . . . . . . . . . . . . . . . . . . . . . . . . . . . . . Data . . . . . . . . . . . . . . . . . . . . . . . . . . . . . . . . . . . . . . . . . . . . . . . . . . . . . . . Default Station . . . . . . . . . . . . . . . . . . . . . . . . . . . . . . . . . . . . . . . . . . . . . . Directory . . . . . . . . . . . . . . . . . . . . . . . . . . . . . . . . . . . . . . . . . . . . . . . . . . . Display Time And Date . . . . . . . . . . . . . . . . . . . . . . . . . . . . . . . . . . . . . . . Do-Not-Disturb . . . . . . . . . . . . . . . . . . . . . . . . . . . . . . . . . . . . . . . . . . . . . . Do-Not-Disturb Cancel . . . . . . . . . . . . . . . . . . . . . . . . . . . . . . . . . . . . . Do-Not-Disturb On/Off . . . . . . . . . . . . . . . . . . . . . . . . . . . . . . . . . . . . . Do-Not-Disturb Override . . . . . . . . . . . . . . . . . . . . . . . . . . . . . . . . . . . . 38 391_____ 390_____ 326_____ 327_____ 328_____ 329_____ 375_____ 376_____ 351_____ 361_____ 360_____ 350_____ 313_____ 355_____ 357_____ 356_____ 358_____ 5_____ 301_____ 340_____ 394_____ 307_____ 300_____ 370_____ 371_____ 372_____ 373_____ Inter-Tel AXXESS Standard & Basic Keyset User Guide General Station Feature Codes (continued): Enhanced Speakerphone Enable . . . . . . . . . . . . . . . . . . . . . . . . . . . . . . . . Feature Key Default . . . . . . . . . . . . . . . . . . . . . . . . . . . . . . . . . . . . . . . . . . Group Listen . . . . . . . . . . . . . . . . . . . . . . . . . . . . . . . . . . . . . . . . . . . . . . . . Handsfree On/Off . . . . . . . . . . . . . . . . . . . . . . . . . . . . . . . . . . . . . . . . . . . . Headset On . . . . . . . . . . . . . . . . . . . . . . . . . . . . . . . . . . . . . . . . . . . . . . . . . Headset Off . . . . . . . . . . . . . . . . . . . . . . . . . . . . . . . . . . . . . . . . . . . . . . . Headset On/Off . . . . . . . . . . . . . . . . . . . . . . . . . . . . . . . . . . . . . . . . . . . . Hold — Individual . . . . . . . . . . . . . . . . . . . . . . . . . . . . . . . . . . . . . . . . . . . Hold — System . . . . . . . . . . . . . . . . . . . . . . . . . . . . . . . . . . . . . . . . . . . . . Hookflash . . . . . . . . . . . . . . . . . . . . . . . . . . . . . . . . . . . . . . . . . . . . . . . . . . Hunt Group Remove . . . . . . . . . . . . . . . . . . . . . . . . . . . . . . . . . . . . . . . . . Hunt Group Replace . . . . . . . . . . . . . . . . . . . . . . . . . . . . . . . . . . . . . . . Hunt Group Remove/Replace . . . . . . . . . . . . . . . . . . . . . . . . . . . . . . . . Message . . . . . . . . . . . . . . . . . . . . . . . . . . . . . . . . . . . . . . . . . . . . . . . . . . . Cancel Message That You Left . . . . . . . . . . . . . . . . . . . . . . . . . . . . . . . Cancel Current Message On Your Phone . . . . . . . . . . . . . . . . . . . . . . . Silent Message . . . . . . . . . . . . . . . . . . . . . . . . . . . . . . . . . . . . . . . . . . . . Microphone Mute On/Off . . . . . . . . . . . . . . . . . . . . . . . . . . . . . . . . . . . . . Page . . . . . . . . . . . . . . . . . . . . . . . . . . . . . . . . . . . . . . . . . . . . . . . . . . . . . . . Page Receive On/Off . . . . . . . . . . . . . . . . . . . . . . . . . . . . . . . . . . . . . . . . . Program Baud Rate . . . . . . . . . . . . . . . . . . . . . . . . . . . . . . . . . . . . . . . . . . Program Keys . . . . . . . . . . . . . . . . . . . . . . . . . . . . . . . . . . . . . . . . . . . . . . . Program Station Password . . . . . . . . . . . . . . . . . . . . . . . . . . . . . . . . . . . . . Queue (Callback) Request . . . . . . . . . . . . . . . . . . . . . . . . . . . . . . . . . . . . . Record-A-Call . . . . . . . . . . . . . . . . . . . . . . . . . . . . . . . . . . . . . . . . . . . . . . Redial . . . . . . . . . . . . . . . . . . . . . . . . . . . . . . . . . . . . . . . . . . . . . . . . . . . . . Reminder Message . . . . . . . . . . . . . . . . . . . . . . . . . . . . . . . . . . . . . . . . . . . Reminder Message Cancel . . . . . . . . . . . . . . . . . . . . . . . . . . . . . . . . . . . Remote Programming . . . . . . . . . . . . . . . . . . . . . . . . . . . . . . . . . . . . . . . . Reverse Transfer (Call Pick-Up) . . . . . . . . . . . . . . . . . . . . . . . . . . . . . . . . Review Keys . . . . . . . . . . . . . . . . . . . . . . . . . . . . . . . . . . . . . . . . . . . . . . . . Ring Intercom Always On/Off . . . . . . . . . . . . . . . . . . . . . . . . . . . . . . . . . Ring Tone Selection . . . . . . . . . . . . . . . . . . . . . . . . . . . . . . . . . . . . . . . . . . Station Monitoring . . . . . . . . . . . . . . . . . . . . . . . . . . . . . . . . . . . . . . . . . . . Station Speed Dial . . . . . . . . . . . . . . . . . . . . . . . . . . . . . . . . . . . . . . . . . . . Station Speed Dial Programming . . . . . . . . . . . . . . . . . . . . . . . . . . . . . System Forward Enable . . . . . . . . . . . . . . . . . . . . . . . . . . . . . . . . . . . . . . . System Forward Disable . . . . . . . . . . . . . . . . . . . . . . . . . . . . . . . . . . . . System Forward On/Off . . . . . . . . . . . . . . . . . . . . . . . . . . . . . . . . . . . . . System Speed Dial . . . . . . . . . . . . . . . . . . . . . . . . . . . . . . . . . . . . . . . . . . . Switch Keymap . . . . . . . . . . . . . . . . . . . . . . . . . . . . . . . . . . . . . . . . . . . . . Transfer To Hold . . . . . . . . . . . . . . . . . . . . . . . . . . . . . . . . . . . . . . . . . . . . Transfer To Ring . . . . . . . . . . . . . . . . . . . . . . . . . . . . . . . . . . . . . . . . . . . . 39 310_____ 395_____ 312_____ 319_____ 315_____ 316_____ 317_____ 336_____ 335_____ 330_____ 322_____ 323_____ 324_____ 365_____ 366_____ 368_____ 367_____ 314_____ 7_____ 325_____ 393_____ 397_____ 392_____ 6_____ 385_____ 380_____ 305_____ 306_____ 359_____ 4_____ 396_____ 377_____ 398_____ 321_____ 382_____ 383_____ 352_____ 353_____ 354_____ 381_____ 399_____ 346_____ 345_____ Standard & Basic Keyset User Guide NOTES 40 Inter-Tel AXXESS