1
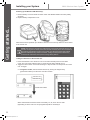
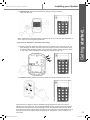
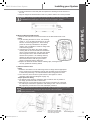
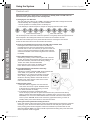
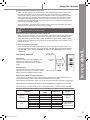
Installing your System
BLY1 Wireless Alarm System
Installing the Control unit
• Remove and retain the two holding screws from front cover of control unit and carefully hinge off the front cover.
ST3x25KA
screw
Hole depth ˃22mm
5~6mm
protrude surface
• Place the control unit Tighten the
base mounting screw to
plate on the wall at fasten the
the chosen location. base plate on
surface
Mark and drill 4mm holes for the two Base Plate
mounting screws. Insert 2.6mm thick
wall plugs and have the top mounting screw screwed in to protrude by about 5 to 6mm before hanging the control unit base mounting plate on wall.
98mm
Getting started...
Fitting
• Align the control unit base mounting plate to vertical position before final tightening of both
mounting screws.
Battery Clip
From External
15V Adaptor
•Wire up the Main Power Adaptor to the control unit, but DO NOT plugs the adaptor into the main supply at this stage.
• Do not install the 9V back up battery (provided with this kit) at this stage, but note its installation position for later.
6LR61 size
9V alkaline
battery
Battery
Compartment
Powering the Control unit
Battery
Cover
• Put back the front cover carefully and secure it with the two holding screws, complete with the screw covers (plugs).
• Power up the Main Power Adaptor to power the control unit. The POWER LED will light up and the TAMPER LED will flash since no backup power is installed yet.
•If the alarm sounds then enter the factory user PIN 1234 to silence the system.
Base Mounting
Plate
WARNING: The control
unit must never be
operated from the mains
with the front cover
opened. The user PIN
code is factory set to 1-23-4. If the system sounds
during the installation,
pressing the factory set
code of 1-2-3-4 will silence
the system.
Control Unit
External 15V
Adaptor
2 Pieces of M3 x 10mm
retaining screws
9
Wireless Alarm System.indd 10
01/06/2012 10:57