1
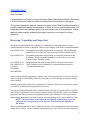
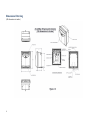
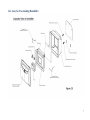
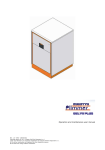
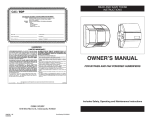
Wine Cellar Cooling Systems Humidifier Installation, Operation and Maintenance Guide Manufactured by: www.wineguardian.com Syracuse, NY www.airinnovations.com Wine Guardian reserves the right, without notice, to make changes to this document at its sole discretion. Please visit out web site for the most current version of the Wine Guardian manual and other literature. Wine Guardian is a registered trademark (2,972,262) of Air Innovations, Inc. Edition 04/2014 © Air Innovations, 2014 0 TABLE OF CONTENTS Directory of Terms ...................................................................................... 2 Introduction ................................................................................................. 3 Receiving, Unpacking and Inspection .......................................................................... 3 General Description .................................................................................... 4 Size and Capacity ........................................................................................................ 5 Overview..................................................................................................... 5 Dimensional Drawing ................................................................................................... 6 Cut Away for Freestanding Humidifier ......................................................................... 7 Wiring Diagram - Integrated Humidifier........................................................................ 8 Wiring Diagram - Freestanding Humidifier ................................................................... 9 Safety ....................................................................................................... 10 Installation ................................................................................................................. 10 Pre-Installation Check................................................................................................ 10 Installation with Freestanding Model ......................................................... 11 Freestanding Installation ........................................................................... 12 Wine Guardian-Mounted (Integrated Installation) ...................................... 13 Attaching Humidifier to Ducted Wine Guardian unit (integrated installation)............. 14 Location of WG Unit Connection for Communication Cable from Humidifier ............. 14 Controller Set-Up Instructions ................................................................... 15 Mounting the Humidistat ........................................................................... 16 Maintenance ............................................................................................. 17 Suggested Maintenance Schedule ............................................................................ 17 Monthly .................................................................................................................. 17 Yearly ..................................................................................................................... 17 Cleaning the Humidifier and Replacement of Evaporative Drip Pad ...................... 18 Humidifier Water Line Maintenance ........................................................................... 19 Water Line Maintenance Detail .................................................................................. 20 Wine Guardian Warranty .......................................................................... 21 1 Directory of Terms Ambient – the area outside the cellar. Could be another room, a basement, garage or outside. BTU/H – British Thermal Unit per Hour is a unit of heat measurement. For example, one ton of cooling equals 12,000 BTU/H. Cellar – cubic feet per minute. Unit of measurement for the amount of air being handled by fan. Condensate/Condensation – the water formed out of the air when it is cooled below a certain temperature (called dew point). Often referred to as “sweating” on pipes and cold surfaces. This water is collected at the bottom of the evaporator or cooling coil and drains out of the unit through the drain line. CSA – Canadian Standards Association Evaporative pad – the wire mesh pad inside the humidifier that becomes coated with water as the water drips down by gravity. Air being drawn over the pad by a fan causes the water to evaporate into the air, increasing its moisture content. Grille or Diffuser – inlet or outlet plates that direct the airflow or protect the inside of the unit. Humidistat – an electrical instrument that measures the relative humidity of air and reads in percent (%). Humidity – relative humidity is the percentage of moisture in the air relative to the maximum amount of moisture the air could hold at any particular condition. Relative humidity is what is most widely used and is what a humidistat measured. For example, 100% relative humidity means the air has as much moisture as it can possibly hold at that temperature. Absolute or specific humidity is the specific amount of moisture (usually measured in grains of moisture per point of air) in the air at a given air condition. Heat Gain/Loss – the amount of cooling or heating expressed in BTU/H that is gained or lost into or out of the wine cellar to the ambient space. It is this load that the Wine Guardian must be able to offset. Moisture – water that has been evaporated into the air. NEC – National Electrical Code Recovery – the amount of cooling or humidifying required to return the cellar to its set point temperature or humidity after some new load has been introduced, such as people in cellar or new cases of warm wine coming in. Return/Inlet Air – the air returning from the cellar and entering the evaporator section of the Wine Guardian unit. Also the air entering the condenser section. Set point – the desired temperature or humidity that is set on the Thermostat or Humidistat. SP – static pressure. Unit of measurement (in inches of water column) of the pressure of the air being handled by the fan. Supply/Discharge Air – the air leaving the Wine Guardian unit and going into the cellar from the evaporator section. Also the air leaving the condenser section. UL – Underwriters Laboratory 2 Introduction Dear Customer: Congratulations and thank you for purchasing a Wine Guardian® Humidifier. We believe it to be the best wine cellar humidifier on the market and hope that you will agree. This guide is intended to help the installer and owner of the Wine Guardian Humidifier to properly install and maintain the equipment. In order to ensure optimal performance, the equipment should be installed properly and have proper care and maintenance. Please read this guide carefully, especially the safety instructions, and keep it for future reference. Receiving, Unpacking and Inspection This Wine Guardian Humidifier is shipped in a cardboard box. Each humidifier is factory assembled and tested prior to shipment. There are three models of the Wine Guardian humidifier. Part #99H0174-00 Freestanding humidifier supplied with its own grille, This freestanding humidifier is to be used in a wine room with a Wine Guardian system. Part #99H0185-00 Freestanding humidifier supplied with its own grille, transformer and humidistat. This freestanding humidifier is to be used in a wine room without a Wine Guardian system. Part #99H0173-00 Part #99H0187-00 Controller (For models D200 &SS200) Integrated humidifier that mounts directly to the side of any ducted Wine Guardian system. Humidifier is controlled Remote Interface via communication cable. Upon receipt and before opening the container, inspect the packing crates or boxes for obvious signs of damage or mishandling. Write any discrepancy or visual damage on the bill of lading before signing. Find the packing slip and check for completeness of contents. Make sure it is the correct model you ordered, including factory options and accessories. Your Wine Guardian Humidifier has a communication cable that gets wired directly to the side of the Wine Guardian unit, a drain line that requires piping to an open floor drain or condensate pump and water fill line. Inspect all equipment for any sign of damage or loose parts caused during transit. Immediately report all visual or concealed damage to the carrier and file a claim. NOTE: If this procedure is not followed, the shipping company may reject the claim and the consignee may suffer the loss. Do not return the shipment to the factory. The Freestanding Humidifier (part # 99H0185-00) ships with a humidistat that must be mounted within the wine cellar, a power cord with transformer plug, a water fill line and water drain line. 3 General Description The Wine Guardian Humidifier is a self-contained unit designed specifically for wine cellars. It has been designed for easy installation and operation, either as a freestanding unit or mounted on a Wine Guardian cooling unit. Wine Guardian uses a humidistat to sense and control the amount of moisture needed to be added to the cellar. Humidifiers are not intended to remove moisture, only add moisture. All components are of a high quality, standard commercial grade. The humidifier, depending upon model, operates with 24-volt power or digital signal from the Wine Guardian control panel, and therefore does not require UL or CSA approval. All wiring complies with NEC. Wine Guardian Humidifiers are the evaporative drip pad-type. Air from the cellar is drawn over a distribution pad that is saturated with water from a distribution tray. As the air passes through the pad, it absorbs moisture through evaporation of the water. This raises the humidity of the leaving air that returns to the cellar. Warm water is recommended for use with the humidifier (105°F max.), however the system will work using cold water. Warm water increases the capacity of the humidifier to evaporate the water as it passes through the pad. The warm water also leaves fewer solids on the surfaces of the pad and flushes contaminants out of the pad. Excess water is collected in the bottom trough and exits through the drain. To avoid build-up of mineral deposits on the pad and potentially causing blockage of the air flow, it is recommended that hard water be treated (filtered and softened). Install a 5- or 10micron in-line water filter ahead of the humidifier to keep dirt from fouling the inlet screen and the evaporation pad inside. If the water has a high mineral content, a softener may be needed to prevent excessive scale from building up too rapidly on the pad. Additionally, to insure adequate wetted surfaces and to help flush away excess minerals, the water flow is set to always have a flow of water to the drain. When operating, the humidifier will use approximately 1 to 2 gallons of water per hour depending on the water pressure in the building. About 60% of that will pass through and go out the drain. There is a strainer and an orifice in the line to restrict the flow of water but a throttling valve may be needed to keep too much water from going to the pad. All that is needed is a steady dripping of water out of the drain to ensure adequate wetting and flushing of the pad media. Excess water does not negatively impact the humidifier’s operation but neither does it contribute to more humidification. The drain volume is too much for just a bucket. A gravity drain line should be piped to an open floor or sink drain, or a condensate pump may be used where a gravity drain is impractical. This excess drain water can be discharged directly onto the ground. The discharge of the drain can be combined into the condensate drain from the cooling unit. The humidistat, located in the cellar, will automatically turn on the humidifier whenever the cellar humidity is below the set point and turns it off when the cellar humidity reaches set point. The recommended setpoint is 55% for wine cellars. This humidity level is high enough to prevent corks from drying out and low enough to prevent mold from forming. When the humidifier turns on, the water solenoid valve opens and the fan turns on. When mounted and connected to a Wine Guardian cooling unit, the humidistat also controls the main fan to circulate air to and from the cellar. 4 CAUTION CAREFULLY FOLLOW THE INSTALLATION INSTRUCTIONS INCLUDED WITH THE HUMIDIFIER. REFER TO THE MANUFACTURER’S INSTRUCTIONS CONTAINED IN THE BOX FOR THE HUMIDISTAT. WE RECOMMEND YOU KEEP THESE INSTRUCTIONS IN A FOLDER ALONG WITH THIS GUIDE FOR FUTURE REFERENCE. Size and Capacity The Wine Guardian Humidifier uses a 10” wide x 11” high x 2” thick expanded coated aluminum pad. Its rated output capacity for wine cellars is 60°F and 50%RH is 1.6 gallons per day (gpd) with 60°F water supply, 3.3 gpd and with 90°F water. The weight of an operating humidifier is approximately 10 lbs. See Figure 1.0 dimensions. Overview (Refer to call-outs on Fig. 2.0) Adapter plates – metal plates used to mount the humidifier to the different sizes of Wine Guardian cooling units. Cabinet – the cabinet and access doors are constructed of ABS(Acrylonitrile Butadiene Styrene) plastic. This provides corrosion protection and an attractive, maintenance-free appearance. Distribution tray – the plastic water trough into which the water drips and is distributed evenly over the drip pad through several holes evenly spaced in the trough. Drain – collects excess water at the bottom of the pad and is piped to an external drain. Electrical controls – most of the electrical components and controls are located inside the humidifier enclosure. All wiring is done in accordance with the National Electrical Code. Wires are numbered and color coded to match the wiring diagrams. Evaporative drip pad – the expanded metal pad through which the cellar air flows and the water drips down the surfaces. Factory tested – all Wine Guardian Humidifiers are run in the factory and tested for operational performance prior to shipment. Fan – turns “On” and “Off” on signal from the humidistat when humidity in the cellar is required. The fan draws air across the evaporative drip pad to absorb moisture. Grille – for freestanding applications only. Used to separate the inlet air from the discharge air. Orifice – small fitting with a very small hole in the center to restrict the flow of water.Strainer – conical shaped stainless steel screen in a plastic frame to capture any sediment in the water and keep it from plugging the orifice. Water solenoid valve – opens and closes to control the flow of water into the distribution trough on signal from the humidistat. 5 Dimensional Drawing (All dimensions in inches) 6 Cut Away for Freestanding Humidifier 7 Wiring Diagram - Integrated Humidifier Figure 3.0 8 Wiring Diagram - Freestanding Humidifier Figure 3.1 9 Safety The Wine Guardian Humidifier uses 24-volt power through a 120-volt transformer plug or digital control through the Wine Guardian main control unit. CAUTION BE SURE TO DISCONNECT THE MAIN POWER TO THE COOLING UNIT OR TO THE HUMIDIFIER. THE POWER PLUG OR COMMUNICATION CABLE SHOULD BE DISCONNECTED AT ITS SOURCE BEFORE SERVICING. CAUTION THE WATER SUPPLY TO THE HUMIDIFER MAY BE HOT. TURN OFF THE HUMIDIFER AND ALLOW THE WATER TO COOL BEFORE SERVICING THE HUMIDIFIER. CAUTION METAL AND PLASTIC EDGES CAN BE SHARP AND CAUSE INJURY IF NOT HANDLED PROPERLY. FAN BLADES CAN ALSO BE SHARP. DO NOT PUT FINGERS OR OTHER OBJECTS INTO A MOVING FAN. Installation CAUTION HUMIDIFIER MAY NOT BE INSTALLED WHERE IT MIGHT BE EXPOSED TO FREEZING TEMPERATURES. IF THE COOLING UNIT IS MOUNTED OUTSIDE, THE HUMIDIFIER WILL HAVE TO BE MOUNTED IN THE SUPPLY DUCT TO THE CELLAR INSIDE THE BUILDING OR MOUNTED AS A FREESTANDING UNIT INSIDE THE CELLAR. Pre-Installation Check To check for any possible non-visible shipping damage, you may wish to test the unit before actually installing it. To do so, remove the unit from its packaging and set it on any sturdy level surface. If a freestanding unit, plug in the unit. If the unit is to be mounted into a cooling unit, you need to wire the humidifier to the cooling unit and the cooling unit must be turned on. Set the humidistat above the room humidity. The unit should now come on. The water solenoid should open and the fan should come on. Listen for any unusual noise or vibration. Turn the humidistat below the room condition and the unit should go off. DANGER 10 NEVER MODIFY THIS EQUIPMENT. CHANGES OR MODIFICATIONS MAY VOID THE WARRANTY, CAUSE DAMAGE TO THE EQUIPMENT, AND/OR CREATE A SAFETY HAZARD. NEVER PLACE ANYTHING ON TOP OF THE UNIT. NEVER BLOCK OR COVER ANY OF THE OPENINGS OR OUTLETS OF THE UNIT. NEVER ALLOW ANYTHING TO REST ON OR ROLL OVER THE POWER CORD, AND NEVER PLACE THE UNIT WHERE THE POWER CORD IS SUBJECT TO WEAR OR ABUSE. DO NOT REMOVE OR OPEN ANY ACCESS DOOR OR COVER UNLESS THE UNIT IS UNPLUGGED. Installation with Freestanding Model Stand Alone Humidifier Installation Options Figure 4.0 11 Freestanding Installation 1) Determine where unit will be mounted. a. If wall mounted, use surface mount bracket (71H0572-00-D). Secure bracket to wall. Attach humidifier to the bracket (with drain tube on bottom) using four (4) screws provided. b. If shelf mounted, place humidifier on shelf with drain tube on bottom. You may need to drill a 1” diameter hole in the shelf and route the drain tube through the hole. c. If through-the-wall mounted, frame opening to have studs 16" OC (on center). Attach the Through-the-Wall bracket (71H0571-00-D) to the studs using drywall screws or something similar. Attach humidifier (with drain tube on the bottom) to the bracket using the eight (8) screws provided. Fill in any gaps between the humidifier and the wall framing with insulation. Trim as necessary. 2) Install a ¼”water line from the water supply to connection at the top of the humidifier. A shut-off valve (not provided) is recommended to isolate the humidifier from the water system when needed. 3) Install a ½” flexible drain line from the bottom of the humidifier to an open drain or connect into the drain line from the cooling unit. For humidifier part number 99H0174-00 proceed to steps 4 and 5. For humidifier part number 99H0185-00 proceed to steps 6 and 7. 4) Humidifier part number 99H0174-00 uses the Remote or Local Interface Controller at the Wine Guardian system to monitor and control humidity. Plug communication cable from humidifier into connection at Wine Guardian unit at this time. The communication cable provides power and control signals to humidifier from Wine Guardian main control panel. 5) Proceed to set up of the Remote or Local Interface Controller at Wine Guardian unit to reprogram for humidity control. 6) Install the humidistat on the wall where it is open to the cellar and can be read easily, approximately 60" above the floor. See section on Humidistat Mounting on page 15. 7) Plug transformer plug into wall outlet. The humidifier should now be operational. 12 Wine Guardian-Mounted (Integrated Installation) NOTE: Integrated humidifiers can be mounted in either of the two side openings of the cooling unit on the cooling or evaporator end only. If a duct connection is in that position, move the duct connection to the top or other side. DO NOT MOUNT THE HUMIDIFIER ON THE CONDENSER END OF THE UNIT. 1) Remove side access panel on the side of the cooling unit where you wish to mount the humidifier. 2) Select the proper adapter plate for the cooling unit (D025, SS025, D050, SS050 and D088, SS088 units use the same adapter plate). D200 and SS200 units require a larger adapter plate and install on the side opening using the screws from the panel removed above. The adapter plate allows the humidifier to be mounted in either a forward position or back toward the center by simply rotating the adapter plate 180 degrees. (See Figure 5.0) 3) Install a ½” flexible drain line from the bottom of the humidifier to an open drain or connect into the drain line from the cooling unit. 4) Install a ¼” warm water line from the water supply to the connection at the top of the humidifier. A shut off valve (not provided) is recommended to isolate the humidifier from the water system when needed. 5) Connect the communication cable to the side of the Wine Guardian system as shown in Figure 6 on the following page. The communication cable provides power and control signals to the humidifier from the Wine Guardian main control panel. 6) Proceed to set-up of Remote Interface Controller within the wine cellar to re-program for humidity control 13 Attaching Humidifier to Ducted Wine Guardian unit (integrated installation) Location of WG Unit Connection for Communication Cable from Humidifier Figure 6.0 14 Controller Set-Up Instructions 1. Locate the Wine Guardian remote interface controller within the wine cellar or proceed to the Wine Guardian Through-the-Wall (TTW) main control panel. (Fig. A& Fig. B) 2. Press the mode button and hold it down for five (5) seconds. The screen will advance to the set up menu and "1F" or "Setting #1" will appear on the screen. (Fig. C & Fig. D) Fig. A (TTW) 3. Continue to press the mode button to advance to setup screen "6 0" or "Setting # 6" . (Fig. E & Fig. F.) Fig. B (Ducted) Fig. C (TTW) Fig. D (Ducted) 4. Press the up arrow to advance this setting to either "2" for Freestanding Humidifier or"1) for Integrated Humidifier (mounted at Wine Guardian Unit. (Fig. G. & Fig. H) 5. Controller setup is complete. Fig. E (TTW) Fig. G (TTW) Fig. F (Ducted) Fig. H (Ducted) 15 Mounting the Humidistat (Freestanding humidifier only, Part# 99H0185-00) NOTE: Each Wine Guardian Freestanding humidifier comes with a humidistat and humidistat cable pre-wired to unit. 1) Mount the humidistat on a solid surface away from doors, corners, air outlets or other drafty or heat generating equipment. Do not mount directly on an outside wall or wall adjacent to a boiler room. 2) Use a piece of foam insulation behind the humidistat to insulate it from the hot or cold surface. The recommended height is 4 feet to 5 feet above the floor. The humidistat is often located next to the thermostat. CAUTION THE HUMIDISTAT IS USED IN A BROAD RANGE OF APPLICATIONS AND THE MANUFACTURER’S LITERATURE CONTAINS INFORMATION THAT MAY NOT BE SPECIFIC TO YOUR WINE CELLAR APPLICATION. REFER TO THE MANUFACTURER’S INSTRUCTIONS CONTAINED IN THE BOX WITH THE HUMIDISTAT. WE RECOMMEND YOU FOLLOW WINE GUARDIAN’S HUMIDISTAT INSTRUCTIONS AND SIMPLY RETAIN THE HUMIDIFSTAT MANUFACTURER’S INSTRUCTIONS IN A FOLDER ALONG WITH THE WINE GUARDIAN OPERATION AND MAINTENANCE MANUAL FOR FUTURE REFERENCE. 3) Disregard the wiring diagrams shown within the manufacturer’s instructions. Refer to the wiring diagram shown in this guide on page 8. The remote outdoor sensor is not required for wine cellar applications and should not be programmed for use. 4) Set the humidistat at the desired humidity, recommended between 55% and 60%, which is adequate to prevent drying out of corks. Over-humidifying can cause mold growth and sweating on surfaces and loosening of labels on bottles. NOTE: The humidifier can only add moisture, not remove it. Removal, or dehumidification, is a function of the cooling system as it lowers the temperature of the air across the cooling coil. The humidistat will only control the addition of moisture 16 Maintenance CAUTION BEFORE PERFORMING MAINTENANCE ON THE UNIT, READ AND UNDERSTAND THE SAFETY INFORMATION CONTAINED IN THIS GUIDE. The Wine Guardian Humidifier is designed for minimal maintenance. Never oil any part of the humidifier. Always disconnect the electrical power to the humidifier and the cooling unit prior to servicing. A regular maintenance program prolongs the life of the humidifier and maintains the humidity in the cellar. Frequency of cleaning and replacement of the drip pad depends on the inlet water conditions and the cleanliness of the cellar air. The drain system may also trap dust and dirt. When water no longer stays on the pad or mineral build-up has started to reduce airflow, the pad needs to be replaced. Suggested Maintenance Schedule Monthly (may change to quarterly depending on experience with individual cellar) √ Check drain – clean as needed – confirm steady flow of water while in operation √ Check for noise or vibration Yearly (in addition to above) √ Clean the humidifier and replace humidifier pad if needed (see procedures below) √ Check for any loose fasteners, gaskets or connections √ Check wiring connections and integrity of cords √ Check operation of humidifier fan and water solenoid √ Check to be sure the water supply tube is aimed at the center of the distribution tray between the two center holes. 17 Cleaning the Humidifier and Replacement of Evaporative Drip Pad CAUTION BEFORE STARTING WORK, BE SURE THE POWER TO THE WINE GUARDIAN COOLING UNIT AND HUMIDIFIER ARE TURNED OFF. MAKE SURE THE POWER CORD IS DISCONNECTED FROM THE POWER SOURCE. 1) Start by disconnecting the electrical power and shutting off the water supply. 2) Remove the access panel at the back of the humidifier. 3) Remove the drip pad by lifting up on the spring-loaded drip tray. 4) To clean the drain, pour some hot water mixed with a cleaning solution into the drain area of the humidifier to flush the dirt down the drain tube. 5) Check the humidifier pad. If dirty or excessive mineral deposits are present, install a new evaporative pad. Replace the pad by lifting up on the spring-loaded drip tray. Note: the pad must be installed in the correct position. There is a colored spot painted on one end of the pad. This is the top of the pad and must be installed with the colored spot UP, next to the distribution trough. There is no inlet or outlet side for the airflow, only the requirement that the colored spot be on the top. 6) Be sure the water feed tube is aimed into the center of the tray. 7) Turn on the water and power. 8) Check for operation. See instructions under Start-Up. Be sure water is flowing into the distribution tray and flows freely out the holes and over the pad. If water flow is not a steady flow, the strainer and/or orifice may need service. See below. 9) Re-install the humidifier access cover. 18 Humidifier Water Line Maintenance (See Figure 8.0) 1) Start by disconnecting the electrical power and shutting off the water supply. 2) Remove front cover of humidifier or remove humidifier from ducted Wine Guardian unit (depending on your set-up). 3) Disconnect the water line at the inlet to the solenoid valve. 4) Remove the in-line strainer from inside the inlet fitting by using a small flat-bladed screwdriver. Do not insert anything into the strainer that has a sharp end on it as it might penetrate the strainer and render it useless. 5) Clean the strainer by flushing under hot water or immersing in a demineralizing solution to break down the mineral deposits. Inspect and replace the strainer if it cannot be cleaned or if the screen is damaged. 6) Reinstall the strainer in the valve inlet and replace the tubing and tighten the compression nut. Double wrench to prevent damage and leaks. 7) Disconnect the water line on the outlet of the solenoid valve. 8) Remove the orifice from the copper tube and make sure this small opening is unplugged. 9) Replace the orifice and reconnect the outlet water line. Double wrench to prevent leaking. 10) Reinstall the in-line strainer and reconnect the inlet water line. Double wrench to prevent leaking. 11) Turn on water supply and reconnect electrical power to the humidifier. 12) Check to be sure the water supply tube is aimed at the center of the distribution tray between the two center holes. This will ensure even distribution off water across the entire tray and equally into each of the six holes, thereby evenly wetting the entire surface of the drip pad. 19 Water Line Maintenance Detail Figure 8.0 20 Wine Guardian Warranty Ducted and Humidifier Warranty GENERAL Wine Guardian warrants, to the original buyer, its goods and all parts thereof to be free from defects in material and workmanship for a period of two (2) years from the date of invoicing assuming NORMAL USE AND SERVICE. LIABILITY Wine Guardian liability shall be limited to the repair or replacement (at its option) of any part, which, at our sole discretion, is determined to be defective. The purchaser shall pay all transportation costs. Additionally, if a malfunction occurs within the first year from the date of invoice, Wine Guardian will reimburse the reasonable cost of labor required for the repair or replacement provided authorization is obtained from one of our authorized representatives prior to incurring any labor charges. LIMITATIONS OF LIABILITY THESE WARRANTIES ARE MADE IN LIEU OFF ALL OTHER WARRANTIES EXPRESSED OR IMPLIED, INCLUDING ANY IMPLIED WARRANTY OF MERCHANTABILITY OR FITNESS FOR A PARTICULAR PURPOSE AND IN LIEU OF ANY OTHER OBLIGATION OR LIABILITY, INCLUDING LIABILITY FOR ANY INCIDENTAL OR CONSQUENTIAL DAMAGES. Wine Guardian will not be responsible for any costs or liabilities whatsoever resulting from improper installation or service of its equipment. In the event that Wine Guardian or its distributors are found liable for damage based on any defect or nonconformity in the products, their total liability for each defective product shall not exceed the purchase price of such defective products. No person or representative is authorized to change these warranties or assume any other obligations or liabilities for Wine Guardian in connection with the sale of its systems. INDEMNIFICATION Purchaser agrees to indemnify, hold harmless and defend seller and its officers, directors, agents and employees from and against any and all claims, liabilities, costs and expenses arising out of or related to Purchaser’s use of the goods, or in any way involving injury to person or property or accident occasioned by the goods sold by Wine Guardian to Purchaser. FOREIGN GOVERNMENT AND INDIAN NATIONS If Purchaser is a foreign government or an Indian nation, Purchaser hereby expressly waives its defense of sovereign immunity in the event of a dispute between Purchaser and Wine Guardian regarding this invoice and Purchaser expressly acquiesces to the jurisdiction of the federal and state courts of the United States. SEVERABILITY If one or more of the provisions contained in this contract shall for any reason be held to be invalid, illegal or unenforceable in any respect, such invalidity, illegality or unenforceability shall not affect any provision of this contract, but this contract shall be construed as if such invalid, illegal or unenforceable provision had never been contained. ADDITONAL REQUIREMENTS If a defect covered by the Warranty occurs, contact Wine Guardian for authorization to proceed with corrective action. Do not return any parts or incur any charges for which you expect to be reimbursed under this Warranty without receiving this authorization. If parts are replaced under this Warranty, the defective parts must be returned prepaid within 30 days. This warranty shall be null and void in its entirety if the Serial Number on the air conditioner or compressor is altered, removed or defaced. Wine Guardian An Air Innovations Company 7000 Performance Drive North Syracuse, NY 13212 www.wineguardian.com ~ 800-825-3268 Rev. 3/2012 21