1
BSIH64-ANZ
60cm Induction Hob
BSIH95-ANZ
90cm Induction Hob
INSTALLATION INSTRUCTIONS AND
USE AND MAINTENANCE RECOMMENDATIONS
INDUCTION AND VITROCERAMIC HOBS
BSIH 64-ANZ / 91102078
BSIH 95-ANZ / 91102079
Contents
Introduction
User Guide
Installation
Positioning the hobs
Fixing the hob
Connecting the electricity
Technical information
Dimensions and characteristics
Page 4
5
Use and Maintenance
Touch Control Panel
User Instructions
Pan detector
Blocking cooktop sensors
Stop Function
Heat Sustainment Function
Power Function
Boil Control Function
Safety shut off
Timer function
Total Zone Function
Overheating safety
Power surges in the network
Suggestions and recommendations
Cleaning and care
Environmental considerations
If something doesn't work
7
7
8
8
10
10
11
11
13
13
13
13
14
14
15
16
16
16
17
17
17
19
20
3
Introduction
Notes about the cookware to be used with
your induction hob.
The size of the base of the cookware to be used
should be large enough to completely cover the
cooking zone drawn on the glass.
Depending on the type of cookware (material
and size), the induction zones may work with
smaller cookware.
Please remember that in order to work, the
induction elements need to be used with cookware that has a ferromagnetic base (material
attracted by a magnet).
Always use cookware with a flat, smooth base on the induction elements. Using
cookware with a deformed, concave or curved base can lead to overheating that can
damage the glass or the cookware.
Please take into account that the
cookware that you use can greatly affect the
how well the induction element works. You
may find cookware on the market that,
although marked as being suitable for induction hobs, does not work very well or is not
easily recognised by the induction element
due to the little amount or poor quality of the
ferromagnetic material that the cookware
has in its base.
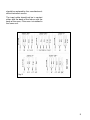
1
3
Model BSIH 64-ANZ
2
4
1 2,300 / 3,200* watt induction element
2 1,850 / 2,500* watt induction element
3 1,400 / 1,800* watt induction element
4 1,850 / 2,500* watt induction element
* Induction power with the Power function
activated.
- Residual heat indicator. (H )
- Maximum induction power: 7,400 watts.
- Power supply voltage: 220-240 volts.
- Frequency: 50/60 hertz.
4
1
Model BSIH 95-ANZ
2
3
4
1 2,300 / 3,700* watt induction element
2 1,400 / 1,800* watt induction element
3 1,850 / 2,500* watt induction element
4 1,850 / 2,500* watt induction element
* Induction power with the Power function
activated.
- Residual heat indicator. (H )
- Maximum induction power: 7,400 watts.
- Power supply voltage: 220-240 volts.
- Frequency: 50/60 hertz.
Guide to Using the Instructions Booklet
Dear Customer,
We are delighted that you have put your
trust in us.
We are confident that the new hob that you
have purchased will fully satisfy your
needs.
This modern, functional and practical
model has been manufactured using topquality materials that have undergone
strict quality controls throughout the manufacturing process.
Before installing and using it, please read
this Manual carefully and follow the instructions closely; this will guarantee better
results when using the appliance.
Keep this Instruction Manual in a safe
place so that you can refer to it easily and
thus abide by the Guarantee conditions.
In order to benefit from this Guarantee, it is
essential that you submit the purchase
receipt together with the Guarantee certificate.
You should keep the Guarantee
Certificate or, where relevant, the technical datasheet, together with the Instruction Manual for the duration of the
useful life of the appliance. It has
important technical information about
the appliance.
Safety Instructions
Before first use, you should carefully read
the installation and connection instructions.
These hob models may be installed in the
same kitchen furniture units as the manu-
facturer brand ovens.
For your safety, installation should be
carried out by an authorised technician
and should comply with existing installation standards. Likewise, any internal work
on the hob should only be done by the
manufacturer's technical staff, including
the change of the flexible supply cable of
the appliance.
Safety warnings:
If the ceramic glass breaks or
cracks, immediately unplug the stovetop to avoid electric shocks.
This appliance is not designed to
work with an external timer (not built
into the appliance) or a separate remote control system.
Do not steam clean this device.
The device and its accessible
parts may heat up during operation.
Avoid touching the heating elements.
Children younger than 8 years old must
stay away from the stovetop unless
they are permanently supervised.
This device may solely be used by
children 8 years old or older, people
with impaired physical, sensory or
mental abilities, or those who lack
experience and knowledge, ONLY when
supervised or if they have been given
adequate instruction on the use of the
device and understand the dangers its
use involves. User cleaning and maintenance may not be done by unsupervised children.
Children must not play with the
device.
Precaution. It is dangerous to cook
5
with fat or oil without being present, as
these may catch fire. Never try to extinguish a fire with water! in this event disconnect the device and cover the flames
with a lid, a plate or a blanket.
magnetic base (material attracted by a
magnet).
Do not place metal objects, such as
knives, forks, spoons or lids on the surface of the hob, as they may get very hot.
Please take into account that the
cookware that you use can greatly
affect the how well the induction element works. You may find cookware on
the market that, although marked as
being suitable for induction hobs, does
not work very well or is not easily
recognised by the induction element
due to the little amount or poor quality
of the ferromagnetic material that the
cookware has in its base.
Do not store any object on the
cooking areas of the stovetop. Prevent
a possible fire hazard.
The induction generator complies
with all current European standards.
Nonetheless, we recommend that people with heart devices, with such as
artificial pacemakers, consult with their
doctor or, if in doubt, refrain from using
the induction zones.
It is advisable not to use the
induction hob during the pyrolitic cleaning function in the case of the pyrolitic
ovens, due to the high temperature reached by this appliance.
When finished, turn off the cooking zone by using the touch controls.
Otherwise an undesired operation
could occur if a pan is accidentally placed on the cooking zone during the
next three minutes. Avoid possible
accidents!
The size of the base of the cookware to be used should be large
enough to completely cover the cooking zone drawn on the glass. Depending on the type of cookware (material
and size), the induction zones may
work with smaller cookware.
Please remember that in order to
work, the induction elements need to
be used with cookware that has a ferro6
Always use cookware with a flat,
smooth base on the induction elements. Using cookware with a deformed, concave or curved base can lead
to overheating that can damage the
glass or the cookware.
Installation
INSTALLATION AND SETUP SHOULD
BE CARRIED OUT BY AN AUTHORISED
TECHNICIAN
ACCORDING
TO
CURRENT INSTALLATION STANDARDS.
fig. 1
Minimum distance to walls
Positioning the hobs
To install these models, an opening with
the dimensions shown in figure 1 should
be cut into the unit's worktop.
The system for fixing the hob is intended
for use with kitchen units with a thickness
of 20, 30 and 40 mm.
Important: minimum
ventilation distances
The minimum distance between the surface of the hob and the lower part of the kitchen unit or the hood located above the
hob should be 650 mm. If the hood's installation instructions recommend that the
gap is greater than this, you should follow
this advice.
DRAWER
The unit where the hob and oven will be
located should be suitably fixed.
THERMOVENTILATED OVEN
INSTALLATION WITH A CUTLERY
DRAWER OR LOW CUPBOARD
If you wish to install a silverware drawer
under the countertop, you should install a
cover or spacer, located at least 60 mm
from the back of the countertop, to avoid
blocking the countertop fans with objects
placed in the drawer. In this way, potential
risks can be avoided due to inflammable
objects that may be stored in the drawer.
INSTALLATION WITH A THERMOVENTILATED OVEN UNDER THE HOB
The oven should be installed according to
the corresponding manual.
If the countertop is installed with an oven
underneath, it is recommended that the
same be a the manufacturer brand ther-
Fitting holes
575
ma
x.
L
W
The dimensions L and W are in the table "Dimensions and characteristics" in the Technical Information section.
7
mo-ventilated oven, to ensure good operation of the countertop.
A space should be left in front of the furniture for evacuation of hot air. The opening
should be at least 5 mm high. Its length
should be the width of the furniture.
An opening of 20 mm should be made in
the back part of the furniture to allow intake of cold air (see figure 1).
When hobs are handled before
being installed, care should be taken in
case there is any protruding part or
sharp edge which could cause injury.
When installing units or appliances above the hob, the hob should be
protected by a board so that the glass
cannot be damaged by accidental
blows or heavy weight.
The glues used in manufacturing
the kitchen unit and on the decorative
laminates and on the laminates that are
part of the worktop surface should be
made to tolerate temperatures of up to
100ºC.
The manufacturer does not assume any responsibility for any malfunction or damage caused by faulty installation.
PLEASE REMEMBER THAT THE GUARANTEE DOES NOT COVER THE
GLASS IF IT SUFFERS A VIOLENT
BLOW OR IF IT IS USED IMPROPERLY.
Fixing the hob
When the gap has been properly sized,
the gasket should be put on the lower side
of the glass. Silicone should not be
applied between the glass and the unit
worktop because if it becomes neces8
sary to remove the hob from its position, the glass could break when trying
to detach it.
To attach the cooking countertop to the furniture, a set of clamps are supplied that
should be fastened in the existing holes in
the lower part of the framework. There are
two possible ways to position the clips, as
can be seen in figure 2.
Depending on the thickness of the worktop,
it is possible to use the self-tapping screws
that are provided as a fastening accessory
by putting them into the clip's round hole.
This hole will be threaded as the screw is
inserted into it. This should be done before
fixing the clip to the worktop.
fig. 2
Sealing washer
Sealing washer
Connecting the electricity
The electric connection is made using an
omnipolar switch or plug, where accessible, that is suitable for the intensity to be
tolerated and that has a minimum gap of 3
mm between its contacts. This will ensure
disconnection in case of emergency or
when cleaning the hob.
The connection should include correct earthing, in compliance with current norms.
If the flexible supply cable fitted to the
appliance ever needs to be changed, it
should be replaced by the manufacturer's
official technical service.
Black
Black
Brown
Don’t use L3
Blue
Grey
Green-Yellow
Brown
Grey
Black
Blue
Grey
Brown
Green-Yellow
Blue
Green-Yellow
Black
Brown
Black
Brown
Blue
Grey
Blue
Grey
Green-Yellow
Green-Yellow
The input cable should not be in contact
either with the body of the hob or with the
body of the oven, if the oven is installed in
the same unit.
fig. 3
9
Technical Information
Technical data
Class 3 Hob.
Dimensions and characteristics
Models
BSIH 64ANZ
Dimensions of the hob
60
Height (mm)
600
Length (mm)
510
Width (mm)
Dimensions for positioning in the kitchen unit
560
Length (mm) (L)
490
Width (mm) (W)
55
Depth (mm)
Configuration
Induction Element
1
1,400 / 1,800* W
Induction Element
1,700/2,500* and 2,500/3,700* W
Induction Element
1
2,300 / 3,200* W
Induction Element
2
1,850 / 2,500* W
Induction Element
2,300 / 3,700* W
Electrical data
Nominal power (W)
7.400
Maximum for 230 V
Power supply
220-240
voltage (V)
Frequency (Hz)
50 / 60
BSIH 95ANZ
60
900
510
860
490
55
1
2
1
7.400
220-240
50 / 60
* Power of the induction elements with the Power function activated.
10
Use and Maintenance
Touch control panel user
instructions
CONTROL PANEL ELEMENTS (see fig. 4)
1 General on/off sensor.
2 Cursor slider for controlling power.
3 PLATE SELECTION SENSORS and
power indicators. *
4 Timer indicators.
5 Direct access to Power Function.
6 Activation sensor for Block Function.
7 Activation sensor for Stop Function.
8 Pilot indicator light Heat sustainment
Function activated *.
9 Pilot indicator light Boil control Function
activated*.
10 Pilot indicator light Block Function activated*.
11 Pilot indicator light Stop Function activated*.
12 Activation sensor for Boil control Function.
13 Activation sensor for Heat sustainment
Function.
14 "Less" sensor for timer.
15 "More" sensor for timer.
16 Decimal point.
17 Total Zone function sensor.
18 Pilot indicator light Total Zone Function
activated*.
The aesthetics
of the Touch
Control may
vary according
the model.
- Light (on): Plate selected (ready to be
used).
- No light (off): Plate not selected (can't be
used).
NOTE: * Visible only when in use.
Operations are carried out by using the
sensors marked on the control panel.
It's not necessary to push hard on the
glass. Simply place your finger on the sensor to activate the desired function.
Use the cursor slider (2) to adjust power
levels (0 - 9, and P) by sliding your finger
over it. Sliding towards the right increases
the value, whereas sliding towards the left
decreases it.
It's also possible to directly select a power
level by placing your finger directly on a
desired point of the cursor slider.
In order to select a plate on these
models, directly touch the POWER
INDICATER NUMBER (3).
fig. 4
11
TURNING THE APPLIANCE ON
The first time the cooktop is plugged in (or
after a power outage), the Block function
will appear as activated (pilot light 10 on).
In this case, you must deactivate the block
function in order to turn the cooktop on. To
do this, push sensor
(6) until pilot (10)
turns off.
1 Touch sensor
second.
(1) for at least one
Touch Control is now activated and a 0
appears in all power indicators (3). If a
cooking zone is hot, the corresponding
indicator will show an H and a 0 alternatively.
Once the Control is on, you must activate
a plate within 10 seconds, otherwise the
Touch Control will automatically turn off.
While the touch control is activated, it can
be disconnected at any moment by touching the general on/off sensor
(1)
even if it has been blocked (see section
"Blocking cooktop sensors"). Sensor
(1) always has priority in disconnecting the
touch control.
ACTIVATING PLATES
Once the Touch Control is activated with
sensor
(1), any plate can be turned on
by following these steps:
1 Select the plate by using the corresponding sensor (3). In other words, press
with your finger the NUMBER INDICATOR. If the glass is hot, the said indicator will go from showing an H to showing
level 0. The decimal point to the bottom
right of the number lights up, indicating
that the plate has been selected.
12
2 Use the cursor slider (2) to choose a
cooking level between 0 and 9.
As long as the plate is selected, in other
words, with the decimal point lit up, its
power level can be modified.
TURNING A PLATE OFF
A plate can be turned off by decreasing its
cooking level to 0. In order to do this, the
plate must have been previously selected
(decimal point lit up).
Once a plate has been turned off, an H will
appear on the corresponding power indicator if the glass surface of the cooking
area reaches an elevated temperature.
Burn risk exists. When the temperature
decreases, the indicator turns off (if the
cooktop is disconnected), or it will show a
0 if it is still on.
TURNING ALL PLATES OFF
All plates can be simultaneously disconnected by using the general on/off sensor
(1). All plate indicators will turn off.
Pan detector
Induction cooking zones have a built-in
pan detector. This way, the plate will stop
working if there is no pan present or if the
pan is not suitable.
The power indicator will show a symbol to
designate "there is no pan"
if, while the
zone is on, no pan is detected or the pan
is not suitable.
If a pan is taken off the zone while it is running, the plate will automatically stop
supplying energy and it will show the
symbol for "there is no pan". When a pan
is once again placed on the cooking zone,
energy supply will resume at the same
power level previously selected.
The time for pan detection is 3 minutes. If
a pan is not placed within this time period,
or the pan is unsuitable, the cooking zone
shuts off. The power indicator will go from
showing the symbol "there is no pan" to
showing 0.
When finished, turn off the cooking zone by using the touch controls.
Otherwise an undesired operation
could occur if a pan is accidentally placed on the cooking zone during the
next three minutes. Avoid possible
accidents!
Blocking cooktop sensors
BLOCK FUNCTION
With the Block Function, you can block the
other sensors, except for the on/off sensor
(1), in order to avoid undesired operations. This function is useful as a childproof safety.
To activate this function, touch sensor
(6) for at least one second. Once you have
done so, the pilot (10) turns on indicating
that the control panel is blocked. To deactivate the function, simply touch sensor
(6) again.
If the on/off sensor
(1) is used to turn
off the appliance while the block function is
activated, it won't be possible to turn the
cooktop on again until it unblocks.
Stop Function
This function puts the cooking process on
pause. The timer will also be paused if it is
activated.
Activating the Stop function
Touch the Stop sensor
(7) for one
second. The pilot (11) lights up and the
power indicators will show the symbol
to indicate cooking has been paused.
Deactivating the Stop function
Touch Stop sensor
(7) again. The pilot
(11) turns off and cooking resumes under
the same power and timer settings that
were established before the pause.
Heat Sustainment Function
This function makes it possible to keep
warm food that is in the pan placed on the
cooking area.
This function is independently available for
each one of the plates.
To activate it, select the plate. The decimal
point will light up. Then push sensor
(13). The symbol "A" will appear in the
indicator and the corresponding pilot (8)
will turn on.
To disconnect this function, all you have to
do is modify the power of the plate or
directly turn it off.
Power Function
This function supplies "extra" power to the
plate, above the nominal value. Said
power depends on the size of the plate,
(see values specified with * in the presentation section), with the possibility of reaching the maximum value permitted by the
generator.
1 Select the desired plate with the corresponding sensor (3). The decimal point
will light up.
13
2 On the cursor Slider, push directly on
position
(5). The power level indicator will show the symbol P, and the plate
will start to supply extra power.
the plate indicator and the pilot (9) will turn
on. In the timer for this plate, a moving
segment will appear which indicates that
the system has started to monitor cooking.
Boil Control Function
After 30 seconds, a second beep will go
off. If you haven't done it already, now is
time to put the food into the pot.
The Power function has a maximum duration as specified in table 1. After this time,
the power level will automatically adjust to
9.
This innovative function is of an enormous
help if you want to cook pasta, rice, eggs,
or boil any kind of food. This function
allows you to perform this cooking method
"almost" automatically.
This function is available only in the plates
where this symbol appears
Pot requirements
For properly using boil control, the pot
must have the following characteristics:
- Bottom size as close as possible to the
diameter of the plate.
- NO COVER.
- Filled more than halfway of its capacity
with room temperature water (never
use lukewarm or hot water).
Not fulfilling these requirements will result
in inadequate control of boiling.
WARNING: do not use this function for cooking methods other than
boiling water. Never use oil. It can overheat and create flames.
Activating the function:
Select the proper plate. The decimal point
lights up.
Push sensor
14
(12). An A will appear on
When the system detects that it is about to
boil, an initial beep will go off. Take this
time to prepare the food you want to boil or
cook.
After the second beep, the system will activate the timer as a chronometer so that
you can control how long the food has
been boiling.
A few seconds after the chronometer is
activated, a third beep will go off indicating
that, from this moment on, the system will
reduce the energy supplied in order to
maintain a gentle and steady boil. The
chronometer will remain active until cooking has finished.
If desired, the chronometer can be deactivated and you can set a time for the countdown to occur and the plate to automatically turn off (see section Timer Function).
Deactivating the function
You can cancel the function at any time by
simply turning off the plate or modifying
the power level.
Safety shut off
MAXIMUM TIME RUNNING
If one or more plates have been accidentally left on, they will automatically shut off
after a certain amount of time which starts
to count from the moment the last action
was taken on the plate. (See table 1).
When the "safety shut off" has occurred,
the power indicator of the corresponding
plate will show an H if there exists a burn
risk. Otherwise, a 0 will be shown.
Table 1
Power level
selected
0
1
2
3
4
5
6
7
8
9
P
Take precaution and do not place
objects on the touch control!
Timer function
(countdown clock)
MAXIMUM
OPERATION TIME
(in hours)
This function facilitates cooking given that
you don't have to be present: You can set
a timer for a plate, and it will turn off once
the desired time is up.
0
8
8
5
For these models, you can simultaneously
program each plate for durations ranging
from 1 to 90 minutes.
4
4
3
Setting a timer on a plate
2
2
1
10 minutes, readjusts to
function turns on even when the touch
control is off!
9
COVERED SENSORS SAFETY
The touch control is equipped with a function to detect when an object (pan, cloth or
certain liquids) covers the panel sensors
for more than 10 seconds.
This, therefore, prevents the object from
being able to activate or deactivate a plate
without you realising it.
When the touch control detects that an
object is covering the sensors, it starts to
beep until the object covering the control
panel is removed. If the touch control was
on, it automatically shuts off for safety reasons.
If after a few minutes the object covering
the sensors has still not been removed,
the beeping will cease.
To set a timer on a plate, you should take
the following steps.
1 Select the desired plate by directly touching its corresponding indicator (3) and
choose a power level with the cursor slider (2).
2 The two digits of the timer for the plate
selected will turn on, showing "- - ". You
can set the amount of time desired with
sensors (14) and
(15).
3 After a few seconds, the countdown
begins. When there is less than one
minute left, the clock will begin to count
down in seconds.
Once the countdown has finished, the
timed plate will turn off and a series of
beeps will be heard. They can be stopped
by touching either of the sensors
(14)
or
(15) associated with the
clock.
Keep in mind that this safety
15
Disconnecting the clock
If you wish to stop the clock before the programmed time is up, this can be done at
any time by simply adjusting its value to '--'.
1 Select the plate you wish to stop the
timer on by directly touching its corresponding indicator (3).
2 Adjust the value of the clock to "--" by
using the "less" sensor
(14). This can
also be done more quickly by pushing
the "less" and "more" sensors
(14)
and
(15) at the same time.
Total Zone Function
By using this function it is possible to
achieve that two plates, as shown in the
screen, function at the same time, both for
selecting a power level as well as for activating the timer function.
To activate this function you should press
the sensor
or (17). Upon doing so,
the decimal points (16) of the plates light
up and both turn to power level 5.
The timer (4) of the lower plate will turn off,
and from then on it will be the upper one
that indicates the values of the clock for
both.
To deactivate this function you should
press the sensor again
or
(17).
Overheating safety
Induction zones are protected against the
electrical system overheating, which could
damage it.
The internal fan automatically turns on and
off depending on the temperature of the
electronic system. Therefore, when the fan
is on and you turn the cooktop off, the fan
16
will continue to run for a few minutes in
order to cool the electronics.
Power surges in the network
The touch control can bear certain variations in voltage supply admissible by electric distribution networks.
Abnormally high power surges can
cause the control system to break
down (just like with any other electric
device).
Suggestions and
recommendations
To get the best use out of your hob, you
should follow the following suggestions
and recommendations:
* Utilize receptacles with completely flat
bottoms, given that the larger the contact surface is between the glass and
the receptacle, so much the better will
the plate performance be. In order to
prevent denting the bases of the cookware, recommend using cookware with
thick bases. Figure 6 shows how cookware that is dented or concave has a
smaller contact surface.
* Make sure that cookware is well-centred
on the drawings that indicate the heating
zone.
* Dry the bases of cookware before placing them on the hob.
* Do not leave any plastic object or utensil
or any aluminium foil lying on the vitroceramic hob.
fig. 5
Right
Wrong
Wrong
* Do not drag over the glass cookware with
corners or edges that could damage the
glass.
* The glass will withstand bangs from large
cookware that does not have sharp
edges. Please be careful with impacts
from small, sharp utensils.
* Please be careful not to let sugar or products containing sugar fall on the glass,
since they may react with the glass
when the glass is hot and damage the
surface.
If you cannot turn off the heating
element due to an overflow of creams,
soups or similar foods, use a wet rag to
remove the food from the touch control
panel and keep the rag on the on/off
sensor button so that the touch control
panel turns off.
Cleaning and care
To maintain the vitroceramic hob in good
condition, it should be cleaned with suitable
products and instruments. The vitroceramic
hob should be cleaned each time it is used,
when it is either lukewarm or cool. This
makes cleaning easier and prevents dirt
from accumulating through repeated use.
Never use aggressive cleaning products or
products that can scratch the surfaces (the
table below shows various common products that may be used). The hob should
also not be cleaned using steam-based
appliances.
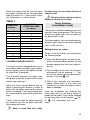
CLEANING AND CARING FOR THE
GLASS
The degree of soiling should be taken into
account when cleaning the glass, and the
instruments and products used should vary
depending on how dirty it is.
Light soiling
Light, non-sticky, soiling can be cleaned with
a damp cloth and a mild detergent or warm,
soapy water.
Heavy soiling
Serious spots and grease should be cleaned using a cleaning agent especially
made for vitroceramic hobs following the
manufacturer's instructions.
RECOMMENDED CLEANING PRODUCTS
Product
Soft and liquid detergents
Aggressive or powder detergents
Special glass ceramic cleaning agents
Grease-removing sprays (ovens, etc.)
Soft cloths
Kitchen towels
Kitchen cloths
Nickel scourers (never use dry)
Steel scourers
Hard synthetic scourers (green)
Soft synthetic scourers (blue)
Glass scrapers
Liquid polish for domestic appliances and/or glass
Should it be used to clean...
...the glass?
YES
NO
YES
NO
YES
YES
YES
YES
NO
NO
YES
YES
YES
...the surround?
YES
NO
YES
NO
YES
YES
YES
NO
NO
NO
YES
NO
YES
17
Sticky stains that have been burned in can
be removed by using a scraper with a
razor blade.
Rainbow colouring: caused by cookware
that has dry bits of grease on its base or
when grease gets between the glass and
the cookware while cooking. It can be
removed from the surface of the glass
using a nickel scouring pad with water or
with a special vitroceramic cleaner.
Plastic objects, sugar or food with a high
sugar content that are melted onto the hob
should be removed immediately while hot
by using a scraper.
When the colour of the glass changes
This does not affect the effectiveness or
stability of the hob and is generally caused
by inadequate cleaning or by poor-quality
cookware.
Metallic sheens are caused by metal cookware sliding over the glass. They can be
removed by thorough cleaning with a special, vitroceramic cleaning agent, although
it may be that the cleaning needs to be
repeated more than once.
Worn trim is the result of using abrasive
cleaning products or cookware with uneven bases which wear down the serigraphy.
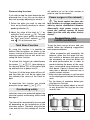
Attention:
Take great care when using the
glass scraper. The blade can cause
injury!
If the scraper is used inappropriately, the blade can break and a fragment
can become incrusted between the
lateral trim and the glass. If this happens, do not try and remove the frag-
18
ments with your hands; carefully use
tweezers or a knife with a sharp tip (See
fig. 6).
fig. 6
Only use the blade on the vitroceramic surface. Make sure that the body
of the scraper does not come into contact with the glass, since this could
scratch the vitroceramic glass.
Only use blades that are in perfect
conditions. Replace the blade immediately when it shows any signs of wear.
After using the scraper, pull in and
protect the blade. (See fig. 7)
fig. 7
Using the scraper
Protected blade
Unprotected blade
Cookware may become stuck to
the glass if something has melted between the base of the cookware and the
glass. Do not attempt to unstick the
cookware when it is cold - you could
break the glass ceramic.
Do not stand or lean on the glass.
It could break and cause injury. Do not
keep any objects on the glass.
The manufacturer’s reserves the right to
alter its manuals in any way it deems
necessary or useful while not altering their
basic characteristics.
Environmental
considerations
The symbol
on the product or on its
packaging indicates that this product
may not be treated as household waste.
Instead, it should be handed over to the
applicable collection point for the recycling of electrical and electronic equipment. By ensuring that this product is
disposed of correctly, you will help prevent potential negative consequences
for the environment and human health
which could occur if this product is not
handled correctly. For more detailed
information on the recycling of this product, please contact your local city office, your household waste disposal service or the shop where you purchased
the product.
Packaging materials are organic and
fully recyclable. Plastic components
are identified by marking >PE<, >LD<,
>EPS<, etc. Throw out packaging materials, such as household waste, in the
container of your municipality.
19
If something doesn't work
Before calling the Technical Service, please check the following possible causes
and solutions:
Problem
Possible cause
Solution
The cookware is inadequate
(it doesn't have a ferromagnetic base or it is too small).
Make sure that the base of
the cookware is attracted by
a magnet or use larger cookware.
The induction zones don't get hot
There is a buzzing sound at the beginning of cooking in the induction zones
Cookware is not thick enough
or it is not one piece. The
buzzing is caused by the
transmission of energy
directly to the base of the
cookware.
This buzzing is not a defect.
However, if you want to prevent it, slightly reduce the
chosen power level or use
cookware with a thicker base
and/or that is one piece.
The lock is activated.
Deactivate the lock.
The induction zones have a
fan that cools the electronic
system.
The fan only works when the
temperature of the electronic
system is high; when the temperature decreases, the fan
turns off automatically regardless of whether or not the
cooker is activated.
The touch control panel doesn't go on or, if it's on, it doesn't respond
The sound of a fan can be heard when cooking and the sound continues
after the cooker has been turned off.
When frying or cooking stew, it seems as though the energy of the
induction zones decreases ("the induction element heats less")
If the temperature of the glass
or of the electronic system
becomes too high while cooking, an auto-protection
system will begin working
which regulates the power of
the heating elements so that
the temperature does not continue increasing.
A heating element goes off and the message C appears
The glass is too hot.
20
Excess temperature problems
during cooking only occur in
extreme situations (an extended period of time cooking at
maximum power) or when installation is inadequate.
Verify that installation has
been done in accordance with
the indications in the instructions manual.
Remove the cookware and
let the glass cool down.
Fault
Possible cause
Possible solution
There is a cloth, container
or liquid on the Touch Control.
Remove any object covering
the Touch Control and/or
clean any liquid that might
have been spilt on it.
The hob suddenly starts to bleep
The timer was activated
and the preset time has
finished.
The hob (or any of the hotplates) powers off during cooking
There is a container, cloth
or liquid covering the Touch
Control.
One or several of the hotplates has overheated.
A timed hotplate failed to power off at the end of the set time
The hotplate had not been
set correctly.
Touch the clock sensor to
deactivate the bleep.
Remove any object that
might be covering the
Touch Control.
Allow the overheated hotplates to cool down for a
few minutes before powering them up again.
Make sure that the time
was set following the instructions manual.
When cooking at a level below 9, there are fluctuations in the power
The induction generator of
the cooker turns on and off
alternately in order to keep
the chosen cooking level.
This is not a defect.
21
IMPORTANT: If your appliance appears not to be
operating correctly, then you should disconnect it
from your mains supply and then contact the
Customer Service Department.
DO NOT ATTEMPT
YOURSELF.
TO
REPAIR
THE
APPLIANCE
Please note that if an engineer is asked to attend whilst the product is
under guarantee and finds that the problem is not the result of an
appliance fault, then you may be liable for the cost of the call out charge.
The appliance must be accessible for the service technician to
perform any necessary repair. If your appliance is installed in
such a way that a service technician is concerned that damage will
be caused to the appliance or your kitchen, then he will not
complete a repair.
This includes situations where appliances have been tiled in,
sealed in with sealant, have wooden obstructions placed in front
of the appliance, like plinths. Or any installation other than the
one specified by Baumatic Ltd has been completed.
IMPORTANT: The manufacturer operates a policy of continuous
improvement and reserves the right to adjust and modify its
products without prior notification.
(AUS)
Think Appliances Pty Ltd.
416-424 Barry Rd
Coolaroo VIC 3048
Sales Telephone
1300 132 824
Service Telephone
1800 444 357
Website
www.thinkappliances.com
(NZ)
Applico Ltd.
Private Bag 92900
Onehunga, Auckland,
New Zealand 1061
Website
www.baumatic.co.nz
(UK)
United Kingdom
Baumatic Ltd.,
Baumatic Buildings,
6 Bennet Road,
Reading, Berkshire
RG2 0QX
United Kingdom
Sales Telephone
(0118) 933 6900
Website:
www.baumatic.co.uk
40