1
SAM4S Printer Series
Windows Driver & Installer
User Guide
All specifications are subject to change without notice.
Contents
Programming
CHAPTER 1. Getting Started·················································3
1.1. Overview·····································································4
1.2. Operating Environment·············································5
1.3. Requirements·····························································5
1.4. Preparations·······························································5
CHAPTER 2. Installation of SAM4S printer·························7
2.1. Verify interface type of SAM4S printer····················8
2.2. Installing a Serial printer········································· 10
2.3. Installing a Parallel printer······································12
2.4. Installing an USB printer·········································14
2.5. Installing an USB to Serial printer························· 19
2.6. Installing an Ethernet printer··································24
2.7. Checking installed printer········································26
CHAPTER 3. Uninstallation of SAM4S printer··················28
3.1. Uninstalling printer(s)··············································29
3.2. Remain information················································31
CHAPTER 4. Specifications of SAM4S printer··················32
4.1. Printer fonts······························································33
4.2. Printer resolutions & Paper sizes···························36
CHAPTER 5. Properties of SAM4S Printer·························37
5.1. Printer Device Control·············································38
5.2. Additional configurations·······································39
CHAPTER 6. Troubleshooting··············································41
6.1. Installation troubleshooting····································42
6.2. Uninstallation troubleshooting······························46
6.3. Printing troubleshooting·········································48
APPENDIX. Testing for SAM4S printer driver using the
WordPad················································································51
CHAPTER 1.
Getting Started
1.1. Overview
1.2. Operating Environment
1.3. Requirements
1.4. Preparations
1
Getting Started
1.1. Overview
This document contains how to install/uninstall an SAM4S printer with an
interface and contains how to configure an SAM4S printer.
To install a printer, refer follows:
1.Verify interface of SAM4S printer (p.8).
2.Install proper SAM4S printer driver.
1)In case of a serial printer (p.10).
2)In case of a parallel printer (p.12).
3)In case of an USB printer (p.14).
4)In case of an USB to Serial printer (p.19).
5)In case of an Ethernet printer (p.24).
3.Make sure installed printer is properly works (p.26).
To uninstall a printer, refer (p.29).
The SAM4S printer driver installer (V1.9.x or above) provides follows
models:
1.ELLIX10 (32bit only)
2.ELLIX20 (32bit only)
3.ELLIX20II (32bit / 64bit)
4.ELLIX30/45 (32bit / 64bit)
5.ELLIX40/45 (32bit / 64bit)
6.ELLIX40BlackMark (32bit only)
7.GIANT-100 (32bit / 64bit)
The SAM4S printer driver installer is supported English and Korean.
»» Refer to 1.2. Operating Environment
4
CHAPTER 1
CHAPTER
X86 (32bit)
X64 (64bit)
WEPOS, POSReady2009, Windows XP Pro, Windows Vista,
Windows 7, Windows 8
Windows XP Pro, Windows Vista, Windows 7, Windows 8
(WEPOS, [[POSReady2009 doesn’t provide the x64)
1.3. Requirements
Warning : This requirement should be satisfied for using an SAM4S printer.
•To install/uninstall a printer, ‘.Net framework 3.0’ or above should have installed.
•To install an SAM4S printer properly, please make sure any related hardware works
fine and interface of printer is well connected.
1.4. Preparations
Preparations for using the SAM4S windows driver installer:
1.Double click the provided executable file so that files for the SAM4S
windows driver installer is extracting to ‘Program Files\SAM4S
PrinterDriver’ folder for a 32bit OS.
For a 64bit OS, the files are
extracting to ‘Program Files
[x86]\SAM4S PrinterDriver’
folder.
5
CHAPTER 1
1.2. Operating Environment
CHAPTER 1
1.4. Preparations
2.This executable file is the
‘WinRAR 32bit executableextracting’ file so compatibility
message can be displayed on a
64bit OS.
If following message is shown,
click ‘This program installed
correctly’ to progress that
will not affect any program or
system.
3.The SAM4S windows driver installer will be started automatically after
extracting files.
4.You can execute the SAM4S
printer driver installer through
shortcut that is on the ‘Program
Menu’.Please refer below for
detail.
6
CHAPTER 2.
Installation of SAM4S
printer
2.1. Verify interface type of SAM4S printer
2.2. Installing a serial printer
2.3. Installing a parallel printer
2.4. Installing an USB printer
2.5. Installing an USB to serial printer
2.6. Installing an Ethernet printer
2.7. Checking installed printer
CHAPTER
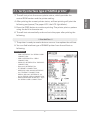
2.1. Verify interface type of SAM4S printer
Checks interface of printer from the ‘self-test’. The self-test checks the
following:
1.Make sure paper roll has been installed properly.
2.Turn on the power while holding down the FEED button. The self-test
begins.
pic1) ELLIX20 / ELLIX20II
pic2) ELLIX30 / ELLIX40 / ELLIX35 / ELLIX45
8
CHAPTER 2
2
Installation of
SAM4S printer
2.1. Verify interface type of SAM4S printer
3.The self-test prints the current printer status, which provides the
4.After printing the current printer status, self-test printing will print the
following and pause (The paper LCD / the LCD light blinks).
5.Press the FEED button to continue printing. The printer prints a pattern
using the built-in character set.
6.The self-test automatically ends and cuts the paper after printing the
following.
** End Self-Test **
7.The printer is ready to receive data as soon as it completes the self-test.
8.You can find interface type of SAM4S printer from the self-test as
following.
Interface list
•USB-I INTERFACE for ‘SERIAL /USB-I
CONNECTION’
•USB-II INTERFACE for ‘USB-II
CONNECTION’
•PARALLEL INTERFACE for ‘PARALLEL
CONNECTION’
•Ethernet-II INTERFACE for
‘ETHERNET CONNECTION’
•WIRELESS LAN (WLAN) INTERFACE
for ‘ETHERNET CONNECTION’
•SERIAL (RS-232C) INTERFACE - 25
pin for ‘SERIAL /USB-I CONNECTION’
•SERIAL/WIRELESS INTERFACE - 9 pin
for ‘SERIAL /USB-I CONNECTION’
9
CHAPTER 2
control ROM version and the printer setting.
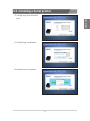
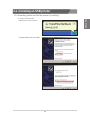
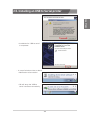
2.2. Installing a Serial printer
1.Selecting a printer that will
CHAPTER 2
be installed.
2.Selecting the ‘SERIAL /
USB-I CONNECTION’.
3.Selecting a port.
•If you don’t have a serial port
on your system, you can’t
progress further. For solution of
this issue, please refer p.42.
10
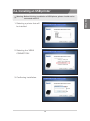
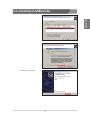
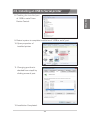
2.2. Installing a Serial printer
4.Configuring the selected
CHAPTER 2
port.
5.Confirming installation.
6.Installation completed.
11
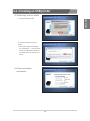
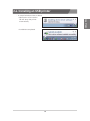
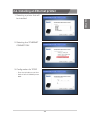
2.3. Installing a Parallel printer
1.Selecting a printer that will
CHAPTER 2
be installed.
2.Selecting the ‘PARALLEL
CONNECTION’.
3.Selecting a port.
•If you don’t have a parallel
port on your system, you can’t
progress further. For solution of
this issue, please refer p.44.
12
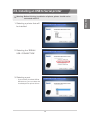
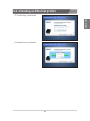
2.3. Installing a Parallel printer
4.Confirming installation.
CHAPTER 2
5.Installation completed.
13
2.4. Installing an USB printer
1.Selecting a printer that will
be installed.
2.Selecting the ‘USB-II
CONNECTION’.
3.Confirming installation.
14
CHAPTER 2
Warning: Before finishing installation of USB printer, printer should not be
connected with PC
2.4. Installing an USB printer
4.Confirming security check.
CHAPTER 2
•In case of windows XP
•In case of windows vista or
above
»» Once you check the ‘Always
trust software …’ and click the
install, the Windows Security
message will not display any
more.
5.Driver installation
completed.
15
2.4. Installing an USB printer
6.Connecting printer so that the printer is installing.
CHAPTER 2
•In case of windows XP
»» Notification of connection.
»» Hardware Wizard for the USB-II.
16
2.4. Installing an USB printer
CHAPTER 2
»» Installation completed.
17
2.4. Installing an USB printer
CHAPTER 2
•In case of windows vista or above
»» Notification of connection.
OS will setup the printer
automatically.
»» Installation completed.
18
2.5. Installing an USB to Serial printer
Warning: Before finishing installation of printer, printer should not be
CHAPTER 2
connected with PC
1.Selecting a printer that will
be installed.
2.Selecting the ‘SERIAL /
USB-I CONNECTION’.
3.Selecting a port.
•If you already installed USB to
Serial driver, you can select the
installed port for printer driver.
19
2.5. Installing an USB to Serial printer
4.Configurations of selected
CHAPTER 2
port.
5.Confirming installation.
6.Installation completed.
20
2.5. Installing an USB to Serial printer
7.Connecting printer so that ‘USB to serial’ interface is installing.
CHAPTER 2
•In case of windows XP
»» Notification of connection.
»» Hardware Wizard for the USB-II.
21
2.5. Installing an USB to Serial printer
CHAPTER 2
»» Installation for ‘USB to serial’
is completed.
•In case of windows vista or above
»» Notification of connection.
»» OS will setup the ‘USB to
serial’ interface automatically.
22
2.5. Installing an USB to Serial printer
8.Checking the installed port
CHAPTER 2
of ‘USB to serial’ from
Device Control.
9.Restart system to complete installation of ‘USB to serial’ port.
10.Open properties of
installed printer.
11.Changing port that is
checked from step 8 by
clicking name of port.
12.Installation Completed.
23
2.6. Installing an Ethernet printer
1.Selecting a printer that will
CHAPTER 2
be installed.
2.Selecting the ‘ETHERNET
CONNECTION’.
3.Configuration for TCP/IP.
•Enter the Ip Address and Port.
•Default Port of SAM4S printer:
6001
24
2.6. Installing an Ethernet printer
4.Confirming installation.
CHAPTER 2
5.Installation completed.
25
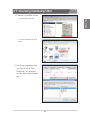
2.7. Checking installed printer
1.Checking installed printer.
CHAPTER 2
•In case of Windows XP.
•In case of Windows Vista or
above.
2.Verifying properties that
are ‘Driver’ and ‘Print
Processor’ of installed
printer from the Advance
tap.
26
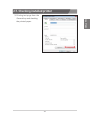
2.7. Checking installed printer
3.Printing test page from the
CHAPTER 2
General tap and checking
the printed paper.
27
CHAPTER 3.
Uninstallation of SAM4S
printer
3.1. Uninstalling printer(s)
3.2. Remain information
CHAPTER
3
Uninstallation of
SAM4S printer
1.There is two ways to start uninstallation.
1)Starting from ‘Add or Remove Program’.
2)Starting from ‘Program Menu’.
2.If there is an installed
printer, printer installation
/ Uninstallation can make a
choice.
‘SAM4S Printer Uninstall’
is selected as the default
setting if you have an
installed SAM4S printer.
If the SAM4S printer
installer doesn’t show the
dialog despite you have
an installed printer, please
refer p.47.
Selecting the ‘SAM4S
Printer Uninstall’.
29
CHAPTER 3
3.1. Uninstalling printer(s)
3.1. Uninstalling printer(s)
3.Selecting one or more
printer that will be
uninstalled.
CHAPTER 3
4.Confirming uninstallation.
5.Uninstallation completed.
30
3.2. Remain information
Even though every installed
printer is uninstalled, files and
registry key are remained on
your system as below:
1.Remain files.
CHAPTER 3
1)SAM4S printer driver
installer files.
2)Driver files on the system
folder.
2.Remain registry keys
1)Copies Setting
2)Copies Cut & Drawer
3)Cut mode
4)Start Doc & End Doc
5)MISC
31
CHAPTER 4.
Specifications of SAM4S
printer
4.1. Printer fonts
4.2. Printer resolutions & Paper sizes
CHAPTER
4
Specifications of
SAM4S printer
4.1. Printer fonts
These drivers support use of printer fonts as well as Windows fonts. Use
of printer fonts permits faster printing. Available printer fonts are listed
“Built-in fonts of a printer” can be specified with the application programs.
The “built-in fonts” are as follows.
- Printer Font (type A, Large)
- Printer Font (type B, Small)
The font names what the user can choose in to the application are as
follows. 2 types of character-height can be chosen in each font. They are
two kinds of the FontAXxX (Ext.) font and the FontAXxX. The character
code of 128 bytes of 80H - FFH varies in the difference in these printer
fonts. A FontAXxX font supports ANSI character code (Code Page 2: 850).
And, a FontAXxX (Ext.) font supports IBM expansion character code (Code
Page 0: 437). A FontAXxX (255) font supports space page. (Code Page:
255).
33
CHAPTER 4
below.
4.1. Printer fonts
CHAPTER 4
34
4.1. Printer fonts
SAM4S Printer can be used to execute a variety of special non-printing
functions, as indicated in the table below. You can execute these functions
by selecting the printer’s special “FontControl” font and then sending the
appropriate character code to the driver. (Note that you cannot use the
“FontControl” font to print normal characters)
Special Function
HT is output
LF is output
CR is output
Open Drawer 2 (50ms drive pulse width)
Open Drawer 2 (100ms drive pulse width)
Open Drawer 2 (150ms driver pulse width)
Open Drawer 2 (200ms drive pulse width)
Open Drawer 2 (250ms drive pulse width)
Cut Receipt (partial cut) without paper feeding
HRI characters are not added to the bar code
HRI character are added at the top of the bar code using Font A
HRI characters are added at the bottom of the bar code using Font A
HRI characters are added at the top of the bar code using Font B
HRI characters are added at the bottom of the bar code using Font B
Text is aligned left
Text is centered
Text is aligned right
Open Drawer 1 (50ms drive pulse width)
Open Drawer 1 (100ms drive pulse width)
Open Drawer 1 (150ms driver pulse width)
Open Drawer 1 (200ms drive pulse width)
Open Drawer 1 (250ms drive pulse width)
NV bit image No 1 is printed in the Normal mode
NV bit image No 2 is printed in the Normal mode
NV bit image No 3 is printed in the Normal mode
NV bit image No 4 is printed in the Normal mode
NV bit image No 5 is printed in the Normal mode
Cut Receipt (partial cut)
NV bit image No 1 is printed in the Double Height Double Width mode
NV bit image No 2 is printed in the Double Height Double Width mode
NV bit image No 3 is printed in the Double Height Double Width mode
NV bit image No 4 is printed in the Double Height Double Width mode
NV bit image No 5 is printed in the Double Height Double Width mode
35
CHAPTER 4
Character
5
6
7
a
b
c
d
e
g
p
q
r
s
t
w
x
y
A
B
C
D
E
G
H
I
J
K
P
[
]
^
_
`
4.2. Printer resolutions & Paper sizes
•Resolutions
The resolution setting supported by SAM4S printer is 180×180.
The following table shows the recommended margins for SAM4S printer. Refer to
this table when setting margins from your printing applications.
Printer
SAM4S
Margins
Printer Area
Left[mm]
Right[mm]
Top[mm]
Bottom[mm]
Width[mm]
0
0
0
0
80
36
CHAPTER 4
•Paper sizes
The paper sizes supported by SAM4S printer are as follow.
- 80 × 3279 mm
- 80 × 297 mm
- 80 × 200 mm
- 80 × 160 mm
- 80 × 120 mm
- 80 × 80 mm
- 80 × 40 mm
- 58 × 3276 mm
- 58 × 297 mm
CHAPTER 5.
Properties of SAM4S
Printer
5.1. Printer Device Control
5.2. Additional configurations
CHAPTER
5
Properties of
SAM4S Printer
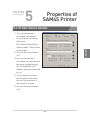
5.1. Printer Device Control
1.You can be entered a
command you wanted
to at the point of starting
document.
➊
Ex) \x1B\x70\x00\x19\xff =
➋
Open Drawer 1 (50ms drive
➌
2.You can fire cash drawer 1
➍
or 2.
3.You can be entered a
➎
command you wanted to at
the point of ending page.
Ex) \x1D\x56\x42 = Cut
Receipt, Type the command
to cut.
4.This is where you enter
the number of line feeds
that will be done after a
document is printed.
5.You can fire cash drawer 1
or 2.
38
CHAPTER 5
pulse width)
5.2. Additional configurations
1.Configuration for printer
copies
1)Number of print copies.
2)Paper cut option.
Checking this option will execute paper cut per each copies.
3)Cash drawer fire option.
Checking this option will fire cash drawer per each copies.
39
CHAPTER 5
SAM4S printers (ELLIX20II or above) provide three options for printer copies.
5.2. Additional configurations
2.Configurations for printer
papers.
SAM4S printers (ELLIX20II
or above) provide the ‘Add
New paper Size’ button for
creating a custom paper
size and modifying a paper
size.
Clicking the button will
open the ‘Custom Paper
Size’ dialog.
CHAPTER 5
1)You can add or modify
a paper form. The paper
properties must be filled.
If you want to make a
new paper size, file the
➌
‘Form Name’ that is not
on the list and fill the
paper size properties.
2)You can delete a selected
➊
paper form.
3)If you select an item from
the list, paper properties
of selected item that is a
paper form will be filled
automatically.
You can modify or delete
the selected item.
40
➋
CHAPTER 6.
Troubleshooting
6.1. Installation troubleshooting
6.2. Uninstallation troubleshooting
6.3. Printing troubleshooting
CHAPTER
6
Troubleshooting
6.1. Installation troubleshooting
1.Not found a serial port.
If you don’t have a serial
port on your system,
Installation for serial port is
not possible.
What you need to do is
make sure whether system
has a serial port or not from
CHAPTER 6
the ‘Device Manager’
1)Scanning for hardware
to make sure all of
hardware is installed.
42
6.1. Installation troubleshooting
2)Checking ‘COM
(communications) Port’
on the list.
3)If you don’t have any ‘COM Port’ on the list, please ask assistance to
hardware engineer of your system.
2.Not found a USB to serial
port.
If you don’t have a serial
port including USB to
CHAPTER 6
serial port on your system,
Installation for serial port is
not possible.
What you need to do is
make sure whether system
has a USB to serial port
or not from the ‘Device
Manager’
1)Scanning for hardware
to make sure all of
hardware is installed.
43
6.1. Installation troubleshooting
2)Checking ‘COM
(communications) Port’
on the list.
3)If you don’t have any ‘USB Serial Port’ on the list, please refer
‘Installing USB to serial printer’ (p.19) to install an USB to Serial
printer.
4)If you have ‘USB Serial Port’ on the list but the SAM4S printer
installer doesn’t show the port when you install a SAM4S printer,
please re-boot your system to apply changes completely and try
CHAPTER 6
again.
3.Not found a parallel port.
If you don’t have a parallel
port on your system,
Installation for parallel port
is not possible.
What you need to do is
make sure whether system
has a parallel port or not
from the ‘Device Manager’
44
6.1. Installation troubleshooting
1)Scanning for hardware
to make sure all of
hardware is installed.
2)Checking ‘LPT Port
(Parallel Port)’ on the list.
to hardware engineer of your system.
45
CHAPTER 6
3)If you don’t have any ‘Printer Port’ on the list, please ask assistance
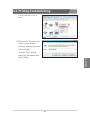
6.2. Uninstallation troubleshooting
1.Unable to uninstall.
Make sure an SAM4S printer is installed from the ‘Printers and
Faxes’.
Name of the installed SAM4S printer should be form as ‘SAM4S
ELLIXxx’ or ‘SAM4S GIANT-xxx’.
•In case of Windows XP.
•In case of Windows Vista or
above.
CHAPTER 6
46
6.2. Uninstallation troubleshooting
4)If the list of ‘Printers and
Faxes’ is not shown,
execute ‘net start spooler’
from the ‘Run’.
To open ‘Run’ dialog,
press the ‘Windows Key’
with ‘R Key’.
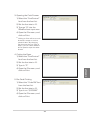
2.Uninstalling the SAM4S Printer Driver Installer.
1)Delete the installer files:
32bit OS - Root\
Program Files\SAM4S
PrinterDriver
64bit OS - Root\Program
Files(x86)\SAM4S
PrinterDriver
CHAPTER 6
2)Delete the shortcut of the
installer.
47
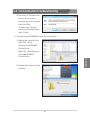
6.3. Printing troubleshooting
1.If printing for a document is not properly.
Open the ‘Printer properties’ from the ‘Printers and Faxes’.
•In case of Windows XP.
•In case of Windows Vista or
above.
CHAPTER 6
48
6.3. Printing troubleshooting
2.Verifying properties that
are ‘Driver’ and ‘Print
Processor’ of installed
printer from the ‘Advance’
tap.
If the Print Processor is
CHAPTER 6
assigning the ‘winprint’,
select the ‘SAM4S ELLIXxx’
or ‘SAM4S GIANT-xxx’.
If installed SAM4S printer
doesn’t show on the list of
printers.
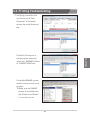
1)Make sure an SAM4S
printer is installed from
the ‘Printers and Faxes’.
•In case of Windows XP.
49
6.3. Printing troubleshooting
•In case of Windows Vista or
above.
2)If the list of ‘Printers and
Faxes’ is not shown,
execute ‘net start spooler’
from the ‘Run’.
To open ‘Run’ dialog,
press the ‘Windows Key’
CHAPTER 6
with ‘R Key’.
50
APPENDIX.
Testing for SAM4S printer
driver using the WordPad
APPENDIX
Testing for SAM4S printer
driver using the WordPad
1.WordPad Environment
WordPad is more adequate to test printer than Microsoft Word. Make
it sure that SAM4S Printer has been chosen as default printer and then
go further with WordPad like below.
- Size / Resolution / Margins [Refer to p.36]
2.Printing Text
1)Select the font you wish
to use from the font list.
2)Select the font size you
wish use from the fontsize list.
3)Type in some text into
the WordPad text-input
area.
APPENDIX
4)Open the File menu, and
click on Print.
※For fastest printing, select a
printer font form the font list.
52
3.Opening the Cash Drawer
1)Select the “FontControl”
font from the font list.
2)Set the font size to 10.
3)Type an “A” into the
WordPad text-input area.
4)Open the File menu, and
click on Print.
※Clicking on Print will cause cash
drawer #1 to open at a drive
speed of 50ms. By changing
the character that you input at
Step 3, you can select different
driver speed or open the other
drawer.
4.Cutting the Paper
1)Select the “FontControl”
font from the font list.
2)Set the font size to 10.
3)Type in “P”.
APPENDIX
4)Open the File menu, and
click on Print.
5.Bar Code Printing
1)Select the “Code128”font
from the font list.
2)Set the font size to 10.
3)Type in an “{A123545”
4)Open the File menu, and
click on Print.
53
SAM4S Printer Series
Windows Driver & Installer
User Guide