1
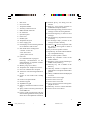
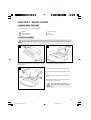
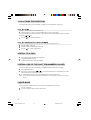
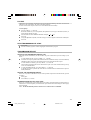
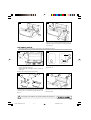
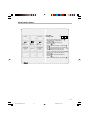
GENERAL VIEW
2
3
1
4
7
8
11
10 9
13 14
12
6
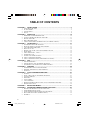
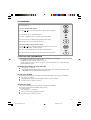
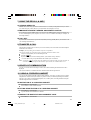
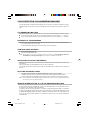
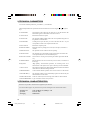
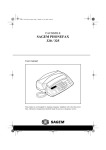
OPERATION PANEL
15
5
16 17 18
24
21
20
19
Recall
Fine Photo
Memory
Tel.
Fax
Tad
Directory
C
OK
Menu
Erase
Hold
4
5
6
7
8
9
*
0
#
42
41 40
35
34
33
36
C
Menu
OK
Recall
45
-
_
’
"
$
\
W
)
S
=
E
[
D
!
R
]
F
;
T
<
G
?
Y
>
H
,
U
{
J
:
I
}
K
Z
X
C
V
B
N
.
Directory
46
&
vocal
Internet
Messages
31
29
32 30
27
26
28
37
38
39
Hold
2_couv 23227943-2.p65
1
BLEU PANTONE 293C
%
O
P
~
/
L
M
@ Ctrl
@
+
Redial
Erase
+
Q
(
A
fax
44 43
3
2
1
Redial
25
22
07/06/2000, 11:32
B
23
1
2
3
4
5
6
7
8
9
10
11
12
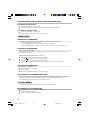
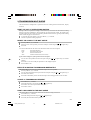
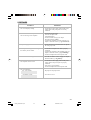
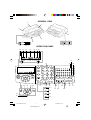
Rear cover
Fax access door
Telephone handset
Auxiliary connector access
Radio module connector
PC connector
Operation panel
Front cover
Handset jack
Telephone line jack
Power supply jack
LCD display screen consisting of 2 lines
of 16 characters and 10 icons
13 Scan mode when sending faxes:
- normal: 2 icons off
- fine: fine icon lit
- photo: photo icon lit
14 Line icon:
Lit: communication in progress
Flashing: establishment of fax
communication or telephone communication in progress
15 Memory usage (0 to 100%)
16 Telephone icon: telephone in service
17 Fax icon: automatic fax reception
18 TAD icon: vocal answering machine in
service
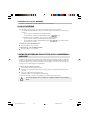
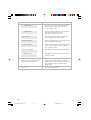
19 Choice of scan mode when sending
faxes
20 Choice of reception mode
21 Numeric keypad
22 Alphabetic keypad
23 Start key: transmission of faxes or local
copy
24 @ key: used to enter the @ character in
e-mail addresses
25 Ctrl key: used in conjunction with any
letter on the keypad to access the symbols
shown above the alphabetic characters
26 Internet @ key: for faxing over the
Internet
27 Stop key: stop current operation or
confidential telephone (Mute)
28 Vocal messages lamp: presence of voice
messages on the answering machine
29 Vocal messages key: to listen to voice
messages
30 Fax messages key: to print faxes received
in memory
31 Fax messages lamp: presence of fax
messages stored in memory
32 Shift key ( ): used in conjunction with
any letter on the keypad to obtain a
capital letter
33 Key to increase speaker volume
34 Speaker key: use of line without unhooking or amplified listening
35 Key to reduce speaker volume
36 Redial key: automatic recall of last
number dialled
37 Recall key: insert a pause in dialling or
PABX recall (Flash key)
38 Directory key: call a number in the
directory
39 Hold key: transfer a telephone communication to a telephone connected in
parallel.
40 OK key: validation of selection displayed
on screen
41 Screen cursor: move right
42 Screen cursor: move up
43 Screen cursor: move left
44 C key: return to previous message displayed on screen
45 Menu key: access to various functions
46 Screen cursor: move down
1
Liasse1_23227944-0.p65
1
07/06/2000, 11:38
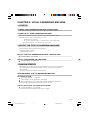
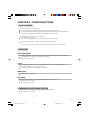
TABLE OF CONTENTS
CHAPTER 1:
INSTALLATION ....................................................................................... 5
CHAPTER 2:
DIRECTORY .......................................................................................... 10
CHAPTER 3:
TELEPHONE (*) .................................................................................... 13
CHAPTER 4:
FAX ........................................................................................................ 17
CHAPTER 5:
INTERNET ............................................................................................. 22
CHAPTER 6:
VOCAL ANSWERING MACHINE .......................................................... 27
CHAPTER 7:
RECEPTION MODES ............................................................................ 31
CHAPTER 8:
ADVANCED COMMUNICATION FUNCTIONS ..................................... 32
1.
2.
3.
4.
1.
2.
3.
4.
5.
1.
2.
3.
4.
5.
6.
7.
8.
9.
10.
11.
1.
2.
3.
1.
2.
3.
1.
2.
3.
4.
5.
6.
7.
9.
1.
2.
3.
4.
5.
UNPACKING THE UNIT ............................................................................................................... 5
OUTPUT PAPER ............................................................................................................................. 5
CONNECTIONS .............................................................................................................................. 6
SETUP .............................................................................................................................................. 8
MEMORISE A SUBSCRIBER RECORD ..................................................................................... 10
CONSULT, MODIFY OR DELETE A RECORD ......................................................................... 11
DELETE A RECORD .................................................................................................................... 12
PRINT THE DIRECTORY ............................................................................................................ 12
SAVING / RESTORING THE DIRECTORY (ACCORDING OPTION)..................................... 12
TELEPHONE USING THE HANDSET ....................................................................................... 13
DIALLING WITHOUT LIFTING THE HANDSET .................................................................... 13
CALL FROM THE DIRECTORY ................................................................................................. 14
REPLY TO A CALL ....................................................................................................................... 14
REDIAL ONE OF THE LAST TEN NUMBERS CALLED ........................................................ 14
MUTE MODE ................................................................................................................................ 14
USING THE RECALL, # AND * .................................................................................................. 15
TRANSFER A CALL ..................................................................................................................... 15
LENGTH OF COMMUNICATION .............................................................................................. 15
USING A CORDLESS HANDSET ............................................................................................... 15
USING A PORTABLE PHONE (DEPENDING ON MODEL) .................................................... 16
FAX TRANSMISSION .................................................................................................................. 17
FAX RECEPTION: FAX ANSWERING MACHINE ................................................................... 20
TELEPHONE CALL DURING FAX COMMUNICATION ......................................................... 21
SUBSCRIPTION AND ACCESS PROVIDER ............................................................................. 22
SENDING / RECEIVING ON THE INTERNET .......................................................................... 23
SETTINGS ..................................................................................................................................... 24
STARTUP ....................................................................................................................................... 27
SELECT THE TYPE OF ANSWERING MACHINE ................................................................... 27
ANNOUNCEMENTS .................................................................................................................... 27
MESSAGES ................................................................................................................................... 28
LOCAL MEMO ............................................................................................................................. 28
CALL FILTERING ........................................................................................................................ 29
REMOTE INTERROGATION OF THE VOCAL ANSWERING MACHINE ............................ 29
PRIVILEGED ACCESS ................................................................................................................ 30
DEPOSIT AND RETRIEVAL (ACTIVE POLLING) ................................................................... 32
TRANSMISSION WAIT QUEUE ................................................................................................. 33
TELECOMMANDS FROM A PARALLEL TELEPHONE .......................................................... 34
RELAY BROADCASTING (MOBILE OFFICE) ......................................................................... 34
MAILBOX ..................................................................................................................................... 35
2
Liasse1_23227944-0.p65
2
07/06/2000, 11:38
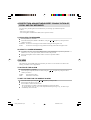
CHAPTER 9:
1.
2.
3.
4.
5.
6.
7.
OTHER FUNCTIONS ............................................................................ 37
PHOTOCOPIES ............................................................................................................................. 37
PRINTING ..................................................................................................................................... 37
RIBBON GAUGE VISUALISATION ........................................................................................... 37
PROTECTION AGAINST INDISCREET CONSULTATION OF VOCAL AND FAX MESSAGES ................................................................................................................................................ 38
ALARM ......................................................................................................................................... 38
PRINTING PAPER ECONOMY ................................................................................................... 39
PC INTERFACE ............................................................................................................................ 39
CHAPTER 10: APPENDICES ........................................................................................ 40
1.
2.
3.
4.
5.
6.
CONSUMABLES REPLACEMENT ............................................................................................ 40
TECHNICAL PARAMETERS ...................................................................................................... 42
TECHNICAL CHARACTERISTICS ............................................................................................ 42
TRANSMISSION REPORT CODES ............................................................................................ 43
REPAIRS ........................................................................................................................................ 45
NOTICE FOR CONNECTION TO THE TELECOMMUNICATION SYSTEM......................... 47
3
Liasse1_23227944-0.p65
3
07/06/2000, 11:38
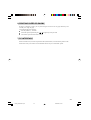
SAFETY WARNINGS
!
Before powering on your unit, make sure the mains outlet it is connected to
meets the requirements printed on the warning label on your unit (Voltage,
Current, Frequency of power network), or on the separate power supply
(depending on the model). If your unit works with a separate Power Supply,
use only the one delivered with your unit; never use another power supply.
The unit’s mains plug is the only way to disconnect the unit from the power
network. Therefore you must respect the following:
• Your unit must be connected to a mains outlet located nearby.
• The mains outlet must remain easily accessible.
Your unit is delivered with a power cord including a plug which, depending
on the model,
may be:
• without earth (the
symbol on the warning label)
• with earth (no symbol
on the warning label).
It is imperative that a power plug with an earth be connected to a wall outlet
with an earth.
In Europe, this unit includes the
stamp, following the 73/23/CEE, 89/
23226033-4
336/CEE and 93/68/CEE directives.
23226033-4 cdsnolaser_GB.p65
1
02/06/2000, 16:05
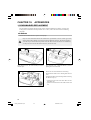
CHAPTER 1: INSTALLATION
1. UNPACKING THE UNIT
Check the presence of the following items:
Machine
Mains supply unit
Telephone handset
Telephone cable
Paper
User manual
2. OUTPUT PAPER
You may use any standard plain paper (A4 format photocopying paper, approx. 80 g/m2). However, for
optimal print quality results, we suggest you use the type of paper recommended by the manufacturer.
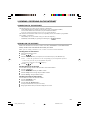
!
1
2
1
3
2
To open the fax access door (1), you must lean toward
it by the side (2)
3
4
Push the paper supporting bracket up (3).
Prepare a sheet of normal paper ( 30 sheets max.).
5
7
6
Insert the paper between the paper guides (4 and
6).
Adjust the left paper guide (4) to the width of the
paper
Push down the clamp (5) to insert the paper in the
paper housing of the machine.
!
Push up the supporting bracket (7)
which will ease the piling up of printed
pages.
5
Liasse1_23227944-0.p65
5
07/06/2000, 11:38
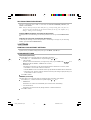
3.CONNECTIONS
1
2
2
1
Connect the telephone handset cord to the
appropriate connector (1) on the main unit
3
3
Connect the small plug of the telephone cable into
the appropriate connector (2) on the main unit, and
connect the other end to your wall telephone socket
!
4
3
Connect the small plug of the mains supply
unit into connector (4) on the main unit.
Ensure the strip (3) is facing upwards.
Check if the wall socket to which you'll connect your
machine complies with directives on the label under the
mains supply unit.
Connect the mains cable plug of the mains supply unit to
the wall socket.
6
Liasse1_23227944-0.p65
6
07/06/2000, 11:38
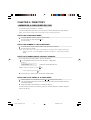
PROGRAMMING
ENTER THE MAIN MENU:
Press the MENU key.
MOVING WITHIN THE MENUS:
Press the
or
arrow to select the previous or the next line in the menu.
Press the OK key to go to the following menu.
Press the C (CORRECTION) key to return to the previous menu.
Press the START key to validate and exit from the current menu.
Press the STOP key to exit from the current menu.
MOVING WITHIN A DATA ENTRY FIELD
or
key to delete the last character or to insert a space or to move
Press the
within a field (for example, recording the date).
Press the C key to abandon the entry and return to the initial value.
Press the START key to confirm the entry and exit from the current menu.
YOUR FIRST FAX TRANSMISSION
It is advisable upon installation to record the following parameters on your machine:
DATE TIME: records the current date and time.
NUMBER: records the telephone number of your fax.
NAME: records the name of the fax to appear on faxes transmitted (if the setting HEADER
TRANSMISSION is active).
ENTERING OR CHANGING THE DATE AND TIME
Press MENU, 2, 1 and OK.
Enter the date and time using the numerical keypad, then Press OK to confirm. For example, to enter
7 May 1999, 9:15, enter 0 7 0 5 9 9 0 9 1 5 then Press OK.
RECORD YOUR NUMBER
Your number is printed on faxes transmitted when the HEADER setting is active. To record your number:
Press MENU, 2, 2 and OK.
Using the numeric keypad, enter the telephone number of your fax machine.
Press the OK key to confirm your choice.
RECORD YOUR NAME
This is the name attributed to your fax machine allowing it to be identified.
It is printed on faxes when the HEADER setting is active.
To record your name:
Press the MENU, 2, 3 and OK keys.
Enter you name using the alphabetic keyboard.
Press the OK key to confirm your choice.
7
Liasse1_23227944-0.p65
7
07/06/2000, 11:38
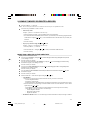
4. SETUP
At any time you can print the list of setup values, press MENU, 5, 4 and OK in order to check what is
programmed by default as well as any modifications to make.
To print the list of setup values, press MENU, 5, 4 and OK.
Your fax machine prints the list of setup values.
TYPE OF NETWORK
The telephone line to which your machine is connected may be connected either to a private network
or the public network (behind a company automatic telephone switcher, for example).
To directly parameter your fax machine on a PABX (private network), press MENU, 2, 4, 1 and OK.
To directly parameter your fax machine on the PSTN, press MENU, 2, 4, 2 and OK.
TYPE OF DIALLING
This concerns the type of dialling practised by the switcher to which your fax machine is connected: pulse
or tone. To determine the type of dialling used, choose the TONE DIALLING parameter and try to call
a number. If the call fails, change to PULSE DIALLING.
To directly parameter your fax machine for tone dialling, press MENU, 2, 5, 1 and OK.
To directly parameter your fax machine for pulse dialling, press MENU, 2, 5, 2 and OK.
NUMBER OF RINGS
This value allows you to set the number of rings after which the answering machine is activated.
To set the number of rings (2 to 9), press MENU, 2, 6 and OK.
Modify the number of rings if you wish and press the OK key to confirm your choice (2 to 9).
RING MELODY
You can choose from between 4 types of different melodies or NO RINGS and adjust the volume of the
melody chosen.
Press MENU, 2, 7 and OK.
Select the desired melody (N° 1 to 4 or WITHOUT RING) using the
To adjust the volume of the melody, press
and
navigator keys.
keys.
When the melody and the volume suit you, press the OK key.
REMOTE INQUIRY CODE
This function allows you to define the code necessary for locally or remotely accessing the vocal messages
recorded or the faxes received by your machine and stored in memory.
To enter an inquiry code, press MENU, 2, 8 and OK.
Enter your code and press the OK key to confirm your choice.
8
Liasse1_23227944-0.p65
8
07/06/2000, 11:38
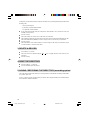
PREFIX
If your unit is connected to a private automatic branch exchange (PABX), you are advised to record the
prefix number (generally 0) into your unit.
Press MENU, 8, 4 and OK.
Select the WITH option using the or keys and press the OK key to validate.
Enter the number used by your PABX to access the telephone network (for instance 0) followed by
a / and press the OK key.
Enter if necessary the phone number length from which the prefix must be automatically added (in
most cases the value is 10) and press the OK key to validate.
Then press the STOP key.
9
Liasse1_23227944-0.p65
9
07/06/2000, 11:39
CHAPTER 2: DIRECTORY
1. MEMORISE A SUBSCRIBER RECORD
To access this menu, press MENU, 1, 1 and OK.
Your fax machine has created a new record. You can now record the characteristics of the subscriber.
Note: You can cancel creation of the record at any time by pressing the STOP key.
ENTER THE SUBSCRIBER NAME
Using the alphabetic keyboard, enter the subscriber name.
key.
You can correct your entry using the
Press the OK key.
ENTER THE NUMBER OF THE SUBSCRIBER
Using the numeric keypad, enter the number of the subscriber's fax machine.
Press the OK key to confirm.
Note: If you wish to insert a tone pause in the dialling (to exit from a private company network, for
example): press the / key on the alphabetic keyboard. The character / is inserted in the number
display.
ENTER YOUR SUBSCRIBERS INTERNET ADDRESS
If your subscriber has an Internet address, enter it in the directory.
Use the alphabetic keyboard to enter your subscribers e-mail address:
E-MAIL:
[email protected]
(example for [email protected])
Notes: to enter the @ character, use the
to enter a full stop, press the
key,
key.
Press the OK key to confirm entry of the subscriber internet address.
ENTER THE VOCAL MEMO OF A SUBSCRIBER
Move the indicator to "VOX MEMO" using the or keys and press the OK key.
Lift your telephone handset and record the vocal message you wish to associate with the subscriber,
for example "SMITH".
Hang up the handset: the subscriber is recorded in the directory.
If you do not want to associate a vocal memo to your record, move the indicator to "WITHOUT MEMO"
and press the OK key.
10
Liasse1_23227944-0.p65
10
07/06/2000, 11:39
2. CONSULT, MODIFY OR DELETE A RECORD
Press keys MENU, 1, 3 and OK.
Note: The records of the subscribers recorded into the directory are in alphabetical order.
You have two possibilities to select a record:
Selection by name
Example : find the record SMITH in the directory:
* Enter the letters S,M and I, your fax machine looks for the subscriber.
* If several subscribers start with the same two letters, you can refine your search by typing more letters
of the name or using the
selection.
or
keys: your fax machine looks for the subscriber as you refine your
* Press the OK key.
Step by step selection using the
and
arrows
Example : find the record SMITH in the directory:
* Press keys MENU, 1, 3 and OK.
* Move the indicator > using the
or
keys until you obtain the SMITH record.
* Press the OK key.
MODIFYING A RECORD IN THE DIRECTORY
When you have selected a record:
You can correct the name by using the
key and modifying the name using the alphabetic keyboard
(as for adding a record).
Press the OK key to confirm.
You can correct the subscriber's fax number by using the
key and changing the number using
the numeric keypad (as for adding a record).
Press the OK key to confirm.
You can correct the E-mail address by using the
key and changing the address using the alphabtic
keyboard (as for adding a record).
Press the OK key to confirm.
You can modify the short number automatically attributed to the subscriber using the
key and
the numeric keypad.
Press the OK key to confirm.
Move the indicator > to the chosen option using the
or
keys:
VOX MEMO:
* If there is no vocal message associated with the record, you have to record one:
. Lift the telephone handset
. Record the vocal message
. Replace the handset: the modifications concerning the subscriber record are taken into account.
* If there is already a vocal message associated with the record: move the indicator > to the chosen
option using the or keys.
. KEEP MEMO: the vocal message associated with the record is kept. Press the OK key.
. NEW MEMO: you can record a new vocal message.
- Lift the telephone handset
- Record the vocal message.
- Replace the handset.
WITHOUT MEMO: if there is a vocal message associated with the record, the message is deleted.
11
Liasse1_23227944-0.p65
11
07/06/2000, 11:39
At this point, you can define certain "privileged" subscribers who you call frequently and personalise their
incoming calls:
- with a special ring tone,
- by choosing a special mailbox number,
- on a particular cordless handset.
If your subscriber normally calls you on the phone, select PHONE CALL; select FAX CALL if he
normally sends you faxes.
Press the OK key.
Select the melody you want to use for calls from your subscriber.
Select WITHOUT RING if you selected FAX CALL and you do not want to be disturbed by fax calls.
Select the MAILBOX NUMBER you want to assign to faxes received from your subscriber.
Press the OK key.
Select the number of the cordless handset you want to assign to calls from your subscriber (only if
a cordless handset is connected to the unit).
3. DELETE A RECORD
Press MENU, 1, 4 and OK.
Select the record to be deleted using the
subscriber.
Press the OK key.
or
keys or typing the letters of the name of your
4. PRINT THE DIRECTORY
Press keys MENU, 1, 2 and OK.
Your fax machine prints the directory.
5.SAVING / RESTORING THE DIRECTORY (according option)
The saving and restoration of the directory as well as parameters of the machine are made possible thanks
to a specific smart card.
To do so, you have to get the saving kit from your retailer. This saving kit includes an user manual. Refer
to the manual for further information.
12
Liasse1_23227944-0.p65
12
07/06/2000, 11:39
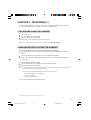
CHAPTER 3: TELEPHONE (*)
Your machine is programmed in the factory to operate on tone dialling electronic telephone exchanges.
To activate pulse dialling refer to §: set-up, in the chapter - INSTALLATION.
1. TELEPHONE USING THE HANDSET
Lift up the handset.
Type the number of your correspondent.
The screen displays the dialled number.
Note 1: You can compose the number before lifting the handset.
Note 2: To call from the directory, refer to § of this chapter: call from the directory.
2. DIALLING WITHOUT LIFTING THE HANDSET
You can call dial the number of your correspondent without lifting the handset:
Dial the number of your correspondent (or use the directory). The screen displays the telephone
number.
Press the SPEAKER key. The machine proceeds with dialling automatically.
When you hear your correspondent, lift the handset or move over to the machines control panel in
order to speak.
You can also take then line before calling:
Press the SPEAKER key, you can hear the dial tone through the speaker.
Dial the number of your correspondent.
Notes: At any time, you can pick up the handset and use it to continue the call (in this case the SPEAKER
and the microphone are automatically disabled).
You can also switch from handset mode to speaker mode during a call:
press and hold down the SPEAKER key,
hang up the handset,
release the SPEAKER key.
Now you can continue the call using the SPEAKER.
* NOTE: The telephone feature is only active when the device is on.
13
Liasse1_23227944-0.p65
13
07/06/2000, 11:39
3. CALL FROM THE DIRECTORY
Your fax machine gives you the possibility of calling your correspondent in several ways.
CALL BY NAME
Example : call the YATES record in the directory.
Enter the letters Y, A and T, your fax machine looks for your correspondent.
If several subscribers start with the same letters, you can refine your search by typing more letters of the name
or using the
Press the
and
keys.
key or pick up the handset.
CALL BY ABBREVIATED 2 DIGIT NUMBER
Example : call the YATES record in the directory under the shortened number 02.
Press the DIRECTORY key.
Enter the number 2 with the numeric keypad.
Press the
key or pick up the handset.
4. REPLY TO A CALL
Your telephone rings and the LINE icon flashes.
Pick up the handset and speak.
To end the conversation, replace the handset.
5. REDIAL ONE OF THE LAST TEN NUMBERS CALLED
Your fax machine gives you the possibility of redialling a number from the last ten called.
Press the REDIAL key.
If necessary, use the navigator and keys to select the number of the correspondent you wish to
call from the last ten correspondents called.
To call the number displayed, press the SPEAKER key or pick up the handset.
Note: You can delete the numbers memorised in the REDIAL key at any time by pressing keys C, REDIAL
and OK.
6. MUTE MODE
During a telephone communication, if you want your correspondent not to hear you:
Press the STOP key.
Press the STOP key again to resume conversation.
14
Liasse1_23227944-0.p65
14
07/06/2000, 11:40
7. USING THE RECALL, # AND *
ACCESSING SERVICES
The RECALL, # and * keys give access to Telecom services. Consult your telephone directory or contact
your Telecom agency, which will give you information concerning these services.
COMMUNICATION WITH A SERVER AND REMOTE CONTROL
If your machine is in pulse dialling mode, you can pass to tone dialling during a call by pressing the * key
to send a multifrequency (tone) sequence to a server or access a machine externally (for example, an
answering machine).
RECALL KEY
If your machine is connected to a private network (PABX), this key generally allows you to transfer a call
(see exchange documentation).
8. TRANSFER A CALL
This function is useful in the case where you wish to continue your conversation on another telephone
connected to the same line.
Example: you are speaking on the handset with your correspondent.
You wish to continue the conversation using a telephone situated in another room:
Tell your correspondent you are transferring the call.
Press the
key.
Replace the handset (instead of freeing the line, your machine "keeps" the line).
Go to the other room, pick up the handset and continue your conversation.
Note: Pressing the
key has no effect if the handset is not replaced within 4 seconds. You have 25
seconds in which to pick up the other handset. After this time, the communication is cut.
9. LENGTH OF COMMUNICATION
For calls, 10 seconds after the last digit is entered, the counter indicating the duration of the call is
displayed.
This counter indicates a communication time calculated from the last digit entered.
10. USING A CORDLESS HANDSET
You can use the machine with one or more cordless handsets. To do this, you must use the "Cordless
Telephone Kit" delivered with your machine, or purchase it from your dealer (depending on the model).
This gives you a phone system featuring telephone, fax, cordless phone, answering machine and copier.
The following functions are available:
REGISTRATION OF A CORDLESS HANDSET
Press MENU, 6, 2 and START.
Press OK then 6 on the cordless handset.
DELETING REGISTRATION OF A CORDLESS HANDSET
Press MENU, 6, 3 and START.
Type the number of the handset to be deleted.
CHANGING THE BASE STATION ASSIGNMENT CODE
Press MENU, 6, 1 and START.
15
Liasse1_23227944-0.p65
15
07/06/2000, 11:40
11. USING A PORTABLE PHONE (DEPENDING ON MODEL)
You can connect a portable phone (GSM) to your machine. This will allow you to send or receive faxes
through your portable phone.
To do so you have to purchase the Fax-Portable phone connection kit from your local retailer. The mobile
kit includes an operating instructions handbook. Please refer to the handbook for further information.
16
Liasse1_23227944-0.p65
16
07/06/2000, 11:40
CHAPTER 4: FAX
1.FAX TRANSMISSION
SCANNING MODE
There are three modes for scanning your documents:
NORMAL mode is used when the document is of good quality and does not contain small details.
FINE mode is used when the document contains small characters or designs.
PHOTO mode is used when the document is a photo.
The selected resolution mode is visualised by the state of the FINE and PHOTO icons.
To change the resolution mode, press the FINE PHOTO key.
IMMEDIATE TRANSMISSION
Insert the document (15 pages maximum), side to be transmitted face down, in the document feeder.
Compose your correspondent's fax number.
Press START.
Notes: You can modify your entry using the
key.
In case of failure (correspondent engaged, for example) the machine redials after a few minutes
wait.
TRANSMIT A DOCUMENT FROM THE DIRECTORY
Insert the document in the feeder.
Your fax machines gives you the possibility to transmit a document to your correspondent following
different procedures:
BY NAME: Example : call the record YATES in the directory :
Enter the letters Y,A and T.
Press the START key.
BY ABBREVIATED 2 DIGIT NUMBER: Example : call the YATES record in the directory under the
shortened number 02:
Press the DIRECTORY key.
Enter the number 2 with the numeric keypad.
Press the START key.
TRANSMISSION WITH SOUND SURVEILLANCE
This method of sending a fax allows you to follow the progress of your communication through the
speaker.
Insert the document in the document feeder.
Press the SPEAKER key. You hear a tone from the SPEAKER.
Compose your correspondent's number.
When you hear a high pitched tone, press START.
17
Liasse1_23227944-0.p65
17
07/06/2000, 11:40
TRANSMISSION FROM MEMORY OR THE FEEDER
Press MENU, 3, 5 and OK.
Move the indicator > to the chosen option using the
or
keys:
MEMORY
The document is first stored in the memory of your fax machine, then it is transmitted.
FEEDER
Document scanning and transmission are performed at the same time. If your correspondent's fax
machine does not answer, the document remains in the feeder.
TRANSMISSION TO SEVERAL CORRESPONDENTS
Place the document in the fax machine feeder.
Dial the name or number of your first correspondent.
Press the
key to enter the name or number of the next correspondent.
Repeat the procedure for all the correspondents you wish to send to (10 maximum).
Press the START key.
Notes: By pressing the DIRECTORY key, you can quickly access a correspondent.
By pressing the REDIAL key, you recall the last numbers called.
DEFERRED TRANSMISSION
Deferred transmission allows you to automatically transmit a fax at a time you choose to one or several
correspondents (10 maximum).
Insert the document in the feeder.
Press keys MENU, 3, 1 and OK.
Enter the number of your correspondent and press OK.
Enter the time at which you wish to transmit the document.
Press the START key.
The document will be sent at the time programmed.
Note 1: Before pressing the START key, by pressing OK you can choose, if you wish:
to send directly from the document feeder,
the number of pages in the document.
Note 2: To cancel transmission of a deferred fax:
If the document is in the feeder, press STOP. If the document is in memory, use the procedure
to cancel a request from the wait queue (§ cancel a transmission request in the chapter
ADVANCED COMMUNICATION FUNCTIONS).
Note 3: To transmit immediately: press START.
TRANSMISSION OF A SHORT MESSAGE ENTERED ON THE KEYBOARD
You can transmit a fax in the form of a short document entered directly on the alphabetic keyboard.
Press keys MENU, 3, 1 and OK.
Enter the number of your correspondent and press OK.
Enter the START time (for deferred transmission) and press OK.
18
Move the cursor to ALPHA KEYPAD using the or keys, the screen displays:
Press START.
By pressing OK, the transmission request continues (number of pages, flyleaf, etc.).
Using the alphabetic keyboard, enter the message to be transmitted (limited to 80 characters) and
press OK.
The document will be sent at the programmed time.
Liasse1_23227944-0.p65
18
07/06/2000, 11:40
FLYLEAF
The flyleaf is an A4 document. This flyleaf is the first sent when transmitting a document. The document
will thus be sent from memory (the choice ADF being ignored).
It can be inserted at the request of the user on each transmission from memory.
To add a flyleaf:
Press keys MENU, 3, 1 and OK.
Record the number of your correspondent, the departure time, the type of document (memory or
feeder) and the number of pages.
Move the indicator onto WITH HEADER PG using the or keys.
Press OK.
Using the alphabetic keyboard, enter the message you want to appear at the bottom of the flyleaf.
Press OK.
STOP TRANSMISSION OF A FAX
Press STOP.
Press the STOP key again to confirm stopping the transmission in progress.
TRANSMISSION REPORT
CHOICE OF THE TRANSMISSION REPORT TYPE
Following each fax transmitted, your fax machine can print a transmission report according of your
choice.
To select WITH directly, press keys MENU, 3, 4, 1 and OK.
A transmission report is printed when transmission has terminated correctly or has been definitely
abandoned. There is thus only one transmission report for each transmission request.
To select WITHOUT directly, press keys MENU, 3, 4, 2 and OK.
The documents transmitted do not have transmission reports (refer to the transmission log to keep
a trace of communications).
To select IF ERROR directly, press keys MENU, 3, 4, 3 and OK.
A transmission report is printed only when all tries at transmission have failed and the request is
finally abandoned.
PRINTING THE TRANSMISSION REPORT
In the case of you choose WITHOUT and you wish to print the report of the last transmission, proceed
as follows:
Insert paper.
Press MENU, 5, 5 and OK.
TRANSMISSION REPORT WITH FIRST PAGE
In the case of transmission of a document which is in memory (deferred transmission from memory or
transmission to several recipients), the transmission report contains the reduced image of the first page
of the document.
Note: The SEND REPORT parameter should be set to either WITH or IF ERROR.
19
Liasse1_23227944-0.p65
19
07/06/2000, 11:40
2.FAX RECEPTION: FAX ANSWERING MACHINE
Your fax machine has a reception memory allowing it to receive faxes or E-mails even if there is no paper.
To automatically receive faxes, the FAX icon should be lit. If this is not the case, press the key TEL. FAX
TAD.
FAX ANSWERING MACHINE
This function allows you to request that the faxes received are not printed directly, but kept in memory.
If you want to directly activate your fax answering machine, press keys MENU, 3, 6, 1 and OK.
If you want to directly disactivate your fax answering machine, press keys MENU, 3, 6, 2 and OK.
PRESENCE OF FAX MESSAGES
The status of the "FAX MESSAGES" lamp tells you of the presence of any faxes received in memory:
- "FAX MESSAGES" off: no messages.
- "FAX MESSAGES" flashing: at least one message received in memory.
PRINTING FAXES RECEIVED
Put the paper in the paper tray.
Press the FAX MESSAGES key.
Note: You can protect access to your messages with a code. Refer to §: protection against indiscreet
consultation of vocal and fax messages in the chapter - OTHER FUNCTIONS.
SATURATION OF RECEPTION MEMORY
When there are too many faxes received in memory, the machine is saturated and cannot record any more
fax messages.
The FAX icon blinks and the MEMORY FULL message is displayed:
You should print the faxes received and/or delete the vocal messages recorded in order to empty the
memory.
DELETING RECORDED FAXES
The pages of fax documents are deleted automatically as soon as they are printed.
Indication of the presence of a document is cleared when all the pages have been printed.
Printing which has been suspended owing to lack of paper restarts at the first page not printed.
Note: You can adjust the RX INMEM parameter (MENU 36) in order to print faxes immediately when
they arrive (not to store them in memory).
REMOTE INTERROGATION OF THE FAX ANSWERING MACHINE
If you are distant from your machine and you have a fax machine locally, you can print faxes received
in memory on your machine on the local machine.
On delivery, the fax answering machine is not capable of being interrogated remotely. To make this
possible, you should enter a remote interrogation code consisting of four digits other than 0000 (refer to
§: remote interrogation code in the chapter - OTHER FUNCTIONS). The remote interrogation code
is also for the vocal answering machine. You can thus also listen to your voice messages during the
communication.
20
Liasse1_23227944-0.p65
20
07/06/2000, 11:41
For remote interrogation of fax messages:
On the remote fax machine having a telephone, dial your number.
Press the * key during the welcome message, then enter the 4 digit interrogation code. The machine
delivers the voice messages. At the end of the messages and during the bips:
Press keys 8 and 0.
Your machine will then retransmit all the faxes received in memory.
Activate the fax machine as soon as you hear the fax tone.
Note: When you interrogate your fax answering machine remotely, the retransmitted faxes are
automatically deleted from memory.
!
For remote calling to work, you should use a telephone configured in tone dialling
mode.
3. TELEPHONE CALL DURING FAX COMMUNICATION
If you wish, you can take the correspondent with whom you are on fax communication on normal
telephone conversation.
YOU CALL YOUR CORRESPONDENT
During transmission of the document (transmission or reception):
Press the SPEAKER key, in place of "TRANSMISSION" or "RECEPTION", your machine will
display "PHONE".
As soon as the page is transmitted, your correspondent (if his/her machine is compatible) is advised of
your request by the ringing tone on the telephone. If your correspondent decides to take the call, your
machine will ring; unhook the receiver to begin conversation.
YOUR CORRESPONDENT CALLS YOU
Your correspondent wishes to call you in order to continue the communication by telephone. Your
telephone rings. You should unhook to talk to your correspondent.
21
Liasse1_23227944-0.p65
21
07/06/2000, 11:41
CHAPTER 5: INTERNET
1. SUBSCRIPTION AND ACCESS PROVIDER
SUBSCRIPTION
Your machine already includes a free E-Mail account.
In order to benefit from this offer and create your own permanent E-Mail address:
Fill in the Internet subscription form provided with your machine.
Insert this form into the document feeder (as if you are sending a fax).
Press MENU, 9, 9, 1 and OK: the form will automatically be sent to the provider to register your
subscription.
If you wish to modify your e-mail address, proceed as follows:
Press MENU, 9, 9, 2 and OK.
Enter your new preferred address.
Confirm with OK.
CHOOSING AN ACCESS PROVIDER
If you wish to use another E-Mail you already have (e.g. on a PC).
Press MENU, 9, 1 and OK keys.
Use the or keys.
Select PROVIDER2 or OTHERS, and press OK to confirm.
In that case, you will have to define all the settings (you can obtain than from you access provider):
access number,
login identifier,
login password,
E-mail identifier,
E-mail password,
E-mail address,
SMTP server: automatically indicates the server address for all Internet transmissions,
POP3 server: automatically indicates the server address for all documents received in your Internet
mailbox,
PRIMARY DNS, then SECONDARY DNS: transmits messages on the Internet (the server address
consists of four groups of three digits maximum, separated by dots).
Note: If your access provider did not give you a Secondary DNS address, enter the PRIMARY
DNS address again.
DISABLING INTERNET FUNCTIONS
If you do not wish to use the Internet functions:
Press MENU, 9, 1 and OK keys.
Use the
or
keys to select "NO ACCESS" and press OK to confirm.
22
Liasse1_23227944-0.p65
22
07/06/2000, 11:41
2. SENDING / RECEIVING ON THE INTERNET
CONNECTING TO THE INTERNET
The following things occur when your fax connects to the Internet:
sends all the Internet-faxes queued for transmission to your correspondent's mailbox,
receives all the Internet-faxes located in your personal Internet mailbox.
NOTE: the actual fax-document itself is sent as an E-mail attachment.
The connection can be made in either of two ways, depending on how your machine is programmed:
(see § Settings - Connection):
automatically once or several times a day (you choose the frequency),
immediately (and manually) by pressing the following keys:
, TWICE.
SENDING ON THE INTERNET
Whatever the document to be sent (fax, E-mail or voice mail), the document is scanned and stored in
memory. It will be sent on the Internet the next time you connect.
Note: If you are sending a document to a PC, it will be received as an E-mail attachment.
Sending faxes on the Internet
Put the document in the feeder.
Press the
key.
Enter the E-mail address of your recipient (or use the directory key or the REDIAL key).
NOTE:
. to enter the @ character, use the corresponding key on the alphabetic keyboard,
. to enter a dot, press the key on the alphabetic keyboard,
. for uppercase characters, use the
Press the
(Shift) key..
key.
Sending E-mail on the Internet
You can send a message entered on the keyboard to an electronic mailbox:
Press the
key.
Enter the E-mail address and press OK to confirm.
Enter the subject of the message and press OK to confirm.
Enter the message and press OK to confirm.
Sending voice mail on the Internet
You can send voice mail to an electronic mailbox:
Press the INTERNET @ key.
Enter the E-mail address,
Press the VOCAL MESSAGES key,
Pick up the handset and record your voice mail,
Hang up the handset when you finish recording the voice mail.
23
Liasse1_23227944-0.p65
23
07/06/2000, 11:43
RECEIVING FROM THE INTERNET
All types of documents (fax, E-mail or voice mail) are received automatically whenever you
connect to the Internet.
Note: Your fax cannot process files other than faxes (e.g. word processing files, CAD files, etc.).
You can keep these documents in your Internet mailbox for use by your computer (see §
Settings - Sorting received messages)
Printing E-Mails and faxes received from the Internet
To print your faxes or E-mail messages, use the same procedure as for a fax: press the FAX MESSAGES
key.
Listening to voice mail received from the Internet
To listen to your messages, use the same procedure as for listening to messages on your answering
machine: press the VOCAL MESSAGES key.
3. SETTINGS
PRINTING YOUR INTERNET SETTINGS
To print a list of your Internet settings at any time, press the MENU, 9, 8, OK keys.
STANDARD SETTINGS
Connection (menu 951)
This menu allows you to choose the mode for connecting to the Internet:
Press MENU, 9, 5, 1 and OK and choose an option using the or keys:
VOLUNTARY
The unit connects to the Internet at your request only, when you press TWICE on:
or on
MENU 9, 2, OK (INTERNET / IMMEDIATE ACCESS)
PERIODICAL
You define how many times per day the unit should connect to the Internet. To do this, define:
* THE FIRST CALL: the time of the first connection.
* THE NUMBER OF CALLS: the number of times per day that the unit should connect to the Internet.
* THE LAST CALL: the time of the last connection of the day (this setting is displayed only if you
set the number of calls to 2 or more).
Press OK to confirm.
SENDING (menu 952)
This menu allows you to choose the mode for sending/receiving documents via the Internet:
Press MENU, 9, 5, 2 and OK and choose an option using the or keys:
IMMEDIATE
Internet-faxes are sent/received immediately (the connection starts immediately).
ON CONNECTION
Internet-faxes are sent/received only during automatic or manual connections.
Press OK to confirm.
24
Liasse1_23227944-0.p65
24
07/06/2000, 11:43
Servers (menu 953)
If you are connected to PROVIDER 2 or OTHER, this menu allows you to access the server settings:
SMTP SERVER
automatically indicates the server address for all standard Internet transmissions.
POP3 SERVER
automatically indicates the server address for all documents to be recovered in your Internet mailbox,
PRIMARY DNS / SECONDARY DNS
send messages on the Internet.
Sorting received messages (menu 96)
This menu allows you to choose where the E-mail messages received on your fax should be sent: you can
keep them in your Internet mailbox for later use with a computer (a PC sharing the same Internet
subscription as your fax).
Press MENU, 9, 6 and OK and choose an option using the or keys:
FAX ONLY: all messages are sent to your fax unit.
* With the help of the
or
keys choose one of the following:
. WITH TRANSLATION of attached files not readable by your fax (document files sent from a PC
- such as .doc, .exe, etc.).
. WITHOUT TRANSLATION of attached files: you will then receive only those documents that
can be read by your fax.
* Validate by pressing OK.
SHARE PC: messages that can be processed by your fax (faxes, E-mails and voice messages) can be
printed or listened to. Other messages are kept in the mailbox to be read by the PC.
* With the help of the
or
keys choose one of the following:
. SEND TO PC: enter the E-Mail address of the PC you wish to receive attached files not read by
your fax (this is only necessary if your PC has a different E-Mail from your f@x machine). Press
OK and choose the type of E-Mails to be sent to your PC:
- all E-Mails,
- only E-Mails with un-readable attachments,
. DO NOT SEND TO PC: (if the PC and your f@x share the same E-Mails address) and choose:
- delete E-Mails already read by the f@x,
- without deleting E-Mails already read by the f@x (in order to receive a copy on the PC).
PC ONLY: all messages are kept in the mailbox to be read by the PC.
Note: If your have chosen SHARE PC or PC ONLY, your fax will indicate how many E-Mails
are present in your mail-box after connecting to your Internet server.
Press OK to confirm.
F@x to Fax (menu 97)
This menu allows you to send a document to another normal fax (which does not have an E-Mails address),
via the Internet.
To activate this service:
Press MENU, 9, 7 and OK and choose one of the following with the help of the
or
keys:
WITH (service enabled),
WITHOUT (service disabled).
Confirm to OK.
25
Liasse1_23227944-0.p65
25
07/06/2000, 11:44
If you have chosen WITH (service enabled) you should enter the PIN code (security code), which
is given to you upon acceptance of your application to use this service.
To send a document to another fax via the Internet with this service:
Insert document in paper feeder.
Dial the international code and number of your correspondent: type + (pressing the + key),
followed by the international code (even '44' for UK) and your correspondent's number omitting the
'0'. Example: for 0181 760 0708, type +441817600708).
Push the
: the document will be sent automatically.
Note: If you wish to keep the "international" number of your correspondent in your directory to send
documents via the Internet in the future, you must enter the + (pressing the + key), followed
by this number, in the place reserved for the E-Mail address of your correspondent, in the
directory.
26
Liasse1_23227944-0.p65
26
07/06/2000, 11:45
CHAPTER 6: VOCAL ANSWERING MACHINE
1. STARTUP
TO MAKE YOUR ANSWERING MACHINE OPERATIONAL
The TAD icon should be lit. If this is not the case, press the TEL. FAX TAD key.
TO SWITCH OFF YOUR ANSWERING MACHINE:
The TAD icon should be off. If this is not the case, press the TEL. FAX TAD key.
Notes: The TAD icon flashes in the following two cases:
- no announcement recorded,
- the answering machine memory is saturated: delete the VOICE messages.
The maximum length of a recorded message is 90 seconds.
2. SELECT THE TYPE OF ANSWERING MACHINE
Your fax machine has two types of answering machine:
• answering machine - recorder,
• simple answering machine.
SELECT THE TYPE ANSWERING MACHINE - RECORD UNIT:
Press keys MENU, 4, 5, 1 and OK.
SELECT THE ANSWER ONLY MACHINE:
Press keys MENU, 4, 5, 2 and OK.
3. ANNOUNCEMENTS
The machine has two announcements, corresponding to the two types of answering machine:
• the announcement for the answering machine - recorder (you have one pre-recorded
announcement),
• the announcement for the simple answering machine.
ANNOUNCEMENT FOR THE ANSWERING MACHINE
RECORDING THE OGM
Press the keys MENU, 4, 1, 1 and OK.
Lift the handset, you can start dictating your message.
Hang up the handset to end recording. The message is automatically played back.
At the end of the playback the answering machine can be activated.
OGM PLAYING MACHINE - RECORDER ANNOUNCEMENT
Press the keys MENU, 4, 2, 1 and OK.
Your fax machine plays the announcement you have recorded.
27
Liasse2_23227944-0.p65
27
07/06/2000, 11:47
ANNOUNCEMENT FOR THE SIMPLE ANSWERING MACHINE
RECORDING THE SIMPLE OGM
Press the keys MENU, 4, 1, 2 and OK.
Proceed in the same way as for recording the first answering machine message.
LISTENING TO THE SIMPLE OGM
Press the keys MENU, 4, 2, 2 and OK.
Your fax machine plays the message you have recorded.
4. MESSAGES
PRESENCE OF MESSAGES
The status of the "VOCAL MESSAGES" lamp tells you of the presence of messages:
• "VOCAL MESSAGES" off: no messages.
• "VOCAL MESSAGES" flashing: at least one message not listened to.
• "VOCAL MESSAGES" lit: presence of messages. ALL the messages have been listened to.
LISTENING TO MESSAGES
Press VOCAL MESSAGES.
Your machine gives the number of messages and, for each message being listened to, the order number
and date/time of reception.
Whilst listening to the VOCAL messages, you can:
Press the
key to return to the start of the message.
Press the
key twice to go to the previous message.
Press the
key to start listening to the next message.
Press the VOCAL MESSAGES key to pause. Pressing a second time restarts listening.
DELETING THE MESSAGES
To delete the voice messages :
Press keys MENU, 4, 4 and OK.
To delete a message :
Press C key whilst listening to the message to supress.
SATURATION OF ANSWERING MACHINE
When there are too many messages in memory, the answering machine is saturated and can no longer
record more messages. The TAD icon flashes and the screen displays "MEMORY FULL".
You should delete the recorded messages to empty the memory.
5. LOCAL MEMO
A memo is a message which you record locally on your answering machine.
RECORDING A LOCAL MESSAGE
Press the keys MENU then VOCAL MESSAGES.
Unhook the handset and speak.
Hang up the handset to finish recording.
28
Liasse2_23227944-0.p65
28
07/06/2000, 11:47
LISTENING TO A LOCAL MESSAGE
To listen to a local message, proceed in the same way as for a message.
6. CALL FILTERING
The call filtering function allows you to listen to a message while it is being recorded.
•
In "WITH CALL FILTERING" mode you hear the messages being recorded on your answering
machine:
.
you can take the communication by lifting the handset,
•
.
you can adjust the volume of the SPEAKER using the
keys.
In "WITHOUT CALL FILTERING", the messages are recorded in silence:
.
you can, however, take the communication by lifting the handset,
.
you can adjust the volume of the SPEAKER using the
a message being recorded.
keys in order to listen to
To activate the CALL FILTERING mode:
Press keys MENU, 4, 6, 1 and OK.
To disactivate the CALL FILTERING MODE:
Press keys MENU, 4, 6, 2 and OK.
7. REMOTE INTERROGATION OF THE VOCAL ANSWERING
MACHINE
On delivery, the vocal answering machine is not capable of being interrogated remotely. To make this
possible, you should enter a remote interrogation code consisting of four digits other than 0000. The
remote interrogation code is common to the fax answering machine. You can thus also print your fax
messages or your e-mails during the communication.
To access your voice messages remotely:
On the remote telephone, dial your number.
Press the * key during the announcement (or during the bips if the announcement has not been
recorded).
Type your 4 digit remote interrogation code.
Listening of all the voice messages starts automatically.
At the end of listening, or if there are no messages, the machine sends a series of bips.
!
For remote calling to work, you should use a telephone configured in tone dialling
mode.
29
Liasse2_23227944-0.p65
29
07/06/2000, 11:47
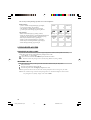
You can carry out the following operations over a remote telephone:
Whilst listening:
• pause or resume message listening by pressing 5,
• go on to next message, by pressing 6,
• start listening to message again, by pressing 4,
• go back to previous message, by pressing 4 twice.
After listening:
• delete received messages, by pressing 1 and 5,
• record your announcement, by pressing 8 and 3 and stop the
recording of your announcement, by pressing any key,
• listen to your announcement, by pressing 3,
• switch on your answering machine, by pressing 7,
• switch off your answering machine, by pressing 9,
• resume message listening, by pressing 5.
Delete
Announce
1
2
3
Last
Message 4
Pause /
Message 5
Next
Message 6
Answering
machine
ON
7
Record
8
Answering
machine
OFF
9
0
#
*
9. PRIVILEGED ACCESS
PRIVILEGED ACCESS CODE
If you do not want to be disturbed by anyone except privileged access callers (with a special access code),
set the unit to TAD receive mode and input a privileged access code:
Press MENU, 4, 7 and START.
Input an access code other than 0000 and press START to confirm.
Note: You must activate the privileged access facility using MENU 48 (setting: WITH).
INCOMING CALLS
Only those callers to whom you have given this code will be able to reach you. They must:
Dial your number.
Wait for your terminal to answer the call.
Press the key, then enter the 4-digit privileged access code.
Note 1: If you do not answer the call, the caller will be prompted to leave a message on your TAD.
Note 2: The "remote message retrieval" and "privileged access" codes must be different. To de-activate
the privileged access facility, simply set the code to 0000.
30
Liasse2_23227944-0.p65
30
07/06/2000, 11:47
CHAPTER 7: RECEPTION MODES
SELECTING THE RECEPTION MODE
Press the TEL FAX TAD key at least once to configure the reception mode you want:
MANUAL MODE
TEL icon lit, FAX and TAD icons off.
Your machine acts as a telephone. You use this mode if the fax traffic is low.
On an incoming call, the machine rings. It never unhooks automatically (except after 10 rings if remote
interrogation is authorised, in which case it transmits the announcement or bips if no announcement has
been recorded).
If you unhook, you can either continue in vocal conversation or receive a fax by pressing the START key.
AUTOMATIC MODE WITH ANSWERING MACHINE
TEL, FAX and TAD icons lit.
Your machine acts as a telephone with an answering machine associated with a fax. You use this mode
when you are absent or if you do not want to lose telephone calls and faxes.
On an incoming call, your machine unhooks after a few rings and transmits your answering machine
announcement:
•
if the call is a fax, your machine passes into fax reception mode,
•
if it is a vocal communication, your correspondent can leave a message.
Note: You can set the number of rings before your machine unhooks.
AUTOMATIC MODE WITHOUT ANSWERING MACHINE
TEL and FAX icons lit, TAD icon off.
Your machine automatically sorts calls before presenting them to you. You use this mode when fax
traffic is high and you do not want to be disturbed by reception of a fax.
On an incoming call, the machine unhooks automatically without disturbing you (*), transmits a welcome
message to your correspondent inviting him to wait (example: "Please hold the line"), then:
• if the call is a fax, your machine receives the fax,
• if it is a vocal communication, your machine rings (alert ring) for 30 seconds to let you know (**). During
this time, your correspondent hears a ringing tone.
(*) For this, the machine does not make you wait for the ringing tone generated by the telephone network. On the other hand, if your installation
has parallel telephones, these ring normally.
(**) If your installation has parallel telephones, these do not ring.
31
Liasse2_23227944-0.p65
31
07/06/2000, 11:47
CHAPTER 8: ADVANCED COMMUNICATION
FUNCTIONS
1. DEPOSIT AND RETRIEVAL (ACTIVE POLLING)
PLACE A DOCUMENT IN DEPOSIT
A document is left in your fax machine at the disposition of one or more correspondents who can obtain
a fax of the document by calling your fax machine using the POLLING function. The document is thus
transmitted to the requesting fax machine.
You can deposit your document in the feeder or in memory. This second solution is preferable, as it frees
your fax machine and allows retrieval by several correspondents.
To prepare transmission by your machine of a document destined to be retrieved by another machine,
carry out the following operations:
Check that your machine is in automatic mode (FAX icon lit).
Insert the document in the feeder.
Press keys MENU, 3, 3 and OK.
Choose SINGLE POLLING or MULTI POLLING using the
ou
navigator keys and press OK.
Note: If you choose MULTI POLLING, the document will be recorded in memory and can be retrieved
by several correspondents.
Choose PAPER FEEDER, MEMORY or ALPHA KEYPAD (in the case of a short message entered
at the keyboard) using the ou navigator keys and press OK.
Press START to start the deposit.
RETRIEVE A DOCUMENT
You want to retrieve a document deposited in a remote fax machine. You call the fax machine to receive
the document which it transmits to your fax machine in automatic mode.
Note: Your feeder should not contain a document.
To retrieve a document deposited at your correspondent:
Press keys MENU, 3, 2 and OK.
To programme the correspondent of the retrieval:
Enter the fax number of your correspondent (or use the directory) and press OK.
To start retrieval immediately:
Press START.
To programme the time of the retrieval:
Enter the time for the retrieval and press START.
32
Liasse2_23227944-0.p65
32
07/06/2000, 11:47
2. TRANSMISSION WAIT QUEUE
This function allows management of operations which are waiting (deferred transmission, deposit,
retrieval).
PRINT THE LIST OF OPERATIONS WAITING
Printing of the list of operations waiting is useful before any intervention on the documents waiting
(deletion, execution, modification). This list indicates for each document waiting: the number of the
operation waiting, the name of the correspondent, planned transmission time, type of operation waiting
and the number of pages in the document.
To print the wait queue directly, press keys MENU, 8, 7, 5 and OK.
The list of operations waiting is printed.
MODIFY OR CONSULT THE WAIT QUEUE
Press keys MENU, 8, 7, 2 and OK.
Move the cursor to the operation you wish to modify or consult using the
Press OK.
or
navigator keys.
Your fax machine indicates the status of the documents which are in the wait queue:
DOC:
Document deposited
POL:
Document to be retrieved
TX:
Deferred transmission
NET:
Internet transmission (fax or E-mail)
If you want to modify one of the operations in the wait queue:
You can select the operation from the wait queue using the
or navigator keys (or from the
number).
Press OK. You can now modify the parameters of the displayed request.
Press START to exit.
EXECUTE A WAITING TRANSMISSION IMMEDIATELY
This function allows you to process a transmission request as soon as possible:
Press keys MENU, 8, 7, 1 and OK.
You can select the transmission requests from the wait queue using the or
navigator keys (or
from their order number).
Press OK to immediately execute the selected request. The waiting operation is then executed.
CANCEL A TRANSMISSION REQUEST
Press MENU, 8, 7, 3 and OK.
Select the document to cancel using the or navigator keys.
Press OK to cancel the request from the wait queue.
Press OK to confirm.
PRINT A DOCUMENT IN THE WAIT QUEUE
This function allows you to know the contents of a document awaiting transmission.
Press MENU, 8, 7, 4 and OK.
Select the waiting document using the ou
Press OK, the selected document is printed.
navigator keys.
33
Liasse2_23227944-0.p65
33
07/06/2000, 11:47
3. TELECOMMANDS FROM A PARALLEL TELEPHONE
Several telecommands are possible from a telephone handset (in tone dialling mode), connected in
parallel on the installation (remark: if the parallel handset is configured for pulse dialling, press * in order
to switch to tone dialling mode).
TELECOMMAND TO STOP THE ANSWERING MACHINE
If you unhook from a parallel handset, and the machine has also unhooked and it transmits its
announcement (or the welcome message), you can stop the transmission of the announcement by pressing,
on your telephone keypad, the sequence #0.
TELECOMMAND TO SWITCH TO FAX RECEPTION
If you unhook from a parallel handset and you do not recognise your correspondent, your can
telecommand your machine in order that it switches to fax reception mode by pressing, on your telephone
keypad, the sequence #7.
4. RELAY BROADCASTING (MOBILE OFFICE)
If you want to automatically transfer all received messages (faxes, E-mail messages or voice messages)
to another telephone and/or fax machine, or to a computer:
Press the MENU, 8, 3 and OK keys,
Choose an option using the or keys:
• WITH RELAY:
All your messages are transferred to a telephone/fax:
* Enter the number of the recipient telephone/fax and press OK to confirm.
Note: The name and number of this telephone-fax are saved automatically in the directory under
the last number in the directory.
* Choose the type of messages to relay (VOICE, FAX or FAX/VOICE) and press OK to confirm.
* Type your 4 digit remote interrogation code and press OK to confirm (If you choose VOICE or FAX/
VOICE).
* Choose WITH or WITHOUT OGM and press OK to confirm.
If you choose WITH OGM: you receive a recorded announcement on the recipient telephone/ fax
indicating that relayed documents are about to arrive.
To record this announcement:
. Pick up the handset,
.
Record the announcement,
. Hang up the handset,
* Choose WITH or WITHOUT FREE RELAY and press OK to confirm.
If you choose WITH FREE RELAY, then you must do the following when receiving relayed
documents on the recipient telephone / fax :
. Pick up the handset,
. Enter the remote access code when you hear beeps or the recorded announcement for relay
broadcasting,
. Follow the procedure for the remote access facility in order to listen to your voice messages, or
receive the fax or E-mail messages.
34
Liasse2_23227944-0.p65
34
07/06/2000, 11:47
• TO THE INTERNET: all your messages are transferred to an E-mail address:
* Choose an option using the
or
keys:
. TO MY MAIL, to transfer all your messages to your E-Mail adresses (shared with a computer for
example),
. OTHER ADRESS: enter the recipient E-Mail adress.
* Choose the type of messages to relay (VOICE, FAX or FAX/VOICE).
• WITHOUT RELAY BROADCASTING: all your messages are kept on your fax.
Press OK to confirm.
5. MAILBOX
Your machine can have up to 5 mailboxes. They are used to receive confidential fax or vocal
messages addressed to different people.
Your correspondent transmits, using his telephone keypad (DTMF codes) the number of the mailbox
in which he wants to deposit his message.
You should enter the number of your mailbox on the keyboard of your machine in order to print the
fax or listen to the vocal message received.
CREATING A MAILBOX
Press MENU, 7, 1 and OK.
Enter a number between 1 and 5 on the keyboard and press OK twice:
Enter a 4 digit code of your choice (different to 0000) on the keyboard and press OK.
Note: The 4 digit code lets you remotely interrogate and/or protect the mailbox.
Press OK.
Use the
to choose to protect your mailbox and press OK to confirm
your choice.
Choose «MBX ANNOUNCE » in order to send a message to the subscriber wishing to deposit a
message in your mailbox.
Press OK.
Unhook your handset and record a message.
Hang up the handset: you listen to your message. Your mailbox is created.
If you have a DECT cordless handset, you can associate your mailbox with your handset. This
function allows you to look up the contents of your mailbox from your DECT handset, without having
to enter the mailbox locking code.
Press OK.
Enter your handset’s number (from 1 to 4), then confirm by pressing OK
Note: The value 0 indicates that no handset is used with the mailbox.
HOW YOUR CORRESPONDENT DEPOSITS HIS MESSAGE IN YOUR
MAILBOX
- Access by DTMF code
Your machine should be in mode TEL FAX TAD.
Your correspondent dials your number and hears the announcement of your vocal answering
machine.
Your correspondent presses the keys # and 1, then he enters your mailbox number (between 1 and
5) and hears the announcement of your mailbox.
After the bip, your correspondent transmits his vocal or fax message (START key).
35
Liasse2_23227944-0.p65
35
07/06/2000, 11:47
- TX MAILBOX (private mode) via Menu 73 and mailbox polling via Menu 74.
HOW TO ACCESS YOUR MAILBOX
If you expect a vocal message, press VOCAL MESSAGES.
If you expect a fax message, press the FAX MESSAGES key.
Enter the mailbox number (between 1 and 5) and press OK.
• If you have not locked your mailbox (MEM ACCESS = WITHOUT), you hear your vocal message
or your fax prints.
• If you have locked your mailbox (MEM ACCESS = WITH), you must enter the 4-digit mailbox code
and press OK.
Note: After having created a mailbox, to hear all messages received or print all faxes, use mailbox
number 0.
REMOTE INTERROGATION OF YOUR MAILBOX
On the remote telephone or fax machine, dial your number. You will hear the announcement of your
vocal answering machine.
Press keys # and 1 and the number of your mailbox (between 1 and 5).
Enter the 4-digit code for your mailbox:
- You hear the vocal messages left in your mailbox.
- If you call from a fax machine, press keys 8, 0 and START to print the faxes.
CANCELLING A MAILBOX
Press MENU, 7, 2 and OK.
Enter the number of the mailbox you wish to cancel and press OK.
Confirm the suppression of your mailbox, pressing the OK key.
36
Liasse2_23227944-0.p65
36
07/06/2000, 11:47
CHAPTER 9: OTHER FUNCTIONS
1. PHOTOCOPIES
The machine can be used as a photocopier:
Insert the document to be copied in the document feeder, as for transmission.
Choose the resolution mode for local copying of photographic documents by pressing FINE PHOTO.
If you do not select PHOTO mode, the photocopies will be in FINE mode.
The machine can make 1 to 99 copies of a document.
Press MENU, 5, 8 and OK.
You can change the number of copies to print using the keys on the keypad.
Press OK. The document is scanned, stored in memory and then printed.
For a simple copy, insert the document to copied in the document feeder and press START.
2. PRINTING
FUNCTION GUIDE
By printing the functions guide you can access the list of functions and their corresponding numbers.
Press the MENU key, then the 5, 1 and OK keys successively.
The machine prints the guide.
LOGS
The last 30 calls are noted in transmission and reception logs which can be printed at any time.
Printing is also automatic every 30 communications.
To print the logs directly, press MENU, 5, 2 and OK.
DIRECTORY
Press MENU, 5, 3 and OK.
SETTINGS
The list of set-up values gives the configuration of the machine at a given time.
To print the list of set-up values:
Press MENU, 5, 4 and OK.
3. RIBBON GAUGE VISUALISATION
At any time, you can check the percentage of remaining printer ribbon:
Press MENU, 5, 9 and OK.
37
Liasse2_23227944-0.p65
37
07/06/2000, 11:48
4. PROTECTION AGAINST INDISCREET CONSULTATION OF
VOCAL AND FAX MESSAGES
You can protect yourself against local consultation of your messages by unauthorised persons.
To do so:
- lock access to your messages,
- set an interrogation code different to 0000 (refer to previous section).
LOCK ACCESS TO MESSAGES
Press keys MENU, 8, 2 and OK.
Select the desired option (WITH or WITHOUT) using the or navigator keys and press OK to
confirm your choice.
WITHOUT: Local access to messages is made without entering the interrogation code.
WITH:
Local access to messages is only possible after having entered the interrogation code.
ACCESS TO LOCKED MESSAGES
According to the case, press VOCAL MESSAGES or FAX MESSAGES. If you have a personal
mailbox (n° 1 to 5), enter your number, otherwise enter 0 and press OK.
Enter the interrogation code or mailbox code if it concerns a personal mailbox.
Press OK.
5. ALARM
The machine sets off an audible alarm at the moment you choose. You can use this as an alarm in the
morning, a reminder or for an appointment.
TO ACTIVATE THE ALARM
Press keys MENU, 8, 1 and OK.
Select the option required (START or STOP) using the
confirm your choice.
START:
activation of the alarm.
STOP:
deactivation of the alarm.
or
navigator keys and press OK to
TO SET THE TIME FOR THE AUDIBLE ALARM
Select the START option using the or navigator keys and press OK.
Enter the time the alarm is to go off.
Press START to confirm the time chosen.
The screen displays a symbol on the right indicating the setting of the alarm.
To stop the alarm, press any key on the keyboard. Without pressing a key, the alarm stops
automatically after 30 seconds.
38
Liasse2_23227944-0.p65
38
07/06/2000, 11:48
6. PRINTING PAPER ECONOMY
In order to economise on paper, you can print messages received on two A4 pages reduced by 50%
vertically on a single A4 page.
To put this function into operation:
Press keys MENU, 5, 7 and OK.
Select the option required using the or navigator keys and press OK.
The machine prints the documents received.
7. PC INTERFACE
When connected to a PC, the unit can print out PC files (GDI interface). You will need to purchase a “PC
interface Kit” from your reseller. The unit will then function as your occasional PC printer.
39
Liasse2_23227944-0.p65
39
07/06/2000, 11:48
CHAPTER 10:
APPENDICES
1. CONSUMABLES REPLACEMENT
The consumables, ink ribbon and ribbon gauge card are already installed in the machine. You may need
to change these consumables when they become worn. To do so, refer to the instructions in the following
paragraphs.
INK RIBBON
The ink ribbon enables the unit to print on normal paper.
!
Only use an ink ribbon that matches the manufacturer’s specifications. The use of other types of ink
ribbons could result in damage to the main unit and invalidate the warranty. Documents printed by
your unit may be read from the used portion of the ink ribbon. If these documents are confidential,
you may want to remove the ink ribbon whenever you leave the unit.
1
2
2
1
1
Open the front cover : let it lean toward you until it
remains open.
Open the back cover : unlock the latches (1) before
pushing the cover backwards.
4
3
Remove the worm ink ribbon from its housing.
Position the ink ribbon over its housing under the rear
cover
Insert the ink ribbon into its housing without removing
the adhesive strip (2):
2
• position the right end of the main roller onto the
retractable axe.
• position the left end of the main roller onto the left
axe.
40
Liasse2_23227944-0.p65
40
07/06/2000, 11:48
55
4
5
6
3
2
4
Pull off the adhesive strip (2) from the ink ribbon .
Insert the small roller in its housing: check that the
gear axe (3) is correctly positioned in the slot (4),
and that the other axe (5) is also correctly positioned
(6) in the slot.
INK RIBBON GAUGE
The gauge enables screen display, after printout, of remaining ink ribbon.
6
7
7
8
9
Remove the gauge compartment flap (7):
• slip the flap backward, then
• lift the front part of the flap to remove it from the
main unit.
Remove the worm gauge from its housing.
8
7
Remove the (pre-cut) gauge (9) from the ribbon
gauge card (8).
9
11
➋
1
9
1
➋
11
10
Insert the gauge (9) into the slit (10) of the gauge
compartment, ensuring that the chip faces you and the
bevelled corner is positioned top right. Replace the
flap (7).
!
Close the rear cover: press down simultaneously on
both sides of the cover (11) until the two latches (1)
click into place.
If the gauge is not installed or not properly installed, the unit displays:
41
Liasse2_23227944-0.p65
41
07/06/2000, 11:48
2. TECHNICAL PARAMETERS
To access the technical parameters, press MENU, 8, 5 and START.
The technical parameters are presented as a list in which the user can move using the
keys.
or
navigation
02 TX HEADER:
Transmission to the recipient of your name, fax n°, the date and time: this
information appears on the header of the fax he receives.
03 TX LOCK UP:
Restraint of transmission speed.
04 ANTI ECHO:
This parameter inhibits satellite echo in the case of problems using faxes on
long distance communications.
10 RX HEADER:
Printing at the top of the faxes you receive the name and fax n° of your
correspondent as well as the reception and date time .
10 RX LOCK UP:
Restraint of reception speed.
20 REDUCE MODE:
Reduction mode on printing (faxes received, local copies): automatic or
manual.
21 REDUCE RATE:
This parameter sets the reduction level on printing.
22 NB OF PAGES
This parameter gives the number of pages printed since the machine has
been operational (faxes received and local copies).
40 RECALL LENGTH
Time the line is cut (long or short) during the "Flash" signal of the Recall
key.
50 SORTED PRINT
Print documents in the reverse order they were received (or scanned for a
local copy).
60 HQ OGM
"High Quality" Announcement parameter, for recording music in an
announcement. This requires more space in memory, and can be disabled.
71 NET ACTIVE
This parameter enables you to define whether Periodic or Fixed Time Internet
connections are authorised during weekends.
72 MODEM SPEED
Used to limit the modem speed for send / receive sessions over the Internet.
73 RECORD REP @
This parameter enables you to automatically register into the directory the
Internet address of a fax sender.
74 EMPTY MAIL BOX
at the next connecton, the first message in the mail box will be deleted.
75 PPP COMPRESSION to get connected to certain acces providers.
3. TECHNICAL CHARACTERISTICS
Internet access provider’s characteristics supported by the machine.
Your fax machine supports any Internet access provider meeting all of the characteristics below:
- modem access:
- protocols:
- messaging:
V32a (14,400 bps) or (9,600 bps) - V42
TCP / IP / PPP
SMTP-POP3
42
Liasse2_23227944-0.p65
42
07/06/2000, 11:48
4. TRANSMISSION REPORT CODES
The result of each transmission is given by the logs (transmission/reception) and by the communication
report.
In the case of an incident, the result is a code whose significance is given below:
PHONEFAX COMMUNICATION ERROR CODES
Code 01 - Your correspondent does not reply
Call later.
Code 02- The number called is suspect, as no fax replies
Check the number of your correspondent.
Code 03 - STOP
You have pressed STOP during the communication.
Code 04 - Invalid abbreviated number
Check the number.
Code 05 - Document feeder incident during the communication
Document jam or document feeder failure.
Code 07 - Incident in the functioning of the remote terminal or the line
Restart communication.
Code 08 - The document which you have transmitted may have been badly received
Replace it. Check with your correspondent.
Code 0A - Retrieve
You have tried to retrieve a document when the remote terminal has no document deposited.
Code 0B - Difference between the number of pages defined for transmission and the number of
pages sent
Check the number of pages.
Code 13 - Memory full
Fax reception made impossible.
Code 17 - Your machine is in protected access mode
A correspondent tried to call you and did not have your password.
Code 23 - Mailbox unknown, n°
The mailbox number which you have indicated is unknown in the machine of your correspondent.
INTERNET COMMUNICATION ERROR CODES
Codes 40 and 41: No ISP reply
The modem cannot connect to the Internet service provider. If the error occurs systematically, check the
supplier’s dial-up number.
Code 42 - Cannot connect to Internet service provider
The service provider refuses the connection, the service is temporarily unavailable. If the error occurs
systematically, check the Internet connection parameters.
43
Liasse2_23227944-0.p65
43
07/06/2000, 11:48
Code 43 - Cannot connect to the SMTP server
Cannot connect to the SMTP server for sending mail, the service is temporarily unavailable. If the error
occurs systematically, check the Internet e-mail and server parameters.
Code 44 - Cannot connect to the POP3 server
Cannot connect to the POP3 server for receiving mail, the service is temporarily unavailable. If the error
occurs systematically, check the Internet e-mail and server parameters.
Code 45 - Internet service provider disconnected
The service is temporarily unavailable; try the operation again later.
Code 46 - SMTP server disconnected
The SMTP server for sending mail is disconnected. The service is temporarily unavailable; try the
operation again later.
Code 47 - POP3 server disconnected
The POP3 server for receiving mail is disconnected. The service is temporarily unavailable; try the
operation again later.
Code 48 - Internet disconnected
The service is temporarily unavailable; try the operation again later.
In order to check on Internet parameters, print them out by successively pressing the MENU, 9, 8 and
START keys.
44
Liasse2_23227944-0.p65
44
07/06/2000, 11:48
5. REPAIRS
INCIDENTS
REMEDIES
- The screen displays nothing
• Check that the mains supply cable and the power
supply cable of the power pack are correctly
connected.
- The machine does not respond to the call
after several rings of the telephone.
• The FAX icon may be off:
check the reception mode
(manual/automatic).
• Check the number of rings (see chapter
INSTALLATION, § Setup).
• Configure the machine on "private network" (see
chapter - INSTALLATION, §: type of network).
- The photocopy printed is blank.
• The document in the document feeder was placed
the wrong way round.
- The telephone exchange does not recognise
the number you have called.
• Check that the telephone line cable is properly
connected.
• Configure the machine in pulse dialling mode (see
chapter - INSTALLATION, §: type of dialling).
• Check the telephone line and the phone outlet.
- The machine does not ring.
• The TEL icon flashes: restore ringing (see chapter INSTALLATION, §: ring melody).
- The telephone does not work.
• Check that the mains supply cable and the power
supply cable for the power pack are properly
connected.
• There may be a power failure.
• Check the telephone line and the phone outlet.
- The screen displays:
OUT OFF PAPER
• Put paper into the paper feeder.
• Close the rear cover.
PRINTER COVER
45
Liasse2_23227944-0.p65
45
07/06/2000, 11:48
INCIDENTS
• Open the rear cover to access the paper path and
remove the piece of paper. Make sure the rear
cover is properly closed.
PAPER JAM
• The last documents printed have a lot of black, the
temperature of the printer is too high.
Wait a few moments for it to cool.
OVERHEATING
GAUGE EMPTY
• You probably forgot to replace the gauge at the
time you replaced a new printer ribbon.
MISSING GAUGE
• Remove the gauge housing cover and make sure the
gauge is present and correctly set.
CHANGE RIBBON
• Install a new printer ribbon with its new gauge and
remove the piece of paper. Make sure the rear
cover is properly closed.
REMOVE DOCUMENT
• Open the front cover and check the document path.
• Print the faxes received and/or listen to the vocal
messages recorded.
MEMORY FULL
-
REMEDIES
One or several vertical black strips are
printed on the documents copied or
received at your correspondent.
• Open the front cover and clean the scanning device
located in front of white roller. Use a soft rag
soaked with alcohol. After cleaning, close the front
cover and make a copy to check black strips
disappearance.
Other cases.
• Call your after sales service.
46
Liasse2_23227944-0.p65
46
07/06/2000, 11:48
6. NOTICE FOR CONNECTION TO THE TELECOMMUNICATION
SYSTEM (FOR UNITED KINGDOM ONLY)
1.BABT Certificate Number/Approval Number for the :
SAGEM PHONEFAX INTERNET 390-i N° 608 817
and
SAGEM PHONEFAX INTERNET 395-i N° 608 816
Approved for connection to telecommunication system specified in the instructions for use subject to the
conditions set out in them.
2. This apparatus has been approved for the use of the following facilities:
- Facsimile
- Simple telephone
- Terminal and subsriber identifier
- Transmission status report (send report only)
- Manual mode (RX and TX)
- Auto-Answering
- Auto calling
- Delayed transmission- Time recorder and logs
- Automatic redial (5 times, 5 minutes intervals)
- Fax switch
- Polling RX (To poll a document from on a distant fax)
- Polling TX (prepare a document to be poll)
- Automatic document feeder
- Halftone 16 shades of grey
- Modem Fax up to 14400 bps
- Facsimile transmission and reception
- Call progressing mode
- Full Numeric Handsfree
- Answering Recording Device
- Fax Answering Device
- PC Printing (GDI Protocole)
- Internet Access
Any other usage will invalidate the approval of the apparatus if as a result, it then ceases to conform to the
standards against which approval was granted.
3.
4.
5.
6.
7.
8.
The connection to the telecommunication system must be unplugged before the earth is disconnected.
The connection to the telecommunication system must be hardwired.
This apparatus may be used on the telecommunication employing loop disconnect or MF dialling.
This apparatus is suitable for connection to direct exchange lines on the PSTN directly or via a
compatible PABX (selection done by parameter setting).
Ringing delay : the maximum number of ring before automatic answering is 5.
Ringer Equivalent Number (REN) = 1
The REN is a custome guide indicating appoximately the maximum number of items of apparatus that
should be connected simultaneously to the line.
The sum of the REN’s of the individual items should be not exceed 4. The REN value of a BT telephone
is assumed to be 1 unless otherwise marked.
Voltage Drop
47
Liasse2_23227944-0.p65
47
07/06/2000, 11:48
While operation may be possible initially, change to or modernization of the network taking place
in the normal course of events may result in the apparatus being connected to be compatible. Failure
of the apparatus to work under these circumstances may not be responsibility of the network operator.
In the unlikely event of such problems occuring, the user should contact the supplier or maintainer
of the apparatus.
Note : The definition of RBS (Relevant branch system) for PSTN lines is given
in BS6789 section 6.1 (1986) clause 2.4
9. Naive caller
« Callers are accustomed to being answered normally within 10s and that the majority abandon calls
that are not answeed within 45s »
It is « normal » to set the number of rings beetween 1 to 5 rings before the answering machine responds
The machine is already preset for a plug and play mode.
« If the intention is to delay answer so that normal voice callers would abandon the call before the
non-voice TE answered, then the delay should at least 45s ».
It is helpful to include the statement of the answering telephone number with the exchange name or
international code and that the announcement must be sutable for the purpose for which it is intented.
The announcement should also start within 3s of answering.
Paytone may be received after answering calls from some types of payphones and may persist forr
up to 13s and the answering announcement should be constructed so as to ensure that an answering
announcement containing the identity of the called line and, where appropriate, the invitation to
record, will be heard by the callers after paytone has ceased.
Important ! Compatible switchboards
Your terminal is approved only for use with the compatible switchboard including those which do not
provide secondary proceed indication. If you would like a list suitable switchboards, contact BT on
0800 800 152.
If you do have a compatible switchboard it cannot be guaranteed that the apparatus will operate
correctly under all possible conditions of connection.If you have any difficulties, contact BT on 0800
800 152.
Calling the Emergency services
WARNING This equipment is not designed for making emergency telephone call (999)
when the power fails. Alternative arrangements should be made for access to
emergency services
10.
SAFETY WARNING
Interconnection circuits should be such that the equipment contibues to comply with the
requirements of 4.2 of EN 41003 for TNV circuits and 2.3 of EN 60950 for SELV circuits, after
making connections between circuits.
Interconnection directly, or by way of the other apparatus, of ports marked « SAFETY
WARNING ». SEE INSTRUCTION FOR USE, with ports marked or not so marked may
produce hazardous conditions on the network. Advice should be obtained from a competent
engineer before such a connection is made.
48
Liasse2_23227944-0.p65
48
07/06/2000, 11:48
WARNING: To prevent fire or shock hazard, do not expose this product to
rain or any type of moisture
How to connect the mains lead to a plug
Your apparatus comes complete with fitted plug. If however, it becomes necessary to fit an
alternative main plug, the following instructions must be adhered to.
For apparatus connected by mains plug, the wall socket must be installed near the apparatus and
must be easely accessible.
Note :
The wires in the mais lead are colored in accorrdance with the following code :
Green-and-yellow :
Blue:
Brown:
earth connected
neutral
live
Read the instruction carefully before connecting the mains lead to a plug. If in doubt, consult a
qualified electrician.
As the colours of the wires in the mains lead of the apparatus may not correspond with the
coloured markings identifying the terminals in your plug, proceed as follows:
- The wire which is coloured blue must be connected to the terminal which is
marked with the letter N or coloured black
- The wire which is coloured brown must be connected to the terminal which is
marked with the letter L or coloured red
- The wire which is coloured green and yellow must be connected to the terminal
which is marked with the letter C or coloured green
49
Liasse2_23227944-0.p65
49
07/06/2000, 11:48
50
Liasse2_23227944-0.p65
50
07/06/2000, 11:48
DETACHABLE GUIDE
Delete
Announce
1
2
3
Last
Message 4
Pause /
Message 5
Next
Message 6
Answering
machine
ON
7
Record
8
Answering
machine
OFF
9
0
#
*
Your TAD
security code:
*
• Go on to next message, by pressing 6 .
• Start listening to message again,
by pressing 4 .
• Go back to previous message, by
pressing 4 twice.
• Delete received messages, by pressing 1
and 5 .
• Record your announcement, by pressing 8
and 3 and stop the recording of your
announcement, by pressing any key.
• Listen to your announcement, by pressing 3 .
• Switch on your answering machine, by
pressing 7 .
• Switch off your answering machine, by
pressing 9 .
• Resume message listening, by pressing 5 .
51
Liasse2_23227944-0.p65
51
07/06/2000, 11:48