1
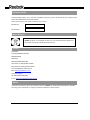
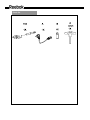
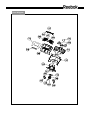
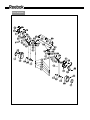
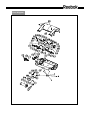
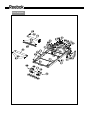
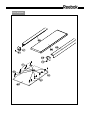
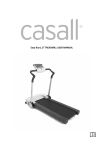
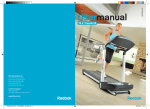
I Run SE User Manual Reebok I Run SE Manual 20120418 Dear Customer, Dear Customer We are pleased, that you have chosen a Reebok Fitness Equipment. This quality product has been designed for in-home use and has been tested and certified according to the European Norm EN 957-1/6. Please carefully read the instructions prior to assembly and first use and be sure to keep the instructions for reference and maintenance. We wish you lots of success and fun while training, Your Reebok – Team WARRANTY Limited Warranty – UK Only RFE UK Ltd. (RFE), warrants this product to be free from defects in workmanship and material, under normal use and service conditions, for a period of (2) two years for parts and labour. extends only to the original purchaser. This warranty RFE’s obligation under this warranty is limited to replacing or repairing, at RFE’s option, the product through one of its authorized service centers. All repairs for which warranty claims are made must be pre-authorized by RFE. This warranty does not extend to any product or damage to the product caused by or attributed to freight damage, abuse, misuse, improper or abnormal usage or repairs not provided by a RFE authorized service centre, products used for commercial or rental purposes, or products used as store display models. No other warranty beyond that specifically set forth above is authorized by RFE. RFE is not responsible or liable for indirect, special or consequential damages arising out of or in connection with the use of performance of the product or damages with respect to any economic loss, loss of property, loss of revenues or profits, loss of enjoyment or use, costs of removal, installation or other consequential damages of whatsoever nature. The warranty extended hereunder is in lieu of any and all other warranties and any implied warranties of merchantability or fitness for a particular purpose is limited in its scope and duration to the terms set forth herein. This warranty gives you specific legal rights. Customer Service To best possible support you in the case of problems with your product, we would ask you to please quote the product Model Name and Serial Number. These can be found on the sticker underside your product. Modelname: Serialnumber: Waste Disposal Reebok products are recyclable. At the end of its useful life please dispose of this article correctly and safely (local refuse sites). Contact RFE UK LTD THE PERFORMANCE CENTRE MAIDSTONE RD KINGSTON MILTON KEYNES MK10 0BD Head office tel: 044 (0)1908 793020 Head office fax: 0044 (0) 1908 793021 E-mail:[email protected] Web: www.reebokfitness.co.uk Technical support: Tel: 0044 (0) 800 440 2459 E-mail: [email protected] Advice The owner’s manual is only for the customer reference. Reebok can not be held responsible for mistakes Occurring due to translation or change in technical specification of the product. Precautions Before assembling or using the treadmill, please read the following instructions carefully. They contain important information for use and maintenance of the equipment as well as for your personal safety. Keep these instructions in a safe place for maintenance purposes or for ordering spare parts. Product-Scope: This product is made for home use only and tested up to a maximum body weight of 100 kilograms. Product-Performance: This treadmill is tested to the European Standard EN 957-1/6 HB. The equipment is not suitable for therapeutic training. Product-Scope: Noise compliance: This treadmill meets the requirements of the noise pollution standards. Product-Performance: The noise creation of treadmill is under 70db. Product-Maintenance: For keeping the run quality use the provided silicon spray every month or after a working time of 100 kilometers between the belt and the running surface. Product-Maintenance: Search for noisy parts: If you should notice unusual noises, like grinding, clacking etc. try to locate it and have it repaired by a professional. Make sure the treadmill is not used until after repairs have been made. Product-Feature: The speed can be changed by the computer. Use-Safety: The function of the immobilization method: The purpose of immobilizing the treadmill is to prevent unauthorized use. This can be accomplished by removing the Safety Key from the console, unclipping it from the cord and putting it in a non-accessible place. Use-Safety: The emergency dismount: Follow the steps listed below if you experience pain, feel faint or need to stop your treadmill in an emergency situation: 1. Grip handrails for support 2. Step onto the lateral platform 3. Pull the Safety key off the console. Use-Safety: The function of the emergency stop: The Safety Key functions as the emergency stop. In an emergency situation, remove the Safety Key from the console and the treadmill will come to a stop. Use-Scope: The exerciser may not be used by persons with a weight of over 100 kg. Use-Scope: This product is designed for the physical exercise by adults. Please ensure that children only use it under adult supervision Use-Environment: Ensure that those present are aware of possible hazards, e.g. movable parts during training. Use-Environment: Ensure that sufficient space is available to use the home exerciser with 2m long x 1m wide of clearance behind it and 1m of clearance for its flanks. Use-Environment: Place the home exerciser on an even, non-slippery surface. Precautions Use-Environment: Please ensure that liquids or perspiration never enter the electronics. Use-Environment: Keep the equipment indoors, away from moisture and dust. Do not put the equipment in a garage, covered patio or near water. If stored in this location you warranty will be affected. Use-Environment: The product is made for home use only. Warranty and manufacturer's liability do not extend to any product or damage to the product caused by commercial use store display models, 2nd hand machines or a machine purchased from an unauthorised retailer. User-Health: Consult your physician before starting with any exercise programs to receive advice on the optimal training technique. User-Health: Incorrect/excessive training can cause health injuries. User-Health: If you feel sickness, chest pain, fits of dizziness or breathlessness during your training, stop training immediately and consult your physician. Product-Preparation: Ensure that training only starts after correct assembly, adjustment and inspection of the home exerciser. Product-Preparation: Follow the steps of the assembly instruction carefully. Product-Preparation: Only use suitable tools for assembly and ask for assistance if necessary. Product-Preparation: Only use original Reebok parts as delivered (see checklist). Product-Preparation: Tighten all adjustable parts to prevent sudden movement while training. Product-Preparation: We suggest using an equipment mat to prevent damage on the ground. Use-Instruction: Please follow the advice as per correct training technique as detailed in the instructions. Use-Instruction: Do not use the home exerciser without shoes or with loose fitting footwear. Use-instruction: Appropriate clothing must be worn at all times during use. Use-Safety: Be aware of the position and proper fixation of adjustable or moving parts while mounting or dismounting the home exerciser. Use-Safety: Allow the belt to fully stop before dismounting. Use-Safety: Pay attention: never insert any part of your body or clothes into the body of the treadmill while it is running or ready for use. Use-Safety: Attach the emergency stop cord to your clothing before starting the treadmill. The Treadmill has an emergency stop mechanism for your safety. Before starting your workout, fasten the cord of the safety key to your clothing. If the treadmill has been shut down by removing the safety key, restart it by reinserting the key. An automatic restart of the treadmill belt does not occur. An unmonitored use of the treadmill by other people can be prevented by removing the safety key and keeping it safely hidden. In case of any emergency, hold on tightly to the handrail or handle bar with both hands and leave the treadmill by means of the anti-slipping surface of the lateral platform. Activate the emergence stop mechanism (safety cut-out). Precautions Use-Safety: Please keep the safety key in a safe place and ensure that it is kept out of reach of children! Product-Power-Safety: The unit requires a power supply of 220-240V / 50Hz. It should be connected to a safety socket with a dedicated 10A fuse. Before powering on and using the unit confirm that the the unit is plugged into the appropriate power supply (observe markings) has been connected properly. Product-Maintenance: If the equipment is in regular use, check all its components thoroughly every 1 – 2 months. Pay particular attention to the tightness of bolts and nuts. This applies especially to the securing bolts for upright and handlebars. Product-Maintenance: Incorrect repairs and structural modifications (e.g. removal or replacement of original parts) may endanger the safety of the user and will invalidate your warranty. Product-Maintenance: Damaged components may endanger your safety or reduce the lifetime of the equipment. For this reason, worn or damaged parts should be replaced immediately and the user should refrain from using the equipment until this has been done. Product-Maintenance: Only use original Reebok replacement parts. Product-Maintenance: Do not under any circumstances carry out electrical repairs or alterations yourself. Always ensure that such work is done by a properly qualified electrician/mechanic or the advise of the Technical Support team is sought firstly Product-Maintenance: Disconnect the apparatus from the mains before doing repair, maintenance or cleaning work. Check list Assembly Unfold Unfold Folding Folding Folding Transport Correct use Correct biomechanical position: Please refer to the picture. Running straight on the treadmill is made easier by focusing on a fixed object in front of you in the room. Run as if you wanted to approach the object. Always keep a distance which you can reach the front hand bar. Major exercise type: This equipment focuses on your lower body, and it can train your thigh and shank muscles Important: Incorrect/excessive training can cause health injuries. Adjusting the incline The treadmill has two levels of inclination: The level can be changed by adjusting the inclination leg. Use the handle (B) to lift the treadmill with one hand and adjust the inclination leg with the other hand as shown in the drawing. Deck lubrication The walking belt has been pre-lubricated at the factory. However, it is recommended that the walking board be checked periodically for lubrication to ensure optimal treadmill performance. Please ensure the lubrication of the running belt is checked every 4-6 weeks after the initial 100 miles/kilometers of use. Every 30 days or 30 hours of operation lift the sides of the walking belt and feel the top surface of the walking board as far as you can reach. If you feel signs of silicone, no further lubrication is required. If it feels dry to the touch, follow the instructions below. Please use a non-petroleum based silicone. To apply lubricant to the walking belt: 1. Position the walking belt so that the seam is located on top and in center of the walking board. 2. Insert the spray nozzle into the spray head of the lubricant can if a nozzle is required. 3. While lifting the side of the walking belt, position the spray nozzle between the walking belt and the board approximately 6" from the front of the treadmill. Apply the silicone spray to the walking board, moving from the front of the treadmill to the rear. Repeat this on the other side of the belt. approximately 4 seconds on each side. 4. Allow the silicone to "set" for 1 minute before using the treadmill. Spray Running belt adjustment This information forms part of the self maintenance and must be carried out periodically by the user* Proper maintenance is very important to ensure your treadmill is always in top working condition. Improper maintenance could cause damage or shorten the life of your treadmill and exceed the LIMITED WARRANTY coverage. IMPORTANT: Never use abrasives or solvents to clean the treadmill. To prevent damage to the computer, keep liquids away and keep it out of direct sunlight. Inspect and tighten all parts of the treadmill regularly. Replace any worn parts immediately. Belt Adjustment The running belt has been adjusted properly by the factory. However transportation, uneven flooring or other unpredicted reasons could cause the belt to shift off centre resulting in the belt rubbing with the plastic side rail or end caps and possibly causing damage. To adjust the belt back to its proper position please follow the directions below: If the belt has only moved by 1-2mm this will not affect the operation of your treadmill 1. If your belt tends to walk to the right, simply adjust the left belt tension bolt by turning it 1/4 turn counter clockwise. Follow with a test. 2. If your belt tends to walk to the left, rotate the left tension bolt clockwise 1/4 turn at a time, and follow with a test. If the belt continues to walk to the left, simply adjust the right tension bolt counter clockwise. 3. If your belt appears to be loose, simply tighten both bolts evenly 1/4turn. If it appears tight, simply loosen both bolts evenly 1/4 turn. WARNING! Do not over tighten rollers! This will cause premature roller bearing failure! Parts diagram Parts diagram Parts diagram Parts diagram Parts diagram Wiring diagram 620 631 610 620 610 631 607 641 641 642 640 610 631 Spare Part list Part No. Part name Quantity 101 Console housing -rear 1 102 computer 1 103 Safety Key base 1 104 Microswitch 1 105 Safety Key 1 106 Console housing holder 2 107 Loudspeaker upper cover 1 108 Console housing -lower 1 109 Loudspeaker 2 110 Computer EVA sticker 1 111 Loudspeaker lower cover 1 112 Computer display overlay 1 113 Computer Button overlay 1 114 I pod dock holder 2 115 I pod dock 1 201 Fold up grip 1 202 Upright -left 1 203 Upright -right 1 204 Console housing support tube 1 205 Hand pulse sensor 2 207 Handlebar cover right -inner 1 208 Handlebar cover right -outside 1 209 Handelbar cover left –inner 1 210 Handlebar cover left -outside 1 211 Side handlebar 2 213 Stationary pin OD12X32 2 214 ø2X3-ø15X16 Spring 2 215 Fold up grip connect rod 2 216 ∮ 1.8X14X39X10 Spring 2 217 Upright lock pin 2 218 Fold up grip connector 2 219 Fold up grip connecting bushing 2 220 OD6X12-9X3 Plastic insert 4 Spare Part list Part No. Part name Quantity 230 Handlebar cover decorate cover-front 2 231 Handlebar Foam grip 2 232 Upright Sleeve ID25XOD31XOD35X13 4 302 Transformer 1 303 Control board 1 304 Main Frame 1 305 Rear transport wheel bracket 1 306 Rear transport axle cap 2 307 Transportation wheel D16XOD63.5X24 4 308 Square foot 2 309 M8X30 bump bolt 2 310 Rear roller tube with shaft 1 311 Front roller tube with shaft 1 313 Rubber Cushion 8 314 Side rail fix braket 2 315 Wire clip OD7X10X24 4 317 Transportation wheel side cover 2 401 Motor Cover-upper 1 403 Motor hood decorate light-strip 1 405 Motor Cover-Bottom 1 406 Upright lower cover-right 1 407 Upright lower cover-left 1 410 Transport wheel bracket connecting bushing 2 60X40X19 411 Power switch board 1 412 Switch 1 413 Electric protector 230V-10A 1 414 Electric outlet 1 415 Stationary pin OD8x17.2 2 416 Fold up foot 2 417 Connecting plate 2 418 Transport wheel bracket connecting tube 2 Spare Part list Part No. Part name Quantity 419 Transport wheel bracket 1 421 Motor 1 422 Motor holder 1 423 Driving belt 1 424 Pu Cushion 8X26X11 1 425 Spring ∮ 1.2X10.7X61X33 2 426 Light with fix cover 2 427 Shrapnel 21X13X0.7 2 428 Electric outlet holder 1 429 Switch board holder 1 430 AC/DC exchange part 1 431 Fold up foot cover-Left 1 432 Fold up foot cover-Right 1 501 Running belt-400X2540X1.6 1 502 Side rail L1024mm 2 506 Rear end cap - rihgt 1 507 Rear end cap - left 1 508 Running deck 1 509 Side rail guider 8 607 Grounding cable 1 610 2 pin Safety key cable 1 620 Hand Pulse Sensor wire 2 631 Six minus one pin cable-2100 1 640 White single wire-150 1 641 Red single wire-110 2 642 White single wire-450 2 801 M4X12 Screw 32 802 M4X15 Screw 15 803 M4X19 Screw 16 806 M8X12 Screw 2 808 M5X14 Screw 4 809 M5X14 Screw/washer 4 Spare Part list Part No. 810 Part name Round head screw M5X14 Quantity 10 811 M10X53 Screw 2 812 M3X8 Screw 4 813 M5X10 Screw 2 814 M8X30 Screw 8 815 M6X55 Allen Bolt 1 816 M6X65 Allen Bolt 1 818 Outside hex head screw M10X80 1 819 Head hex screw M12X25 2 820 821 822 M5 Thin Nut M8 Locknut M10 Nut 10 3 1 823 6.5X13X1.5 Washer 3 824 6.4X18X1.5 Washer 2 826 8X17X1.5 Washer 8 827 10.5X20X1.5 Washer 1 828 9X35X8 Curve Washer 2 829 M8 C-clip 4 830 12X25X3 Washer 2 831 8X14X2 Washer 2 832 OD8XM8X78X25 Bolt 1 833 M5X24 Screw 2 834 M8 Thin Nut 2 835 M4X6 Screw 4 836 M4X15 Allen head 7 837 M3X14 Screw 4 839 washer 21X13X0.7 2 840 M6X10 screw 4 841 washer 4.2X8X1.5 1 842 Owner manual 1 847 “C” clip - M15 2 848 Cup head hex screw M6X12 2 849 “C” clip – M25 4 850 M4X35 screw 2 851 M3X14 screw 1 A Power cord 1 B Silicone oil bottle 1 Reebok