1
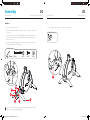
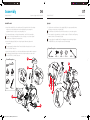
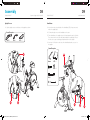
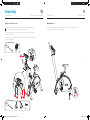
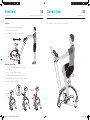
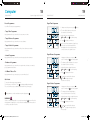
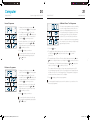
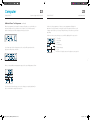
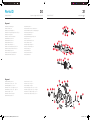
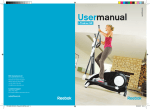
reebokfitness.info
Usermanual
i-Bike.SE
RFE International Ltd
The Performance Centre
Maidstone Road, Kingston
Milton Keynes MK10 0BD
+44 (0) 1908 793 020
[email protected]
Customer Support
0800 440 2459
[email protected]
reebokfitness.info
RFE4489_RE014101_iBikeSE_UMFINAL.indd 1-1
25/06/2010 15:14
Contents
Reebok i-Bike.SE
01
reebokfitness.info
Welcome from
Reebok Fitness
Thank you for choosing Reebok. Before you get
started, please read these instructions carefully.
If you experience any difficulties, our support
team will be happy to help – or check out our
website at reebokfitness.info
Parts . . . . . . . . . . . . . . . . . . . . . . . . . . . . . . . . . . . . . . . . . . . . . . . . . . . . . . . . . 02
Assembly . . . . . . . . . . . . . . . . . . . . . . . . . . . . . . . . . . . . . . . . . . . . . . . . . . . . 04
Precautions . . . . . . . . . . . . . . . . . . . . . . . . . . . . . . . . . . . . . . . . . . . . . . . . . . 12
Functions . . . . . . . . . . . . . . . . . . . . . . . . . . . . . . . . . . . . . . . . . . . . . . . . . . . . 14
Correct Use . . . . . . . . . . . . . . . . . . . . . . . . . . . . . . . . . . . . . . . . . . . . . . . . . . 15
Warm Up . . . . . . . . . . . . . . . . . . . . . . . . . . . . . . . . . . . . . . . . . . . . . . . . . . . . 16
Computer . . . . . . . . . . . . . . . . . . . . . . . . . . . . . . . . . . . . . . . . . . . . . . . . . . . 17
Important note:
Consult your doctor before starting any exercise programme. If you feel any sickness, chest
pain, dizziness or breathlessness during your training, stop exercising and consult your
doctor immediately.
Maintenance . . . . . . . . . . . . . . . . . . . . . . . . . . . . . . . . . . . . . . . . . . . . . . . . . 24
Troubleshooting . . . . . . . . . . . . . . . . . . . . . . . . . . . . . . . . . . . . . . . . . . . . . . 26
Parts ID . . . . . . . . . . . . . . . . . . . . . . . . . . . . . . . . . . . . . . . . . . . . . . . . . . . . . . 28
Limited Warranty . . . . . . . . . . . . . . . . . . . . . . . . . . . . . . . . . . . . . . . . . . . . 32
If you have any further queries please contact our customer support team on the details
provided either at the foot of this page or on the back of the manual.
Model name: Reebok i-Bike.SE
Serial number: . . . . . . . . . . . . . . . . . . . . . . . . . . . . . . . . . . . . . . . . . . . . . . . . . These details can be found on the underside of your product.
Customer Support
0800 440 2459
[email protected]
RFE4489_RE014101_iBikeSE_UMFINAL.indd 1-1
25/06/2010 15:14
Parts
02
Reebok i-Bike.SE
Customer Support 0800 440 2459
03
Reebok i-Bike.SE
reebokfitness.info
Checking The Parts
Before you begin, please check all parts are present and undamaged. If you are
missing any parts, please call our Technical Support team on the number at the
top of this page.
281 x 1
419 x 1
410 x 1
805 x 1
255 x 1
437 x 1
438 x 1
347 x 1
418 x 1
312 x 1
842 x 1
Blister Pack
215 x 5
M8x20mm
807 x 7
8mm
373 x 5
8mm
541 x 1
M5x29mm
219 x 2
M6x50mm
220 x 2
6mm
211 x 2
M4x10mm
Ax1
4mm
Bx1
5mm
Cx1
6mm
316 x 1
285 x 1
Dx1
Ex1
Fx1
804 x 1
RFE4489_RE014101_iBikeSE_UMFINAL.indd 2-3
25/06/2010 15:14
Assembly
04
Reebok i-Bike.SE
Customer Support 0800 440 2459
05
Reebok i-Bike.SE
reebokfitness.info
Stabiliser
1.
Remove the bike from the box.
5.
2. Remove the transport stabiliser, located at the back of the product. These bolts
are 2 x 854 .
3. There are three holes in the rear stabiliser (347). Attach the rear stabiliser to the
main frame, as shown, by fixing 2 x 854 bolts and 2 x 807 spring washers into
the bottom two holes.
4.
Once complete, clip the plastic cover (419) over the stabiliser.
You will require:
419 x 1
Now fix the rear stabiliser by inserting 1 x 215 bolt in the top hole, along with 1 x
807 spring washer and 1 x 373 flat washer.
You will require:
5/6mm
854 x 2
807 x 3
215 x 1
373 x 1
1
419
215
373
807
854
807
347
To aid access to the bolt holes during assembly, it may help to place the bike
body on a piece of polystyrene packaging.
RFE4489_RE014101_iBikeSE_UMFINAL.indd 4-5
25/06/2010 15:14
Assembly
06
Reebok i-Bike.SE
Customer Support 0800 440 2459
07
Reebok i-Bike.SE
reebokfitness.info
Saddle/Pedals
Upright
6.
Attach the saddle (316) to the saddle stem (312) using the bolt which is already
in place. Insert the saddle stem into the main body by unscrewing the
adjustment knob a couple of turns and pulling it out.
10. Clip the wires at the bottom of the upright (285), to the pre assembled wires
sticking out at the front of the bike (fig.1).
7.
Slot the pedal straps on the pedals as marked L and R for left and right.
11. Fix the upright to the main body of the bike using 4 x 215 bolts, 4 x 807 spring
washers and 4 x 373 flat washers (fig.2).
You will hear a click, which will confirm those wires are connected together.
The side of the pedal strap with more slots should go on outside of pedal
to allow ease of adjustment at a later date.
8.
For ease, place the upright (285) over fixing plate. Insert and finger tighten
1 x 215/807/373. You can now tighten each bolt individually.
Attach the right pedal (438) onto the right pedal shaft and tighten with
the spanner.
The right pedal is marked with an R and should be threaded onto the crank
in a CLOCKWISE direction.
9.
You will require:
Attach the left pedal (410) onto the left pedal shaft and tighten with the spanner.
The left pedal is marked with an L and should be threaded onto the crank
in a COUNTERCLOCKWISE direction.
You will require:
1
438 x 1
6mm
316
215 x 4
807 x 4
373 x 4
405
2
312
285 x 1
285
410 x 1
215
316 x 1
312 x 1
807
2
1
373
438
R
L
RFE4489_RE014101_iBikeSE_UMFINAL.indd 6-7
410
25/06/2010 15:14
Assembly
08
Reebok i-Bike.SE
Customer Support 0800 440 2459
09
Reebok i-Bike.SE
reebokfitness.info
Upright Covers
Handlebars
12. Clip the upright covers onto the base of the uprights as shown.
13. Insert the two wires from the back of the handlebars (255) to the pre mounted
wires in the upright (fig.1).
You will require:
405 x 1
14. Pull wires through to mount the handlebars on the stem.
418 x 1
15. Fix the handlebar to the upright using 2 x 220 spring washers and 2 x 219 bolts.
These insert from the front of the bike back towards the saddle (fig.2).. Ensure
the wires do not get crushed by pushing them back into the upright.
437 x 1
16. Now insert 1 x 541 bolts into the sides of the handlebar bracket, to secure it to
the upright.
You will require:
1
405
4mm
255 x 1
541 x 1
220 x 2
219 x 2
2
418
255
437
RFE4489_RE014101_iBikeSE_UMFINAL.indd 8-9
1
2
541
220
219
25/06/2010 15:14
Assembly
10
Reebok i-Bike.SE
Customer Support 0800 440 2459
11
Reebok i-Bike.SE
Console & Console Covers
Adjustable Feet
17. Connect the console (842) wires to the wires in the top of the upright (fig.1).
20. There are adjustable feet in the rear stabiliser. These can be screwed in or out
to accommodate minor level imbalances.
You will hear a click to confirm these have connected.
reebokfitness.info
18. Screw the console to the console plate using 4 x 321 screws (located in the
back of the console).
19. Clip the console covers (804 and 805) over the handlebars, and secure using
2 x 211 screws (fig.2).
You will require:
1
842 x 1
842
2
211
805
804 211
You will require:
805 x 1
RFE4489_RE014101_iBikeSE_UMFINAL.indd 10-11
804 x 1
211 x 2
25/06/2010 15:14
Precautions
Reebok i-Bike.SE
12
Customer Support 0800 440 2459
These instructions are intended to provide important information for use and
maintenance of the equipment as well as for your personal safety. Keep this
user manual in a safe place for future reference.
WARNING!
This product is made for home use only and tested up to a maximum body
weight of 120kg.
RFE International Ltd. assumes no responsibility for personal injury or
property damage sustained by or through the use of this equipment. It is
the responsibility of the owner to ensure that all users of this equipment are
adequately informed of all warnings and precautions.
SCOPE
•
Maximum user weight of 120kg.
•
This product is designed for physical exercise by adults. This product is not
suitable for use by persons under 14 years of age.
•
Never allow more than one person on the equipment at a time.
ENVIRONMENT
13
Reebok i-Bike.SE
USER HEALTH
•
Consult your doctor before starting any exercise programme to receive
advice on the optimal training.
•
Ensure the product is on a flat, level surface with at least 0.5m of clear area
surrounding the product.
•
Incorrect/excessive training can cause health injuries.
•
If you feel sickness, chest pain, fits of dizziness or breathlessness during
your training, immediately stop the training and consult your doctor.
PRODUCT PREPARATION
•
Ensure that training only starts after correct assembly, adjustment and
inspection of the product.
•
Follow the steps of the assembly instructions carefully.
•
Only use suitable tools for assembly and ask for assistance if necessary.
•
Only use original Reebok parts as delivered (see checklist).
SAFETY CHECKS (Before Every Use)
•
Tighten all adjustable parts to prevent sudden movement while training.
Tighten all nuts and bolts.
•
Ensure that those present are aware of possible hazards e.g. moveable
parts during training.
•
•
Check that the tension knob is secure.
•
Ensure that sufficient space is available to use the product.
•
Ensure the product is on a flat, level surface.
•
Please ensure that liquids or perspiration are wiped off the product.
•
Do not use the product without shoes or with loose shoes.
•
This product is designed to be used and stored indoors. Do not store the
product outside, or in damp/dusty environments.
•
Be aware of non-fixed or moving parts whilst mounting or dismounting
the product.
•
The product is made for home use only. Warranty and manufacturer’s
liability do not extend to any product or damage to the product caused by
commercial use.
•
Do not wear loose or poorly fitting clothing that may become trapped in
the product.
RFE4489_RE014101_iBikeSE_UMFINAL.indd 12-13
reebokfitness.info
25/06/2010 15:14
Functions
14
Reebok i-Bike.SE
Customer Support 0800 440 2459
Transport
1.
Correct Use
Reebok i-Bike.SE
15
reebokfitness.info
We recommend you use your bike in the following way:
Tilt the bike forward, onto the front stabiliser.
2. Wheel the bike into position.
3. Lower the bike until all feet are flat on the floor.
Adjust the seat height
1.
Undo the seat adjustment knob and pull to release
the locating pin.
2. Move the seat up or down as required.
3. Release the adjustment knob to relocate the pin.
4.
An audible click will confirm the seat is locked into place.
5.
Retighten the adjustment knob.
1
Undo then
pull
2
RFE4489_RE014101_iBikeSE_UMFINAL.indd 14-15
1
2
Release and
tighten
25/06/2010 15:14
Warm Up
16
Reebok i-Bike.SE
Customer Support 0800 440 2459
Warming Up
17
Computer
Reebok i-Bike.SE
reebokfitness.info
Computer Functions:
It is important to warm up before exercising to prepare your body for the workout it
is about to do. The first phase of a warm up is to increase your heart rate and get
blood pumping around your body faster. Choose an activity which will warm up
the same muscles you are going to use during your workout.
1.
5-10 minutes heart rate raising activity
2. Static stretching
3. Workout
Up Button
Stretches
Start Button
Hold each stretch for about 30 seconds. Stretching should not hurt; only stretch
your muscles to as far as is comfortable. If you have a tight or previously injured
muscle stretch the affected muscle group within the warm up. Do not perform
any sudden movements while warming up.
Fitness Test Button
Down Button
Stop/Enter Button
Calf
Stretch
Hamstring
Stretch
Groin
Stretch
Speed Display
Mph
Pulse Display
Km/H
Weight Display
Resistance Display
Side
Stretch
Quad
Stretch
Arm
Stretch
Cool Down
Distance/Age
Display
Rpm
Height/Calories Display
Following your workout you should carry out a cool down.
This should gradually bring your heart rate back to a resting level. To do a cool
down perform an activity of your choice at a low intensity e.g. a steady 5 minute
cycle. This should be followed by static stretches, similar to those in the warm up.
Again, hold each stretch for 30 seconds.
RFE4489_RE014101_iBikeSE_UMFINAL.indd 16-17
WARNING!
The console requires to use the adaptor and plug in the adaptor in the lower of chain cover.
25/06/2010 15:14
Computer
18
Reebok i-Bike.SE
Customer Support 0800 440 2459
Preset Programmes
19
Reebok i-Bike.SE
reebokfitness.info
Target Time Programme
Your i-Bike.SE has 6 preset programmes:
1.
• Target Time Programme
2. The time will be flashing on the screen
(the default is 30.00 minutes).
A programme where you can workout for a set amount of time.
Having turned the power on, press
once.
3. Adjust this time using the buttons
and
, press
to confirm setting.
• Target Distance Programme
4.
A programme where you can workout for a set distance.
Press
to begin your workout.
At the end of the programme, a long beep
will sound. Your workout data will then
be displayed for 30 seconds before the
console returns to its original screen.
• Target Calories Programme
A programme where you can workout until you have burnt a set number
of calories.
Target Distance Programme
• Interval Programme
A programme where you can workout at various speeds and resistances.
1.
• Endurance Programme
2. The distance will be flashing on the screen
(the default is 5.0km or 3.2 miles).
A programme where you can workout for a given time or distance over varied,
pre programmed resistances.
3. Adjust this distance using the buttons
, press
to confirm setting.
and
• 20 Minute Fitness Test
4.
A programme where you can assess your current fitness level.
To exercise without any preset programme:
Turn the power to the bike on. Press
and begin pedalling immediately.
The console will record your distance, calories and time (counting up).
.
WARNING!
Failure to start pedalling within 30 seconds of pressing the
button will result in
the programme stopping. The console will enter standby mode 3 minutes later if
no activity is detected in this time.
RFE4489_RE014101_iBikeSE_UMFINAL.indd 18-19
Press
to begin your workout.
You can press and hold the buttons
or
to adjust the target
distance more quickly.
Quick start
All programmes can be overridden at any time by pressing
Having turned the power on, press
to
select P2, and press
enter into program.
Target Calories Programme
1.
Having turned the power on, press
to
select P3, and press
enter into program.
2. The target calories will be flashing on
the screen (the default is 50 calories).
3. Adjust the target calories using the buttons
, press
to confirm setting.
and
4.
Press
to begin your workout.
You can press and hold the buttons
or
to adjust the target calories
more quickly.
25/06/2010 15:14
Computer
20
Reebok i-Bike.SE
Customer Support 0800 440 2459
21
Reebok i-Bike.SE
reebokfitness.info
Interval Programme
20 Minute Fitness Test Programme
1.
The fitness test programme assesses your ability
to work to a target heart rate. At the end of the
session you will be graded between 1 and 6. It
is recommended you only progress your fitness
test difficulty level when you have achieved an
excellent (F1) score in the difficulty level below.
Having turned the power on, press
to
select P4, and press
enter into program.
2. L1 will appear on the screen. This is the
resistance level. Use
or
to adjust the
resistance between Level 1 (L1) and level 8
(L8). Press
to confirm your choice.
3. Now, the default time of 30.00 minutes will
appear on the screen. Press
or
to
adjust the duration of your workout. Press
to confirm your choice.
4.
Press
to begin your workout.
You can adjust the resistance level during
the interval programme by pressing the
or
buttons.
In order to complete the fitness test programme,
the computer needs to know your height, weight,
age and target heart rate:
1.
3. The default height of 170cm or 67 inches will be flashing now. Use the
and
buttons to adjust this value to your height. Press
to confirm your choice.
Endurance Programme
3. Now, the default time of 30.00 minutes will
appear on the screen. Press
or
to
adjust the duration of your workout. Press
to confirm your choice.
4.
Press
The default age of 35 will be flashing now. Again, press
value to your age. Press
to confirm your choice.
or
to adjust this
The computer will now calculate your heart rate range during exercise (65%
of your maximum heart rate). E.g. for a 35 year old person, the target heart rate
would be (220-35) x 65% = 120 beats per minute. The programme is designed
to make you work at a heart rate of 115 to 125bpm.
Having turned the power on, press
to
select P5, and press
enter into program.
2. L1 will appear on the screen. This is the
or
to adjust the
resistance level. Use
resistance between Level 1 (L1) and level 8
(L8). Press
to confirm your choice.
button.
2. The weight value will be flashing on the console (factory default is 68kg
or 150lb). Press
or
to adjust this value, and use
to confirm
your choice.
4.
1.
Press the
5.
Press
to begin your fitness test programme.
You must grip the hand pulse sensors for the duration of your workout on the
fitness test programme.
to begin your workout.
You can adjust the resistance level during
the endurance programme by pressing the
or
buttons.
RFE4489_RE014101_iBikeSE_UMFINAL.indd 20-21
25/06/2010 15:14
Computer
Reebok i-Bike.SE
22
Customer Support 0800 440 2459
23
Reebok i-Bike.SE
reebokfitness.info
20 Minute Fitness Test Programme continued
When the programme is underway, the computer will guide you to work within your
required training zone. If your heart rate is too high, the console will beep twice,
and the following screen will be displayed in the speed section:
At the end of the programme, a 1 minute recovery programme will begin. It is
important to keep your hands on the pulse sensors throughout this minute so the
computer can measure your recovery. During this time you should notice your heart
rate falling.
At the end of the recovery minute your score will be displayed in the top section:
If your heart rate is below the target zone, the console will beep twice and the
speed arrow will point up as follows:
F1 Excellent
F2 Very Good
F3 Good
F4 Satisfactory
F5 Below Average
F6 Poor
Fx.xFailure to hold pulse sensors throughout recovery period
When you are pedalling at an appropriate speed, the screen will appear as follows:
If you hear more than two beeps, you need to change your speed significantly in
order to work within the target heart rate zone.
RFE4489_RE014101_iBikeSE_UMFINAL.indd 22-23
25/06/2010 15:14
Reebok i-Bike.SE
reebokfitness.info
Maintenance
24
Customer Support 0800 440 2459
Proper maintenance is very important to ensure your equipment is always in top
working condition. Improper maintenance could cause damage or shorten the life
of your equipment as well as exceeding the warranty coverage.
1. Inspect and tighten all parts of the equipment regularly:
•Any worn parts must be replaced immediately.
train
•Pay particular attention to nuts, bolts, screws and washers.
2. For continued smooth operation ensure the front and rear stabilisers are fully
tightened and kept clean and free from any residue like perspiration or dust.
3. To ensure all components of the equipment, including the frame, are in a good
condition please ensure any perspiration or dust is wiped clean on a regular
basis using a soft, damp cloth.
4. Please don’t use abrasives or solvents as this may affect the colouring or
operation of the components.
5. Check the pedals/footplates are fully tightened before each use.
6. Keep the equipment out of direct sunlight at all times.
The Reebok i-Series line is designed to be smart and easy with
compact structures, simple assembly and easy-to-use controls.
Product shown: Reebok i-Trainer.S in red.
RFE4489_RE014101_iBikeSE_UMFINAL.indd 24-25
25/06/2010 15:14
Troubleshooting
Reebok i-Bike.SE
26
Customer Support 0800 440 2459
27
Reebok i-Bike.SE
Q My equipment is out of the warranty can you still help me?
Q My new bike squeaks, is this normal?
A Yes we can still help, we have a large network of engineers that cover 98% of
the British Isles and can provide replacement parts. For a quote on parts or
engineer call out please contact our Technical Support phone line listed on
the back of this manual.
A This is not normal there are some basic checks that we would advise you
to perform:
reebokfitness.info
•Please check all nuts and bolts are secure but not over tightened (it may be
worth loosening slightly if noise seems to be coming from a specific area).
•Please check that all washers are fitted and in the correct position.
Q Can I keep my equipment in my garage?
•Please lubricate all moving parts with either WD40 or light grease (grease
is the best option).
A Yes, but not in a garden shed. Note if your equipment is kept in a garage,
ensure it is covered and placed on a mat or carpet. It is important to protect it
from being exposed to extremes in temperature, heat, humidity and moisture.
•Ensure front and rear stabilisers are attached correctly.
•Ensure the front upright post is locked in position with no movement.
•Make sure all bolts are tight.
Q I have an error message on my screen what does this mean and what
can I do?
•Please check pedal/foot plates are fully secure.
A There are a number of error messages that may be displayed on your
computer. Please see the codes below:
•E1 – No speed signal.
•E2 – The computer can not interface with the computer chip.
•E3 – When analysing the body fat this error will occur if the computer
can not read your pulse.
If these checks do not help to remedy the fault please don’t hesitate
to contact us.
Q I can’t seem to attach my left pedal?
A Please be aware the left pedal has a reverse thread and will attach in
a backward direction. This needs to be threaded onto the crank in a counter
clockwise direction.
•E5 or ERR-M – This indicates there is a fault with the servo motor.
If you have any of these errors we would advise for you to recheck all the
connecting wires in the back of the computer, the front post and the pulse
wires coming from the handle bars firstly. If this does not cure the problem
please contact us on Technical Support phone line listed on the back of
this manual.
Q When I press the buttons on my bike it does beep but there is no display
on the screen. Do I need a new computer?
A This may be a simple contrast setting please follow the instructions below:
•Remove the power from the machine.
•Insert the power back to the machine.
Q The console does not display distance, speed or calories.
•Press and hold the “stop” button.
A Firstly the wiring that was connected during assembly needs to be checked.
These are located into the rear of the computer and halfway down the inside of
the handlebar tube. These can be disconnected completely then reconnected
to reset this function. If the console still does not function properly, please do
not hesitate to contact our Technical Support phone line above.
•While holding the “stop” button tap the “up” arrow.
RFE4489_RE014101_iBikeSE_UMFINAL.indd 26-27
•You will find the screen starts to reappear.
•When you are happy with the screen release all the buttons.
If this does not work please contact our Technical Support phone line listed
on the back of this manual.
25/06/2010 15:14
Parts ID
Reebok i-Bike.SE
28
Customer Support 0800 440 2459
29
Reebok i-Bike.SE
reebokfitness.info
Diagram 1
IB SE-842 Console Housing Cover – Upper x 1
IB SE-808 Console Housing Cover – Lower x 1
IB SE-804 Upright Upper Cover – Left x 1
IB SE-805 Upright Upper Cover – Right x 1
IB SE-803 Battery Cover x 1
IB SE-802 M4x15 Screw x 6
IB SE-255 Handle Bar x 1
IB SE-202 Handle Pulse Sensor – Upper x 2
IB SE-203 Handle Pulse Sensor – Lower x 2
IB SE-204 Foam Grip x 2
IB SE-705 Handle Pulse Sensor Wire x 2
IB SE-206 Handle Bar End Cap x 2
IB SE-250 Handle Bar Foam Grip – Middle x 2
IB SE-702 7 Pin Wire-Upper x 1
IB SE-285 Upright x 1
IB SE-245 M3.5x16 Screw x 4
IB SE-213 M5x14 Washer/Srcrew x 6
IB SE-215 M8x20 Bolt x 5
IB SE-286 Speed Sensor x 1
IB SE-287 Speed Sensor Holder x 1
IB SE-219 M6x50 Bolt x 2
IB SE-220 6x10x2 Spring Washer x 2
IB SE-706 Handle Pulse Sensor Wire – Middle x 2
IB SE-522 Spring x 1
IB SE-510 6300 Bearing x 2
IB SE-524 M5x14 Screw x 1
IB SE-541 M5x29 Screw x 1
IB SE-211 M4x10 Screw x 2
IB SE-854 M8x85 Bolt x 2
IB SE-373 8x17x1.5 Washer x 5
IB SE-351 Rear Stabilizer Tube Adjustment Foot x 2
IB SE-347 Rear Stabilizer Tube x 1
IB SE-307 Rear Stabilizer Tube Foot Cover – Right x 1
IB SE-342 Rear Stabilizer Tube Foot Cover – Left x 1
IB SE-309 Front Stabliser Tube Transport Cover – Left x 1
IB SE-341 Front Stabliser Tube Transport Cover – Right x 1
IB SE-311 Transport Wheel x 2
IB SE-312 Saddle Post x 1
IB SE-326 Saddle Post Plastic Insert x 1
IB SE-323 Seat Post Height Adjustment Knob x 1
IB SE-703 7 Pin Wire – Lower x 1
IB SE-316 Saddle x 1
IB SE-281 Main Frame x 1
IB SE-318 M6 Spring x 2
IB SE-319 Transport Fit Bolt M6x35x10 x 2
IB SE-321 M5x14 Screw x 8
IB SE-338 M8 Nut x 1
IB SE-807 8x14x2 Spring Washer x 7
IB SE-801 Overlay x 1
IB SE-818 Button Overlay x 1
204
801
818
206
250
842
255
316
202
808
802
203
705
203
803
802
706
245
702
804
213
312
706
211
219
211
220
541
524
510 519
326
110
285
373
323
338
703
522
319
213
215
287
807
286
311
215
373
318
807
IB SE-519 Tension Pulley Bracket x 1
373
309
321
311
281
319
347
342
321
318
807
854
351
RFE4489_RE014101_iBikeSE_UMFINAL.indd 28-29
805
215
373
807
307
321
702
341
321
351
25/06/2010 15:14
Parts ID
Reebok i-Bike.SE
30
Customer Support 0800 440 2459
31
Reebok i-Bike.SE
reebokfitness.info
204
Diagram 2
IB SE-558 6004 Bearing x 2
IB SE-501 M18 Nut x 2
IB SE-503 20x30x2 Washer x 1
IB SE-504 Driving Belt Large Plastic Pulley x 1
IB SE-505 Driving Belt x 1
IB SE-506 Crank Shaft 20x208 x 1
IB SE-544 M6x10 Screw x 4
IB SE-540 M6x12 Screw x 6
IB SE-509 M8x14 Screw x 1
IB SE-511 8x23x2 Washer x 1
IB SE-513 ID35xOD192x35.5 Flywheel x 1
IB SE-514 OD255x3 Aluminium Disc x 1
IB SE-126 M8x15 Screw x 4
IB SE-516 Small Pulley OD28x84.3 x 1
IB SE-529 17.2x22.2x1.5 Washer x 4
IB SE-422 M10 Nut x 1
IB SE-526 Aluminum Disc OD75x11.5 x 2
IB SE-527 ID18xOD35x12 One Way Bearing x 1
IB SE-528 6003 Bearing x 4
IB SE-539 M10x78 Bolt x 1
IB SE-807 8x14x2 Spring Washer x 4
IB SE-631 Motor x 1
IB SE-373 8x17x1.5 Washer x 5
IB SE-338 M8 Screw x 1
IB SE-618 Magnet braket x 1
IB SE-601 10x26x2 Washer x 1
IB SE-602 Spring x 1
IB SE-604 M6 Nut x 1
604
608 618
605
631
373
422
539
513
540
601
602
514
528
527 529 373
807
126
509 511
516 526
526 529
528
IB SE-605 M6x70 Bolt x 1
IB SE-608 M6 Nut x 1
338
528
373
126
807
524
501 503
504
506
558
540
528
519
505
544
Diagram 3
IB SE-802 M4x15 Screw x 5
IB SE-403 Main Chain Cover – left x 1
IB SE-404 Saddle Post Cover x 1
IB SE-405 Chain Cover Upper Cover x 1
IB SE-407 Main Chain Cover – Right x 1
IB SE-410 Pedal – Left x 1
IB SE-443 Crank End Cap x 2
IB SE-412 M10x1.25 Nut x 2
IB SE-441 Crank – Left x 1
IB SE-414 Crank – Right x 1
IB SE-438 Pedal – Right x 1
IB SE-437 Upright Lower Cover – Left x 1
IB SE-418 Upright Lower Cover – Right x 1
IB SE-426 Front Stabliser Tube Cover x 1
IB SE-419 Rear Stabliser Tube Cover x 1
441
404
405
437
418
403
410
443
412
441
407
414
438
412
426
802
443
419
RFE4489_RE014101_iBikeSE_UMFINAL.indd 30-31
802
25/06/2010 15:14
Reebok i-Bike.SE
32
Customer Support 0800 440 2459
RFE International Ltd warrants products to be free from defective workmanship
and materials, under normal use and service conditions, for the period of 2 years
from the date of purchase. Details of these service conditions can be found within
the product’s user manual.
reebokfitness.info
Limited Warranty
i.series
range
In order to validate warranty dates, a proof of purchase is required. This warranty
only extends to the original purchaser and will only be covered in the country the
machine was purchased.
RFE’s obligation under this warranty is limited to replacing or repairing, at RFE’s
discretion, the product through one of its authorised service centres. All repairs for
which warranty claims are made must be pre-authorised by RFE.
iBike.SE
This warranty does not extend to any defect caused by abuse, misuse, additions,
modifications or repairs not provided by an RFE authorised service centre.
Products used for commercial or rental purposes and/or used as store display
models are not covered by this warranty. This product is designed for
home use.
No other warranty beyond that specifically set forth above is authorised by RFE.
RFE is not responsible or liable for indirect, special or consequential damages
arising out of or in connection with the use or performance of the product or
damages with respect to any economic loss, loss of property, loss of revenues
or profits, loss of enjoyment or use, costs of removal, installation or other
consequential damages of whatsoever nature.
We advise that your product is kept in a room with a constant environment;
preventing your product from being exposed to extremes in temperature,
heat, humidity and moisture. Guidance on the correct storage of equipment is
contained within the product’s user manual.
iTrainer.SE Crosstrainer
PLEASE RETAIN YOUR RECEIPT AS PROOF OF PURCHASE.
Your statutory rights remain unaffected.
iRun.SE Music Treadmill
cycle
Reebok products are recyclable. At the end of its useful life please dispose of
this Reebok product correctly and safely at a local refuse site.
For more information visit
www.reebokfitness.info
RFE4489_RE014101_iBikeSE_UMFINAL.indd 32-33
25/06/2010 15:14