1
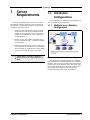
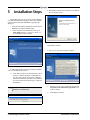
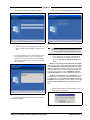
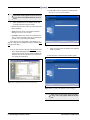
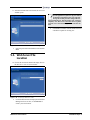
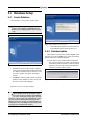
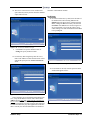
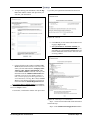
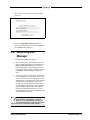
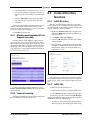
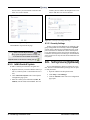
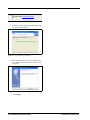
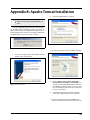
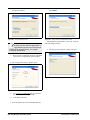
026-1010 Rev 7 06-OCT-2011
Site Manager Installation Guide
Retail Solutions
3240 Town Point Drive NW, Suite 100
Kennesaw, GA 30144, USA
Phone: 770-425-2724
Fax: 770-425-9319
Table of Contents
1 SERVER REQUIREMENTS........................................................................................................................................ 1
1.1. INSTALLATION CONFIGURATIONS.................................................................................................................................
1.1.1. Multiple-Server Machine Configuration ..............................................................................................................
1.2. APPLICATION AND DATABASE SERVER SUPPORTED CONFIGURATION ........................................................................
1.2.1. Multiple Server Configuration ..............................................................................................................................
1
1
2
2
2 SUPPORTED SECURITY............................................................................................................................................ 3
3 ESTIMATED BANDWIDTH USAGE ........................................................................................................................ 3
4 BACKUP DATABASE AND WEB SERVER............................................................................................................. 3
5 INSTALLATION STEPS.............................................................................................................................................. 4
5.1. PREREQUISITE INSTALLATION ...................................................................................................................................... 6
5.2. DATABASE CONNECTION SETUP .................................................................................................................................. 7
5.3. WEB SERVER FILE LOCATION ...................................................................................................................................... 9
5.4. DATABASE SETUP ....................................................................................................................................................... 10
5.4.1. Create Database ................................................................................................................................................. 10
5.4.2. Database Update................................................................................................................................................. 10
5.5. PRODUCT REGISTRATION AND ACTIVATION .............................................................................................................. 14
5.5.1. Registration......................................................................................................................................................... 14
5.5.2. Activation ............................................................................................................................................................ 16
5.6. LAUNCHING SITE MANAGER ...................................................................................................................................... 17
6 UPGRADING SITE MANAGER............................................................................................................................... 18
7 UNINSTALLING SITE MANAGER......................................................................................................................... 19
8 QUICK START SOFTWARE SETUP ...................................................................................................................... 20
8.1. OVERVIEW ..................................................................................................................................................................
8.2. LAUNCHING SITE MANAGER ......................................................................................................................................
8.3. LOGIN .........................................................................................................................................................................
8.4. LICENSING ..................................................................................................................................................................
8.4.1. Maintenance Upgrades & Tech Support Licensing ............................................................................................
8.4.2. Feature Licensing ...............................................................................................................................................
8.5. CREATE A DIRECTORY STRUCTURE ...........................................................................................................................
8.5.1. Add A Directory ..................................................................................................................................................
8.5.2. Add A Site............................................................................................................................................................
8.5.3. Add A Control System .........................................................................................................................................
8.6. SET UP USERS (OPTIONAL) ........................................................................................................................................
20
20
20
20
21
21
21
21
21
22
22
APPENDIX A: JAVA INSTALLATION .................................................................................................................. A-1
APPENDIX B: APACHE TOMCAT INSTALLATION ..........................................................................................B-1
APPENDIX C: SUPPORTED PRODUCT VERSIONS .......................................................................................... C-1
Site Manager Installation Guide
Table of Contents • v
1
Server
Requirements
There are several things that can effect how well the
Site Manager software will run in a given environment.
Each of these is slightly different but can be considered a
comparable load on the system.
1.1. Installation
Configurations
The configuration for installing the Site Manager software is multiple server configuration.
1.1.1. Multiple-Server Machine
Configuration
1. Number of users: The number of users in general -but especially the number of simultaneous users -can put a taxing load on the web server to service requests both to controllers as well as reading data
from the database.
2. Number of sites: The number of sites that the system can communicate with -- especially simultaneous connections.
3. Functions performed on sites: There is quite a different load on the system between an occasional log
retrieval, backup, or graphical screen versus pulling
every log out of each controller at a site daily.
NOTE: Refer to Appendix C: Supported
Product Versions for supported product versions.
Installation Configurations
Figure 1-1 - Multiple-Server Machine Configuration
This installation configuration has the Site Manager
Web application server and the database on two separate
machines. This frees up the UI and protocol from having
resources taken by the database server. This can be especially crucial during intensive operations (such as log retrieval, which has to update the UI, pull logs from
controllers and place those logs in the database).
Server Requirements • 1
1.2. Application and Database Server Supported
Configuration
1.2.1. Multiple Server Configuration
1.2.1.1. Application Server (Separate Machine):
• Minimum Specification:
-
Intel Xeon 1.8GHz with 4GB of memory
-
40 GB drive with 20% free space
-
See Appendix C: Supported Product Versions for the supported versions of Microsoft Windows Server
1.2.1.2. Database Server (Separate Machine):
• Minimum Specification:
-
Intel Xeon 1.8GHz with 4GB of memory
-
Disk space size is variable depending on amount of data required
-
See Appendix C: Supported Product Versions for the supported versions of Microsoft Windows Server
-
See Appendix C: Supported Product Versions for the supported versions of Microsoft SQL Server
NOTE: Using E2 2.10F01 or higher with the
Site Manager program is recommended for
optimum performance.
2 • Site Manager Installation Guide
026-1010 Rev 7 06-OCT-2011
2
Supported
Security
The product supports the use of all security possibilities
available to an Internet product such as SSL, firewalls,
VPN, etc.
3
Estimated
Bandwidth Usage
4
Backup Database
and Web Server
For a complete recovery of information in the event of
a failure of the Web server on which Site Manager is running, it is highly recommended that backups be performed
on a daily basis in two separate areas:
• Backup of the database (using the standard procedure for your particular database)
• Backup of applicable Web server areas
For more information on backup procedure, see the Administrator Activities section of the Site Manager online
help.
The bandwidth usage can be divided into two categories:
1. Bandwidth between the Web server and client
browsers is dependent on the number of users
logged into the system and how quickly they are
changing pages.
2. Bandwidth between the Web server and the controllers that are on the corporate WAN is dependent on
the activity being performed and the number of
sockets that is open. The number of sockets open
can be configured in the application server.
Application and Database Server Supported Configuration
Supported Security • 3
5
Installation Steps
2. When Yes is clicked, the Site Manager InstallShield
Wizard window opens:
If upgrading from a previous version of Site Manager,
you must first uninstall the program. Skip to the Upgrade
section of this install guide (Section 6, Upgrading Site
Manager).
1. Insert the Site Manager Installation CD into the CD
ROM drive to begin installation setup.
a.
If the setup does not automatically start, go to
Start >Run and type “x:\setup.exe” where x is
your installation source location.
Figure 5-3 - Install Welcome
Click Next to continue.
3. The License Agreement window will open:
Figure 5-1 - Preparing Setup
A confirmation window will appear asking if a database
server is installed and accessible:
b.
Click Yes if you have one installed, No if you do
not have a database installed. Clicking No will
stop the setup and exit the program. A database
must then be installed, accessible, and a database
user-created with correct privileges to connect to
the database.
Figure 5-4 - License Agreement
a.
Read the “Terms of Use Agreement” and select I
accept the terms of the license agreement if you
wish to continue.
b.
Click Next to continue.
NOTE: You may choose which database and
Web server will be used.
Figure 5-2 - Is A Database Installed?
4 • Site Manager Installation Guide
026-1010 Rev 7 06-OCT-2011
4. The Customer Information window will open:
Figure 5-5 - Enter Customer Information
a.
6. The Web Server Information window will open:
Figure 5-7 - Select Tomcat or Another Web Server
Enter your name and company name into the respective fields and click Next to continue the install.
5. If you are running previous versions of Web servers
or Java Runtime, the Previous Version Removal
window will open with a list of the older products
that must be updated before you can proceed with
the installation:
NOTE: Regardless of the type of server being
used, it is suggested that a generic, non-version specific location for the install be chosen.
a.
Select whether to use Tomcat or another Web
Server installation: (For supported product versions, see Appendix C: Supported Product Versions.)
Install or Use existing Tomcat Web Server Installation: Use an existing Tomcat Installation or install Tomcat,
select Install or Use existing Tomcat Web Server Installation. Click Next to continue and go directly to the Prerequisite Installation Review window (Step 10, Section 5.1.,
Prerequisite Installation). Go to Appendix B: Apache
Tomcat Installation for Tomcat installation instructions.
Install or Use other Web Server Installation: If you
wish to install, or already have installed another Web server besides Tomcat, select Install or Use other Web Server
Installation and click Next to continue (Step 7). Go to Appendix A: Java Installation for Java Installation instructions.
7. A confirmation window will open and ask if you
have a Web server installed:
Figure 5-6 - Remove Any Old Versions of Web Servers
If no software upgrades are needed, proceed with the
installation to Step 6:
Figure 5-8 - Web Server Installed?
Application and Database Server Supported Configuration
Installation Steps • 5
a.
on the Web Server Information window (Step 6).
If you already have a Web server installed, click
Yes.
8. Because Tomcat is not being used as the Web server, select the Web server location:
Figure 5-11 - Use Tomcat or Install Web Server
c.
Click OK to continue and the install is terminated.
You will need to install a Web server to continue
with the install.
For instructions on Web server installations, go to Appendix A: Java Installation for Java installation instructions and Appendix B: Apache Tomcat Installation for
Tomcat installation instructions.
5.1. Prerequisite
Installation
Figure 5-9 - Web Server Location
a.
Select Change to choose a custom location for the
Web server application location.
b.
Click Next to continue.
10. If you are not running the supported version of
Tomcat and Java Runtime, the Prerequisite Installation Review window opens, listing the prerequisites that need to be installed before the Site
Manager installation can proceed. (If no prerequisites need to be installed, go directly to Step 11).
9. If you choose No on the Do you have a Web server
already installed? message window, (Step 7) you
are presented with a confirmation window that will
ask if you wish to install Tomcat on your machine
as the Web server:
Figure 5-10 - Install Tomcat as Web Server?
a.
b.
If you wish to install the Tomcat supported version as your Web server, click Yes. The Prerequisite Installation Review window opens, (Step 10)
listing the prerequisites that need to be installed
before the Site Manager installation can proceed.
Figure 5-12 - Prerequisite List
a.
Click Next to install the prerequisites and continue with the install.
If you do not wish to use the Tomcat supported
version as the Web server, click No. A message
window opens informing you that a Web server
must be installed to continue or to select Install or
Use existing Tomcat Web Server Installation
6 • Site Manager Installation Guide
026-1010 Rev 7 06-OCT-2011
12. The Windows authentication window:
5.2. Database Connection
Setup
11. The Database Connection Setup window will open
after all the prerequisites have been installed.
Choose which database Site Manager will be connecting to:
Figure 5-14 - Windows Authentication for Microsoft SQL
For the Domain field, choose to use either Windows
Authentication or SQL authentication for both users (database administrator and Site Manager end user). The same
authentication type must be used for both users. For Windows authentication, enter the domain name. For SQL Authentication, leave the Domain field blank.
Figure 5-13 - Choose Database
a.
If Microsoft SQL is chosen, enter the domain for
Windows authentication (Step 12).
For the Instance field, if using an SQL instance that is
not the default, enter it into the field. Otherwise, leave the
Instance field blank.
13. The Database Connection Setup window opens:
NOTE: If you are using Microsoft SQL Server
2000, you must be running at least Microsoft
SQL Server SP 3.
If using Windows XP SP2 and Microsoft SQL
Server 2000, you must be running at least Microsoft
SQL Server, SP 4.
Figure 5-15 - Database Connection Setup
The information in these fields will be used to connect
the database with Site Manager.
Database Connection Setup
Installation Steps • 7
15. Click Next to enter your password and open the
Web Server File Location window:
NOTE: These parameters must be exact. If the
information in these fields is entered incorrectly, you must contact Retail Solutions for assistance.
a.
Enter the database server, database name, and
username into their respective fields:
• Server: Enter the name of the server that has the database installed.
• Name: Enter the name of the database that Site
Manager will use to store its data.
• Username: Enter who will be the connection user.
This is for the connection of the server running the
product, not for populating the database.
After entering your information, click Next to go to
Step 15. (Only proceed to Step 14 if using a database other
than Microsoft SQL.)
Figure 5-17 - Enter Password for Database User
a.
14. If you have chosen a database other than Microsoft
SQL, (Step 11) highlight all the database .jar files
from the location on your PC and click Open. The
database files will be copied into the correct location during the installation.
Enter the password for the database user and click
Next to continue.
16. The Database Command Setup window opens:
Figure 5-16 - Highlight Database Files and Click Open
Figure 5-18 - Username with Database Owner Privileges
NOTE: This user must have proper privileges
to drop, create, and populate tables in the database.
8 • Site Manager Installation Guide
026-1010 Rev 7 06-OCT-2011
17. After the username has been entered, the Password
window opens:
NOTE: This location must be correct in order
for the application to function. If your Tomcat
location has changed because of an upgrade
during this install, you must change the location to match this new Tomcat location (the “webapps”
subfolder). For Web servers other than Tomcat, please
see Web server documentation for correct location details.
b.
Click Next to continue with the install and create
a database or update an existing one.
Figure 5-19 - Password with Database Owner Privileges
a.
Enter the password for the database user and click
Next.
5.3. Web Server File
Location
18. Choose the location the install will deploy from in
the Web Server File Location window:
Figure 5-20 - Location for Web Server Files
a.
Use the default location for deployment of the Site
Manager Web server files, or click Browse to
choose your own location.
Web Server File Location
Installation Steps • 9
5.4. Database Setup
5.4.1. Create Database
19. The Database Create/Update window opens:
NOTE: If updating or changing an existing database, it is strongly recommended that you
back up any existing database before continuing.
Figure 5-22 - Database Create Procedure
a.
Click Next when the database has been created, or
click Cancel to quit the install and start over.
5.4.2. Database Update
The Database Create Procedure window (Figure 5-22)
will open if you choose Update or if you have chosen Create but already have a database installed.
Figure 5-21 - Create or Update Database
a.
If Create is chosen on this window, a database
will be created and populated with basic data only,
if a database already exists, the Database Create
Procedure window will appear when Next is
clicked.
b.
If Update is chosen on this window, an existing
database will be updated to work correctly with
the latest version of Site Manager.
21. Click Yes to exit the install and back up the database, or pause on this screen, where you can back up
the database and then click No to continue with the
install. If you do not wish to back up the database,
click No to continue with the install.
Figure 5-23 - Back Up Database?
20. Database Create Procedure window:
NOTE: If an existing database is used with this
option, all data stored in the database will be
lost. Also, the users created by the installation
are “user” with a password of “pass” for basic
user access to the program, and “administrator” with a
password of “pass” that has full control of the Site
Manager system. It is strongly recommended that you
rename these users and change the passwords as soon
as the program is installed and running.
10 • Site Manager Installation Guide
026-1010 Rev 7 06-OCT-2011
22. The Choose Destination Location window will
open where the you may choose where the database
scripts will be stored:
formation. Click Next to continue.
Email Setup
24. To send out advisories by email, enter the name of
the machine that will be hosting SMTP in the
SMTP field in the Email Setup window and click
Next. (Change the Port if necessary and enter the
Username if the SMTP server needs a login in order to send emails.) If you do not want to set up
email sending, leave this field blank and click Next
to skip to Step 25.
Figure 5-24 - Location for Database Scripts
a.
Click Next to accept the default location or
Change to specify another location.
23. For Advisory Receiving Setup, enter the server
name or IP Address of where the advisories will be
sent and the open ports for E1 Port and E2 Port
fields:
Figure 5-26 - Set Up Email Sending Ability
25. If a username is entered, enter the password in the
window that appears below:
Figure 5-25 - Advisory Receiving Setup
These fields may be pre-populated with defaults; however, verify the IP address or server name entered in the
Address field is static and visible from the controllers at
the site. This address should also belong to the machine on
which the installation is located. The ports entered must be
available and unused by any other application on this machine. Consult your network administrator for further in-
Database Setup
Figure 5-27 - Enter Password
Installation Steps • 11
27. If the Web server is up and running, you will be
asked to shut it down:
Figure 5-30 - Shut Down Web Server If Running
NOTE: The Web server must be shut down and
ALL PEOPLE MUST BE OUT OF THE DATABASE before the installation can be continued.
a.
After shutting down the Web server, click OK.
Figure 5-28 - Email Setup
To complete email setup, enter the sender email addresses in the fields; otherwise, leave blank. The Scheduler email address will be the sender of the scheduled activity
results.
Click the Next button to continue.
28. The Ready to Install the Program window will open
to indicate the installation is ready to begin.
a.
Click Install to begin the installation of Site Manager, Back to go back to the previous window, or
Cancel to exit the install.
26. Review the installation information in the Installation Review window:
Figure 5-31 - Begin Installation
Figure 5-29 - Installation Review
a.
Click Next to continue.
12 • Site Manager Installation Guide
026-1010 Rev 7 06-OCT-2011
29. The Setup Status progress window will display, detailing the status of the setup/installation:
Web Server Settings
Figure 5-32 - Install Status
Figure 5-35 - Web Server Settings
30. If Create was chosen in the Database Create/Update window (Step 19), you will see this type of update status while the database scripts are running:
These values are created automatically and are calculated for you based on the amount of memory. These values
should not need to be changed. If you have any questions,
contact Retail Solutions for assistance at 770-425-2724.
The max JVM heap size (Java command line setting
-Xmx) and the min JVM heap size (Java command line
setting -Xms) should be set to the same value. -Xmn is a
Java “garbage” collection setting.
Figure 5-33 - Database Scripts Status
If Update was chosen in the Database Create/Update
window (Step 19), you will see this type of update status
while the database scripts are running:
31. Once the settings are correct, click Next to complete
the installation.
32. The InstallShield Wizard Complete window opens:
Figure 5-34 - Database Scripts Status
Figure 5-36 - Install Complete
Click Finish to complete the installation of the program.
Database Setup
Installation Steps • 13
NOTE: For Site Manager to function, you
must start your Web server after the installation is complete.
2. Click the Registration button to proceed in obtaining a license.
33. If the InstallShield Wizard Complete window asks
if you would like to restart your computer, select to
restart now (Yes) or later (No) and click Finish.
Figure 5-39 - Click OK to Proceed
3. Click OK to open the Product Activation License
Registration window. The state of the current license is displayed on this page:
Figure 5-37 - Restart Computer Now or Later
Figure 5-40 - Click Register to Begin Entering Information
5.5. Product Registration
and Activation
5.5.1. Registration
To register the software for a Trial License (90 days),
go to the Feature Licensing page of the software.
1. Click the Help drop-down list and click Feature
Activation. The Feature Licensing page will open:
Figure 5-38 - Feature Licensing Page
14 • Site Manager Installation Guide
026-1010 Rev 7 06-OCT-2011
4. To begin entering your information, click the Register button and the window will open where you
will enter your information:
fy you that your registration information has been sent:
Figure 5-42 - Click OK
6. Click OK and you will return to the Feature Licensing page (Figure 5-38).
7. For systems that are not SMTP-enabled, (for
more information, refer to Step 24 of this document)
after filling out your information (Figure 5-41), follow the instructions in the Product Activation and
Licensing window:
Figure 5-41 - Fill Out All Fields and Click Submit Registration
5. Fill out all fields on this window including: Sales
Order # (call Customer Service at 770-425-2724 to
obtain your sales order number), Company Name,
Address, Name, Email, Confirm Email, and a
contact Phone Number. If desired, enter any extra
information into the Additional Information box
(optional). Note that for non-SMTP enabled systems, you must specify if the Web application is a
virtual machine by selecting Yes or No for Virtual
Server. Verify that the information you entered is
correct and click the Submit Registration button.
For systems that are SMTP-enabled, your information will be sent automatically to Emerson Retail Solutions.
Proceed to Step 6 to finish.
If successful, a confirmation window will open to noti-
Figure 5-43 - Follow Steps 1-5 on this Window
Step 1 - Create an email and include all the information
listed in this step.
Step 2 - Enter [email protected] in
Product Registration and Activation
Installation Steps • 15
your email’s To: field.
Step 3 - In the Subject: field of your email, enter Site
Manager Product Activation License SO# (followed by
the Sales Order number obtained from customer service).
4. The Product Activation License Import window
will open and show the current state of licensing:
Step 4 - Open your browser window and locate the directory that contains the .zip file (verify that it is the most
current version if there are more than one).
Step 5 - Send the email to
[email protected]
Click OK.
This will return you to the Feature Licensing page
(Figure 5-38).
5.5.2. Activation
1. Once you receive the email containing the file for
purchasing the software, save the file to a location
on your drive.
Figure 5-46 - Click Browse
5. Click Browse and the File Upload window will
open:
2. On the Feature Licensing page (Figure 5-38), click
Activation:
Figure 5-47 - Locate File in the File Upload Window
Figure 5-44 - Activate License - Feature Licensing Page
6. Highlight the file and click Open.
3. Click OK on the confirmation window to proceed:
7. When the file appears in the Browse path, click the
Import License button:
Figure 5-45 - Click OK
Figure 5-48 - Click Import License
16 • Site Manager Installation Guide
026-1010 Rev 7 06-OCT-2011
8. The Product Activation License Update window
will open:
Figure 5-49 - Click Apply Imported License
9. Once the Apply Imported License button is
clicked, the selected license file will be applied (or
click Cancel to stop and exit).
5.6. Launching Site
Manager
1. To launch the Site Manager program:
a.
Open a Web browser. If running the same computer on which Site Manager was installed, type
http://localhost/emerson inside the browser
field. If running the program from another computer, use the machine name or IP address instead
of localhost. The Site Manager program will
open.
b.
You may now log into the program. Users created
by the installation are “user” with a password of
“pass” for basic user access to the program, and
“administrator” with a password of “pass” that has
full control of the Site Manager system. It is
strongly recommended that you rename these users and change the passwords as soon as the program is installed and running so that duplicate
login names and passwords do not occur. For
more information, refer to the User Manager and
Group Manager online help.
NOTE: If you wish to import site information
from UltraSite or Site Manager Terminal
Mode, go to the Administrative Activities section of the Site Manager online help and follow
the instructions for importing an XML datafile.
Launching Site Manager
Installation Steps • 17
6
Upgrading Site
Manager
ers as they may impact installation after the upgrade
is complete.
NOTE: When upgrading Site Manager, refer
to Technical Bulletin P/N 026-4307 for complete instructions on how to upgrade Tomcat.
1. To upgrade Site Manager to a newer version, run
the CD or the setup.exe, and the Upgrade or Remove Program window opens to indicate that the
program has been detected.
Figure 6-3 - Make a Note of Upgrade Reminders
You must first uninstall the current installed version,
and then repeat the setup steps of this guide (Section 5, Installation Steps) to install the new version.
5. Click Next to uninstall the current version and repeat the installation steps.
Figure 6-1 - Upgrade Site Manager
2. Select Upgrade and click Next.
Figure 6-2 - Uninstall Current Version of Site Manager to
Upgrade
3. Click Yes to continue with the uninstall, No to go
back to the previous screen.
4. An Upgrade Reminders window will open with
varying reminders depending on what version of the
software you are upgrading to. Note these remind-
18 • Site Manager Installation Guide
026-1010 Rev 7 06-OCT-2011
7
Uninstalling Site
Manager
1. To uninstall Site Manager, go to Add/Remove Programs in the Windows Control Panel, choose Site
Manager, and the Upgrade or Remove Program
window opens indicating that the program has been
detected.
Figure 7-1 - Select Remove to Uninstall
if the install identifies that the Web server is up and
running; otherwise the window does not appear.)
Figure 7-3 - Click Yes to Continue
5. The Maintenance Complete window will open.
Click Finish to complete and exit the uninstall.
Figure 7-4 - Maintenance Complete
2. Select Remove and click Next to begin an uninstallation of the program. A confirmation window will
open asking if you want to remove the selected application and all of its features.
Figure 7-2 - Remove Application?
3. Click Yes and a confirmation window opens. The
Web server must be shut down before continuing
with the uninstall. (Start > Control Panel > Administrative Tools > Services > Your Web Server
> Right-click and select Stop)
4. Click Yes (Figure 7-3) after the Web server has
been shut down to continue with the uninstall, or
click No to stop the uninstall. (This will only occur
Launching Site Manager
Uninstalling Site Manager • 19
8
Quick Start
Software Setup
2. Press the Login button or press Return on your keyboard.
8.1. Overview
This section gives step-by-step instructions to show
you how to log in to Site Manager, set up the navigation
tree, user access, and communication information. From
the navigation tree you can connect to controllers, set up directory, site, control system, and unit information.
8.2. Launching Site
Manager
To begin using Site Manager, open a Web browser:
If running the same computer on which Site Manager
was installed, type http://localhost/emerson inside the
browser field. If running the program from another computer, use the machine name or IP address instead of localhost. The Site Manager program will open.
You can begin using Site Manager by creating a directory structure Section 8.5., Create A Directory Structure or
setting up users Section 8.6., Set Up Users (Optional).
8.3. Login
The login page is the first page that appears when the
program is started.
1. Enter your Login ID and password into their respective fields (the Password field is case sensitive).
Users created by the installation are “user” with a password of “pass” for basic user access to the program, and
“administrator” with a password of “pass” that has full control of the Site Manager system. It is strongly recommended that you rename these users and change the passwords
as soon as the program is installed and running. It is also
highly recommended that each user have his/her own login.
For more information, go to User Manager and Group
Manager sections of the Site Manager online help.
Figure 8-1 - Site Manager Login
3. Click the I Agree button to begin using the application. (First-time users will be presented with the license agreement window.)
4. Once your login has been validated, the home page
will open where the navigation tree and main information window are located.
8.4. Licensing
Site Manager has basic (Maintenance Upgrades &
Tech Support license) and extra features that are activated
by obtaining a license (some of which will need to be renewed yearly) and includes features such as user info,
pending activities, activity history, setup, obtaining controller info, adding, editing, and deleting directories, sites,
and control systems, and some administrator functions.
For features such as backing up, sending reports, forwarding and viewing advisories, setpoint broadcast, accessing the online help system, firmware transfer, and
more, a Site Manager license is needed for activation. Additional plug-in features will need specified keys for operation.
The license key must be entered on the Feature Licensing page to activate the desired feature. A Maintenance Upgrades & Tech Support license key activates basic features
and the feature license key activates feature functionalities
of Site Manager.
The licensing activation page is accessible from the
Feature Activation menu on the online help drop-down
menu in Site Manager. The menu will only be visible with
certain user privileges enabled to allow you to add/edit
software license keys.
1. Locate your unique Hardware Fingerprint number
on the Feature Licensing page.
20 • Site Manager Installation Guide
026-1010 Rev 7 06-OCT-2011
2. Call Retail Solutions Customer Service at 770-4252724 with the Hardware Fingerprint to obtain a license key for the desired features you wish to activate.
3. Click the Add Feature button on the Licensing
page and enter the key into the boxes provided.
4. Click Save.
The key entered will know what feature it is associated
with and will populate the appropriate field(s) on the
screen. To override an existing key, a new key will need to
be added and replace the existing key.
Click Cancel to stop and exit.
8.4.1. Maintenance Upgrades & Tech
Support Licensing
The basic features of Site Manager require a Maintenance Upgrades & Tech Support license key and will be
entered when first starting the program. As the one-year renewal period approaches, a reminder window will appear
and prompt you to renew the Maintenance Upgrades &
Tech Support key. Contact Retail Solutions Customer Service for renewal 770-425-2724.
8.5. Create A Directory
Structure
8.5.1. Add A Directory
Directory structures include a directory, a site, and a
control system. Units will automatically be populated once
the control system has been added. To begin using the program by setting up a directory structure:
1. Right-click Site Directories in the navigation tree
and click Add Directory, or open the Admin Tools
drop-down menu.
2. Click Setup > Directory Manager.
3. Click the Add New button. The Directory Configuration page opens.
4. Enter the directory information into the fields and
click Save. Your directory should now appear in the
navigation tree where you can begin adding sites
and other view levels.
Figure 8-3 - Directory Configuration Page
Once a directory is created, sites and control systems
can be added and will become visible on the tree. These different levels or “nodes” make up the navigation tree structure.
Figure 8-2 - Site Manager Feature Licensing Page
8.5.2. Add A Site
For more information on Status definitions, see the
Feature Activation and Licensing topic in the Site Manager online help.
To add a site from the navigation tree:
8.4.2. Feature Licensing
2. Click Add Site. The Site Configuration page opens.
All possible Site Manager features will be displayed on
the Site Manager Feature Activation screen.
1. Right-click the directory you wish to add the site to.
You can also access this menu from the Site Manager
menu located under the Admin Tools drop-down list (click
Add New) from the Site Manager page.
3. Enter the site information into the fields and click
Save. The site you just added appears in the naviga-
Create A Directory Structure
Quick Start Software Setup • 21
tion tree where you can continue to add sites and
other view levels if desired.
control system is visible in the navigation tree. Continue to add other view levels if desired.
Figure 8-5 - Control System Configuration Page
Figure 8-4 - Site Configuration Page
Click Cancel to stop and exit the page.
NOTE: Click the Refresh button
at the
top of the navigation window to see any new
levels that have been added. The Windows
Refresh button on the browser will log you off.
8.5.3. Add A Control System
To add a Control System from the navigation tree:
1. Right-click the site you wish to add the control system to (a control system is a descendant level of a
site).
2. Click Add Control System. The Control System
Configuration page opens.
3. Enter the control system information (Name, IP
Address) into the fields and click Save. The new
22 • Site Manager Installation Guide
8.5.3.1. Security Settings
Security settings for Site Manager are defaulted at the
group configuration level normally. Under the Optional
section on the Control System Configuration page: If the
protocol checkbox is enabled here (at the control system
level), Site Manager will use the protocol information entered at the control system level and bypass the information
at the group level for only the units located under this control system.
8.6. Set Up Users (Optional)
It is recommended that a directory structure be set up
first, but users with administrator privileges can set up users and passwords:
1. Open the Admin Tools drop-down menu.
2. Click Setup > User Manager.
3. Click the Add New button. The User Configuration
page opens.
026-1010 Rev 7 06-OCT-2011
4. Enter the user information into the fields and click
Save. A user has been created and is saved to the database.
Figure 8-6 - User Configuration Page
What Else Can You Do On The User Configuration Page? Set the Engineering Units default,
activate GS Screen menus, and enable GS
Screens to be set as your home page.
You have now successfully created a navigational tree
structure where you can continue adding directories, sites,
and other view levels.
Set Up Users (Optional)
Quick Start Software Setup • 23
Appendix A: Java Installation
Environment are the only two that need to be selected.
NOTE: Refer to Appendix C: Supported
Product Versions for supported product versions.
If you are installing Java Runtime, the following windows will appear. If you need the Apache Tomcat installation, go to Appendix B: Apache Tomcat Installation.
1. The license agreement window will open:
b.
If you wish to deselect an option, click the down
arrow in the icon next to the item and select don't
install this feature now.
c.
Click Next and the development components will
be installed.
3. The next Custom Setup window displays program
features to install. Click Next to install these default
features and proceed to the Browser Registration
window.
Figure A-1 - Java License Agreement
a.
The Java 2 SDK License Agreement window will
open. I accept the terms in the license agreement
must be selected to continue with the install and
open the Custom Setup window:
Figure A-3 - Default Program Features to Install
4. The Browser Registration window will open:
Figure A-2 - Select Program Features to Install
Figure A-4 - Browser Registration
2. The Custom Setup window gives you the option to
only install what features are needed.
a.
a.
Click Next to continue and start the installation.
Development Tools and Public Java Runtime
• A-1
NOTE: If you have questions about the install, contact www.java.sun.com.
5. A progress window will appear showing the progress of the Java installation:
Figure A-5 - Java Install Progress Window
6. When the installation of the Java is complete, the
Java 2 SDK InstallShield Wizard Completed window opens:
Figure A-6 - Java Install Complete Window
a.
Click Finish.
A-2 • Site Manager Installation Guide
026-1010 Rev 7 06-OCT-2011
Appendix B: Apache Tomcat Installation
a.
Click the I agree button to continue:
NOTE: Refer to Appendix C: Supported
Product Versions for supported product versions.
If you are upgrading from a previous version of Tomcat, click No on this confirmation window to preserve any
custom screens and your configuration settings. Refer to
technical bulletin P/N 026-4307 for complete instructions
if upgrading from a previous version of Tomcat.
Figure B-3 - Tomcat Software License
Figure B-1 - Click No To Save Your Configuration Settings
2. The Tomcat Installation Options window will open:
1. If you are installing Tomcat, click Next on the first
window of the Setup Wizard:
Figure B-4 - Select Components to Install
a.
Check Tomcat, Service, Start Menu Items,
Documentation, Examples, and Webapps. It is
strongly recommended that Service be checked.
If the Service component is not selected, you will
have to manually start the Web service each time
the server is rebooted.
b.
Click Next to proceed and select the directory
where you would like Tomcat to be installed.
Figure B-2 - Install Tomcat
3. Choose the default location or click Browse to
choose a custom location from the Tomcat Installa-
• B-1
tion Options window:
Figure B-5 - Tomcat Install Location
NOTE: To avoid a change in Site Manager’s
location each time Tomcat is upgraded, it is
suggested that a generic, non-version specific
location for the install be chosen. For example,
C:\Program Files\Tomcat.
a.
click Install:
Figure B-7 - Select the Java Virtual Machine Path
This default location should be correct, but verify the
path and change if needed.
6. The Tomcat Setup progress window will open:
When you have selected the location, click Next
to proceed to a configuration options window:
4. The Configuration Options window opens:
Figure B-8 - Tomcat Setup Progress
Figure B-6 - Change Connector Port to 80
a.
It is strongly recommended that for normal use
the connector port be changed to 80.
b.
Click Next to continue.
5. Select the path for the Java Virtual Machine and
B-2 • Site Manager Installation Guide
026-1010 Rev 7 06-OCT-2011
a.
Complete the Wizard Setup:
Figure B-9 - Click Finish To Complete Tomcat Setup
b.
Verify the Run Apache Tomcat checkbox is unchecked, and click Finish to close the Tomcat Setup window and complete the setup.
• B-3
Appendix C: Supported Product Versions
The following products used by Site Manager are only supported for the specified versions. Installing products with
different versions are not supported.
Product Name
Supported Version
Java
1.5.0_11
Tomcat
5.5.26
Microsoft Windows Server
Windows Server 2003 SP2 - Standard Edition, Standard x64 Edition,
Enterprise Edition
SQL Server
SQL Server 2005 SP1 - SP4
• C-1
The contents of this publication are presented for informational purposes only and they are not to be construed as warranties or guarantees, express or implied, regarding the products or services described
herein or their use or applicability. Emerson Retail Services, Inc. reserves the right to modify the designs or specifications of such products at any time without notice. Emerson Retail Services, Inc. does
not assume responsibility for the selection, use or maintenance of any product. Responsibility for proper selection, use and maintenance of any Emerson Retail Services, Inc. product remains solely with
the purchaser and end-user.
026-1010 06-OCT-2011 Emerson is a trademark of Emerson Electric Co. ©2011 Emerson Retail Services, Inc. All rights reserved. Printed in the USA.