1
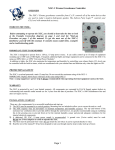
XGC-1e Xtreme Greenhouse Controller
The XGC-1e Xtreme greenhouse controller from C.A.P. controls all of the
main devices that are used in today’s modern hydroponic garden. The built-in
Fuzzy Logic™ controls your CO2 level with unmatched accuracy.
Word To The Wise...
Before attempting to operate the XGC, you should at least take the time to
look at the Example Connection diagram on page 2 and read the “Startup Procedure on page 3 of this manual. To get the most out of the XGC1e, familiarize yourself with this manual. It contains many useful hints,
examples and a troubleshooting guide.
Important Stuff To Remember
The XGC is designed to operate from a 120vac, 15-amp power source. It can
safely control up to 15-amps of equipment including up to 1000 watts of HID
lights. If required, additional lights and larger equipment can be connected
to the XGC-1e by using our HPR, MLCs or UPM “Universal Power Modules”.
In addition to lights, the XGC also maintains the temperature and humidity by
controlling your exhaust fan(s). CO2 levels can be controlled with the builtin timers, which are coordinated with your exhaust fans and function only
when the lights are ON.
Protection & Safety
The XGC is overload protected a main 15-amp fuse. Do not exceed the
maximum rating of the XGC-1e.
IMPORTANT: Replace blown fuses with fuses of the same rating ONLY!
Note: A surge suppressor / power strip is always recommended when
operating electrical equipment such as the XGC.
Warranty
The XGC is protected by our 3-year limited warranty. All components are
warranted by R & M Supply against defects in workmanship and materials under normal use for 3-years from the date of purchase. The XGC
is 100% maintenance-free and does not require service.
Installation / Start-Up
There are a few requirements for a successful installation and start-up.
1) The XGC must be mounted in a vertical position. Mounting feet are included to allow you to secure the unit to a wall.
2) The XGC requires “free air movement” to maintain temperature and humidity accuracy. The top and bottom of the enclosure has ventilation slots to provide airflow through the unit however, we greatly recommended using an oscillating fan in the growing area to provide fresh air for the internal humidity sensor and provide adequate ventilation for the internal electrical components.
3) A dedicated 120 VAC, 15-amp power supply is recommended. A ground wire (3-wire outlet) must be used. Do not use 2-wire adapters or cords to operate the XGC.
4) The XGC must be protected from water. Do not mount the unit where it can be exposed directly to water.
5) Read the rest of the manual!!! It has been designed to take you through step-by-step to make start-up a breeze.
“FRONT PANEL”
Overview
“The XGC-1e is a self-contained greenhouse control system designed for people who want simply the best all-in-one controller available”.
Humidity
Controller
Temperature
Controller
2 Exhaust
Outlets
2 Light
Outlets
24 hour
timeclock
Hydro mode
selector switch
Hydro
“ON” timer
Hydro “OFF”
timer
Night device
outlet
CO2 device
outlet
2 Hydro
pump Outlets
Fuzzy Logic™
CO2 controller
Fuse protected
15-amps @ 120 volts
Start-Up Procedure
Overview
“There is no substitute for reading and understanding the operating manual however... You can use the instructions on this page for a
trouble -free start-up”.
How To Start-Up The XGC
1) Locate a suitable source for power. A 3-wire, grounded, 15-amp dedicated circuit is recommended.
2) Secure the enclosure to a wall using the enclosed mounting “feet”. The XGC requires a vertical orientation for proper internal ventilation. If proper ventilation is not provided, the thermostat may not be able to properly control the temperature & humidity of the growing area.
3) Plug the XGC into the power source. Do not connect your lights until you have set the “ON and “OFF” times on the 24-hour timeclock.
4) You may want to change the CO2 set point on the “Fuzzy Logic”™ controller. Normally 1250 to 1500 PPM is recommended for most applications. Once you set the PPM level, the built-in CO2 sensor and “Fuzzy Logic”™ module work together to actually dial-in the perfect parameters for YOUR area automatically. Refer to Changing the setpoint (SV).
5) Now set the thermostat and de-humistat to the approximate settings you would like to use. A small, inexpensive combination thermometer and hygrometer works just fine to “dial in” the exact settings. Just compare the reading on the thermometer to what the XGC is set at and adjust as required.
6) You can now select the Hydro mode you would like to use. Choose between operating the Hydro outlet during the “Daytime” only or, 24-hours a day. Move the Hydro mode switch to the appropriate position. Moving the switch to the center “OFF” position momentarily will reset the timer.
7) There are 2 timers on the XGC, which are used to control your hydroponics pumps. To fully understand the timers that control the XGC, refer to the Timers section of this manual. Set the Hydro “ON” and “OFF” timers to your desired settings before continuing. (Refer to Timers)
8) The 24-hour timeclock can now be set. Push in the trip levers on the front face of the timer dial for the time you want your lights to be “ON”. Rotate the dial to the current time to set the timer.
9) Now you can plug the equipment you will be using into the appropriate receptacles. Remember that the XGC can handle a combined load up to 15-amps. A single 1000-watt HID ballast needs over 9-amps alone. Select and size your pumps and fans appropriately or use our UPM-1 or MLCs to increase power capacity.
*Note: We highly suggest NOT plugging in your HID ballast just yet.
10) When the “day” cycle begins, the “Lights” indicator will light up to confirm power is going to the (2) light receptacles. If you have selected the “Daytime” setting on the Hydro mode, the “Hydro Pumps” indicator will also light up to indicate your pump is powered for the amount of time you selected
11) You can manually override the timeclock to switch from “night” to “day” or back to Night by rotating the outer dial of the timeclock slowly clockwise. At night, the Lights and CO2 are disabled while the thermostat and humistat continue to control the temperature and humidity.
* NOTE: The Hydro outlet will also be disabled if the “Daytime” mode is selected on the Hydro mode switch.
12) When all settings have been confirmed, the HID lights or UPMs can be plugged into the “Lights” receptacles. If more than 1000 watts are to be controlled, use our Universal Power Modules or the MLCs.
* IMPORTANT: Do not plug in more than 1000 watts worth of lighting into the XGC receptacles.
13) Monitor the equipment connected to the XGC to ensure proper operation. Small adjustments are likely to be made until you find the right combination of controls. Once you are happy with the settings sit back and enjoy the show!
For more details concerning any of the XGC functions, refer to the appropriate section of this manual.
“Controls”
Overview
“The XGC-1e controls your lights, hydroponic pumps, exhaust fan or A/C, de-humidifier, heater and CO2 level with “Part-Per-Million”
accuracy… automatically! No more guesswork!
24 Hour Timeclock
The timeclock selected to run the XGC performs all of the day to night transitions required for crops requiring controlled photoperiods. It
can directly control up to 1000 watts of HID lights.
To set the current time on the timeclock, turn the dial clockwise until the current time on the outer dial lines up with the arrow on the
inner dial. To set the timeclock on and off times, carefully push in each of the orange trip levers at the times you want the lights to be on.
*NOTE: If power is interrupted, the timeclock will have to be reset.
Temperature Controller
The XGC utilizes a remote-bulb thermostat with a 30” lead to control ventilation and cooling functions. This allows you to place the
temperature sensor up to 30” away from the XGC. The thermostat can be set to control temperature from 50 – 115’F.
The thermostat is coordinated with the CO2 control system and the exhaust receptacles to maintain a constant temperature. When the
temperature rises above the set point selected on the thermostat, the CO2 system is disabled and the Exhaust receptacles are enabled.
When the temperature level drops below the set point, the CO2 system is re-activated.
IMPORTANT: To achieve the greatest accuracy, provide the XGC with plenty of “fresh air”. The enclosure is designed to allow air to
pass over the humidity sensor.
Humidity Controller
The XGC utilizes a de-humistat to control ventilation and humidity levels. The de-humistat can control humidity levels from 20% - 80%.
The de-humistat is coordinated with the CO2 control system and the exhaust receptacles to maintain a constant humidity. When the
humidity rises above the set point selected on the de-humistat, the CO2 system is disabled and the Exhaust receptacles are enabled. When
the humidity level drops below the set point, the CO2 system is re-activated.
Hydro Mode Select Switch
The Hydro mode select switch is used to select whether the hydro outlet will cycle 24-hours or only during the day. The mode selector
switch also doubles as a Hydro bypass switch. Each time the switch position is changed to the center “OFF” position, the hydro timers
will reset and initiate a new cycle. This comes in handy during set-up of the hydro pumps and timer settings.
NOTE: *Leaving the mode select switch in the center position disables the hydro function.
Night Only Device
An additional outlet is provided which is powered only at “night” when the lights are turned OFF. This works great for heaters, fans,
dehumidifiers or any other device that needs to run only at night.
What Is “Fuzzy Logic”™ Co2 Control?
What set’s the XGC-1e apart from the competition? Fuzzy logic… What is “fuzzy logic”? Fuzzy Logic can be compared to a good driver.
As a good driver approaches a red light, he or she applies the brakes to gradually slow down BEFORE getting to the intersection. Fuzzy
Logic uses the same idea to bring the CO2 level up to the desired setting without going over the set point. With Fuzzy Logic, relatively safe
compressed CO2 can replace LP / gas CO2 generators economically.
The XGC combines an extremely accurate infrared CO2 sensor with a state-of –the-art Fuzzy Logic module to give you the most precise
method of controlling supplemental CO2. SIMPLY SET IT… AND FORGET IT!
Timers
Overview
The XGC-1e uses 2 timers to control the hydroponic pump functions. It also has a 24-hour time-clock which controls your daytime and
nightime functions.
Adjustable Recycling Timers
The two Adjustable Recycling Timers (ART) provide an adjustable “ON” / “OFF” cycle for various devices. The 2-adjustable recycling
timers onboard the XGC are set using the dials on the front face of the enclosure. The timer name and range of each timer is printed
around the timer dials. Because the dials of the XGC are small to conserve space, the settings may have to be adjusted to an actual time
setting. If necessary, use a watch or stopwatch to confirm the settings are correct. Once the timers are set, they are repeatable to +/- .5%.
The timers are designed to finish the cycle they are presently timing which means adjustments made to the timers during a cycle will not
affect the present cycle.
RESETTING HYDRO TIMERS: The Hydro timers can be reset by switching the Hydro mode select switch to the center “OFF” position
momentarily. Switching back to your desired mode starts the timing cycle.
Hydroponic Pump Timers
The Hydroponic outlet can be configured to cycle one of two ways… 24-hours a day or, during the “daytime” only. Simply moving the
Hydro Mode selector switch to either the “24-Hour” or the “Daytime” position enables the desired mode. When used in the Daytime”
mode, the Hydro outlet will only cycle while the lights are on. The “24-hour” mode works great for NFT or aeroponic systems that require
moisture during the day and night. The mode selector switch also doubles as a Hydro bypass switch. Each time the switch position is
changed, the hydro timers will reset and initiate a new cycle. This comes in handy during set-up of the hydro pumps and timer settings.
There are two timers that control the hydroponics receptacle, Hydro “ON” and Hydro “OFF”. The XGC-1’s Hydro “ON” time can be set from
30 seconds to 20 minutes; the Hydro “OFF” time can be set from 12 to 480 minutes. Set the timers by moving the dial to the appropriate
position.
24 Hour, Timeclock
The timeclock selected to run the XGC performs all of the day to night transitions required for crops requiring controlled photoperiods. It
can directly control up to 1000 watts of HID lights.
To set the current time on the timeclock, turn the dial clockwise until the current time on the outer dial lines up with the arrow on the
inner dial. To set the timeclock on and off times, carefully push in each of the orange trip levers at the times you want the lights to be on.
*NOTE: If power is interrupted, the timeclock may have to be reset.
Fuzzy Logic™ CO2 Control
Overview
Most people who have used the XGC-1e, rate it the best combination controller available today. The fact that the built-in “Fuzzy Logic”™
CO2 control system has redefined what true Part-Per-Million CO2 control is really about, may have something to do with it…
“Supplemental CO2”
Let’s talk about ... Carbon Dioxide. CO2 is present in relatively low quantities, (300-600 PPM) in your normal, generic, everyday air. But
plant growth can be increased and accelerated if the level of CO2 is increased to, let’s say... 1000 -1500 PPM. For this reason, the XGC can
control CO2 distribution for those people who prefer to use supplemental CO2.
There are some inherent dangers associated with using CO2. Here are some of the rules to remember when using CO2:
A) Cylinders (bottles) of compressed CO2 should never be stored inside the growing area or anywhere else where the temperature may
rise above 100º F.
B) The growing area should not be occupied while CO2 is in operation.
C) Do not enter the growing area until the CO2 has been exhausted.
D) CO2 is heavier than air and will accumulate towards the ground.
E) In high enough concentrations CO2 can kill!!! The OSHA maximum “Personal Exposure Level” is 5000 PPM.
*Note: The XGC CO2 control system can be used for both compressed CO2 cylinders, and generators. The CO2 receptacle is 120vac.
Compressed CO2 cylinders require an approved regulator / flow gage and a valve.
If optimum CO2 “mileage” is desired, a self-contained air conditioner or other “Closed loop” cooling method is highly recommended. A
closed loop system will regulate temperatures within the zone allowing you to extend the CO2 maximum cycle time thus reducing CO2 use
dramatically.
Another method of reducing heat build up includes utilizing “Ventilated light hoods”. Just be sure to make the ventilation system of the
hood as airtight as possible so that your precious CO2 is not being drawn out of the area by the ventilated hood exhaust fan.
If sufficient CO2 is provided and the proper level of nutrients and light is available, a 35% increase in growth rate is possible. However if
you suspect the higher temperatures are adversely affecting the plants, a shorter CO2 cycle may produce better results. Remember that
a shorter CO2 cycle duration translates to increased CO2 usage.
Fuzzy Logic™ CO2 Control
Fuzzy Logic is a form of Artificial Intelligence (AI). It is as though a trained operator is there to monitor the level and release more CO2 only
when required. It can also “learn” how to maintain the set point when it is first started by pressing a couple of buttons. It then calculates
how to best maintain the CO2 level for any size space… automatically!
Auto-Tuning CO2
Every growing area has variables such as area size, fan types, ambient temperature, unique airflow characteristics, CO2 delivery system
and flow-rate. Ordinary “part-per-million” controllers do not take most of these variables into consideration thus they are not very good
at keeping the CO2 at a constant level. A standard set of “parameters” which define how the Fuzzy Logic’s AI (Artificial Intelligence) is
pre-programmed into the XGC-1e. For MOST applications, the standard set will work fine. In fact, most people report the XGC-1e maintains
their desired setpoint +/- 15-25 PPM.
If after a few days of operating the XGC-1e you are not satisfied with the performance, you can try to allow the unit to “re-teach” itself the
base parameters FOR YOUR SPECIFIC AREA. And that is exactly what the “Auto-Tuning” function does. When the “Auto-Tuning” function
is used, the XGC-1e automatically measures your systems performance and calculates the best method to control CO2 within the area.
It then uses this information in conjunction with a simple form of Artificial Intelligence called Fuzzy-logic to give you truly exceptional
efficiency. Auto-tuning is only required when using compressed CO2 and Fuzzy-logic control mode.
There are ONLY four reasons to perform “Auto-Tuning” and most people will not see any improvement over the factory setpoints.
1) Unsatisfactory performance after operating the unit for a few days.
2) Changing the set point (SV) more than 500 PPM.
3) Major (and some minor) changes in the CO2 delivery system, area configuration, fan changes, ECT.
4) Abnormal or inconsistent results from previous Auto-Tunings.
*Note: NEVER perform an Auto-tune when using a CO2 generator.
Fuzzy Logic™ Co2 Control (Continued)
How To Perform “Auto-Tuning”
The Auto-Tuning function takes from 1 ½ to 2 ½ hours to complete. DON’T WORRY. It is completely automatic once the test is started.
However, before performing an Auto-Tuning, you MUST prepare the area for the procedure. This may take at the most 15 minutes.
1) During the Auto-Tuning, the area must be operating normally. Circulating fans must remain operating.
2) Exhaust and/or cooling fans which bring fresh air into the area must be disabled. If heat or humidity build-up is a problem during the 2-hours required, reduce the lighting or other heat loads temporarily until the test is completed.
3) Set the CO2 flow-gage to the setting most likely to be correct for your area. If no estimate is known, set it near the middle of the range and increase it if the first Auto-Tuning does not provide consistent control.
4) Turn the thermostat & humistat responsible for running the exhaust fans all the way to the maximum setting until the Auto-tune is complete.
5) Close the CO2 tank valve. Connect the CO2 valve or generator to the XGC-1e. There should be no CO2 flowing out of the tank until the test is started.
6) Set the SV (desired CO2 level) to the desired level. (See Changing Set-Point)
7) Press [SEL] for 1 second. (RUN will be displayed)
8) Press the [Down] button one time. (AT will be displayed)
9) Press the [SEL] button once. (0 is displayed)
10) Press the [UP or DOWN] button to bring up 1. (1 is displayed)
11)Press the [SEL] button once. The decimal point will begin to flash until the Auto-Tuning procedure is completed. The CO2 outlet will be
energized.
12) Quickly open the CO2 tank valve and verify CO2 is flowing out of the flow-gage / regulator.
13) Get out of the area and do not disturb the area for a minimum of 2 hours. After two hours, enter the area and confirm the decimal point has stopped flashing, which indicates the test is complete.
14) Reconnect the Exhaust fans, CO2 Disable cable and return the area to normal operation while monitoring the level of CO2. Do not continue to stand next to the XGC-1e while monitoring. Just keep an eye on the display and record the level every 30 minutes or so. Also try to observe the unit reacting to and recovering from the Exhaust fans operating. The level should drop down to 800 or less and then recover quickly without overshooting the setpoint more than 150 PPM.
15) If after operating a day or two you are not getting good consistent control, (+/- 100 PPM from set point) it may be a good idea to perform a second Auto-Tuning.
*NOTE: If your CO2 tank runs out for a period of time, the control may take a few hours to re-stabilize, this is normal.
Changing The Setpoint (SV)
The XGC-1e has an adjustable set point. The set point is the minimum CO2 level in Parts-Per-Million you want to maintain. The face of the
Fuzzy Logic controller has 5 led indicators on the front. The one marked (SV) is illuminated when viewing and / or changing the set point.
1) Press (SEL) momentarily. The SV indicator will light up and the current set point is displayed.
(The XGC-1e is factory set @ 1500 PPM)
2) Use the (UP / DOWN) buttons to change the set point to your desired level. Normally between 1250 –2000 PPM.
3) Press the (SEL) button momentarily to accept the change.
Changing Control Modes
People operating compressed CO2 systems will definitely benefit from the XGC-1e’s “Fuzzy Logic”. But some people who are using LP /
Natural gas generators may want to extend the life of their generator by changing the XGC-1e’s control mode to ON / OFF. When operating
in ON / OFF mode, the rapid pulsing of the control solenoid is eliminated. The XGC-1e will still control the CO2 generator with extreme
accuracy. A preset hysteresis (dead-band) of 50PPM still allows the XGC-1e to control the CO2 to an average level of +/- 200 PPM. For
comparison’s sake, the average accuracy of the Fuzzy Logic control mode is around +/-25PPM. Follow the procedures listed below to
easily change the control modes on the XGC-1e.
Fuzzy Logic™ CO2 Control (Continued)
Changing Control Modes (Continued)
Changing to ON / OFF control mode
1) Press and hold the (SEL) pushbutton for three seconds. (P will be displayed)
2) Press the (SEL) button momentarily. (The current proportional band setting will be displayed = 5.0)
3) Using the (Down) pushbutton, change the display to read (0.0)
4) Momentarily press the (SEL) button to accept the change.
5) Allow the unit to re-start by not touching any of the buttons for approximately 30 seconds.
Changing to “Fuzzy Logic” control mode
1) Press and hold the (SEL) pushbutton for three seconds. (P will be displayed)
2) Press the (SEL) button momentarily. (The current proportional band setting will be displayed = 0.0)
3) Using the (Down) pushbutton, change the display to read (5.0)
4) Momentarily press the (SEL) button to accept the change.
5) Allow the unit to re-start by not touching any of the buttons for approximately 30 seconds.
* Note: There are several other “hidden” internal parameters that are normally locked-out from the user. These setting are critical in
order for the unit to function properly. DO NOT change any of these settings! If you mistakenly access these “weird” numbers reset the
unit. To reset the unit, unplug the main power cord for 20 seconds and re-connect.
Calibration
The XGC-1e is factory calibrated. The sensor onboard the XGC-1e is capable of remaining in calibration for a minimum of three years.
Extreme shock during shipping and other factors may affect the calibration. To check the calibration, follow the procedure below.
Supplying the unit with outside air can quickly verify the calibration. The reading outdoors should be around 250-550PPM. If the XGC-1e
calibration is incorrect, the unit can be returned to the manufacturer. Please note:
• The XGC-1e CO2 sensor has built-in temperature compensation that automatically corrects the reading depending on the ambient
temperature. However, extreme temperatures of below 20°F or above 120°F may affect the reading.
•
Checking calibration in urban areas usually results in higher ambient CO2 readings due to car exhaust and human activity.
To check calibration:
1) Bring the unit outside so that it will receive fresh air. Do not locate the unit in direct sunlight.
2) Plug the power supply and power cord into 120vac.
3) Move away from the controller to allow the reading to stabilize for approximately 20 minutes.
4) Check the CO2 level.
*Important: Do not breathe while checking the calibration the unit. As you exhale, large concentrations of CO2 are expelled from your
lungs. This higher level of CO2 will affect the calibration of the unit. Try to hold your breath!
5) If the level is between 250 and 550 the unit is performing fine. If it is outside that range, allow the unit to stabilize longer.
6) If the calibration is still off, the unit can be returned to the factory for re-certification.
Options
Overview
The XGC-1e can be upgraded and expanded by using our expansion devices including the UPM-1, and the MLC-4. The Universal Power
Modules and Master Lighting Controllers allow you to run multiple pumps, fans and lights by controlling remote relays.
Universal Power Module (Upm-1)
The UPM-1 Universal Power Module is a unique device that can allow the user to run
additional HID lights or control multiple fans / air conditioners etc.
The UPM-1’s “plug-box” was designed to be plugged into a standard household outlet.
The 16-foot long “trigger cable” coming from the UPM-1 is then connected to your control
device such as a time clock or thermostat. When the control device turns ON, the relay
inside the UPM-1 box applies power to the twin outlets on the front of the UPM-1 turning
ON whatever is plugged into it. This allows you to run additional lights etc. from a different
circuit with one common control device.
The UPM-1 is rated at 15-amps @ 120 volts.
High Power Relay (Hpr-1)
The HPR-1 is a hard-wired, 30-amp capacity, 120/240-volt version of the UPM-1. The
HPR-1 is perfect for controlling higher loads such as large air-conditioners or multiple HID
ballasts. The user can supply either 120 or 240-volt power to the “input” side of the HPR-1.
The air-conditioner or ballasts to be controlled are then wired into the “output” side of
the relay. When the trigger cable connected to your control device is activated, the relay
applies power to the equipment connected to the HPR-1.
The HPR-1 is rated at 30-amps 120/240 volt.
Master Lighting Controller (Mlcs)
The MLC-4X and MLC-4XT Master Lighting Controllers are the best devices for controlling
up to (4) HID lights from one time clock or controller. Like the HPR-1, power must be
brought into the “input” side of the control relay. The MLC-4 features (4) standard 240v
outlets, which your ballasts are plugged into. The MLC-4X is designed for 120 volt ballasts
however it can also be used to run ballasts wired for 240-volt operation, which have 120volt power cords. The MLC-8 Master Lighting Controller is the best device for controlling
up to (8) HID lights from one time clock or controller. Power is brought into the MLC-8 by
hardwiring up to a 40-amp circuit. The MLC-8 features (8) standard 120/240v outlets, which
your ballasts are plugged into.
The MLCs both feature a 120-volt trigger cable to plug into a standard 24-hour timer or
controller. The MLC-4X & MLC-4XT are rated 30-amps @120/240 volt. The MLC-8 is rated
at 40-amps @ 120/240 volt.
Hid Lighting Controller (Hlc-2)
The HLC-2 HID lighting controller was primarily designed to protect your expensive HID
lights from HOT-STARTS.
A “Hot-Start” occurs whenever your lights are turned off… and then back on before the
lamps are allowed to cool off. Hot-starts caused by power outages reduces your lamp’s
life and intensity. It can be plugged into either of the “Lights” outlets.
When the HLC-2 is connected to your lights, it will sense a power interruption, and start
a 15-minute time-delay to keep the lights from trying to re-fire while the cool down. The
HLC-2 can also be used to delay other devices from starting.
The HLC-1 is rated for 15-amps @ 120volts.
Troubleshooting
If you are having problems with this unit, refer to these troubleshooting hints. Also, refer to the connection diagram to ensure your devices
are connected properly.
Problem
Suggested Action
•
I have no lights and no function at all.
Check the fuse and main power. Replace the fuse if required with the correct rated fuse.
Check the equipment connected to the XGC for problems and/or short circuits.
•
The fuse continues to blow.
If the fuse blows repeatedly, verify the devices connected to the unit are working properly and that they are not too large for the XGC-1e to safely control.
You may need to consider using expansion modules, (UPM / HPR / MLC) to decrease the amperage (load) on the XGC fuse.
•
The fans are running so often, the CO2 You may have too much heat building up in your area or too small of an exhaust fan. is hardly ever ON.
Reduce the heat sources or increase your fan size.
You may also consider using a “closed-loop” air conditioner to keep the temperature and humidity below the set points so that CO2 is allowed to run for longer amounts of time.
•
My CO2 consumption seems to be quite high.
Make sure your area is sealed. You may want to install a motorized damper to seal your exhaust fans when they are “OFF”.
•
The Hydro pumps are not cycling properly.
The Hydro pump outlets can be operated 24-hours a day or only when the “Lights” are “ON”.
The “Hydro” selector switch also has a center “OFF” position, which can be used to “reset” the
timing function. Make sure the switch is not turned “OFF”.
•
The CO2 outlet is pulsing ON and OFF too often.
If you are running a CO2 generator, you may want to change to ON / OFF control.
If running compressed CO2 you may want to try running an Auto tune.
•
After my compressed bottle or LP tank If your CO2 tank runs out for a period of time, the controller may take anywhere from a few hours
to a couple of days to re-stabilize, this is normal. When the tank ran out, the PPM-2a tried to
was replaced, the level fluctuates.
compensate by changing its internal settings.
•
My CO2 outlet never comes on.
Make sure the CO2 disable function is not ON.
If the actual CO2 level is above the set point (SV) the outlet will not turn on. Allow the level to
drop or raise the (SV).
Making Connections
All of the main functions controlled by the XGC are accessed using (8) standard 120 VAC, 15-amp receptacles mounted on the sides of
the enclosure. This allows you to simply “plug in” any standard device without hardwiring or hassles. Printed labels on the front face of
the enclosure identify the receptacles.
We highly recommend using only 3-wire devices with a ground. Suitably double-insulated devices are acceptable. Keep in mind that the
combined amperage draw on all of the devices connected to the XGC-1e must be less than 15-amps @ 120 VAC.
Maintenance / Specifications
Precautions
1) Please take care in the handling of this precision device. If the unit is dropped or subjected to extreme shock, the calibration may be thrown off. Calibration problems due to abuse, or droppage may affect the warranty.
2) DO NOT expose the XGC-1e to water. It utilizes a ventilated enclosure to properly “sample” the CO2.
Specifications:
System operating voltage
120vac +/- 20% @ 50-60 Hertz
Maximum Switching amperage
15-amps @ 120vac
Overload protection
15-amp normal blow fuse
Operating temperature 30-120º F
Maximum humidity 95% RH (Non-condensing)
Temperature control range
50-115º F with a 7º F differential, +/- 3.6º
Humidity control range
20 - 80% RH with a 5% differential
Adjustable timer repeatability
+/- .5% under fixed conditions
Timer setting accuracy
+/- 10%
Hydro “ON” timer
30 seconds to 20 minutes
Hydro “OFF” timer
12 minutes to 480 minutes
24-hour timeclock accuracy
+/- 3% monthly
CO2 Operating principle
Fuzzy Logic™, w / Single-beam Non-Dispersive Infrared (NDIR)
CO2 Measurement range
0 – 5000 PPM CO2
CO2 Warm-up time
Minimum 10 minutes (full accuracy)
CO2 Maximum drift per year
+/- 15 PPM
CO2 Accuracy @ 77’F
+/- 5% of reading
CO2 Repeatability
< 1% of Fixed Scale
CO2 Calibration interval
Three years
CO2 sensor Operating life expectancy
15 years typical
Dimensions
10” X 8” X 7”
Weight
Less than 6 lbs.
Relay operations
Minimum 100,000 electrical / 10,000,000 mechanical
Maintenance:
1) Consult the troubleshooting chart for a listing of the most common problems.
2) DO NOT open the enclosure!!! There are no components that require maintenance.
3)Do not use this equipment for purposes other than what it is designed for. It will provide many years of trouble-free service when
used properly.
4)In the event you cannot solve the problem, first consult the dealer who sold the unit then contact the factory for instructions on
how to return it to the factory for repair.
Published By R & M Supply Inc.
Copyright 2009 R & M Supply
All Rights Reserved.
Liability statement:
R & M Supply and their retailers and distributors are not responsible for any damage or injuries (consequential or otherwise) arising
from the use of this device. The purchaser assumes all responsibility for the use and proper installation of this device.