1
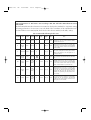
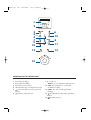
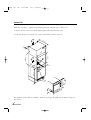
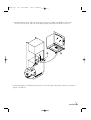
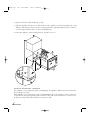
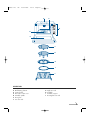
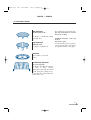
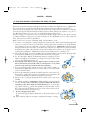
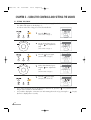
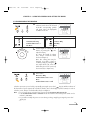
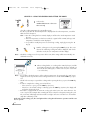
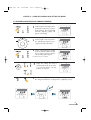
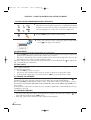
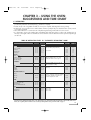
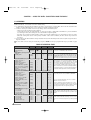
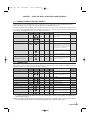
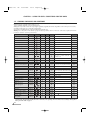
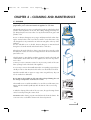
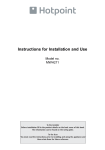
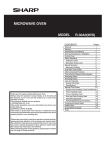
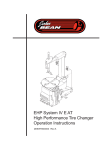
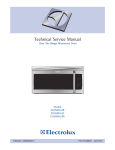
MW865 inc. •GB
23-04-2002
16:16
Pagina 1
MICROWAVE FAN OVEN
WITH ELECTRONIC CONTROLS
MW865 inc. •GB
23-04-2002
16:16
Pagina 2
Data and instruction for Performance Tests according to IEC 705 and further Amendment Document
59H/69/CD.
The International Electrotechnical Commission SC 59H, has developed a Standard for comparative testing
of heating performances of microwave ovens. The Draft of the new Edition of this Standard has been
circulated with Document 59H/69/CD, which also describes the tests marked, in this table, with (*).
We recommend the following for this oven:
Test Nr. on
standard
Item
Duration
Function
Power
Level
Oven
temp.
Weight
Standing
time
Note
A
Egg
custard
16 min.
only mw
5
-
750 gr
5 min
The upper surface shall be evaluated after the
standing time. The inner custard evaluation shall be
conducted after two hours.
B
Sponge
cake
6 min.
only mw
5
-
475 gr
5 min
Use the borosilicate glass container stated in the
Standard (max. dia. 210 mm) or a Pyrex® glass
container dia. 210 mm, height 50 mm and wall thick
6 mm. Put the container on the low wire rack placed
on the turntable.
C
Meat loaf
20 min.
only mw
4
-
900 gr
5 min
Cover the container with cling film and pierce the
film. Use the rectangular borosilicate glass container
stated in the Standard or the Arcopal® Cat. nr.
Z1/B8 (01)10460-1.
Defrosting
Defrosting
minced
meat
11 min.
only mw
-
500 gr
15 min
Place the frozen load directly on the turntable (I ).
Turn upsidedown the load after half of the defrosting
time.
D (*)
Potato
gratin
30 min.
combi
mw + fan
(simult.)
5 min
Use the borosilicate glass container stated in the
Standard (max. dia. 210 mm) or a Pyrex® glass
container dia. 210 mm, height 50 mm and wall thick
6 mm. Put the container on the lower wire rack (F)
placed on the turntable.Do not preheat the oven.
5 min
Use the borosilicate glass container stated in the
Standard (max dia. 210 mm) or a Pyrex® glass
container dia. 210 mm, height 50 mm and wall thick
6 mm. The oven shall be preheated (in FAN ONLY
function) with the lower rack (F) placed on the
turntable. Once preheated, place the container on the
lower rack (F).
5 min
The following instruction shall be strictky observed for
this type of load: put the chicken in a pyrex® glass
container dia 210 mm, height 50 mm and wall
thickness of 6 mm. Put the container on the lower wire
rack (F) placed on the turntable.
E (*)
F (*)
Sponge
cake
Poultry
30 min.
combi
mw + fan
(simult.)
50 min.
combi
mw + fan
(simult.)
4
2
4
170°C
160°C
190°C
1100 gr
710 gr
1200 gr
MW865 inc. •GB
23-04-2002
16:16
Pagina 3
1
2
3
5
4
7
9
10
6
15
12
13
8
11
14
DESCRIPTION OF THE CONTROL PANEL
1. Time and mode display
7 - 8 - 9 - 10 - 11
2. Oven temperature display
3. Function Key: mode selection
“AUTO” keys: pre programmed rapid selection
12. “STOP” key: interruption of cooking and
4. “°C” Temperature key: oven temperature selection
5.
Power level key: microwave power level
cancellation of settings
13. “START” key: start of cooking and rapid
selection
6.
Clock key: setting the clock
reheating
14.
Time Adjust knob: setting of time and cooking
duration
15.
Turntable stop key
MW865 inc. •GB
23-04-2002
16:16
Pagina 4
BUILDING-IN
Inside the oven there is a plastic bag with fixing material. Take this bag out of the oven.
1. Remove the two screws ‘X’ from the fastening bar under the microwave oven.
2. Fasten metal strip ‘A’ using the two screws ‘X’ that have just been removed.
55
0m
in.
50
min
.
8
0+ 0
450+2
0
ventilation
56
A
30
30
29
5m
=
=
850 min
in.
18
X
458
X
5
59
The appliance needs sufficient ventilation. Make an opening in the plinth at least 280 cm2 large for
this purpose.
4
MW865 inc. •GB
23-04-2002
16:16
Pagina 5
3. Fit the fastening bar ‘B’ at the correct position in the recess. Make sure that there is the same
amount of free space at each side of the fastening bar. Fasten the bar with the screws ‘H’.
H
B
B
H
=
=
B
H
Fix the fastening bar such that the two lips stick out over the edge of the bottom of the recess and rest
against it at the front.
5
MW865 inc. •GB
23-04-2002
16:16
Pagina 6
4. Open the lid of the smoke discharge ‘C’ fully.
5. Slide the appliance into the recess. Slide the front of the appliance over the fastening bar ‘B’. Keep
sliding it until the front of the oven ‘G’ is resting against the cupboard and the holes ‘D’ under the
oven are aligned with the holes ‘E’ in the fastening bar ‘B’.
6. Fasten the appliance to the fastening bar ‘B’ using the screws ‘F’.
G
B
C
E
F
B
D
G
D
ELECTRICAL CONNECTION - IMPORTANT:
If the appliance is provided with supply cord AND plug, the appliance shall be positioned so that the
plug is always accessible.
If the appliance is provided with a supply cord WITHOUT the plug, the appliance must be connected
to a fixed main wiring incorporating a disconnection switch with contact separation of at least 3 mm
in all poles and provided with permanent connection to earth.
6
MW865 inc. •GB
23-04-2002
16:16
Pagina 7
C
A
B
D
E
F
G
H
I
L
DESCRIPTION
A
B
C
D
E
F
Grill heating element
Control panel
Microwave outlet cover
Turntable spindle
Door glass
Low wire rack
G
H
I
L
High wire rack
Turntable
Turntable support
Rectangular wire rack
7
MW865 inc. •GB
23-04-2002
16:16
Pagina 8
INDEX
CHAP. 1 – GENERAL
1.1
1.2
1.3
1.4
1.5
1.6
Important safety warnings .....................................pag.
Technical data ......................................................pag.
Installation and electrical connection ......................pag.
Accessories supplied.............................................pag.
Ovenware to use ..................................................pag.
Rules and general suggestions for using the oven ...pag.
CHAP. 2 – USING THE CONTROLS AND SETTING THE MODES
2.1 Setting the clock ...................................................pag.
2.2 Programming the cooking .....................................pag.
2.3 Automatic sequence for defrosting and cooking......pag.
2.4 Recalling the pre-memorised recipes
(“Auto” keys) .......................................................pag.
2.5 Quick Reheat .......................................................pag.
2.6 Child safety..........................................................pag.
2.7 Stop Turntable key ...............................................pag.
2.8 Timer only function ...............................................pag.
CHAP. 3 – USING THE OVEN:
3.1
3.2
3.3
3.4
3.5
3.6
3.7
3.8
9
10
10
11
12
13
14
15
17
18
18
18
18
18
SUGGESTIONS AND TIME GRIDS
Defrosting ............................................................pag.
Reheating ............................................................pag.
Cooking first courses ............................................pag.
Cooking meat .....................................................pag.
Cooking side dishes and vegetables ......................pag.
Cooking fish.........................................................pag.
Cooking desserts and cakes .................................pag.
Reheating/cooking using the “Auto” keys ..............pag.
19
20
21
21
22
23
23
24
CHAP. 4 – CLEANING AND MAINTENANCE
4.1 Cleaning..............................................................pag.
4.2 Maintenance ........................................................pag.
25
26
8
MW865 inc. •GB
23-04-2002
16:16
Pagina 9
CHAPTER 1 – GENERAL
1.1 IMPORTANT SAFETY WARNINGS
Read carefully these instructions and keep for future reference
1) WARNING: If the door or door seals are damaged, the oven must not be operated until it has been repaired by a competent person (trained by the manufacturer or by its Customer Service).
2) WARNING: It is hazardous for anyone other than a competent person to carry out any service or repair
operation which involves the removal of a cover which gives protection against exposure to microwave
energy.
3) WARNING: Liquids and other foods must not be heated in sealed containers since they are liable to
explode. Eggs in their shell and whole hard-boiled eggs should not be heated in microwave ovens since
they may explode even after microwave heating has ended.
4) WARNING: Only allow children to use the oven without supervision when adequate instructions have
been given so that the child is able to use the oven in a safe way and understands the hazards of improper use. Do not allow children near the oven when it is in operation, as this may result in severe burns.
5)
6)
7)
8)
9)
10)
11)
12)
13)
14)
15)
16)
Do not attempt to operate the oven with the door open by tampering with
the safety devices.
Do not operate the oven if objects for any kind get stuck between the front
panel of the oven and the door. Always keep the inside of the door (E)
clean, using a damp cloth and non-abrasive detergents. Do not allow dirt
or remains of food to accumulate between the front panel of the oven on
the door.
The following warnings must be considered when the door is open: Do not
place heavy objects on the door or pull the handle downwards any further.
Never place hot containers or pans (e.g. just taken off the stove) on the
door.
Do not operate the oven if the supply cable or the plug is damaged, as this
may result in electric shocks. If the supply cord is damaged, it must be
replaced by the manufacturer or its service agent or a similary qualified
person in order to avoid a hazard.
The appliance is not intended for use by young children or infirm persons.
Young children should be supervised toensure that they do not play with the
appliance.
If smoke is observed, switch off or unplug the appliance and KEEP THE
DOOR CLOSED in order to stifle any flames.
Only use utensils that are suitable for use in microwave ovens. In order to
avoid overheating and the consequent risk of fire, it is advisable to supervise the oven when cooking food in disposable containers made of plastic,
cardboard or other inflammable materials, and when heating small quantities of food.
Never place the turntable in water after it has ben heated for a long time.
The high thermal shock resulting would break the turntable.
When cooking "Only MICROWAVE" and "COMBINED WITH MICROWAVE" , you absolutely must not pre-heat the oven (without foodstuffs in it)
and you must not operate it when it is empty, because you might cause
sparking.
Before using this oven, check to be certain that the utensil and containers
chosen are suitable for microwave oven use (see the section on "Glassware and Similar Items").
During the use the appliance becomes hot. Do not touch the heating elements inside the oven.
When heating liquids (water, coffee, milk, etc.) it is possible that the contents may suddenly start to boil and spill violently as a result of delayed
boiling, causing scalding. To avoid this happening, you should place a
fig. 1
fig. 2
fig. 3
fig. 4
fig. 5
9
MW865 inc. •GB
23-04-2002
16:16
Pagina 10
CHAPTER 1 - GENERAL
heat-resistant plastic spoon or a glass rod in the container before starting to heat liquids. Anyway, care
shall be taken when handling the container.
17) Do not heat spirit with a high alcohol content, nor large quantities of oil, as these could catch fire !
18) The contents of feeding bottles and baby food jars shall be stirred or shaken and the temperature shall
be checked before consumption in order to avoid burns. It is also advisable to stir or shake the food in
order to ensure that it has an even temperature.
When using commercially available bottle sterilisers, before turning the oven on, ALWAYS make sure the
container is filled with the quantity of water indicated by the manufacturer.
N.B. When the oven is used for the first time it is possible that, for a period of approx. 10 minutes, it
may produce a “new” smell and a small amount of smoke. This is only a result of protective substances
applied to the heating element.
1.2 TECHNICAL DATA
• ENERGY CONSUMPTION (CENELEC HD 376 norms)
To reach 200°C
0,35 kWh
To maintain a temperature of 200°C for an hour
1,15 kWh
Total consumption
1,5 kWh
O
U
T
P
U
T
P
O
W
E
R
In this oven the maximum power of the microwave, is shown on the data plate placed on the front frame of
the appliance, under the heading MICRO OUTPUT.
In some models the maximum power yielded in WATTS, is also indicated in the
symbol on the side, shown on the control panel.
This information will be useful for you to consult the prescription pads for microwaves currently on sale.
• MICROWAVE OUTPUT POWER: 1000W (IEC 705)
For further data, consult the rating plate positioned on the front frame of the appliance.
This appliance conforms to E.E.C. directive no. 89/336 and 92/31 regarding Electromagnetic Compatibility, and to directive 89/109/E.E.C. regarding materials which come into contact with food.
1.3 INSTALLATION AND ELECTRICAL CONNECTION
1) First built-in the oven (see instruction for installation), then clean the inside with a soft, damp cloth.
2) Check that there is no damage as a result of transportation, and in particular that the door opens and closes properly.
3) Place the support (I) in the centre of the circular groove and fasten the turntable (H) to it. The spindle (D)
should be inserted in the corresponding groove in the centre of the turntable.
4) Only connect the appliance to a power socket with a power capacity of at least 10A. Also make sure that
the main switch installed in your home has a minimum power capacity of 10A in order to avoid it suddenly tripping while the oven is on.
5) After the installation has been performed, the power supply cable and the power socket must be easy to
access.
6) Before use, check that the power supply voltage is the same as the one shown on the rating label and that
the power outlet is properly earthed: the manufacturer disclaims any liability in the event of non-compliance with this safety regulation.
10
MW865 inc. •GB
23-04-2002
16:16
Pagina 11
CHAPTER 1 - GENERAL
1.4 ACCESSORIES SUPPLIED
LOW WIRE RACK
Fan Oven Only mode:
for all types of traditional cooking,
especially cakes
HIGH WIRE RACK
Grill Only mode:
for all types of grilled food.
The turntable (H) can be left in place.
This wire rack cannot be used for
microwave cooking.
Combined microwave + fan oven
mode or
microwave + grill
For rapid cooking of meat, potatoes,
some leavened cakes and desserts
and gratinéed dishes (i.e lasagne)
TURNTABLE
The turntable is used in all
modes.
RECTANGULAR WIRE RACK
Fan oven only mode
For all types of traditional cooking to
be done in large casserole
dishes.The food must be stirred and
turned during the cooking process.
Position this wire rack directly on the
bottom of the oven.
11
MW865 inc. •GB
23-04-2002
16:16
Pagina 12
CHAPTER 1 - GENERAL
1.5 OVENWARE TO BE USED
In the “Microwave Only” and “Microwave Combined” modes, all types of containers in glass (preferably
Pyrex), ceramics, china and clay may be used provided that they are undecorated and free of metal parts (i.e.
gilt trimmings, handles, feet etc.). Heat resistant plastic containers can also be used, but only for “Microwave
Only” cooking. If you are still doubtful about using a particular container, you can perform a simple test. Place
the empty container in the oven for 30 seconds at maximum power (“Microwave Only” function).
If the container is still cold or only slightly warm, it is suitable for microwave cooking.
If it is very hot or gives out sparks, it is not suitable.
Containers in heat-resistant plastic may also be used. Paper napkins, cardboard trays and disposable plastic
plates can also be used for short cooking times. The size and shape of the containers must be such as to allow
them to rotate properly inside the oven.
Metal, wood, cane and crystal containers are not suitable for microwave cooking.
It is worth remembering that - since microwaves heat the food, not the dish - it is possible to cook the food
directly on the plate on which it is to be served. This means that you do not need to use saucepans. However,
remember that heat may be transferred from the food itself to the plate, making it necessary to use an oven
glove.
If the oven has the “Fan Oven Only” or “Grill only” settings, all types of ovenware may be used.
In any case, observe the guidelines shown in the following table:
Glass
GlassTerracotta Silver foil
ceramics
Plastic
Paper or
cardboard
Metal
containers
YES YES YES YES
NO
YES YES
NO
“Combined”
NO
YES YES YES
NO
NO
NO
NO
“Fan Only”
“Grill Only”
NO
YES YES YES YES
NO
NO
YES
Mode:
“Microwave Only”
Mode:
Mode:
12
Pyrex
MW865 inc. •GB
23-04-2002
16:16
Pagina 13
CHAPTER 1 - GENERAL
1.6 RULES AND GENERAL SUGGESTIONS FOR USING THE OVEN
Microwaves consist of electromagnetic radiation found in nature under the form of light waves (e.g., sunlight). Inside
the oven, these waves penetrate food from all directions and heat up the water, fatty and sugar molecules.
Heat is produced very quickly only in the food itself, whereas the container being used warms up indirectly
by means of heat given off by the heated food. This prevents food from sticking to its container, so you can use
very little fatty substance or, in some cases, no fat at all during the cooking process.
Therefore cooking in a microwave oven is considered to be healthy and good for one’s diet. And in contrast
to traditional methods, cooking in a microwave foodstuffs are less dehydrated, lose less of their nutritional
value, and retain more of their original flavour.
Basic rules for correct cooking with a microwave oven
1) In order to set cooking times correctly, remember (in referring to the charts on the following pages) that
when you increase the amount of foodstuffs the cooking temperature must likewise be proportionately
increased and vice-versa. It is important to respect the “standing” times: standing time means that period
during which the food must be left to “rest” after being cooked so as to allow an even greater spreading
of the temperature within. The temperature of meat, for example, will rise about 5°-8° C. (approx. 9°-15°
F.) during the standing time. Standing times may be observed either inside or outside the oven.
2) One of the main things you must do is stir the food several times while it is being cooked. This helps make
the temperature distribution more uniform and thus shortens the cooking time.
3) It is also advisable to turn the foodstuff over during its cooking process: this
applies especially for meat, whether it is in large pieces (roasts, whole chickens, etc.) or small (chicken breasts, etc.).
4) Foods having a skin, shell or peel (e.g., apples, potatoes, tomatoes, frankfurters, fish) must be pierced with a fork in several points so as to permit
steam to escape and to prevent those items from exploding .
fig. 9
5) If you are preparing a large number of portions of the same food item (e.g.,
boiled potatoes), place those portions in a Pyrex dish in order to have them
cook in a uniform manner .
6) The lower the temperature at which a foodstuff is placed in a microwave oven,
the longer the cooking time required. Food having a room temperature will
cook more quickly than food having a refrigerator temperature.
7) Always do your cooking by placing the food container in the centre of the
turntable.
8) It is perfectly normal for condensation to form inside the oven and near the
fig. 10
air outlet. To reduce such condensation, cover the foodstuffs with clear-sheet,
wax paper, a glass lid or simply an overturned plate. Then, too, foods having a water content (e.g., greens and vegetables) cook better when covered.
The covering of food also helps keep the oven clean on the inside. Use clearsheet made expressly for microwave ovens.
9) Do not cook eggs in their shells
Do not re-heat eggs which have already been cooked,unless they are scrambled.
10) Open containers which are air tight or sealed before heating or cooking.
fig. 11
13
MW865 inc. •GB
23-04-2002
16:16
Pagina 14
CHAPTER 2 – USING THE CONTROLS AND SETTING THE MODES
2.1 SETTING THE CLOCK
•
When the appliance is connected to the domestic power supply for the first time, or after a power cut,
four dashes will appear on the display (----).
In order to set the time of day, proceed as described below:
1
Press the
key (6).
(The hours flash on display 1)
2
Set the desired time by turning the
time adjust knob
(14).
(The hours flash on display 1)
3
Press the
key (6) again.
(The minutes flash on display 1)
4
Set the desired minutes by turning the
time adjust knob
(14)
(The minutes flash on display 1)
5
Press the
key (6) again.
(The display shows the time set)
•
•
14
If you wish to change the hour on the dial once it has been set, press the “
” key (6) before proceeding to set the new time as described above.
It is possible to display the current time even after starting the mode set, by pressing the “
” key (6)
(the time is displayed for 2 seconds).
MW865 inc. •GB
23-04-2002
16:16
Pagina 15
CHAPTER 2 – USING THE CONTROLS AND SETTING THE MODES
2.2 PROGRAMMING THE COOKING
1
INDICATOR
Press the function key (3) (mode
selection) and select the desired
mode.The corresponding symbols
will apear above the display.The
available modes are:
MODE SELECTED
MODE SELECTED
INDICATOR
Microwave Only
Combined Microwave and Grill
Automatic Defrosting
Fan Oven Only
Combined Microwave e
Fan Oven
Grill Only
Timer
2
Set the length of cooking time, in
minutes, by turning the
time
adjust knob (14).
(To choose the length of cooking
time, always consult the tables
shown in Chapter 3).
Note: The cooking time may be
changed even while cooking is
underway simply by turning the
time adjust knob (14), unless the
child safety device has previously
been actived (see chapter 2.6).
3
In the modes:
Microwave Only
Combined Microwave + Fan
Oven
Combined Microwave + Grill
select the microwave power level by repeatedly pressing the power level
key (5) until the indicator of
the desired level power (expressed in numbers) flashes, above the display 2 (on the bottom). In order to
select the power, always consult the tables shown in Chapter 3.
Note • it is not necessary to select any level of power for the Automatic Defrosting mode.
• in the Combined Microwave + Fan Oven mode the maximum microwave power which can be
selected is 750 Watts.
• it is possible to modify the power set even during cooking, simply by pressing the power level
key (5).
15
MW865 inc. •GB
23-04-2002
16:16
Pagina 16
CHAPTER 2 – USING THE CONTROLS AND SETTING THE MODES
4
In the modes:
Combined microwave + fan oven
Fan oven only
select the cooking temperature by repeatedly pressing
the °C key (4) until the desired temperature is displayed.To select the temperature, consult the
tables shown in Chapter 3.
Note • Once the cooking has been started, display 2 will show the actual temperature inside
the oven
• Once the temperature set has been reached, a signal will be emitted (3 beeps). The
temperature set will then remain displayed.
• It is possible to modify the power set even during cooking, simply by pressing the °C
key (5).
5
Start the cooking process by pressing the START key (13). The countdown of the remaining cooking time will be displayed, and if included in the mode, the oven temperature will also display.
Note: • Should the cooking process for any reason fail to start, al the settings will be automatically cancelled after 2 minutes.
6
When cooking finishes, a sound signal is emitted (3 beeps) and the
word “END” will appear on the display. Open the door and take out
the food (the time will appear, or if the oven is hot, the word “COOL”
– see note below).
Note: • It is possible to check the progress of the cooking set at any time, by opening the door and inspecting the food. This stop the microwave working until the door is closed and the START key is pressed.
• Should it be necessary to suspend the cooking without opening the door, just press the STOP key
(12).
• In order to complete the cooking, proceed as follows:
- if the oven door is open, press the STOP key (12) once;
- if the door is closed and cooking is underway, press the STOP key (12) twice; the display will
go back to showing the clock.
• this model is equipped with an automatic cooling cycle which comes into action whenever the
oven is very hot (for example after something has been cooked for a long time). During this cycle
the word “COOL” will display. The fans and the oven light will come on & then turn off automatically when sufficiently cooled.
At the end of each cooking cycle, the oven light and the cooling fan will remain in operation until the oven
door is opened.
16
MW865 inc. •GB
23-04-2002
16:16
Pagina 17
CHAPTER 2 – USING THE CONTROLS AND SETTING THE MODES
2.3 AUTOMATIC DEFROSTING AND COOKING SEQUENCE
To programme an automatic defrosting and cooking sequence follow these instructions:
1
Set the automatic defrosting mode by
pressing the function key (3) twice
(mode selection) . The corresponding
automatic defrosting symbol will
appear on the display.
2
Set the length of time required for
the defrosting (in minutes) by turning the time adjust knob (14).
3
Set the cooking option by selecting
the desired mode with the function
key (3) (mode selection) until the
corresponding symbol appear.
(ex. Combined microwave + fan function)
4
+
Adjust the cooking time and, if
included in the mode, the microwave power level and the oven temperature as required.
5 Press the START key (13).
The change from defrost to cooking mode is signalled by a beep.
17
MW865 inc. •GB
23-04-2002
16:16
Pagina 18
CHAPTER 2 – USING THE CONTROLS AND SETTING THE MODES
2.4 USING THE PRE-PROGRAMMED RECIPES (AUTO KEYS)
1 Press the desired AUTO key.
(The indicators of the length and temperature set will flash on the display
and the pre-memorised mode and power level indicators will come on.)
Consult paragraph 3.8 in order to choose the most suitable menu.
2 Press the START key (13) in order to start cooking.
3
At the end of the pre-set time 3 long beeps will be heard and the
word “EE N D” will appear on the display.
2.5 QUICK REHEAT
This mode is very useful for heating small quantities of food and drink.
•
Press the START key (13); the oven will come on for 30 seconds at maximum power. By pressing the key
again the time will increase by 30 seconds each time up to 3 minutes.
•
This mode is activated only if it is carried out within 1 minute of the food being placed in the oven. The
Quick Reheat is also useful to complete unfinished cooking.
When the cooking procedure has started, the programmed time can be modified with the
time adjust knob
(14) to a maximum time of 60 minutes.
2.6 CHILD SAFETY
The oven is equipped with a safety device which prevents pre-set cooking times from being tampered with whilst the cooking is underway.
To activate the safety feature:
•
Press the STOP key (12) for 5 seconds.
•
A short beep will sound,and it will no longer be possible to alter the times during all cooking.
•
To deactivate this safety feature once activate,press the STOP key (12) until the beep is heard.
2.7 STOPPING THE TURNTABLE
When using large sized containers that are not able to rotate, the turntable can be stopped. Press the
stop
turntable key (15), after selecting a cooking function (the LED in the top right will start flashing).
After pressing START, the LED will flash a further 5 times, and will then remain on for the duration of set time.
The turntable stopper function will remain on the next time the oven is used, until the stop turntable key is
pressed again.
For the microwave-only function, the maximum power available is 750W (reduced automatically when the stop
turntable key is pressed).
2.8 TIMER ONLY FUNCTION
This function allows for the use of the timer,(oven NOT functioning) for up to 60 minutes.
• Press the Function key until 3 dashes are displayed, then select the desired time by turning the
adjust (14) knob and pressing the START (13) key.
• At the end, 3 beeps will sound and the “end” warning will be displayed.
18
time
MW865 inc. •GB
23-04-2002
16:16
Pagina 19
CHAPTER 3 – USING THE OVEN:
SUGGESTIONS AND TIME CHART
3.1 DEFROSTING
• Frozen food in plastic bags, plastic film or cardboard packets can be placed directly in the oven for defrosting as
provided the packet has no metal parts (e.g. metal ties or staples).
• Certain foods, such as vegetables and fish, do not require complete defrosting before being cooking.
• Boiled foods, stews and meat sauces defrost better and more quickly if they are stirred from time to time, turned
over and/or separated.
• Meat, fish and fruit lose a certain amount of liquid during defrosting. Defrost these foods in a bowl.
• It is important to observe the standing times immediately after defrosting, before cooking. The standing time (in
minutes) is the length of time for which the food must be left to stand to allow the heat to spread evenly through
out the food.
TABLE OF DEFROSTING TIMES IN “AUTOMATIC DEFROSTING” MODE
TYPE
QUANTITY
TIME (minutes)
• Hamburgers
• Sausages
1 kg
200 gr
500 gr
250 gr
500 gr
200 gr
300 gr
19 - 21
4-6
10 - 12
5-7
10 - 12
5-7
6-8
POULTRY
• Duck, turkey
• Whole chicken
• Pieces of chicken
• Chicken breast
1,5 kg
1,5 kg
850 gr
300 gr
25 - 27
25 - 27
13 - 15
8 - 10
MEAT
• Roasts (pork, beef, veal etc.)
• Steaks, chops, rashers
• Stew, goulash
• Minced
WIRE RACK
TO BE USED
STANDING
TIME
None
None
None
None
None
None
None
20
5
10
15
15
10
10
None
None
None
None
20
20
10
10
Turn the fish over halfway through
defrosting
None
None
None
None
7
7
7
7
Remove the silver foil or any metal parts Do
not frost completely. Observe the standing
time.Cream should be removed from its
container and placed in a dish.
None
10
None
15
None
5
NOTES/SUGGESTIONS
Turn over halfway through defrosting
See note
*
Turn the poultry over halfway through .
When the standing time is over, rinse
under warm water to remove any ice.
VEGETABLES
Frozen vegetables do not need to be
defrosted before cooking
FISH
• Fillets
• Slices
• Whole
• Prawns
300 gr
400 gr
500 gr
400 gr
7-9
8 - 10
10 - 12
8 - 10
MILK/DAIRY PRODUCTS
• Butter
250 gr
4-6
• Cheese
250 gr
5-7
• Cream
200 ml
7-9
BREAD
• 2 medium-sized rolls
• 4 medium-sized rolls
• Sliced bread
• Sliced wholemeal bread
150 gr
300 gr
250 gr
250 gr
1-2
2-4
2-4
2-4
Put the bread directly onto the turntable.
None
None
None
None
3
3
3
3
FRUIT
• Strawberries, plums, cherries, redcurrants, apricots
• Raspberries
• Blackberries
500 gr
300 gr
250 gr
8 - 10
5-7
3-5
Stir 2-3 times
Stir 2-3 times
Stir 2-3 times
None
None
None
10
10
6
*
These guidelines are suitable for carrying out the Defrosting Test for mince according to IEC Regulation 705, Par. 18.3, (see par. 2). Turn the
block upside down halfway through the time set. The block which is to be defrosted should be placed directly on the turntable. Further information, also regarding other Performance Tests according to IEC Regulation 705 is given in the table on page 2.
19
MW865 inc. •GB
23-04-2002
16:16
Pagina 20
CHAPTER 3 – USING THE OVEN: SUGGESTIONS AND TIME GRIDS
3.2 REHEATING
Reheating food is one of the key features in which your microwave oven displays its usefulness and efficiency. Compared to
traditional methods, a microwave saves time and electricity.
• It is advisable to reheat food (especially if it is frozen) to a temperature of at least 70°C. This means the food will not be
ready to eat immediately (because it is too hot!) but it will be completely sterilised.
• In order to reheat pre-cooked or frozen food, always observe the following rules:
- always remove the food from metal containers
- cover it with microwave safe trasparent film, or grease proof paper so that all the natural flavour is preserved and the
oven will stay cleaner; the food may also be covered with a an upturned plate;
- if possible, stir or turn the food frequently in order to speed up the reheating process, and to help it cook more evenly;
- follow the cooking times shown on the packet, and that under certain conditions, the times shown may need to be
increased.
• Frozen food must be defrosted before being reheated. The lower the initial temperature of the food, the longer the reheating time will take.
Note: some dishes can also easily be reheated by using the “AUTO” function pre-programmed recipes (see table on page
24).
TABLE OF REHEATING TIMES
TYPE
QUANTITY
SOFTENING AND MELTING FOOD
100 gr
• Chocolate/icing
50-70 gr
• Butter
CHILLED FOODS (5/8°C) up to 20/30°C
• Yoghurt
125 gr
• Feeding bottle
240 gr
TIME
minutes
FUNCTION
POWER LEVEL
“
3
5
4-5
Put in a dish. It is not necessary to stir chocolate cubes. Mix
0’.10”-0’.15” the icing once. To melt butter, add one minute.
“
“
5
“
0’.15”-0’.20” Remove the metal top. Heat the baby’s bottle without the teat and mix
0’.30”-0’.35” it immediately after heating to ensure on even temperature. Check the
temperature before use. With milk at room temperature the heating time
is lower. Moke sure dried milk is stirred evenly-use already sterilized milk.
PRE-COOKED CHILLED FOODS (initial temp. 5/8°C) up to approx. 70°C
400 gr
3-5
5
• Packet of lasagne or
“
stuffed pasta
400 gr
3-5
• Packet of meat with rice
“
“
and/or vegetables
300 gr
2-4
• Packet of fish and/or vegetables
“
“
400 gr
4-6
• Plate of meat and/or vegetables
“
“
400 gr
4-6
• Plate of pasta, cannelloni or
“
“
lasagne
300 gr
3-5
• Plate of fish and/or rice
“
“
FROZEN FOOD TO BE REHEATED/COOKED (initial temp. -18/-20°C) up to approx. 70°C
400 gr
• Packet of lasagne or
5-7
5
“
stuffed pasta
400 gr
• Packet of meat with rice
4-6
“
“
and/or vegetables
300 gr
• Packet of pre-cooked fish
2-4
“
“
and/or vegetables
300 gr
• Packet of fish and/or raw
6-8
“
“
vegetables
400 gr
• Portion of meat and/or vegetables
5-7
“
“
400 gr
• Portion of pasta, cannelloni
6-8
“
“
or lasagne
300 gr
• Portion of fish and/or rice
3-5
“
“
NOTES/SUGGESTIONS
Packets of any type of pre-cooked food available in the shops,
to be reheated to 70°C. Remove the food from any metal
packets and put it directly onto the plate from which it is to be
eaten. For best results the food should always be covered.
Plate of meat and/or vegetables Portions of any type of cooked
food to be reheated to 70°C. The food should be placed directly
onto the plate from which it is to be eaten and should always be
covered either with transparent film or with an upturned plate.
All kinds of pre-cooked frozen food to be reheated to 70°C
directly in the packet. DO NOT USE METAL CONTAINERS
Remove raw food from the packets, place it in a container
suitable for microwaves and cover.
Portions of cooked frozen food to be heated to 70°C. Place
the frozen food onto the dish from which it is to be eaten and
cover it with an upturned plate or Pyrex lid. Make sure that it
is thoroughly heated in the centre by stirring if possible.
CHILLED DRINKS (5/8°C) up to approx. 70°C
•1
•1
•1
•1
cup of water
cup of milk
cup of coffee
bowl of clear soup
180 cc
“
150 cc
“
100 cc
“
300 cc
“
DRINKS AT ROOM TEMPERATURE From 20/30°C up to approx. 70°C
5
“
“
“
1’30” - 2’ All drinks should be shaken after reheating to ensure an ever
1’.15” - 1’.45” temperature. We recommend covering clear soup with an uptur1’.15” - 1’.45” ned plate.
3-4
•1
•1
•1
•1
cup of water
cup of milk
cup of coffee
bowl of clear soup
5
“
“
“
1’.15” - 1’.45” All drinks should be shaken after reheating to ensure on ever tem1 - 1’.30” perature. We recommend covering clear soup with an upturned
0’.45” - 1’.15” plate.
2-3
20
180
150
100
300
cc
cc
cc
cc
“
“
“
“
MW865 inc. •GB
23-04-2002
16:16
Pagina 21
CHAPTER 3 – USING THE OVEN: SUGGESTIONS AND TIME GRIDS
3.3 - COOKING ANTIPASTI AND FIRST COURSES
Soups in general require less liquid because in a microwave oven evaporation is rather minimal. Salt must be
added only at the end of cooking or during standing time as it dehydrates the food.
It is fair to say that the time needed to cook rice in the microwave oven is more or less equal to the time taken to cook
it on a stove in the traditional manner. The advantage of preparing a risotto in a microwave oven is that it does not
need stirring continually (this only needs to be done 2 or 3 times).
TYPE
QUANTITY
• Lasagne
1100 gr
FUNCTION
+
POWER
LEVEL
TEMPERATURE
TIME
minutes
NOTES/SUGGESTIONS
WIRE RACK
TO USE
5
-
12
+
Suitable times for raw pasta. If the pasta is precooked, 8 minutes of Combined MICROGRILL
cooking is enough.
Low
5
Avoid piling them up too heavily
Low
8
• Gnocchi alla romana
600 gr
5
-
12
• Macaroni
1500 gr
5
-
8
The pasta should have previously been boiled separately.
Low
• Risotto
300 gr.
of rice
5
-
12-15
The ingredients should all be placed together in
a container suitable for microwaves and covered
with transparent film (750 g of clear soup is
needed for 300 g of rice with the microwaves on
full power for approx. 10-12 minutes).
None
• Pizza
800 gr
-
200°C
30
Spread the pizza on oven paper resting on the
base of a cake tin.Preheat the oven to 200°C.
Low
• Fresh Quiche Lorraine
800 gr
-
160°C
40
Use a cake tin with a handle (the oven should be
pre-heated).
Low
• Frozen Quiche Lorraine
550 gr
-
190°
45
Place on the bottom of a metal baking tin (the
oven should be pre-heated).
Low
3.4 - COOKING MEAT
Cooking is closely linked to the size and uniformity of the food which is to be cooked: kebabs cook before a roast
because they consist of smaller, more evenly-sized pieces of meat. To keep roasts, chicken and kebabs moist, it is
advisable to add 1 or 2 cups of water at the start of cooking.
POWER
LEVEL
TEMPERATURE
TIME
minuti
NOTES/SUGGESTIONS
WIRE RACK
TO USE
1000 gr
4
190°C
45-50
Leave on a little fat to avoid it drying out. Do not add
much sauce.
Low
• Meatloaf
800 gr
4
180°C
25-30
Mix 500 g of minced beef with egg, ham, grated Bread,
etc. Add a touch of oil and a little white wine.
Low
• Meatloaf
• Whole chicken
• Pieces of chicken
• Kebabs
•Goulash
• Chicken breast
•Veal or pork chop
900 gr
1200 gr
850 gr
600 gr
1500 gr
500 gr
3 pieces
4
4
4
3
5
4
-
190°C
190°C
180°C
-
20
50
30-35
20-25
30-35
10-15
16-18
See note
• Sausages
3 pieces
-
-
10-12
Preheat the oven for 3 minutes. Turn while cooking, as the heating
element only produced heat from the upper part of the oven.
High
• Hamburgers
3 pieces
-
-
10-12
Preheat the oven for 3 minutes. Turn while cooking, as the heating
element only produced heat from the upper part of the oven.
High
TYPE
QUANTITY
•Roasts (pork, beef)
*
**
FUNCTION
*
Prick the skin to allow the fat to run off. See note
Stir once during cooking
**
Turn halfway through cooking
Cook uncovered and stir 2-3 times
Turn halfway through cooking
Preheat the oven for 3 minutes. Turn while cooking, as the heating
element only produced heat from the upper part of the oven.
None
Low
Low
Low
None
None
High
These guidelines are suitable for carrying out the Cooking Tests for mince according to IEC Regulation 705, Par. 17.3, Test C. Cover
the container with transparent film. Further information, also regarding other Performance Tests according to IEC Regulation 705 is
given in the table on page 2.
These guidelines are suitable for carrying out the Cooking Tests according to IEC Regulation 705, Par. 17.3, Test F. Further information, also regarding other Performance Tests according to IEC Regulation 705 is given in the table on page 2.
21
MW865 inc. •GB
23-04-2002
16:16
Pagina 22
CHAPTER 3 – USING THE OVEN: SUGGESTIONS AND TIME GRIDS
3.5 - COOKING SIDE DISHES AND VEGETABLES
Vegetables cooked in a microwave oven preserve their colour and nutritional value better than traditional cooking.
Wash and peel the vegetables before starting to cook.
Larger vegetables should be cut into evenly-sized pieces.
Add approx. 5 spoonfuls of water for every 500g of vegetables (vegetables which have a high fibre content will require more water).
Vegetables should always be covered with transparent film.
Stir at least once halfway through cooking and add a little salt at the end.
Warning: the cooking times in the table are purely intended as guidelines and are on the basis of the food’s weight and initial temperature as well as its consistency and structure.
TYPE
QUANTITY
FUNCTION
POWER
LEVEL
TEMPERATURE
TIME
minutes
WIRE RACK
TO USE
• Asparagus
500 gr
5
-
• Artichokes
300 gr
5
-
10-11 It would be better to use artichoke hearts
None
• Green beans
500 gr
5
-
10-11 Cut into pieces
None
• Broccoli
500 gr
5
-
6-7
Separate into single “flowers”
None
• Brussels sprouts
500 gr
5
-
6-7
Leave whole
None
• White cabbage
500 gr
5
-
6-7
Leave whole
None
• Red cabbage
500 gr
5
-
6-7
Leave whole
None
• Carrots
500 gr
5
-
8-9
Cut into evenly-sized pieces
None
• Cauliflower
500 gr
5
-
• Cauliflower in béchamel
1000 gr
5
-
sauce
• Celery
+
8-9
NOTES/SUGGESTIONS
10-11 Separate into tops
13
+
10
500 gr
5
-
• Aubergines
800 gr
5
• Grilled aubergines
4 slices
-
• Aubergines “alla parmigiana”
1300 gr
•Leeks
500 gr
• Button mushrooms
• Onions
Cut into 2 cm pieces
Timing as for raw cauliflower. If pre-cooked,
needs only 10 minutes with grill in
Combined mode
None
None
Low
6-7
Separate into pieces
None
-
5-6
Cut into cubes
None
-
9-11
Preheat for 3 minutes. Turn halfway through cooking
High
5
-
7-9
The aubergines may be grilled or fried first
5
-
5-6
Leave whole
None
500 gr
5
-
5-6
Leave whole and cover. No water needed
None
250 gr
5
-
4-5
Whole in equal sizes. No need for water
None
• Spinach
300 gr
5
-
5-6
Cover after washing and draining
None
• Peas
500 gr
5
-
9-10
Low
None
Cut into quarters
• Fennel
500 gr
5
-
11-12
• Grated tomatoes
800 gr
5
-
9-11
It is preferable for them to be of equal
sizes
Cut into pieces
None
Preheat for 3 minutes. Turn halfway through cooking
High
500 gr
5
-
8-9
• Grilled peppers
4 quarters
-
-
9-11
• Stuffed peppers
1400 gr
5
-
12
5
-
9
• Peppers
+
+
Cut into evenly-sized pieces
500 gr
5
-
• Roast potatoes (fresh)
500 gr
4
190°C
30-35 Stir 2-3 times
900 gr
1100 gr
4
200°C
35-40 Stir 2-3 times
(total)
4
170°C
30
See note
500 gr
5
-
6-7
Leave whole
• Potato gratin
• Courgettes
*
Low
Low
None
• Potatoes
• Roast potatoes (frozen)
7-8
Preferably the short, broad kind
None
*
Low
Low
Low
None
These guidelines are suitable for carrying out Combined Cooking Test D according to the Regulation Project (3rd edition of IEC 705)
contained in the document IEC 53H/69/CD. Further information, also regarding other Performance Tests according to IEC Regulation
705 is given in the table on page 2.
22
MW865 inc. •GB
23-04-2002
16:16
Pagina 23
CHAPTER 3 – USING THE OVEN: SUGGESTIONS AND TIME GRIDS
3.6 - COOKING FISH
Fish cooks very quickly and with excellent results. It can be dressed with a little butter or oil (if so desired). Cover it
with transparent film. If skin is left on, this must be scored, and the fillets should be arranged evenly. It is not advisable to cook fish battered or crumbed.
TYPE
QUANTITY
• Fillets
• Pieces
• Whole
• Whole
• Slices
• Prawns
• Baked fish
FUNCTION
300 gr
300 gr
500 gr
250 gr
400 gr
500 gr
600 gr
POWER
LEVEL
TEMPERATURE
TIME
minutes
4
4
4
4
4
4
2
190°
5-7
7-9
8-10
5-7
7-9
7-9
30
NOTES/SUGGESTIONS
Cover with film
Cover with film
Cover with film
Cover with film
Cover with film
Cover with film
Add oil, a clove of garlic and drop of white wine. Do
not cover.
WIRE RACK
TO BE USED
None
None
None
None
None
None
Low
3.7 - COOKING DESSERTS AND CAKES
For cooking cakes the oven must be preheated to the temperature shown in the table. Only after reaching the temperature set (signalled by 5 beeps) should the cake by placed in the oven
WIRE RACK
TO BE USED
POWER
LEVEL
TEMPERATURE
1100 gr
2
170°C
25-30 Use a heat-resistant container
Low
• Quark cake
1500 gr
4
160°C
35-40 Use a heat-resistant container
Low
• Jam tart
700 gr
-
160°C
55
Use a metal cake tin
Low
• Plum cake
950 gr
-
160°C
90
Use a rectangular mould
Low
• Light sponge cake
700 gr
-
160°C
40
Use a metal cake tin
Low
• Walnut cake
650 gr
-
160°C
40
Use a metal cake tin
Low
• Egg custard
750 gr
5
-
16
See note
• Sponge cake
475 gr
5
-
8
See note
• Sponge cake
710 gr
2
160°C
30
See note
TYPE
QUANTITY
• Hazelnut cake
*
**
FUNCTION
TIME
minutes
NOTES/SUGGESTIONS
*
*
**
None
Low
Low
These guidelines are suitable for carrying out the Cooking Tests according to IEC Regulation 705, Par.
17.3, Tests A and B respectively. Further information, also regarding other Performance Tests according to IEC Regulation 705 is given in the table on page 2.
These guidelines are suitable for carrying out Combined Cooking Test E according to the Regulation
Project (3rd edition of IEC 705) contained in the document IEC 59H/69/CD. Remember to preheat the
oven only in Fan mode with the low wire rack in place. Further information, also regarding other
Performance Tests according to IEC Regulation 705 is given in the table on page 2.
23
MW865 inc. •GB
23-04-2002
16:16
Pagina 24
CHAPTER 3 – USING THE OVEN: SUGGESTIONS AND TIME GRIDS
3.8 - REHEATING/COOKING USING THE “AUTO” function KEYS
The AUTO function keys are 5 different programmes with “pre-programmed” cooking duration, power level
and oven temperature as detailed in the table below:
KEY
(11) BEVERAGES
• Press once
• Press twice
• Press 3 times
• Press 4 times
(8)
•
•
•
JACKET POTATOES
Press once
Press twice
Press 3 times
(10) READY MEALS
WHAT TO DO
SUGGESTIONS
• Reheat 1 small coffee cup (50 cc) at room
temperature.
• Reheat a coffee cup (125 cc) starting from
room temperature
• Reheat one large cup (200 cc) starting from
chilled
• Reheat 1 soup dish (300 cc) starting from
chilled
After reheating the liquid, stir
well to spread the
temperature evenly.
• Cook 200 g of potatoes
• Cook 400 g of potatoes
• Cook 600 g of potatoes
Wash the potatoes thoroughly in their
jackets, pierce them and put them on
the turntable. They should be served
stuffed with butter or cheese.
chilled ready meals (5-8°C)
Warning: at the end of the reheating the food and the Suitable for cooked portions of
food, preserved in the refrigerator
containersi may be very hot. Use tweezers or oven gloves.
• Press once
• Reheat 1 portion (250-350 g)
• Press twice
• Reheat 2 portions (450-550 g)
The food must never be covered.
For pre-cooked dishes in packets,
remove the food from metal
packaging and place it on a plate.
(9) PIZZA Pizza and frozen ready meals
Warning: at the end of the reheating the food and the
containersi may be very hot. Use tweezers or oven gloves.
• Press once
• Reheat 1 frozen pizza (250 - 500 g)
• Press twice
• Reheat 1 portion (250-350 g)
• Press 3 times
• Reheat 2 portions (450-550 g)
(7) POP CORN
• Press once
• Cook 1x100 g packet of popcorn
24
Place the pizza directly on the
low wire rack.
Place the packet on the turntable,
making sure you remove any covers
(film bags). If the packet is not
microwaves safe (e.g. metal tubs),
remove the food from the
packet.Place it uncovered on the
turntable.
Follow the instructions written on
the box closely The packet can
go directly on the turtable.
MW865 inc. •GB
23-04-2002
16:16
Pagina 25
CHAPTER 4 – CLEANING AND MAINTENANCE
4.1 CLEANING
Before any cleaning and maintenance are carried out, always disconnect the
plug from the power socket and wait for the appliance to cool down.
The internal cavity of your oven is covered with a special non-stick finish to which
splashes and food particles do not stick, thus making cleaning particularly simple. Always keep the microwave outlet cover (C) clean and free from grease and
splashes of fat.
Do not use abrasive detergents, wire sponges and sharp metal tools when cleaning the external surface of the oven. Also be careful to ensure that water or liquid detergent does not penetrate the air and steam vent grilles on the top of the
appliance.
It is also advisable not to use alcohol, abrasive detergents or ammonia-based
detergents to clean the internal and external surfaces of the door.
Always keep the inside of the door clean to ensure that it closes properly, so that
dirt and food residues do not become trapped between the door and the front
panel of the oven.
Check from time to time that the ventilation openings located on the back and
underneath the cabinet which houses the appliance are free from any obstructions or dust.
Contact your Service Assistance Centre for any necessary controls of the ventilation openings found on the back of the appliance.
It is necessary to remove the turntable (H) and its corresponding support (I) periodically in order to clean them; the bottom of the oven should also be cleaned.
Wash the turntable and its support in soapy water using mild soap. They can
also be washed in a dishwasher.
Do not immerse the turntable in cold water after prolonged heating; the sudden change in temperature would cause it to crack.
The turntable motor is sealed. Nevertheless, be careful to avoid the water penetrating under the turntable spindle (D) when the bottom of the oven is being
cleaned.
To make the cleaning of the inside of the oven easier, the upper heating element
can be lowered by turning the ceramic hook.
IMPORTANT: After cleaning, reposition and refasten the electrical element. The
oven must not be used with the element in the lowered positioned.
25
MW865 inc. •GB
23-04-2002
16:16
Pagina 26
CHAPTER 4 – CLEANING AND MAINTENANCE
4.2 MAINTENANCE
If something does not quite work right or if a foult devalops, contact technician for service.Please check the following faults before calling technician:
PROBLEM
The appliance does not work
Condensation on the work surface, inside the
oven or around the door.
Sparks inside the oven
CAUSE/SOLUTION
•
•
•
The door is not closed properly.
The plug is not correctly inserted.
No power at the socket
No power at the socket (check the fuse box)
•
When food is cooked which contains water it is quite normal
for the steam which is generated inside the oven to escape
and condense inside the oven, on the cooking surface or
around the doorframe.
•
Do not turn the oven on without food for
Microwave
and Combined cooking modes.
Do not use metal containers for the above cooking modes
or bags or packets with metal parts.
•
•
The food does not heat or cook properly
The food burns
•
Select the correct cooking mode or increase the cooking
time.
The food has not been completely defrosted before being
cooked.
•
Select the correct cooking mode or reduce the cooking
time.
•
Stir the food during cooking. Remember that food cooks
better when cut in evenly-sized pieces.
The turntable is blocked.
The food does not cook evenly
•
NOTE: The oven may be used safely even if the light bulb is not working. Contact an authorised technician
for bulb replacement.
26
MW865 inc. •GB
23-04-2002
16:16
ELECTRICAL
A)
Pagina 27
CONNECTION
If your appliance comes fitted with a plug, it will incorporate
a 13 Amp fuse. If it does not fit your socket, the plug should
be cut off from the mains lead, and an appropriate plug
fitted, as below.
WARNING: Very carefully dispose of the cut off plug after
removing the fuse: do not insert in a 13 Amp socket
elsewhere in the house as this could cause a shock hazard.
With alternative plugs not incorporating a fuse, the circuit
must be protected by a 15 Amp fuse.
WARNING - THIS APPLIANCE MUST BE EARTHED
IMPORTANT
The wires in the mains lead are coloured in accordance with the
following code:
E
Green and yellow:
Earth
L
Blue:
Neutral
N
Brown:
Live
B)
(U.K.
ONLY)
If the plug is a moulded-on type, the fuse cover must be refitted when changing the fuse using a 13 Amp Asta approved
fuse to BS 1362. In the event of losing the fuse cover, the plug
must NOT be used until a replacement fuse cover can be
obtained from your nearest electrical dealer. The colour of the
correct replacement fuse cover is that as marked on the base
of the plug.
If your appliance is not fitted with a plug, please follow the
instructions provided below:
As the colours of the wires in the mains lead may not correspond
with the coloured markings identifying the terminals in your plug,
proceed as follows:
The green and yellow wire must be connected to the terminal in the
plug marked with the letter E or the earth symbol
or coloured
green or green and yellow.
The blue wire must be connected to the terminal marked with the
letter N or coloured black.
The brown wire must be connected to the terminal marked with the
letter L or coloured red.
27