1
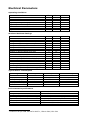
AT240 Advanced Vehicle Tracking Device User Guide Version: 3.8 Date: February 2015 Abbreviations ADC ASCII BLE CAN DC FET GIS GPRS GPS GSM IP LED MEMS NMEA OTA PC PCB PDU RFID SIM SMS SMSC SV TCP UDP WGS84 Analogue to Digital Converter American Standard Code for Information Interchange (computer character set) Bluetooth Low Energy Controller Area Network Direct Current Field Effect Transistor Geographic Information System General Packet Radio Service (part of GSM) Global Positioning System Global System for Mobile communication Internet Protocol (part of TCP/IP) Light Emitting Diode Micro Electro-Mechanical System National Marine Electronics Association (defined a GPS output format) Over the Air (remote configuration of devices) Personal Computer Printed Circuit Board Protocol Description Unit (describes a binary SMS format) Radio Frequency Identification Subscriber Identity Module Short Message Service Short Message Service Centre Satellite Vehicle Transmission Control Protocol (part of TCP/IP) User Datagram Protocol World Geodetic System 1984 (global co-ordinate system used by GPS) Product Overview The AT240 is a highly featured vehicle tracking device, housed in a sturdy plastic enclosure with internal GPS/GSM antennas and sealed to IP67 specifications. The AT240 incorporates the very latest technology, including the latest Cortex M3 ARM processor, Telit GE865 Quad Band GSM/GPRS modem and SiRFstar IV GPS with high sensitivity and anti-jamming features. The AT240 operates from an external power feed and has an optional 450mAh back-up battery which allows operation for approx. 5 hours in continuous mode. Interconnections are made with a single 30 way connector which provides IP68 sealing when mated. Features The main features of the AT240 are highlighted below: Compact size (approximately cigarette box dimensions) IP67 sealing Cortex M3 ARM Processor SiRFstar IV GPS, -163dBm sensitivity and anti-jamming feature Telit GE865 QUAD band GSM/GPRS modem Internal GSM antenna, ceramic PIFA type Internal GPS antenna, 25mm ceramic patch Low power consumption (near zero current drain when vehicle ignition is off) 3 axis accelerometer (2/8g) CANBus interface Internal Buzzer Bluetooth Low Energy transceiver (future option) Extensive I/O – 6 digital inputs, 5 digital outputs, 2 ADC inputs and 2 RS232 Ports Internal back-up battery, lithium, 450mAh Configuration by RS232, SMS or TCP/UDP Fast and reliable over the air firmware update Supports AT100 and AT220 Protocols for easy compatibility with existing applications Reporting protocols support TCP or UDP Pass through data mode SDK available for rapid development of client customised applications Approved to: CE, 2004/104/EC Technical Specifications1 E-GSM/GPRS Modem: 2 Watts (E-GSM900 and GSM850 Class 4) 1 Watt (GSM1800 and GSM1900 Class 1) GPRS multi-slot class 10 GSM up-link (TX): Frequencies 824 – 849 MHz, 880 – 915 MHz, 1710 - 1785 MHz, 1850 – 1910 MHz GSM down-link (RX): Frequencies 869 – 894 MHz, 925 - 960 MHz, 1805 - 1880 MHz, 1930 - 1990 MHz GPS Receiver: L1 receiver: Position accuracy: Receiver sensitivity: TTFF: Cold start Warm start Hot start 48 channels < 2.5m CEP autonomous -163dBm (tracking) < 35 sec < 32 sec < 1 sec Input voltage: 7 – 36 volts DC Input Protection: Reverse polarity, overvoltage, internal self-resetting fuse Internal Battery: 3.7V, 450mAh, lithium (optional) Battery Life: 5 hours continuous operation 4 days operation in hourly update mode Data transfer modes: GPRS (TCP/UDP) Inputs/outputs: 6 digital inputs 5 digital outputs 2 RS232 serial port 2 ADC inputs CANBus iButton (4 normally low, 2 pull-down) (2 solid state relays, 3 low side MOSFET switches) (5.0V and 15.0V range) Driver ID: iButton Current consumption: 25mA @ 13.8 VDC (typical) < 4mA (sleep mode - without battery) < 50uA (sleep mode - battery fitted) Dimensions: 104 x 85 x 23 mm Weight: 160g Ingress Protection: IP67 according to DIN VDE 0470 Part 1 / EN 60 529 / IEC 529 Temperature: Operating Storage -20 to +60°C -40 to +85°C Connector: Samtec RPB5-15 Mating Cable Assembly: Samtec RC5-15-01 Product Approvals: CE, 2004/104/EC 1 (with battery) Specifications may change without notice. Hardware Description Overall Dimensions 104 x 85 x 24 mm SIM installation Enclosure Sealing When fitting the enclosure cover, please ensure that both clips are snapped into place to guarantee IP67 sealing. Power requirements The AT240 operates from a DC Voltage between 7 and 36 Volts. We recommend that a permanent ‘live’ power source is used to supply the AT240. If current drain is of concern, please refer to the power management section for options to minimise vehicle battery drain when stationary for long periods. Back-up Battery (option) The AT240 operates from the external voltage source. If the optional back-up battery is fitted, the AT240 will maintain optimum charge level and automatically switch to battery power should the external voltage source fail or fall outside of the permitted range. Note that the operating temperature range of the AT240 is reduced when the battery option is fitted (see Specifications section). Please also note the handling precautions for lithium polymer batteries as outlined in the AT240 Installation Guide. Fuse Recommendations Typical current drain is 25mA @ 13.8VDC and 14mA @ 27.6VDC, although maximum peak current can be around 1.5A for very short periods. We recommend the use of 3A fuses in the power feeds and ignition sense wires. Interconnections All connections to the AT240 are provided by a single 30 way cable assembly. AT240 Pin Applications and Colour Code Pin Number 1 2 3 4 5 6 7 8 9 10 11 12 13 14 15 16 17 18 19 20 21 22 23 24 25 26 27 28 29 30 Application supply voltage 7-36 VDC Digital input 5 (pull-down) GND Digital input 3 (opto-coupled) Digital output 4 (MOSFET) Digital input 1 (opto-coupled) – Ignition Digital input 2 (opto-coupled) – Panic ADC1 (0-5V) Digital input 4 (opto-coupled) Digital output 2B (RELAY) Digital input 6 (pull-down) – Private mode Digital output 2A (RELAY) ADC2 (0-15V) Digital output 1B (RELAY) GND Digital output 1A (RELAY) GND Digital output 5 (MOSFET) iButton (Dallas Key) 5.0V output (unregulated), 250mA fused SWDIO (SDK users only) SWCLK (SDK users only) Digital output 3 (MOSFET) 3.3V output (regulated), 250mA fused RS232-TX1 RS232-TX2 RS232-RX1 RS232-RX2 CANH CANL Wire Colour black brown red orange yellow green blue purple grey white pink light green black / white stripe brown / white stripe red / white stripe orange / white stripe green /white stripe blue / white stripe purple / white stripe red / black stripe orange / black stripe yellow / black stripe green / black stripe grey / black stripe pink / black stripe pink / red stripe pink / blue stripe pink / green stripe light blue light blue / black stripe Digital Inputs Digital inputs 1 to 4 are normally low inputs and can be connected directly to 12/24V vehicle circuits. Digital inputs 5 and 6 are normally high, for use in pull-down applications. Simply switch to GND to activate these inputs. Note: damage may be caused to the AT240 device if a voltage source is applied to digital inputs 5 and 6. Digital Outputs The AT240 is capable of switching 5 different loads with 2 different types of switch, as described below. Low Side Switches 1 -3 are MOSFET switches to GND and must be used to switch the GND side of the load. Relay Switches 1 and 2 are solid state relays. These are 2 port, bi-directional switches that can be used to interrupt/connect circuits of various types and can often be used in applications where low side switched cannot be used directly without an external relay. Use pins 1A/1B for relay switch 1 and pins 2A/2B for relay switch 2. All the above switches are capable of handling loads of up to 30V, 0.5A maximum. The use of a 1A in-line fuse with these switches is essential to prevent any damage through fault scenarios. Analogue to Digital Converter (ADC) Inputs ADC1 can be used to measure analogue voltages up to 5.0V maximum ADC2 can be used to measure analogue voltages up to 15.0V maximum External scaling can be used to measure higher voltages if necessary. Integrated Accelerometer(s) The AT240A has a built in 3 axis MEMS accelerometer that operates in the range ±2g and is used to measure driver behaviour (acceleration and braking) during normal driving conditions. The accelerometer also allows the AT240 to wake from sleep on movement, with configurable thresholds. Please refer to the MEMS parameter and Power Management section for more details. iButton (Dallas Key) Interface This can be used to read iButton devices for the purpose of Driver Identification. See the Driver ID Application Note for more details of how to use this feature. CANBus The AT240 has integrated CANBus. Please refer to CANBus and FMS Application Notes for details of supported protocols and features. IMPORTANT NOTE: The CANBus pins are ESD protected to 15kV, but can only withstand a continuous voltage of 12V maximum. These pins must not be used for any other application to avoid damage to the device. USB Reserved for future applications 4.2V and 3.3V Outputs These are reserved for use with external devices. The 3.3V regulated output can be used as a reference voltage for external temperature sensors and used with the ADC1 input. These outputs are fused at 250mA, maximum recommended current drain is 100mA. Electrical Parameters Operating Conditions Parameter Power Supply Input Voltage Digital Input High Voltage Threshold Digital Input Low Voltage Threshold Digital Maximum Voltage Digital Maximum Current Min Max Units +7 +36 V +5.0 - +2.0 V V - +30.0 0.5 V A Min Max Units -32 -32 -25 -13 -12 -5 +40 +32 +3.3 +25 +13 +12 +5 V V V V V V V - 500 500 100 +30.0 mA mA mA V -40 -20 0 +85 +60 45 °C °C °C Absolute Maximum Ratings Parameter Power Supply Input Voltage Voltage on Digital 1-4 and ADC Inputs Voltage on Digital 5-6 (pull-down) Voltage on RS232 RX Voltage on RS232 TX Voltage on CAN RX/TX Voltage on iButton/Dallas Interface Current Current Current Voltage sunk by MOSFET low side switches handling of solid state relay switches capacity of 3.3V and 5.0V outputs rating of relay and MOSFET switches Storage Temperature Operating Temperature (without battery) Operating Temperature (with battery) Typical Power Consumption Operating Mode Fully Operational Battery charging Sleep (no battery) Sleep (with battery) Current @ 13.8V Current @ 27.6V Power Consumption 25mA 500mA 0.5mA < 10uA 14mA 275mA 0.3mA < 10uA < 400mW < 7W 7mW 0.1mW Environmental Specifications Parameter Storage temperature Operating temperature (no battery) Operating temperature (with battery) Ingress Protection Vibration, broadband random Shock Humidity * Specification -40 to +85 °C -20 to +60 °C 0 to +45 °C (note: no charging below 0°C) IP67 (dustproof and waterproof to 1m *) Complies with IEC60068-2-64 Complies with IEC60068-2-64 Complies with IEC60068-2-64 Conditions as per DIN VDE 0470 PART 1 / EN 60 529 / IEC 529 Configuration The AT240 has a versatile set of features to facilitate detailed customisation. Programming with an ASCII Terminal Custom configuration of the AT240 is best achieved via a serial interface to a PC. It is possible to use any ASCII terminal program (e.g. HyperTerminal, Teraterm, ProComm, Com7 etc.) to enter commands. Terminal settings are 115200 baud, 8 data bits, 1 stop bit, no parity and no flow control. How to Start a HyperTerminal Session (Windows Vista and earlier) To open a HyperTerminal session, go to the Windows Start Menu and select: Start – Programs – Accessories – Communications – HyperTerminal Double click on the Hypertrm.exe icon and enter a name for the session (e.g. AT240 Terminal). Select “Direct to COM1” (or whatever COM port you are using) from the bottom field of the “Connect To” dialogue box. Now select “115200” bits per second and “None” for Flow Control. Select OK and the terminal session will start. Note that the AT240 does not echo typed characters, so it is also useful to enable the “echo typed characters locally” option from the Properties – Settings – ASCII Setup menu. These settings can be saved by selecting the appropriate option before closing the session. Terminal Program for Windows 7 Windows 7 does not include HyperTerminal. In this case we recommend Teraterm, which can be downloaded free of charge. For details and download sources see http://logmett.com/ Command Format The AT240 uses the same command format for all input methods; TCP, SMS and RS232. Each command will take the following format: $AAAA,<arg1>,<arg2>,<argX><CR><LF> Where AAAA is the command code and the text enclosed in < > are optional arguments. Response Format Each command will result in one response, by the same mode as the command was received. For multiple commands see the section Multiple Command Response Format. The format of an individual response message is as follows: $AAAA,<status><CR><LF> Where <status> is one of the following values UN OK ER PR Unknown Command Command Completed Successfully Command Failed (Error) Password Required Single Command Examples Status Unknown Success Error Command $FISH,400,56 $DIST,50 $DIST,9999909090 Response $FISH,UN<CR><LF> $DIST,OK<CR><LF> $DIST,ER<CR><LF> unrecognised command valid command, ok parameter out of range Multiple Command Format In SMS mode it is often convenient to send several commands together in one SMS or packet. It is possible to append multiple commands together as described below. Example1 $DIST,50<CRLF> $GPSQ,100<CRLF> Example2 (recommended format for TCP/UDP mode) $DIST,500$APPW,orangeinternet$FRED,1 Multiple Command Response Format Multiple commands received at the same time via any mode will result in one response for each command parsed. The responses will be in exactly the same format as those described in the section Single Command - Response. For Example2 above the response would be: $DIST,OK<CR>$APPW,OK<CR>$FRED,UN<CR><LF> The first two commands are recognised and successfully executed, whereas the last command is unrecognised. Over the Air Configuration by SMS/GPRS The commands and formats described above can all be used over SMS, UDP or TCP sockets. The response will always be returned by the same mode as the command is received, so commands submitted by SMS will be responded to by SMS to the sender’s phone number. Note that the sender’s telephone number must be disclosed for the response to succeed. When sending commands over TCP/UDP sockets, please do not include carriage return (CR) or line-feed (LF) characters between commands, these are not necessary and can cause parsing problems. Prevention of Unauthorised Device Reconfiguration There is a PIN code feature, which can be used to prevent unauthorised reconfiguration of devices by SMS. Please refer to the PASS command in the Configuration section of this document. Application Parameters GPRS Access Point Address (APAD) When using GPRS mode, it is necessary to set the access point network (APN) details for the specific network being used. This information should be supplied by your GSM Network Operator or Service Provider. A list of GPRS access point addresses, usernames and passwords for most GSM operators can be found at http://www.taniwha.org.uk/gprs.html GPRS Access Point Username (APUN) See above. GPRS Access Point Password (APPW) See above. TCP Acknowledgment Timeout (TCPT) This parameter specifies the maximum number of seconds that the AT240 device will wait for the host to send the ACK code in response to sending a report. The default value is 30 seconds. A value of zero will disable the acknowledgment feature. TCP Host IP Address (IPAD1) When using GPRS mode, the host server must provide a TCP socket with a static (public) IP address. This address should be entered (without the port number). Alternatively, a hostname can be accepted for the IPAD parameter, in which case the GPRS network service provider will provide the DNS look-up to resolve the hostname to an IP address. Maximum hostname length is 64 characters. NOTE: IP address should be entered WITHOUT LEADING ZEROS TCP Host Port Number (PORT1) The port number for the TCP host, as required for GPRS mode. PTDM Host IP Address (IPAD2) Host IP address or hostname to be used in Pass Through Data Mode. Maximum hostname length is 64 characters. Please refer to the appropriate Application Note for further details. NOTE: IP address should be entered WITHOUT LEADING ZEROS PTDM Host Port Number (PORT2) Port number to be used in Pass Through Data Mode. Please refer to the appropriate Application Note for further details. Communication Mode (MODE) This command specifies the required GSM communication mode, as described in the table below: <mode> 1 2 3 4 5 6 Communication method RESERVED RESERVED RESERVED GPRS (TCP) LOGIN DISABLED GPRS (UDP) GPRS (TCP) LOGIN ENABLED Reporting Level (REPL) This parameter is a bitfield (3 bytes) which can be used to enable/disable certain types of report based on their reason code. The bits are defined to match the reason bytes in the appropriate protocol, set the appropriate bit to enable reports based on the associated reason. Note there are differences between protocols, please refer to specific protocol documentation for details. A value of 16777215 will enable all reports. Reporting Protocol (PROT) The AT240 supports various reporting protocols (data packet formats). Protocols used by other devices are implemented for compatibility with existing systems. To take advantage of the full AT240 feature set, the specific AT240 protocols “M” or “V” are recommended. Documentation for each of these protocols is available on request from Astra Telematics, please email [email protected] for a copy. <prot> 0 1 2 3 4 5 6 7 8 9 10 11 12 13 14 Fixed Fixed Fixed Fixed Fixed Fixed Fixed Fixed Fixed Fixed Fixed Fixed Fixed Fixed Fixed Reporting protocol packet protocol “A” packet protocol “C” packet protocol “G” Basic version packet protocol “G” Extra version packet protocol “H” packet protocol “F” packet protocol “K” packet protocol “L” packet protocol “M” packet protocol “N” packet protocol “P” packet protocol “R” packet protocol “S” packet protocol “T” packet protocol “V” Legacy - not for new implementations Legacy - not for new implementations Legacy - not for new implementations Legacy - not for new implementations Legacy - not for new implementations Legacy - not for new implementations Legacy - not for new implementations Legacy - not for new implementations RECOMMENDED (AT240 w/o CANBus data) AT240 with FMS data Carrier Transicold Refrigerator data AT240 with OBD data As “M” but with Enhanced ADC resolution As “M” but with ECON gritter status data RECOMMENDED (AT240 with FMS or OBD) Pass Through Data Mode (PTDM) Pass through data mode enable. Default is 0. Set this parameter to 1 to enable Pass Through Data Mode. Note that when Pass Through Data Mode is enabled, debug and NMEA output are suppressed from the AT240 serial port (DBUG and NMEA set to zero). Please refer to the appropriate Application Note for further details. Alarm Phone Number (ALRM) This is the delivery destination for alarm text messages sent via SMS. These are typically sent to a GSM handset (mobile telephone). The number should be entered in international format (e.g. +447979123456). Alarm text messages are sent for external power loss and low external power (supply input less than the level defined by CPWR). Configure Power Monitoring (CPWR) This command sets the conditions for sending external power alarms. $CPWR,<low_external_voltage_level>,<low_external_voltage_delay>,<external_power_event_d elay> The voltage level can specified with decimal places, e.g. 11.5. The delays are in seconds. When external power falls below <low_external_voltage_level> for <low_external_voltage_delay> seconds a low external power SMS is sent. When external power is lost an external power lost SMS is sent. External power is considered to be lost when it is less than 6V for <external_power_event_delay> seconds. The default settings are $CPWR,11.5,30,30 Roaming Enable (ROAM) This parameter can be used to disable network roaming, as a means of controlling GSM network running costs. A value of zero will disable network roaming. The ROAM parameter can also be used to allow reporting at a reduced rate when roaming. A value of greater than 1 will cause the reporting intervals (DIST, HEAD, STIM and JTIM) to be extended by the specified value of ROAM. For example, when ROAM is set to 2, all of the reporting intervals are doubled, so that the reporting rate will be approximately half as much as when using the home GSM network operator. The default setting for ROAM is 1, which enables normal reporting on either home or roaming networks. SMS Monthly Usage Limit (SMSL) This parameter can be used to control SMS costs by setting a monthly limit on the number of SMS which may be sent from the AT240. A value of zero will disable the Monthly SMS Limit feature. Default is 50. Distance Reporting Interval (DIST) Distance based reporting interval in metres. This feature can be disabled by setting Minimum Distance Moved to zero. Default is 5000. Heading Reporting Threshold (HEAD) The objective of this feature is to provide a vehicle trace which closely follows the actual route, but with the minimum of position update reports. In broad terms, the system provides fewer updates whilst driving in a straight line (e.g. motorways), but increases the number of updates whilst negotiating corners (e.g. city/town driving). Heading based reporting can be disabled, by setting HEAD to zero. Default is 45. Stationary Timed Message Interval (STIM) This parameter defines the maximum time interval in minutes between position update reports whilst stationary. The appropriate value for Stationary Timed Interval will depend on the user application. The default is 60. Setting the Stationary Timed Message Interval to zero will disable time based reports whilst stationary. Journey Timed Message Interval (JTIM) This parameter defines the maximum time interval between position update reports whilst in a journey. The journey mode is dictated by the IGNM setting, as below: <IGNM> 0 1 2 3 4 Journey Detection Method GPS speed Digital input 1 Digital input 1 External Voltage From CANBus data The appropriate value for Journey Timed Interval will depend on the user application. The default setting for JTIM is 2 minutes. Setting the Journey Timed Message Interval to zero will disable time based journey reports. Journey Timed Message Interval (JSEC) The journey timed reporting interval may be entered in seconds using the JSEC command. Default is 120. Idle Mode Timed Message Interval (ITIM) This parameter defines the maximum time interval between position update reports when a vehicle is idling. Idling mode is initiated after a period of stationary time (see IDLE parameter) whilst the ignition is on. Setting the Idle Mode Timed Message Interval to zero will disable time based idle mode journey reports. The setting is in minutes and the default is 5. Idle Mode Threshold (IDLE) A vehicle is defined as being in Idle Mode when a vehicle is stationary for a specific length of time whilst the ignition is on. Idle Mode ends once the vehicle starts moving again. This parameter defines the length of time (in seconds) that a vehicle must be stationary before Idle Mode is initiated. Note that Idle mode start reports, timed reports and end reports are sent to the host application, hence an excessively low value for IDLE can result in increased reporting. The default value for IDLE is 180 seconds. Over-speed Speed Threshold (OSST) The AT240 can be configured to report over-speed events, which are defined as exceeding a given speed for a given amount of time. The OSST parameter defines the over-speed threshold in kmh. In order to trigger an over-speed event, the vehicle must travel in excess of OSST kmh for a period of OSHT seconds (see below). Further over-speed events cannot be triggered until OSIT seconds have elapsed and vehicle speed has fallen below the OSST threshold. A value of zero for OSST will disable over-speed events/reports. Default is 120. Over-speed Hold Time (OSHT) Defines the period of time (in seconds) that a vehicle must exceed OSST kmh to trigger an overspeed event. Default is 30. Over-speed Inhibit Time (OSIT) Defines the minimum time between over-speed events. Once an over-speed event has occurred, further over-speed events cannot be triggered until OSIT seconds have elapsed. Default is 120. Ignition Mode (IGNM) This parameter defines the function of the IGNITION input and the method of journey START/STOP detection, as follows: IGNM Start/Stop Reports Default Power Down? Ignition Input 0 1 2 3 4 based on GPS (speed) based on Digital 1 input based on Digital 1 input based on External Voltage from CANBus data NO NO YES NO NO Not required GREEN WIRE GREEN WIRE Not required OBD or FMS The command format is: $IGNM,<ignition_source>[,<low_power_mode>] where <ignition_source> is one from the above table (1 and 2 being the same). Default is 1. If <low_power_mode> is 0 then power down is disabled and if it is 1 then power down is enabled. Power down mode is automatically enabled when <ignition_source> is set to 2. In other <ignition_source> modes, <low_power_mode> is disabled by default, but it can be enabled by specifying a value of 1 when setting the <ignition_source>. When IGMN=3 the AT240 will detect that the vehicle engine is running from the increase in external voltage (typically, the vehicle battery voltage increases by 2 Volts whilst the engine is running. This mode requires a two wire installation and frees up a digital input for other uses. Note 1: please refer to the AT240 Installation Guide for installation and calibration guidance relating to the use of IGNM mode 3. STOP Report Delay (STPD) When IGNM is set to zero (see above), the AT240 will determine journey START and STOP events from GPS. A STOP event will occur after the vehicle has remained stationary for a predetermined time. The length of stationary time necessary to trigger a STOP report is dictated by the STPD parameter. When IGNM is set to three a STOP event will occur after the vehicle external voltage has dropped for a pre-determined time. The length of time of the drop in voltage level necessary to trigger a STOP report is dictated by the STPD parameter. If the voltage rises before the time in STPD is reached the vehicle is considered to still be in the same journey. GPS Minimum Acceptable Quality (GPSQ) Defines the minimum acceptable quality threshold for an acceptable GPS fix, based on the estimated GPS position accuracy. The value for GPSQ is a percentage, allowed values are from 1 to 100. The default value is 50%, which corresponds to an estimated position error of 50m. A value of 100% specifies near perfect GPS results with an estimated error of 2m or less. A value of 1% for GPSQ specifies the lowest acceptable quality, based on an estimated error of 100m. The AT240 GPS quality algorithms will not accept 2D fixes. GSM Cell ID Mode (CLID) Set the level of GSM Cell ID reporting. Default is 0. $CLID,<mode>[,<request_period>] where: <mode> <request_period> <mode> 0 1 2 3 see table below for CLID=3 this is the minimum time between requests for location from the GSM network. Range 1-65535 minutes. Description Never report Cell ID information Report Cell ID information only when no GPS fix Report GSM Cell ID information always Report location provided by GSM network using M2M location service when no GPS fix For CLID=3 when GPS is invalid any event that generates a report or a reply to $POLL or $POSN will cause the location to be requested from the GSM network, but only if the last request was more than <request_period> minutes ago. The status in the report will indicate that the location is network based in addition to invalid GPS. iButton Mode (IBTN) Enable iButton features and configure timeouts. $IBTN,<ibutton_mode>,<validity_timeout_secs>,<auth_timeout_secs>,<imob_output_state> where: <ibutton_mode> <validity_timeout_secs> <auth_timeout_secs> <imob_output_state> IBTN 0 1 2 3 4 5 6 iButton enabled No Yes Yes Yes Yes Yes Yes Reminder: Confirm: Report All iButtons: Immobilise: see table below. Default is 0. ibutton validity timeout. ibutton data will be attached to all journey START and STOP reports until validity expires. Default is 7200. ibutton authentication timeout. For use in iButton modes 2 and 3 In these modes, ibutton must be presented before the vehicle engine is started. If no ibutton was seen for auth_timeout_secs the AT240 output switch will be closed to activate the reminder (buzzer or indicator light etc.). Default is 30. The state of the digital output when immobilisation is active. 0 = output OFF for immobilisation. 1 = output ON for immobilisation. Default is 0. Reminder N/A No Yes Yes No No Yes Confirm N/A No No No Yes No Yes Report all iButtons N/A No No Yes Yes No Yes Immobilise No No No No No Yes No drives an indicator when ignition is turned ON until iButton is presented drives an indicator (short pulse) whenever and iButton is read triggers a report each time an iButton is presented output switch is used to disable the vehicle until an iButton is presented. See the CDIG command for the outputs used for immobilise, reminder and confirm. *Note: iButton immobilisation mode (IBTN=5) uses a set of commands sent from the host to approve or decline iButtons. The device will maintain a list of approved iButtons in order to determine which ones will allow the vehicle to be started. This set of commands is described in the section Authorised Driver Implementation in Utility and Engineering Commands. Alternatively, an external card reader for use with Mifare cards can be used so that the Mifare cards provide authorisation and the driver ID (7 bytes in total). iButton Options (IBTO) Alternative command to enable iButton features and configure timeouts. $IBTO,<reminder>,<confirm>,<report>,<immobilise>,<validity_timeout_secs>, <auth_timeout_secs>,<imob_output_state> where: <reminder> <confirm> <report> <immobilise> <validity_timeout_secs> <auth_timeout_secs> <imob_output_state> Set to 0 (default) to disable and 1 to enable (see description above) Set to 0 (default) to disable and 1 to enable (see description above) Set to 0 (default) to disable and 1 to enable (see description above) Set to 0 (default) to disable and 1 to enable (see description above) ibutton validity timeout. ibutton data will be attached to all journey START and STOP reports until validity expires. Default is 7200. ibutton authentication timeout. For use in iButton modes 2 and 3 In these modes, ibutton must be presented before the vehicle engine is started. If no ibutton was seen for auth_timeout_secs the AT240 output switch will be closed to activate the reminder (buzzer or indicator light etc.). Default is 30. The state of the digital output when immobilisation is active. 0 = output OFF for immobilisation. 1 = output ON for immobilisation. Default is 0. Debug Level (DBUG) Set the level of debug information displayed in the NMEA serial output as defined in the following table. Default is 2. DBUG level 0 1 2 3 4 Information displayed Only NMEA output on serial port 1 Display errors only Display normal diagnostic information Display extended diagnostic information Display maximum diagnostic information OTA Programming PIN Code (PASS) OTA PIN code feature, which can be used to prevent unauthorised reconfiguration by SMS. The PIN code is specified using the PASS command. The PASS code can be set by RS232, SMS or TCP mode commands, but if PASS is non-zero, the correct current PASS code must be supplied before the new value. By default, PASS is set to zero, which disables OTA PIN code requirement. If PASS is set to any other value, the correct value must be specified with each OTA command. The PASS parameter must be the first command in the sequence. e.g. to change distance reporting, when current PASS code is set to 12345: $PASS,12345$DIST,1500 e.g. to change PASS code from 12345 to 5678: $PASS,12345$PASS,5678 Only commands which change parameters require the PIN code. The PIN code is never required for the following commands: $ATSW, $BOOT, $DIAG, $IMEI, $NACK, $PARA, $POLL, $POSN, $SDIG, $SHDN, $SHOW, $SSMS and $STAT. Geofences (GEOF) Device based geofences can be configured with the GEOF command, which has 5 arguments as follows: $GEOF,<index>,<type>,<radius>,<latitude>,<longitude> Field <index> <type> Description geofence index geofence type Range 1 - 100 0 1 2 3 <radius> <latitude> <longitude> geofence radius in metres geofence latitude, WGS84 decimal degrees geofence longitude, WGS84 decimal degrees disabled alarm on entry alarm on exit alarm on entry & exit 20 - 65535 -90.0 to +90.0 -180.0 to +180.0 Entering the command with index argument only will echo back the existing geofence settings. Acceleration and Deceleration Maximum Thresholds (ACMX & DCMX) Report events can be triggered on specified thresholds of acceleration and deceleration (i.e. braking). ACMX specifies the acceleration threshold in m/s/s * 10, integer format. Default is 35. DCMX specifies the deceleration threshold in m/s/s * 10, integer format. Default is 40. Example: $ACMX,35 $DCMX,45 set accel threshold at 3.5 m/s/s set decel threshold at 4.5 m/s/s Cornering Maximum Thresholds (ACMY & DCMY) Report events can be triggered on specified thresholds of cornering force. ACMY and DCMY specify the cornering threshold in m/s/s * 10, integer format. Default ACMY and DCMY is 50. Example: $ACMY,35 $DCMY,45 set cornering accel threshold at 3.5 m/s/s set cornering decel threshold at 4.5 m/s/s Collision Event Threshold (COLN) This parameter defines the acceleration/deceleration threshold (on any axis) to be classified as a collision event. COLN specifies the threshold in m/s/s * 10, integer format. Default is 100. Device Orientation (ORTN) This parameter defines the AT240 installation orientation in order to allow corrections to be applied to the accelerometer X/Y data to ensure data is correctly orientated with the vehicle axis. When ORTN is specified correctly (as per the table below) X data will correspond to vehicle acceleration and deceleration and Y will correspond to cornering forces (+ve Y corresponding to a left turn and -ve Y for right hand turns). Default is 0. ORTN 0 1 2 3 4 AT240 Installation Position Unspecified connector facing to vehicle LHS connector facing to vehicle front connector facing to vehicle RHS connector facing to vehicle rear Data Corrections Applied No X/Y orientation corrections applied No X/Y orientation corrections applied X/Y swapped & X axis sign inversion Both X and Y axes sign inversions X/Y swapped & Y axis sign inversion Tow Alert Parameters (TOWP) A tow alert (i.e. report with REASON bit set indicating tow alert event) is generated whenever movement is detected whilst the vehicle ignition is off. This scenario is detected using a number of different sources, including GPS speed, GPS location and accelerometer based motion sensor. The sensitivity of tow alert detection can be changed by editing the various decision thresholds using the TOWP command. The format of the command is as follows $TOWP,<distance_metres>,<speed_kmh>,<speed_seconds>,<motion_sensitivity>, <trembler_sensitivity> Field <distance_metres> <speed_kmh> <speed_seconds> <motion_sensitivity> <trembler_sensitivity> Description distance travelled from the last ignition off position that will trigger a tow alert speed threshold to trigger a tow alert. The speed must exceed the threshold for the time in the <speed_seconds> field to trigger an alert. time for which the speed must be above the threshold in the field <speed_kmh> to trigger a tow alert. accelerometer based motion detection sensitivity for triggering a tow alert. Range 0 disables distance check 100 – 65535 default=500 Tremble sensor based motion detection sensitivity for triggering a tow alert. 0 0 20 – 65535 disables speed check default=50 1 – 65535 default=10 0 disables accelerometer based motion detection (1=most sensitive, 10=least sensitive, default=5) disables trembler based detection (1=most sensitive, 10=least sensitive default=5) 1 – 10 1 – 10 Utility and Engineering Commands Delete All Geofences (GEOD) Individual geofences can be deleted by setting <type> to zero. The GEOD command provides a convenient way of deleting all geofences. Configure Digital Outputs (CDIG) Where an output is controlled in response to an event the digital output used can be configured using this command. $CDIG,<immobiliser_output>,<reminder_output>,<confirm_output>, <driver_behaviour_output> The 5 digital outputs are numbered as follows: <output> 1 2 3 4 5 Digital Digital Digital Digital Digital output output output output output 1 2 3 4 5 Description (RELAY) (RELAY) (MOSFET) (MOSFET) (MOSFET) Examples: $CDIG,1 use digital output 1 for immobilisation $CDIG,1,3,4 use digital output 1 for immobilisation, digital output 3 for reminder and digital output 4 for confirmation Default settings for CDIG are: <immobiliser_output> 1 <reminder_output> 3 <confirm_output> 4 <driver_behaviour_output> 0 A value of 0 disables a feature, i.e. stops that feature from driving an output. When you select a digital output it must be different from the other three otherwise CDIG will return with the error $CDIG,ER. If an output has been configured for <driver_behaviour_output> then that output will be turned on whilst the GPS speed exceeds the overspeed limit set by $OSST. If an accelerometer event (acceleration, braking or cornering) is generated then the output will pulse on/off for several seconds. Set Digital Output (SDIG)* Allows setting and re-setting of the 5 digital outputs as listed for the CDIG command. Examples: $SDIG,1,1 $SDIG,1,0 switch output 1 ON switch output 1 OFF Configure Digital Inputs (CDIP) The digital inputs can be de-bounced over a period of time configured using the command $CDIP,<digital1_db_secs>,<digital2_plus_db_secs> The ignition input de-bounce period is specified separately from other inputs using <digital1_db_secs>. The de-bounce period for all other outputs is specified using <digital2_plus_db_secs>. A value of 0 disables input state de-bouncing. The maximum allowed period is 5 seconds. Default settings for CDIP are: <digital1_db_secs> <digital2_plus_db_secs> 1 0 Accelerometer Wake-up Interrupt Configuration (MEMS) Allows configuration of the criteria for wake from sleep based on accelerometer motion detection. $MEMS,<threshold>,<time-limit> Immobilise (IMOB)* Set digital output for purposes of vehicle immobilisation, giving the option of making the activation conditional on vehicle ignition status and speed to ensure safe immobilisation. When this command is used, the output will remain in the ON (activated) state until $IMOB,0 is received to clear the immobilise condition. When $IMOB is used to activate the output switch, it cannot be reset or cleared by presentation of an iButton. If $IMOB is used with no argument, the default mode 3 is used (conditional on ignition OFF and speed = zero). If IBTN mode is 5, $IMOB with no argument uses mode 4 (immediate and unconditional). $IMOB,<mode> <mode> IMOB Conditions 0 1 2 3 4 Clear immobilisation mode and deactivate output switch (OFF) Activate output switch when vehicle ignition is OFF Activate output switch when vehicle is stationary Activate output switch when vehicle is stationary AND ignition is OFF (DEFAULT) Activate output switch immediately and unconditionally Automatic Immobilisation Schedule Settings (IMOS) Automatic immobilisation can be scheduled individually for each day of the week using this command. $IMOS,<day>,<on_time>,<off_time> Field <day> <on_time> <off_time> Description Day of week since Sunday 0 = Sunday 1 = Monday 2 = Tuesday 3 = Wednesday 4 = Thursday 5 = Friday 6 = Saturday 7 = Apply same settings to every day Vehicle enabled time: hour of day, GMT, 24 hour format Vehicle disabled time: hour of day, GMT, 24 hour format Note: The output used is configured by the CDIG command Range 0-7 0-24 0-24 <on_time> and <off_time> can be defined for each day of the week Specify <day>=7 to set the same <on_time> and <off_time> to all days of the week <on_time> and <off_time> are defined to the nearest hour using 24 hour clock <on_time> and <off_time> are specified in GMT (same as UK time in winter, but -1 hour when daylight saving time reverts to British Summer Time) Set <on_time> = <off_time> to disable auto immobilise schedule for any given day The output will be turned OFF after the specified <on_time> for any given day of the week. The output will be turned ON after the specified <off_time> for any given day of the week and will remain ON until the specified <on_time> for the following day. The state of the output can be over-ridden by the use of the SDIG or IMOB command, which will force the state as specified until the next scheduled <on_time> or <off_time>. Authorised Driver Implementation (DRID) The device will store a list of up to 10 approved iButtons and up to 10 declined iButtons. Each time a 'new' iButton is read (i.e. not currently in the approved list), the device will query the host server for approval to accept the new iButton. This process should take approximately 10 seconds. iButtons approved by the host will be added to the approved list and when presented again in the future they will be immediately authorised by the device. iButtons that are declined will not be added to the approved list and will not allow the vehicle to be started. These are stored in a declined list. Declined iButtons send a query to the host so that if they are changed to approved in future they will be added to the approved list. iButtons previously approved can be removed from the approved list by the host. If there are no communications with the host server, approved iButtons will allow the vehicle to be started and declined iButtons will not allow the vehicle to be started. Unknown iButtons will be temporarily allowed to start the vehicle and approval will be requested as soon as communications resume. If declined at that point, the vehicle will be immobilised. If the approved list becomes full and a new iButton is presented and authorised, the oldest iButton will be removed from the list to make room for the new one. The oldest iButton is based on the last time that the iButtons were presented, so regularly used iButtons should never be removed from the approved list. The device can re-request authorisation from the server of all iButtons in the approved list periodically. In the command descriptions the <family-code> and <serial-number> are formatted as follows: Argument <family-code> <serial-number> Format iButton family code, fixed length, 2 hexadecimal digits (leading zeros), e.g. 01 iButton serial number, fixed length, 12 hexadecimal digits (leading zeros), e.g. 0000125408C9 The following table describes the commands. The first command is from device to host whilst the rest are from host to device. Command $DRID,<model>,CHECK,<imei>,<family-code>,<serial-number> $DRID,APPROVE,<family-code>,<serial-number> $DRID,DECLINE,<family-code>,<serial-number> $DRID,ADD,<family-code>,<serial-number> $DRID,REMOVE,<family-code>,<serial-number> Description Device requests iButton authorisation from host Host approval of iButton Host declines iButton (unknown) Host request to add iButton to approved list Host request to remove iButton from approved list $DRID,CLEAR $DRID,CLEAR,WHITE $DRID,CLEAR,BLACK $DRID,BLOCK,<family-code>,<serial-number> $DRID,VERIFY,<hours> Host request to delete approved and declined list Host request to delete approved list Host request to delete declined list Host request to add iButton to declined list Host request to set the device whitelist verification period (0-65535). 0 disables the request For example: $DRID,AT110,CHECK,351777042187300,01,0000125408C9 ADC Configuration (ADCC) In protocols S, T and V the average ADC readings are reported as 12 bit values in every report. ADC1 and ADC2 will be sampled at regular intervals. Each sample is a 12 bit value. The average over a specified number of samples will be inserted in the next protocol S report. If a sample changes by more than a specified percentage of the input voltage range from the previous reading then this will cause a report to be sent. The format of the ADCC command is as follows: $ADCC,<event_threshold_%_change>,<avg_samples>,<avg_sample_interval> Field <event_threshold_%_change> <avg_samples> <avg_sample_interval> Description Percentage change of the analogue reading from one sample to the next that will cause a report to be sent. Percentage is the change compared to the full scale input range Number of most recent samples that is used to calculate the average reading Number of seconds between each sample Range 0-100 Default 0 0 will disable this feature 1-100 Default 10 1-65535 Default 5 Restore Factory Default Settings (FACT) Resets all parameters to factory defaults (or client defaults) as built into the device firmware. Position on Demand (POLL) The AT240 will send an update report to the host server in response to a variety of userconfigurable events. The POLL command can be used to request an update when there is no event to report. Firmware Update (LOAD) AT240 firmware can be updated over GPRS with this command. The firmware files must first be loaded onto a webserver in the correct format. Please contact Astra Telematics for support and assistance on remote firmware updates. $LOAD,<host-ip-address>,<port-number>,<pathname>,<filename><CR><LF> Reboot (BOOT) Trigger a device reboot. Firmware Version (ATSW) Returns the device firmware version IMEI Query (IMEI) Returns the device IMEI Status Check (STAT) See Appendix Parameter Check (PARA) See Appendix Position Check (POSN) A device location can be queried from a mobile phone etc. using the POSN command. The reply will be formatted as a link to google maps, which can be viewed directly from a mobile telephone handset. $POSN,<map_type>,<zoom> <map_type> ‘m’ = map, ‘k’ = satellite, ‘h’ = hybrid <zoom> 1-20, 20=maximum zoom in, 1=maximum zoom out The parameters are optional. The $POSN command alone will give a position link with map view at zoom level 10. Format of the POSN response: POSN:<IMEI> DD/MM/YYYY HR:MIN:SEC http://maps.google.co.uk/?q=AT240@<latitude>,<longitude>&t=<map_type>&z=<zoom> Diagnostics (DIAG) Engineering diagnostics facilities: $DIAG,1 GPS reset $DIAG,2 Modem reset $DIAG,3 RESERVED $DIAG,4 Load defaults settings $DIAG,5 Ignition (mode 3) recalibrate $DIAG,6 check battery and ext voltage (and debug to RS232) $DIAG,7 recalibrate accelerometer at rest values $DIAG,8 RESERVED $DIAG,9 RESERVED $DIAG,110 recalibrate fuel level / consumption interpolation Erase Stored Reports (ELOG) Erase stored reports from non-volatile (flash memory). If no argument is specified, all reported will be deleted, otherwise the specified number will be deleted (oldest first). Non-volatile Set (NVST) Initialise runtime and lifetime odometer. If the NVST command is submitted without parameters, both values are initialised to zero. $NVST,<odometer_km>,<runtime_hrs> Disable Acknowledgment (NACK) Suppress the response to a given command (SMS/TCP mode) NMEA enable (NMEA) Enable NMEA GPS output on the serial port. A value of 1 enables $GPRMC NMEA sentences and zero disables them (see DBUG to enable/disable other serial output). Default is 1. Serial Port Baud Rate (BAUD) Configure the baud rate of the AT240 RS232 serial port. Default is 115200. Display Settings (SHOW) Display settings in readable ASCII format (not recommended for TCP/SMS, see PARA) Send SMS (SSMS) Send an SMS text message. $SSMS,<gsm_number>,<message> This command is intended to engineering purposes, typically to check/confirm GSM telephone number for unknown SIMs. The implementation does not provide any message buffering or communication retries etc. and hence it is not recommended for operation applications. Device Shutdown (SHDN) This sets the device to sleep mode and turns off the immobiliser output for a specified number of minutes or indefinitely. $SHDN,<minutes> Where <minutes> is in the range 1 to 65535. The <minutes> parameter is optional and if it is omitted the shutdown is indefinite. Send LOGIN packet (LOGN) When MODE is set to 6, the device will send a LOGIN packet each time a new TCP socket is opened. Thereafter, the LOGIN packet will not be resent unless specifically requested using $LOGN command or if/when the socket gets closed and has to be re-opened. CANBus Configuration (CANC) When configured for Protocol V our devices can automatically detect whether the CANBus is FMS or OBD and configure the CANBus interface automatically. Otherwise, the settings can be configured manually using the CANC command: $CANC,< silent mode>,<bit rate index>,<extended CAN ID>,<interface type> The silent mode option operates as described in the following table: silent mode 0 1 Description silent mode off (uses dominant ACK bits. Device will acknowledge received messages). This is the default. silent mode on (uses recessive ACK bits. Device will not acknowledge received messages) The bit rate index is in the range 0-2 and represents an actual bit rate as given in the following table: Bit rate index 0 1 2 Bit rate 125 kbit/s 250 kbit/s. This is the default. 500 kbit/s The extended CAN ID option selects 11 bit or 29 bit CAN identifiers for CAN transmissions as follows: Extended CAN ID 0 1 Description Standard 11 bit identifiers. This is the default. Extended 29 bit identifiers The interface type is set as follows: Interface type 0 1 2 Description Auto-detect. This is the default. FMS OBD (Note that the device will transmit on the CANBus) If the auto-detect process is selected in protocol V and faults are indicated on the vehicle then change to the appropriate fixed FMS/OBD mode. For FMS the following parameters should be presented on the network by the vehicle control units: Parameter Group Number (PGN) 0xFEF1 (65265) 0xF003 (61443) 0xFEE9 (65257) 0xFEFC (65276) 0xF004 (61444) 0xFEEA (65258) 0xFEE5 (65253) 0xFEEC (65260) 0xFDD1 (64977) 0xFEC1 (65217) 0xFEC0 (65216) 0xFE6C (65132) 0xFEEE (65262) 0xFEF5 (65269) 0xFE6B (65131) 0xFEF2 (65266) 0xFDA4 (64932) 0xFD09 (64777) Description Cruise Control/Vehicle Speed Electronic Engine Controller #2 Fuel Consumption Dash Display Electronic Engine Controller #1 Vehicle Weight Engine Hours Vehicle Identification FMS-standard Interface High Resolution Vehicle Distance Service Informations Tachograph Engine Temperature 1 Ambient Conditions Driver's Identification Fuel Economy PTO Drive Engagement High Resolution Fuel Consumption For OBD the following parameters may be presented on the network by the vehicle electronic control units: Parameter ID 0x01 Description 0x04 Engine load 0x05 Engine coolant temperature 0x0C Engine RPM 0x0D Vehicle speed 0x11 Throttle position 0x1F Run time since engine start 0x21 Distance travelled with malfunction indicator lamp on 0x2F Fuel level input Malfunction indicator lamp status and number of diagnostic trouble codes to display CANBus Event Mask (CANM) FMS CANBus events can be configured to generate reports using the following command: $CANM,<canbus_event_mask> where the mask bits are set to 1 to enable event triggers and cleared to disable event triggers. The mask bits are described in the following table: Status Brake switch – pedal released Brake switch – pedal depressed Cruise control – switched on Cruise control – switched off PTO – Off / Disabled PTO – Set PTO – Not Available Vehicle Direction – Forward Vehicle Direction – Reverse Vehicle Speed – Overspeed Vehicle Speed – No Overspeed Reserved Reserved Reserved Reserved Reserved Bit 0 1 2 3 4 5 6 7 8 9 10 11 12 13 14 15 Default 0 0 1 1 1 1 1 1 1 1 1 0 0 0 0 0 Therefore, the default CANM setting is 2044 (0x7FC). FMS/OBD Configuring of Event Reporting Thresholds The CANBus event reporting thresholds can be configured by setting the relevant parameters using the commands described below: Engine load $ELRT,<engine_load_high_threshold> $ELHT,<engine_load_high_hold_timeout> $ELIT,<engine_load_high_inhibit_timeout> Parameter engine_load_high_threshold engine_load_high_hold_timeout engine_load_high_inhibit_timeout Description value which when reached or exceeded by the reported value will generate a report. A setting of 0 turns off event reporting for this threshold. the time (in seconds) for which the reported engine load must exceed the engine_load_high_threshold setting in order for an event to be reported the time (in seconds) following an engine load high event for which another event cannot be reported The engine load is reported on a scale of 0-125 percent of the operational range of FMS and 0100 for OBD. RPM $RPRT,<rpm_high_threshold> $RPHT,<rpm_high_hold timeout> $RPIT,<rpm_high_inhibit timeout> Parameter Description Parameter rpm_high_threshold rpm_high_hold_timeout rpm_high_inhibit_timeout Description value which when reached or exceeded by the reported value will generate a report. A setting of 0 turns off event reporting for this threshold. the time (in seconds) for which the reported RPM must exceed the rpm_high_threshold setting in order for an event to be reported the time (in seconds) following RPM high event for which another event cannot be reported The RPM is reported divided by 32 on a scale of 0-250 (to represent 0-8000 rpm) for FMS and 0255 (0-8160) for OBD. Throttle position $THRT,<rpm_high_threshold> $THHT,<rpm_high_hold timeout> $THIT,<rpm_high_inhibit timeout> Parameter throttle_high_threshold throttle_high_hold_timeout throttle_high_inhibit_timeou t Description value which when reached or exceeded by the reported value will generate a report. A setting of 0 turns off event reporting for this threshold. the time (in seconds) for which the reported throttle position must exceed the throttle_high_threshold setting in order for an event to be reported the time (in seconds) following a throttle high event for which another event cannot be reported The throttle position is reported on a scale of 0-100%. To summarise, the ranges for the event threshold parameters are given in the table below: Parameter engine_load_high_threshold engine_load _hold_timeout (secs) engine_load _inhibit_timeout (secs) rpm_high_threshold rpm_hold_timeout (secs) rpm_inhibit_timeout (secs) throttle_high_threshold throttle_hold_timeout (secs) throttle_inhibit_timeout (secs) Minimum 1 1 1 1 1 1 1 1 1 default value 90 30 60 4000 30 60 75 30 60 Maximum 125 65535 65535 8000 65535 65535 100 65535 65535 Over The Air Test Command (TEST) The $TEST command can be send by SMS, RS232 or TCP. We recommend that this command is used after every installation, BEFORE the installer leaves the vehicle / site. The format of the $TEST response starts with TEST: and is followed by: Line 1 2 3 4 5 6 7 8 9 10 11 12 13 14 Description Comments Device model Firmware version number IMEI Network operator name External input voltage e.g. AT240 e.g. 4.0.41.0 15 digits, e.g. 357322042745742 e.g. Orange UK In Volts followed by percentage of power present over last 7 days, e.g. PWR:12.5V (99%) As a percentage, e.g. BAT:100% OK, ERR or JAM followed by percentage, e.g. GPS:OK (95%) OK, ERR or N/A if errors in any above status, e.g. GPRS:OK (98%) OK, ERR or N/A if errors in any above status, e.g. APN:OK OK, ERR or N/A if errors in any above status, e.g. SKT:OK OK, ERR or N/A if errors in any above status, e.g. ACK:OK OK or ERR, e.g. IGN:OK + current state of IGN OK or ERR, e.g. CAN:OK (CANBus based protocols only) ON or OFF Battery level GPS status (% availability) GPRS status (% availability) APN connection status TCP socket status TCP ack status Ignition inactivity CANBus Inactivity Immobilisation output state Some example responses are shown below: Example 1: device with no errors/problems: TEST:AT200 4.0.41.0 357322042745742 O2 UK PWR:12.5V (100%) BAT:100% GPS:OK (95%) GPRS:OK (98%) APN:OK SKT:OK ACK:OK IGN:OK (OFF) IMOB:OFF Example 2: device with a GPS problem: TEST:AT200 4.0.41.0 357322042745742 Orange UK PWR:12.5V (100%) BAT:100% GPS:ERR (12%) GPRS:N/A (98%) APN:N/A SKT:N/A ACK:N/A IGN:OK (OFF) IMOB:OFF Example 3: device with incorrect APN settings: TEST:AT200 4.0.41.0 357322042745742 Vodafone PWR:12.5V (100%) BAT:100% GPS:OK (98%) GPRS:OK (93%) APN:ERR SKT:N/A ACK:N/A IGN:OK (ON) IMOB:ON Example 4: device with an external power issue (not permanent): TEST:AT200 4.0.41.0 357322042745742 O2 UK PWR:12.5V (24%) BAT:100% GPS:OK (95%) GPRS:OK (98%) APN:OK SKT:OK ACK:OK IGN:OK (ON) IMOB:OFF Status Check (STAT) – Response Format STATUS: AT240 serial number Software version number Date of the last GPS fix Time of the last GPS fix Latitude of the last GPS fix Longitude of the last GPS fix Speed of the last GPS fix Heading of the last GPS fix External Input voltage Battery Level Percentage Number of reports queued/stored SMS used this month/monthly limit Network Roaming GPS current satellites used GPS % availability (last 7 days) GSM current signal strength GSM % availability (last 7 days) GSM Mobile Network Code Ignition status, current ERROR CODES: GPS timeout error Modem GPRS attach error Modem GPRS connect error Modem TCP socket error Modem TCP acknowledgment error Ignition inactivity error Fixed packet header 15 digit IMEI number (serial number of device) Floating point number dd/mm/yy hh:mm:ss Floating point – decimal degrees Floating point - decimal degrees integer - kmh Integer - degrees Floating point - volts Integer % integer Integer/integer “H” for home network and “R” when roaming Integer Integer % Integer Integer % Integer Boolean 0: no error 1: GPS timeout 2: jammer detected Boolean (0 = no error, 1 = error) Boolean Boolean Boolean Boolean Notes on error codes: 1. GPS timeout No GPS fix has been returned for the specified timeout period (GPST). Could be an indication of an antenna fault or simply that the vehicle is parked in covered area (e.g. underground car park). 2. Modem GPRS attach fail Can be simply due to GSM network coverage, but persistent attach failure is an indication that the GSM SIM card is not enabled for GPRS. 3. Modem GPRS connect fail If the modem is attached, but not connected, this is usually caused by incorrect GPRS access point settings (APAD, APUN and APPW). See appendix E for a list of access point details for most networks. 4. Modem TCP socket error The modem has failed to open a socket on the specified IP address and port number. Can be caused by incorrect TCP address settings (IPAD, PORT), a fault at the host server or even wider internet problems. 5. Modem TCP acknowledgment fail This error code indicates that the AT100 can proceed all the way to open a socket and deliver the report packet, but does not get the normal acknowledgment response from the host TCP application. This is normally caused by a fault at the host end. 6. Ignition input inactivity error This error is set when no ignition events have been detected for more than 24 hours Parameter Check (PARA) – Response Format PARA: Fixed packet header Software version number Floating point number SERV SMS host number International format telephone IPAD primary TCP IP address PORT primary TCP port number TCP IP address number TCP port number - integer IPAD2 TCP IP address for PTDM mode TCP IP address PORT2 TCP port number for PTDM mode TCP port number - integer APAD access point address Text string APUN access point username Text string APPW access point password Text string DIST distance report value (metres) Integer HEAD heading change report value Integer JTIM in-journey timed reporting interval (degrees) STIM stationary timed report interval (minutes) ITIM idling timed report interval (minutes) (minutes) IDLE idle mode start threshold (seconds) Integer STPD stop report delay (seconds) Integer OSST overspeed threshold (kmh) Integer OSHT overspeed hold time (sec) Integer OSIT overspeed inhibit time (sec) Integer MODE GSM reporting mode Integer PROT reporting protocol Integer REPL reporting level Integer SMSL maximum monthly SMS usage Integer IGNM ignition mode Integer GPSQ minimum GPS quality Integer ROAM network roaming enable integer TCPT TCP mode timeout (seconds) Integer IBTN iButton Mode Integer CLID cell-ID mode Integer PTDM pass through data mode enable Integer GSM network operator name Text string (max 12 chars) GSM own telephone number Text string (max 15 chars) Integer Integer Integer