1
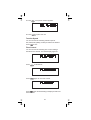
SC200 200-Channel Programmable Twin Turbo Hand-Held Sports Scanner OPERATING GUIDE Precautions Before you use this scanner, please read and observe the following: WARNING! Uniden DOES NOT represent this unit to be waterproof. To reduce the risk of fire or electrical shock, DO NOT expose this unit to rain or moisture. n IMPORTANT! Be sure to use only the supplied earphone, or a stereo headset of the proper impedance (32W ). Use of an incorrect earphone or stereo headset may be potentially hazardous to your hearing. n WARNING: Set the volume to a comfortable audio level coming from the speaker before plugging in the supplied earphone or a stereo headset of the proper impedance (32W ). Otherwise you might experience some discomfort or possible hearing damage if the Volume suddenly becomes too loud because of the Volume Control or Squelch Control setting. This may be particularly true of the type of earphone that is placed in the ear canal. n n NICKEL-CADMIUM BATTERY WARNING · This equipment contains a Nickel-Cadmium Battery. · Cadmium is a chemical known to the State of California to cause cancer. · The Nickel-Cadmium Battery contained in this equipment may explode if disposed of in a fire. · Do not short circuit the battery. · Do not charge the Nickel-Cadmium Battery used in this equipment with any other AC Adapter/Charger other than the one designed to charge this battery (AD-70U). Using another charger may damage the battery, or cause the battery to explode. n Nickel-Cadmium Battery Disposal Nickel-Cadmium Batteries Must Be Disposed Of Properly. Read the Nickel-Cadmium Battery Disposal package insert for important information. Uniden® and Bearcat® are registered trademarks of Uniden America Corporation. Sportcat™ is a proprietary trademark of Uniden America Corporation. ii Contents About Your New SportCat . . . . . . . . . . . . . . . . . . . . . . . 3 What is Scanning?. . . . . . . . . . . . . . . . . . . . . . . . . . . . . 3 What is Searching? . . . . . . . . . . . . . . . . . . . . . . . . . . . . 3 What is CTCSS and CDCSS?. . . . . . . . . . . . . . . . . . . . 4 Important Notice . . . . . . . . . . . . . . . . . . . . . . . . . . . . . . 5 Types of Communication. . . . . . . . . . . . . . . . . . . . . . . . 5 Where to Obtain More Information . . . . . . . . . . . . . . . . 6 Unpacking . . . . . . . . . . . . . . . . . . . . . . . . . . . . . . . . . . . 6 Feature Highlights . . . . . . . . . . . . . . . . . . . . . . . . . . . . . . 7 Controls and Indicators . . . . . . . . . . . . . . . . . . . . . . . . . 9 Top View . . . . . . . . . . . . . . . . . . . . . . . . . . . . . . . . . . . . 9 Front View . . . . . . . . . . . . . . . . . . . . . . . . . . . . . . . . . . 10 Setup. . . . . . . . . . . . . . . . . . . . . . . . . . . . . . . . . . . . . . . . 15 Installing the Battery Pack . . . . . . . . . . . . . . . . . . . . . . 15 Mounting the Flexible Antenna . . . . . . . . . . . . . . . . . . 16 Installing the Belt Clip . . . . . . . . . . . . . . . . . . . . . . . . . 16 Using the Earphone. . . . . . . . . . . . . . . . . . . . . . . . . . . 16 Operation Overview. . . . . . . . . . . . . . . . . . . . . . . . . . . . 17 Programming Channels . . . . . . . . . . . . . . . . . . . . . . . . 19 Programming By Manual Entry . . . . . . . . . . . . . . . . . . 19 Deleting a Stored Frequency. . . . . . . . . . . . . . . . . . . . 20 Programming with Search . . . . . . . . . . . . . . . . . . . . . . 20 Programming Channels with Alpha Characters. . . . . . 21 Alert Beep Setting . . . . . . . . . . . . . . . . . . . . . . . . . . . . 22 Scanning . . . . . . . . . . . . . . . . . . . . . . . . . . . . . . . . . . . . 23 Bank Scanning . . . . . . . . . . . . . . . . . . . . . . . . . . . . . . 23 Priority Scan . . . . . . . . . . . . . . . . . . . . . . . . . . . . . . . . 24 Delay . . . . . . . . . . . . . . . . . . . . . . . . . . . . . . . . . . . . . . 24 Locking Out Channels . . . . . . . . . . . . . . . . . . . . . . . . . 25 Looking for “Locked Out” Channels. . . . . . . . . . . . . . . 25 Weather Channel Scanning. . . . . . . . . . . . . . . . . . . . . 26 Searching . . . . . . . . . . . . . . . . . . . . . . . . . . . . . . . . . . . . 27 Band Search . . . . . . . . . . . . . . . . . . . . . . . . . . . . . . . . 27 Limit Search. . . . . . . . . . . . . . . . . . . . . . . . . . . . . . . . . 27 VFO Search. . . . . . . . . . . . . . . . . . . . . . . . . . . . . . . . . 28 Search Skip Frequency . . . . . . . . . . . . . . . . . . . . . . . . 28 CTCSS/CDCSS Operation. . . . . . . . . . . . . . . . . . . . . . . 29 Programming CTCSS Tone/CDCSS Tone . . . . . . . . . 29 Searching for CTCSS Tone/CDCSS Tones . . . . . . . . 30 Using Tone Search . . . . . . . . . . . . . . . . . . . . . . . . . . . 31 Using CTCSS Tone or CDCSS Tone Search While Searching . . . . . . . . . . . . . . . . . . . . . . . . . . . . . . . . . . 33 Changing a CTCSS/CDCSS Tone . . . . . . . . . . . . . . . 35 Erasing a CTCSS/CDCSS Tone . . . . . . . . . . . . . . . . . 36 1 Remote Interface . . . . . . . . . . . . . . . . . . . . . . . . . . . . . . 38 Connecting the Scanner . . . . . . . . . . . . . . . . . . . . . . . 38 Scanner to External Modem . . . . . . . . . . . . . . . . . . . . 39 Scanner to Scanner. . . . . . . . . . . . . . . . . . . . . . . . . . . 39 SmartScan Mode. . . . . . . . . . . . . . . . . . . . . . . . . . . . . 39 Menu for SmartScan . . . . . . . . . . . . . . . . . . . . . . . . . . 42 Program Lock . . . . . . . . . . . . . . . . . . . . . . . . . . . . . . . 42 Transfer Speed . . . . . . . . . . . . . . . . . . . . . . . . . . . . . . 43 Flow Control . . . . . . . . . . . . . . . . . . . . . . . . . . . . . . . . 43 Dial Type . . . . . . . . . . . . . . . . . . . . . . . . . . . . . . . . . . . 44 SmartScanner Tips . . . . . . . . . . . . . . . . . . . . . . . . . . . 44 Clone Mode . . . . . . . . . . . . . . . . . . . . . . . . . . . . . . . . . 45 Care and Maintenance . . . . . . . . . . . . . . . . . . . . . . . . . 47 Replacing the Battery Pack . . . . . . . . . . . . . . . . . . . . . 47 Location . . . . . . . . . . . . . . . . . . . . . . . . . . . . . . . . . . . . 48 Cleaning . . . . . . . . . . . . . . . . . . . . . . . . . . . . . . . . . . . 48 Repairs . . . . . . . . . . . . . . . . . . . . . . . . . . . . . . . . . . . . 48 Birdies . . . . . . . . . . . . . . . . . . . . . . . . . . . . . . . . . . . . . 49 Proper Care of your Scanner. . . . . . . . . . . . . . . . . . . . 49 Technical Specifications. . . . . . . . . . . . . . . . . . . . . . . . 50 CTCSS/CDCSS Tone Frequencies (Hz) . . . . . . . . . . . 52 Optional Accessories and Replacement Parts . . . . . . 53 Troubleshooting . . . . . . . . . . . . . . . . . . . . . . . . . . . . . . 54 One Year Limited Warranty . . . . . . . . . . . . . . . . . . . . . 56 2 About Your New SportCat The SportCat™ is a state-of-the-art information radio with automatic scanning capabilities. It can store frequencies such as sporting events, police, fire/emergency, and other communications into 10 banks of 20 channels each. And you can scan all 200 channels at super fast Turbo Scan speed. What is Scanning? Unlike standard AM or FM radio stations, most two-way communications (listed below) do not transmit continuously. The SportCat scans programmed channels at the rate of nearly 100 CH per second until it finds an active frequency. Scanning stops on an active frequency, and remains on that channel as long as the transmission continues. When the transmission ends, the scanning cycle resumes until another transmission is received. Or, you can select an optional delay so the scanner stays on the channel for 2 more seconds after the transmission stops, waiting for another transmission, before resuming scanning. While the SportCat is scanning channels, it is in “SCAN Mode”. When you stop the scanning with , it is in “MANUAL Mode”. What is Searching? The SportCat can search each of 12 preprogrammed bands to find active frequencies. This is different from scanning, because you can search for frequencies that have not been programmed into your SportCat. You can also search within the range of frequencies you have programmed before. You can set the direction of searching as well as the speed. The Turbo Search feature, new for Uniden scanners, can search VHF bands at up to 3 times the normal speed. When the SportCat is searching for active frequencies, it is in “TURBO SEARCH Mode” or “TWIN TURBO SEARCH Mode”. When you stop the search with , it is in “SEARCH HOLD Mode”. 3 What is CTCSS and CDCSS? The term “Continuous-Tone-Controlled-Squelch-System” (herein referred to as CTCSS) and “Continuous DigitalControlled-Squelch-System” (herein referred to as CDCSS) shall define a system where the radio receiver (s) are equipped with tone or data responsive devices which allow audio signals to appear at the receiver audio output, select voice processing such as scrambling, select between voice or data, or control repeater functions, only when a carrier modulated with a specific tone or data pattern is received. CTCSS and CDCSS are used for many purposes. In many cases, CTCSS and CDCSS are used to restrict access to a commercial repeater, so that only those units which transmit the correct tone along with their signal can “talk to the repeater.” You may also need to have your scanner coded correctly to “hear” the repeater. CTCSS and CDCSS are also used in areas of high interference where there are several stations with output frequencies in close proximity with one another. When this occurs, you may hear multiple communications at the same time. The stations could even interfere with each other to the point where it is impossible to clearly receive either one. When your receiver, in this case, a scanner, is equipped for CTCSS and CDCSS, you can code each received frequency with a specific CTCSS and CDCSS frequency. Then, when multiple signals are broadcast, you will only hear the transmission with the CTCSS tone or CDCSS tone you have programmed. If you do not receive the correct tone with a signal, the squelch of your scanner remains closed and you will not hear anything. Establishment of the CTCSS tone and CDCSS tone for each transmitter (or repeater) is usually done through the cooperative setting of standards by local frequency allocation groups. 4 Important Notice n This scanning radio has been manufactured so that it will not tune to the radio frequencies assigned by the FCC for cellular telephone usage. The Electronic Communications Privacy Act of 1986, as amended, makes it a federal crime to intentionally intercept cellular or cordless telephone transmissions or to market this radio when altered to receive them. n The installation, possession, or use of this scanning radio in a motor vehicle may be prohibited, regulated, or require a permit in certain states, cities, and/or local jurisdictions. Your local law enforcement officials should be able to provide you with information regarding the laws in your community. n Changes or modifications to this product not expressly approved by Uniden, or operation of this product in any way other than as detailed by this Operating Guide, could void your authority to operate this product. Types of Communication You will be able to monitor communication such as: » » » » » » » » » Automobile, boat, and marathon races Golf tournaments Traffic information Police and fire department (including rescue and paramedics) NOAA and Canadian weather broadcasts (10 preprogrammed channels) Land transportation, such as trucking firms, buses, taxis, tow trucks, and railroads Marine and amateur radio. Aircraft Public Service 800 MHz band And many more in the following 12 Bands: RANGE (MHz) STEP (kHz) BAND SUBJECT 10 Meter Amateur Band VHF Low Band 6 Meter Amateur Band AM Aircraft Military Land Mobile 2 Meter Amateur Band VHF High Band Federal Govt. Land Mobile 70 cm Amateur Band UHF Standard Band 29.0000-29.9950 30.0000-49.9950 50.0000-54.0000 108.0000-136.9875 137.0000-143.9950 144.0000-147.9950 148.0000-174.0000 406.0000-419.9875 5 5 5 12.5 5 5 5 12.5 NFM NFM NFM AM NFM NFM NFM NFM 420.0000-449.9875 450.0000-469.9875 12.5 12.5 NFM NFM 5 RANGE (MHz) 470.0000-512.0000 806.0000-823.9875 849.0125-868.9875 894.0125-956.0000 STEP (kHz) 12.5 12.5 12.5 12.5 BAND NFM NFM NFM NFM SUBJECT UHF “T” Band Public Service “800" Band Important! The SportCat will not tune within the Cellular Telephone Band. Where to Obtain More Information The Bearcat Radio Club and other similar hobby clubs have publications, information on computer bulletin boards, and even contests for the radio enthusiasts. See the enclosed pamphlets for more information. Additional information is also available through your local library. Unpacking Carefully check the contents against this list: n n n n n n n n n SportCat Twin Turbo Sports Scanner Rubber Antenna AC Adapter/Charger (AD-70U) Earphone Belt Clip with 2 Screws Battery (BP-180) Remote Cable This Operating Guide Frequency Directories Order Form and Betty Bearcat Club Information n SportCat Frequency Guide n Nickel-Cadmium Battery Disposal Notice n Product Registration Form If any items are missing or damaged, call the Uniden parts department at the number below. Please read this Operating Guide thoroughly before operating the scanner. Uniden Parts Department (800) 554-3988 Hours are 8:30 a.m. to 5:00 p.m. Central Time Monday to Friday We can also be reached on the web at www.uniden.com 6 Feature Highlights ◆ Twin Turbo Scan & Search —This lightning-fast technology enables the SportCat to scan nearly 100 channels per second. Search speed is selectable between 100 and 300 steps per second. (300 steps per second only in bands with 5 kHz steps.) Because the frequency coverage is so large (see previous section for band listing), very fast scanning and searching are essential. ◆ 200 Channels You can program each of these memory channels to store one frequency. ◆ 12 Bands, 10 Banks Includes 12 Bands, with Aircraft and 800 MHz. 10 Banks of 20 channels each are useful for storing similar frequencies in order to maintain faster scanning cycles. ◆ 29 MHz - 956 MHz Indicates the range of frequencies that can be searched within the bands of your scanner. (Note: The frequency coverage is not totally continuous from 29.0 MHz to 956 MHz.) ◆ 10 Priority Channels You can assign one Priority Channel in each Bank. Assigning priority channels allows you to keep track of activity on your most important channel(s) while monitoring other channels for transmissions. (Priority Channels are initially set in the first channel in each Bank.) ◆ Weather Channels Lets your scanner function as a weather information radio. ◆ Memory Backup The stored channels are retained in memory permanently. ◆ Programmable Alpha Characters You can program up to 200 channels with alphabetical characters for easy reference. ◆ Band Search You can search within the preprogrammed bands. ◆ Limit Search You can search within a specific range of frequencies. ◆ VFO Search You can search by using the VFO control. ◆ Alert Beep If the SportCat finds a transmission on a channel you have preset, it beeps twice. ◆ Auto Light The SportCat can turn on its backlight automatically when it finds a transmission if this function is activated. 7 ◆ Smart Scanner Automatically programs your SC200 with all the frequencies and Alpha Characters of the frequency for your local area by accessing our national database with your PC or just an external modem. (No PC required.) ◆ CTCSS/CDCSS (Continuous Tone Controlled Squelch System), (Continuous Digital Controlled Squelch System). When activated, the SportCat will only tune to a frequency if the associated CTCSS tone or CDCSS tone you have programmed is included with the transmission. You can also use this feature to search for a CTCSS tone or CDCSS tone when monitoring a transmission. 8 Controls and Indicators Top View Antenna Connector Connect the rubber antenna to the BNC connector and turn clockwise until it locks. Earphone Jack Plug the supplied earphone into this jack for private listening. When the earphone is connected, the internal speaker is disconnected. Note the warning on page 16. Adjust this control to set the scan threshold and to eliminate the background rushing noise heard in the absence of an incoming signal. See the Operation Overview Section for adjustment procedures. Use this control to turn the scanner on or off, and to adjust the volume. SQUELCH Control ON-OFF/ VOLUME Control VFO Control Use this control to select channels in Manual mode, select the band for Band Search, and select frequencies in Band/Limit Search mode. You can also use this to program Alpha Name characters and CTCSS/CDCSS Data. 9 Front View 10 1. LCD DISPLAY — The liquid crystal display (LCD) shows the current channel and frequency. It also displays the mode, status, and bank indicators. A. Priority Channel Indicator — P appears when the scanner stops on a Priority Channel. B. Channel Number — Indicates the current channel that the scanner is on. C. Memory Bank Numbers — Each Memory Bank consists of 20 channels that you can select or deselect during scanning operation, using the numeric keypad. When you select a Bank, its number appears on the display. When you deselect a Bank, its number disappears from the display. When you press to stop scanning, only the Bank of the current channel appears. D. Bank Indicator — Appears with the Bank Numbers (1~10). E. Frequency Indicator — Indicates the frequency being received by the scanner, or Alpha Name, etc. F. Low Battery Indicator — Appears on the display when the Battery Pack is low and needs recharging. G. Mode/Function Indicators — (Only the active mode(s)/function(s) are displayed during operation.) SCAN Indicates SCAN and WEATHER SCAN HOLD. SEARCH Indicates SEARCH Mode. Flashes when in TURBO SEARCH Mode. PRIORITY Indicates PRIORITY SCAN is activated. HOLD Indicates MANUAL and WEATHER SCAN HOLD or SEARCH HOLD Mode. DELAY Indicates DELAY is activated. L/O In MANUAL Mode, indicates the channel shown is “Locked Out”. In SEARCH HOLD Mode, indicates the frequency shown is “Locked Out”. WX Indicates WEATHER SCAN Mode. 11 ATT Appears when the Attenuator function is set. Indicates the keypad is locked. Appears when the display mode is Alpha Name mode. CTCSS Appears when the Subaudible Tone function is turned on and a CTCSS tone is associated on the display channel. CDCSS Appears when the Subaudible Tone function is turned on and a CDCSS tone is associated on the display channel. 2. Press to start scanning all programmed channels that are not locked out. (SCAN moves across the display during scanning.) 3. In SCAN and WX or SEARCH Mode, press to stop scanning. (HOLD appears on the display.) In Manual mode, press to step up the channel. 4. NUMERIC KEYPAD — Use these keys to program a channel for scanning. Also use to access a channel directly with . During SCAN Mode, use these keys to select or deselect any of the 10 memory banks. (Only the selected bank indicator(s) appear on the display.) Note: You cannot deactivate all 10 banks at the same time. Key Bank Channel 1 1 - 20 2 21 - 40 3 41 - 60 4 61 - 80 5 81 - 100 6 101 - 120 7 121 - 140 8 141 - 160 9 161 - 180 10 181 - 200 12 5. Press and hold /BAND to start Limit search. The VFO knob allows you to toggle through the bands. Then press /BAND again to start band search. 6. Press to stop Band serch, Limit search and WX scan. Also, press it to move to next higher channel or frequency. Press and hold to change the search direction to upper side. 7. In Limit search, input the frequency and press to program the lower/higher frequency. Press to stop Band search, Limit search, and WX scan. Also, press it to move to next lower channel or frequency. Press and hold to change the search direction to lower side. 8. Press /ALERT to change the display mode when you program frequency or Alpha characters. Press and hold /ALERT to set the Alert Beep function in Manual mode. 9. Use /CLR to enter the decimal point when programming a frequency into a channel. If you make an entry error, press /CLR before the key to erase the entry, and start over. Also, use /CLR to clear the error message display. 10. Press to store a displayed frequency and CTCSS/CDCSS Data and Alpha characters into any displayed channel. 11. Press to “Lock Out” or prevent scanning of the displayed channel, including Priority Channels. (L/O appears on the display.) To unlock a channel, press again. can be used for Scan or SEARCH Modes. 12. There are 10 Preprogrammed NOAA and Canada weather channels. Press /ATT to find the active NOAA and Canada weather channel in your area. WX appears on the display in Weather Mode. If you want to set or reset the Attenuator function, press and hold /ATT. 13 /KEYLOCK to turn ON or OFF the 13. Press automatic 2-second delay during scanning or searching for active frequencies. (When delay is activated, DELAY appears on the display.) In this mode, when the scanner monitors an active frequency, searching or scanning will not resume until transmission stops for 2 seconds. appears Press and hold /KEYLOCK until on the display. This disables the keypad and VFO control and prevents any accidental key entries. To enable the keypad, press and hold /KEYLOCK until disappears from the display. 14. While Scanning, press /TURBO to activate the PRIORITY SCAN function. (PRIORITY appears on the display.) While Searching, press /TURBO to toggle between 100 steps and 300 steps per second. (When in TURBO SEARCH is activated. SEARCH flashes on the display.) 15. Press to turn the Subaudible tone Mode on/off. Press and hold to turn the Subaudible tone search on/off. 16. Press to turn the LCD Back light on and off. Press and hold for 2 seconds to make the scanner turn the LCD Back Light on when a transmission is found (Auto Light function). 14 Setup The SportCat comes with a rechargeable Nickel-Cadmium Battery Pack. When fully charged, this Battery Pack will supply up to 12 hours of dependable use. (With the Squelch control in “closed” position.) Before using the SportCat for the first time, or whenever the LOW BATTERY Indicator appears on the LCD display, you should fully charge the Battery Pack. Note: When the Battery Pack is low, the Low Battery Indicator will start to blink. After about 10 minutes, the scanner will shut itself off to prevent the battery from becoming completely discharged. Before charging, you must first install the Battery Pack according to the steps below. Installing the Battery Pack 1. Open the cover. 2. Insert the battery pack. 3. Replace cover and press down until it clicks into place. 15 Mounting the Flexible Antenna Place the end of the antenna onto the BNC connector on top of the scanner and turn clockwise until tight. Installing the Belt Clip 1. Place the Belt Clip on the mounting area on the back of the scanner, making sure the holes in the clip line up with the threads in the back of the scanner. 2. Insert the 2 screws into the corresponding holes and tighten. CAUTION: Do not tighten the screws too tight. You could damage the case or clip. Using the Earphone The PHONE jack at the top of the SportCat is a standard 3.5mm stereo phone jack. You can use either the supplied earphone, or a stereo headset of the proper impedance (32W ). The output of this jack is monaural audio, but you will hear it in both headphones of a stereo headset. IMPORTANT! Be sure to use only the supplied earphone, or stereo headset of the proper impedance (32W ). Use of an incorrect earphone or stereo headset may be potentially hazardous to your hearing. WARNING: To avoid discomfort or possible hearing damage, be sure to set the Volume Control before plugging in the earphone or proper headphones. A sudden opening of the Squelch may cause unexpected loud audio. 16 Operation Overview Note: Before operating the SportCat for the first time, make sure you have fully charged the Battery Pack. 1. Before turning on the scanner, rotate the Squelch Control fully clockwise. 2. Turn the scanner on by rotating the On-Off/Volume Control clockwise until you hear a click. Turn the Volume Control a small amount clockwise to a low listening level. 3. You should hear either a “rushing” noise or some communications. If you are monitoring a transmission, wait until it stops before adjusting the Squelch Control. 4. Readjust the volume to a comfortable listening level. 5. Turn the Squelch Control counterclockwise just until the rushing noise disappears. At the squelch threshold, any incoming signal just slightly stronger than the noise will open the squelch. Any communication that is received will open the Squelch, and stop scanning or Searching. Note: If squelch is set too tight, that is, too far counterclockwise from the threshold point, a much stronger signal is required to open the squelch. If squelch is set on a point clockwise from the threshold, you will hear a constant sound (noise, if no signal is present.) The scanner will not scan. The SportCat has 200 memory channels, each of which can be programmed to store one frequency. The channels are divided into ten 20-channel banks, useful for storing similar frequencies in order to maintain faster scanning cycles. You can monitor communication in one of two ways: n BANK SCAN If you have programmed channels, you can scan all programmed channels in the selected bank(s), except locked out channels. When the scanner stops on an active frequency, it remains on that channel as long as the transmission continues. When the transmission stops, the SportCat resumes scanning. If the Delay Function is on, the scanner remains on the same channel for 2 more seconds, waiting for a responding transmission. If there is no responding transmission within 2 seconds, the scanning cycle resumes. 17 Any channels that are not programmed (000.0000) are skipped during scan. When the SportCat is in SCAN Mode, the display will look something like this: n SEARCH The Search function is different from Scan. When you select a frequency band to search, the scanner searches for any active frequency within the lower and upper limits of the band. Also, when you program frequency range, you can search within the frequency range. When an active frequency is found, the scanner stops on that frequency as long as the transmission lasts. If the Delay Function is on, the scanner remains on the same channel for 2 more seconds, waiting for a responding transmission. If there is no responding transmission within 2 seconds, the search cycle resumes. When the SportCat is on SEARCH Mode, the display will look something like this: 18 Programming Channels Before you can scan, you must program the channels within a bank. You can store one frequency per channel, up to 200 channels. Note: If appears on the display (keypad Locked), unlock the keypad by pressing and holding /KEYLOCK until disappears. There are four ways to program a channel: n Manually select a channel and frequency, using the numeric keypad. You can determine the frequencies you want from the Betty Bearcat (or similar) Frequency Book (optional), or from the SportCat Frequency Guide (included). n Search a band to find an active frequency, and then directly store it into a channel. n SmartScan Mode ® P39 n Clone Mode ® P45 A. Programming By Manual Entry 1. Select a frequency from the appropriate Frequency Directory. Example: Program 125.2500 MHz into Channel 18. 2. Press 3. Press to stop scanning. to go to Channel 18. 4. Enter the frequency number using the numeric keypad. (Be sure to include the decimal point.) . If you make a mistake and want to clear the entry, press and re-enter the frequency. 5. Press to store the entry. The frequency on the display will blink twice to confirm the programming. Note: To enter frequency in manual mode, Tone Search must be turned off. See page 31, “Using Tone Search.” 19 6. If that frequency is already stored in another channel, you will hear a “beep”, and the other channel number will appear on the display. If you want to store the frequency in the selected channel (18) as well, press again. The frequency will blink twice to confirm the programming. Or, you can press and enter another frequency for the currently selected channel. Note: Any frequency already stored in any channel will automatically be replaced by the new one. 7. If you try to enter a frequency that is outside one of the 12 Bands, you will hear a “beep”, and the word “Error” appears on the display. Press and re-enter the correct frequency. 8. To program another channel, repeat the above procedures. Deleting a Stored Frequency To delete a frequency from a channel: 1. Display the channel and frequency that is to be deleted. 2. Press on the numeric keypad. 3. Press . The current channel is erased, and the display shows 000.0000. Note: That channel will be skipped during scanning. B. Programming with Search The Search feature enables you to rapidly search for active frequencies within the specified band limits. When an interesting frequency is found, you can store it into a channel using the procedure below. For more information about SEARCH Mode, see the section titled “Searching”. 1. Press and hold /BAND to enter the BAND SEARCH Mode. 20 2. Use the and keys or VFO control until you see the Band you want. 3. Wait for at least 2 seconds or press /BAND for Search to begin. If you wish to change the search direction, press and hold or to search in an up or down direction. 4. When Search stops on a desired frequency, press or to stay on that frequency. 5. To store the displayed frequency into a channel: Select the channel number with the numeric keys, and press . The selected channel will appear on the display. The frequency currently stored in the channel will appear for 2 seconds and then will be replaced by the frequency located from the search. 6. To store the displayed frequency into that channel, press . The frequency will blink twice to confirm the programming. The next available empty channel to store the frequency will be blinking on the display. Programming Channels with Alpha Characters Use this feature to name channels (up to 200 channels) for easy reference. 1. Select the channel. 2. Press “ /ALERT to go to the Alpha Name display, ” appears on the display. 3. Press . The Edit cursor flashes. Note: If the frequency of the channel has not been programmed, you cannot program the Alpha Name on the channel. 4. To select the edit position, press cursor to the right or to move the Edit to move it to the left. 21 5. Select the character using VFO Control. Turn clockwise to move 0 - 9, A - z and other characters and stop the control at the letter you wish to store. 6. Repeat the steps 4 and 5 for all the characters you want to program. 7. When you complete the input, press . The words you have programmed flash twice. Alert Beep Setting When a transmission occurs on a channel on which you have set the Alert Beep function, 2 beeps will let you know that your “favorite” channel has been received. You can set this function for each channel. Select a channel, then press and hold /ALERT to set this function on a channel in Manual mode. appears on the display. (Except in Alpha Name display Mode) You cannot set this function for the channels which have not been programmed before. 22 Scanning Bank Scanning 1. If SCAN is not indicated on the display, press . The SportCat should begin scanning. The indicators for the selected Banks (1 through 10) appear on the display. The indicator of the Bank currently being monitored flashes. While the SportCat is scanning, the word SCAN moves across the display. Scanning stops on any active channel that is not “Locked Out”, and displays the Channel Number and frequency or Alpha Name. Scanning resumes automatically after the transmission stops. 2. You can deselect any bank(s) from being scanned by entering the number of the bank. The deselected bank indicator(s) disappear from the display, and those channels will not be scanned. This procedure helps to speed up the scanning cycle. Note: One Bank must always be active. You cannot deactivate all 10 banks at the same time. If you try to deactivate all 10 Banks, Bank 1 will automatically be active. 3. To restore any bank for scanning, just enter its number again. The bank indicator will reappear on the display. 4. To stop scanning any time, press . (HOLD appears on the display.) The scanner remains on the displayed channel, and only the bank indicator for that channel appears. Press , to resume scanning. 5. When you are stopped at a channel, you can press to step down a channel, or to step up a channel. Press and hold either key to rapidly step through the channels. Note: You do not skip a locked out (“L/O”) channel when you use or . 23 To access a specific channel: 1. Press . 2. Enter the channel number using the numeric keys. 3. Press again. Priority Scan The SportCat has 10 Priority Channels, 1 per Bank. Initially these are the first channel in each Bank. (e.g. Channel 1, Channel 21, Channel 41, and so on.) In priority scan mode, the scanner checks the Priority Channel(s) every 2 seconds during the Scan cycle. If a transmission is received, the scanner will stop at that channel. If the Priority Channel in any Bank is “Locked Out”, it will be skipped during scanning. You can move the Priority to any other channel in a Bank as follows: 1. Go directly to that channel using any of the methods described above. 2. Press and hold for at least 2 seconds. You will hear “two beeps,” and P will appear on the display to the left of the new channel number. That channel will now be the Priority Channel for that Bank. (The P will no longer appear for the previous Priority Channel.) To activate Priority Scan, press . The PRIORITY indicator will appear at the bottom of the display. To deactivate Priority Scan, press again. The PRIORITY indicator will disappear from the bottom of the display. Delay Normally the scanner will resume scanning when a transmission stops. If you want to remain on a channel until a responding transmission is received, activate the DELAY feature. This feature can be active in SCAN, MANUAL, SEARCH, and WEATHER Modes. 1. Press . The DELAY indicator appears on the display. The scanner will now pause 2 seconds after transmission stops before resuming scanning. 2. Press again to deactivate Delay. The DELAY indicator disappears from the display. 24 Locking Out Channels You may have programmed certain channels that you do not want to hear every time you scan. These might be channels that are busy a major portion of the time, causing the scanner to stop at the channel(s) often enough to interrupt the scan cycle. You can Lock Out those channels so they are not scanned. 1. Go directly to the channel using any of the methods described above. 2. Press . L/O appears on the display. That channel is now “Locked Out” of the scanning cycle. To include the channel back in the scanning cycle: 1. Go directly to the desired channel. 2. Press . The L/O indicator now disappears from the display, and the channel is no longer “Locked Out”. You can lock out any or all of the Priority Channels in the same way as other channels. If you lock out all Priority Channels you will see this message in Priority Mode: You can also remove L/O from all “Locked Out” channels in the selected Scan Banks (those appearing on the display.) Press and hold for at least 2 seconds. You will hear 2 beeps and all channels except empty channels (000.0000MHz) are returned to the scanning cycle in the selected Scan Banks. Looking for “Locked Out” Channels During scanning, you will not see “Locked Out” channels. To look for “Locked Out” channels, first press to stop scanning. Then use or to step through the Bank. You will see L/O on the display to indicate a “Locked Out” channel. 25 Weather Channel Scanning The SportCat is designed to search for your local NOAA and Canada weather channel(s) from 10 preprogrammed NOAA and Canada channels. 1. Press /ATT to begin Weather scan. WX appears at the lower side of the display and the word SCAN moves across the display. 2. When the Weather scan finds an active channel in your area, the scanner stops at that frequency. 3. To stay at that frequency, press To resume Weather scan, press or /ATT. . It is possible for you to hear more than one Weather broadcast in your area. If the broadcast sounds weak and distant, press /ATT again to look for a closer station. Or, press or to move to another station. 4. To exit Weather Mode, press /BAND. , or Note: All weather channels transmit continuous broadcasts. Once the Weather scan stops on a transmission, it will remain on that channel. Weather scan will not resume automatically. You must press /ATT again to reactivate scanning. In some parts of the country, you may not be able to monitor weather broadcasts, such as in low-lying areas. Normally a higher location will improve the reception. 26 Searching Band Search The SportCat has 12 Preprogrammed Search Bands. You can search any of these Bands to find desired frequencies if you do not have a Frequency Directory handy, or if new stations have been added since the Directory was published. 1. Press and hold /BAND to enter the Band Search Mode. Then the upper and lower limits of the band currently selected are displayed. 2. Use VFO control, or to select the band you wish to search. 3. Wait for about 2 seconds and the SportCat will begin searching that Band. Or, press begin. /BAND again to 4. During a Search, press /TURBO to activate TURBO SEARCH. In some band Searches TURBO SEARCH is not available. If this is the case, an Error tone will be heard. This increases the Search Speed to 300 steps per second in those bands that have 5 kHz steps. (See the table on page 5 for the Band Chart.) When you activate TURBO SEARCH, the SEARCH indicator flashes. Press /TURBO again to deactivate TURBO SEARCH. 5. Press at any time to stop the search on a frequency. Press /BAND to resume searching. 6. When Search is stopped, you can press or to move up or down 1 frequency step. (See the table on page 5 for the step size for each Band.) Limit Search In Limit Search mode, you can search within the frequency range you have set. To use this function, you must set the lower/higher frequency of your search range first. Setting the Frequencies 1. Press . 2. Enter the lower limit of your search range. 3. Press . 27 4. Enter the higher limit of your search range. 5. Press . 6. Press /BAND to begin the search between the two limits. Using the Limit Search 1. Press /BAND to enter Limit Search mode. 2. Press or to stop searching. (”HOLD” appears on the display.) VFO Search You can search by using the VFO control. 1. In Manual mode, enter the frequency by using the number keypad and turn VFO control. -- OR -In Band Search Hold or Limit Search Hold, enter the frequency by using the number keypad, and turn the VFO control. “ V ” appears on the display. 2. Turn the VFO control clockwise to move up the frequency step, and turn the VFO control counterclockwise to move down the frequency step. 3. When you wish to store frequency or change the channel, you need not press first. Search Skip Frequency The scanner may stop at certain frequencies during Search that you do not want to hear. You can program up to 50 Skip Frequencies into the SportCat. When the scanner stops at one of these frequencies during Search, press . That frequency is now “memorized” and will be skipped during any Search. The scanner will then search to find other active frequencies. If you enter the 51st frequency, the 1st one is overwritten. 28 CTCSS/CDCSS Operation Your scanner is equipped with a Continuous Tone Controlled Squelch System (CTCSS) and Continuous Digital Controlled Squelch System (CDCSS) which allow squelch to open only when the tone you have programmed with a specific frequency is received along with a transmission. When using CTCSS or CDCSS, consider the following: n n n Your Scanner Scan Speed becomes slow while Subaudible Tone function is activated. You cannot enter CTCSS and CDCSS tones in the AM Air Band. If you have more questions about CTCSS or CDCSS see What is CTCSS and CDCSS on page 4. Programming a CTCSS Tone/CDCSS Tone 1. Select a channel you want to program. Note: The priority function can not be activated while programming CTCSS/CDCSS codes. Priority may be reactivated after storing codes. 2. Press to activate the Subaudible Tone function. 3. Press /REM. 29 At first, CTCSS tone is displayed. If you want to change between CTCSS and CDCSS, press . 4. Enter a tone. a. Use VFO, or b. Then press and to select the tone. . Change per 1sec. Note: Press to cancel the CTCSS or CDCSS Program Mode. The CTCSS or CDCSS indicator and displayed programs are turned off but not deleted. If you want to program a no Tone, press then press . at first, Searching for CTCSS Tones/CDCSS Tones You can use the CTCSS Tone Search Mode and CDCSS Tone Search Mode to determine if the frequencies in your area are broadcast with associated tones. 30 Note: Subaudible tone search mode will be locked out for channels that have been previously programmed for subaudible tone. To perform a new subaudible tone search for a previously programmed channel, re-program the frequency for the channel first, and then enter subaudible tone search mode. This is intended to prevent inadvertent reprogramming of previously programmed channels. Using Tone Search 1. Press . 2. To determine if a stored frequency has an associated CTCSS tone or CDCSS tone, press scanner stops on a channel. 3. Press and hold when your until you hear two short beeps. CTCSS and CDCSS display and begin flashing, and the scanner starts searching for an associated CTCSS and CDCSS tone. All tones are checked if the transmission is long enough. If there is a break before a tone is identified, then your scanner starts searching where it left off when the transmission begins again. Note: If a CTCSS or CDCSS tone has been stored in a channel, then tone search is not available. 31 If a CTCSS tone or CDCSS tone is found, the tone begins flashing in the display. 4. Press to program the tone with the frequency stored in the channel. Change per 1sec. 32 5. Repeat Steps 1 - 4 to search for tones associated with other stored frequencies. If you want to program tones for several stored frequencies, follow these steps: n n After you program a CTCSS tone or CDCSS tone with a stored frequency, the CTCSS Tone or CDCSS tone Search Mode is canceled. The CTCSS or CDCSS indicator remains on but does not flash. To activate the CTCSS Tone Search Mode or CDCSS Tone Search Mode again, press and hold until you hear two short beeps. If you decide to cancel the CTCSS Tone Search Mode or CDCSS Tone Search Mode while scanning, press and hold until you hear two short beeps and the CTCSS or CDCSS indicator turns off. You can select the CTCSS Search Mode or CDCSS Tone Search Mode before pressing in Manual Mode. Simply, press and hold until the CTCSS or DCS indicator begins flashing, and then press . When your scanner stops, the CTCSS Tone or CDCSS Tone search begins immediately. If a tone is found before the transmission ends, press to program the tone with the frequency stored in the channel. Using CTCSS Tone or CDCSS Tone Search While Searching 1. Set a Search Range. For information about setting a search range, see Limit Search on page 27. 2. Press and hold until you hear two short beeps. 33 CTCSS and DCS begins flashing in display. The scanner starts searching for an associated CTCSS tone or CDCSS tone when it stops on a transmission. All tones are checked if the transmission is long enough. However, if you press ,and there is break before a tone is identified, the tone search starts where it left off when the transmission begins again. 3. If a CTCSS tone is found, the tone begins flashing in the display. 4. Press to program the tone with the frequency stored in the channel. -- OR -Send the frequency with its associated tone to another channel. For information about sending a frequency to another channel, see Programming Channels on the page 19. 5. Restart the search and repeat Steps 3 - 4 to search for tones associated with other frequencies in the search range you set in Step 1. 34 If you want to program tones for several frequencies during your search, follow these steps: n n After you program a frequency and a CTCSS tone or CDCSS tone into a channel, the Search Mode is changed to Search Hold Mode. To /BAND. activate the Search Mode press If you decide to cancel the CTCSS Tone Search Mode or CDCSS Tone Search Mode while you are searching for frequencies, press and hold until you hear two short beeps and the CTCSS indicator or DCS indicator turns off. Changing a CTCSS/CDCSS Tone 1. Press to activate the Subaudible Tone function. 2. Select the channel you want to change. Change per 1sec. 3. Press . 4. Enter the new CTCSS tone or CDCSS tone using VFO control, or . If you make a mistake while using your keypad, press and enter the tone again. 35 5. Press to change the CTCSS tone. Erasing a CTCSS/CDCSS Tone 1. Press to activate the CTCSS mode or CDCSS mode. 2. Select the channel with the CTCSS tone or CDCSS tone you want to erase. Change per 1sec. 36 3. Press . The CTCSS tone or CDCSS tone begins flashing. 4. Press or use your VFO control to select 000.0. 5. Press to erase the CTCSS tone. The CTCSS tone or CDCSS tone is removed, and the CTCSS icon and DCS icon remain on. 37 Remote Interface You can communicate and program your SC200 in numerous ways with peripheral devices using the Remote Interface Cable port. This radio offers the following modes: n n SMARTSCAN MODE Automatically load frequencies, from the Uniden National Frequency Database server into your scanner using an external modem or an internal modem included with a PC. CLONE MODE Clone all the frequencies of your scanner into another SC200. Connecting the Scanner Scanner to PC Plug the smaller end of the supplied remote interface cable into the remote port on the right side of your scanner. When connecting the cable to your scanner, make sure the label side of the cable is facing forward. Plug the other end of the cable (DB-9 serial connector) into a personal computer’s serial port. A few PC’s may require an adapter, most will not. You may need a DB-9 to DB-25 null modem adapter, available at most computer stores. Of course, make sure your PC is turned on. To use SmartScan mode with an internal modem, you will need a small custom software program to allow the serial port to talk with the internal modem and act as a simple “pass through” device. To download this free program, go to Uniden’s website, look up under Scanners “SmartScanner” or the SC200 scanner, for the SmartScanner software. Run this program and it should automatically set the port setting for you (although you can override the settings). Make sure that you have a phone line plugged into the modem jack on the back of your PC and your scanner is connected to the serial port of the PC using the supplied cable. 38 Scanner to External Modem Plug the scanner end of the supplied remote interface cable into the remote port on the right side of your scanner. When connecting the cable to your scanner, make sure the label side of the cable is facing forward. Plug the other end of the cable (DB-9 serial connector) into the external modem. You may need a DB-9 to DB-25 null modem adapter, available at most computer stores. Of course, make sure your external modem is turned on. Make sure that you have a phone line plugged into the modem jack on the back. Scanner to Scanner Plug the scanner end of the supplied remote interface cables into the remote ports on the right sides of each of the two scanners. When connecting the cable to your scanner, make sure the label side of the cable is facing forward. SmartScan Mode You can automatically download frequencies, from the Uniden National Frequency Database server. After connecting the scanner to a modem using the Scanner to PC or Scanner to External Modem steps (see page 38), turn the radio off. Press and hold REM key and turn the radio on. 1. The following screen appears. (SmartScan Mode) To select SmartScan mode, press 39 or . 2. The following screen appears. 3. Before starting the frequency download, you must enter your zip code. Using the keypad, enter the ZIP code for the area you will be using your scanner. For example if your ZIP code is 75021. 4. Press key, the ZIP code is stored into memory. The dial-in telephone number appears in the display. Note: If you want to prevent some banks from being overwritten by the frequency download, go to Program Lock. (See page 42) 5. Press key. The scanner dials to the database server. 40 6. If the connection is successful, the scanner starts clearing the memory. And during that period, will appear for 12 seconds. 7. After clearing the memory is over, the scanner starts downloading the frequency. 8. will be displayed when your downloading is completed. 9. To start the scanner, you must turn the unit off/on. If downloading is not successful, one of the following error messages will appear. “Modem Err”: “No Carrier”: “Busy”: “No Answer”: “Error End”: “Timeout”: Modem Access Error Receive No Carrier message from modem Receive Telephone line busy message Receive No Answer message from modem Quit access line by server Non data receive time out NOTE: If the scanner does not display Loading (see step 7), disconnect the access by pressing . Then, make sure the modem is connected properly, and try again. NOTE: If the scanner’s display locks up or does not work properly after you connect power, you need to turn the scanner off then on again. 41 NOTE: The number preprogrammed into your scanner for downloading frequencies is 1-900-225-4822. There is a $0.99 per minute charge for using the SmartScan database. The frequencies in the SmartScan database are updated, at a minimum, every 6 to 12 months. To get current frequencies, as well as special /sporting event frequencies, regularly update your scanner by using SmartScan. NOTE: If you are unable to dial a “900” number, check with your local phone company to find out if you have a “900” block on your phone line. This will prevent you from dialing to the server. Menu for SmartScan Press key, Prog Lock appears in the display. And you can change several parameters used for SmartScan whenever you press . Transfer speed 300, 1200, 2400, (9600), 14400 bps Flow control setting (Xon/Xoff), RTS/CTS, Off Dial type (TONE), PULSE Program Lock SmartScanner will overwrite frequencies that you have already programmed into your scanner. To save the previously programmed frequencies, you can lock out specific banks prior to calling the database as follows: 1. After you enter your zip code, press . 2. With the phone number on the display, press . appears in the display. 3. Press the bank numbers using the 1-9 and 0 key (for bank 10) that you wish to lock out from programming so that they will not be overwritten during the download. 4. Press again. The zip code is displayed. 42 5. Press 6. Press . The phone number appears. to place the call. Transfer Speed You can choose the following transfer speeds. 300,1200,2400,(9600),14400 bps 9600 is the default. Press to exit. Flow Control You can choose the following flow control settings. Xon/Xoff is the default. The initial display appears. Press for RTS/CTS, Press again for non flow control. Press when desired setting is displayed and Flow Control is set. 43 Dial Type You can choose the Dial Type setting. Tone is set as a default. You can change it to PULSE by pressing . SMARTSCANNER TIPS There are literally hundreds of thousands of public safety radio licenses in the United States. The editors of the Uniden National Frequency Database have poured over these records to provide you with the most accurate possible download of frequencies for whichever area of the country you desire. Because of the volume of data, and because some systems operate on expired licenses or digital radio systems (which are not included in the dataset as they cannot be monitored), we cannot guarantee that you will receive every active public safety frequency in your area. If you find any flaws in your data and you would like to offer suggestions, please e-mail them to us at [email protected] or mail them to us at SmartScanner National Database, P.O. Box 610428, Newton Highlands, MA 02468. Due to the volume of mail we receive, you may not receive a reply. The SmartScanner database downloads frequency to the scanner using the following order: 1. All licenses within your zip code. 2. All licenses within your community (with more than one zip code) 3. All your county licenses (such as County Sheriff) 4. All the licenses for all the communities within your county (in random order). 5. Statewide licenses (such as Highway Patrol, state forestry, DOT, but not trunking) 6. National licenses (such as common ambulance, marine, and Family Radio Service channels). Look at the web sites Uniden.com and Trunktracker.com for further information. The downloads are not available through the Internet at this time. 44 A few notes about the frequency download order: 1. The scanner fills up less than its allotted 200 channels if there are not more than 200 of the above types of licenses in your area. 2. If there are more than 200 of the above listed types of licenses, or you have locked-out some banks prior to the download using the Program Lock feature, the scanner may run out of memory locations and you may not, for example, receive part or all of your county, state or nationwide data. 3. If you wish to also receive a download of frequencies from an adjacent county, lock those banks you wish to keep, shut the scanner off, turn it back on again and enter the SmartScanner download mode. Then enter a zip code from a community within the adjacent county. 4. The SmartScanner editors used their best efforts to delete digital and MDT (mobile data terminal) computer records from the database; however, it would be impossible to delete them all. Therefore, you may hear some non-voice transmissions on the frequencies downloaded into your scanner. If not, then you should lock these frequencies out or delete them by entering a new frequency or entering 0, . 5. The database will be updated every 6 to 12 months at a minimum. Clone Mode You can clone the frequency data of one SC200 scanner to another. After connecting the two scanners, using the Scanner to Scanner steps (See page 39), make sure the scanners are turned off. On each scanner, press and hold REM key and turn the radio on. 1. On each scanner, press . Or press or until this screen is displayed on both scanners. Then press . (Clone Mode) 45 2. Determine the scanner that has the frequency data that you want to transfer. This one must be set up as the “Master Unit”, and the other must be set as the “Slave Unit”. 3. On the scanner that is the” Master Unit”, press the or key until appears in the display. 4. On the scanner that is the” Slave Unit”, press the or key until appears in the display. 5. Press the key on both scanners. The data transfer is started from the Master Unit to the Slave Unit. During the data transfer, will continue to flash. and When the data transfer is completed, characters displays. If the data transfer is not successful, the following error message will appear. 46 Care and Maintenance Replacing the Battery Pack 1. Turn the On-Off/Volume Control OFF. 2. Turn the scanner over so you are looking at the back. If the belt clip is attached, remove it by taking out the two screws. 3. Press in on the ribbed area and slide the battery cover down and off. 4. Carefully unplug the battery pack and lift it out of the case. You may need to exert slight pressure toward the top of the scanner as you slide the battery pack out of the case. 5. Carefully plug in the new battery pack, observing the proper polarity. (The RED wire should be on the upper side as you plug it in.) Although the plug is keyed to reduce the chance of inserting it in wrong, make sure the wires are in the correct position before pushing it in all the way. DO NOT FORCE THE PLUG. 47 6. Insert the battery pack by placing the bottom in the case first. Make sure it is seated within the case before replacing the battery cover. 7. Replace the battery cover by putting the two tabs in the corresponding opening and sliding it upward until it locks in place. Location n If strong interference or electrical noise is received, relocate the scanner or its antenna away from the source of the noise. A higher elevation, if possible, may provide better reception. n Do not use the scanner in high-moisture environments such as the kitchen or bathroom. n Avoid placing the unit in direct sunlight or near heating elements or vents. n Do not plug the scanner into an outlet controlled by a wall switch as prolonged periods without power will cause scanner memory loss. Cleaning n Disconnect the power to the unit before cleaning. n Clean the outside of the scanner with a mild detergent. n To prevent scratches, do not use abrasive cleaners or solvents. Be careful not to rub the LCD window. n Do not use excessive amounts of water. Repairs Do not attempt any repair. The scanner contains no serviceable parts. Contact the Uniden Customer Service Center or take it to a qualified repair technician. 48 Birdies All scanners are subject to receiving undesired signals or birdies. If your scanner stops during SEARCH Mode and no sound is heard, it may be receiving a birdie. Birdies are internally generated signals inherent in the electronics of the scanner. Use the Search Skip feature to skip the unwanted frequencies. Proper Care of Your Scanner Use only the AC Adapter/Charger that came with your scanner. Do not leave the AC Adapter/Charger plugged in for long periods. Avoid placing the scanner in direct sunlight or near heating elements or vents. Also, do not subject the scanner to continuous sub-zero temperatures. If the scanner is exposed to temperatures below -5°F or above 140°F, the liquid crystal display may temporarily cease to function properly, or can become permanently damaged. 49 Technical Specifications Receiver Type: Channels: Banks: WX: Search Bands: No. Triple Conversion Superheterodyne 200 Total 10 Banks 20 Channels each 10 Programmed Channels (All NOAA Weather Service and three Canadian wheather service) 12 Preprogrammed Search bands (NFM or AM) RANGE (MHz) BAND STEP (kHz) 1 29.0000-29.9950 NFM 5 2 30.0000-49.9950 NFM 5 3 50.0000-54.0000 NFM 5 4 108.0000-136.9875 AM 12.5 5 137.0000-143.9950 NFM 5 6 144.0000-147.9950 NFM 5 7 148.0000-174.0000 NFM 5 8 406.0000-419.9875 NFM 12.5 9 420.0000-449.9875 NFM 12.5 10 450.0000-469.9875 NFM 12.5 11 470.0000-512.0000 NFM 12.5 12 806.0000-823.9875 NFM 12.5 849.0125-868.9875 NFM 12.5 894.0125-956.0000 NFM 12.5 Scan Rate: Search Rate: 100 channels per second 100 steps per second (Normal Search Mode) 300 steps per second (Turbo Search Mode) Scan Delay: 2 seconds Audio Output: 180 mW nominal into 8W internal speaker 38 mW nominal into 32W stereo headphones 9 mW nominal into 64W supplied earphone Antenna: Rubber antenna included Operating Temperature: - 20°C (- 4°F) to + 60°C (+ 140°F) 50 Size: 2-1/2" (W) x 1-3/4" (D) x 11-3/4" (H) (with antenna attached) 65 mm (W) x 39.5 mm (D) x 296.5 mm (H) (w/antenna w/o belt clip) Weight: 0.71 lb. (320 g) Power Requirements: 4.8V DC (internal battery or AC Adapter/Charger) Certified in accordance with FCC Rules and Regulations Part 15 Subpart C as of date of manufacture. Features, specifications, and availability of optional accessories are all subject to change without notice. 51 CTCSS/CDCSS Tone Frequencies (Hz) CTCSS 67.0 71.9 74.4 77.0 79.7 82.5 85.4 88.5 91.5 94.8 97.4 100.0 103.5 107.2 110.9 114.8 118.8 123.0 127.3 131.8 136.5 141.3 146.2 151.4 156.7 162.2 167.9 173.8 179.9 186.2 192.8 203.5 210.7 218.1 225.7 233.6 241.8 250.3 053 CDCSS 023 025 026 031 032 036 043 047 051 054 065 071 072 073 074 114 115 116 122 125 131 132 134 143 145 152 155 156 162 165 172 174 205 212 223 225 226 243 244 245 246 251 252 255 261 263 265 266 271 274 306 311 315 325 331 332 343 346 351 356 364 365 371 411 412 413 423 431 432 445 446 452 454 455 462 464 465 466 503 506 516 523 526 532 546 565 606 612 624 627 631 632 654 662 664 703 712 723 731 732 734 743 754 52 Optional Accessories and Replacement Parts The following optional accessories and replacement parts for your SportCat are available from your local Uniden Dealer or through the Uniden Customer Service Center by calling: 1-800-297-1023, 7:00 AM to 7:00 PM Central Time, Monday through Friday. ITEM PART NO. Spare Battery Pack BP-180 Replacement Rubber Antenna AT-218 Earphone EP-009 AC Adapter/Charger AD-70U Straight Cigarette Lighter Power Cord (fused) UA-502 Coiled Cigarette Lighter Power Cord (fused) UA-502A Belt Clip with 2 screws BCK-150 SportCat Sports Frequency Guide FB-150 SportCat Operating Guide OMSC200 Remote Cable WZ-1407 53 Troubleshooting If your SC200 is not performing properly, try the following steps. PROBLEM Scanner won’t work. SOLUTION 1. Check the connections at both ends of the AC Adapter. 2. Turn on the wall switch of your room. You could be using an outlet controlled by the wall switch. 3. Move the AC Adapter to another wall outlet or replace the battery pack. Improper reception. 1. Check the antenna connection or move and reposition the antenna. 2. Move the scanner. 3. You may be in a remote area which could require an optional multi-band antenna. Check with your dealer or local electronics store. Scan won’t stop. 1. Adjust squelch threshold-refer to page17 setting the squelch. 2. Check the antenna connection. 3. Check to see if may of the channels are locked out. If so, the scanner has less chance of finding an active channel. 4. Review each channel’s frequency to see if it is still stored in memory and is correct. 5. It’s possible that none of the programmed frequencies are currently active. Scan won’t start. 1. Press the key again. 2. Adjust the SQUELCH control. 3. Check to see if all channels are locked out. Weather Scan won’t work. 1. Adjust squelch threshold-refer to page 17 setting the squelch. 2. Check the antenna. 54 PROBLEM SOLUTION Channel Activity Indicators are flashing but no sound is heard. 1. May be a private or telephone interconnect call, which are intentionally blocked by your scanner. 2. The ID in your display is not active. If you still cannot get satisfactory results and want additional information, or to return the unit for service, please call or write the Uniden Parts and Service Division. The address and phone number are listed in the Warranty (at the end of this manual). 55 One Year Limited Warranty WARRANTOR: UNIDEN AMERICA CORPORATION (“Uniden”) ELEMENTS OF WARRANTY: Uniden warrants, for one year, to the original retail owner, this Uniden Product to be free from defects in materials and craftsmanship with only the limitations or exclusions set out below. WARRANTY DURATION: This warranty to the original user shall terminate and be of no further effect 12 months after the date of original retail sale. The warranty is invalid if the Product is (A) damaged or not maintained as reasonable or necessary, (B) modified, altered, or used as part of any conversion kits, subassemblies, or any configurations not sold by Uniden, (C) improperly installed, (D) serviced or repaired by someone other than an authorized Uniden service center for a defect or malfunction covered by this warranty, (E) used in any conjunction with equipment or parts or as part of any system not manufactured by Uniden, or (F) installed or programmed by anyone other than as detailed by the Operating Guide for this product. STATEMENT OF REMEDY: In the event that the product does not conform to this warranty at any time while this warranty is in effect, warrantor will repair the defect and return it to you without charge for parts, service, or any other cost (except shipping and handling) incurred by warrantor or its representatives in connection with the performance of this warranty. THE LIMITED WARRANTY SET FORTH ABOVE IS THE SOLE AND ENTIRE WARRANTY PERTAINING TO THE PRODUCT AND IS IN LIEU OF AND EXCLUDES ALL OTHER WARRANTIES OF ANY NATURE WHATSOEVER, WHETHER EXPRESS, IMPLIED OR ARISING BY OPERATION OF LAW, INCLUDING, BUT NOT LIMITED TO ANY IMPLIED WARRANTIES OF MERCHANT ABILITY OR FITNESS FOR A PARTICULAR PURPOSE. THIS WARRANTY DOES NOT COVER OR PROVIDE FOR THE REIMBURSEMENT OR PAYMENT OF INCIDENTAL OR CONSEQUENTIAL DAMAGES. Some states do not allow this exclusion or limitation of incidental or consequential damages so the above limitation or exclusion may not apply to you. LEGAL REMEDIES: This warranty gives you specific legal rights, and you may also have other rights which vary from state to state. This warranty is void outside the United States of America. PROCEDURE FOR OBTAINING PERFORMANCE OF WARRANTY: If, after following the instructions in this Operating Guide you are certain that the Product is defective, pack the Product carefully (preferably in its original packaging). Include evidence of original purchase and a note describing the defect that has caused you to return it, The Product should be shipped freight prepaid by traceable means, or delivered, to warrantor at: Uniden America Corporation Parts and Service Division 4700 Amon Carter Blvd. Ft. Worth, TX 76155 1-800-554-3988; Mon-Fri; 8:30am to 5:00pm Central 56 57 COVERED UNDER ONE OR MORE OF THE FOLLOWING U.S. PATENTS: 4,219,821 4,270,217 4,398,304 4,409,688 4,455,679 4,461,036 4,521,915 4,597,104 4,627,100 4,841,302 4,888,815 4,932,074 4,947,456 5,014,348 5,199,109 5,408,692 5,428,826 5,438,688 5,448,256 5,465,402 5,471,660 5,483,684 5,548,832 5,551,071 5,642,424 5,710,992 5,530,296 5,574,995 5,577,076 5,598,430 5,600,223 ©1999 Uniden America Corporation. All rights reserved. UBZZ01303ZZ Printed in the Philippines 58