1
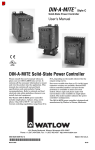
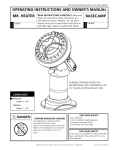
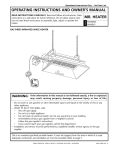
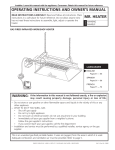
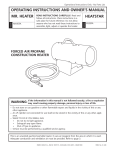
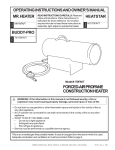
Operational Instructions Only - No Parts List Operating Instructions and Owner’s Manual Model # MHGLLP B MHGLLP G READ INSTRUCTIONS CAREFULLY: Read all information and instructions, including gaslamp Warning Tag attached to light, before installation or use. Retain this guide for future reference. INDOOR GASLAMP WARNING: If the information in this manual is not followed exactly, a fire or explosion may result causing property damage, personal injury or loss of life. — Do not store or use gasoline or other flammable vapors and liquids in the vicinity of this or any other appliance. — FOR YOUR SAFETY If you smell gas: • Shut off gas to the appliance. • Open windows. • Don’t touch electrical switches. • Extinguish any open flame. • Immediately call your gas supplier. — Service must be performed by a qualified service agency. Attention installer: C.S.A. regulations require that you leave these instructions with the appliance for the consumer. ENERCO GROUP, INC., 4560 W. 160TH ST., CLEVELAND, OHIO 44135 • 800-251-0001 08/08 20362 Rev. L1 WARNING: WARNING: Every time tank is connected to unit, connection must be checked for leaks in one or more ways: Apply soapy water to connection, look for bubbles, listen for hiss of escaping gas, feel for extreme cold, smell for rotten egg odor. Do not use if leaking! Use your gaslamp in vented rooms only. Carbon monoxide is produced by the incomplete combustion of fuel. WARNING: Do not store or use gasoline or other flammable vapors and liquids in the vicinity of this or any other appliance. WARNING: Any changes to this heater or its controls can be dangerous. THE STATE OF CALIFORNIA REQUIRES THE FOLLOWING WARNING: WARNING: Early signs of carbon monoxide poisoning resemble the flu, with headache, dizziness and/or nausea. If you have these signs, heater may not be working properly. Get fresh air at once! Have heater serviced. WARNING: Combustion by-products produced when using this product contain carbon monoxide, a chemical known to the State of California to cause cancer and birth defects (or other reproductive harm). GENERAL INFORMATION: CONTENTS • Install and use gaslamps with care. General Safety Instructions.................................................2 Installation & Assembly......................................................3 Mantle Installation.............................................................3 Lighting Instructions...........................................................4 Recommended Maintenance..............................................5 Bunsen Burner Venturi (BBV) Cleaning Instructions.............5 Parts List............................................................................6 Limited Warranty...............................................................8 • Installation must conform to local codes or in the absence of local codes, use the National Fuel Gas Code ANSI Z223.1/ NFPA 54.(latest edition), and/or with CAN1-B149.2 (latest edition) installation code for propane burning appliances and equipment. GENERAL SAFETY INSTRUCTIONS • Use gaslamp for illumination only. Installation and repair of propane gas-operated equipment requires technical knowledge and expertise. Do not attempt to install or repair your gaslamp unless you have been thoroughly trained and are experienced in working with LP devices. If your gaslamp appears to be malfunctioning, turn it to the “OFF” position and immediately contact your retailer or Mr. Heater. WARNING: Test all gas piping and connections for leaks after installing or servicing. Correct all leaks at once. WARNING: Never use an open flame to check for a gas leak. Apply a mixture of liquid soap and water to all joints. Bubbles forming show a leak. Correct all leaks at once. Mr. Heater | MHGLLP B MHGLLP G 2 Operating Instructions and Owner’s Manual Installation & ASSEMBLY 3. Connect approved copper tubing to gas inlet using proper fitting. It is easier to connect the tubing before fastening wall bracket assembly to wall. Valve assembly (Ref. #2) must be straight on the wall bracket assembly. Orifice (Ref. #4) must aim into the center of the Bunsen Burner Venturi (BBV) (Ref. #28) for proper air and gas mixture. A knockout tab (twist out using pliers) in the valve cover is provided for connecting the gas line through the bottom of the valve cover. 4. Fasten wall bracket assembly to wall using four mounting screws (Ref. #26) supplied. WARNING: Read all instructions and gaslamp Warning Tag (attached to light) before installing light. Make sure that the gas supply is turned OFF at the supply tank and that the gaslamp valve handle is in the ‘OFF’ position. Plumbing Requirements The following plumbing supplies are needed for installation. They are available from your local gas dealer. CAUTION: To provide adequate air circulation, the mounting bosses must not be embedded into the wall. Do not overtighten screws. Copper Tubing Internally tinned copper tubing, 3/8” outside diameter, is recommended. Copper tubing must be internally tinned to meet National Fuel Gas Code unless otherwise directed by local codes. 5. Attach valve cover assembly (Ref. #27) to wall bracket assembly by engaging slots on the valve cover assembly with wall bracket assembly tabs. 6. Mount gaslamp by carefully swinging down the valve cover assembly so that the slots in the bottom of valve cover engage Lock Screws (Ref. #12). 7. Tighten valve cover lock screws. 8. Loosen globe lock screw (Ref. #14) and remove globe. Be sure that all packaging material has been removed. 9. Install mantles: Fittings If 3/8” copper tubing is used, a 3/8” Flare Male Connector x 1 /8 NPT Straight Fitting is required. Mr. Heater #20347 (included). If gaslamp is to be connected from behind (through wall) a 1 /8 NPT Street Elbow (Male-Female), Mr. Heater #20348 (included) must be used in addition to the straight fitting. a. Pre-formed mantle: Grasp ceramic ring – do not touch mantle itself. Hook legs into reverse “L” of the burner head. Permanent screws that attach valve assembly to wall plate should never be loosened or removed. Removing valve assembly from wall plate will void warranty and may create a dangerous condition. b. Tie-on mantle: Loop the tie-on strings at the opening of the mantle. Enlarge the opening so that it will fit over the ceramic burner head and seat in lower groove of burner head. Do not tie the mantle to the BBV. Distribute mantle evenly around the burner head. Pull the ends of the string so that mantle and string are seated securely in the burner head groove. Knot and clip off excess string. Locating the gaslamp Always mount gaslamp on an open wall. Never mount gaslight in a boxed-in or recessed area. Wall Bracket Assembly (Ref. #1) must be mounted so that Heat Deflector (Ref. #15) is a minimum of four inches from a combustible surface, and outside of Globe (Ref. #13) is a minimum of three inches from a combustible surface to either side or in front. Mounting gaslamps too close to a door may subject delicate mantles to vibrations and could damage the mantle. 10. Attach globe by engaging tabs and inserting globe so that lock screw can be tightened into the neck of the globe. Do not over-tighten. 11. Before use have qualified gas personnel approve your installation and check for gas leaks using a leak detector. Tubing, fittings, gaslamp valve, and any other gas transporting component should be checked. Mounting & Assembly 1. Remove all packaging materials from gaslamp. 2. Locate gaslamp according to minimum clearances described below: Replacement parts and accessories are available from your local gas dealer or from Mr. Heater, Inc. Mantle installation Never use damaged mantles (holes, etc.) Replace damaged mantles immediately. 1. Install new mantles if necessary: A. Loosen globe lock screw and remove globe. B. Remove used mantels and install new ones by; a. Pre-formed mantle: Grasp ceramic ring – do not touch mantle itself. Hook legs into reverse “L” of the burner head. Minimum Clearances Mr. Heater | MHGLLP B MHGLLP G 3 Operating Instructions and Owner’s Manual b. Tie-on mantle: Loop the tie-on strings at the opening of the mantle. Enlarge the opening so that it will fit over the ceramic burner head and seat in lower groove of burner head. Do not tie the mantle to the BBV. Distribute mantle evenly around the burner head. Pull the ends of the string so that mantle and string are seated securely in the burner head groove. Knot and clip off excess string. LIGHTING GAS Lamp C. Replace globe. lighting instructions Step 1 Caution: Do not turn on/off lever, #20316, to “ON” position until after lighting match. 1. Mantle burn off: WITH gaslamp ON/OFF LEVER IN THE “OFF” POSITION, and in a well ventilated room, hold a flame close to, but not touching, bottom of mantle. Remove flame when mantle begins to smolder. Allow fabric to burn completely. NOTE: It is normal for mantles to smoke during burn-off procedure. WARNING: After burn-off, mantle is a chemical ash. It will break if touched. Upon lighting of gaslamp, it will shrink to its final form. 2. Lighting of gaslamp (See detailed lighting instruction at right): Light gaslamp only after mantle burn-off (Step 2) has been completely accomplished. Caution: Do not turn gaslamp to “ON” position until after lighting match. Step 2 Press in and turn lever to “ON” position. Do not touch mantle, #20351, with the match. Note: When gaslamp is newly installed, air may be present in the gas line. It might take some time before the gaslamp will light. After a new mantle is ignited, allow it to burn for five to ten minutes so it will shrink to its final form. gaslamp is now ready for use. 3. Turning gaslamp off: To turn off, simply move gaslamp valve handle to the “OFF” position. • Keep area clear and free from combustible materials, including gasoline and other flammable vapors and liquids. Provide unobstructed flow of combustion and ventilation air. Step 3 • Use propane gas only for models MHGLLP B and MHGLLP G. Propane gas must be to this rating: 2500 to 2530 B.T.U. per cubic foot. Mr. Heater propane gas orifices are manufactured to this rating only. See “gaslamp Warning Tag.” When gaslamp is burning properly, flame is bright white and has no visible outlines. • Mr. Heater supplies a natural gas orifice (Part No. F220369) to convert the propane gaslamp for natural gas use. The natural gas supply must be regulated to 4” W.C. Propane gas supply tank and regulator Gas supply tank must not be overfilled. Regulator must be adjusted to operate at a pressure of 11 inches of water column (27.9 cm) (6 oz. of mercury). This same gas pressure must be maintained at the orifice of the gaslamp. Higher or lower pressures will cause the gaslamp to malfunction. Step 4 CAUTION: Use only new installation pipe. Internally-tinned copper tubing may be used in certain areas. Check your local codes. Use pipe of larger enough diameter to allow proper gas volume to heater. If pipe is too small, undue loss of pressure will occur. Mr. Heater | MHGLLP B MHGLLP G To turn off, simply move gaslamp on/off lever to the “OFF” position. 4 Operating Instructions and Owner’s Manual Orifice All gaslamps are equipped with standard propane orifices. To use gaslamps at elevations of 4500 feet or more above sea level, order High Altitude Orifice, #20368 for propane gas. Bunsen Burner Venturi (BBV). Unobstructed flow of combustion air and ventilation air must be maintained. To ensure proper air flow and gas mixture, the inside of the BBV must be clean and free of any obstruction. Make a periodic visual check of the BBV. Bunsen burner venturi (bBV) CLEANING INSTUCTIONS WARNING: Never touch drilled hole in orifice, as it is extremely delicate. Use low-pressure compressed air to clean the orifice. Pins, wire, even oil from hands, may disturb proper gas flow. Replace orifice if in question. Both MHGLLP B and MHGLLP G are ready to use with PROPANE ONLY, at altitudes under 4,500 ft. The following gas orifices are available for these other applications: 1. Remove burner head. 2. Pull a clean, dry cloth through BBV to clean out foreign material. 3. Replace seal. Reassemble burner head and tighten securely. 4. It can also be cleaned by blowing it out with compressed air. 5. Never attach a mantle directly to the BBV. Note: Always replace seal if lamp has been previously lit. FUEL TYPEGAS Orifice Propane (High Altitude) F220368 Natural Gas Conversion Kit F220369 Bunsen Burner Venturi (BBV) Valve Assembly. The valve assembly must be straight on the wall bracket. Over tightening bracket can cause tubing, flare nut or orifice to become incorrectly aimed. Gas must flow through the orifice; straight down the center of the Bunsen Burner Venturi. Burner head screen Recommended Maintenance In order to keep your gaslamp operating safely and effectively, performance maintenance at regular intervals. If your gaslamp has been out of use for a period of time, examine it before lighting it. Seal When gaslamp is operating properly, gas consumption is 2400 B.T.U. per hour. One “pound” of propane gas produces approximately 10 hours of light. Burner head Permanent screws that attach valve assembly to wall plate should never be loosened or removed. Removing valve assembly from wall plate will void warranty. Mantles. Use Mr. Heater mantles designed for use with propane gas only. Never use broken mantles. Inspect for carbon deposits each time gaslamp is used. Clean or replace defective mantles immediately. Use proper ceramic burner head and mantle combination. (Example: “Tie-on” type burner head, #20352, with tie-on mantles, #20353, or “Pre-formed” type burner head, #20337, with pre-formed mantles, #20351.) Also see “Mantle Installation.” “Pre-formed” mantle Use “Preformed” type burner head, #20337, with pre-formed mantles, #20351 “Tie-On” mantle Use “Tie-on” type burner head, #20352, with tie-on mantles, #20353 Burner Head Screen. Screen must be in threaded end of burner head. gaslamp will not function properly if screen is missing. Seal. Seal is placed on threaded end of burner head. Seal and burner head should be screwed securely into Bunsen Burner Venturi (BBV.) The seal must be replaced any time the burner head is removed after the lamp has been used. Mr. Heater | MHGLLP B MHGLLP G 5 Operating Instructions and Owner’s Manual Mr. Heater | MHGLLP B MHGLLP G 6 Operating Instructions and Owner’s Manual This Page Intentionally Left Blank Mr. Heater | MHGLLP B MHGLLP G 7 Operating Instructions and Owner’s Manual Operating Instructions and Owner’s Manual Model # MHGLLP B MHGLLPG WARNING: USE ONLY MANUFACTURER’S REPLACEMENT PARTS. USE OF ANY OTHER PARTS COULD CAUSE INJURY OR DEATH. REPLACEMENT PARTS ARE AVAILABLE FROM MR. HEATER LOCAL DEALER OR DIRECT FROM THE FACTORY AND MUST BE INSTALLED BY A QUALIFIED SERVICE AGENCY. PARTS ORDERING INFORMATION: PURCHASING: Accessories may be purchased at any Mr. Heater local dealer or direct from the factory FOR INFORMATION REGARDING SERVICE Please call Toll-Free 800-251-0001 www.mrheater.com Our office hours are 8:30 AM – 5:00 PM, EST, Monday through Friday. Please include the model number, date of purchase, and description of problem in all communication. LIMITED WARRANTY The company warrants this product to be free from imperfections in material or workmanship, under normal and proper use in accordance with product instructions of Enerco Group, Inc., for a period of one year from the date of delivery to the buyer. Enerco Group, Inc., at its option, will repair or replace products (except globe, gaskets and/or mantles which are considered consumable parts) returned by the buyer to the factory, transportation prepaid within said one year period and found by the Company to have imperfections in material or workmanship. If a part is damaged or missing, call our Technical Support Department at 800-251-0001. Address any Warranty Claims to the Service Department, Enerco Group, Inc., 4560 W. 160TH ST., CLEVELAND, OHIO 44135. Include your name, address and telephone number and include details concerning the claim. Also, supply us with the purchase date and the name and address of the dealer from whom you purchased our product. The foregoing is the full extent of the responsibility of the Company. There are no other warranties, express or implied. Specifically there is no warranty of fitness for a particular purpose and there is no warranty of merchantability. In no event shall the Company be liable for delay caused by imperfections, for consequential damages, or for any charges of the expense of any nature incurred without its written consent. The cost of repair or replacement shall be the exclusive remedy for any breach of warranty. There is no warranty against infringement of the like and no implied warranty arising from course of dealing or usage of trade. This warranty will not apply to any product which has been repaired or altered outside of the factory in any respect which in our judgment affects its condition or operation. Some states do not allow the exclusion or limitation of incidental or consequential damages, so the above limitation or exclusion may not apply to you. This Warranty gives you specific legal rights, and you may have other rights which vary from state to state. Enerco Group, Inc. reserves the right to make changes at any time, without notice or obligation, in colors, specifications, accessories, materials and models. ENERCO GROUP, INC., 4560 W. 160TH ST., CLEVELAND, OHIO 44135 • 800-251-0001 Mr. Heater is a registered trademark of Enerco Group, Inc. © 2003, Enerco/Mr. Heater. All rights reserved CAN 1-2.15-M83 Mr. Heater | MHGLLP B MHGLLP G 8 Operating Instructions and Owner’s Manual ANSI Z21.42a 2004