1
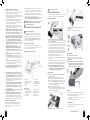
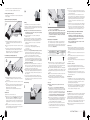
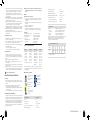
EC310-AS
EC310-AS
JML America LLC, 7850 Ruffner Avenue, Van Nuys CA 91406
www.JMLAmerica.com, Made in PR China
©JohnMillsLtd/PS/10.08/EX/A
Instructions
JML America LLC, 7850 Ruffner Avenue, Van Nuys CA 91406
www.JMLAmerica.com, Made in PR China
English
GENERAL POWER TOOL SAFETY WARNINGS
WARNING! Read all instructions. Failure to follow all
instructions listed below may result in electric shock,
fire and/or serious injury. The term “power tool” in
all of the warnings listed below refers to your mains
operated (corded) power tool or battery operated
(cordless) power tool.
SAVE THESE INSTRUCTIONS
1. Work area
a) Keep work area clean and well lit. Cluttered and dark areas
invite accidents.
b) Do not operate power tools in explosive atmospheres,
such as in the presence of flammable liquids, gasses or
dust. Power tools create sparks, which may ignite the dust
of fumes.
c) Keep children and bystanders away while operating a
power tool. Distractions can cause you to lose control.
2. Electrical safety
a) Power tool plugs must match the outlet. Never modify
the plug in any way. Do not use any adapter plugs with
earthed (grounded) power tools. Unmodified plugs and
matching outlets will reduce risk of electric shock.
b) Avoid body contact with earthed or grounded surfaces
such as pipes, radiators, ranges and refrigerators. There
is an increased risk of electric shock if your body is earthed or
grounded.
c) Do not expose power tools to rain or wet conditions.
Water entering a power tool will increase the risk of electric
shock.
d) Do not abuse the cord. Never use the cord for carrying,
pulling or unplugging the power tool. Keep cord away
from heat, oil, sharp edges or moving parts. Damaged or
entangled cords increase the risk of electric shock.
e) When operating a power tool outdoors, use an extension
cord suitable for outdoor use. Use of a cord suitable for
outdoor use reduces the risk of electric shock.
3. Personal safety
a)Stay alert, watch what you are doing and use common
sense when operating a power tool. Do not use a power
tool while you are tired or under the influence of drugs,
alcohol or medication. A moment of inattention while
operating power tools may result in serious personal injury.
b) Use safety equipment. Always wear eye protection.
Safety equipment such as dust mask, non-skid safety
shoes, hard hat, or hearing protection used for appropriate
conditions will reduce personal injuries.
c) Avoid accidental starting. Ensure the switch is in the off
position before plugging in. Carrying power tools with your
finger on the switch or plugging in power tools that have the
switch on invites accidents.
d) Remove any adjusting key or wrench before turning the
power tool on. A wrench or a key left attached to a rotating
part of the power tool may result in personal injury.
e) Do not overreach. Keep proper footing and balance at
all times. This enables better control of the power tool in
unexpected situations.
f) Dress properly. Do not wear loose clothing or jewellery.
Keep your hair, clothing and gloves away from moving
parts. Loose clothes, jewellery or long hair can be caught
in moving parts. Rubber gloves and non-skid footwear are
recommended when working outdoors.
g)If devices are provided for the connection of dust
extraction and collection facilities, ensure these are
connected and properly used. Use of these devices can
reduce dust related hazards.
4. Power tool use and care
a) Do not force the power tool. Use the correct power tool
for your application. The correct power tool will do the job
better and safer at the rate for which it was designed.
b) Do not use the power tool if the switch does not turn it on
and off. Any power tool that cannot be controlled with the
switch is dangerous and must be repaired.
c) Disconnect the plug from the power source before
making any adjustments, changing accessories, or
storing power tools. Such preventive safety measures
reduce the risk of starting the power tool accidentally.
d)Store idle power tools out of the reach of children and do
not allow persons unfamiliar with the power tool or these
instructions to operate the power tool. Power tools are
dangerous in the hands of untrained users.
e) Maintain power tools. Check for misalignment or
binding of moving parts, breakage of parts and any other
condition that may affect the power tools operation. If
damaged, have the power tool repaired before use. Many
accidents are caused by poorly maintained power tools.
f) Keep cutting tools sharp and clean. Properly maintained
cutting tools with sharp cutting edges are less likely to bind
and are easier to control.
g) Use the power tool, accessories and tool bits etc., in
accordance with these instructions and in the manner
intended for the particular type of power tool, taking
into account the working conditions and the work to be
performed. Use of the power tool for operations different
from intended could result in hazardous situation.
5. Service
a) Have your power tool serviced by a qualified repair person
using only identical replacement parts. This will ensure that
the safety of the power tool is maintained.
General Power Saw Safety
Warnings
1. DANGER:
a) Keep hands away from cutting area and the blade.
b) Do not reach underneath the workpiece. The guard
cannot protect you from the blade below the workpiece.
c) Adjust the cutting depth to the thickness of the
workpiece. Less than a full tooth of the blade teeth should
be visible below the workpiece.
d)Never hold piece being cut in your hands or across
your leg. Secure the workpiece to a stable platform. It
is important to support the work properly to minimise body
exposure, blade binding, or loss of control.
e)Hold power tool by insulated gripping surfaces when
performing an operation where the cutting tool may
contact hidden wiring or its own cord. Contact with a “live”
wire will also make exposed metal parts of the power tool
“live” and shock the operator.
f) When ripping always use a rip fence or straight edge
guide. This improves the accuracy of cut and reduces the
chance of blade binding.
g) Always use blades with correct size and shape (diamond
versus round) of arbour holes. Blades that do not match
the mounting hardware of the saw will run eccentrically,
causing loss of control.
h)Never use damaged or incorrect blade washers or bolt.
The blade washers and bolt were specially designed for your
saw, for optimum performance and safety of operation.
INSTRUCTIONS • ENGLISH
4
2. Causes and prevention of kickback:
• Kickback is a sudden reaction to a pinched, bound or
misaligned saw blade, causing an uncontrolled saw to lift up
and out of the workpiece toward the operator;
• when the blade is pinched or bound tightly by the kerf closing
down, the blade stalls and the motor reaction drives the unit
rapidly back toward the operator;
• if the blade becomes twisted or misaligned in the cut, the
teeth at the back edge of the blade can dig into the top
surface of the wood causing the blade to climb out of the kerf
and jump back toward the operator.
Kickback is the result of saw misuse and/or incorrect
operating procedures or conditions and can be avoided by
taking proper precautions as given below.
a) Maintain a firm grip on the saw and position your arm to
resist kickback forces. Position your body to either side
of the blade, but not in line with the blade. Kickback could
cause the saw to jump backwards, but kickback forces can
be controlled by the operator, if proper precautions are taken.
b) When blade is binding, or when interrupting a cut for any
reason, release the trigger and hold the saw motionless
in the material until the blade comes to a complete
stop. Never attempt to remove the saw from the work
or pull the saw backward while the blade is in motion or
kickback may occur. Investigate and take corrective actions
to eliminate the cause of blade binding.
c) When restarting a saw in the workpiece, centre the
saw blade in the kerf and check that saw teeth are
not engaged into the material. If saw blade is binding, it
may walk up or kickback from the workpiece as the saw is
restarted.
d)Support large panels to minimise the risk of blade
pinching and kickback. Large panels tend to sag under
their own weight. Supports must be placed under the panel
on both sides, near the line of cut and near the edge of the
panel.
e) Do not use dull or damaged blades. Unsharpened or
improperly set blades produce narrow kerf causing excessive
friction, blade binding and kickback.
f) Use extra caution when making a “plunge cut” into
existing walls or other blind areas. The protruding blade
may cut objects that can cause kickback.
d) Have defective switches, guards and components replaced
by an authorised service facility. Inspect extension cords
periodically. If the supply cord becomes damaged it should
only be replaced by the manufacturer or its service agents.
e) When using outdoors, a residual current circuit breaker should
always be used in conjunction with the tool.
f) Do not use any other accessory or attachment other than
those recommended by EXAKT Precision Tools.
4. Additional safety instructions
a) Keep handles dry, clean and free from oil and grease.
b) Do not stop the blade by applying lateral force to it.
c) When not in use, tools should be stored in a dry, high or
locked up place.
5
Operating Instructions
This tool should always be used with the dust hose connected
and attached to a suitable vacuum cleaner/dust extractor.
Setting the Cutting Depth
WARNING! Never use the power tool for any purpose
other than that shown in the instruction manual.
EC-310-AS Safety Warnings –
f) Replace the safety retaining washer and tighten the screw.
(Diagram D)
g) Remove both hex keys before plugging in.
Instructions for Putting Into Use
Setting up the Saw for Use
After unpacking check that there are no parts missing or
damaged. If there are contact supplier and do not operate.
Before using a blade needs to be fitted as described in the
operating instructions. (See Blade Changing Section)
A cardboard packing disk may be fitted in place of the blade,
which will need to be removed.
Information on Power Supply
This equipment should be connected to a normal domestic
socket outlet with a voltage rating between 210 and 250 V and
a current rating of between 13 and 16A.
Illustrated Description of Functions
a) The depth of cut can be set in millimetres by turning the depth
control knob. (Diagram A)
b) The depth scale has long lines representing whole millimetres
and short lines for half millimetres. To set for whole millimetres
align the bottom edge of the depth control knob on a long line
and read off the number that is just completely exposed.
c) When cutting wood the depth of cut should be set to slightly
greater than the thickness of the material for best results.
d) When cutting plastics the depth of cut should be set to slightly
greater than the thickness of the material. If melting occurs a
greater depth setting will improve results.
e) When cutting metals the depth of cut should be set to
approximately 1.0 mm greater than the material thickness for
best results.
If it is desirable not to mark the surface beneath the workpiece,
the depth can be set to the same as the material thickness, when
cutting wood or plastics, but this may result in a rough edge.
NB. If the depth control knob becomes difficult to turn,
unscrew it until the rubber seal can be seen. Clean the
surrounding area with a soft brush and then apply a very
small quantity of synthetic grease to the seal.
3
a) Check guard for proper closing before each use. Do
not operate the saw if guard does not move freely and
enclose the blade instantly. Never clamp or tie the guard
with the blade exposed. If saw is accidentally dropped,
guard may be bent. Check to make sure that the guard
moves freely and does not touch the blade or any other part,
in all angles and depths of cut.
b) Check the operation and condition of the guard return
spring. If the guard and the spring are not operating
properly, they must be serviced before use. Guard may
operate sluggishly due to damaged parts, gummy deposits,
or a build-up of debris.
c) Assure that the guide plate of the saw will not shift while
performing the “plunge cut.”
d) Always observe that the guard is covering the blade
before placing the saw down on bench or floor. An
unprotected, coasting blade will cause the saw to walk
backwards, cutting whatever is in its path. Be aware of the
time it takes for the blade to stop after switch is released.
EC-310-AS Safety Warnings
Guard Removal
NB. Do not use without the Guard.
a) Ensure the tool is unplugged from the mains supply.
b) Unscrew the guard release screw. Slide off the guard.
(Diagram E)
NB. When replacing the guard the blade can protrude
through the slot in the base plate. To avoid injury
ensure that the hand is kept well clear. Ensure the
guard is replaced the correct way round.
Blade Changing
1.Baseplate
2.Guard lock (not shown)
3.Depth adjuster knob
4.Switch
5.Handle
6. and 7. Air vents
8. Dust extract nozzle
9. Cutting width marks
10. Guard removal screw
11. Saw blade
List of contents
1x EXAKT Precision Saw Blades (dependant on kit)
1x 60 tooth HSS blade
1x 18 TCT blade
1x G50 blade
1x Torx key & 1x U key
1x Spare safety washer
1x Dust extraction hose
1x Storage case
1x Instruction manual
NB. Incorrect positioning of the blade can permanently
damage the tool.
a) Ensure the tool is unplugged from the mains supply.
b) Unscrew the depth adjuster until the number 12 is visible.
c) Without removing the guard insert the U key into the blade
shaft to lock it. (Diagram B ) Slide off the removeable cover
and insert the torx key into the blade retaining screw and
unscrew clockwise. (Diagram C)
d) Depress the guard to remove the blade.
e) Place the new blade onto the blade shaft ensuring the hole
locates correctly and the teeth point forwards in the direction
of the curved arrow. (Diagram C)
Clamping
It is not normally necessary to clamp the material being cut as
long as it is fully supported on a work surface and held with one
hand. Clamping should be used where;
• The operator is inexperienced in the use of power saws or
weak handed
• Small parts or tough material is to be cut.
Cutting Limitations
There is no limitation on the size of material that can be cut as
long as it is fully supported.
INSTRUCTIONS • ENGLISH
6
The saw will cut up to 12 mm deep. Material up to twice as
thick can be cut if cutting is performed on both sides.
Holding and Switching On
Holding the tool correctly will result in easier and safer operation,
with less fatigue.
Right handed operator: (Diagram F)
Cutting
The EXAKT Precision Saw is unique because it clamps the
material to be cut between its base plate and the work surface
using a plunge action to ease the blade into the cut. This results
in a faster, easier and cleaner cut.
c) Grasp the handle firmly with the right hand so that it feels
comfortable. The thumb should be towards the rear of the
power switch.
d) Do not cover any of the front vents and no more than one rear
vent.
e) To operate, ensure that any part of the thumb between the
tip and middle joint is over the serrated area of the switch.
(Whichever part is most comfortable). Squeeze the switch in
towards the handle and then pull backwards.
Left handed operator: (Diagram G)
a) Grasp the handle firmly with the left hand so that it feels
comfortable. The forefinger should be towards the rear of the
power switch.
b) Do not cover any of the front vents and no more than one rear
vent.
c) To operate, ensure that any part of the forefinger between the
tip and middle joint is over the serrated area of the switch.
(Whichever part is most comfortable)
Squeeze the switch in towards the handle and then pull
backwards.
Guard Lock
a) Place the tool at the start of the cut.
b) Switch on the tool in accordance with the instruction manual.
Next release the guard lock. (Diagram H). Then plunge the
saw blade to start the cut. The guard lock is released by
pushing in the direction of the arrow in the diagram. Either the
hand holding the tool or work piece can be used, whichever is
easier.
c) After the cut has been finished and the tool switched off,
ensure the guard lock has fully returned to its resting position.
If not clean thoroughly with a soft brush.
7
NB. Always cut in a forward direction. Never draw the tool
backwards. If you are a novice user, practice by cutting
thin wood until proficient.
a) Check the specifications to ensure the suitability of the
material to be cut.
b) Fit the correct blade ensuring it is sharp and not damaged.
c) Set the depth of cut. (See Setting the Cutting Depth Section)
d) Place the material to be cut onto a flat surface such as a
workbench, table or floor. Use a piece of scrap material
underneath if:
• You do not wish to mark the work surface.
• The work surface is likely to damage the blade. E.g. a
concrete floor.
e) Plug into mains supply.
f) Grasp the tool firmly (See Holding & Switching on Section)
and rest its metal base plate onto the surface to be cut.
Ensure that the rear half of the base plate overhangs the work
surface. Do not plunge the blade into the material.
g) Switch on the tool and wait for one second for the blade
to run up to speed. Next, depress the guard lock lever and
plunge the blade into the material slowly and gently, but firmly.
Then push the tool forwards along the line to be cut. (Never
draw the tool backwards)
h) Very little force should be used to feed the tool along the cut.
Excess force will cause operator fatigue and excessive wear
to the blade and tool. Excess force is also likely to cause the
temperature cut-out to trip, resulting in delays.
i) Ensure that the base plate is always held flat on the material
being cut. This is particularly important at the start or finish of
a cut or if thin strips are being cut where the base plate is not
fully supported.
j) Once the cut has been finished, lift the tool from the work
surface before switching off. If a lot of dust has been created,
keep switched on for a few seconds extra to allow the dust to
clear from within the tool.
Line Following
a) Pointers at the front and rear of the guard allow a line to be
followed, when cutting. (Diagram I)
b) For more accurate and neater cutting a metal ruler, held
with the free hand, can be followed. To position the ruler
draw a second line 10 mm to the left of the cutting line.
(Or 33 mm to the right of the cutting line for left handed
operators.) (Diagram J)
Measuring the Cutting Width
When making cut outs it is desirable to know exactly where
the cut will start and stop to prevent unsightly over cutting.
Indication numbers, which correspond to the depth setting, are
marked on both sides of the guard to show where the blade
starts and stops. (Diagram K)
a) Mark the area to be cut out on the material to be cut. If the
area is not a square or rectangle, separate start and finish
lines may have to be drawn. These are drawn from the start
and finish point, at right angles to the line of cut.
b) To use the width indication system first set the cutting depth,
(See Setting the Cutting Depth Section) for example, to 9 mm.
c) Identify this number (e.g. 9) both on the front and rear of the
guard.
d) Align the indication mark below the rearmost number on the
guard with the start line on the material to be cut.
e) Proceed with the cut until the indication mark below the
forward number aligns with the finish line on the material
being cut.
Cut-outs
NB. Plunge cutting may not be possible in some hard
materials.
a) Set the depth of cut, (See Setting the Cutting Depth
Section) plug in the mains supply and then place the metal
base plate onto the work surface. Ensure that the rear width
indication mark on the guard aligns with the start line. (See
Measuring the Cutting Width Section) To ensure accurate
cut-outs the guard can be held with the free hand, but
ensure it does not come into contact with the blade.
b) Switch on the tool and wait for one second for the blade to run
up to speed. Next, plunge the blade into the material slowly
and gently, but firmly. Then push the tool forwards along the
line to be cut. (Never draw the tool backwards)
c) Once the finish line has been reached, lift the tool from the
work surface before switching off. If a lot of dust has been
created, keep switched on for a few seconds extra to allow
the dust to clear from within the tool.
d) Cutting out tips:
• If the cut is to be covered, for example by a vent cover, the
corners can be overlapped to ensure that the waste material
is completely detached.
• If the cut out is to be seen, do not overlap the corners. In
this circumstance, as the cutting blade is circular, the waste
material will not be fully detached. The corners will therefore,
require finishing with a knife. If the material is thin and the
back surface unimportant, the waste material can just be
pushed out.
• Where there is access to the back surface of the material to
be cut, the cut out can be marked out with an over cutting
allowance. The cut is then made from the back surface to
ensure perfect corners on the front surface. A table of over
cutting allowances is shown in the specifications section.
Cutting particularly Tough or Abrasive Materials
NB. Learn to use the tool by cutting wood before
attempting to cut anything tougher. When cutting
tougher material, such as metals and some plastics,
more force is required to hold the work piece and
clamping may be required.
Never cut materials that produce toxic dust or fumes
such as PTFE or asbestos.
1. Sheet metal:
• Always set the depth adjustment to at least 1 mm greater
than the material thickness to avoid the blade riding up over
the surface. Scrap material is required underneath the work
surface.
• Remove burrs and rust as these impede the feed across the
material.
• Thick beeswax (furniture polish) applied to the base plate of
the tool makes metal cutting easier.
• Do not cut galvanised steel.
• Every 2 minutes of metal cutting should be followed by a rest
of at least 3 minutes.
2. Ceramic tiles, slates etc:
• Only use a blade specifically designed for the purpose.
• Always use with a suitable vacuum cleaner or dust extractor
connected as the dust can be hazardous to the operator and
prevent the guard operating correctly.
• Applying masking or PVC tape to the base plate of the tool,
or alternatively to the work piece can make cutting easier and
avoid scratching the tile.
3. Plasterboard:
• The EXAKT Precision Saw is only recommended for making
occasional cut outs in plasterboard and always with a suitable
vacuum cleaner or dust extractor connected. The dust can
prevent the guard operating correctly.
• Conventional tools such as keyhole saws or knives generally
give excellent results, though the EXAKT Precision Saw can
be used if a particularly neat, dust free cut is required or if
there is a danger of cutting pipes or cables.
Dust Extraction
The EXAKT Precision saw is a powerful tool capable of producing
a large amount of dust. As the tool has a fully enclosed blade,
forced dust extraction is particularly efficient. Forced dust
extraction should be used for all but small trimming jobs.
a) An industrial vacuum dust extractor or domestic vacuum
cleaner can be connected to the dust outlet nozzle of the tool,
using the dust hose kit from EXAKT Precision Tools Ltd.
b) Before using ensure that the metal retaining clip is flush with
the end of the hose.
INSTRUCTIONS • ENGLISH
8
c) To attach the hose disconnect the tool from the mains supply.
Press the hose end with the metal clip onto the dust outlet
nozzle only as far as the raised ridges on the tool body.
Ensure the guard moves up and down freely. Press the
stepped adaptor onto the vacuum hose. Tape can be used to
assist, if required.
d) Ensure that the vacuum cleaner to be used is recommended
for use with a power tool. Generally most domestic wet and
dry vacuum cleaners are suitable.
e) Forced dust extraction is particularly recommended when a
lot of cutting is being carried out as far fewer stoppages are
required for cleaning the tool and surrounding area.
f) Forced dust extraction should always be used when cutting
hazardous materials such as hard woods, MDF or ceramics.
g) Forced dust extraction is recommended when it is desirable
to keep the working area clean.
h) Forced dust extraction is essential if the material being cut is
slightly damp.
Temperature cut-out
The EXAKT Precision Saw is fitted with a temperature cut-out to
prevent the tool overheating.
If the cut-out trips the tool will stop. It will not re-start until the tool
has cooled down. This could take up to 15 minutes.
The temperature cut-out will trip in the following circumstances:
• Using blunt blades.
• Excess force applied when cutting.
• Continuous cutting of very hard or thick materials.
Using a V Guard
A V Guard can be purchased as an accessory or may be
included in the kit from some suppliers. The V Guard is used
to cut plastic, copper and aluminium pipes as well as wooden
dowel.
a) To fit the V Guard see Guard removal section.
b) For cutting copper or aluminium pipes only use a 60 or 80
tooth blade.
c) Place the pipe so that the area being cut is fully supported on
the work surface.
d) Place the saw on top of the pipe to be cut and use free hand
to rotate the pipe as required. Ensure that the hand holding
the pipe is kept at a safe distance from the cutting blade.
EC-310-AS Safety Warnings –
NB. Never replace this washer with anything other than an
EXAKT replacement part. (See List of user-replacable
parts)
Blades
NB. Always use a sharp blade.
• If the tool does not cut as well as expected or if it overheats
(temperature cut out may trip) the most common cause is a
blunt blade.
• It is difficult to see or feel if the blade is blunt. If in doubt use a
new blade.
• Blades are consumable items.
• Always use EXAKT blades.
• Beware when changing blades as they can become hot
during use. Allow the blade time to cool before replacing.
Servicing
EXAKT Precision Tools Ltd.Tel: +44 (0)1467 633800
Midmill Business Park
Fax: +44 (0)1467 633900
Tumulus Way
e-mail: [email protected]
Kintore
Freephone numbers:
Inverurie AB51 0TG
D: 0800 180 7063
Scotland, UK
F: 0800 916696
I: 800 930 019
List of user-replaceable parts:
Blade
Part No.
Accessory
Part No.
22 Teeth
30 Teeth
44 Teeth
60 Teeth
80 Teeth
100 Teeth
18 TCT
G50 Diamond
AS-24-01
AS-23-01
AS-25-01
AS-26-01
AS-27-01
AS-29-01
AS-31-01
AS-32-01
Dust hose
Spare Guard
Blade washer
Blade Screw
Guard Screw
Torx Key
U Hex Key
Fence Guard
AS-38-03
AS-43-01
AS-42-01
AS-129-01
AS-108-02
AS-128-01
AS-130-01
AS-40-01
V-Guard
AS-39-01
2.65Ib (1.2kg)
Maximum blade diameter
50.8 mm
Maximum / Minimum blade width
2 mm / 0.75 mm
Hand arm vibration value
< 2.5 m / s2
Sound pressure level No load
83 dBA
Sound power level Lwa No Load
94 dBA
Cutting Specs.
Wood
Metals
Composites
Plastics
Minerals
All types up to 12 mm
Up to 3 mm in Aluminium & lead
MDF, ply & chipboard to 12 mm
Tufnol, perspex, fibreglass etc.
Wall & Floor tiles, slates etc.
Where there is access to cut from the back surface of the
material, over cutting by the allowance shown will ensure
perfect corners on the front surface.
Over cutting allowances in mm
Depth
setting
1
2
3
4
6
9
12
Overcut
by
3
5.5
7.5
9
11.5
14.5
16.5
Assumes the depth has been set to 0.5 mm greater than
the material to be cut.
Explanation of Symbols
This product is UL
listed
Wear suitable
face mask
Cleaning
Double insulated
appliance
Wear suitable
eye protection
Read instructions
before use
Wear suitable
ear protection
Regular cleaning is required for the safe operation of the tool,
as an excessive build up of dust will prevent the tool operating
correctly.
The dust extract nozzle may block and require cleaning
occasionally, especially if damp wood is being cut.
• Unplug from mains supply and remove guard. (See Guard
Removal Section)
• Clean thoroughly with a small soft brush, like a paint brush.
Risk of electric
shock
Risk of injury when
instructions are not
followed
Safety Blade Retaining Washer
9
8.8:1
Approximate weight
If the replacement of the supply cord is necessary, this has to be
done by the manufacturer or his service agent in order to avoid
a safety hazard.
Maintenance and Servicing
The blade is clamped in place using a special safety washer that
is designed to slip if the blade jams. The result is that the motor
slows down, sounds like it is labouring and the tool will stop
cutting. If this happens the operator should immediately reduce
the feed pressure until the motor sounds healthy or remove
the tool from the work piece to prevent permanent damage.
The washer is a consumable item, which should be replaced if
damaged or deformed.
Gearbox reduction ratio
Specifications
EC-310-AS
Usage
DIY
Motor power
350W
Depth of cut
0.472” (12mm)
Approx. no load blade speed
4000 rpm
Maximum duty cycle
3 min / 5 min
INSTRUCTIONS • ENGLISH
10
JML America LLC
7850 Ruffner Avenue,
Van Nuys CA 91406
www.JMLAmerica.com
Made in PR China
Patents apply. Registered design.
The EXAKT Logo is a registered trade markMade in PRC.
11
INSTRUCTIONS • ENGLISH
12