1
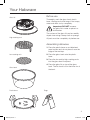
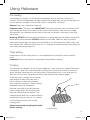
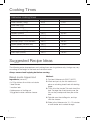
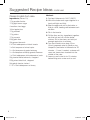
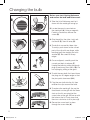
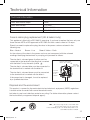
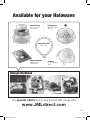
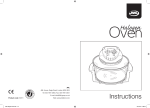
OFF
Thaw
Wash
C
F
125°C
257°F
175°C
343°F
150°C
302°F
OFF
10
20
30
50
40
Instructions
HW_IM_B.indd 1
27/03/2014 13:08
aw
sh
C
F
Thank you for purchasing Halowave from JML.
To ensure you enjoy all the tastiest, juiciest, most flavoursome cooking from
Halowave, please read these instructions in full and keep them safe for
future reference.
Contents
Safety Warnings & Advice
2-3
Suggested Recipe Ideas
7-9
Your Halowave
4
Before use
4
Self-Cleaning - ‘Wash’
10
Assembling Halowave
4
General Cleaning and Care
10
Using Halowave
5
Cleaning and Care
Guarantee
10
Operation
5
Pre-heating
6
Changing the Bulb
11
Thaw setting
6
Technical Information
12
Cooking
6
Technical Information
12
7
Fuse & Mains Plug Replacement
12
Cooking Times
Customer Helpline
10
10
1
HW_IM_B.indd 2
27/03/2014 13:08
Safety Warnings & Advice
This appliance is intended for domestic use and within similar environments, such as:
- Staff kitchen areas in shops, offices and other working environments
- Farm houses
- In hotels, bed and breakfasts, and other residential type environments
Not intended to be operated by means of an external timer or separate remote-control system.
If the supply cord is damaged, it must be replaced by the manufacturer, its service agent or a similarly
qualified person in order to avoid a hazard.
Keep out of the reach of children.
This appliance is not intended for use by persons (including children) with reduced physical, sensory or
mental capabilities, or a lack of experience and knowledge, unless they have been given supervision or
instruction concerning the use of this appliance by a person responsible for their safety. Children should
be supervised to ensure that they do not play with the appliance.
DO NOT rest the lid on a flammable surface or adjacent to flammable materials.
WARNING! - The lid should be unplugged when cooking is complete and before it is lifted from the pot
as accidental closure of the handle will re-energise the heating element.
Always wear protective, insulated oven gloves or mitts when removing food items or handling Halowave
- THE BOWL GETS VERY HOT.
Unplug from the mains power socket when not in use.
Check the power cord and electric plug for signs of damage before use. Do not use if damaged.
Always use the tongs provided to lift the racks in and out of the bowl when hot.
Always use the handle to remove the glass lid from the glass bowl.
Ensure Halowave is clean and dry before use.
Only place food in Halowave before setting the timer or after pre-heating.
WARNING! - Only use on a safe, stable, heat-proof work surface and do not place near the edge of the
worktop.
WARNING! - DO NOT touch the hot surfaces. Surfaces remain hot even after Halowave is switched off.
WARNING! - When operating Halowave on a work surface keep the surrounding areas clear and free
from clutter. Ensure adequate air space surrounding Halowave for circulation.
DO NOT operate Halowave with other major appliances plugged into the same power socket – there is
a risk of fusing the circuit.
DO NOT stare directly into the bulb.
DO NOT move Halowave when in use.
DO NOT immerse the glass lid, power cord or electric plug in water or other liquids.
DO NOT use in a manner other than directed.
DO NOT leave Halowave unattended whilst in use.
DO NOT place Halowave on or near a hot gas or electric hob, or in a heated oven.
DO NOT allow the power cord to hang over the edge of surfaces.
2
HW_IM_B.indd 3
27/03/2014 13:08
Safety Warnings & Advice
DO NOT allow the power cord to touch any hot surfaces.
DO NOT disassemble or modify Halowave in any way.
DO NOT over-fill Halowave; the glass lid must be completely shut.
DO NOT use any accessories other than those supplied with Halowave.
DO NOT cover Halowave when in use.
DO NOT place paper, cardboard, plastic or other flammable materials in Halowave.
DO NOT touch the halogen bulb when hot or plugged in.
DO NOT attempt to repair Halowave; if necessary contact JML customer services.
DO NOT operate Halowave near where aerosol products are being used.
EXTREME caution must be used when handling or disposing of hot oils or other liquids.
3
HW_IM_B.indd 4
27/03/2014 13:08
Your Halowave
Glass lid
Before use
Thoroughly wash the glass bowl, plastic
base, cooking racks and tongs in hot soapy
water and allow to dry completely.
Important: DO NOT immerse
the glass lid in water or place in a
dishwasher.
High cooking rack
The surface of the glass lid can be carefully
wiped clean using a damp cloth or sponge.
All parts must be completely dry before use.
Assembling Halowave
1. Place the plastic base on a stable heatproof surface and do not place it near the
edge of the worktop.
Low cooking rack
2. Place the glass bowl onto the plastic
base.
3. Place the low and/or high cooking racks
into the glass bowl if required.
Glass bowl
Plastic base
4. Place the glass lid on top of the glass
bowl. The lid should sit on the inner rim of
the bowl.
Tongs
4
HW_IM_B.indd 5
27/03/2014 13:08
Using Halowave
First check that:
• Halowave is on a stable heat-proof
surface and it is not near the edge of the
worktop.
• Halowave is plugged into an earthed
mains power socket (the red power light
will be illuminated).
• You have a space cleared to place the
glass lid when removed from Halowave.
• You have placed the required cooking
rack inside the glass bowl.
• You have oven gloves ready to remove
cooked food.
• The power cord is not touching anything
hot.
What cookware items can be used in Halowave?
Any oven safe pans, bowls, plates, tin foil etc. that can be used in a conventional oven.
Operation
Setting the temperature
Select the required heat setting by turning
the temperature control clockwise (from OFF
to 245ºC). Halowave will not turn on until the
cooking time has been set.
Control panel
Place the food in the glass bowl, using a
cooking rack if required.
Temperature
Important note: The handle operates
as a safety switch; as soon as it is lifted
Halowave will turn off.
Time
The handle MUST be flat down in its stored
position for Halowave to operate.
Setting the cooking time
Select the required cooking time by turning
the control clockwise (from 0 to 60 minutes).
Once the time has been set the halogen
light will turn on and the green heat light will
illuminate.
Push down handle
to operate
Safety
switch
The halogen light will turn off when the
required heat setting has been reached,
the halogen light will then turn itself on and
off to maintain the set temperature. When
the timer control reaches the off position
Halowave will turn itself off.
5
HW_IM_B.indd 6
27/03/2014 13:08
Using Halowave
Pre-heating
If pre-heating is required, set the required temperature and set the time control to 10
minutes. Once the temperature has been reached the halogen light will turn off, the food can
now be placed in the glass bowl and the correct cooking time can be set.
Caution: Take care, Halowave will be hot.
Important note: The time control MUST NOT be turned backwards (anti-clockwise) as this
may damage the timer. Take care to set the correct time required. If the time set is longer
than required, turn Halowave off and wait for the timer to naturally count down to the time
you require.
Warning: DO NOT touch the surface of Halowave – it will get extremely hot when in use and will
remain hot for some time after. DO NOT immerse in cold water. When hot, allow to cool first.
When removing the glass lid always use the handle as this will operate the safety switch and
turn Halowave off. Halowave will be very hot; it is strongly recommended that oven gloves be
used when removing the glass lid.
Thaw setting
Halowave has a thaw setting which is a low temperature that should be used to defrost
foods.
Important: Always ensure food is adequately thawed before cooking.
Cooking
The cooking time depends on the size and weight etc. of the food to be cooked. Most meat,
for example, comes with a recommended cooking time. These times should be used as a
guide, however. Halowave will cook faster than a conventional oven, so you may need to
allow less time to cook. For guidance, refer to the cooking times table on page 7.
To ensure food is cooked, use a cooking
thermometer or pierce the food with a
fork or skewer to check for uncooked
juice on meats, poultry etc. When cooking
vegetables check for tenderness.
Moisture may build up inside Halowave
when cooked food is not removed soon
after the cooking time has expired. The
steam/moisture build-up can be avoided by
removing the food as soon as it is cooked.
Use the tongs provided to lift out the
cooking racks.
Always ensure food is piping hot inside
before serving.
Using the tongs
6
HW_IM_B.indd 7
27/03/2014 13:08
Cooking Times
Halowave cooking times
Food
Temperature
Time
Roast chicken (1.6kg)
200ºC
70 min
Roast beef (1kg)
180ºC
75 min
Cod steak (150g)
200ºC
24 min
Chicken breast (350g)
190ºC
20 min
Peppers (halved)
200ºC
34 min
Onion (whole, small)
200ºC
60 min
Potatoes (roast, small, cut in two)
200ºC
36 min
Parsnips (strips – 2cm diameter)
200ºC
36 min
Potato (baked, medium size)
200ºC
75 min
Onion (quarter)
200ºC
60 min
Yorkshire pudding (ready made)
200ºC
12 min
Oven chips (frozen)
200ºC
18 min
Suggested Recipe Ideas
The following recipe temperatures and cooking times are for guidance only; timings may vary
according to the weight of the food and individual tastes.
Always ensure food is piping hot before serving.
Baked crumb-topped cod
Method:
Ingredients (serves 4):
1. Pre-heat Halowave to 200ºC (400ºF).
4 x 150g skinless firm white cod steaks
2. Wash and pat dry the fish steaks and
place on a baking sheet lined with baking
paper.
1 beef tomato
1 medium leek
4 tablespoons of stuffing mix
100g grated mature cheddar cheese
3. T
hinly slice the tomato.Trim and shred the
leek. Arrange the sliced tomato over the
fish so they overlap and then pile on the
leek.
4. Sprinkle over the stuffing mix, and top
with the cheese.
5. Bake in the Halowave for 10 – 15 minutes
or until tender and cooked through.
7
HW_IM_B.indd 8
27/03/2014 13:08
Suggested Recipe Ideas continued
Macaroni bake
Method:
Ingredients (serves 4):
1. Pre-heat Halowave to 180ºC (350ºF).
125g leeks, thinly sliced
2. P
ut the leeks into a saucepan of boiling
water. Bring back to the boil and drain.
150g macaroni
2 red onions, finely sliced
1 pepper, finely chopped
15ml tablespoon olive oil
150ml carton natural yogurt
150g light cream cheese
400g can of chopped tomatoes, drained
Salt and freshly ground black pepper
65g cheddar cheese, grated
3. Cook the macaroni in a large pan of
boiling salted water for 10 – 12 minutes
and drain.
4. Mix together the onions and peppers.
Heat the oil in a large frying pan and fry
for 3 – 4 minutes until softened but not
brown.
5. In a bowl, mix together the yogurt, cream
cheese, tomatoes and seasoning. Mix in
the macaroni and the vegetables.
6. Put into a suitable oven safe dish and
sprinkle with grated cheese. Bake in
Halowave for 20 – 30 minutes until
golden.
Open apple pie
Method:
Ingredients (serves 6):
1. Pre-heat Halowave to 200ºC (400ºF).
Base:
2. For the pastry base: make up the pastry
as per the pack instructions. Use ¾ to
line a 23cm pie dish. Cut the remaining
rolled pastry into strips 1cm wide.
450g shortcrust pastry mix
Filling:
500g Bramley apples, peeled, cored and
chopped
1 pinch ground cloves
5ml teaspoon of ground cinnamon
1 pinch freshly grated nutmeg
50g raisins
70g caster sugar
Top:
1 medium size egg, beaten
3. For the filling: Combine together all the
filling ingredients and pile into the pastrylined pie dish.
4. To top: Top with the pastry strips to form
a lattice. Glaze with a little of the egg and
sprinkle sugar over the top.
5. Cook for 25 – 35 minutes in Halowave.
6. Serve immediately with ice cream or
cream.
20g caster sugar
8
HW_IM_B.indd 9
27/03/2014 13:08
Suggested Recipe Ideas continued
Classic English fruit cake
Method:
Ingredients (serves 10):
1. Pre-heat Halowave to 140ºC (290ºF).
170g unsalted butter
2. W
hisk the butter and sugar together in a
bowl until light and fluffy.
170g light brown sugar
100ml apple juice
3. Beat the eggs and add to the butter, a
little at a time, beating well between each
addition.
170g sultanas
4. Stir in the treacle.
170g raisins
5. Sift the flour and dry ingredients together,
add the fruit and stir into the butter
mixture. Stir in the sherry and add just
enough apple juice to moisten.
4 medium sized eggs
170g currants
250g plain flour
55g ground almonds
2 x 15ml tablespoons of black treacle
1 x 5ml teaspoon of mixed spice
½ x 5ml teaspoon of grated nutmeg
½ x 5ml teaspoon of freshly ground cinnamon
1 x 15ml tablespoon of bicarbonate of soda
55g toasted flaked almonds, chopped
255g mixed dried fruit, chopped
6. Turn the mixture into a deep, 25cm
(9 inch) prepared cake tin (ideally a ring
shaped tin) and bake in Halowave for 45
minutes – 1 hour. If cooked, a skewer will
come out clean when inserted into the
middle of the cake.
7. Leave to cool in the tin for 15 minutes
before lifting onto a wire rack to cool.
30g glacé cherries, halved
2 – 3 x 15ml tablespoons of sherry
9
HW_IM_B.indd 10
27/03/2014 13:08
Cleaning & Care
Caution: DO NOT attempt to wash the glass bowl or lid until they cool down
to room temperature. If cold water is poured on the glass while it is still hot, it
could crack or break.
Self-cleaning - ‘Wash’
Halowave has a special self-cleaning setting, ‘Wash’, on the temperature control, which
should be used to wash the glass bowl:
1. Allow Halowave to cool.
2. Remove any food and drain away any fat from the glass bowl.
3. Add approximately 1.5cm of cold water into the glass bowl with a squirt of washing up
liquid. Replace the glass lid and turn the temperature control to ‘Wash’.
4. Set the time control to 10 - 15 minutes, depending on how dirty the glass bowl is.
The combination of the heat, the swirling motion caused by the fan and the washing up
liquid will clean the glass bowl quickly and efficiently.
The cooking racks can be left in the glass bowl when cleaning to soften any stuck on
deposits.
5. Allow Halowave to cool.
6. You may need to use a washing up brush to remove stubborn deposits before rinsing
and wiping dry.
General cleaning and care
Before cleaning, ensure Halowave is turned off, unplugged from the mains and has cooled down.
All parts EXCEPT the glass lid and the plastic base are dishwasher safe.
DO NOT use abrasive cleaners or scouring pads on the metal or plastic surfaces.
The outer surface of the glass lid should only be wiped clean with a damp cloth.
Warning: When hot, do not place the glass lid on or close to any flammable or combustible
items. It may cause fire or explosion.
Guarantee
This product is unconditionally guaranteed for one year against all defects of workmanship
and materials. This guarantee does not affect your statutory rights. If you have any problems
or queries about this product please contact JML.
JML customer services: 0800 781 7831
10
HW_IM_B.indd 11
27/03/2014 13:08
Changing the bulb
A
B
Before you start: Unplug Halowave
and ensure the bulb and lid are cool.
1. T
ake the lid off Halowave and lay it
down with the metal grill facing up.
C
D
2. L
ocate the round screw hole on
the metal grill (A). Using a magnetic
Pozidriv screwdriver, remove the
screw (B).
3. G
rip the grill by the sides, twist anticlockwise (C), then lift away (D).
E
F
4. T
he bulb is secured by three clips.
To unclip, push down on the curved
part of the clip with one finger, while
bending back the straight part with
another (E). Be careful of sharp
edges.
5. O
nce unclipped, carefully push the
curved part back to release (F).
Unplug the bulb by pulling the plastic
plug up and away from the lid (G). Do
not unplug by pulling at the glass.
G
H
6. T
o add the new bulb, first bend down
the plug at a 90 degree angle so that
the pins point downward (H-I).
7. P
lug the new bulb into the lid, then
refasten the clips around the bulb.
I
J
8. T
o replace the metal grill: line up the
three hooks on the grill with the three
slots on the lid, ensuring that the
screw hole on the grill will line up with
the hole on the lid. Push down and
then turn clockwise to fit in place (J).
9. S
ecure the screw back in place
through the screw hole (A).
11
HW_IM_B.indd 12
27/03/2014 13:08
Technical Information
Technical Information
Glass bowl external diameter
33cm
Glass bowl internal depth
16cm
Glass bowl volume
10.5 litres
Power consumption
1200 - 1400W
Power supply
220-240V~50Hz AC
Fuse & mains plug replacement (UK & Ireland only)
This appliance is fitted with a BS 1363 13-amp plug. If you have to replace the fuse, only use
those that are ASTA or BSI approved to BS 1362 and with a rated current of 13 amps.
Should you need to replace the plug; the wires in the power cord are coloured in the
following way:
Blue – Neutral
Brown – Live
Green & Yellow – Earth
As the colours of the wires in the power cord may not correspond with the coloured
markings identifying the terminals in your plug, and proceed as follows:
The wire that is coloured green & yellow must be
connected to the terminal in the plug that is marked
.
with the letter E or by the earth symbol
Connect green/yellow
lead to ‘E’ or - Earth
The wire that is coloured blue must be connected to
the terminal that is marked with the letter N.
The wire that is coloured brown must be connected
to the terminal that is marked with the letter L.
E
Connect
brown lead
to ‘L’ - Live
L
Connect
blue lead
to ‘N’ Neutral
N
If the power lead is damaged, it must be replaced
by a qualified electrician.
Disposal and the environment
This product is covered by the waste electrical and electronic equipment (WEEE) regulations.
It should not be discarded with normal household waste,
but taken to your local collection centre for recycling. For further information, please contact
the local authority or approved disposal agency.
JML , JML House, Regis Road, London NW5 3EG
Tel: 020 7691 3800, Fax: 020 7691 3801
E-mail: [email protected] Web: www.jmldirect.com
©JohnMillsLtd/JW/03.14/DG/B
HW_IM_B.indd 13
12
27/03/2014 13:08
13
HW_IM_B.indd 14
27/03/2014 13:08
Available for your Halowave
Extension Ring
Frying Basket
Gives you an extra
3 litres of space
Make chips, wedges
and more
Replacement Bulb
Easy to install
Halogen Handbook
A great selection of
gourmet recipes
Lid Stand
For safe, convenient
storage
Halogen Handbook
Baked camembert
Mini pizzas of sicily
Roast turkey
Bread pudding
For special offers and to see the full JML range visit
www.JMLdirect.com
14
HW_IM_B.indd 15
27/03/2014 13:08
Protect your
Halowave for
less than £5
per year!!
Extended 2 Year Warranty
If for any reason you require any service for your
Halowave, it will be repaired or replaced with a
brand new unit, no questions asked, any time
within two years of your warranty purchase.
PLUS
Order Now!
only
£9.95
...if you do need to return your Halowave the
P&P will be absolutely FREE!*
To take advantage of this great offer you must order via our sales hotline on 08451 949 730
or return the coupon below WITHIN 30 DAYS OF PURCHASING YOUR Halowave*
ITEM
PRICE
P&P
TOTAL
I enclose Cheque/P.O.
Halogen Oven Extended 2 Year Warranty
£9.95
£1.95
£11.94
(made payable to JML) for £
or charge my MasterCard/Visa/Maestro/Solo/Delta Account.
Issue No. (Switch/Solo Cards)
11.90
Order Code: HOW875
Name Mr/Mrs/Miss/Ms
Address
Post Code
Tel No.
E mail
Please send this coupon free of charge to JML Direct FREEPOST. A valid proof of purchase receipt no more than 30 days old must be included.
Terms and Conditions
This offer must be redeemed within 30 days of purchasing your Halowave. You will be required to send a proof of purchase receipt to our customer service team
before your warranty certificate will be despatched. If you are paying by cheque, please enclose your receipt with the above coupon.
* Free P&P is only valid for the return of Halowaves that have an accompanying 2 year extended warranty previously purchased. Free P&P is not applicable if you
have not purchased a warranty for the product and is only valid if the product is faulty or defective. You will be required to pay for the postage outright and a cheque
refund will be provided upon successful processing of your warranty redemption.
HW_IM_B.indd 16
27/03/2014 13:08