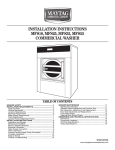
1
Contents Chapter 1 — Your Above Ground Swimming Pool 1.Introduction................................................................................................................................................. 4 2.Planning..................................................................................................................................................... 5 3. Step By Step Process................................................................................................................................ 6 A) Pre-Installation (To-Do-List)........................................................................................................... 7 B) Above Ground Swimming Pool Installation................................................................................... 7 4. Start-up Procedures................................................................................................................................... 8 5.Opening...................................................................................................................................................... 9 6.Maintenance............................................................................................................................................. 11 7.Closing..................................................................................................................................................... 17 8. Safety Guidelines..................................................................................................................................... 21 Chapter 2 — Chemical Treatment and Water Tests 1.Introduction............................................................................................................................................... 24 2. Test Parameters....................................................................................................................................... 25 3. Water Tests .............................................................................................................................................. 27 4. Appendix: Water Problems....................................................................................................................... 29 Client’s Name:_____________________________________________ Contract No. : ______________________ Brand : __________________________ Model:___________________ Purchase Date : ____________________ Structure : _______________________ Size : ____________________ Water Volume : _____________________ ACCESSORIES Type Brand Model Size/Dimensions Serial No. Ladder/Steps Lighting Cleaner Tank/Filter Pump Standard Chlorinator Salt Chlorinator Purifier Stretch Bands System Jets Waterfalls Water Heater Liner Other Club Piscine Super Fitness - Above Ground Swimming Pool - Owner’s Manual (03/2012) 2 Chapter 1 : Your Above Ground Swimming Pool 3 Club Piscine Super Fitness - Above Ground Swimming Pool - Owner’s Manual (03/2012) 1. Introduction Welcome to the Club Piscine Super Fitness family ! Congratulations on the purchase of your Club Piscine Super Fitness swimming pool. You have chosen the best value for your money, with a comprehensive warranty, and unsurpassed after-sale service. The purchase of a swimming pool is often a dream come true, and it represents a long-term investment. At Club Piscine Super Fitness, we understand this, so we have created this booklet to help you get a clear picture of what this major purchase entails. Hold on to this guide, but don’t forget that your Club Piscine Super Fitness store offers a full array of services, and experts to advise and help you. You may also refer to our website “www.clubpiscine.ca”, and select “Contact us” at the bottom of the home page for any question you may have. Have a wonderful summer, and enjoy your new purchase. We suggest that you notify your insurance company of your new purchase to ensure that you have adequate protection. Remember, even if you use your pool during the summer months only, you own it all year round ! Club Piscine Super Fitness - Above Ground Swimming Pool - Owner’s Manual (03/2012) 4 2. Planning With a project of this size, there are several steps that must be completed before the delivery and installation of your pool. Club Piscine Super Fitness offers a poolful of tips and recommendations to help make your dream a reality. MUNICIPAL REGULATIONS It is your responsibility to check the rules that apply to your property with your municipality. For example : • Mandatory distances from property lines • Municipality power standards • Required permits • Required fencing • Some municipalities may regulate the distance heat pumps must be located from the property lines or decibel levels. SITE SELECTION You must also plan where your pool will be located, taking into account the following factors : • Your yard’s sun exposure • Location of patio and pool house • Children’s play area • Underground and overhead wires and cables (See some of Hydro Québec’s requirements shown in the picture below, which is to be used as a guideline only since each installation is unique, and local regulations may differ.) • Trees and underground roots We recommend that you make a diagram to scale depicting the desired pool configuration in order to ensure it will be in compliance with all municipal regulations. For more information, visit Hydro-Québec’s website. 7.5 m min. 7.5 m min. 5 m min. 5 m min. 1.5 m min. 5 Club Piscine Super Fitness - Above Ground Swimming Pool - Owner’s Manual (03/2012) 3. Step By Step Process A DETAILED GUIDE TO THE INSTALLATION PROCESS A) PRE-INSTALLATION (TO-DO-LIST) Your dream has come true… the pool is yours ! Now as a new above ground pool owner, there are a few steps you must ensure are completed, and a couple items you need to consider prior to intallation day. 1. Visit your municipal planning department to: • Apply for permits • Obtain a certificate of location and a copy of the regulations 2.Call Info-Excavation at 1 800 ON-EXCAV (663-9228) to determine the location of any underground lines belonging to Bell, Hydro-Québec, Gaz Métropolitain, Vidéotron or others. 3.Plan to have all pool materials delivered a few days before the scheduled installation date (Please note this material may come in extra large boxes, and thus require some planning on your part before delivery for the extra space that may be needed. on your part before delivery,); YOU MUST SUBMIT EQUIPMENT PAYMENT DULY IN THE FORM OF A SIGNED CERTIFIED CHEQUE OR FINANCING TO THE DELIVERY PERSON. 4. Make provisions for the water supply needed to fill your pool (at owner’s expense). 5.Find out from your local store what are your options for waste removal and disposal: sod, soil, boulders, stumps, roots, blasting, etc. 6.Remember to stop by your local Club Piscine Fitness Store to have your pool water tested and analyzed on a regular basis, totally free of charge. IF YOUR YARD SHOWS EVIDENCE OF DAMAGE BY, OR EXCESSIVE AMOUNT OF ANTS OR OTHER INSECTS, WE RECOMMEND THAT YOU RESOLVE THIS ISSUE BEFORE STARTING ANY YARD WORK IN ORDER TO AVOID FUTURE PROBLEMS. ELECTRICAL WORK You must have a licensed electrician install a power line for the filtration system, heat pump, and lighting. WARNING The installation of a pool may vary from one region to another depending on weather conditions, and soil type. Please consult with your pool manufacturer prior to having your pool installed. Club Piscine Super Fitness - Above Ground Swimming Pool - Owner’s Manual (03/2012) 6 B) ABOVE GROUND SWIMMING POOL INSTALLATION A CLUB PISCINE SUPER FITNESS PROFESSIONAL INSTALLER WILL CONTACT YOU, AND MAKE AN APPOINTMENT TO GO OVER THE ACTUAL INSTALLATION OF YOUR IN GROUND SWIMMING POOL. Please note that the initial start and/or completion date could be delayed due to inclement weather. PLAN ONE INSTALLATION DAY FOR: • Preparing the perimeter (compacting dirt) ; • Compacting the bottom (sand and dirt) ; • Assembling the frame ; • Installing the liner ; • Installing the filter system and other equipment (heat pump, water heater, steps, ladder, etc.) ; • THE INSTALLER WILL ASK FOR PAYMENT DULY IN THE FORM OF A SIGNED CERTIFIED CHEQUE OR FINANCING. EXPECT EXTRA CHARGES FOR : • Level differences of more than 6” • Saucer depth of over 6” • Removing soil and turf from your yard • Removing stumps • Installing a deck • Installing a solar blanket roller • Installing a water-heater with a bypass • Connecting a gas line for a propane or natural gas water-heater • Licensed electrician for electrical hook-up • Removing sod • Levelling the ground and digging the saucer (4 to 6 inches) • Installing pool lights SHOULD YOU DECIDE TO BUILD A DECK, CLUB PISCINE SUPER FITNESS RECOMMENDS THAT YOU DO SO ONLY ONCE YOUR POOL HAS BEEN INSTALLED, AND THAT YOU ENSURE YOUR POOL IS STILL EASILY ACCESSIBLE IN CASE ADDITIONAL WORK BE REQUIRED. IN ADDITION, UNDER NO CIRCUMSTANCES SHOULD THE DECK OVERHANG THE POOL’S EDGE IN ORDER TO PREVENT ACCIDENTS. 7 Club Piscine Super Fitness - Above Ground Swimming Pool - Owner’s Manual (03/2012) 4. Start-Up Procedures The installation of your new pool is now complete! Here are some tips to get you started on the right foot : 1.Fill the pool 3/4 of the way up the skimmer and start the motor (set the motor to the ON position). Make sure the three-way valve is at position 4 and/or pointed to the side. 2.Give us a water sample so that we can ensure the pH is between 7.4 and 7.8, calcium hardness is between 120 and 350 ppm (adjust hardness only if you have a Nature2 water heater or water purification unit) and total alkalinity is between 80 and 120 ppm. Please note that we recommend a complete test at the beginning of each season, and then at least once a month, especially if you have a water heater. In-store water tests are free and only take a few minutes. You will need to provide at least 250 mL of water (1 cup) for the test. 3. Balance your pool water before installing the Nature2 cartridge. 4.Follow the manufacturer’s instructions to give your pool water a chlorine shock treatment after sundown. Repeat daily for four days. 5.If you have a chlorinator, start it up and insert the concentrated chlorine pucks. Adjust the chlorinator valve to ¼ (this setting will be adjusted following the chemical tests you will perform on the following mornings). 6.Run the pump non-stop throughout these four days, keeping the chlorine concentration between 1 and 3 ppm. 7.For the remainder of the season, you can reduce the concentration of chlorine but NEVER have it lower that 0.6 ppm. If you are using a Nature2 sanitizer, it is normal for your chlorine test to have no reading: chlorine is not used in this sanitizer. NATURE2 SANITIZER The Nature2 cartridge must be replaced every season. It is important to test the water at least at least once a week, in the morning only (to check the pH). This is why we recommend that you come to the store at least once a month for a free water analysis. Get advice from our specialists and avoid problems ! TIPS FOR NATURE2 OWNERS • Run the pump and filter at least 12 hours a day. • Perform a pH and total alkalinity test once a week. • Add chlorine at the end of the day to keep a minimum concentration of 0.6 ppm. • You cannot use bromine with Nature2. ____________________________________________________________________________ 1 ppm = parts of a product per million parts of water. Club Piscine Super Fitness - Above Ground Swimming Pool - Owner’s Manual (03/2012) 8 5. Opening Depending on the weather, you can start opening your pool in mid-April, ideally when there is still some ice on the surface or before the water reaches 21oC (70oF). As water temperatures rise, bacteria will multiply, making your water green and dirty. This will also make it harder to keep the chemicals balanced. Use Club Piscine’s recommendations for opening your pool and enjoy ideal water conditions all summer long ! 1) PREPARATION – Before filling your pool It will prove very helpful if you followed our recommendations for closing your pool, that is, made a sketch, took photos or videotaped the filtration set-up. a)Check the general state of the pool, looking out the following problems: a seized, noisy or wobbly pump motor; a cracked pump lid, basket or lid gasket; split hoses or broken valves and seals; loose plates and connectors; a damaged skimmer or water return. b)Complete the necessary repairs before proceeding. Don’t forget that your Club Piscine Super Fitness store is always there to help you. c)Check all chemical products you have on hand, and if any has expired, dispose of it at your local recycling center. Stock up on any missing products before proceeding with the opening of your pool. If you have a test kit with bottles, replace the OTO and PHENOL every year. Verify the expiration date on Club Piscine Super Fitness test strips as well. d)If filter sand is over four years old, or if it was contaminated during winter (signs of algae), replace it. We also recommend replacing the pressure gauge every year. (For additional information, go to Section 6. Maintenance, step 6) Sand Filter on page 12.) 2) PROCEDURE a) Removing the winter cover • First remove all the leaves and debris you can with a leaf skimmer. • Remove the cover, then rinse and let dry before storing it away. Note : IF YOU DID NOT COVER THE POOL OVER THE WINTER, remove all the leaves and debris in the pool with a leaf skimmer before continuing with the opening. b) Filtration system hook up • Remove the styrofoam or polystyrene from the skimmer. • Remove the styrofoam or polystyrene coil. • Reconnect the skimmer hose to the front of the pump, the hose at the top of the pump to the “PUMP” filter, and the filter “RETURN” hose to the water return. • Be sure to apply liquid silicone to lubricate the pump O-rings, and chlorinator and pump lids. Never use Vaseline. • Connect the “BACKWASH” hose to the “WASTE” filter. • Attach a new pressure gauge with Teflon tape. The gauge should register exactly 0. • Re-install the glass bottle (if applicable). • Cover drain plugs (pump, filter, chlorinator and Nature2) with Teflon tape before reinstalling. • Connect the water heater if applicable. 9 Club Piscine Super Fitness - Above Ground Swimming Pool - Owner’s Manual (03/2012) c) Cleaning • Wash off the dirty ring around the pool with a biodegradable vinyl-cleaning product. • Bring the water level to three-quarters of the way up the skimmer. • Meanwhile, install your accessories: skimmer basket and lid, lights (when the water level is above the lights), solar blanket roller (but not the solar blanket yet), water return eyeball and fittings, ladder, thermometer, etc. • Start the motor and make sure that it is free of air and leaks. Do not use the bottom drain as long as there is debris in the pool; use the skimmer only. • Backwash the filter (“BACKWASH” setting on the filter) for about four to five minutes to clean the sand. (For more details, go to Section 6. Maintenance, step 1) Backwashing on page 10.) • Use the vacuum. If the pool is very dirty, put the filter handle on “DRAIN” or “WASTE.” If you have a cartridge filter, remove the cartridge so that it won’t get dirty, and open the valve between the filter and the pump. Do not forget to leave the garden hose running in the skimmer at this point to keep the water level three-quarters of the way up the skimmer. d) Opening Kit Note : Read the product’s information on the package or talk with a Club Piscine Super Fitness representative to find out which Club Piscine Super Fitness opening kit is best for your above ground swimming pool. Before adding any chemical product included with your opening kit, make sure the pH and alkalinity are balanced (test them using drops or strips) to increase the effectiveness and activate the products. If you’re not sure, do not hesitate to meet with a Club Piscine Super Fitness technician for a free complete water analysis free of charge. We will need at least 250 ml (1 cup) of water for this analysis. • Pour the degreaser and clarifier evenly around the inside of the pool. Let it filter all night. • Pour the shock treatment into a bucket of lukewarm water, and stir to dissolve completely, as recommended. Then pour all around the inside of the pool. Wait one hour then add a 40% algicide. • We recommend you vacuum regularly and backwash as needed. NATURE2 You can only install the sanitizer cartridge if the opening chemical treatment has been applied, and the water is balanced. See the manufacturer’s owner manual for instructions. FIND OUT ABOUT OUR POOL OPENING KIT! CLUB PISCINE SUPER FITNESS OFFERS YOU A SMALL KIT, WHICH INCLUDES SHOCK AND ALGEA TREATMENTS, A CLARIFIER, AND A SUPER DEGREASER. FOR A GREAT SEASONAL KICK OFF, START WITH EITHER OUR SUPER KIT, OR EXTRA KIT. Club Piscine Super Fitness - Above Ground Swimming Pool - Owner’s Manual (03/2012) 10 6. Maintenance Proper maintenance is the key to keeping your pool in good condition and filled with clear, clean water. Please read these instructions thoroughly, and follow them carefully. Only a few minutes a day will keep your pool in perfect condition. 1) BACKWASHING We recommend you backwash once a week. This must also be done when the pressure gauge measures higher than normal (over 10 pounds) and each time you vacuum. This operation consists of reversing the water flow through the filter pipes and sand. Here are the steps to follow: Caution ! Each time you change the position of the filter handle, shut off the motor and re-start it once the change has been made. • Unroll the backwash hose to its full length and turn off the pump. • Move the filter handle to “BACKWASH.” • Run the pump for two or three seconds then turn it off. This will open up the tube so that it will not burst or split from the pressure. • Run the pump for two to three minutes during the weekly cleaning, or four to five minutes when opening, or closing your pool, or until the water in the glass bottle is clear. • Turn off the pump. • Move the filter handle to “RECIRCULATE” or “WHIRLPOOL.” • Run the pump for one minute. This will enable the sand to settle at the bottom of the filter. Turn off the pump. • Move the filter control handle to “RINSE.” Run the pump for 30 seconds. This will get rid of any debris redeposited on the surface of the sand. If you do not have this setting, some debris may return to the pool after backwashing. Turn off the pump. • Return the control handle to “FILTER” and turn on the pump. 2) VACUUM • If your pool had a bottom drain, put the three-way valve control handle at “SKIMMER” (pointing downwards) so that the skimmer does not run. • Make sure the water is at the ideal level, ¾ of the way up the skimmer. • Connect the vacuum hose to the vacuum head. Note : If your vacuum hose has one end that swivels, connect this end to the vacuum head, not the skimmer. The swivel head will prevent the hose from becoming tangled when the vacuum head turns in the water. • Connect the telescoping pole to the handle on the vacuum head. • Lower the vacuum head into the water. • Put the non-pivoting end of the hose into the water return while holding the pole tightly. The hose will fill with water, and the air will exit from underneath the head. When there are no more air bubbles coming out, the hose is full of water and ready to connect to the skimmer. Turn off the pump. • Place the vacuum adapter on the skimmer basket and attach the non-pivoting end of the vacuum hose to the adapter. If the vacuum has an elbow, attach it to the adapter and connect the hose to the elbow. • Leave the filter handle at “FILTER” for regular maintenance. 11 Club Piscine Super Fitness - Above Ground Swimming Pool - Owner’s Manual (03/2012) • If the pool is very dirty, put the filter handle at “DRAIN” or “WASTE” and leave your garden hose running into the skimmer to keep the water high enough that the pump does not draw air. Don’t forget to unroll the backwash hose for this step. Never use the vacuum with the filter handle at “BACKWASH.” • Run the pump then the vacuum over the bottom of the pool. Once done, proceed with a backwash cycle, and empty the pump and skimmer baskets (step 1) Backwashing on page 10). 3) CHLORINATOR This automatic feeder controls the amount of chlorine that goes into the pool. It uses tablets of concentrated chlorine that last five to seven days. Some precautions must be taken : • Insert the number of tablets required to obtain an adequate amount of chlorine in the water, between 1.0 and 1.5 ppm. Test regularly. • Never put chemical products (for example, algicide, shock treatment, etc.) directly into the skimmer; contact with chlorine could create a very dangerous chemical reaction ; • Never put granulated chlorine in the chlorinator—it could explode ; • Turn off the pump before opening the chlorinator lid. ; • If the lid leaks, check the gasket; it might be cracked. 4) PRESSURE GAUGE • Replace the pressure gauge if it does not register “0” when the pump is not running. • Normal pressure What is considered normal pressure varies from one pressure gauge to another, as many factors are involved. The main thing is to determine what the normal pressure is for your system. To do this, start off the season by verifying that the pressure gauge is in good condition, then backwash for four to five minutes. Move the handle to “FILTER,” make sure the pump is not drawing air, and record the pressure shown on the pressure gauge. This is your normal pressure for the year. It may change from year to year as the sand is used over time or when any other modifications are made to the pump. • Low pressure If the pressure is low compared to normal, check if the pump is drawing air, or if the skimmer and pump baskets are dirty or contain debris. It is normal for the pressure to drop when you vacuum. • High pressure First, backwash the sand to clean it. Make sure the control handle is at “FILTER” and that the water return eyeball is not blocked. A slight increase in pressure is normal if you have just installed a water oxygenator. Check that the impeller is not blocked by pine needles or other debris. Club Piscine Super Fitness - Above Ground Swimming Pool - Owner’s Manual (03/2012) 12 5) THREE-WAY VALVE The control valve we install under the skimmer is a three-way valve, and can therefore perform four functions. It is best to turn the motor off every time you turn this valve. • When the handle points upwards The skimmer is cut off, and only the bottom drain is working at 100%. This setting is used to drain water from the pool, or to vacuum deposits on the bottom using maximum suction. • When the handle is at setting 2 Water inflow to the pump is cut off. Cleaning the pump basket is easier this way. THE VALVE MUST NEVER BE IN THIS POSITION WHEN THE PUMP IS RUNNING. • When the handle points downwards Only the skimmer is working at 100%. This setting is necessary when vacuuming or connecting a robotic cleaner. • When the handle is at setting 4 Nothing is cut off; this is the 50/50 position. The bottom drain and skimmer are working simultaneously. This is the valve’s normal position. 6) SAND FILTER A sand filter will function with a minimum of upkeep. However, it is important to understand the various functions it performs. Here are the settings : • Filtre-Filter-Filtrage Filters impurities from the water. Also used when vacuuming ; • Backwash-Décolmatage-Nettoyage par refoulement Used to remove debris and dirt in the sand. Backwashing takes about two to three minutes or until water is clear (with the exception of springtime when it takes approximately 4 to 5 minutes) (step 1) Backwashing on page 10) ; • Whirlpool-Recirculate-Recyclage Allows water to circulate without passing through the sand. This setting is useful for mixing some chemical products into the water. We also use this filter setting for the second step of backwashing. ; • Drain-Waste-Déchets : Used for three functions, i.e. lowering the water level, vacuuming a particularly dirty pool (such as in the spring), and vacuuming dead algae subsequent to a shock treatment. ; • Winterize-Hivernisation For the winter period when the filter is not being used and has been emptied. The handle stays raised in this position. Note : You should replace the filter sand every three or four years. Always turn the pump off when you change the position of the filter handle. 13 Club Piscine Super Fitness - Above Ground Swimming Pool - Owner’s Manual (03/2012) 7) CARTRIDGE FILTER We recommend that the cartridge in cartridge filters be cleaned by hosing it down when the pressure reads 10 pounds more than when the cartridge is clean. If it is very dirty or covered in algae, let it soak in a solution specifically made for this for 12 to 24 hours. Rinse the cartridge and let it dry before putting it back into the filter. Cartridge lifespans vary with each model and depend on use and maintenance. They must be replaced when they no longer clean the water or have lost their shape. A three-way valve is usually installed between the pump and the filter. Turn the handle so it is pointing at the filter when you want to drain water from your pool or when you are washing it and the water is very dirty Note : Backwashing is not possible with a cartridge filter. 8) PUMP The pump is the heart of the filtration system. Emptying the strainer basket is the main element of pump upkeep : POOL WITH A BOTTOM DRAIN : • Turn the pump off and position the three-way valve at number 2. • Move the filter valve handle to “CLOSED” or “TEST.” • Remove the pump lid. You may see a bit of water run out. • Empty the dirt from the basket and rinse the basket with a garden hose. • Put the basket back into the pump and make sure the gasket is in place before replacing the lid. • Return the three-way valve and filter handle to their normal settings. • Turn the pump back on. POOL WITHOUT A BOTTOM DRAIN : • Turn off the pump. • Put a cloth (or plug) in the skimmer hole. • Remove the pump lid. You may see a little water run out. • Empty the dirt from the basket and rinse the basket with a garden hose. • Put the basket back into the pump and make sure the gasket is in place before replacing the lid. • Return the filter handle to its normal setting. • You may have to add water to the strainer to replace what drained out. • Turn the pump back on. Note : Never use an extension cord to connect your pool pump. Instead, install a GFCI-protected breaker near the pool. A certified electrician will be able to help you. Note : While you are working on the pump or motor, use the time they are open to lubricate or, if needed, replace seals, O-rings, etc. Never use Vaseline. Always select a silicon-based lubricant. Club Piscine Super Fitness - Above Ground Swimming Pool - Owner’s Manual (03/2012) 14 9) HEAT PUMP / WATER HEATER You will need to install a bypass with three valves. This will let you: • Control water flow when needed. • Halt inflow to the unit when water is chemically unbalanced and for shock treatments. Note : When you use a water heater or heat pump, you must check and adjust your water’s alkalinity, pH and hardness at least once a month because unbalanced water can adversely affect the warranty. This test is offered free of charge at your Club Piscine Super Fitness store. Always use a silicone-based lubricant. 10) POOL LINER These suggestions will help prolong the life of your liner. • Clean the border of the liner regularly with a sponge and Club Piscine Super Fitness’ special vinyl cleaner. • Cover the pool with a winter cover for optimal protection of your pool during cold weather. • Avoid frequent additions of large quantities of chlorine (due to the risk of discoloration). • Never completely empty your pool, since the liner may shift or dry out. 11) SOLAR BLANKET Solar blankets are very useful accessories. They keep water warmer so you can maximize your swimming season. Take these precautions to prolong the life of your solar blanket : • Place the blanket in the pool with the bubble side down, facing the water. • Remove the blanket for shock treatments, when adding hydrochloric acid, or when the chlorine level is too high. • Remove the blanket when it is very hot, but replace it at night. • When you remove the blanket, drain off as much water as possible, cover with a protective cover, then set it aside in the shade. • If you use a blanket roller, make sure the blanket does not rub against the pool border. • If water circulation turns the blanket, attach the blanket to the ladder with a strap. • Never leave the blanket on the water for more than 48 to 72 hours, because lack of oxygen may promote algae growth. 12) WOODEN POOLS It is paramount to stain wood surfaces with a waterproof stain every year or your warranty will be voided. We strongly recommend you stain the pool walls as well. The pool must be installed on a ring of concrete blocks. 15 Club Piscine Super Fitness - Above Ground Swimming Pool - Owner’s Manual (03/2012) 13) NATURE2 SANITIZER Read the manufacturer’s Owner’s Manual for details on maintaining your sanitizer. Please note that it is important to mention that you have a water sanitizer when you have your water tested in our store. Interpreting the tests is quite different when a Nature2 sanitizer is involved. 14) SALT CHLORINATOR Please read the manufacturer’s Owner’s Manual for details on maintaining your salt chlorinator. Please note that it is important to mention that you have a chlorinator when you have your water tested in our store. Club Piscine Super Fitness - Above Ground Swimming Pool - Owner’s Manual (03/2012) 16 7 Closing To facilitate opening your pool in the spring, we recommend that you close your pool as late as possible, ideally when water temperature reaches about 10˚C (50˚F). However, keep the pump cycling to prevent it from freezing up (for instance, by using a timer at night time). Also, in order to maintain your pool water and bottom clean all winter long, we strongly recommend that you perform a water test to adjust the alkalinity between 100 and 200 ppm2, and the pH between 7,2 and 7,4. Keeping the water and bottom clean for a longer time means that less debris will accumulate, fewer bacteria and algae will form, and the vinyl liner will not be exposed to the sun as much; consequently, it will be less prone to drying and fading. 1) PREPARATION a)It is important to verify that the pool’s water level is stable, and that there are no leaks. An easy way to accomplish this is simply by drawing a line on the pool cover at water level. You will thus be able to observe if the water level drops over the following four consecutive rainless days. Do not be concerned if the water level drops about ¼ inch (1 cm) since it is normal. Any repairs must be done before closing the pool for the winter, because a layer of ice will form on the water surface when the weather gets cold. If the temperature drops suddenly, this ice will exert pressure on the pool walls, and could cause damage. Any leaks not repaired could undermine your pool’s structure and cause it to collapse. b) Ideally, the water must be very cold. Adjust pH and alkalinity to between 7.2 and 7.6. c)The water must be clear, and free of algae and leaves. You can purchase a mesh net leaf cover at your Club Piscine Super Fitness store to help keep your water clean. A cover like this will save you a lot of work in both the fall and spring. d) Do not turn off the filtration system until the day you close the pool for the winter. e)Come spring time, you will save yourself a lot of trouble as you prepare to reconnect your filtration system, and all related equipment, if you take the time to label all inlets and outlets, and make a diagram or take a picture of its actual setup. f)Prior to draining your filter, proceed with a good 5-minute or so backwash in order to clean the sand adequately. However, remove water debris beforehand with a leaf collector creating as little turbulence as possible. Do not be concerned with the debris at the very bottom of your pool, the vacuum cleaner will pick them up later on. To extend your sand’s effectiveness, use a sand filter cleaning solution. 2) PROCEDURE a) Clean the filter • Attach the drain hose to the filter, and unwind the coil all the way to the street. • Firmly tighten the collar or ring that secures the hose to the filter. • Turn off the pump. • Turn the filter handle counter clockwise till it reaches the BACKWASH position, then turn on the pump for 3 seconds, just long enough to uncoil the hose, and prevent damage when full pressure is applied. (Wait till water reaches the other end.) • Once again, turn on the pump, and keep it on for about 5 minutes, before turning it off. • Turn the filter handle to the RINCE position, and run the pump for a good 30 seconds, before turning it off. b) Lower the water level to 18 inches below the skimmer opening. POOL WITHOUT BOTTOM DRAIN • Set up as if you were going to vacuum. When the hose has been connected to the skimmer, turn the control handle to “DRAIN” or “WASTE.” Never drain the pool on the “BACKWASH” setting ; 17 Club Piscine Super Fitness - Above Ground Swimming Pool - Owner’s Manual (03/2012) • Run the filter and vacuum over the bottom one last time, while keeping an eye on the water level ; • When the water level has dropped below the skimmer, the filter will draw air ; • To maintain suction, trickle water from a garden hose into the skimmer. POOL WITH BOTTOM DRAIN • Turn off the pump ; • Put the filter handle at “DRAIN” or “WASTE” ; • Close the skimmer water intake completely with the selector on your three-way valve (handle pointing upwards) ; • Start the pump and the pool water will flow out through the bottom drain ; • Turn the pump off when the desired water level is reached. Ensure that the water level remains 6 to 12 inches below the skimmer prior to the first layer of ice. c) Store the following equipment away from the cold: For a quick and easy installation in the spring, clearly identify all accessories SOLAR BLANKET As soon as the swimming season is over, remove the solar blanket to ensure the water will remain well oxygenated. It is best to clean it with a degreaser right away. Simply dilute the degreaser with water in a 50/50 mix, scrub the entire blanket, then let it dry completely prior to storing it away in a dry location. Be careful, since this product can damage your grass, we recommend doing the cleaning on the pavement. DECK LADDER THERMOMETRE SOLAR ROLLER TOYS MAINTENANCE EQUIPMENT STEPS Remove the inside steps before the water gets too cold, since it is much easier done from inside the pool. d) Pay special attention to these components : BOTTOM DRAIN (if applicable, and may vary based on its installation) • Remove the bottom drain valve conduit. • Join this conduit to another 3-inch conduit. • Secure this conduit on the skimmer in order to maintain it above water level. This will prevent loss of pool water due to gravity. • Set the 3-way (BY-PASS) valve to position «2». • Pour antifreeze in the conduit (refer to the instructions on the product’s package for appropriate quantity). The bottom drain conduit is full once antifreeze pours out of the of the pool’s center drain. • Insert 4 feet of coiled styrofoam or polystyrene (etafoam). • Tie the conduit to the skimmer. Club Piscine Super Fitness - Above Ground Swimming Pool - Owner’s Manual (03/2012) 18 SKIMMER • Remove then clean the skimmer’s door and basket. • Insert the protective styrofoam or polystyrene in the skimmer. • Use one coil at the bottom of the skimmer, and one coil in the backflow’s conduit. • The styrofoam and polysterene together must be even with ground level. FILTER TANK • Remove and store away the drain cap. • Set the dialer to «WINTERIZE», then cover it up with a plastic bag fastened with a rope or clip. • Tilt the filter to drain all remaining water. Leave the filter slightly tilted all winter long to enable water drainage. Do not put the cap back on till spring time. CHLORINATOR • If you cannot store the unit, remove the lid and lay the chlorinator on its side, or remove the drain plug. PUMP • Disconnect the pump. • Switch off the breaker, then empty the pump’s water. • Loosen the lower bolt in order to empty the water inside the pump. • Lubricate the sealing joint under the cover. • Add plumbing antifreeze to the pump then store it away. HEAT PUM P/ PROPANE HEATER (if applicable) • Turn off the heat pump (control at “OFF”) and the breaker providing power to the pump. • Take apart all water hose couplings and blow or draw the air from water pipes. This will prevent ice from forming and expanding in the pipes when it gets cold. • Cover with a waterproof cover or plastic wrap for the winter. • Never put antifreeze in the unit. GAS / OIL WATER HEATER (if applicable) • P lease read the manufacturer’s Owner’s Manual for details on maintaining your gas or oil water heater. NATURE2 SANITIZER • Disconnect the unit prior to draining the water. • Lubricate the sealing joints using a silicon-based lubricant. Never use vaseline. • Throw away the biodegradable cartridge. SALT CHLORINATOR (if applicable) • Please read the manufacturer’s Owner’s Manual for details on maintaining your salt chlorinator. LUMI-O LIGHTS • Disconnect from the power source. 19 Club Piscine Super Fitness - Above Ground Swimming Pool - Owner’s Manual (03/2012) • Remove the light bulb. • Apply vaseline to the bushing. • Store away the niche and power plug in a plastic bag, then close it and hang it up. DECK Because pool decks should not rise above pool edges, they must be pulled away at least 8 inches to allow the pool to shift as the weather freezes and thaws. Otherwise, the pool could become stuck, causing serious damage to the structure, and adversely affect the warranty. If this is not feasible, use styrofoam, polystyrene, hay, or simply snow to insulate the grounds below the deck to help lower the freezing point. WINTER COVER Club Piscine Super Fitness recommends using a winter cover to shield the vinyl liner from the sun and prevent debris, dust, and leaves from getting in the water. A special winter air pillow can be placed under the winter cover so that water will drain off. This will prevent unnecessary pressure that could damage the pool and void the warranty. See a representative at your Club Piscine Super Fitness store for details on the various winter covers and their installation. e) Closing Kit Note : in order to select the appropriate closing kit for your above ground pool, simply refer to the information provided on the package, or contact a Club Piscine Super Fitness representative. This should be done only after the water level has been reduced. It will help maintain clean water throughout the winter. Carefully read all instructions provided with the closing kit, and follow the manufacturer’s recommendations. IMPORTANT SNOW BUILD-UP : It is important to never let snow pile up more than one foot above the upper rim. Remember that your pool is designed to withstand lateral pressure caused by the weight of the water, not vertical pressure caused by the weight of snow. SOIL DRAINAGE : Make sure that water from rain and thawing snow has adequate drainage that will take the water away from the pool. WATER LEVEL : Keep water at the same level it was at freeze-up. You must install insulation in the skimmer for your warranty to be valid. LINER : Never let kids or anyone else touch or throw anything on your pool liner (vinyl) winter time, when it is most fragile, and could easily break or crack. Club Piscine Super Fitness - Above Ground Swimming Pool - Owner’s Manual (03/2012) 20 8. Safety Guidelines Read this section carefully to understand the safety issues involved when using your pool. It is your responsibility to be aware of, and understand the following points and related safety regulations. RECOMMENDATIONS • Remove the solar blanket completely when swimming so that nobody gets caught in it. • Remove all surplus water that accumulates on the solar blanket. • Always raise the ladder when no one is using the pool. • Make sure the filter is protected by a circuit breaker. • Playing around the filter and pool piping should never be allowed. • Turn off the motor when using the pool. • Carefully follow all manufacturers’ instructions for using and maintaining pool accessories (toys, filter, water heater, etc.). • Ensure that pool water is clear at all times, and never use your pool if the water shows signs of impurities. • Carefully follow all manufacturer’s instructions with respect to usage and storage of chemical products. Never set dry products beneath liquid solutions. Keep them in a dry place away from children. • Never let young children swim without supervision. • Do not install a slide in an above-ground pool. It can be very dangerous. • Never dive into an above ground pool. • Keep a lifebuoy or pole near the pool. • Do not swim if there is thunder or an electric storm. BE PREPARED FOR EMERGENCIES • Always have a well-stocked first-aid kit nearby (but away from children) that you keep clearly marked and accessible. • Encourage everyone in your family to learn first aid, and mouth-to-mouth resuscitation. • Memorize emergency telephone numbers. 21 Club Piscine Super Fitness - Above Ground Swimming Pool - Owner’s Manual (03/2012) Swimming Pool Safety Safety Tips Check with your town or city to find out the rules for putting up a fence around your pool. Build a fence and a gate that will keep children away from your pool. Keep the gate locked at all times. ALWAYS have an adult watching children in and around the pool. Children under the age of 3 and children who cannot swim must wear a life jacket or PFD (personal floatation device). Send children to swimming and water safety lessons. Each year, many children drown in backyard swimming pools and in small kiddie pools. Children are in danger because: They like to play in water. They move quickly. They can drown in only a few centimetres (1 inch) of water. Why do these drownings happen? 1. Sometimes the pool is not fenced in all the way around. 2. Sometimes the gate to the backyard is not shut all the way or locked. 3. Sometimes a young child gets to the pool through a patio door or garage door that opens into the backyard. Make sure lifesaving equipment and a first aid kit are handy. Take a course on pool safety, first aid and lifesaving skills (such as CPR). Have emergency phone numbers listed at the telephone closest to the pool. Make sure toys, garden furniture and tools are not near the pool fence. Children can climb up on these things to get into the pool. To learn more about water safety and learn-to-swim programs, please call your local Canadian Red Cross Society, or the local Branch Office of the Lifesaving Society. For more information contact Product Safety, Health Canada: 1-866-662-0666 www.healthcanada.gc.ca/cps [email protected] © Her Majesty the Queen in Right of Canada, represented by the Minister of Health, 2005 Reprinted 2010 Cat.: H46-2/05-404 ISBN: 0-662-68854-6 HC Pub.: 100092 Club Piscine Super Fitness - Above Ground Swimming Pool - Owner’s Manual (03/2012) 22 Chapitre 2 : Chemical Treatment and Water Tests 23 Club Piscine Super Fitness - Above Ground Swimming Pool - Owner’s Manual (03/2012) 1. Introduction This section will explain how you can test your pool water. You will learn which parameters to check, what products are recommended, and how to solve problems. Of course, if a problem persists, go straight to one of our analysts or technicians who will be glad to help. PREPARATION To successfully test your pool water, you must have a good test kit that combines rapidity, accuracy, ease of use, and affordability. Club Piscine Super Fitness test strips are also a good choice. However, these and kits are not comprehensive: they don’t test water hardness. For a more thorough testing, please come to our store and meet with one of our specialists. The free, comprehensive tests are performed by our chemical product specialists. Recipe for Success These elements will help keep your pool water just right and reduce the need for testing. • Never leave the solar blanket on the pool for more than 48 to 72 hours. Ideally, put the blanket on in the evening and remove it in the morning. • Change the sand in your filter every three to four years. •Use the backwash to clean once a week and every time you use the pool vacuum cleaner. • Never pour two chemical products in the pool at the same time. Follow our CLUB PISCINE SUPER FITNESS consultant’s and/or manufacturer’s instructions and advice. • Do not turn the pump off for more than 12 hours a day. • IF YOU HAVE A TIMER TO USE WITH A CHLORINATOR, SALT CHLORINATOR OR SANITIZER, NEVER TURN THE FILTER OFF. • Close your pool as late as possible in the fall, keep the water clear and balanced, and open it as early as possible in the spring. • Check the water’s alkalinity every week or, if you have an artesian well, each time you add water. • Check the pH regularly and adjust if needed. • Add algicide every week. Do not add chlorine to the pool the same day you add algicide. IF YOU HAVE A NATURE2 SANITIZER DO NOT USE ALGICIDE IN YOUR POOL. • Add chlorine and administer shock treatments on a regular basis. Club Piscine Super Fitness - Above Ground Swimming Pool - Owner’s Manual (03/2012) 24 2. Test Parameters After you or our technicians have completed the tests, you may need to correct your water balance. Note : Elements are listed in order of importance, which means that if one component is modified, it could affect the following one. 1) Total alkalinity Total alkalinity is the sum of carbonates, bicarbonates and hydroxides—such as sodium and potassium— in solution in the water. The more there are, the more alkaline the water is. The less there is, the more acidic the water is. ALKALINITY IS THE SECOND MAJOR CAUSE OF WATER PROBLEMS, FOLLOWING INSUFFICIENT CHLORINE. To increase alkalinity, use sodium bicarbonate. To reduce alkalinity, use hydrochloric acid. Note : When alkalinity is too low, you will detect the odour of chlorine, your eyes will burn, algae forms, pH is unstable and chlorine disappears rapidly. Be careful: your water will still appear very clear. When the alkalinity is too high your skin will itch, chlorine no longer has an effect, pH is unstable and the water becomes cloudy. 2) pH The potential of hydrogen, or pH, is the measure of acids and bases in the water. The more bases are in the water, the more basic it is and the higher the pH. The fewer it contains, the more acidic it is and the lower the pH. Ideal pH is between 7.2 and 7.6. You must not confuse acidity related to alkalinity with acidity related to pH. Alkaline acidic water is corrected with sodium bicarbonate and water that is pH-acidic is corrected with sodium carbonate. To increase pH, use PH+. To reduce pH, use PH-. Hydrochloric acid is not recommended as it will also lower the alkalinity. Note : When the alkalinity is unbalanced, chlorine no longer has an effect and the water becomes cloudy. When you adjust the pH, you must wait 24 hours before adding any other chemical products to the water. 3) Hardness (in-store test only) Water hardness depends on the calcium and magnesium content of the water. Different factors affect the results for water hardness tests, such alkalinity, pH and the amount of chlorine. It is therefore important to balance these before testing for hardness. To increase hardness, use calcium chloride. To reduce hardness, use a water softener or any other product designed to eliminate water metals. 4) Chlorine Chlorine removes bacteria from the water and destroys algae. Ideal chlorine levels are between 1 and 3 ppm. Since there are many types of chlorine, seek the advice of a Club Piscine Super Fitness expert at your local store. Note : When levels are too high, chlorine burns the eyes, emits an odour and fades bathing suits. When levels are too low, chlorine does not eliminate bacteria, water becomes cloudy and chloramines form. It could also cause itchy skin. We recommend you dilute chlorine before adding it to your pool. Pour diluer le chlore, utilisez un récipient et versez les produits dans l’eau et non l’eau sur les produits. 25 Club Piscine Super Fitness - Above Ground Swimming Pool - Owner’s Manual (03/2012) 5) Isocyanuric acid (in-store test only) Isocyanuric acid is what is commonly called chlorine stabilizer. The normal levels for isocyanuric acid are 30 to 50 ppm. Note : When the isocyanuric acid level is too high, chlorine has no effect, and the reading remains elevated even if chlorine is added. When the isocyanuric acid level is too low, chlorine evaporates quickly in the sun, and a larger dose than usual must be used. 6) Combined Chlorine Combined chlorine consists of small bacterial particles contaminated by organic matter (skin, mucus, urine, make-up, leaves, dust, etc.). These contaminants react with free chlorine to form combined chlorine or chloramines. Test kits that use small tablets to detect combined chlorine are not very accurate. We therefore suggest a weekly shock treatment for prevention. 7) Salt level (salt chlorinator) When you have a salt chlorinator, your pool water must have a salt concentration around 3,000 ppm. Make sure you check the salt concentration weekly using the test strips specifically designed for this. You will ensure your chlorination cell is functioning at its best, and thus avoid expensive damage. Note : If an issue persists, see a representative at your local Club Piscine Super Fitness store. Club Piscine Super Fitness - Above Ground Swimming Pool - Owner’s Manual (03/2012) 26 3. Water Tests Here’s how to perform the actual tests. For testing, use a test kit or bring a sample of at least 250 ml (1 cup) of your water to one of our stores on a regular basis. It’s free ! • Make sure you change the bottles of OTO and PHENOL every year. • Check the expiration date on the bottle containing the test strips. • Check if the sand is dirty, worn or contaminated (algae present). If so, change the sand. • Make sure to apply the recommended quantity and concentration of algicide regularly (once a week). • Make sure the filtration system runs at least 12 out of 24 hours. • Make sure the solar blanket does not remain on the pool for more than 48 hours; this prevents oxygen from entering the water. TEST WITH STRIP a) Dip a strip into the water horizontally for one second. b) Take the strip out and wait 15 seconds. Compare the colours obtained with those shown on the bottle. You will be able to tell if the chemicals are balanced or need adjusting. . TEST WITH TUBES a) b) Add the required number of drops to each test tube. Put five drops of OTO in the test tube for chlorine and five drops of PHENOL in the test tube for the pH test. c) Insert the stopper and shake the whole device. d) Compare the colours obtained with those shown on each side. 27 Fill the two test tubes with water and pour off the excess. Club Piscine Super Fitness - Above Ground Swimming Pool - Owner’s Manual (03/2012) 1) Chlorine and pH tests Record these values, but do not make any adjustment right away. Start with the chlorine: if it is too high, it will affect the pH. Bring a water sample to the store to have the following tests done free of charge. 2) Alkalinity test Even though the range starts at 80 ppm, aim for 100 ppm. When the adjustment has been made, take the pH reading again, and adjust if necessary. Then, if the chlorine is weak or not registering, give the water a shock treatment. 3) Hardness test This analysis will detect the presence of minerals in the water. Make sure alkalinity, pH, and chlorine are perfectly balanced before performing this test so that the results are accurate. 4) Isocyanuric acid test This test is rarely done, and only on an as-needed basis. If you notice that the chlorine is evaporating too quickly, or that it is not evaporating at all, and all other values are normal, bring a water sample to your Club Piscine Super Fitness store for an isocyanuric acid test. Club Piscine Super Fitness - Above Ground Swimming Pool - Owner’s Manual (03/2012) 28 4. Appendix : Water Problems PROBLEM CAUSE WHY SOLUTION • Algae bloom • Inadequate filtration • Check filter. • Solar blanket left on too long • Do not leave the solar blanket on the pool more than 48 to 72 hours, depending on the temperature. • Not enough algicide • Add algicide. • Not enough chlorine • Add chlorine. • Alkalinity too low or too high • Adjust alkalinity. Green or yellow water Slippery bottom • pH too low or too high • Adjust pH. • Reaction between two • Follow the steps for testing water. chemical products • Scrub the blanket with a brush or nylon stocking filled with granular chlorine. Cloudy water •D ead algae in suspension • Inadequate filtration • Check filter. •S tart of algae bloom •S olar blanket left on too long •D o not leave the solar blanket on the pool more than 48 to 72 hours, depending on the temperature. •B acterial matter in suspension • Not enough algicide • Add algicide. • Not enough chlorine • Add chlorine. • Alkalinity too low or too high • Adjust alkalinity. • pH too low or too high • Adjust pH. • Reaction between two • Follow the steps for chemical products testing water. • Corrosive water •M etal object in water • Hydrochloric acid • Hydrochloric acid in • Do not let this product come in contact with rustproof surfaces. contact with stainless steel surfaces (ladder, skimmer screws, water return) • Artesian well • Alkalinity or hardness too low Rust 29 • Avoid this problem in the future to prevent permanent stains. • Adjust alkalinity and hardness. Club Piscine Super Fitness - Above Ground Swimming Pool - Owner’s Manual (03/2012) 4. Appendix : Water Problems (continued) PROBLEM CAUSE WHY SOLUTION • Calcium deposits • Water too hard • Check water hardness. • Dead leaves • Dirt left on liner too long • Give water a shock treatment. Wait 2 hours. Brush off cover. If stains persist, scrub with a nylon stocking filled with granular chlorine and rinse immediately. Stains on liner • Incorrect pH Irritated eyes and itchy skin Odour of chlorine Scaling Metal fittings corroding Dirt Ring • Adjust pH to between 7.2 and 7.6. •C hloramines (See “Odour of chlorine”) •N ot enough chlorine. The cause is not insufficient chlorine, but insufficient free available chlorine. • Adjust pH and give water a shock treatment. Repeat if needed. • High pH • Lower pH. • High total alkalinity • Lower alkalinity. • High calcium hardness •E levated hardness levels may require draining some water from the pool. You could also use a scale remover and iron. • Low pH • Increase pH. • Low total alkalinity • Increase total alkalinity. • Low calcium hardness • Increase calcium hardness. •A ccumulation of human seborrhoea and dirt • Remove with a cleaning product for vinyl. Read and follow instructions on the label. • If dirt remains, scrub with a nylon stocking filled with granular chlorine and rinse immediately. Club Piscine Super Fitness - Above Ground Swimming Pool - Owner’s Manual (03/2012) 30