1
ENGLISH
inspecting and installing an accessory, position
yourself and bystanders away from the plane of
the rotating accessory and run the power tool
at maximum no-load speed for one minute.
Damaged accessories will normally break apart
during this test time.
• Make sure the disc or wheel rotates
in the direction of the arrows on the
accessory and the tool.
• Avoid overloading. Should the tool
become hot, let it run a few minutes
under no load condition to cool the
accessory. Do not touch accessories
before they have cooled. The discs
become very hot during use.
OPERATION
Instructions for Use
• Never work with the grinding cup
without a suitable protection guard in
place.
WARNING: Always observe the safety
instructions and applicable regulations.
WARNING: To reduce the risk
of serious personal injury, turn
tool off and disconnect tool from
power source before making any
adjustments or removing/installing
attachments or accessories. Before
reconnecting the tool, depress and
release the trigger switch to ensure that
the tool is off.
• Do not use the power tool with a cutoff stand.
• Never use blotters together with
bonded abrasive products.
• Be aware, the wheel continues to
rotate after the tools is switched off.
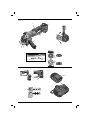
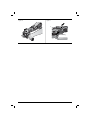
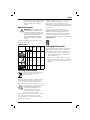
Proper Hand Position (fig. 1, 6)
WARNING: To reduce the risk of
serious personal injury, ALWAYS use
proper hand position as shown.
WARNING:
• Ensure all materials to be ground or
cut are secured in place.
• Secure and support the workpiece.
Use clamps or a vice to hold and
support the workpiece to a stable
platform. It is important to clamp and
support the workpiece securely to
prevent movement of the workpiece
and loss of control. Movement of
the workpiece or loss of control may
create a hazard and cause personal
injury.
• Support panels or any oversized
workpiece to minimize the risk
of wheel pinching and kickback.
Large workpieces tend to sag under
their own weight. Supports must be
placed under the workpiece near the
line of cut and near the edge of the
workpiece on both sides of the wheel.
• Apply only a gentle pressure to the
tool. Do not exert side pressure on the
disc.
• Always wear regular working gloves
while operating this tool.
• The gear case becomes very hot
during use.
• Always install the guard and
appropriate disc or wheel. Do not use
excessively worn disc or wheel.
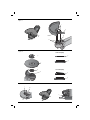
• Be sure the inner and outer flange are
mounted correctly.
WARNING: To reduce the risk of
serious personal injury, ALWAYS hold
securely in anticipation of a sudden
reaction.
Proper hand position requires one hand on the side
handle (e), with the other hand on the body of the
tool, as shown in figure 6.
Switch
WARNING: Before using the tool,
check that the handle is tightened
securely.
LOCK-OFF BUTTON AND TRIGGER SWITCH (FIG. 7)
Your cut-off tool is equipped with a lock-off
button (b).
To lock the trigger switch (a), press the lock-off
button as shown in figure 7. When the lock-off
button is depressed to the lock icon, the unit is
locked.
Always lock the trigger switch when carrying or
storing the tool to eliminate unintentional starting.
To unlock the trigger switch, press the lock-off
button (b). When the lock-off button is depressed
to the unlock icon, the unit is unlocked. The lock-off
button is colored red to indicate when the switch is
in its unlocked position.
Pull the trigger switch (a) to turn the motor ON.
Releasing the trigger switch turns the motor OFF.
17