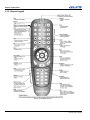
1
J Series 2.0, 2.4, and 3.0 kW Setup Guide 020-100751-03 J Series 2.0, 2.4, and 3.0 kW Setup Guide 020-100751-03 NOTICES COPYRIGHT AND TRADEMARKS Copyright © 2014 Christie Digital Systems USA, Inc. All rights reserved. All brand names and product names are trademarks, registered trademarks or trade names of their respective holders. REGULATORY The product has been tested and found to comply with the limits for a Class A digital device, pursuant to Part 15 of the FCC Rules. These limits are designed to provide reasonable protection against harmful interference when the product is operated in a commercial environment. The product generates, uses, and can radiate radio frequency energy and, if not installed and used in accordance with the instruction manual, may cause harmful interference to radio communications. Operation of the product in a residential area is likely to cause harmful interference in which case the user will be required to correct the interference at the expense of the user. This Class A digital apparatus complies with Canadian ICES-003. Cet appareil numérique de la classe A est conforme à la norme NMB-003 du Canada. 이 기기는 업무용 (A 급 ) 으로 전자파적합등록을 한 기기이오니 판매자 또는 사용자는 이점을 주의하시기 바라며 , 가정 외의 지역에서 사용하는 것을 목적으로 합니다 . GENERAL Every effort has been made to ensure accuracy, however in some cases changes in the products or availability could occur which may not be reflected in this document. Christie reserves the right to make changes to specifications at any time without notice. Performance specifications are typical, but may vary depending on conditions beyond the control of Christie such as maintenance of the product in proper working conditions. Performance specifications are based on information available at the time of printing. Christie makes no warranty of any kind with regard to this material, including, but not limited to, implied warranties of fitness for a particular purpose. Christie will not be liable for errors contained herein or for incidental or consequential damages in connection with the performance or use of this material. The product is designed and manufactured with high-quality materials and components that can be recycled and reused. This symbol means that electrical and electronic equipment, at their end-of-life, should be disposed of separately from regular waste. Please dispose of the product appropriately and according to local regulations. In the European Union, there are separate collection systems for used electrical and electronic products. Please help us to conserve the environment we live in! Canadian manufacturing facility is ISO 9001 and 14001 certified. GENERAL WARRANTY STATEMENTS For complete information about the Christie limited warranty, please contact your Christie dealer. In addition to the other limitations that may be specified in the Christie limited warranty, the warranty does not cover: a. Damage occurring during shipment, in either direction. b. Projector lamps (See the separate Christie lamp program policy). c. Damage caused by use of a projector lamp beyond the recommended lamp life, or use of a lamp supplied by a supplier other than Christie. d. Problems caused by combination of the product with non-Christie equipment, such as distribution systems, cameras, video tape recorders, etc., or use of the product with any non-Christie interface device. e. Damage caused by misuse, improper power source, accident, fire, flood, lightning, earthquake or other natural disaster. f. Damage caused by improper installation/alignment, or by product modification, if by other than a Christie authorized repair service provider. g. For LCD projectors, the warranty period specified applies only where the LCD projector is in “normal use.” “Normal use” means the LCD projector is not used more than 8 hours a day, 5 days a week. For any LCD projector where “normal use” is exceeded, warranty coverage under this warranty terminates after 6000 hours of operation. h. Failure due to normal wear and tear. PREVENTATIVE MAINTENANCE Preventative maintenance is an important part of the continued and proper operation of your product. Please see the Maintenance section for specific maintenance items as they relate to your product. Failure to perform maintenance as required, and in accordance with the maintenance schedule specified by Christie, will void the warranty. Table of Contents 1: Introduction 1.1 Purchase Record and Service Contacts .......................................................................................1-1 1.1.1 List of Components..............................................................................................................1-1 1.2 Safety Warnings and Guidelines .................................................................................................1-2 1.2.1 General Precautions .............................................................................................................1-2 1.2.2 AC/Power Precautions.........................................................................................................1-3 1.2.3 Lamp Precautions ................................................................................................................1-3 2: Installation and Setup 2.1 Projector Quick Setup and Installation ........................................................................................2-1 2.1.1 Install a Projection Lens ......................................................................................................2-1 2.1.2 Position the Projector...........................................................................................................2-3 2.1.3 Connect a Source .................................................................................................................2-3 2.1.4 Connect the Line Cord.........................................................................................................2-3 2.1.5 Power up ..............................................................................................................................2-5 2.1.6 Select a Source.....................................................................................................................2-5 2.1.7 Adjust the Image..................................................................................................................2-5 2.2 Detailed Setup and Installation....................................................................................................2-5 2.2.1 Mounting..............................................................................................................................2-5 2.2.2 Basic Optical Alignment......................................................................................................2-6 2.2.3 Advanced Optical Alignment ..............................................................................................2-7 2.2.4 Powering Down ...................................................................................................................2-9 2.3 Projector Communications ..........................................................................................................2-10 2.3.1 Status LEDs .........................................................................................................................2-10 3: Operation 3.1 How to Use the Remote Keypad or Built-In Keypad ..................................................................3-1 3.1.1 Guide to Keypads.................................................................................................................3-1 3.1.2 Remote Keypad....................................................................................................................3-2 3.1.3 Wired Remote ......................................................................................................................3-3 3.1.4 Built-in Keypad....................................................................................................................3-3 3.1.5 Overview of LED and Key States........................................................................................3-4 3.1.6 Remote Keypad Commands ................................................................................................3-4 3.2 Navigating the Menus..................................................................................................................3-8 3.2.1 Main Menu...........................................................................................................................3-8 3.2.2 Change the Menu Language ................................................................................................3-9 3.2.3 On-line Help ........................................................................................................................3-9 3.2.4 The Global Icon ...................................................................................................................3-9 3.2.5 How to Use Slide Bars and Other Controls .........................................................................3-9 3.2.6 Edit Text ..............................................................................................................................3-11 3.3 Alarm Conditions ........................................................................................................................3-12 4: Troubleshooting 4.1 Projector Does Not Power ON ....................................................................................................4-1 4.2 Lamp............................................................................................................................................4-1 J Series 2.0, 2.4, and 3.0 kW Setup Guide 020-100751-03 Rev. 1 (02-2014) 1 Table of Contents 4.2.1 Lamp Does Not Ignite..........................................................................................................4-1 4.2.2 Lamp Suddenly Turns OFF..................................................................................................4-2 4.2.3 Flicker, Shadows Or Dimness..............................................................................................4-2 4.3 Blank LCD Screen, No Menu Display ........................................................................................4-2 4.4 Remote Keypad Does Not Seem to Work ...................................................................................4-2 4.5 The OSD Menu Does Not Display ..............................................................................................4-2 4.6 Can Not Establish Communication with Projector......................................................................4-3 4.7 Displays .......................................................................................................................................4-3 4.7.1 The Projector is ON but There is No Display ......................................................................4-3 4.7.2 Severe Motion Artifacts .......................................................................................................4-3 4.7.3 Image Appears ‘Squeezed’ or Vertically Stretched into Center of Screen..........................4-3 4.7.4 The Display is Jittery or Unstable........................................................................................4-3 4.7.5 The Display is Faint .............................................................................................................4-4 4.7.6 The Upper Portion of the Display is Waving, Tearing or Jittering......................................4-4 4.7.7 Portions of the Display are Cut Off or Warped to the Opposite edge .................................4-4 4.7.8 Display Appears Compressed (Vertically Stretched) ..........................................................4-4 4.7.9 Data is Cropped from Edges ................................................................................................4-4 4.7.10 Display Quality Appears to Drift from Good to Bad, Bad to Good ..................................4-4 4.7.11 Display Suddenly Freezes ..................................................................................................4-4 4.7.12 Colors in the Display are Inaccurate ..................................................................................4-4 4.7.13 Display is Not Rectangular ................................................................................................4-4 4.7.14 Display is “Noisy” .............................................................................................................4-5 4.8 Web Interface...............................................................................................................................4-5 4.8.1 After a Projector Software Upgrade, The Web Pages Do Not Display Correctly ...............4-5 4.8.2 A Backup Or Interrogator File Cannot Be Saved ................................................................4-5 5: Specifications 5.1 Feature Set ...................................................................................................................................5-1 5.1.1 Air Filters (Optional) ...........................................................................................................5-1 5.1.2 Lamp ....................................................................................................................................5-1 5.1.3 Projection Lens Compatibility .............................................................................................5-1 5.2 Power Requirements ....................................................................................................................5-2 5.3 Lamp Specification ......................................................................................................................5-2 5.4 Accessories and Service Components .........................................................................................5-3 2 J Series 2.0, 2.4, and 3.0 kW Setup Guide 020-100751-03 Rev. 1 (02-2014) 1 Introduction Every effort has been made to ensure the information in this document is accurate and reliable; however, due to constant research the information in this document is subject to change without notice. 1.1 Purchase Record and Service Contacts Whether the projector is under warranty or the warranty has expired, Christie highly trained and extensive factory and dealer service network is always available to quickly diagnose and correct projector malfunctions. Complete service manuals and updates are available for all projectors. Should a problem be encountered with any part of the projector, contact your dealer. In most cases, servicing is performed on site. If you have purchased the projector, fill out the information below and keep with your records. Dealer: Dealer or Christie Sales/Service Contact Phone Number: Projector Serial Number*: Purchase Date: Installation Date: * The serial number can be found on the license label located on the back of the projector. Default Gateway: DNS Server: Projector DLP Address: Projector Mgmt IP Address: Subnet Mask: 1.1.1 List of Components Ensure the following components were received with the projector: IR remote keypad (includes two, 1.5V AA batteries and an XLR to mini-stereo cable conversion to wired) Line cord Lens Mount Security Screw (M6x10mm long, Qty. 2) Lens Mount Security Screw Driver (5mm Hex, Qty. 1) Warranty Card Web Registration Form J Series 2.0, 2.4, and 3.0kW Setup Guide 020-100751-03 Rev. 1 (02-2014) 1-1 Section 1: Introduction 1.2 Safety Warnings and Guidelines 1.2.1 General Precautions HIGH BRIGHTNESS. Never look directly into the projector lens. The extreme high brightness can cause permanent eye damage. Always power down the projector and disconnect all power sources before servicing or cleaning. FIRE HAZARD. Keep hands, clothes and all combustible material away from the concentrated light beam of the projector. Position all cables where they cannot contact hot surfaces or be pulled or tripped over. In the unlikely event of a lamp explosion, particles may be blown out of the rear air vents. Keep clear of the exhaust air path during operation. Take appropriate precautions to shield operators and audience members from lamp explosion particles. High leakage current. Earth connection essential before connecting supply. All installation and maintenance procedures must be performed by a Christie accredited service technician. Projector must be operated in an environment that meets operating specifications, as listed in Section 5 Specifications. The American Conference of Governmental Industrial Hygienists (ACGIH) recommends occupational UV exposure for an 8-hour day to be less than 0.1 microwatts per square centimeters of effective UV radiation. An evaluation of your workplace is advised to assure employees are not exposed to cumulative radiation levels exceeding the government guidelines for your area. Be aware that some medications are known to increase sensitivity to UV radiation. 1-2 J Series 2.0, 2.4, and 3.0kW Setup Guide 020-100751-03 Rev. 1 (02-2014) Section 1: Introduction 1.2.2 AC/Power Precautions Use only the AC power cord supplied. Do not attempt operation if the AC supply and cord are not within the specified voltage and power range. See the license label on the back of the projector or Section 5 Specifications for rated voltage and power. The projector is equipped with a 3-wire plug with a grounding pin. This is a safety feature. If you are unable to insert the plug into the outlet, contact an electrician to have the outlet replaced. NEVER defeat the safety purpose of the grounding-type plug. Do not allow anything to rest on the power cord. Locate the power cord where persons walking on it or objects rolling over it cannot damage the cord. 1.2.3 Lamp Precautions Never attempt to access the lamp while the lamp is ON. After turning the lamp OFF, it is crucial that you wait at least 10 minutes before handling the lamp. This provides sufficient time for the lamp cooling fans to properly cool the lamp. For all other precautions critical for safe removal and replacement of the lamp. High leakage current. Earth connection essential before connecting supply. J Series 2.0, 2.4, and 3.0kW Setup Guide 020-100751-03 Rev. 1 (02-2014) 1-3 2 Installation and Setup This section explains how to install, connect and optimize the projector for delivery of superior image quality. Illustrations are graphical representations only and are provided to enhance the understanding of the written material. 2.1 Projector Quick Setup and Installation The following instructions are for those preferring a quick setup. Refer to the remaining subsections for detailed setup instructions. Always power down the projector and disconnect all power sources before servicing or cleaning. See the Safety Warnings and Guidelines in Section 5 Specifications. 2.1.1 Install a Projection Lens The projection lens, shipped separately from the projector, must be installed prior to setting up the projector. Remove the lens plug from the lens opening in the projector before installing the lens. Retain the lens plug for projector transportation to protect the optical components from dust and debris. IMPORTANT! The lens seals the projector, preventing contaminants from entering the interior of the projector. Never operate a projector without a lens. Remove the rear lens cap from the lens. Keep the front lens cap on the lens to protect it during installation. 1. Rotate the lens clamp to the OPEN position, as shown. J Series 2.0, 2.4, and 3.0 kW Setup Guide 020-100751-03 Rev. 1 (02-2014) 2-1 Section 2: Installation and Setup 2. Align the lens interface plate with the lens mount. Align the lens electrical connector with the mating connector on the lens mount. Fully insert the assembly straight into the lens mount opening without turning. Press using your hand as shown. NOTE: When installing the lens, ensure that the lens is not inserted at an angle, as this can cause damage. 3. While holding the lens flat against the lens mount, rotate the lens clamp clockwise to lock the lens assembly in place. 4. Remove the front lens cap. 5. For added stability such as motion applications, fasten the security screws provided with the lens-mount. NOTE: There are two types of lens plate models. 6. Use a 5mm hex driver to fasten the red security screws provided with the lens mount, or hand tighten the lens retaining screws attached to the lens. NOTES: 1) Recommended for heaviest lenses such as 0.73:1 and 1.2:1. Use of the lens red security screws or the lens retaining screws is required if the projector is hoisted or installed in an overhead position. 2-2 J Series 2.0, 2.4, and 3.0 kW Setup Guide 020-100751-03 Rev. 1 (02-2014) Section 2: Installation and Setup 2.1.2 Position the Projector 2 people are required to safely lift and install the projector. Place the projector on a sturdy, level surface and position it so that it is perpendicular to the screen at a suitable distance. The further back the projector is positioned for the screen, the larger the image will be. To level the projector adjust the 3 feet. With the projector positioned perpendicular to the screen the image will appear rectangular instead of keystoned. 2.1.3 Connect a Source The input panel where all source connections are made, is located at the back of the projector. Each input is clearly labeled for easy identification. Depending on the type of option card installed, connect your source using the appropriate cable(s), as follows: • Analog Input Card: Connect 3-, 4-, or 5-wire RGB source to Red/Pr, Green/Y, Blue/Pb, H/C and V using 3, 4 or 5 BNC connectors as required. • Dual 3G/HD/SD-SDI Input Card: Connect the SDI (Serial Digital Interface) cable to one of the two inputs, 1-IN or 2-IN. Both standard-definition (SD) and high-definition (HD) signals are accepted and automatically recognized on either input. • Dual Link DVI Input Card: Connect a single or dual DVI video signal to the DVI-I connector, an analog video signal to the DVI-I connector or an analog video signal to the VGA connector. The DVI signal may contain HDCP (High-Bandwidth Digital Content Protection). • Twin HDMI Input Card: Connect HDMI (High-Definition Multimedia Interface) cable to one of the two inputs, 1-IN or 2-IN. • Video Decoder Input Card: Depending on the source you can apply the following; • Composite video source to 1-CVBS, using a BNC Cable NOTE: Same signal can be used on 4, 5 or 6 when input is selected as CVBS. • A component signal on Inputs 4(Pr), 5(Y), 6(Pb) using BNC Connectors. NOTE: Grouped as a component input, YPbPr. • S-Video to one of the two, 2-SVID or 3-SVID using S-Video cable. • S-Video using two BNC cables, with Luma (Y) connected to 4 (Sy) and Chroma (C) connected to 6 (Sc). NOTE: Must be grouped as 1 S-Video + 1 CVBS. • DMX512 Interface Card: Has two 5pin XLR connectors - 1 (input) male and 1 (output) female. If there is active communications on the DMX512 Interface card the power LED will blink between low intensity and high intensity. • Twin DisplayPort Input Card: Accepts DisplayPort 1.1a inputs from one or two DisplayPort sources. 2.1.4 Connect the Line Cord High leakage current. Earth connection essential before connecting supply. IMPORTANT!Use the line cord provided with the projector, or make sure you are using a line cord, power plug and socket that meet the appropriate rating standards. Voltage and current requirements are listed on the license label, located at the back of the projector. This product can be connected to an IT power distribution system. To prevent the line cord from inadvertent disconnection, perform one of the following steps: J Series 2.0, 2.4, and 3.0 kW Setup Guide 020-100751-03 Rev. 1 (02-2014) 2-3 Section 2: Installation and Setup For 1900W and 2400W Models: 1. Connect the line cord of the projector to the AC receptacle at the AC inlet of the projector, then push the wire clip over the plug to retain it, as shown. For 3000W Model: 1. Remove the locking pin from the bracket surrounding the AC receptacle at the AC inlet of the projector by pressing down on the button on the end of the locking pin, and then pull upwards on the pin to remove it. 2. Open the cap on the AC plug and line up the slot on the plug with the pin on the receptacle. 3. Insert the plug fully on to the receptacle. When fully inserted, the cap on the AC plug will rest against the side of the projector. 4. Reinsert the locking pin into the bracket surrounding the AC receptacle by pressing down on the button on the end of the locking pin and insert the pin into the bracket, as shown. Do not attempt operation if the AC supply and cord is not within the specified ratings. On power down, wait 5 minutes for the fans to turn OFF before unplugging the projector. Always switch off the projector before unplugging the AC line cord. 2-4 J Series 2.0, 2.4, and 3.0 kW Setup Guide 020-100751-03 Rev. 1 (02-2014) Section 2: Installation and Setup 2.1.5 Power up After the AC Power has been switched on, the LCD display above the keypad indicates “Please wait” and the 4 LED status indicators at the rear of the projector will be solid amber. The projector has reached standby and is ready for use when: • The LCD displays “Standby mode” • The Status LED is solid amber • The Lamp LED is off To turn on the projector, do one of the following: • Press and hold the power button on either the built-in keypad or the remote control • Press the power button twice (quickly) on either the built-in keypad or the remote control Thereafter; the lamp and fans will power on and a green LED will start scrolling back and forth indicating that the projector is in warm up mode. The projector is on and ready to display video when the lamp LED and the status LED are both solid green. NOTES: 1) See Section 3 Operation for a full description of the status indicators. 2) If the projector has a stepper motor lens mount installed and the inserted lens has never been calibrated, there will be a short period where the projector calibrates all of the lens motors (zoom, focus, horizontal, and vertical) by moving them through their full range of motion. 2.1.6 Select a Source Press one of the input keys on the remote, or on the built-in keypad to select and display the image for a connected source. 2.1.7 Adjust the Image Adjust the image settings, such as Brightness, Contrast, Gamma, Focus, Zoom etc. using the direct keys on the remote, or on the built-in keypad. See Section 3 Operation for more details. 2.2 Detailed Setup and Installation Always power down the projector and disconnect all power sources before servicing or cleaning. In the unlikely event of a lamp explosion, particles may be blown out of the rear air vents. Keep clear of the exhaust air path during operation. Take appropriate precautions to shield operators and audience members from lamp explosion particles. High leakage current. Earth connection essential before connecting supply. See the Safety Warnings and Guidelines in 1.2 Safety Warnings and Guidelines. 2.2.1 Mounting J Series 2.0, 2.4, and 3.0 kW Setup Guide 020-100751-03 Rev. 1 (02-2014) 2-5 Section 2: Installation and Setup There are several methods for mounting the projector. Depending on your chosen installation, one method may be more suitable than another. In typical front and rear screen installations the projector can be mounted to a secure and level surface, such as a table or cart. Carts are useful when the projector has to be moved during a presentation or from site to site. It is recommended you lock the wheels on a cart, when the cart is in position, to prevent someone from accidentally moving it during a presentation. Ceiling Mount The projector can be inverted and suspended from the ceiling using a specially designed ceiling mount (P/N: 104-104001-XX). This mounting is recommended for fixed installations and for those that want the projector out of plain view or have limited amount of space for the projector and audience. For more information, contact your dealer. Use only the Christie approved ceiling mount kit designed for your projector. Refer to the installation instructions and safety guidelines provided in the kit. 2.2.2 Basic Optical Alignment Only perform image alignment on-ce the projector is fully assembled and powered up in its final location. Basic image alignment ensures the image reflected from the DMDs is parallel to and well-centered with the lens and screen. This initial optical alignment is the foundation for optimizing images on the screen and must be completed before final boresight adjustments. Before beginning ensure the projector is properly positioned relative to the screen. Basic Optical Alignment Procedure 1. Display a test pattern: Appropriate for analyzing image focus and geometry, such as the “framing” test pattern showing the cross-hair centered across the image. Press the TEST key on the remote keypad or use the built-in keypad and press the soft key that displays Test on the LCD display. 2. Course focus: Do a quick preliminary focus and (if available) zoom adjustment with the primary lens. Do not worry about consistency across the image at this point, just center focus. It is good practice to have zoom adjustment color and focus adjustment color in the center of its range. 3. Center the image in the lens: Holding a piece of paper at the lens surface, adjust offsets as necessary until the image is centered within the lens perimeter. A full white field works best for this. 4. If necessary, center the image on the screen: If the projector is mounted off center to the screen axis, then offset the lens as much as required. Aim the projector over slightly towards the center of the screen, but use caution when doing so, as too much tilt will cause excessive keystone distortion. Lens offset will not. 5. Re-check side-to-side leveling: With the framing pattern on screen, double-check projector leveling so the top edge of the image is parallel to the top edge of the screen. 6. Throw Distance: Ensure the projector is positioned in the throw distance range for the particular lens. 2-6 J Series 2.0, 2.4, and 3.0 kW Setup Guide 020-100751-03 Rev. 1 (02-2014) Section 2: Installation and Setup Folded Optics In rear screen applications where space behind the projector is limited, a mirror may be used to fold the optical path. The position of the projector and mirror must be accurately set - if considering this type of installation call your dealer for assistance. 2.2.3 Advanced Optical Alignment Boresight Alignment Procedure for CT Lens Mount To adjust the boresight on a J Series projector equipped with a CT lens mount, see the Boresight Adjustment Procedure instruction sheet found on the Christie website (P/N: 013-100141-04). Boresight Alignment Procedure for ILS Lens Mount 1. Display the Boresight Test Pattern by pressing the TEST key on the remote keypad or use the built-in keypad and press the soft key that displays Test on the LCD display, then UP ARROW KEY to cycle to Boresight, then Enter. 2. Focus the image on cross-hair pattern I. Evaluate the focus on cross-hair image II and III. If all 3 images are in focus, no further action is required. If boresight is required see step 3. 3. If boresight is required, refer to Figure 2-1 Cross-Hair Pattern to understand how the adjustment screws on the lens mount affect the corresponding cross-hairs on the test pattern. NOTE: The capscrew may be under a plastic cap, remove and retain before adjusting. J Series 2.0, 2.4, and 3.0 kW Setup Guide 020-100751-03 Rev. 1 (02-2014) 2-7 Section 2: Installation and Setup 4. Loosen the 3 locking setscrews on the lens mount, see Figure 2-2 Screw Locations. NOTE: The setscrews must be backed out several turns to avoid contact with the inner lens mount plate. FIGURE 2-1 CROSS-HAIR PATTERN FIGURE 2-2 SCREW LOCATIONS 5. Fine tune the focus of cross-hair pattern I by adjusting the appropriate capscrew, see Figure 2-2 Screw Locations. Adjust until the cross-hair image is in focus with minimal flare. 6. Adjust cross-hair pattern II, by adjusting the appropriate capscrew, see Figure 2-2 Screw Locations. Adjust until the cross-hair image is in focus with minimal flare. 7. Adjust cross-hair pattern III, by adjusting the appropriate capscrew, see Figure 2-2 Screw Locations. Adjust until the cross-hair image is in focus with minimal flare. 8. Repeat step 5, 6, and 7 as required until all 3 cross-hair patterns are in equal sharp focus. If the boresight is acceptable, see step 11. If the boresight does not appear to be converging to an acceptable level of image quality or if the lens will not focus over the correct range of throw distances, then the boresight requires coarse adjustment, see step 9. 9. The original factory boresight can be recovered approximately by positioning the 3 setscrews, see Figure 2-2 Screw Locations. Position the setscrews flush with the front face of the lens mount plate and in contact with the inner lens mount plate. This may require adjusting both setscrews and capscrews. 10. If further action is required. Repeat #2. 11. Lock the setscrews so they do not shift, and re-check the boresight quality. 2-8 J Series 2.0, 2.4, and 3.0 kW Setup Guide 020-100751-03 Rev. 1 (02-2014) Section 2: Installation and Setup 2.2.4 Powering Down The projector can be powered down by using one of the following methods: Remote Keypad/Built-In Keypad • Press and hold POWER -OR• Press POWER twice -OR• Press POWER once, then press the DOWN key. NOTES: 1) For Step 2 and 3, if the second key is not pressed immediately, a confirmation window will appear. The second key press must be pressed within 1 second of the window appearing. 2) After powering down, the Status LEDs cycle and the LCD displays the message “Cooling Down”, until cool down is complete. Web User Interface (UI) 1. From the Main Tab, Select Power > OFF. NOTE: A window will display for confirmation on powering down. 2. Select Yes. J Series 2.0, 2.4, and 3.0 kW Setup Guide 020-100751-03 Rev. 1 (02-2014) 2-9 Section 2: Installation and Setup 2.3 Projector Communications 2.3.1 Status LEDs Looking from the back of the projector, the LEDs represent, from left to right; Lamp, Communications, Status, and Shutter. The LEDs will display the colors as shown below: STATUS LED LED # LED STATE Off - Lamps are off Yellow - Lamp time has expired and lamp should be replaced Lamp 1 Green - Lamp is on and operating correctly Flashing Red - Lamp has malfunctioned Flashing Yellow - Lamp door is open Comm 2 Flashing Green - Projector communication in progress Off - AC power is off Status 3 Yellow - AC is present but projector is in standby Green - Projector is powered up and operating normally Flashing Red - Error has occurred. Details are displayed on the status display Shutter 4 Green - Shutter is open Yellow - Shutter is closed NOTE: A condition occurs on the first power on after a software upgrade, and is indicated by all the following: • The Status LEDs are cycling green • The LCD displays the warning “Image Processor Upgrading” • The LED on the Image Processor card flashes green • The Web page shows a warning that the Image processor card is upgrading. When this occurs, the projector should not be AC power cycled and the Image Processor card should not be removed. 2-10 J Series 2.0, 2.4, and 3.0 kW Setup Guide 020-100751-03 Rev. 1 (02-2014) 3 Operation This section describes the controls and switches used for basic projector operation once it is properly installed, aligned and configured by a Christie accredited service technician. See the Safety Warnings and Guidelines in 1.2 Safety Warnings and Guidelines. 3.1 How to Use the Remote Keypad or Built-In Keypad The projector is typically controlled using one of the following keypads: • Remote Keypad: For wired or wireless control up to 25 feet (8 m) away (includes cable for use as a wired remote). The remote keypad controls the projector by way of wireless communications from a batterypowered infrared (IR) transmitter. Use the remote keypad the same way you would use a remote keypad supplied with a TV or VCR. When pressing a function key, direct the keypad toward the projector’s front or rear IR sensor. One of the two IR sensors on the projector will detect the signal and relay the commands for internal processing. A laser pointer is built into the remote keypad. See Figure 3-1 Remote Keypad. • Built-in Keypad: Located at the side of the projector, see Figure 3-2 . While each of the keypads provides complete control of the projector, they differ slightly in their arrangement of keys and in what functions can be accessed directly with a key press rather than requiring use of the menu system. You may find one keypad more convenient than another for your specific installation and application. 3.1.1 Guide to Keypads Keep these guidelines (common to both keypads) in mind: • Press keys one-at-a-time; there are no simultaneous key combinations required. NOTE: Use POWER, SHUTTER, and OSD FUNCTIONS by doing one of the following: “press-and-hold” (2 seconds) or press twice quickly, followed by pressing either the UP ARROW KEY to switch on or the DOWN ARROW KEY to switch off once. See Figure 3-1 Remote Keypad. • Arrow keys are held down for continuous adjustment/movement in the related key direction. NOTE: In serial networks, pause briefly between adjustments to make sure that more distant projectors can “keep up” with the commands. If you press a key while the projector is still responding to the previous action, such as during power-up, the second key press may not take effect. See Figure 3-1 Remote Keypad for the description of the keys provided for the remote keypad. Laser radiation is emitted from the laser diode in the remote. DO NOT look directly into the beam of the laser. J Series 2.0, 2.4, and 3.0 kW Setup Guide 020-100751-03 Rev. 1 (02-2014) 3-1 Section 3: Operation 3.1.2 Remote Keypad FIGURE 3-1 REMOTE KEYPAD 3-2 J Series 2.0, 2.4, and 3.0 kW Setup Guide 020-100751-03 Rev. 1 (02-2014) Section 3: Operation 3.1.3 Wired Remote You can convert the remote keypad into a wired remote keypad using the cable provided with the projector. Connect one end into the remote and the other to the XLR connector on the input panel labeled as wired keypad. The wired remote is recommended when: • The built-in keypad is inaccessible • The lighting conditions are unsuitable for proper IR transmission NOTE: Leave the batteries in the wired remote for the laser pointer key to work. 3.1.4 Built-in Keypad FIGURE 3-2 BUILT-IN KEYPAD The built-in keypad has a LCD status display window which displays all states of the keypad controls. The LCD displays status information when the projector is powering up “Warm up: Lamp is warming up” and when the projector is cooling down “Cool down: Lamp is cooling down.” The display shows the state of the keys, menu structure, and menu items. J Series 2.0, 2.4, and 3.0 kW Setup Guide 020-100751-03 Rev. 1 (02-2014) 3-3 Section 3: Operation 3.1.5 Overview of LED and Key States The LED color of the keys indicates that the key is in one of these states: • Amber: A functionality is available that will affect the displayed image of the projector • Blue: A functionality is available that is relevant to the built-in LCD only and will not affect the displayed image from the projector • Off: The key is disabled in the current context • Power Key: Used to switch from Standby mode to ON, and from ON to Standby mode; LED always remains Amber • Help Key: Only available in the On Screen Display (OSD) context; LED is Amber when the menu is being displayed on the projected image display; when no menu is being displayed, the Help key is still enabled if the OSD is enabled. It is only disabled when the entire OSD is set to OFF. • Auto Key: Enabled state when the power is ON, and there are no test patterns on the screen. If the power is OFF or a test pattern displays, the Auto key is disabled. • Exit Key: Is determined in the specific context of the screen being displayed. • Input Key: Enabled when the power is ON. Disabled if the power is OFF. • Lens Key: Enabled when the power is ON. Disabled if the power is OFF. • Shutter Key: Enabled when the power is ON. Disabled if the power is OFF. • Menu Key: Always remains in the enabled state when the power is ON. If the power is off the Menu key is disabled. • Soft Key: Used to select an action indicated by text above the key on the LCD. If no text is shown, the associated key is disabled. • Convenience Light Key: toggles the input panel light ON or OFF. 3.1.6 Remote Keypad Commands Specific keypad commands are explained in Figure 3-1 Remote Keypad. Power ON/OFF Press and hold POWER for two seconds or press twice quickly to action the projector ON or OFF. Or press and release POWER followed immediately by the UP ARROW KEY (ON) or DOWN ARROW KEY (OFF) to guarantee the correct action (useful if you are unsure of the present state). NOTES: 1) After powering down, the lamp cooling fan remains on for approximately five minutes to cool the lamp. 2) Avoid turning the projector back on until it has been off for a few minutes. Hot re-strikes of the lamp will reduce lamp life and may cause the lamp to explode. Test Steps forward through all internal test patterns. After stepping past the last test pattern, you will return to current input. Press TEST and then cycle by using the UP ARROW KEY and DOWN ARROW KEY arrow keys, to cycle in either direction through the test patterns. Press EXIT to return to the current input. 3-4 J Series 2.0, 2.4, and 3.0 kW Setup Guide 020-100751-03 Rev. 1 (02-2014) Section 3: Operation Auto Initiates an automated process in which the projector optimizes critical display parameters such as size, position, pixel tracking, etc., for the current source. These parameters are listed in the following table. An auto setup can save time in perfecting a display and you can modify the adjustments as desired. NOTE: You must have an unlocked channel present to use Auto Setup. Table 3.1 Auto Setup OPTIMIZES SETS TO DEFAULT Pixel Tracking Contrast Pixel Phase Brightness Size and Blanking Auto Input Level (off) Vertical Stretch Detail (if video source) Position Filter Input Levels Luma Delay The best auto setup will be obtained under the following conditions: • Input levels, it is best to have an image with saturated (very bright) colors. • Phase, high contrast edges are needed. To determine active window size: • Video images should have whites and blacks in the image. • Wide range video images should have content (including white) that extends to all edges of the image. Channel Select a specific source setup (channel) defined and stored in projector memory. Once you enter a two-digit channel number (or, if there is a list displayed, highlight it and press ENTER), the display will automatically change and update according to the numerous setup parameters defined for that channel. NOTES: 1) A new channel is automatically created if you adjust an image from a new source. 2) CHANNEL key behavior during a presentation depends on whether or not Display Channel List is enabled in the Menu Preferences menu. You can choose to use a scrolling list of channels when you press CHANNEL, or you may prefer to enter the desired channel number “blind”, i.e., without on-screen feedback. Slot 1, 2, 3, 4 Press to display the next active input on the card in the slot. Input Displays all inputs in all slots, both active and inactive. Scroll through the list to select an input for the main image. Press Input again to show the list and select the picture-in-picture (PIP) image. PIP Turns picture-in-picture ON or OFF. Swap Swaps the main and PIP images. J Series 2.0, 2.4, and 3.0 kW Setup Guide 020-100751-03 Rev. 1 (02-2014) 3-5 Section 3: Operation Contrast Changes the level of peak white in your images. Use LEFT/RIGHT ARROW KEY until you reach the desired level of contrast—for best results, start low and increase so that whites remain bright but are not distorted or tinted and that light areas do not become fully white (i.e., “crushed”). Conversely, low contrast causes dim images. Bright Increases or decreases the black level in the image. Use LEFT/RIGHT ARROW KEY until you reach the desired level of brightness. For best results, start high and decrease so that dark areas do not become fully black (i.e., “crushed”). Conversely, overly high brightness changes black to dark grey, causing washed-out images. Gamma Determines how grey shades are displayed between minimum input (black) and maximum input (white) for a given amount of signal. The proper setting helps maintain optimized blacks and whites while ensuring a smooth transition for the “in-between” values utilized in greys. Unlike brightness and contrast controls, the overall tone of an image can be lightened or darkened without changing the two extremes and your images will be more vibrant yet with good detail in dark areas when using the Gamma control. The nominal setting for Gamma Correction of 0 is correct for most signals and conditions. If excess ambient light washes out the image and it becomes difficult or impossible to see details in dark areas, increase the gamma correction setting to compensate. Number Keys Press 1 to 9 to enter a value in a text box or to select a menu item. 10+ Press 0 before pressing another number to enter a number greater than 9, e.g. press 0 then 2 to enter the number 12 as a menu selection. NOTE: When entering numbers in a text field, this button acts as 0. Help Press HELP to display context-sensitive help. Press HELP again to toggle the help window OFF. Menu Press MENU to enter or exit the projector menu system. OSD (On-Screen Display) Press OSD then the DOWN ARROW to hide the projector’s menu system during use. To see the menus again, do one of the following: • Press and hold OSD for two seconds. • Press and release OSD followed immediately by UP ARROW. • Press OSD, OSD. Invisible menus are fully functional, enabling “hidden” access to numbered features and image adjustments by entering the corresponding sequence of key presses on the keypad. NOTE: With OSD turned ON, you can still hide error messages and slide bars by disabling these options in the Menu Preferences menu. 3-6 J Series 2.0, 2.4, and 3.0 kW Setup Guide 020-100751-03 Rev. 1 (02-2014) Section 3: Operation Shutter Press and hold SHUTTER for two seconds to toggle the internal mechanical shutter blade closed or open with a single keystroke. Or press and release SHUTTER followed immediately by UP ARROW KEY (closed) or DOWN ARROW KEY (open) to guarantee the correct state (useful if you are unsure of the present state). Alternatively, press SHUTTER, SHUTTER to toggle from the present on/off state. A closed shutter blanks the display (turns it to black). Close the shutter to block the displayed image while maintaining access to projector functions. Opening the shutter restores the image. NOTES: 1) The LCD display shows the current state of the shutter. 2) The shutter is open upon power-up. Function Key Within A Numeric Field In A Menu: Use FUNC to enter a negative number. Within A Text Field: Press FUNC followed by the UP ARROW KEY or DOWN ARROW KEY to convert between capital and lower case letters. Press FUNC followed by the LEFT ARROW KEY or RIGHT ARROW KEY to insert or delete a character. Press FUNC followed by ENTER to delete all characters. Within A Presentation: Press FUNC followed by two numeric numbers to enable a specific color or colors in the display. For example, will display only red, and will display green data. Eliminating one or more colors can help with certain diagnostics and setups, such as when accurately overlaying one image on top of another from stacked projectors. NOTE: Color enabling can also be implemented from numerous locations within the menu system. 6 0 6 1 = Red 6 2 = Green 6 3 = Blue 6 4 = Yellow 6 5 = Cyan 6 6 = Magenta 6 7 = White (all colors) 6 9 = Invert 3D input = White (all colors) Press FUNC followed by HELP to disable Keystone, Edge Blending and Brightness Uniformity settings. This will disable the features without changing the settings associated with them. Projector Press PROJ to access a specific projector within a group of projectors or to confirm if the local projector is listening. The number in the “Enter Number” window indicates which projector is currently listening to commands, and will match the projector number that has been defined in the Menu Preferences menu. The PROJ check box (read-only) shows whether or not the projector physically connected to a keypad is listening to commands from that keypad. A check mark means that connected projector is listening; if there is no check mark, you are communicating with a different projector. To control a specific projector with the keypad, press PROJ and then enter the three-digit number assigned to the projector you want to use. If you switch to a projector other than the one you are currently using, the check mark will disappear. To broadcast to multiple projectors, press PROJ and then PROJ again without entering a projector number. Keypad commands will then effect all projectors present. NOTES: 1) There is no method of controlling a group of projectors within the same wired configuration using the wired keypad exclusively, since there is only one wired protocol available. 2) The projector’s address can be set in the Configuration Menu > Communications Submenu. Enter Press ENTER to select a highlighted item, to toggle a check box, or to accept a parameter adjustment and return to the previous menu or image. J Series 2.0, 2.4, and 3.0 kW Setup Guide 020-100751-03 Rev. 1 (02-2014) 3-7 Section 3: Operation Exit Press EXIT to return to the previous level, such as the previous menu. NOTE: EXIT does not save changes within text editing boxes (including number editing of a slide bar value) or within pull-down lists. In these cases, EXIT acts as a “cancel”. Arrow Keys Use the LEFT/RIGHT ARROW KEY to change a slide bar value or to select a different option within a pull-down list without having to first scroll through options or navigate within a menu, pull-down list or text box. Lens H and Lens V When adjusting the image for focus, zoom or horizontal and vertical positioning, use the specific arrow keys (LEFT/RIGHT ARROW KEY or UP/DOWN ARROW KEY) related to each function. A small window will appear to indicate the type of adjustment taking place. For example, • • • • Use the FOCUS and the LEFT ARROW or RIGHT ARROW KEY to improve image clarity as desired. Use the ZOOM and the LEFT ARROW or RIGHT ARROW KEY to achieve a desired image size. Use the LENS H and the LEFT ARROW or RIGHT ARROW KEY to position the image horizontally. Use the LENS V and the UP ARROW or DOWN ARROW KEY to position the image vertically. Press EXIT to return to a presentation level. NOTE: Use the LENS key (built-in keypad) with the general UP/DOWN ARROW KEY to get the same effect as if using the arrow keys related to “Lens V” or “Lens H” on the Remote Keypad. All 4 lens settings can be adjusted by using the soft keys. Laser Press LASER to activate the laser pointer on the remote. Point the remote at the screen to highlight an area of your presentation. NOTE: Leave batteries in the wired remote keypad for the LASER key to work. 3.2 CAUTION LASER RADIATION DO NOT STARE INTO BEAM LASER DIODE Wavelength 670nm Max Output 1mW CLASS II LASER PRODUCT Navigating the Menus 3.2.1 Main Menu Most of the projector controls are accessed from within the menu system. There are several groups of related functions, with each group selectable from the Main menu as shown. Press MENU at any time to display this Main menu. Main Menu 1. 2. 3. 4. 5. 6. 7. 8. 9. Size & Position Image Settings Channel Setup Configuration Lamp Status Input Switching & PIP Language Test Pattern On the remote keypad, enter the number that corresponds to the function menu you wish to access, English such as 2 for the Image Settings menu. Or use the UP/ Off DOWN ARROW KEY on any keypad to highlight the desired option, then press ENTER. The corresponding function menu or pull-down list of further options will appear. 3-8 J Series 2.0, 2.4, and 3.0 kW Setup Guide 020-100751-03 Rev. 1 (02-2014) Section 3: Operation With a function menu displayed, enter a menu option number for any numbered option, or use the UP/DOWN ARROW KEY to highlight the desired option and then press ENTER. Long menus have a scroll bar on the right; use the arrow keys to access the remainder of the menu. Locked items or items that do not pertain to the current action or condition appear dimmed and cannot be selected. When finished with a function menu: • Press EXIT to return to the previous screen. -OR• Press MENU to leave the menu system and return to the presentation. NOTES: 1) If there is no signal present, all source-dependent adjustments are disabled. 2) After 15 minutes of inactivity, the projector leaves the menu system and returns to the presentation. 3) The Status menu is readonly. 3.2.2 Change the Menu Language The On-Screen Display (OSD) menu supports English, French, German, Italian, Spanish, Korean, Japanese and Simplified Chinese. Select the preferred language from the Main menu > Language list. 3.2.3 On-line Help Press HELP to display summary information about the current menu or highlighted option. Press HELP again to exit. 1. 2. 3. 4. 5. 6. 7. 8. 9. Main Menu Size & Position Image Settings Channel Setup Configuration Lamp Status Input Switching & PIP Test Pattern Language Help Help Use this menu to adjust settings affecting current image size and position, such as horizontal and vertical placement, blanking, resizing, and others. Off English 3.2.4 The Global Icon Menu options that include this icon apply universally. Menu options without this icon apply to the selected channel only. 3.2.5 How to Use Slide Bars and Other Controls Most of the function menus allow you to change settings by using slide bars, check boxes, and pull-down lists. • Enter the menu option number corresponding to the setting you wish to change. For example, press MENU 1, 3 to select “Vertical Stretch” in the Size and Position menu. • Move the highlight to the option desired and press ENTER. • Move the highlight to the option desired and press LEFT/RIGHT ARROW KEY to adjust immediately. • You can bypass the menus entirely and use a single key to immediately access an adjustment during your presentation (applies only to options having their own key, such as Contrast, Brightness, Gamma, etc.). J Series 2.0, 2.4, and 3.0 kW Setup Guide 020-100751-03 Rev. 1 (02-2014) 3-9 Section 3: Operation Slide Bars In Menus: The current value for a given parameter, White Uniformity such as size or vertical stretch, appears to the left of its slide bar 1. Left Side 35.6 icon (adjustment window). This number often expresses a percentage, or it may have units associated with it (such as pixels), depending on the specific option. Press LEFT/RIGHT ARROW KEY to gradually adjust the setting up or down; both the number and the length of the bar change accordingly. Hold for continuous adjustment. Or press ENTER to activate a slide bar text box for specific number entry via the keypad and then press ENTER to save (or press EXIT to cancel). “Direct” Slide Bars: For quick access, to Gamma, Brightness, and Contrast slide bars without traveling the menu system. Press Gamma, Brightness, or Contrast to display the contrast slide bar. Use the arrow keys to adjust a direct slide bar, or press ENTER and enter a specific number from the keypad, then ENTER or LEFT ARROW KEY or RIGHT ARROW KEY to save (or EXIT to cancel). When you are done, press EXIT to save and return to your presentation. NOTES: 1) You can still adjust a direct slide bar as usual if the display is turned off (see OSD or Menu Preferences menu) — the slide bar just won’t be visible. 2) A direct slide bar disappears if it is not used within five seconds. Check Boxes: Conditions are present if its adjacent check box contains a check mark. To toggle the check box, highlight and press ENTER, or highlight and use RIGHT ARROW KEY to check and LEFT ARROW KEY to clear. If a check box is numbered, enter its number to immediately toggle the check box. 1. Edge Blending Blending Enable Pull-Down Lists: To see a pull-down list of options available for a given parameter: • Highlight the list and press ENTER -OR• Enter the menu option number Use the UP ARROW KEY or DOWN ARROW KEY to navigate up and down within the list. Press ENTER to choose an option from the list. 1. 2. 3. 4. 5. 6. 7. 8. 9. 10. Communications Serial (RS-232 IN) Options Serial (RS-232 OUT) Options Serial (RS-422) Options Projector Address Separate Network Routing Ethernet Settings Broadcast Key Front IR Enable Back IR Enable Wired Keypad Enable 1. 2. 3. 4. Separate RS-232 and RS-422 Joined RS-232 and Ethernet Joined All Joined If you prefer to quickly scroll through a list without first pulling it down, highlight the option and use LEFT ARROW KEY or RIGHT ARROW KEY. Press ENTER when the desired choice appears. NOTES: 1) Press LEFT ARROW KEY or RIGHT ARROW KEY to jump between pages in an extra long pull-down list. 2) Press EXIT while in a pull-down list to cancel any change. 3-10 J Series 2.0, 2.4, and 3.0 kW Setup Guide 020-100751-03 Rev. 1 (02-2014) Section 3: Operation 3.2.6 Edit Text Activate the Edit Window: To enter or edit text, highlight the desired parameter (such as a channel name) and press ENTER to activate its adjacent edit window. Any previously entered text is displayed with its first character highlighted in a square cursor, signifying that this character is ready for editing. Navigate Within the Edit Window: Press RIGHT ARROW KEY to move the cursor forward or LEFT ARROW KEY to move the cursor backwards as desired. Edit a Character: To edit a highlighted character, use UP ARROW KEY and DOWN ARROW KEY to scroll through the available alphabet, numbers, spaces and punctuation. When the character you need appears, press RIGHT ARROW KEY to select it; the cursor will move to the next available character of current text. To convert a lower case letter into a capital letter, position the cursor on the letter and press FUNC followed by the UP ARROW KEY. To convert a capital letter into a lower case letter, position the cursor on the letter and press FUNC followed by the DOWN ARROW KEY. NOTE: Numbers can also be entered directly from the keypad. Add or Delete a Character or Space: To insert a space at the cursor location, press FUNC then the RIGHT ARROW KEY. To delete a highlighted character (or space), press FUNC then the LEFT ARROW KEY. Delete All Characters: Press FUNC followed by ENTER. Press Enter When Finished: To accept edits and leave the edit window, press ENTER. NOTE: Press EXIT at any time to cancel changes and return to the previously defined text. Edit Numerical Values: Enter numbers directly from the keypad to specify numbers representing projector channels (source setups), or slots. As each digit is entered, it is inserted on the right of the field, and the numbers already in the field are shifted on the left. The channel numbers are defined with two digits; for example, if you enter only a single digit (such as “7”) for a channel number, the channel will automatically be defined as “07”. Enter “07” to utilize this channel. If you press any non-numbered key, the number entered up to that point is accepted and updated as the new value. Press EXIT to cancel editing of numerical values. J Series 2.0, 2.4, and 3.0 kW Setup Guide 020-100751-03 Rev. 1 (02-2014) 3-11 Section 3: Operation 3.3 Alarm Conditions An alarm condition consists of a message that is on the LCD display located beside the built-in keypad. There are two types of alarm conditions: • Warning Alarm • Critical Alarm A warning alarm is shown when an error or a non-optimal condition has occurred. That will generally not prevent the projector from operating. An example is when a temperature is slightly elevated. A critical alarm is shown when a condition occurs that could prevent the projector from operating and could cause damage to the projector. This may cause the projector to shut down automatically. An example would be a fan not running. Both alarm types display: • The item of alarm • The status of the item The item of the alarm can be either physical, i.e. fan or sensor, or the alarm can be a software issue, i.e. lamp driver. The LCD displays the status of the item and its units; if applicable. If the status of the item is out of normal range an alarm is created. When the status of the item is within normal range the alarm will clear. NOTES: 1) When an alarm is displayed in the LCD display, the built-in keypad is disabled. To confirm the alarm, press the OK soft key to enable the built-in keypad. 2) The alarm condition can also be viewed using the remote in the read only Status menu. 3-12 J Series 2.0, 2.4, and 3.0 kW Setup Guide 020-100751-03 Rev. 1 (02-2014) 4 Troubleshooting If the projector is not operating properly, note the symptoms and use this section as a guide to resolve the problem. If the problem cannot be resolved. contact your dealer for assistance. NOTE: A Christie accredited service technician is required when opening an enclosure to diagnose any “probable cause”. 4.1 Projector Does Not Power ON 1. Ensure projector is plugged in: Check power switch above power cord is in the ON position. 2. Check that the Status LEDs are ON: While the projector is busy initializing, the LEDs should be cycling. When finished initializing, the Power and Shutter LEDs (the two on the right) should be on. 3. Check the LCD display: While the projector is busy initializing, the display should show “Please wait”. When finished initializing, the display should show “Standby mode”. 4. Check the LCD display for any warnings or errors. NOTE: A condition occurs on the first power on after a software upgrade, and is indicated by all the following: • • • • The Status LEDs are cycling green The LCD displays the warning “Image Processor Upgrading” The LED on the Image Processor card flashes green The Web page shows a warning that the Image processor card is upgrading. When this occurs, the projector should not be AC power cycled and the Image Processor card should not be removed. This operation may take as long as 5 minutes to complete. 4.2 Lamp 4.2.1 Lamp Does Not Ignite 1. Check for an interlock failure: Check the LCD display for an error. If the other lamp has ignited and an image can be seen, use the remote keypad and check the Status menu for any errors and for the Lamp door interlock status. If not lamp has ignited, use the Virtual OSD on the web interface to check these items. The interlock failure could be an open lamp door or a failed lamp fan. 2. Using the remote keypad or Virtual OSD as above, check the lamp mode in the Lamp menu. This may be set to a single lamp or dual lamp mode. Check in the Status menu what the reported mode is. 3. For suspected communication failures, power-down the projector and try again. 4. If the lamp does not ignite after the second attempt and after powering down and up again (complete AC power down, then replace the lamp. J Series 2.0, 2.4, and 3.0 kW Setup Guide 020-100751-03 Rev. 1 (02-2014) 4-1 Section 4: Troubleshooting 4.2.2 Lamp Suddenly Turns OFF 1. Check lamp power through the remote keypad checking the Lamp menu or from the web user interface Advanced: Lamp menu. Try increasing lamp power. 2. Check for an alarm condition on the LCD keypad display. 3. Replace the lamp. 4.2.3 Flicker, Shadows Or Dimness 1. Check lamp power through the remote keypad checking the Lamp menu or from the web user interface Advanced: Lamp menu. Try increasing lamp power. 2. Replace the lamp. 4.3 Blank LCD Screen, No Menu Display Press any arrow key on the built-in keypad. The backlight on the LCD and the backlight for the built-in keypad should turn on. If the LCD is still blank, restart the projector. 4.4 Remote Keypad Does Not Seem to Work 1. Replace the batteries. 2. Check if IR signals are received by the projector. Pressing any key on the remote control towards the front or rear sensor, the Status LED will blink, regardless if any command is executed. If the LED does not blink, restart the projector. 3. Ensure the remote keypad is enabled. If the projector is powered, using the built-in keypad, open the OSD menu and go to the Main Menu > Configuration > Communication submenu and check the check boxes for Front IR Enabled and Rear IR Enabled are enabled. Enable them if they were disabled and try again. 4. Projector is busy. If the projector is busy in a warm-up mode or in a cool-down mode, the commands from the remote keypad may be ignored. Wait until the projector reaches a stable state (Power ON or Stand By) and try again. 5. Press the PROJ key on the remote keypad. If this brings up a pop-up box on the OSD, ensure that the check box is marked to enable the projector. 6. Using the XLR connector, use the remote as a “wired” keypad. If it does work and all the IR sensors have been enabled, then there may be a problem with the IR sensors. 4.5 The OSD Menu Does Not Display • Using the LCD, ensure that OSD menu is enabled, scroll-down until the item OSD appears. The LCD shows “OSD: off”. Press and hold the OSD soft key on the built-in keypad. The LCD now shows “OSD on” then press the menu key on the remote keypad. -OR• Press and hold the OSD key on the remote keypad for 2-3 seconds, then press the menu key. 4-2 J Series 2.0, 2.4, and 3.0 kW Setup Guide 020-100751-03 Rev. 1 (02-2014) Section 4: Troubleshooting 4.6 Can Not Establish Communication with Projector 1. Ensure any address changes have been saved, and reboot to implement. If you still have trouble establishing communications with a projector added to an existing Ethernet network, the projector IP address is likely in conflict with another address already in use. Contact your network administrator. 2. Ensure Ethernet settings are valid for the site. All devices should have the same subnet mask yet unique IP addresses. 4.7 Displays 4.7.1 The Projector is ON but There is No Display 1. Was a lens cover accidently left on? Remove lens cover. 2. On the LCD display, check that the shutter is open. This will also be indicated by the shutter LED being green. 3. Is the correct input selected? Check cable connections. 4. Check if menus appear on the screen. 5. Can you access test pattern? Ensure a full black test pattern has not been selected for display, press Menu to access test patterns, then cycle patterns with keys. Check your source connections again. 4.7.2 Severe Motion Artifacts 1. Most likely there is a synchronization problem with reversed 3-2 pull-down in 60Hz-to-24Hz film-todigital conversion in your source. Correct at the source. 2. Set the projector to run in Free run. Open OSD menu and go to Input Switching and PIP. Ensure that running mode is set to Free Run not to Frame Lock. 3. Display a test pattern on the screen, pressing the Test button on the remote keypad. The test pattern should be displayed correctly. If not, contact your dealer for assistance. 4.7.3 Image Appears ‘Squeezed’ or Vertically Stretched into Center of Screen 1. Run auto setup, pressing AUTO button on the remote keypad. 2. Check your resizing selection. 4.7.4 The Display is Jittery or Unstable 1. If the display is jittery or blinking erratically, ensure that the source is properly connected and of adequate quality for detection. With poor quality or improperly connected source, the projector will repeatedly attempt to display an image, however briefly. 2. The horizontal and vertical scan frequency of the input signal may be out of range for the projector. See Section 5 Specifications for scan frequency ranges. 3. The sync signal may be inadequate. Correct the problem at the source. J Series 2.0, 2.4, and 3.0 kW Setup Guide 020-100751-03 Rev. 1 (02-2014) 4-3 Section 4: Troubleshooting 4.7.5 The Display is Faint 1. Brightness and/or contrast and/or gamma may be set incorrectly. 2. The source may be double terminated. Ensure the source is terminated only once. 3. The source (if non-video) may need a different sync tip clamp location. 4.7.6 The Upper Portion of the Display is Waving, Tearing or Jittering This can occur with video or VCR sources. Check your source. 4.7.7 Portions of the Display are Cut Off or Warped to the Opposite edge Resizing may need adjustment. Adjust until entire image is visible and centered. 4.7.8 Display Appears Compressed (Vertically Stretched) 1. The frequency of the pixel sampling clock is incorrect for the current source. 2. Sizing and positioning options may be adjusted poorly for the incoming source signal. 3. Use an anamorphic lens for typical HDTV and anamorphic DVD sources that have been re-sized and vertically stretched, via 3rd-party software. 4.7.9 Data is Cropped from Edges To display the missing material, reduce image size to fill the display area available in the projector, then stretch vertically to fill the screen from top to bottom. Add the anamorphic lens to regain image width. 4.7.10Display Quality Appears to Drift from Good to Bad, Bad to Good 1. The source input signal may be of low quality. 2. The horizontal or vertical frequency of the input may have changed at the source end. 4.7.11Display Suddenly Freezes If the screen blacks out inexplicably, it is possible that excessive voltage noise on the AC or ground input has interrupted the projector’s ability to lock on to a signal. Power down the projector and disconnect from AC. Then plug in again and power up as usual. 4.7.12Colors in the Display are Inaccurate 1. The color, tint, color space and/or color temperature settings may require adjustment at your input source. 2. Try Auto Setup. 3. Ensure signal connections are correct. 4. Ensure the proper channel for this source is being used. 4.7.13Display is Not Rectangular 1. Check leveling of the projector. Ensure the lens surface and screen are parallel to one another. 2. Is the vertical offset correct? Make the necessary adjustments to the vertical offset on the lens mount. 4-4 J Series 2.0, 2.4, and 3.0 kW Setup Guide 020-100751-03 Rev. 1 (02-2014) Section 4: Troubleshooting 4.7.14Display is “Noisy” 1. Display adjustment at the input source may be required. Adjust pixel tracking, phase and filter. Noise is particularly common on YPbPr signals from a DVD player. 2. Ensure the video input is terminated (75 ohms). If it is the last connection in a loop-through chain, the video input should be terminated at the last source input only. 3. The input signal and/or signal cables carrying the input signal may be of poor quality. 4. If the distance between the input source device and the projector is greater than 25 feet, signal amplification/conditioning may be required. 5. If the source is a VCR or off-air broadcast, detail may be set too high. 4.8 Web Interface 4.8.1 After a Projector Software Upgrade, The Web Pages Do Not Display Correctly 1. After an upgrade, the temporary internet files and cookies must be cleared from the web browser to ensure that Web UI changes can take effect. 2. Using the Internet Explorer menu bar, select Tools > Internet Options. Click Delete from the Browsing History option. Click Delete files. Once the Delete Files window displays, click Yes. Then click Delete cookies. Once the Delete Cookies window displays, click Yes then click Close. Click OK to close the Internet Options window. 3. Close the browser and re-open before connecting to the projector. 4.8.2 A Backup Or Interrogator File Cannot Be Saved After performing a backup of Interrogator, you may be prompted from a pop-up window before saving the file. If you have not specifically set Internet Explorer to automatically open/save the file without prompting, and if pop-up windows have been disabled (by enabling the pop-up blocker), then you will not be able to save the file. Disable the pop-up blocker from Main > Tools > Pop-up Blocker. NOTE: Different types of tool bars have the potential to block pop-ups. -OR1. Using the Internet Explorer menu bar, select Tools > Internet Options to open the Internet Options window. 2. Select Internet, then click Custom Level to open the Security Settings-Internet Zone window. 3. Scroll down the list until you see “Downloads” option setting. Ensure the “Automatic prompting for file downloads” and “File Download” options are enabled, then click OK. Once the Warning window displays, click OK. 4. Using the Internet Option window, select Local intranet, then click Custom Level. Repeat Step 3. J Series 2.0, 2.4, and 3.0 kW Setup Guide 020-100751-03 Rev. 1 (02-2014) 4-5 5 Specifications This section provides detailed J Series features; including inputs, lamp, and power requirements. NOTE: Due to continuing research, detailed features are subject to change without notice. 5.1 Feature Set 5.1.1 Air Filters (Optional) Filter media types Dust filter Fog filter Filter access Service-interchangeable via access panel 5.1.2 Lamp Ushio Xenon bubble lamp system Lamps are accessed from the rear of the projector 5.1.3 Projection Lens Compatibility Lens type Reverse Telocentric Internal-focus Motorized zoom and focus with position feedback NOTE: Calculated Throw distance values are subject to a ±5% lens tolerance Table 5.1 Lens Throw Ratio THROW RATIO LENS DESCRIPTION FIXED ZOOM PART NUMBER SXGA+ HD WUXGA Lens ILS 0.73:1SX+/0.67:1HD 118-100110-XX 0.73 0.67 0.67 Lens ILS 1.2SX+/1.1HD 118-100117-XX 1.2 1.1 1.1 Lens ILS 1.25-1.6SX+/1.16-1.49HD 118-100111-XX 1.25-1.6 1.16-1.49 1.16-1.49 Lens ILS 1.5-2.0SX+/1.4-1.8HD 118-100112-XX 1.5-2.0 1.4-1.8 1.4-1.8 Lens ILS 2.0-2.8SX+/1.8-2.6HD 118-100113-XX 2.0-2.8 1.8-2.6 1.8-2.6 Lens ILS 2.8-4.5SX+/2.6-4.1HD 118-100114-XX 2.8-4.5 2.6-4.1 2.6-4.1 Lens ILS 4.5-7.5SX+/4.1-6.9HD 118-100115-XX 4.5-7.5 4.1-6.9 4.1-6.9 Lens ILS 7.5-11.2SX+/6.9-10.4HD 118-100116-XX 7.5-11.2 6.9-10.4 6.9-10.4 J Series 2.0, 2.4, and 3.0 kW Setup Guide 020-100751-03 Rev. 1 (02-2014) 5-1 Section 5: Specifications 5.2 Power Requirements High leakage current. Earth connection essential before connecting supply. PARAMETER POWER REQUIREMENT Rated Voltage 3000W 200 VAC - 240 VAC 2400W 200 VAC - 240 VAC 1900W 200 VAC - 240 VAC 3000W 20 A 2400W 16 A 1900W 14 A Line Frequency All 50/60 Hz AC Input Coupler 3000W 32 A, 250 VAC, IEC 309 1900W 20 A, 250 VAC, IEC 320-C20 2400W 20 A, 250 VAC, IEC 320-C20 3000W 10AWG type SJT with plug, NEMA L6-30P, 30A 2400W 12AWG type SJT with plug, NEMA 6-20P, 20A 1900W 12AWG type SJT with plug, NEMA 6-20P, 20A Inrush Current All 60 A max Maximum Power Consumption 3000W 4000W 2400W 3200W 1900W 2800W Rated Current Line Cord 5.3 Lamp Specification Type Bubble Lamp Power Range 3000W 2000W min, 3000W max (software adjustable) 2400W 1500W min, 2400W max (software adjustable) 200W 1200W min, 1900W max (software adjustable) Rated lamp life to 50% brightness (2 hrs. on, 15 min. off duty cycle) 5-2 3000W 750 hrs. minimum 2400W 750 hrs. minimum 2000W 1000 hrs. minimum Warm-up time (to full output) 20 minutes max Operating position Full rotation allowed about the lamp axis, some portrait mode allowed J Series 2.0, 2.4, and 3.0 kW Setup Guide 020-100751-03 Rev. 1 (02-2014) Section 5: Specifications 5.4 Accessories and Service Components PRODUCT NAME PART NUMBER SOLD WITH PRODUCT SOLD SEPARATELY Analog Input 108-309101-XX Dual Link DVI Input 108-312101-XX Video Decoder Input 108-310101-XX Dual 3G/HD/SD-SDI Input Card 108-313101-XX Twin HDMI Input 108-311101-XX DMX512 Interface 108-314101-XX TDPIC Card 108-451101-XX Dust Filter (5-pack) 132-116109-XX Fog Filter (5-pack) 132-117100-XX Lens ILS 0.73:1SX+/0.67:1HD 118-100110-XX Lens ILS 1.25-1.6SX+/1.16-1.49HD 118-100111-XX Lens ILS 1.5-2.0SX+/1.4-1.8HD 118-100112-XX Lens ILS 2.0-2.8SX+/1.8-2.6HD 118-100113-XX Lens ILS 2.8-4.5SX+/2.6-4.1HD 118-100114-XX Lens ILS 4.5-7.5SX+/4.1-6.9HD 118-100115-XX Lens ILS 7.5-11.2SX+/6.9-10.4HD 118-100116-XX Lens ILS 1.2SX+/1.1HD 118-100117-XX Lens ILS 1.2SX+/1.1HD 118-101103-XX ILS Lens Conversion Kit 108-331108-XX CT MOUNT Xe Bubble 132-112105-XX Kit Upgrade S+14K-J to Mirage 132-103105-XX Kit Upgrade HD14K-J to Mirage 132-104106-XX Kit Upgrade S+18K-J to Mirage 132-105107-XX Kit Upgrade HD16K-J to Mirage 132-106108-XX Kit Upgrade S+22K-J to Mirage 132-107109-XX Kit Upgrade HD20K-J to Mirage 132-108100-XX Kit Upgrade WU20K-J to Mirage 132-109101-XX YNF Upgrade 132-110103-XX AutoSTACK 108-308101-XX Handle 104-108101-XX Edge Blending CT 104-102101-XX Remote IR Sensor 104-106101-XX Portrait Adapter 118-116109-XX J Series 2.0, 2.4, and 3.0 kW Setup Guide 020-100751-03 Rev. 1 (02-2014) 5-3 Corporate offices Worldwide offices USA – Cypress ph: 714-236-8610 Australia ph: +61 (0) 7 3624 4888 Canada – Kitchener ph: 519-744-8005 Brazil ph: +55 (11) 2548 4753 Consultant offices China (Beijing) ph: +86 10 6561 0240 Italy ph: +39 (0) 2 9902 1161 China (Shanghai) ph: +86 21 6278 7708 Eastern Europe and Russian Federation ph: +36 (0) 1 47 48 100 France ph: +33 (0) 1 41 21 44 04 Germany ph: +49 2161 664540 India ph: +91 (080) 6708 9999 Singapore ph: +65 6877-8737 Japan (Tokyo) ph: 81 3 3599 7481 Spain ph: + 34 91 633 9990 Korea (Seoul) ph: +82 2 702 1601 United Arab Emirates ph: +971 4 3206688 Republic of South Africa ph: +27 (0)11 510 0094 United Kingdom ph: +44 (0) 118 977 8000 For the most current technical documentation, please visit www.christiedigital.com