1
15. TROUBLESHOOTING
15 −1 PROBLEMS NOT INVOLVING THE GAME BOARD
In case a problem occurs, first check wiring connector connections.
● In order to prevent electric shock and short circuit, be sure to turn
power off before performing work.
● Be careful not to damage the wires. Damaged wires may cause
electric shock or short circuit or present a fire risk.
● After removing the cause of the functioning of the Circuit Protector,
reinstate the Circuit Protector. Depending on the cause of the
functioning, using the Circuit Protector as is without removing the
cause can cause generation of heat and fire hazard.
TABLE 15
PROBLEMS
CAUSE
COUNTERMEASURES
Power is not supplied.
Securely insert the power plug into the plug
socket.
Power supply/voltage is not
correct.
Make sure that power supply/voltage is correct.
The Circuit Protector
functioned due to a
momentary electrical
overload.
After eliminating the cause of overload,
reinstate the AC Unit's Circuit Protector
(see 5 of Section 6, refer to the following).
The color on the
projector screen is
incorrect.
Image adjustment is not
appropriate.
Adjust appropriately (see Sec. 11).
No sound is emitted.
Sound volume adjustment
is not appropriate.
Adjust sound volume (see Sec. 9).
Board and Amplifier
malfunctioning
Perform the sound test and confirm
(see Sec. 9-2).
With Main SW ON,
no activation.
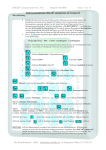
CIRCUIT PROTECTOR
CIRCUIT PROTECTOR
Functions due to the activation of
bimetal. To restore the function,
wait for approximately one minute
or longer until the bimetal cools
off. (Press the Button.)
FIG. 15. 1 a
− 129 −
PROBLEMS
CAUSE
COUNTERMEASURES
Sights are not aligned due
to changes in the
surrounding environment.
Perform sighting adjustment in the test mode
(see Sec. 9-3).
LED board malfunctioning
Check to ensure that the LED lights up. If it
does not light up, replace (see Fig. 15.1b).
Sensor unit malfunctioning
Replace the sensor unit (see Sec. 10).
<JPT-2030 SENSOR UNIT>
LED board and LED board
cover are contaminated.
Wipe off soiled surfaces (see Sec. 14).
Fuse on the sensor unit has
blown due to a momentary
electrical overload.
Fix the source of the overload, then replace the
fuse (see Sec. 15-3). <514-5143-200 FUSE S.B
200MA250V HBC CE ROHS or 514-5146200 FUSE S.B 200MA250V 218 CE ROHS>
A fault with the
microswitches
Use an Input Test to make sure they change
between ON and OFF. If they do not, exchange
the faulty microswitches (see Sec. 10).
<509-5080 SW MICRO TYPE>
A fault with the LED board
Check that the LEDs are on. If not, exchange
them (see FIG. 15.1b).
Speed sensor settings are
wrong.
Use TEST Mode to correct the settings
(see Sec. 9-3).
The sensor unit is broken.
Exchange the sensor unit (see Sec. 10).
The speed sensor circuit
fuse has blown due to a
momentary electrical
overload.
After resolving the cause of the overload,
change the fuse (see Sec. 15-3).
<514-5143-200 FUSE S.B 200MA250V HBC
CE ROHS or 514-5146-200 FUSE S.B
200MA250V 218 CE ROHS>
The fluorescent light
does not come on.
The fluorescent light has
died.
Exchange the fluorescent light (see Sec. 13).
The cold-cathode
tube does not come
on.
The cold-cathode tube has
died.
Exchange the cold-cathode tube (see Sec. 13).
The inverter board is
broken.
Exchange the inverter board (see Sec. 13).
Control Unit (Gun)
sighting is not
satisfactory.
The Control Unit
(Gun) does not
appear to be
operating correctly.
− 130 −
Replacing the LED Board
Removing or attaching of the mask must be carried out by at least two
people, one on the left and one on the right. A single person working alone
can lead to injury.
If the light from the 2 LEDs cannot be seen then there is a problem or malfunction. Follow the
steps below to exchange them. You can also use the following steps to clean the screen.
Replacement is required is the light from 2 LEDs cannot be seen.
FIG. 15. 1 b
① Turn the power off.
② Remove the four truss screws and remove the front panel.
TRUSS SCREW (4), black
FRONT PANEL
M4×12, large flat washer used
PHOTO 15. 1 a
PHOTO 15. 1 b
− 131 −
③ Disconnect the two connectors.
Disconnect the connectors.
PHOTO 15. 1 c
④ Remove the six screws from the side of the
projector.
SCREW (6), black
M4×10, w/flat & spring washers
PHOTO 15. 1 d
⑤ Have one person take the left and
another the right and remove the
mask.
− 132 −
PHOTO 15. 1 e
⑥ The mask has the LED boards attached. Remove the two U nuts holding the malfunctioning
board, disconnect both connectors and remove and replace the LED board.
Be carefully not to lose the flat metal washers and plastic washers safe, and pay attention to the
facing/direction of the LED board when inserting it.
U NUT (2)
LED BOARD
M3, flat metal & plastic washers used
838-13145R02
PHOTO 15. 1 f
⑦ If the problematic LED board is in the corner of the mask remove the 5 screws and remove the
joint bracket. The joint bracket has the same parts are the boards along the straight sections of
the mask, and there are 2 types.
SCREW (5), black
M4×8, w/flat & spring washers
JOINT BRACKET
PHOTO 15. 1 g
− 133 −
⑧ Remove the two U nuts, disconnect both connectors and remove and replace the LED board.
Be carefully not to lose the flat metal washers and plastic washers safe, and pay attention to the
facing/direction of the LED board when inserting it.
U NUT (2)
LED BOARD
M3, flat metal & plastic washers used
838-13145R02
PHOTO 15. 1 h
⑨ After exchanging the LED board enter TEST Mode and perform a lighting test.
− 134 −
15 −2 ERROR CODES
● If an error code is displayed get on-site maintenance personnel or
other qualified professional to look at it. An unqualified person
attempting to resolve an error code problem may lead to electric
shock, short circuit and risk of fire.
If no on-site maintenance personnel or qualified professional is
available immediately turn off the power and contact the customer
services in this manual or your supplier.
● If a problem not described in this manual occurs, or the resolution to a
problem described in this manual is not effective, do not make further
attempts to resolve the problem yourself. Immediately turn off the
power and contact the customer services in this manual or your
supplier. Any unguided attempts to solve such problems may lead to a
serious accident.
● If Error 20 occurs it is necessary to restart the machine in order to
clear the error.
● The errors below include some which can never occur during the
normal operation of "The House of the Dead 4."
● If an error number or message not listed below appears, cease using
the product immediately and send the LINDBERGH board in for
repairs.
The LINDBERGH board is equipped to display various errors on-screen to help solve any
problems. If an error is displayed the game cannot be used. Use the following table of causes
and resolutions to solve the problem.
Error 01
DISPLAY
CAUSE
COUNTERMEASURES
Error 02
DISPLAY
CAUSE
COUNTERMEASURES
Error 05
DISPLAY
CAUSE
COUNTERMEASURES
Game Program Not Found.
The key chip is not connected.
Check that the key chip is connected correctly. Check that the
keychip is not inserted the wrong way or that the key chip from a
different system is not inserted.
Game Program Not Available.
The key chip is not supported.
Send the LINDBERGH board in for repair with the key chip still in
place.
Wrong Region.
The game is for a foreign region.
Use a domestic game.
− 135 −
Error 06
DISPLAY
CAUSE
COUNTERMEASURES
Error 07
DISPLAY
CAUSE
COUNTERMEASURES
Error 08
DISPLAY
CAUSE
COUNTERMEASURES
Error 09
DISPLAY
CAUSE
COUNTERMEASURES
Error 10
DISPLAY
CAUSE
COUNTERMEASURES
Error 11
DISPLAY
CAUSE
COUNTERMEASURES
Error 12
DISPLAY
CAUSE
COUNTERMEASURES
I/O Device Not Found.
The LINDBERGH board's I/O board cannot be found.
Send the LINDBERGH board in for repair with the key chip still in
place.
Graphic Card Not Found.
The LINDBERGH board's graphics card cannot be found.
Send the LINDBERGH board in for repair with the key chip still in
place.
Sound Card Not Found.
The LINDBERGH board's sound card cannot be found.
Send the LINDBERGH board in for repair with the key chip still in
place.
System Memory Not Enough.
The LINDBERGH board does not have enough memory.
Send the LINDBERGH board in for repair with the key chip still in
place.
Unexpected Game Program Failure.
The game program crashed due to an unexpected error.
Turn the power off and then restart.
JVS I/O board is not connected to main board.
(1) The I/O board is not connected.
(2) Unreliable connection between the main board and the I/O
board.
(1) Connect the I/O board to the main board.
Verify that the power cable is connected to I/O board.
(2) Reconnect or replace the JVS cable that connects the I/O board
to the main board.
JVS I/O board does not fulfill the game spec.
The correct I/O board is not connected.
Use an I/O board that provides the proper input/output for the
game.
− 136 −
Error 14
DISPLAY
CAUSE
COUNTERMEASURES
Error 15
DISPLAY
CAUSE
COUNTERMEASURES
Error 21
DISPLAY
CAUSE
COUNTERMEASURES
Network firmware version does not fulfill the game spec.
Required version XX.XX.
The firmware version installed on either the network board or the
DIMM Media board is older than the required version.
Use a network board or DIMM Media board with firmware that
meets or exceeds the required version.
Game Program Not Found.
The key chip is not connected.
Check that the key chip is connected correctly. Check that the key
chip is not inserted the wrong way or that the key chip from a
different system is not inserted.
Game Program Not Found on Game Disk.
There is no program image on the game disk.
Check that a game disk corresponding to the key chip is inserted
into the drive.
Error 22
DISPLAY
CAUSE
COUNTERMEASURES
Game Program Not Found on Device.
There is no game image on the game installer device.
Perform a reinstall from the game disk.
Error 24
DISPLAY
CAUSE
COUNTERMEASURES
DVD Drive Not Found.
The DVD drive cannot be found.
Connect the DVD drive.
Error 25
DISPLAY
CAUSE
COUNTERMEASURES
Game Disk Not Found.
The game disk cannot be found.
Insert the game disk.
Error 26
DISPLAY
CAUSE
COUNTERMEASURES
Error 27
DISPLAY
CAUSE
COUNTERMEASURES
Storage Device Not Found.
The program installer device cannot be found.
Send the LINDBERGH board in for repair with the key chip still in
place.
Storage Device is Not Acceptable.
The program installer device does not have enough space.
Send the LINDBERGH board in for repair with the key chip still in
place.
− 137 −
Error 28
DISPLAY
CAUSE
COUNTERMEASURES
Error 29
DISPLAY
CAUSE
COUNTERMEASURES
Error 31
DISPLAY
CAUSE
COUNTERMEASURES
Error 32
DISPLAY
CAUSE
COUNTERMEASURES
Error 33
DISPLAY
CAUSE
COUNTERMEASURES
Error 34
DISPLAY
CAUSE
COUNTERMEASURES
Error 35
DISPLAY
CAUSE
COUNTERMEASURES
Error 36
DISPLAY
CAUSE
COUNTERMEASURES
This Game Disk is Not Acceptable.
The game disk cannot be read correctly.
Exchange the game disk for a proper game disk. Check that the
game disk is not scratched, damaged or dirty.
Cannot Control DVD Drive.
The DVD drive cannot be controlled.
The DVD drive may be damaged.
Storage Device Not Enough.
The program installer device does not have enough space.
Send the LINDBERGH board in for repair with the key chip still in
place.
Installing Game Program Failed.
Transfer of the program failed.
Check that the DVD drive is connected correctly. Check that the
game disk is not scratched, damaged or dirty.
Storage Device is Not Acceptable.
The program installer device cannot be found.
Send the LINDBERGH board in for repair with the key chip still in
place.
Storage Device Not Found.
The program installer device cannot be found.
Send the LINDBERGH board in for repair with the key chip still in
place.
Storage Device is Not Acceptable.
The program installer device does not have enough space.
Send the LINDBERGH board in for repair with the key chip still in
place.
Storage Device May be Broken.
The program installer device is broken.
Send the LINDBERGH board in for repair with the key chip still in
place.
− 138 −
Error 37
DISPLAY
CAUSE
COUNTERMEASURES
Error 41
DISPLAY
CAUSE
COUNTERMEASURES
Error 42
DISPLAY
CAUSE
COUNTERMEASURES
Error 43
DISPLAY
CAUSE
COUNTERMEASURES
Error 44
DISPLAY
CAUSE
COUNTERMEASURES
Verifying Game Program Failed.
The program image is unverified due to the program image not
existing on the game disk or server.
Check that the correct game disk is inserted.
Server Not Respond.
The server is not responding.
Check the network settings.
Set IP Address and other settings.
Check that the network cable has not been pulled out.
Server Mount Failed
The server directory is could not be reached.
Check the network settings.
Set IP Address and other settings.
Check that the network cable has not been pulled out.
IP Address Not Assigned.
An IP Address could not be obtained from the DHCP server.
Check the network settings.
Set IP Address and other settings.
Check that the network cable has not been pulled out.
Game Program Not Found on Server.
No program image on the network server.
Check that the game title, place on the network server, and the key
chip correspond to each other.
Caution 51
DISPLAY
CAUSE
COUNTERMEASURES
Wrong Resolution Setting.
The game does not support the current resolution settings.
Change the DIP SW to the correct settings and restart.
Caution 52
DISPLAY
CAUSE
COUNTERMEASURES
Wrong Horizontal/Vertical Setting.
The monitor horizontal/vertical settings are incorrect.
Change the DIP SW to the correct settings and restart.
− 139 −
15 −3 REPLACING THE FUSE
● Fuse replacements other than those specified can cause accidents
and are strictly forbidden. In case fuse replacements other than those
stated in this manual are necessary, contact where you purchased the
product from for inquiries regarding this matter.
● To prevent accidents due to electrical shock, always turn the power off
and disconnect the power plug from the power outlet before performing
any task that involves touching the interior of the product.
● Be careful not to damage the wires. Damaged wires may cause
electric shock, short circuit or present a risk of fire.
● Be sure to use fuses meeting the specified rating. Using fuses
exceeding the specified rating can cause fire and electric shock
accidents.
● After eliminating the cause of a blown fuse, replace the fuse.
Depending on the cause of the fuse blow, continued use with the
blown fuse can cause generation of heat and present a risk of fire.
The Control Unit (Gun) circuit fuses are found, from facing the cabinet, inside side door R on
the right side of the cabinet. There are four fuses arranged vertically on the control panel inside
side door R. From top to bottom these fuses are - Player 1 Control Unit (Gun) speed sensor fuse
- Player 2 Control Unit (Gun) speed sensor fuse
- Player 1 Control Unit (Gun) targeting sensor unit fuse
- Player 2 Control Unit (Gun) targeting sensor unit fuse
① Turn the power off.
② Remove the three truss screws on side door R.
TRUSS SCREW (3), black
M4×40, large flat washer used
PHOTO 15. 3 a
− 140 −
③ Unlock and remove side door R.
PHOTO 15. 3 b
④ Exchange the fuse.
FUSE 0.2 A, 250 V
514-5143-200 or 514-5146-200
PHOTO 15. 3 c
− 141 −
16. GAME BOARD
● In order to prevent electric shock and short circuit hazards, be sure to
turn power off before performing work.
● Be careful not to damage the wires. Damaged wires may cause
electric shock or short circuit or present a fire risk.
● Do not expose the Game BD, etc. without a good reason. Failure to
observe this can cause electric shock hazard or malfunctioning.
● Do not use this product with connectors other than those that were
connected and used with the Game Board at the time of shipping. Do
not carelessly connect wires to connectors that were not used at the
time of shipping, as this may cause overheating, smoke or fire
damage.
● When replacing or repairing the game board and then returning it to
the cabinet, be sure to reconnect all the connectors correctly. Improper
connection may cause electric shock, short circuit or fire.
● When connecting the connectors, be sure to attach them correctly.
There is only one correct way in which they must be connected.
Attempting to connect them incorrectly may cause damage to the pins
on the connectors, and cause electric shock, short circuit or fire.
● In this product, setting changes are made during the Test Mode. The
Game BD need not be operated. Use the Game BD, etc. as is with the
same setting made at the time of shipment so as not to cause electric
shock and malfunctioning.
● Static electricity from your body may damage some electronics devices
on the IC board. Before handling the IC board, touch a grounded
metallic surface so that the static electricity can be discharged.
● When exchanging the game board place and post off the damaged
board in the new board's special packaging. If you do not have the
packaging or it is damaged order one using the following product
number/name <601-11691: CARTON BOX LBG>.
● When sending a board for repairs or do not dismantle the board in any
way prior to sending it away. It may not be possible to meet your
request if any parts are missing.
● Send a game board in for repair with the key chip still inserted.
− 142 −
16 −1 REMOVING THE GAME BOARD
The game board (LINDBERGH board) is found, from the facing the cabinet, inside side door L
on the left side of the cabinet. Remove the entire wooden board (ASSY MAIN BD) on which
the LINDBURGH board is placed.
① Turn the power off.
② Remove the three truss screws from
side door L.
TRUSS SCREW (3), black
M4×40, large flat washer used
PHOTO 16. 1 a
③ Unlock and open side door L.
PHOTO 16. 1 b
− 143 −
④ Disconnect all connectors attached to
the LINDBERGH board.
PHOTO 16. 1 c
⑤ Remove the two screws holding the
base (wooden board) in place.
Take care as once these screws are
removed there is a risk of the entire
board falling forward.
SCREW (2)
M4×30, w/flat & spring washers
PHOTO 16. 1 d
⑥ Remove the ASSY MAIN BD.
PHOTO 16. 1 e
⑦ Place the ASSY MAIN BD on a flat surface.
− 144 −
⑧ Remove the four screws and remove the LINDBERGH board.
SCREW (4)
M4×12, w/flat & spring washers
PHOTO 16. 1 f
− 145 −
16 −2 COMPOSITION OF THE GAME BOARD
● The game board becomes the game board for this product once the
key chip is inserted.
● The DIP SW (dip switches) on the board must be set as specified
below. If set incorrectly for this product, an error will be displayed and
the game will not run.
ASSY CASE LBG L 1GB HDF EXP (844-0002D-02)
Board number sticker
KEY CHIP
DIP SW
FIG. 16. 2 a
DIP SW Setting
Use this product with the DIP SW settings shown in the figure below.
FIG. 16. 2 b
− 146 −
17. DESIGN RELATED PARTS
For the Warning Display stickers, refer to Section 1.
BILLBOARD SIDE PLATE R
HDF-0559
BILLBOARD PLATE
HDF-0553
BILLBOARD SIDE PLATE L
HDF-0558
STICKER BILLBOARD SIDE R
HDF-0557
STICKER BILLBOARD SIDE L
HDF-0556
STICKER DLP SIDE R
HDF-0512
Opposite side: STICKER DLP SIDE L
HDF-0511
STICKER TOP LID COVER
HDF-1001-B
CTRL PANEL ENG
HDF-2002-01
LIGHTING PLATE R
HDF-1203
LIGHTING PLATE L
HDF-1202
− 147 −