1
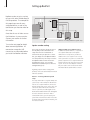
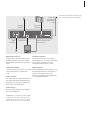
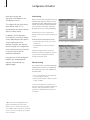
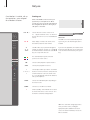
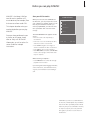
BeoPort
Guide
CAUTION
RISK OF ELECTRIC SHOCK
DO NOT OPEN
CAUTION: To reduce the risk of
electric shock, do not remove
cover (or back).
No User-serviceable parts inside.
Refer servicing to qualified service
personnel.
WARNING: To reduce the risk of fire or
electric shock, do not expose this appliance
to rain or moisture. Do not expose this equipment to dripping or splashing and ensure
that no objects filled with liquids, such as
vases, are placed on the equipment.
To completely disconnect this equipment
from the AC Mains, disconnect the power
supply cord plug from the AC receptacle.
The lightning flash with arrowhead symbol
within an equilateral triangle, is intended
to alert the user to the presence of uninsulated “dangerous voltage” within the
product’s enclosure that may be of sufficient
magnitude to constitute a risk of electric
shock to persons.
The exclamation point within an equilateral
triangle is intended to alert the user to the
presence of important operating and maintenance (servicing) instructions in the
literature accompanying the product.
Acknowledgement and liability
Product names mentioned in this Guide
may be trademarks or registered trademarks of other companies.
– Music recognition technology and related
data are provided by Gracenote ® and the
Gracenote CDDB ® music recognition
service. Gracenote is the industry standard
in music recognition technology and related
content delivery. For more information visit
www.gracenote.com.
– Music-related data from Gracenote and
Gracenote CDDB Client Software © 2003,
all rights reserved. This product and service
may practice one or more of the following
U.S. Patents: #5,987,525; #6,061,680;
#6,154,773; #6,161,132; #6,230,207;
#6,230,192; #6,240,459; #6,330,593 and
other patents licensed, issued or pending.
Services may be supplied and/or device
manufactured under license from Open
Globe, Inc. for U.S. Patent #6,304,523.
– The Gracenote CDDB Service uses a unique
identifier to track queries for statistical
purposes. The purpose of a randomly
assigned numeric identifier is to allow the
Gracenote CDDB service to count queries
without knowing anything about who you
are. For more information, see the web
page for the Gracenote Privacy Policy for the
Gracenote CDDB Service.
Gracenote, CDDB, the Gracenote logo, and
the CDDB logo, are all registered trademarks
of Gracenote. The “Powered by Gracenote”
logo is a trademark of Gracenote.
Portions based upon Microsoft Windows Media
Technologies. Copyright© 2000 Microsoft
Corporation. All rights reserved. Microsoft,
Windows Media and the Windows Logo are
registered trademarks of Microsoft Corporation
in the United States and/or other countries.
MicroOS Operating System (U.S. Patent
#5,787,445)
Please note that Bang & Olufsen will, in no
event, be liable for any consequential,
incidental or indirect damages arising out of
the use or inability to use the software.
Note to installer
This reminder is provided to call your attention
to Article 820-22 of the National Electrical
Code (Section 54 of Canadian Electrical Code,
Part 1) which provides guidelines for proper
grounding and, in particular, specifies that the
cable ground shall be connected to the
grounding system of the building as close to
the point of cable entry as practical.
For your safety
– Do not mount BeoPort with the cable
connections turning downwards. Keep
BeoPort away from water and do not place
items on top of it. The mains plug enables
the separation (switch off) from the net
voltage. The wall outlet has to be close to
the device and must be easily accessible.
– Avoid placing your BeoPort in direct sunlight or direct artificial light (e.g. a spotlight). BeoPort is developed for indoor use in
dry, domestic environments only, and for
use within a temperature range of 10–40°
C (50–105° F).
– Do not attempt to open BeoPort. Leave
such operations to qualified service
personnel.
CAUTION: To prevent electric shock do not
use the polarized plug with an extension
cord, receptacle or other outlet unless the
blades can be fully inserted to prevent blade
exposure.
Contents
This Guide provides you with a
complete overview of installation,
basic aspects about configuration,
and the principles of daily use. We
recommend that you follow the
listed sequence in the chapter
Before you start… on page 5.
In addition to this Guide, BeoPort
contains an On-Screen Guide,
accessible once you have installed
BeoPort.
Before you start…, 5
Follow this sequence of instructions to ensure flawless installation and fast
access to BeoPort. This chapter also includes a list of system requirements.
Setting up BeoPort, 6–7
Find out how you can set up your BeoPort, what Option number setting is all
about, and how to connect the cables.
Installing BeoPort, 8–9
Choose between an installation with or without a TV tuner card. You can also
find out how to repair or upgrade your BeoPort installation.
Configure BeoPort, 10–11
Find out how to make the configuration settings you need. This chapter shows
you some basic settings, and explains registration of BeoPort.
Daily use, 12
Starting out.
Before you can play N.MUSIC…, 13
How to scan for music tracks already stored on your PC.
Index, 14
3
4
Before you start…
To ensure a successful BeoPort
installation, follow the sequence of
instructions on this page exactly.
5
1 Make sure that your setup meets the
requirements listed below
2 Setup your BeoPort (p. 6)
3 Connect BeoPort (p. 7)
4 Install BeoPort, including TV tuner card
and driver (pp. 8–9)
5 Configure BeoPort (p. 10)
6 Register (p. 11)
BeoPort requirements
To be able to install the BeoPort
application, your PC must meet the
following requirements:
Hardware requirements
– Pentium-class PC (233 MHz or above) with
50 MB available disk space
– Min. 64 MB RAM
– Super VGA monitor with a minimum
resolution of 800 × 600 and 16-bit colour
depth
– One available USB socket
Operating system requirements
– Windows 2000 or XP
– DirectX 8.0a or newer
– Media Player 9.0 or newer
Browser requirements
– Internet Explorer version 4.01 or newer
Browser configuration requirements
Select the following preferences in Explorer
Support:
– Download signed ActiveX controls
– Run ActiveX controls
– Script ActiveX controls marked safe for
scripting
– Utilize active scripting
TV tuner card
If you have a TV tuner card, make sure that it
is supported by BeoPort. For continuous
updates on compatible TV tuner cards, refer
to www.beoplayer.com. Note that some TV
tuner cards may necessitate that your PC
meets other hardware requirements than
those listed above. Refer to the tuner card
documentation for this information.
Setting up BeoPort
6
BeoPort can be set up in a variety
of ways with other linkable Bang &
Olufsen products. The example on
this page shows one of many
setup possibilities, as well as the
connections you need to make for
this setup.
OPTION 6
Note that the use of video sources
has limitations in some countries.
Contact your retailer for further
information.
Turn to the next page for details
about connecting BeoPort. All
connections except the USB
connection must be made before
you install the BeoPort software.
BeoPort – in a Bang & Olufsen system setup
Option number setting
For a setup to function, the BeoPort box
and any link products included in the
setup must “know” in what kind of
environment they are placed. To ensure
this, you simply select an Option number
for each product in your setup. You select
the Option number for BeoPort in the
Configuration menu, once you have
finished the installation process. Refer to
Configuration (p. 11).
Regarding ‘Option’ number setting of link
products, refer to the documentation enclosed
with these products.
BeoPort – in a Bang & Olufsen system
setup
The setup shown above is a typical example of a
system setup. In this example the BeoPort box
must be set to Option number 6, which is the
default setting. From your PC in one room, you
can listen to either main room or link room
sources. If you wish, the audio signals can be
distributed to additional link rooms throughout
the house and to the main room. With a
connected IR receiver, you can operate your
system with a Beo4 remote control. To be able
to remote control your sources via BeoPort, your
PC must be turned on.
Additional Options for the BeoPort box
In addition to Option number 6, it is possible to
select Option numbers 0, 2 and 4. Option
number 0 is for a setup where you want to
disable an IR receiver. Option 2 is for a setup
where you want to use your PC as a main room
product. Option 4 is for a setup with link room
products placed in the same room as the main
system. The use for these Options is limited,
but your retailer can be contacted for further
information about Option number selection.
7
Master Link
connection to a
Bang & Olufsen
system
Power Link
connection
IR receiver
connection
IR
Mains
connection
USB
AUDIO
IN
USB connection
POWER LINK
MASTER LINK
Audio connection to the
PC sound card
AUDIO OUT
Master Link connection
A Master Link connection enables you to
distribute signals between your PC and
Bang & Olufsen products throughout your
home.
IR receiver connection
The IR socket is used for connecting an
optional IR receiver to your PC. This enables
you to operate your different sources
directly with a Beo4 remote control.
Power Link connection
The Power Link socket is used for connecting
Power Link speakers to your BeoPort
setup.
Mains connection
Connect attached products, speakers, your
PC and the BeoPort box to the mains. For
safety reasons, always connect the
BeoPort box (and all your PC equipment)
to a grounded wall outlet.
Audio connection
The audio connection between the BeoPort
box and the PC sound card allows for the
transmission of analogue sound from the
PC to your connected products.
USB connection
Connect the BeoPort box to the PC with
the enclosed USB cable.
IMPORTANT! It is crucial that you do not make
the USB connection until you are specifically
prompted to do so on the screen. You do not
have to turn off the PC to connect this cable.
The BeoPort box should be fastened to the
wall or the back of your PC desk/furniture.
Install BeoPort
8
Once you have inserted the BeoPort
CD-rom into your CD-rom drive,
the BeoPort installation menu
appears on the screen.
Select Install BeoPort to initiate the
installation process. During this
process you will be asked to decide
whether you want to make an
installation with a TV tuner card,
or an installation without a TV
tuner card.
Choose the latter, if you either
have a compatible, already
working, TV tuner card installed,
or if you don’t want to be able to
watch TV on your PC screen. You
can always install a TV tuner card
at a later time.
The installation menu also contains
information about system
requirements and compatible TV
tuner cards.
NOTE! In case the installation menu does not
appear automatically when the CD-rom is
inserted, select Run from the start menu and
write X:\InstallGuide.exe in the command line,
substituting the X with the driveletter of your
CD-rom drive.
The Installation process
> Select BeoPort installation from the menu.
> Follow the instructions on the screen
carefully.
> When prompted to install the TV tuner
card, mount the card according to the
instructions supplied with the card.
> Connect the tuner card with the sound
card using the audio cable supplied with
the tuner card.
At the end of the BeoPort installation process
you will be prompted to connect the USB
cable from the BeoPort box to the PCs USB
connector.
> Make the USB connection when
prompted, not before!
When you have installed the software, the
BeoPort Configuration program starts automatically.
It may be necessary to remove an already
mounted graphics card, in which case the
TV tuner card will function as both TV
tuner and graphics card.
This will initiate the installation of the USB
driver for BeoPort.
If you have a previous installation of
BeoPlayer, BeoLink PC Office or BeoLink
PC 2, this software will automatically be
removed to avoid conflicts.
9
To repair or upgrade your
BeoPort installation
Should elements of your BeoPort be
missing, if e.g. files have been deleted, you
can use the installation program to repair
or upgrade your installation.
> Select Run from the start menu and write
X:\installguide.exe in the command line,
substituting the X with the drive letter of
your CD-rom drive.
> In the Installation menu, select Repair/
upgrade your installation.
If the program registers that you already
have BeoPort installed on your PC, you will
enter the BeoPort Maintenance program.
> Select whether you want to repair or
upgrade or remove your current installation.
> Click Next to continue.
> Follow the instructions on the screen to
complete the chosen task.
Configuration of BeoPort
10
Make your settings and
adjustments for BeoPort in the
Configuration menu*.
This chapter tells you what to do,
to be able to watch PC TV,
including how to make the correct
Option number setting.
In addition, the Configuration
menu contains a variety of choices
which, depending on your specific
setup, may be necessary to
consider. Therefore, we urge you
to click through the ‘Configuration
menu’ and refer to the instructions
in the On-Screen Guide for
additional information.
Once you have initially configured
BeoPort, you are prompted to
register, as described on the
opposite page.
Auto-tuning
Before you auto-tune TV channels for your
TV tuner card, make sure that the correct
broadcast system is displayed under ‘Video
System’, that you have indicated whether
your connection is via cable or antenna,
and that the correct country is displayed.
Remember that to receive a transmission,
antenna or cable must be connected directly to
your PC.
From the ‘BeoPort Configuration’ menu…
> Click the Tune tab to be able to tune and
make presets.
> Click AutoTune to start auto-tuning TV
channels.
During the tuning sequence, the located
channels are shown in the display. At any time,
you can stop the tuning and the channels
already found will be stored.
Manual tuning
If you want to tune in a channel manually,
perhaps because it was not found during
auto-tuning, go to the section Manual in
the Tune menu.
> In the section Manual, use the small arrows
to click through the channels.
> When you have found the channel you want
to add, click Add.
On the TV tuner cards, the TV channels you
tune in are registered as program numbers and
channels. Please note that not all TV tuner
cards observe standard channel numbers for
TV channels.
*NOTE! The BeoPort Configuration menu
appears automatically when you install
BeoPort. To access this menu at a later date,
select CONFIG under SETUP on the control bar.
To access the On-Screen Guide, select GUIDE
in the control bar.
The ‘Tune’ tab in the Configuration menu.
The ‘Advanced’ tab in the Configuration menu.
11
Option setting
Registration of BeoPort
It is important that BeoPort is set to the
correct Option, corresponding with your
setup.
Once you have initially configured BeoPort,
you are prompted to register, if you have
access to the Internet at that time.
Although you can use BeoPort without it,
registration is necessary in order to receive
the service provided by CDDB*. Naturally,
Bang & Olufsen handles the information
provided during registration with utmost
confidentiality.
To make an Option number setting…
> Select CONFIG to access the menu.
> Select the Advanced tab to call up Option
settings.
> Select the appropriate Option number from
the list; 0, 2, 4 or 6.
For further information about Option setting,
refer to page 6.
If you have not registered…
A registration form automatically appears on
screen.
> Click New User and fill out the form.
If you have already registered…
> Enter your User Name and E-mail address.
In order to receive CDDB information, your PC
must be connected to the Internet and be online. If you have no Internet access, you are not
prompted to register, but if you obtain Internet
access at a later date, you will be prompted to
register.
*CDDB is a storage and distribution service for
music information. CDDB is a service of
GraceNote, Int. The information you can
receive from the CDDB database, is the ‘tag’
information, which often accompanies your
N.MUSIC tracks, such as artist name and album
title. Be aware that the service will only
function properly if your internet connection is
open while you use BeoPort.
Daily use
12
Once BeoPort is installed, call up
the control bar – your navigator
for all BeoPort functions.
<
PC TV
Starting out
Click on the B&O icon short-cut in your
System tray to start up BeoPort. Move
your mouse cursor to the far right and click
the triangular tab (shown to the right) to
call up the control bar.
>
PC TV
N.MUSIC
PC CD
Click to switch on a source such as PC TV.
If < > appears around a source – as shown to
the left, then click on < or > to reveal additional
sources.
Status display – indicates the current source
and channel, station or track number.
Short-cuts
The B&O icon is inserted automatically in the
System tray, once the BeoPort application is
installed.
Click m or p to step up or down through for
example TV channels, CD tracks etc. Click or
to wind backwards or forwards on a CD or a
tape, or to step from CD to CD.
If you close the application, then start BeoPort
from the BeoPort directory in your Start menu,
or use the B&O icon short-cut in your System
tray.
PHOTO
m
N.RADIO
PC TV
p
The coloured buttons operate functions
specific to the chosen source.
PC TV
GO
GO
Click to resume playback of a paused source.
STOP
STOP
<
r
MUTE
u
Click to pause playback of a source.
>
Click to adjust volume up or down – click MUTE
between r and u to mute the sound, and click
a volume button to restore the sound. Click <
or > to reveal MUTE HP and click this button to
mute your headphones.
SETUP
GUIDE
SETUP
Click to view individual options depending on
the chosen source.
GUIDE
Click to access the On-Screen Guide.
•
Switch to standby – click and hold • for 2 seconds
to switch off all sources. Click • twice to close
the BeoPort control bar and application.
NOTE! The control bar changes appearance
when you switch sources, making the
appropriate options available for the active
source. For further information, refer to the
On-Screen Guide.
Before you can play N.MUSIC
N.MUSIC is the Bang & Olufsen
term for music stored on a PC,
music obtained, for example, from
the Internet or from audio CD’s.
This chapter describes what you
need to do, before you can play
N.MUSIC.
Once you have performed a scan
as shown on this page, simply
refer to ‘Daily use’ for further
information, as well as to the Onscreen Guide for in-depth
instructions.
Scan your PC for tracks
When you select the source N.MUSIC for
the first time, you are prompted to search
your computer for playable tracks*. A scan
must be performed the first time you
want to play N.MUSIC, as well as the first
time a particular drive is used for track
storage.
The SCAN OPTIONS menu appears on the
screen…
> Move the cursor to the input box by a
relevant drive.
> Click once to set a check mark by the drive,
and twice to remove a check mark.
> Click START to begin a scan. Progress is
shown in red below the drive selection box.
> Click STOP to cancel a scan in progress.
> Click HIDE SCAN to conceal the SCAN OPTIONS
menu. Scans in progress will continue until
they are complete.
13
SCAN OPTIONS
Games (C:)
System (D:)
Compact disc (E:)
Work (G:)
START
STOP
HIDE SCAN
When scanning is complete…
> Click N.MUSIC on the control bar to begin
playback of the first track.
If your existing tracks contain ‘tagging’ information,
such as artist names, track and album names,
or genres, this information is stored during a
scan.
*NOTE: Once you have accessed N.MUSIC for
the first time, a hidden update of your available
music on the drives you initially stored on will be
made every time you access N.MUSIC. Therefore,
it is only necessary for you to scan your hard
drive again, if you choose to store music on
another drive.
14
Index
Beo4 remote control
Option
IR receiver in a system setup, 6
What is Option setting?, 6
CDDB
Requirements
CDDB information and registration, 11
Hardware, operating system, browser, and
TV tuner card requirements, 5
Configuration
Registration
Auto-tuning the TV tuner card, 10
Calling up the Configuration menu, 10
Manual tuning of the TV tuner card, 10
Option setting, 6 and 11
Register your BeoPort, 11
Scan
Connections
Scan your PC for tracks, 13
Master Link, Power Link, Audio, USB, IR
receiver, and Mains connection, 7
Setup
Daily use, 12
Locate the Configuration menu, 10
BeoPort in a Bang & Olufsen system setup,
6
Option settings, 6
Placing the BeoPort box, 7
Setup button on the control bar, 12
Driver
Sound adjustment
Driver installation, 8
Mute, 12
Mute Headphones, 12
Control bar
Install
TV tuner card
Driver installation, 8
Installation, 8
Repair or upgrade installation, 9
TV tuner card installation, 8
Configuration of TV tuner card, 10
Tuner card requirements, 5
USB
N.MUSIC
What is N.MUSIC?, 13
Scan your PC for tracks, 13
On-Screen Guide
Call up the Guide on the control bar, 12
USB connection, 7
When to make the USB connection, 8
NOTE: This equipment has been tested and
found to comply with the limits for a class B
digital device, pursuant to part 15 of the FCC
Rules. These limits are designed to provide
reasonable protection against harmful
interference in a residential installation.
This equipment generates, uses and can
radiate radio frequency energy and, if not
installed and used in accordance with the
instructions, may cause harmful interference to
radio communications. However, there is no
guarantee that interference will not occur in a
particular installation. If this equipment does
cause harmful interference to radio or
television reception, which can be determined
by turning the equipment off and on, the user
is encouraged to try to correct the interference
by one or more of the following measures:
– Reorient or relocate the receiving antenna
– Increase the separation between the
equipment and receiver
– Connect the equipment into an outlet on a
circuit different from that to which the
receiver is connected
– Consult the retailer or an experienced radio/
TV technician for help
Waste Electrical and Electronic Equipment
(WEEE) – Environmental protection
The European Parliament and the Council of
the European Union have issued the Waste
Electrical and Electronic Equipment Directive.
The purpose of the Directive is the prevention
of waste of electrical and electronic
equipment, and to promote the reuse and
recycling and other forms of recovery of such
waste. As such the Directive concerns
producers, distributors and consumers.
The WEEE directive requires that both
manufacturers and end-consumers dispose of
electrical and electronic equipment and parts
in an environmentally safe manner, and that
equipment and waste are reused or recovered
for their materials or energy.
Electrical and electronic equipment and parts
must not be disposed of with ordinary
household refuse; all electrical and electronic
equipment and parts must be collected and
disposed of separately.
Products and equipment which must be
collected for reuse, recycling and other forms
of recovery are marked with the pictogram
shown.
This class B digital apparatus meets all
requirements of the Canadian InterferenceCausing Equipment Regulations.
When disposing of electrical and electronic
equipment by use of the collection systems
available in your country, you protect the
environment, human health and contribute to
the prudent and rational use of natural
resources. Collecting electrical and electronic
equipment and waste prevents the potential
contamination of nature with the hazardous
substances which may be present in electrical
and electronic products and equipment.
Your Bang & Olufsen retailer will assist with
and advise you of the correct way of disposal
in your country.
This product fulfils the conditions stated in the
EEU directives 89/336 and 73/23.
Technical specifications, features and the
use thereof are subject to change without
notice.
3508614
0511
Printed in Denmark by Bogtrykkergården a-s, Struer
www.bang-olufsen.com