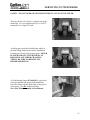
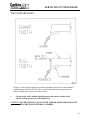
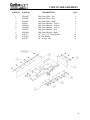
1
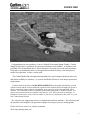
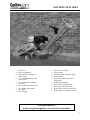
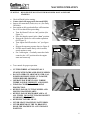
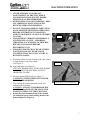
Model 900
Machine Serial #
Engine Model & Spec #
Engine Serial #
Purchase Date
Dealer
Carlton
J.P. Carlton Company
Div. D.A.F. Inc.
121 John Dodd Road
Spartanburg S.C. 29303
Ph. (864) 578-9335
Fax (864) 578-0210
www.stumpcutters.com
____________
____________
____________
____________
____________
DIESEL ENGINE EXHAUST WARNING
CALIFORNIA
Proposition 65 Warning
Diesel engine exhaust and some of its constituents are
known to the State of California to cause cancer, birth
defects, and other reproduction harm.
900
SAFETY ALERT
900
SAFETY ALERT
STUMP GRINDER LIMITED WARRANTY
J.P. Carlton Co. Inc., hereafter referred to as the “Manufacturer”, warrants each new Carlton Grinder to be free of
defects in workmanship and material for a period of one year.
This warranty takes effect upon delivery to the original retail purchaser. The manufacturer, at its option, will replace
or repair, at a point designated by the manufacturer, any parts which appear to have been defective in material or
workmanship. The manufacturer is not responsible for consequential damages.
This warranty will not apply if the grinder is not operated in a manner recommended by the manufacturer. The
following examples would void warranty:
1.
2.
3.
4.
The grinder has been abused.
The machine is involved in or damaged by an accident.
Repairs or attempted repairs were made without prior written authorization.
Including but not limited to repairs made due to normal wear.
The owner is responsible for all regular maintenance as explained in the operators’ manual. Neglect in regular
maintenance or failure to replace normal wear items such as teeth, pockets, lubrication oils, filters, belts, bearings,
etc. may void warranty.
This warranty is expressly in lieu of any other warranties, expressed or implied, including any implied warranty or
merchantability of fitness for a particular purpose and of any non-contractual liabilities including product liabilities
based upon negligence or strict liability. J.P. Carlton Co. Inc. will not be liable for consequential damages resulting
from breach of warranty.
IT IS NECESSARY TO RETURN THE WARRANTY VALIDATION FORM AND NOTIFY J.P. CARLTON
CO. INC. IN WRITING WITHIN TEN (10) DAYS FROM DELIVERY DATE TO VALIDATE THIS
WARRANTY.
NOTE: This warranty applies only to new and unused equipment or parts thereof manufactured by J.P. Carlton Co.
Inc. ANY MACHINES USED FOR LEASE OR RENTAL - WARRANTY IS LIMITED TO 90 DAYS FROM
FIRST DAY OF INITIAL SERVICE.
NOTICE: All power units and associated components are NOT warranted by J.P. Carlton Co. Inc. or their
dealers. It is the customers’ responsibility to return machine to the local engine distributor.
INFORMATION PHONE NUMBERS TO FIND YOUR LOCAL ENGINE & PARTS SERVICE CENTERS:
Honda ............................................ 1-770-497-6400 (GA-Eastern Time Zone)
Kohler Engines.............................. 1-800-544-2444 (Toll Free)
Briggs & Stratton Engines ........... 1-800-233-3723 (Toll Free)
Lombardini ................................... 1-770-623-3554 (GA-Eastern Time Zone)
Deutz Engines................................ 1-800-241-9886 (Toll Free)
John Deere Engines ...................... 1-800-533-6446 (Toll Free)
Caterpillar ..................................... 1-877-636-7658 (Toll Free)
Kubota ........................................... 1-847-955-2500 (IL-Central Time Zone)
Kawasaki Engines......................... 1-616-949-6500 (MI-Eastern Time Zone)
Wisconsin Engines ........................ 1-800-932-2858 (Toll Free)
Onan Engine ................................. 1-800-888-6626 (Toll Free)
In order to process any warranty claims, it is the owners’ responsibility to report claims promptly to us or our
authorized dealer from whom the equipment was purchased. It is necessary to include the following information on
any and all request for warranty:
1.
2.
3.
4.
Dealer from whom purchased
Date of delivery
Serial number of unit
Model number of unit
5.
6.
7.
8.
Engine make and serial number
Length of time in use
Date of failure
Nature of failure
STUMP GRINDER LIMITED WARRANTY
EXPLANATION OF LIMITED WARRANTY
The manufacturer will not reimburse the customer or dealer labor cost incurred for
installing “bolt-on” or “slip-on” items, such as pumps and motors, bearings, belts,
pulleys, etc. The manufacturer will provide replacement parts at no cost to the
customer for defective parts during the warranty period. Defective parts must be
returned to J.P. Carlton Company. It will be the customers’ responsibility to install
the replacement parts unless arrangements are made with the selling dealer.
The manufacturer will not reimburse travel cost to servicing dealer. It is the
customers’ responsibility to deliver machine to dealers’ facility, unless other
arrangements have been agreed to between the selling dealer and the customer.
The manufacturer may elect, at its discretion, to reimburse reasonable labor cost to
customer or dealer for major defect repairs. Prior approval must be obtained from
J.P. Carlton Company Inc.
IMPORTANT NOTICE
1. AIR FILTER MAINTENANCE IS CRITICAL ON STUMP
GRINDING MACHINES. DIRT INGESTION WILL NOT BE
WARRANTED BY THE ENGINE MANUFACTURER OR
J.P. CARLTON COMPANY.
2. OIL AND OIL FILTER MAINTENANCE AND STAYING
WITHIN THE LIMITS OF THE ANGLE OF OPERATION IS
ALSO CRITICAL ON STUMP GRINDING MACHINES.
STARVING THE ENGINE FOR OIL WILL NOT BE
WARRANTED BY THE ENGINE MANUFACTURER OR
J.P. CARLTON COMPANY.
Warranty Validation Form
Congratulations on your purchase of a Carlton Stump Grinder. This product has been designed and manufactured to
provide years of profitable service while minimizing maintenance and downtime. Please take the time now to
complete this warranty validation form. This information is necessary for Carlton to instate your warranty.
Return Form To:
J.P. Carlton Company, Div. D.A.F. Inc.
121 John Dodd Road
Spartanburg, SC 29303
Phone: 1-864-578-9335
Purchaser Information:
Company Name:_______________________ Street Address:_____________________________
City:_________________________ State:__________ Zip Code:__________________________
Telephone:_______________________Contact:________________________________________
Machine Information:
Model Number :_______________________
Serial Number :________________________
Engine Model :________________________
Serial Number :________________________
Dealer Information:
Dealer Name:____________________ Street Address:___________________________
City: _______________________
State:__________
Zip Code:____________________
Contact Name: ____________________
1.
2.
3.
______
______
______
4.
5.
6.
7.
______
______
______
______
8.
______
9. ______
10. ______
11. ______
Customer has been instructed on operation and safety aspects of operating the equipment.
Customer has been advised not to reach into cutter wheel area.
Customer has been advised to stop machine and remove key before performing any type of
maintenance.
Customer has been warned not to operate the machine without the cutter wheel guard in place.
Customer has been furnished with all parts and operators manuals.
Customer has been instructed on equipment maintenance schedules and procedures.
Customer has been advise that the engine or power unit that is used on this machine is warranted
by the engine manufacturer and NOT J.P. Carlton Company. All engine warranty issues should
be addressed to the local engine dealer.
Customer understands the importance of air and oil filter maintenance, and the importance of
staying within the angle of operation of the engine. If either of these is not adhered to, the engine
warranty is VOID.
Customer understands to keep locking collars tight and purge bearings with grease.
All operation and warning decals are properly displayed on equipment.
Customer understands it is his responsibility to train all operators on operator safety.
I have inspected this equipment and find it in good working condition. To the best of my knowledge, the customer
and his personnel are aware of the above procedures.
Date: _______________
Signed: ____________________________________
Dealer Representative
The equipment has been thoroughly checked by the above named dealer representative, and I am
satisfied with his instructions.
Date: ________________
Signed: ___________________________________
Purchaser
TABLE OF CONTENTS
INTRODUCTION
FOREWORD
1
MACHINE FEATURES
2
MACHINE SPECIFICATIONS
3
OPERATION
SAFETY PRECAUTIONS
4
DAILY CHECKLIST
5
MACHINE OPERATION
6
MAINTENANCE
MACHINE MAINTENANCE
9
TROUBLE SHOOTING GUIDE
11
SERVICING CUTTER WHEEL
12
PARTS
CHIP GUARD ASSEMBLY
15
BRAKE ASSEMBLY
16
AXLE ASSEMBLY
17
BELT GUARD ASSEMBLY
18
HARDWARE ASSEMBLY
19
CUTTER WHEEL ASSEMBLY
20
FOREWORD
Congratulations on your purchase of a new Carlton® Professional Stump Grinder! Carlton
Stump Grinders have a reputation for superior performance and reliability. A machine is not
profitable if it's broken-down and we do our absolute best to help you avoid costly downtime.
Each and every machine has been over designed and overbuilt to ensure years and years of
trouble-free operation. In this, we take pride.
The Carlton Model 900 is designed and intended to be used in unique situations where size
and maneuverability are foremost. As a result, the Model 900 has it's own unique operational
requirements.
Read this manual carefully and TAKE RESPONSIBILITY for thoroughly familiarizing yourself
with the controls and the concepts behind the operation of this machine before attempting to operate it.
Slowly experiment with the controls and gradually work yourself up to the full capabilities of this
machine. The Carlton Model 900 is a profitable professional stump grinder. Read this manual. Use
proper safety precautions and use common sense and your "OX" will perform like its namesake. If
getting more work done in a day, with less trouble, is your idea of good business, then you'll love your
new Carlton Stump Grinder!
We welcome your suggestions on how we might better build our machines. We solicit any and
all questions concerning the safe operation or proper servicing of your new stump grinder.
Please feel free to write to us with any comments.
We'll enjoy hearing from you!
1
MACHINE FEATURES
•
•
•
•
•
•
•
•
Gas Power
Heavy construction
Tapered roller bearings on
cutter wheel.
1/2” thick Blanchard ground
cutter wheel
Low maintenance, multiple
drive belt
12 carbide tipped cutter teeth
24” width to clear narrow
fence gates
Axle bearings
•
•
•
•
•
•
•
•
•
•
Safety tie down loops
Epoxy primer
Dupont Imron® protective finish
Premium tires
Heavy duty rubber and metal
chip guards
Replaceable chip flap
Easy engine belt adjustment
Heavy duty industrial clutch
Disk brake to lock pivoting wheel
High capacity air filtration system
We Pride Ourselves
in the strength and quality of each and every machine
2
MACHINE SPECIFICATIONS
Engine..........................................................Honda 9 HP
Weight...........................................................220 lbs.
Length ...........................................................77”
Height............................................................44”
Width.............................................................24”
Cutting Depth
Below Ground...............................................9”
Cutting Height
Above Ground...............................................21”
Number of Teeth
on Cutter Wheel ............................................12
Cutter Wheel
Diameter W/Teeth.........................................12 1/4”
Cutter Wheel
Thickness ......................................................1/2” Blanchard Ground
Fuel Tank Capacity .......................................1.59 Gallons
3
SAFETY PRECAUTIONS
Read and understand this manual as well as the engine manual supplied with your unit
before operation. Be thoroughly familiar with controls and operation of equipment. Know
how to stop unit quickly in case of an emergency.
Understand and follow each Danger, Warning, Caution and Instruction decal installed on
equipment.
NEVER allow children to operate equipment. DO NOT allow adults to operate unit
without proper instructions.
PERSONAL PROTECTION:
Wear face shield and hearing protection
Keep clear of cutter wheel
Keep spectators away
Keep away from moving parts
P/N 0700008
P/N 070000A
•
•
•
•
•
•
•
•
•
•
•
•
•
Read and understand the operations manual thoroughly.
Do not operate around water, gas, power or phone lines. Call
utilities to check.
Avoid fences and other objects (buried junk,
metal, etc.). Be aware of the possibility of
foreign objects imbedded in or around the
stump.
Stand clear of cutter wheel.
Never leave the controls unattended while in operation.
Disengage cutter wheel and let come to a complete stop before
getting near work area (i.e. clearing rocks, chips, etc.).
Stop engine when repairing or adjusting machine or drive belts.
Allow pulleys or other moving parts to cool sufficiently before
touching.
Hot machine parts can cause severe burns.
Do not allow moving machine parts to pinch body parts. Maintain a
safe distance from moving parts while in operation.
Do not run the machine without a complete number of teeth in the
cutter wheel.
Do not touch engine while running or hot (serious burns may result).
Do not refuel engine while hot. Danger of fire or explosion exists.
Never allow bystanders to stand and watch machine in operation
without proper hearing and eye protection.
P/N 0700010
P/N 0700027
4
DAILY CHECKLIST
•
•
•
•
•
•
•
•
Check engine oil at dipstick. Take reading with engine sitting level. Add
recommended oil as required.
Check fuel filter for debris or water.
Check fuel supply before starting engine. DO NOT fill gasoline tank
indoors, when engine is running, or while engine is still hot. Allow engine
to cool several minutes before removing fuel cap. Wipe off any spilled
gasoline before starting engine.
Check condition and tightness of belts. (See Servicing Belts)
Check for any loose, broken or missing cutter teeth and pockets.
Inspect machine for tightness, wear, or leakage. Replace if necessary.
Check air filters & pre-cleaners. Inspect dry air cleaners. Do not blow out
or tap on ground. REPLACE WITH MANUFACTURER
RECOMMENDED AIR FILTER ONLY.
Check condition of tires. Inflate to proper pressure.
Honda Engines
Type
Unleaded gasoline with a pump
octane rating of 86 or higher.
Capacity
GX270: 1.59 US gal
GX390: 1.72 US gal
Type
SAE 10W-30, API SF or SG, for
general use (see engine manual)
Capacity
1.16 US qt
Type
NKG: BPR6ES,
DENSO:W20EPR-U
Gap
0.028-0.031 in (0.70-0.80mm)
(see engine manual)
Idle Speed
1,400 ± 150 rpm
(see engine manual)
Before each
use
Check engine oil level..
Check air filter.
Fuel
Engine Oil
Spark Plug
Carburetor
Maintenance
First 20 hours
Subsequent
Change engine oil.
See engine manual. (page 23)
5
MACHINE OPERATION
STARTING - READ ENGINE MANUFACTURERS OWNERS MANUAL BEFORE
STARTING.
•
•
•
•
Check all fluids before starting.
Cutter wheel will engage with increased RPM.
Inspect all connections, teeth, tires, etc. (See Daily
Checklist).
Start engine at idle speed and allow sufficient time
for oil to circulate before proceeding.
o Turn fuel shut-off valve to “on” position (See
Figure 1).
o Place the throttle control at the “slow” position.
o Engage the Choke for cold weather operation
(See Figure 2).
o Turn engine On/Off switch to “on” (see figure
3).
o Engage the operator presence bar (see figure 4).
o Pull the starter handle firmly with a smooth,
steady motion to start.
o For a cold engine – Gradually return the choke
control to the “off” position after the engine
starts and warms up.
•
Test controls for proper operation.
•
CUTTER WHEEL AUTOMATICALLY
STARTS WITH INCREASED ENGINE SPEED.
DO NOT OPERATE AROUND WATER, GAS,
POWER OR PHONE LINES. IF IN DOUBT,
CHECK BEFORE GRINDING.
OPERATE EQUIPMENT ONLY WHERE
THERE IS GOOD VISIBILITY AND LIGHT.
WEAR FACE SHIELD AND HEARING
PROTECTION.
KEEP CLEAR OF CUTTING WHEEL AND
MOVING MACHINE PARTS.
KEEP CLEAR OF DISCHARGE AREA AT
ALL TIMES. DO NOT PUT HANDS OR FEET
NEAR ROTATING PARTS.
KEEP SPECTATORS AWAY.
NEVER LEAVE MACHINE UNATTENDED.
NEVER DEPEND ON THE TO BRAKE TO
HOLD THE MACHINE IN A STATIONARY
POSITION.
•
•
•
•
•
•
•
•
Figure 2
Figure 1
Figure 3
Figure 4
6
MACHINE OPERATION
•
•
•
•
•
•
•
•
•
•
NEVER ATTEMPT TO MAKE ANY
ADJUSTMENTS TO THE UNIT WHILE
ENGINE IS RUNNING (EXCEPT WHERE
SPECIFICALLY RECOMMENDED).
KEEP ENGINE IN GOOD CONDITION. KEEP
ALL SHIELDS IN PLACE AND SAFETY
DEVICES OPERATING PROPERLY.
DO NOT TOUCH EQUIPMENT PARTS THAT
HAVE MIGHT BE HOT FROM OPERATION.
BEFORE ATTEMPTING TO MAINTAIN,
ADJUST OR SERVICE, ALLOW SUCH PARTS
TO COOL.
IF EQUIPMENT VIBRATES ABNORMALLY,
STOP ENGINE AT ONCE. ABNORMAL
VIBRATION IS A WARNING OF TROUBLE.
REPAIR ANY DAMAGE BEFORE
RESTARTING UNIT.
WEAR EYE PROTECTION. WEAR STURDY
FOOTWEAR. DO NOT WEAR LOOSE
CLOTHING THAT MAY GET CAUGHT IN
ROTATING PARTS.
Position machine in front of stump with cutter wheel
a slight distance away from stump
(see Figure 5).
Apply the brake (see Figure 6).
CAUTION: BRAKE ONLY LOCKS ONE WHEEL
AND ALLOWS THE MACHINE TO PIVOT
FROM SIDE TO SIDE.
Increase engine RPM to full (see Figure 7).
CAUTION: CUTTER WHEEL IS ENGAGED
WITH INCREASED RPM.
Test controls for proper operation, speed, and
unobstructed movement.
CAUTION: ALWAYS STAND BEHIND THE
CONTROL HANDLE; NEVER LEAVE THIS
POSITION WHILE CUTTER IS RUNNING.
Rotate the cutter head back and forth, around
the locked left pivot wheel working down to the
desired depth (see Figure 8).
Figure 5
Figure 6
BRAKE SHOWN IN LOCKED POSITION
7
MACHINE OPERATION
•
•
•
•
•
Unlock the brake, move the machine further
forward, reset the brake, and resume the grinding
process.
Should there be excessive chip build-up shut off
cutter and move out of position and rake away chip
build-up then start to cut again.
Continue in this manner until stump has been
removed.
Reduce engine speed to idle. Turn off motor.
Allow cutter wheel to come to a complete stop
before inspecting.
Figure 7
CUTTER WHEEL WILL ENGAGE WITH
INCREASED RPM.
For optimal performance, the stump should be cut with the portion of the cutter wheel shown.
NEVER UNDERCUT THE STUMP. Undercutting the stump can cause severe kickback,
vibration and component damage. NEVER CUT THE STUMP FROM THE TOP. The cutter
wheel will throw debris up and toward the operator, instead of down and under the machine.
8
MACHINE MAINTENANCE
− Check engine oil at dipstick with engine sitting
level. Add recommended oil and change oil as
required. (See engine owner’s manual.)
− Grease cutter wheel bearings DAILY. These
bearings should be purged using grease DAILY.
Purge until new grease comes out. Use
Texaco® Starplex II grease.
− Grease wheel bearings WEEKLY. These
bearings should be purged using grease
WEEKLY. Purge until new grease comes out.
Use Texaco® Starplex II grease.
− Check v-belt for proper tension by removing
cover.
− Always use Carlton recommended belts. They
are available through your dealer or from the
factory.
9
MACHINE MAINTENANCE
− To adjust V-belt tension, loosen the four bolts
on the engine plate (See Figure 1). Then,
equally adjust engine slide plate bolts to desired
position (See Figure 2).
− Proper tension of drive belt is 5/32” deflection
at center of span between pulleys with 10 lbs. of
pressure applied.
− Too much tension results in excessive wear and
stress on flywheel shaft bearings.
− Belts tend to “seat-in” during the first few hours
of operation. Carlton recommends adjustment
of belt tension after the first two hours of
operation.
− Replace belts when worn or when repeated
adjustments are necessary. Belts should never
get so loose that all of the adjustment capability
is used.
Figure 1
Figure 2
− Check break pads for wear (See Figure 3).
Figure 3
− Check cutter wheel, pockets, and teeth for wear.
If any repair is needed, see “Servicing cutter
wheel” Section for further instruction.
− Make sure all teeth and pockets are tightened.
− Tighten pocket bolts to 150 ft-lbs.
10
TROUBLE SHOOTING GUIDE
COMPLAINT
CAUSE
Engine will not start. (see Engine
Manufacturer Manual for further
information.)
•
•
Belt Squeal.
•
•
Cutter wheel vibration.
Cutter wheel throwing teeth.
Engine switch set to
OFF position.
Operator presence
bar not engaged.
Belt tension too
loose.
Belt out of line.
CORRECTION
•
Turn on.
•
•
Hold handle while
starting.
Tighten.
•
Align Pulleys.
•
•
•
Replace missing teeth.
Always replace pockets in
pairs across from each
other.
Install correctly with like
pairs of teeth directly
across from each other.
Replace pocket.
Clean pocket and replace
missing teeth.
Replace cutter wheel
Use gauge to set teeth
correctly.
Use gauge to set teeth
correctly.
Replace belt.
Replace key.
Replace shaft.
•
Replace fitting
•
•
Tooth missing.
Pocket out of
balance.
•
•
•
Improper tooth
arrangement.
•
•
•
Bad pocket.
Dirt in pocket
•
•
•
•
Worn cutter wheel
Teeth set too far out
of pocket.
Teeth set too far out
of pocket.
Engine belt broke.
Sheared key in shaft.
Broke cutter wheel
shaft.
Grease fitting
clogged.
•
•
Cutter wheel breaking teeth.
•
Cutter wheel stops turning.
•
•
•
Bearing will not take grease.
•
•
11
SERVICING CUTTER WHEEL
SAFETY - DO NOT OPERATE MACHINE WITHOUT A FULL SET OF TEETH.
There are twelve (12) teeth to a complete set on the
model 900. Two (2) straight teeth, five (5) left 25°
teeth and five (5) right 25° teeth.
A locking pin is provided to hold cutter wheel in
position during tooth removal and re-installation.
Locking pin will only lock on outer teeth. NEVER
PLACE HAND ON CUTTER WHEEL TO
HOLD IN PLACE WHILE CHANGING
TEETH. BE SURE TO REMOVE PIN
BEFORE OPERATING.
A Tooth Setting Gauge (P/N 0450111) is provided
with each machine for proper tooth installation.
Line all teeth up with the inside edge of the groove
in the gauge. Set ALL teeth to this edge.
See Cutter Wheel Assembly for breakdown.
12
SERVICING CUTTER WHEEL
TOOTH ARRANGEMENT
•
•
•
Inspect pockets, teeth and bolts for damage
and replace as required.
When replacing pockets, always replace
new pockets across from each other in
order to prevent vibration.
Replacement teeth must be carbide tipped
and of like design as provided with the
machine.
•
•
•
Use anti-seize on threads to prevent bolts
from “freezing up” in cutter wheel.
When replacing complete set of teeth, be
sure to duplicate original factory tooth
arrangement.
Torque bolts to 150 ft/lbs.
Opposing outside pockets carry like arrangements of teeth to cancel vibration.
•
•
Straight teeth are mounted in TWO
•
OPPOSING OUTSIDE POCKETS. A
straight tooth must have a 25° tooth
accompanying it in the same pocket set.
The opposite pocket sets should have this
same combination of straight and 25° teeth,
except with positions reversed. Mounting
these teeth opposite each other on the cutter
wheel cancels damaging vibration.
Mount two left teeth at one o’clock and
seven o’clock and two right teeth at five
o’clock and eleven o’clock according to the
diagram in above picture.
13
SERVICING CUTTER WHEEL
TOOTH SHARPENING
Begin by removing the exposed area of the steel shank shown above with a standard
grinding stone to provide relief for the cut. After the shank has been ground, use a
silicon carbide green stone to dress the carbide.
•
Cut the shank with a standard grinding stone and cut the carbide with a
silicone carbide green stone or diamond rock.
CAUTION: EYE PROTECTION ALONG WITH A FRESH AIR RESPIRATOR MUST
BE WORN WHILE GRINDING CARBIDE.
14
CHIP GUARD ASSEMBLY
ITEM NO
1
2
3
4
5
6
7
8
9
10
11
PART NO
900108E
900108F
900108G
900108
900108A
900108B
900108C
900108D
0150117
0150303
0150207
DESCRIPTION
QTY
Chip Guard Skirt - Left
Chip Guard Skirt - Rear
Chip Guard Skirt - Right
Chip Guard Bracket – Left (a)
Chip Guard Bracket – Left (b)
Chip Guard Bracket – Left (c)
Chip Guard Bracket - Rear
Chip Guard Bracket - Right
3/8”-16 x 1 1/4” Carriage Bolt
3/8” Flat Washer
3/8”-16 Lock Nut
1
1
1
1
1
1
1
1
16
16
16
15
THROTTLE AND BRAKE ASSEMBLY
ITEM NO
PART NO
1
2
3
4
0150510
0150510A
0150511
900111
DESCRIPTION
Brake Lever Assembly
Brake Cable
Brake Caliper Assembly
Throttle Cable
QTY
1
1
1
1
16
AXLE ASSEMBLY
ITEM NO
PART NO
1
2
3
4
5
6
7
8
900100
900101
900107
900104
0550008A
0150231B
0150231A
0150231C
DESCRIPTION
Frame Weldment
Handle Weldment
Axle
Wheel Assembly w/brake
Wheel Assembly
3/4” Flat Washer
Castle Nut 3/4”
Cotter Pin – 1/8”x 1 1/2”
QTY
1
2
1
1
1
2
2
2
17
BELT GUARD ASSEMBLY
ITEM NO
1
2
3
4
5
6
7
8
9
10
11
12
13
PART NO
900112
0150712
0150404
0150303
0150304
0250194
0150118
0400134
0200298
A160T03
0250173
A160T04
900103
DESCRIPTION
V-Belt Guard Cover
7/16” - 20 x 1 1/4”
3/8” Lock Washer
3/8” Flat Washer
1/2” Flat Washer
Clutch
3/8”-16 x 1”
V-Belt
Sheave
1/4” x 1 1/4” Key
Bushing
1/4” x 2” Key
V-Belt Guard Back
QTY
1
1
5
5
1
1
4
1
1
1
1
1
1
18
HARDWARE ASSEMBLY
ITEM NO
PART NO
1
2
3
4
5
6
7
8
9
10
11
12
13
900105
0350011E
0150106
0150304
0150206
0200111
900109
0150207
0150303
900110
0150104
0150605
DESCRIPTION
Safety Shut-Off Bar
Spring
Kill Switch
1/2”-13 x 1 1/4”
1/2” Flat Washer
1/2”-13 Lock Nut
13 HP Honda Engine
Motor Positioning Brace - Front
3/8”-16 Lock Nut
3/8” Flat Washer
Motor Positioning Brace - Rear
3/8”-16 x 2 1/2”
Hitch Pin – 6 1/4”
QTY
4
10
5
2
6
3
3
3
24
6
1
1
19
CUTTER WHEEL ASSEMBLY
ITEM NO
PART NO
DESCRIPTION
QTY
1
2
3
4
5
6
7
8
9
10
11
12
13
14
0150107
0150304
0150206
0500110A
0450107
0450104A
900106
0450104B
0450101
0450108
0450106
–
0150106
900106A
1/2”-13 x 2”
1/2” Flat Washer
1/2”-13 Lock Nut
Pillow Block Bearing – 1 1/4”
Round Pocket - Thd.
Tooth – Left 25°
Cutter Wheel
Tooth – Right 25°
Tooth – Straight
5/8”-18 x 1 3/4”
Round Pocket - C/S
Key
1/2”-13 x 1 3/4”
Cutter Wheel Shaft
4
16
8
2
6
5
1
3
2
12
6
1
4
1
20
STUMP CUTTERS
MODEL
TYPE
ENGINE
HP
FUEL
CUTTING
DEPTH
CUTTING
HEIGHT
CUT
SWING
NO.
TEETH
WHEEL
DIA.
WHEEL
THICKNESS
TONGUE
EXTENSION
WEIGHT
(lbs.)
900H
WalkBehind
Honda
13
Gas
9"
21"
N/A
12
12.25"
.5"
N/A
220
SP2000
WalkBehind
Kohler
27
Gas
24"
27"
N/A
16
19"
.5"
N/A
695
SelfPropelled
Kohler
27
Gas
13"
34"
40" arc
20
21"
1"
30"
1,550
SelfPropelled
BriggsVanguard
35
Gas
13"
34"
40" arc
20
21"
1"
30"
1,650
SelfPropelled
Lombardini
28.7
Diesel
13"
34"
40" arc
20
21"
1"
30"
1,650
SP7015
SelfPropelled
Deutz Turbo
60
Diesel
15"
43"
70" arc
32
26.5"
1"
N/A
3,500
SP7015TRX
TrackMounted
Deutz Turbo
60
Diesel
15"
43"
70" arc
32
26.5"
1"
N/A
4,300
SP8018 TRX
TrackMounted
Deutz Turbo
78
Diesel
18"
43"
80" arc
32
26.5"
1"
N/A
5,420
HURRICANE
RS
TrackMounted
John Deere
Turbo
140
Diesel
25"
53"
360°
48
31"
1.5"
N/A
8,500
TrackMounted
John Deere
Turbo
140
Diesel
25"
72"
360°
64
36"
1.5"
N/A
12,000
TrackMounted
John Deere
Turbo
175
Diesel
25"
72"
360°
64
36"
1.5"
N/A
12,000
TrackMounted
John Deere
Turbo
250
Diesel
25"
72"
360°
64
36"
1.5"
N/A
12,000
3500D
TowBehind
Deutz Turbo
60
Diesel
15"
40"
80" arc
32
26.5"
1"
48"
2,900
7500
TowBehind
Deutz Turbo
78
Diesel
24"
46"
92" arc
48
31"
1.5"
60"
4,400
SP4012
HURRICANE
TRX
Call and ask about Carlton’s line of Disk Style Chippers or visit our website:
www.stumpcutters.com
CARLTON—QUALITY PRODUCTS AND EXCEPTIONAL SERVICE
Carlton Owner’s Manual
900
Revised: 11/07