1
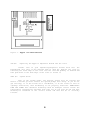
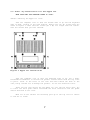
Rocket Chip
Installation Manual and user’s Guide
PRELIMINARY
November, 1988
Bits & Pieces Technology, Inc.
31332 Via Colinas, Suite 112
Westlake Village, California, 91362
Table of Contents
1.0 Introduction
2.0 RocketChip Features
3.0 RocketChip Installation
3.1 For Apple II, II Plus, IIe
3.2 For Apple IIc
4.0 RocketChip Quick Reference and
Operation Guide
5.0 RocketChip Warranty
Page
3
3
3
4
7
10
12
RocketChip is a registered trademark of Bits & Pieces Technology, Inc.
Apple, ProDOS, DOS 3.3 are registered trademarks of Apple Computer, Inc.
Transwarp and Ramfactor are registered trademarks of Applied Engineering,
Inc.
CP/M is a registered trademark of Digital Research, Inc.
2
1.0
Introduction
Bits & Pieces Technology is pleased to introduce you to RocketChip — the
most advanced single—chip accelerator available for the Apple II, II Plus, IIe
and IIc computer marketplace. It does not require cables, slots or a
complicated installation procedure. RocketChip does speed up program execution
from all memory locations (64k or 128k), 1.6 Megabytes of auxiliary memory,
expansion ROMs, and peripheral board ROMS, while retaining normal game
paddle/joystick operation and offering you the choice of normal or unique game
play sounds
2.0
RocketChip Features
*
*
*
*
*
*
*
*
*
3.0
Operates from 5MHz to 50KHz — 5 times faster than normal Apple speed
to 20 times slower than normal Apple speed of lMHz.
Requires very little power - Less than l00mA
Easy to install and does not require a slot.
Standard power—up configuration or can be programmed by the user.
Keyboard selectable special features
Emulation of AE Transwarp speed setting protocol.
Accelerates all memory locations:
*System memory (64k or 128K)
*Auxiliary memory up to 1.6 Megabytes
*Expansion ROMs.
*Peripheral card ROMs.
Accelerates all 80 column operations
Non-standard configurations of the RocketChip registers are retained
until the power is turned off.
RocketChip Installation Procedure
The installation of RocketChip into your Apple computer is an easy
procedure when you follow the steps outlined in this section. If you have an
Apple II, II Plus, or IIe the installation steps are detailed in Section 3.1.
If you have an Apple IIc, the installation requires disassembly of the
computer case, the removal of the 65C02 microprocessor and replacement with
the RocketChip. The Apple IIc installation steps are detailed in Section 3.2.
If you do not feel comfortable disassembling the Apple IIc, please refer to
your dealer for additional assistance.
You will need the following tools to install your RocketChip;
1 IC chip puller tool or a small flatbladed screwdriver
1 Medium Phillips screwdriver - For Apple IIc installation
3
******************************************************************
Warning
Turn OFF the AC power switch on your Apple computer. Leave the AC
power cord connected to the wall outlet and the computer.
Attempting to install RocketChip with the power applied can cause serious
damage to your Apple computer and to RocketChip. Bits & Pieces Technology,
Inc. will not assume responsibility for damage caused by improper installation
or handling.
******************************************************************
3.1 RocketChip Installation for the Apple II, II Plus, and IIe
MAKE SURE THAT THE COMPUTER POWER IS “OFF”
STEP #1: Removing the Apple II Cover
Grasp the back edge of the cover. Lift up on the cover until it releases
and then pull it straight back and lift it off. Set the cover aside.
STEP #2 : Removing Expansion Boards
The easiest way to gain access to the 6502/65C02 microprocessor is to
remove any optional expansion boards that you have installed in slots #2, #3,
#4, and #5. To remove an expansion board, carefully pull up on the board to
free it from the motherboard connector.
STEP #3 : Removing the 6502/65C02 Microprocessor and Installing RocketChip.
Important Note for you to read: Both your original microprocessor and
RocketChip can be damaged by static electricity, 6502/65C02, before touching
the 6502/65C02 or removing RocketChip from the anti—static protective package,
it is necessary for you to GROUND YOURSELF by touching the power supply
housing with your hand to remove any static electricity.
Touch the power Supply housing. The location of the 6502 for the Apple
II, and II Plus is shown in Figure 1. The location of the 6502/65C02 for the
Apple IIe is shown in Figure 2. Use an IC chip puller tool or a small
flatbladed screwdriver to carefully remove the 6502/65C02 from the socket on
the motherboard. To avoid damaging the 6502/65C02, try to work the part
straight out of the socket so that pins do not get bent. If pins do get bent,
they can be carefully straightened with long nose pliers.
Touch
the
power
supply
housing.
Remove the Rocketchip from the
protective package. Look at either Figure 1 (II, II Plus) or Figure 2 (IIe)
and install Rocketchip in the motherboard socket as shown. Before pushing
RocketChip fully into the socket, make sure that Pin #1 is oriented correctly
and that all 40 pins of the RocketChip are properly aligned in the socket and
that they are not bent.
4
Pin #1
RocketChip
Pin 1
Figure 1 -
Apple II, II Plus Motherboard
5
Figure 2 - Apple IIe Motherboard
STEP
#4:
Replacing the Apple II Expansion Boards and the cover.
Install each of your expansion/peripheral boards back into the
motherboard slot that it was removed from in Step #2. Replace the cover by
inserting the front edge of the cover into the case and pushing it forward and
then push down on the back edge of the cover to secure it
STEP #5:
System Check
Turn on the system power. The monitor screen will be cleared and
within 2 seconds you will receive the system prompt and a beep. If you do not
get the beep, or if the screen has a checkboard, or if the screen is full of
“garbage characters", then RocketChip is not properly installed. IMMEDIATELY
TURN THE POWER OFF otherwise RocketChip could be damaged. Please review the
installation instructions and make sure that all of the pins are OK and that
RocketChip is installed in the correct socket and that Pin #1 is correctly
located.
6
3.2 Rocket.~hip Installation for the Apple IIC.
MAKE SURE TEAT THE COMPUTER POWER IS "OFF”
STEP #1: Removing the Apple IIc cover.
Turn the computer over so that the bottom side is up and the keyboard
side is down, resting on the work surface. Remove the six (6) screws that are
shown in Figure 3. Note that two screws (#1 & #2) are larger than the others.
Save the screws that you have removed.
Figure 3
-
Apple IIc Bottom Side
Turn the computer over so that the keyboard side is up. Use a small
flatbladed screwdriver to release the plastic latches which hold the top cover
in place. Start in the front of the case and work toward the back of the
case, being careful not to damage the plastic. Do not use excessive force.
There are two case styles for the Apple IIc. For the two piece case, try
to leave the back plate which surrounds the back connectors and the power
switch attached to the cover.
When all of the latches are released, pull up on the top cover to remove
it and set it aside.
7
STEP #2:
Folding up the keyboard.
Grasp the Apple IIc keyboard assembly and gently lift the front edge
(about 1/4”) and then pull it forward Out of the case (about 1/2”) to release
the tabs on the back of the keyboard from the slots in the disk drive housing.
Do not disconnect the flat cable that connects the keyboard to the computer
motherboard. Gently fold the keyboard up and rest it on the computer as shown
in Figure 4.
STEP #3:
Removing the 65C02 Microprocessor and Installing the Rocketchip.
Important Note for you to read: Both your original microprocessor and
RocketChip can be damaged by static electricity, therefore, before touching
the 65C02 or removing Rocketchip from the anti—static protective package, it
is necessary for you to GROUND YOURSELF by touching the disk drive assembly
with your hand to remove any Static electricity. The location of the disk
drive is shown in Figure 4
Touch the disk drive housing. The location of the 65C02 is shown
in Figure 4. Use an IC chip puller tool or a small flatbLaded screwdriver to
carefully remove the 65002 from the socket on the motherboard. To avoid
damaging the 65C02, try to work the part straight out of the socket so that
pins do not get bent. If pins do get bent, they can be carefully straightened
with long nose pliers.
8
Figure 4 - Apple IIc Motherboard
Touch
the
disk
drive
housing.
Remove the Rocketchip from the
protective package. Look at Figure 4 and install the Rocketchip in the
motherboard socket as shown. Please notice that RocketChip Pin *1 is marked
and that all of the part number markings for devices on the motherboard and
the Rocketchip are readable and oriented the same way. Before pushing
RocketChip fully into the socket, make sure that Pin *1 is oriented correctly
and that all 40 pins of the RocketChip are properly aligned in the socket and
that they are not bent.
STEP #4:
Replacing the Apple IIc Keyboard and Cover.
Gently unfold the keyboard and place it back into position, making sure
that the keyboard tabs are inserted in the slots in the disk drive housing.
Replace the top cover and engage the plastic latches. Turn the computer over
and replace the six bottom screws that you removed in Step #1.
STEP #5:
System Check
Turn on the system power. The monitor screen will be cleared and within 2
seconds you will receive the system prompt and a beep. If you do not get the
beep, or if the screen has a checkboard, or if the screen is full of “garbage
characterS”, then RocketChip is not properly installed. IMMEDIATELY TURN THE
POWER OFF, otherwise RocketChip could be damaged. Please review the
installation instructions and make sure that all of the pins are OK and that
RocketChip is installed in the correct socket and that Pin #1 is correctly
located.
9
4.0
R o c k e t C h i p Quick Reference - Operation Guide
General:
RocketChip powers up in a standard configuration mode with
expansion slots *5 & *6 running at 1MHZ and slots #1, #2, #3, #4 & #7
running at 5MHz. This configuration accommodates most Apple II, II Plus,
and IIe systems with a variety of peripheral expansion boards. The
RocketChip auto identifies the Apple IIc, so that it operates at its
maximum speed potential. The keyboard options offer you a choice of
several feature selections. The use of the configuration software allows
you to make modifications for non-standard installations of expansion
boards or to obtain maximum performance from your system
System Recommendations and Cautions
a)
If your floppy disk drive controller card is not in either slot
*5 or #6, you must use the Configuration Program to set your
floppy disk controller card slot to 1MHz by using APPLE.SLOT7—1.
Your floppy disk must operate at 1MHz or the diskette could be
damaged. If you need to boot from the floppy disk that is not in
slot #5 or *6, hold down the ESCape key during power up.
b) Do not use CACHE.SLOT7-l or CACHE.EXP.ROM7—1 to accelerate an
Apple SCSI, AE ramfactor or any card that bank switches ROMs.
c) AUDIO.MUSIC and AUDIO.HIFI will slow down game play for any game
that produces a lot of sound effects.
d) Any Apple II or II Plus without a paddle/joystick attached will
cold boot every time that CTL—RESET is hit. To delete this
function, use IIPLUS.NOBOOT or install a paddle/joystick and then
CCNTROL—Z will provide a cold boot function for your Apple II or
II Plus.
e) RocketChip must run at 1MHz when using some CP/M cards and cards
that employ DMA. Use the Configuration Program, boot with ESCape,
or CTL-RESET ESCape to set 1MHz
f) Several configuration programs can be combined to make a pre-boot
HELLO or STARTUP file for your unique system configuration if
needed
4.1 Power Up: RocketChip runs at the maximum speed of 5MHz with Apple
II expansion slots #5 & #6 running at 1MHz and slots #1, #2, #3, #4 & #7
running at 5MHz with all available Auxiliary memory being accelerated.
Holding down the ESCape key during Power Up forces the RocketChip to run
at normal Apple speed of 1MHz.
10
4.2 Keyboard
Selectable
Options:
The following modes of operation
are activated whenever the CONTROL and RESET (CTL-RESET) keys are pressed
at the same time and this key sequence is followed by:
ESCape
RETURN
Space Bar
Open-Apple
CONTROL-Z
CONTROL—D
CONTROL-F
RocketChip runs at 1MHz (Normal Apple speed)
RocketChip returns to 5MBz or previously set RocketSpeed
of 50KHz to 5MHz.
RocketChip runs immediately without changing speed.
Cold boot (Key does not need to be held down)
Cold boot for Apple II and II Plus systems.
Deletes 2 second pause after CTL-RESET
Restores 2 second pause after CTL-RESET (Key sequence is:
Hold CONTROL—F then hit RESET for Apple IIe & IIc. For
Apple II & II Plus: CONTROL—RESET F—REPEAT)
4.3
Software
Speed
Selection:
The RocketChip speed can be also be
changed by using software commands in Applesoft BASIC using Applied
Engineering's Transwarp protocol.
To get RocketSpeed(5MHz)
To get Apple speed(lMHz)
Type:
Type:
POKE 49268,0 <RETURN>
POKE 49268,1 <RETURN>
4.4
Configuration
Software:
The configuration disk allows the user
to modify the features of the RocketChip. This disk provides ProDOS files
(Front side) and DOS 3.3 files (Back side) . The configuration set by the
user is retained until the power is turned off. The following files can
be run by typing:
] BRUN Filename <RETURN> in DOS 3.3 [OR]
] -Filename <RETURN> [OR] -Dir/Filename <RETURN> in PrODOS [OR]
] 10 PRINT CHR$(4), “BRUN Filename” <RETURN> in BASIC
Filenames:
SPEED.5MHZ/4MHZ/3MHZ/2MHz/1MHz/500KHz/250KHz/l00KHz/50KHz
AUDIO.NORMAL/SILENT/DisTORTED/MUSIC/HIFI (Selecting MUSIC
or HIFI will slow down the RocketChip and game play)
PAUSE.AT.RESET (Restore 2 second pause after CTL—RESET)
NOPAUSE.RESET (Delete 2 second pause after CTL-RESET)
ROCKET.WAIT (Runs Monitor Wait routine at RocketChip
speed)
TRANSWARP.CMD (AE TRANSWARP protocol enabled)
NOTRANSWARP.CMD (AE TRANSWARP protocol disabled)
STD.LANG.CRD
NONSTD.LANG.CRD (Titan, Saturn, SwyftCard, etc.)
IIPLUS.NOBOOT (CTL—Z & paddle/joystick button (Open—Apple)
ignored after CTL-RESET)
IIPIUS.BOOT (All CTL—RESETS cause cold boot unless a
paddle/joystick is installed)
11
Filenames (Continued)
(1)
(1)
(2)
(2)
(2)
APPLE.SLOT7—1 (Apple speed of 1MHZ for selected slot)
ROCKET.SLOT7—1 (RocketChip speed for selected slot)
CACHE.SLOT7—1 (Accelerate Peripheral card ROM:$Cn00—$CnFF)
CACHE.EXP.ROM7-l (Accelerate Expansion ROM: $C800-$CFFF)
NOCACHE.SLOT7—l (NO ROMS or cannot accelerate slot ROMs)
Notes for PrODOS: (1) Dir = SLOT.SPEEDS (2) Dir = SLOT.CACHING
6.0 R o c k e t C h i p Warranty
6 . 1 . B i t s £ P i e c e s T e c h n o l o g y , I n c . R o c k e t C h i p Warranty
Bits & Pieces Technology, Inc. (hereafter referred to as EPT Inc.)
warrants RocketChip to be free from defects in materials and workmanship for
a period of ONE YEAR from the date of original purchase. BPT Inc., at its
option, will repair or replace a defective part during the warranty period.
BPT Inc. will not assume any responsibility for damage due to improper
installation or handling by the purchaser. BPT Inc. makes no warranties,
either express or implied, regarding the enclosed product, its merchantability
or its fitness for any particular purpose. In no event shall BPT Inc. be
liable for any loss of profits, loss of use of facilities or equipment, or
other indirect, incidental or consequential damages. The exclusion of implied
warranties is not permitted by some states. The above exclusion may not apply
to you. This warranty provides you with specific legal rights. There may be
other rights that you may have which vary from state to state.
If your RocketChip proves to be defective, please contact your local
dealer for a replacement or contact BPT Inc. Any defective product returned to
BPT Inc. must be shipped prepaid and accompanied by a Return Materials
Authorization (RMA) . To obtain a RMA number, please call our Customer Service
Department at: (818) 706—7932 [9am to 5pm PST]
6.2 Apple Computer, Inc. Copyrights and Disclaimer of Warranty
ProDOS and DOS 3.3 are copyrighted programs of Apple Computer, Inc.
licensed to BPT Inc. to distribute for use only in combination with BPT Inc.
Configuration Program. Apple Software shall not be copied onto another
diskette (except for archive purposes) or into memory unless as a part of the
execution of BPT Inc. Configuration Program. When the software has completed
execution, Apple Software shall not be used by any other program
Apple Computer, Inc. makes no warranties, either express or implied,
regarding the enclosed computer software package, its merchantability or its
fitness for any particular purpose. The exclusion of implied warranties is not
permitted by some states. The above exclusion may not apply to you. This
warranty provides you with specific legal rights. There may be other rights
that you may have which vary from state to state.
12
Rocketchip is an accelerator-on-a-chip for the Apple® II, II Plus,
IIe and IIc. Requiring no slot, the 40-pin DIP package replaces
the 6502 or 65C02 microprocessor, consumes less power than existing
accelerator products, accesses expanded memory and lets your Apple II run
up to five times faster.
Compatibility
RocketChip will run virtually all Apple II software, supports all
peripheral hardware, works with any standard hard disk and supports
all standard operating systems including ProDOS™ GEOS™ DOS 3.3™
UCSD Pascal™ and Digital Research CP/M™
BITS & PIECES
T E C H N 0 L 0 G Y, I NC.
31332 Via Colinas
Suite 110
WestlakeVillage, CA 91362
Features/Specifications
Operates at 5 MHz; competitive with IBM®AT,™ faster than
TransWarp™
faster than the Apple® Mac+™ and nearly twice as fast as the IIGS™
RocketChip accelerates program execution in all memory locations
for 64K or 128K.
AUX Memory— more than 1.6 Megabytes accelerated;
any additional memory runs at normal speed.
Apple memory expansion card and compatibles.
Peripheral card ROM.
Low power CMOS technology Typical operating current less
than 100mA.
One simple keystroke allows return to normal Apple operating
speed of 1 MHz
Variable speed from 50 kHz up to 5MHz.
No distortion of program sound effects,
Accelerates all 80 column display operations. Easy to install,
Standard power-up configuration or call he user programmed. The ONLY
accelerator technology that will work in the closed
system Apple IIc.
contents: This package contains one RocketChip, an instruction manual,
and a utility diskette.
Minimums system requirements: Apple II, II+, IIe or IIc with 64K RAM.
RocketChip is a trademark of Bits & Pieces Technology. All other brand and product names are registered trademarks
of their respective holders