1
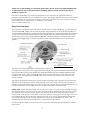
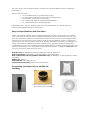
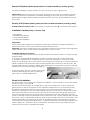
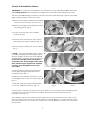
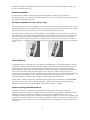
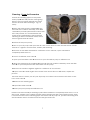
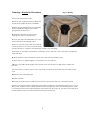
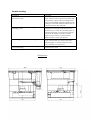
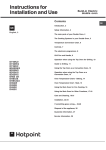
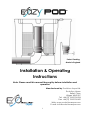
TM
Patent Pending
Made in England
Installation & Operating
Instructions
Note: Please read this manual thoroughly before installation and
operation
Manufactured by Evolution Aqua Ltd.
Evolution House
Kellet Close
Wigan WN5 0LP
Tel: +44 (0) 1942 216554
Fax: +44 (0) 1942 216562
Web: www.evolutionaqua.com
E-mail: [email protected]
1
Thank you for purchasing your new Eazy Pod™ filter. We are sure you will be delighted with
its performance. If you are unsure about anything, please consult your Evolution Aqua
dealer or contact us.
The Eazy Pod filtration unit has been designed on the principles of high performance,
minimum maintenance and a compact foot print. This design delivers optimum water quality
by using Kaldnes K1 media. The concept of the Eazy Pod is based on the world renowned
Nexus Eazy system - please see our website for full details www.evolutionaqua.com
Eazy Pod Overview:
The concept is simple and yet innovative. Water enters via the inlet A (fig. 1) and enters the
outer chamber B, which runs around the entire circumference of the Pod. Between B and
the central chamber C, is a stainless steel perforated screen. These perforations are situated
in the lower half of the screen and around its entire face. This means that when the water
passes from the outer to inner chamber (B to C), a downward flow is created. This causes
many of the larger solids to settle in the base of the outer chamber, due to the force of
gravity.
See page 9 for dimensions
The size of the perforations will not allow large mechanical waste to enter the central
chamber, thus acting as a first stage mechanical filter. The central chamber holds 30 litres of
static K1 media. As the water enters the central chamber, the fine smaller solids become
entrapped in the K1. After passing through the K1 media, the clean water then rises and
overflows into the inner return pipe D of the Pod. From here it returns to the pond via the
return outlet E.
The Eazy Pod filtration system gives water quality and clarity that surpasses all expectations.
The nature and volume of the K1 media means, that when static, apart from being a very
efficient mechanical filter, there is more than enough surface area for beneficial bacteria to
colonise. Therefore on a smaller pond, the Pod is an excellent complete filter.
Please note that in normal running, the K1 has to be static – it is only moved during cleaning
and maintenance. If the K1 is moved in normal operation, whether by air or by hand, all of
the debris it has collected will be returned to the pond! The K1 is cleaned and moved by
connecting an air pump to the airline in the Pod, which in turn goes to an air ring in the base
of chamber C. This has small holes, which cause the K1 to move and therefore clean itself.
During the cleaning cycle, the finer particles escape into chamber B from the K1. This
wastewater can then be dumped via a 1.5 inch/40mm ball valve F.
Please check the table to make sure you run your Pod within the specified limits to achieve
best results
2
The ‘new’ Pod is truly multi-functional. It can be run in several different ways for different
applications.
The Pod can be used:
• as a complete filter on a quarantine system
• as a pre-filter at the front of any new or existing system
• as a polisher at the end of any system
• off a mid water feed to aid mechanical filtration
• on a skimmer line as a mechanical filter
Remember that if you use the Pod solely as a mechanical filter, you will also get an
enhanced biological benefit in your system.
Eazy Pod Specifications and Flow Rates
Follow this manual carefully and your filter will provide a perfect environment for your fish.
One of the factors that can have a significant influence on our ponds is the turn over rate.
This is the time that it takes for the total water volume of the pond to pass through the filter
system once. On Eazy Pod ponds, where is used as the only filtration system, a total pond
volume turn over of every 2 hours is found to be best. Therefore if you have a 10,000 litre koi
pond, a flow rate of 5,000 litres per hour is ideal. On an ornamental pond of 20,000 litres,
10,000 litres per hour is the maximum flow rate and is ideal for that size and type of pond. The
lower the flow rate you use, the better the performance will be - as long as it does not result
in a turn over rate of more than two hours.
Max flow rate: 10,000 litres/hr 2,200 UK gallons/hr 2,640 US gallons/hr
Max koi pond size: 10,000 litres / 2,200 UK gallons / 2,666 US gallons
Max ornamental pond size (goldfish, shubumkins etc): 20,000 litres / 4,400 UK gallons / 5,333
US gallons
Kaldnes K1: 30 litres
Max feed rate: 100-120g per day
Recommended air pump: Airtech 40 or Airtech 40e
On opening your Eazy Pod you will find the
following;
30 ltr Kaldnes K1 Fig.2
4 inch rubber connector Fig.1.1
(Fit narrow end to outlet E)
Cleaning pipe Fig.3
Lid Fig.4
3
Pump Fed Systems (Water pumped into Pod and returned to pond by gravity)
The Eazy Pod filtration system can be set up in two ways, pump or gravity fed.
Please Note: The pump must not be placed on the base of the pond, as failure in the pipe
work or connectors could lead to complete drainage of the pond. The pump should be
raised high enough to leave sufficient water for the fish to survive, in the unlikely event that
this occurs.
Gravity Fed Systems (Water gravity fed into Pod and returned to pond by pump)
Gravity feed users please note, you will have to alter return pipe D…see instructions page 5.
Installation Section (Pump + Gravity Fed)
• Preparation
• Installation Equipment
• Pump Fed Installation
• Gravity Fed Installation
Preparation
A base with level solid ground is required. It should be a minimum of 600mm x 600mm, to
allow easy access to your valves and for maintenance purposes.
Important: The Eazy Pod filter needs to be supported evenly on a level base (a paving flag is
ideal). Failure to do so could cause damage when it is full of water.
Installation Equipment required:
1. Pond Pump. Please ensure that the pumps maximum actual flow rate is no more than the
specified limits.
2. Air Pump for cleaning the Kaldnes K1 media. An Airtech 40 or 40 e is recommended.
3. A length of garden hose or braided pipe (10 mm inner diameter) to connect your air
pump to the air ring in the Pod. Tip: When connecting to your air pump, cut an inch from the
airline supplied on the Pod. Insert this into the hosepipe that connects to the air pump. This
will help maintain the hosepipe’s rigidity when inserting it into the rubber connector and clip
supplied with your air pump (Fig. 5 and Fig. 6).
5. Pipe work from the unit’s waste valves to the
intended discharge point. This can be rigid
pipe work or a simple flexible hose.
Fig. 5
Pump Fed Installation
Fig.6
The Pod comes to you ready for a pump fed installation – all you need to do is fit the rubber
connector (Fig.1.1)to outlet E.
The unit should be situated at a height above the pond water level, to allow adequate
gravity return to the pond (subject to the maximum performance of your chosen pump).
The gravity return pipe work from the exit point of the Pod to the pond needs to be a
minimum of 4 inches (90-115 mm external diameter) and should have no restrictions. Great
care should be taken to ensure that no air locks are created within the gravity return pipe
work. Downward returns with no bends are recommended. The pipe work from the pond
pump to the inlet of the Pod will need to be connected to the 1.5 inch (40mm) slide valve G.
The 4 inch / 90-115 mm (minimum) gravity return pipe work will need to be connected to the
rubber adaptor E on the exit point of the Pod. This fitting when first connected to this pipe
could appear too big (especially 90mm) – it will however reduce with the clip provided and
make a tight seal – this is done with a screwdriver. The return pipe is then extended and
returned to the pond or waterfall as required.
4
Gravity Fed Installation Section
IMPORTANT…For gravity fed installations, you will need to swap pipes D and E for eachother,
(no cutting required) and change the configuration of the inlet, outlet fittings and valves.
The return pipe D although crucial for a pump fed system would impede a gravity unit when
slight fouling of debris occurs in the Pod.
1. Remove the overflow assembly and safely
store the 3 screws which secure it. Fig. 7
2. Remove the stainless steel perforated pipe
by pulling gently. Fig. 8
3. Loosen the upper clip on the rubber
connector Fig. 9
Fig. 7
Fig.8
Fig. 9
Fig.10
Fig. 11
Fig. 12
Fig. 13
Fig 14
4. Invert the Pod and remove the 2 screws
and plastic pipe support bracket Fig. 10
5. Pull the pipe assembly from the Pod body.
Fig. 11
6. NOTE – The return pipe D is part of a pipe
assembly comprising of a 90 degree elbow
and two lengths of pipe. The return pipe D
(as delivered), is longer than the outlet pipe
E. Turn the assembly around 180 degrees
and replace the shorter length as the return
pipe and the longer length as the exit pipe.
You have now swapped E for D over for
each other.
7. The assembly is refitted by pushing the
shorter pipe through the inverted Pod’s
central exit hole. Fig. 11
8. Tighten up the rubber connector to form
a watertight seal, on the now shorter pipe D.
Fig. 12
9. Refit the steel pipe with the perforations
at the top, not at the bottom. Fig. 13
The Pod must be situated at pond water level. That is to say, that when the circulating pump
is switched off, water is level with the overflow assembly. This level will lower when in
operation. (see Fig. 14)
The 2 rubber connectors on the inlet and outlet ports must be swapped over so that on the
inlet you will have the 4 inch (90-115mm) rubber connector E (Fig.1.1) to take your pipe work
from the pond and on the outlet you will have the 1.5 inch (40mm) connector for your return
pressure line.
5
The slide valve G is no longer necessary; however you could reposition it directly after your
pump for maintenance use.
Recommendations:
It is important be able to isolate the Pod for maintenance purposes. Therefore we
recommend that you install an isolating valve (4 inch / 90-115 mm slide or ball valve) on your
inlet gravity line before the Pod.
Air Pump Installation (Pump + Gravity Fed)
Now that you have your Pod installed, you will need to connect your air pump to the Pod for
the cleaning cycle. This will agitate the K1 so that the waste that has collected in the media
can be removed from the system. We recommend an Airtech 40 or 40e.
The air pump is connected to the air ring inlet using a garden hose or braided pipe (10 mm
inner diameter). The air ring inlet is positioned on the outside of the Pod. It is recommended
that the air pump is positioned higher than the water level in the Pod to prevent water
flowing back into the air pump when it is switched off. However, the air valve should be in
the off position, and the air pump switched off or in use elsewhere when not in the cleaning
mode.
air valve off
air valve on
Getting Started
Completely empty your bag of K1 into the inner chamber C. It is essential NEVER to remove
or add any media other than the 30 litres supplied. Cleaning and maintaining the Pod will
depend on flow rate, feed, stocking, blanket weed etc. A Pod on a summer pond with
heavy blanket weed will need more frequent maintenance than a pond in December with
no food fed. Be aware that any movement of the Pod’s K1 whilst the pond pump is in
operation will dislodge the waste collected and will be sent back to the pond and clarity will
suffer. If this does happen, the Pod will eventually remove this waste again in time. The
cleaning regimes for both pump and gravity installations are listed below.
Please Note. A pump fed system will need cleaning when the water level in chamber B/C
has risen and is close to the overflow assembly. A gravity fed system will need cleaning
before the water level in chamber B has lowered by 4 inches / 100mm.
System running and maintenance:
To achieve optimum water quality and clarity we recommend that the Pod be air
backwashed and purged on a regular basis. The frequency of cleaning will depend on the
loading of the pond. However, the filter must be cleaned regularly. In the event of a
blockage, the circulation pump will become starved on a gravity system or the chamber will
overflow on a pump fed system. The overflow assembly (on fig 1) is a built in overflow. Should
a blockage of the K1 media occur, water will bypass the stainless steel screen and return to
the pond.
6
Cleaning - Pump fed Procedure
Fig. 19 Pump
1 Insert the cleaning pipe into the plastic
return pipe D. This will prevent waste going
back to the pond and maintain the water
level in the Pod whilst cleaning it. Fig. 19
Pump
2 When the water level in chamber B is just
level with the overflow assembly, close slide
valve G on your inlet pressure line. Ensure that
this is fully closed, as it is essential that this
water level is maintained to allow efficient
cleaning. If there is insufficient water, the K1
will not agitate and self clean.
3 Switch off the pond pump.
4 Turn on your air pump and open the air valve on the Pod. In a few seconds the K1 media
will start to ‘agitate’ and circulate, thereby self cleaning.
5 After the K1 has been aerated for a minimum of two minutes, open valve F and
completely drain the Pod.
6 Once it is drained, close valve F.
7 Open your inlet slide valve G and turn on your circulation pump to refill the Pod.
8 When the water level in chamber B is just level with the overflow assembly, close the slide
valve G on your inlet pressure line and switch off the pump.
9Allow the K1 media to agitate again for a minimum of two minutes.
10 Open valve F to drain again. If the water in the Pod is still not 100% clean, repeat the
process.
11 Once the K1 is clean, turn off your air pump or re-divert it and close the air valve on the
Pod. Close valve F.
12 Remove the cleaning pipe.
13 Open inlet slide valve G.
14 Start your pond pump and refill the Pod.
Please note that normally 2 cleaning cycles will be needed to completely clean the K1. On a
dirty pond, maybe even 3 will be needed. When doing more than one cleaning cycle, there
is no need to remove the cleaning pipe and switch the air pump off, just leave it running until
the final clean when it is switched off and the pipe removed.
7
Cleaning – Gravity Fed Procedure
Fig. 19 Gravity
1 Stop the circulation pump.
2 Wait a short period of time to allow the
water levels within the Pod to stabilise.
3 Insert the cleaning pipe into the plastic
return pipe D. This will prevent waste
going back to the pond
4 Isolate the pond from the pod by
closing the valve on the inlet line.
5 Close the slide valve G which you have
fitted after your circulating pump.
6 Turn on your air pump and open the air
valve on the Pod. In a few seconds the K1
media will start to ‘agitate’ and circulate, thereby self cleaning.
7 After the K1 has been aerated for a minimum of two minutes, open valve F to completely
drain the Pod.
8 When drained close valve F and open your inlet valve to refill the Pod.
9 Allow the K1 to agitate again for a minimum of two minutes.
10 Open valve F to drain again. If the water in the Pod is still not 100% clean, repeat the
process.
11 Once the K1 is clean, turn off your air pump or re-divert it and close the air valve on the
Pod
12 Remove the cleaning pipe
13 Close valve F
14 Open your inlet valve to refill the pod from the pond and start you circulation pump
Please note that normally 2 cleaning cycles will be needed to completely clean the K1. On a
dirty pond, maybe even 3 will be needed. When doing more than one cleaning cycle, there
is no need to remove the cleaning pipe and switch the air pump off, just leave it running until
the final clean when it is switched off and the pipe removed.
8
Trouble shooting
Problem
Solution
My K1 stays on the surface of the water
and will not sink:
The K1 when brand new traps air and
floats. When it has come into contact with
pond water, it gets a slimy coating which
prevents air bubbles getting caught inside.
Pushing it under the water continuously for
a short period of time will help
The air pump is either not powerful enough
or there isn’t enough water in the Pod –
check that you used the cleaning pipe to
maintain the level on a pump fed system.
Check all air fittings and line for leaks.
Make sure you haven’t inadvertently
added more K1 than the 30 litres
Check that you turned your circulating
pump off and that you have used the
cleaning pipe, so that the dirt in the K1
hasn’t returned to the pond.
Make sure that you haven’t exceeded the
maximum flow rate
The K1 doesn’t move well during the
cleaning cycle
The pond gets dirty after cleaning
Too much maintenance, poor clarity, or
Pod overflowing
Dimensions
9
Register on our website to get a free monthly newsletter on new products and great pond
tips
Distributed by:
Evolution Aqua Ltd
Evolution House, Kellet Close, Wigan, WN5 0LP
United Kingdom.
UK
Sales: +44 (0) 1942 219 898
Technical: +44 (0) 1942 219872
Eazy Pod Guarantee
This product comes with a 2 year warranty, which is valid from date of purchase. Proof of
purchase will be required.
Any unauthorised repairs, modifications or
alterations to this unit will invalidate the
warranty.
Evolution Aqua accepts no responsibility or liability due to accident, improper installation or
misuse. Liability is limited to replacement of the defective parts. This guarantee is not
transferable. It does not affect your statuary rights.
If there is a warranty issue please contact
Evolution Aqua’s Technical Service
department.
Claims for transport damage shall only be recognized if the damage is reported within 24
hours after delivery and confirmed by the carrier.
Evolution Aqua reserve the right to change this product specification without prior notice.
All products designed to ISO 9001 and manufactured to ISO 9000
Patent Information: GB2.293333B; WO/00 61258; PCT/GB01/05533; PCT/GB01/05549; 0750591;
0575314; 5,543,039; 5,458,779; 6126829; 689246; 2119893; 3183406
10