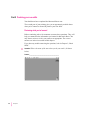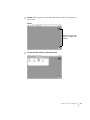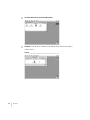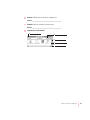
1
PowerBook Getting Started Setup and important health-related information for the PowerBook 150 computer K Apple Computer, Inc. This manual is copyrighted by Apple, with all rights reserved. Under the copyright laws, this manual may not be copied, in whole or in part, without the written consent of Apple. The Apple logo is a trademark of Apple Computer, Inc., registered in the U.S. and other countries. Use of the “keyboard” Apple logo (Option-Shift-K) for commercial purposes without the prior written consent of Apple may constitute trademark infringement and unfair competition in violation of federal and state laws. Every effort has been made to ensure that the information in this manual is accurate. Apple is not responsible for printing or clerical errors. © 1994 Apple Computer, Inc. 1 Infinite Loop Cupertino, CA 95014-6299 (408) 996-1010 Apple, the Apple logo, AppleShare, AppleTalk, LaserWriter, LocalTalk, Macintosh, PowerBook, and StyleWriter are trademarks of Apple Computer, Inc., registered in the U.S. and other countries. AppleColor, Disk First Aid, Finder, and Macintosh PC Exchange are trademarks of Apple Computer, Inc. Adobe, Adobe Illustrator, Adobe Photoshop, and PostScript are trademarks of Adobe Systems Incorporated, which may be registered in certain jurisdictions. Aldus and PageMaker are registered trademarks of Aldus Corporation. Canvas is a trademark of Deneba Software. CompuServe is a registered service mark of CompuServe, Inc. Exposure is a registered trademark of Preferred Publishers, Inc. Helvetica and Times are registered trademarks of Linotype Company. Lotus is a registered trademark of Lotus Development Corporation. Macintosh Basics was developed using VideoWorks Interactive. MacroMind is a registered trademark, and VideoWorks is a trademark, of Macromedia, Inc. (formerly MacroMind, Inc.). MacDraw and MacWrite are registered trademarks, and Claris Resolve is a trademark, of Claris Corporation. Microsoft is a registered trademark, and Windows is a trademark, of Microsoft Corporation. NuBus is a trademark of Texas Instruments. QMS is a registered trademark of QMS, Inc. QuarkXPress is a registered trademark of Quark, Inc. Quattro is a trademark of Borland International, Inc. SuperPaint is a registered trademark of Aldus Corporation. Tektronix is a registered trademark of Tektronix, Inc. Ventura Publisher is a registered trademark of Ventura Software, Inc. WordPerfect is a registered trademark of WordPerfect Corporation. WriteNow is a registered trademark of T/Maker Company. Simultaneously published in the United States and Canada. Mention of third-party products is for informational purposes only and constitutes neither an endorsement nor a recommendation. Apple assumes no responsibility with regard to the performance or use of these products. Contents Communications regulation information vii Preface Corrections to the Macintosh Reference book 1 Setting Up Your PowerBook 1 Step 1 Plug in the power adapter Step 2 Open the display 1 3 Step 3 Turn on the computer What to do next 4 6 Backing up your hard disk 6 Restoring the information on your hard disk Turning your computer off 11 13 Putting your computer to sleep 14 Restarting your computer when it’s already on 2 Learning to Use Your Computer Part 2 Practicing your new skills Answers to the review questions 15 17 Part 1 Starting the Macintosh Basics tour Practice session ix 18 22 26 28 Clues on your screen 36 iii 3 Basic Skills 39 Working with icons 40 Working with windows 42 Working with documents Working with disks 44 46 Organizing your desktop 47 Working with pull-down menus 48 Keyboard shortcuts in the Finder and in directory dialog boxes 4 Health, Safety, and Maintenance Tips Important care and safety instructions Caring for batteries 49 49 51 Health-related information about computer use 5 The Control Strip 52 57 What is the Control Strip? 57 How does the Control Strip differ from control panels? Closing, opening, and resizing the Control Strip Hiding the Control Strip 59 Moving the Control Strip 60 Rearranging the modules in the Control Strip Using the Control Strip 6 Power Management Power sources 60 67 67 Responding to low-power messages Recharging the battery Disposing of dead batteries 73 Replacing the backup battery Reconditioning the battery iv Contents 67 69 Removing or replacing the battery Maximizing work time 58 74 74 75 72 60 58 48 7 Customizing and Traveling With Your PowerBook Customizing your PowerBook 83 Traveling with the PowerBook 91 Storing the PowerBook Service and support 92 92 8 Connecting Other Equipment to Your PowerBook Connecting a printer Connecting SCSI devices 102 106 The trackball 107 108 SCSI devices 108 Disk drives and disks Modems Printers Networks 101 104 The screen Memory 94 96 9 Tips and Troubleshooting Power 93 93 Connecting an external modem The PowerBook 83 109 112 112 114 Application programs 115 Appendix A Using the PowerBook File Assistant What is file synchronization? 117 117 Starting the PowerBook File Assistant 118 Linking files or folders for synchronization Synchronizing linked folders or files Turning off the alert messages 118 123 125 Setting up completely automatic synchronization 126 Contents v Appendix B Exchanging Files With DOS or Windows Macintosh PC Exchange at a glance 127 127 Using DOS-format disks on your Macintosh Opening DOS documents on your Macintosh 128 131 Assigning Macintosh programs to DOS documents Saving documents onto a DOS-format disk Index vi Contents 145 141 132 Communications regulation information FCC statement This equipment has been tested and found to comply with the limits for a Class B digital device in accordance with the specifications in Part 15 of FCC rules. See instructions if interference to radio or television reception is suspected. Radio and television interference The equipment described in this manual generates, uses, and can radiate radio-frequency energy. If it is not installed and used properly—that is, in strict accordance with Apple’s instructions—it may cause interference with radio and television reception. This equipment has been tested and found to comply with the limits for a Class B digital device in accordance with the specifications in Part 15 of FCC rules. These specifications are designed to provide reasonable protection against such interference in a residential installation. However, there is no guarantee that interference will not occur in a particular installation. You can determine whether your computer system is causing interference by turning it off. If the interference stops, it was probably caused by the computer or one of the peripheral devices. If your computer system does cause interference to radio or television reception, try to correct the interference by using one or more of the following measures: m Turn the television or radio antenna until the interference stops. m Move the computer to one side or the other of the television or radio. m Move the computer farther away from the television or radio. m Plug the computer into an outlet that is on a different circuit from the television or radio. (That is, make certain the computer and the television or radio are on circuits controlled by different circuit breakers or fuses.) If necessary, consult an Apple-authorized service provider or Apple. See the service and support information that came with your Apple product. Or, consult an experienced radio/television technician for additional suggestions. You may find the following booklet helpful: Interference Handbook (stock number 004-000-00493-1). This booklet, prepared by the Federal Communications Commission, is available from the U.S. Government Printing Office, Washington, DC 20402. IMPORTANT Changes or modifications to this product not authorized by Apple Computer, Inc., could void the FCC Certification and negate your authority to operate the product. This product was tested for FCC compliance under conditions that included the use of Apple peripheral devices and Apple shielded cables and connectors between system components. It is important that you use Apple peripheral devices and shielded cables and connectors between system components to reduce the possibility of causing interference to radios, television sets, and other electronic devices. You can obtain Apple peripheral devices and the proper shielded cables and connectors through an Apple-authorized dealer. For non-Apple peripheral devices, contact the manufacturer or dealer for assistance. Communications Regulation Information vii DOC statement DOC Class B Compliance This digital apparatus does not exceed the Class B limits for radio noise emissions from digital apparatus as set out in the interference-causing equipment standard entitled “Digital Apparatus,” ICES-003 of the Department of Communications. Observation des normes—Classe B Cet appareil numérique respecte les limites de bruits radioélectriques applicables aux appareils numériques de Classe B prescrites dans la norme sur le matériel brouilleur: “Appareils Numériques”, NMB-003 édictée par le ministre des Communications. VCCI statement viii Communications Regulation Information Corrections to the Macintosh Reference Book This Getting Started manual provides instructions for setting up your PowerBook 150, learning basic Macintosh software skills, and using the many special features of your computer. In addition to this manual, your computer came with a Macintosh Reference book that provides instructions for performing many tasks that are common to all Macintosh and PowerBook computers. Please note the following corrections in the Macintosh Reference book. You may want to mark these corrections on the appropriate pages of that manual for future reference. The Disk Tools and Utilities floppy disks The Macintosh Reference book mentions a floppy disk called Disk Tools in several places. You did not receive this disk with your PowerBook 150. Instead, you received a disk called Utilities. Whenever you are instructed to use the Disk Tools disk, you should substitute the Utilities disk, which includes much the same software as Disk Tools. References to the Disk Tools disk appear on pages 10, 19, 20, and 21 of the Macintosh Reference. ix The Apple HD SC Setup and Internal HD Format utilities The Apple HD SC Setup utility program that comes with many Macintosh and PowerBook computers is not designed for use with the internal hard disk of the PowerBook 150. Instead, your Utilities disk includes a utility program called Internal HD Format, which was designed to work specifically with the hard disk in your PowerBook 150 computer. If you ever need to initialize your internal hard disk, refer to “Disk Drives and Disks” in Chapter 9 of this Getting Started book for instructions on using the Internal HD Format utility. Please disregard the instructions in “Initializing a Hard Disk” on pages 10–11 of the Macintosh Reference book. You cannot use the Internal HD Format program to test a hard disk. Therefore, please disregard the instructions in “Testing a Hard Disk” on page 21 of the Macintosh Reference book. Using a RAM disk The instructions for setting up and using a RAM disk on pages 71–72 of the Macintosh Reference book are slightly incorrect for the PowerBook 150. Please refer instead to the instructions on pages 85–87 of this Getting Started book. Using the Chooser to select a printer The PowerBook 150 has only a printer port, not an external modem port. On page 76 of the Macintosh Reference book, please disregard the instruction to select a port; your printer port will be selected automatically when you open the Chooser. x Corrections to the Macintosh Reference Book Follow the steps in this chapter to set up your PowerBook, back up the contents of your hard disk, and learn about turning your computer on and off. 1 Setting Up Your PowerBook To set up your PowerBook for the first time, you need the power adapter that came with your PowerBook. Step 1 Plug in the power adapter When you plug in the power adapter, the computer’s battery recharges. You should plug in the power adapter now in case the battery has drained during shipping and storage. WARNING Use only a PowerBook power adapter with your PowerBook computer. Adapters for other electronic devices (including other portable computers) may look similar, but they may damage your computer. 1 m Plug the power adapter into a standard electrical outlet or power strip. Then plug the power adapter cable into the power adapter port (marked with the icon ¯) on the back panel of the computer. ¯ Power adapter port 2 Chapter 1 Step 2 Open the display m Slide the latch to the right and lift up the display. m Position the display at a comfortable viewing angle. You can adjust the angle of the display at any time. Setting Up Your PowerBook 3 Step 3 Turn on the computer m Press the Power On button located on the back of the computer to turn on the computer. The Power On button is marked with this icon: P P Power On button You hear a tone when you turn on the computer. It takes the computer a moment to start up. When you see something like this on your screen, the computer is ready to use: Note: Your screen should look very similar to this picture, but it might not look exactly the same. 4 Chapter 1 Problems turning on your computer? m The computer made a sound, but you can’t see anything on the screen. Adjust the brightness control (marked with the icon ¤) and the contrast control (O) until an image appears and the screen is easy to read. O Contrast control ¤ Brightness control m Nothing happened when you pressed the Power On button. Make sure the power adapter is connected to both the computer and a power source. If the power adapter is plugged into a power strip, make sure the power strip is plugged in and turned on. Try pressing the Power On button again. If these suggestions don’t solve the problem, see Chapter 9, “Troubleshooting,” for further help. Setting Up Your PowerBook 5 What to do next m New Macintosh users: If you have never used a Macintosh computer before, turn to Chapter 2 now to learn how to use your PowerBook. After you have completed Chapters 2 and 3, come back to this chapter for instructions on backing up your computer’s hard disk, turning the PowerBook off, and putting the PowerBook to sleep. m New PowerBook users: If you have used other Macintosh computers but are new to the PowerBook, continue with this chapter. Then skim the rest of this book for information about your new PowerBook. m Experienced PowerBook users: Read the rest of this chapter for instructions on backing up your computer’s hard disk. Then skim the rest of this book for information about your new PowerBook. IMPORTANT No matter what your level of experience, be sure to read the safety information in Chapter 4 before beginning your own work. Backing up your hard disk This section describes how to protect the software on your computer’s hard disk. Why back up? Your computer’s hard disk comes with valuable information stored on it, including the system software (which operates the computer) and some application programs. You should make a copy of the information on your hard disk for safekeeping, using the PowerBook 150 Backup program supplied on your hard disk. (The extra copy is called a backup, and the process of making the copy is called backing up.) You should also make a copy of your System Folder. Then if the System Folder on the hard disk becomes damaged, you can quickly restore it from your backup copy. To restore information to your hard disk, use the PowerBook 150 Restore program that came with your computer. See “Restoring the Information on Your Hard Disk” later in this chapter. 6 Chapter 1 What you need Just as you need paper to make copies of important documents, you need floppy disks to copy the information on your hard disk. You can probably buy the floppy disks at the same place you bought your computer. Floppy disks come in a variety of sizes and capacities. The ones you need for backing up your hard disk are called high-density 3.5-inch disks. You can recognize the disks by the way they look: High-density disks have two holes... ...and they have this symbol. Even though these disks have a hard plastic casing, they are called “floppy disks” because the disk inside the casing is floppy. Depending on exactly what was installed on your computer at the factory, the information on your hard disk will fill more than 20 high-density disks. Disks usually come in boxes of 10, so you should have three boxes of disks before starting to follow the backup instructions in this chapter. If you don’t have enough disks, you can skip this section for the moment. But the sooner you make the backup copy, the better. Buy the disks as soon as possible, then return to this section and follow the instructions. For more information on using floppy disks, see “Using Disks” in the Macintosh Reference book. Setting Up Your PowerBook 7 Making the copy To start the PowerBook 150 Backup program, follow these instructions: 1 Turn on your computer. 2 Open the PowerBook 150 Backup program by double-clicking its icon. After a moment, the PowerBook 150 Backup program opens. 8 Chapter 1 3 Make sure your disks are high-density floppy disks. Then click the Continue button. A message appears, telling you how many floppy disks you will need to make your backup copy and about how long it will take. The number of disks and the copying time will vary depending on the contents of your computer’s hard disk. 4 Click the appropriate choice, as follows: m First click the Copy System Folder button, then continue with the instructions in this section. m When you have finished copying the System Folder, click the Copy all Files button and again follow the instructions in this section. m If you start copying and find that you don’t have enough floppy disks for your choice, click Quit. Skip the rest of this section for now, and continue with “Turning Your Computer Off” later in this chapter. Buy floppy disks as soon as you can, then follow the instructions in this section to back up all of your hard disk. Make sure you have enough time and floppy disks to complete the copying. If you stop the copying before it’s finished, you’ll have to start over again from the beginning. Setting Up Your PowerBook 9 5 Insert a high-density floppy disk into the disk drive. Do not use the Utilities floppy disk that came with your computer. Insert metal end first, label side up. 6 Follow the instructions on the screen until a message tells you that you’re finished. Insert a new disk whenever the screen messages tells you to. As you fill each disk, make a note of the name displayed on the screen. The name will disappear as soon as the disk is ejected. Then immediately label the disk so that you know what its contents are later. 7 Follow steps 3–6 again, but this time click the Copy all Files button. 8 When you’re finished, be sure the floppy disks are properly labeled and locked, then store them in a safe, cool place. As time goes by, you will store more information on your computer. You should back up your hard disk at least once a month. (You may want to recycle your backup disks so that you don’t need to buy a new set every time you back up.) 10 Chapter 1 Restoring the information on your hard disk If information on your hard disk is damaged or lost, you can restore it if you have a backup copy of the information. Your PowerBook comes with a program called PowerBook 150 Backup, which you can use to back up the information on your hard disk. Then if you need to, you can use the program called PowerBook 150 Restore, also included with your computer, to put the copied information back on your hard disk. You can also use PowerBook 150 Backup to make a copy of your System Folder (the folder that contains the software the computer uses to operate). If your computer does not start up anymore, replacing the System Folder may solve the problem. You can use PowerBook 150 Restore to replace the damaged System Folder on your hard disk. For instructions on using PowerBook 150 Backup, see “Backing Up Your Hard Disk” earlier in this chapter. IMPORTANT If at any time during restoring you see a message reporting that the hard disk is damaged or unreadable, see “Using Disks” in the Macintosh Reference book. To use PowerBook 150 Restore to restore information to your hard disk, you need the Utilities floppy disk that came with your computer and the floppy disks that you used to back up your hard disk. Follow these steps: 1 Make sure the computer is off. 2 Insert the Utilities disk into the floppy disk drive, then turn on the computer. 3 If necessary, open the Utilities icon by double-clicking it. 4 Open the PowerBook 150 Restore program by double-clicking its icon. Setting Up Your PowerBook 11 In a moment you’ll see this screen: 5 Click the Continue button. 6 Insert your first backup disk. Restoring begins and proceeds automatically. 7 Respond to any messages you see on the screen. If PowerBook 150 Restore finds an item on your hard disk that is newer than an item with the same name on the floppy disk, it asks whether you want the older version of the item to replace the newer version. Click your choice. If you think the item on the hard disk may be damaged, you should replace it. 8 Insert the next disk in your stack of backup disks and repeat step 7. Continue inserting disks until you have gone through all the disks in the stack. Make sure you insert disks in the correct order. The PowerBook 150 Restore program lets you know when you are finished. Return your backup disks to a safe, cool place for storage. 9 Restart your computer, then check to be sure that everything is back on your hard disk. If the computer still doesn’t start up or your hard disk still doesn’t work properly, see “Using Disks” in the Macintosh Reference book. If you are able to repair the disk, then try again to restore the information on your hard disk. 12 Chapter 1 Restoring your System Folder If your computer doesn’t start up anymore, replacing the System Folder may solve the problem. If you used PowerBook 150 Backup to make a backup copy of your System Folder, you can use PowerBook 150 Restore to replace the damaged System Folder on your hard disk with the copy on your backup disks. To restore the System Folder to the hard disk, follow the instructions in this section, using the floppy disks that contain a backup copy of your System Folder. Turning your computer off When the PowerBook is off, the computer is not using any power or doing any work. You should always turn the computer off before attaching other equipment to it or replacing its battery. Also turn it off to conserve power when you won’t be using it for several hours. To turn the computer off: m If the computer is on, choose Shut Down from the Special menu. m If the computer is in sleep, wake it by pressing any key on the keyboard (except Caps Lock), and then choose Shut Down from the Special menu. Setting Up Your PowerBook 13 Putting your computer to sleep When the PowerBook is in sleep, it has a darkened screen and appears to be off, though it is still drawing battery power at a low level. The computer is on, but almost completely inactive. To put your PowerBook to sleep: m Choose Sleep from the Special menu. Automatic sleep If you don’t use the computer for several minutes, it goes to sleep automatically. This conserves battery power. To wake the computer, press any key on the keyboard (except Caps Lock). In a few seconds, the screen will go back to the way it looked before the computer went to sleep. For more information on sleep and automatic sleep, see Chapter 6. 14 Chapter 1 Restarting your computer when it’s already on You need to restart your computer—turn it off and back on again immediately—when you want to make certain changes to your control panels, use a newly installed system software file, or start up the computer from a different disk. To restart your computer: m Choose Restart from the Special menu. When you choose Restart, the computer prompts you to save your work, closes all open programs, and restarts itself. Choosing Restart does not affect any RAM disk you created or its contents. If you can’t choose Restart You may occasionally see a “system error” message on the screen (indicating a temporary software problem). If this happens, you need to restart the computer. In most cases, the error message is accompanied by a Restart button. Use the trackball to click the Restart button. For additional suggestions if you can’t restart using either of these methods, see Chapter 9, “Troubleshooting.” Setting Up Your PowerBook 15 Speaker O Contrast control ¤ Brightness control Trackball Floppy disk drive Elevation feet P Power On button ¯ Power adapter port Q Modem port (optional) Reset switch g SCSI port (HDI-30) [ Printer port Go through the exercises in this chapter to learn how to use your computer. 2 Learning to Use Your Computer Your computer comes with a tutorial that teaches you the basics. The tutorial is divided into two parts: m Part 1 You start the Macintosh Basics tour on your computer. The tour presents the basic skills you need to master. m Part 2 After you complete the Macintosh Basics tour, you return to this chapter to practice what you learned. You also learn some additional skills. If you’ve never used a Macintosh computer before, you should complete both parts of the tutorial. If you’re an experienced Macintosh user, you may want to look over the rest of this book to learn about special features of this computer. Then, as you work with your Macintosh, consult the Macintosh Reference book for answers to questions about the system software that came with your computer. IMPORTANT If you need to turn off your computer at any point before finishing the tutorial, please see “Turning Your Computer Off” in Chapter 1. 17 Part 1 Starting the Macintosh Basics tour Your Macintosh Basics tour is on the hard disk that’s inside your computer. To take the tour, follow the steps in this section. Make sure your computer is turned on. If the screen is dark, try adjusting the screen (see “Problems Turning On Your Computer?” in Chapter 1) until you see words and small pictures on your screen. 1 Roll the trackball to move the arrow pointer (8) around on the screen. Place your index finger on the trackball and your thumb on the lower trackball button. Don’t press either button yet. Roll the trackball, watching the arrow on the screen. Notice that the arrow moves in the same direction as you roll the trackball. You may need to roll the trackball around for a few seconds to “break in” the mechanism so it works smoothly. 18 Chapter 2 2 Roll the trackball so that the tip of the arrow is on the picture labeled “Macintosh HD.” Make sure the tip of the arrow is over the picture, not over the words “Macintosh HD.” Note: Your screen should look similar to the one below, but may not look exactly the same. Move the arrow so that it is on top of this picture. 3 Being careful not to roll the trackball, press the button twice in quick succession. (This is called “double-clicking.”) Now your screen should look like the illustration following step 4. The items in that illustration may not exactly match those on your screen. The only item you need right now is the Macintosh Basics folder. If the screen doesn’t look right, try steps 2 and 3 again, paying special attention to the following: m Make sure the tip of the arrow is touching the picture, not the words beneath it. m Be sure to press the trackball button twice. m Press twice quickly and be careful not to roll the trackball while you press. Learning to Use Your Computer 19 4 Move the arrow so that it is on top of this picture. 5 Roll the trackball to place the tip of the arrow on the picture of the folder labeled “Macintosh Basics.” You may see other items on the screen. Your screen should look similar, but may not look exactly the same. Being careful not to roll the trackball, press the button twice in quick succession. Now your screen should look like the following illustration: 20 Chapter 2 6 Roll the trackball so that the arrow is on the picture of the man labeled “Macintosh Basics.” Move the arrow so that it is on top of this picture. 7 Press the trackball button twice in quick succession. Now your screen should look like the following picture: If you don’t see this screen, try again, paying special attention to the following: m Make sure the tip of the arrow is touching the picture, not the words beneath it. m Be sure to press the trackball button twice. m Press twice quickly and be careful not to roll the trackball while you press. 8 Follow the instructions on the screen and work through the tour. When you finish the tour, continue with the rest of this chapter. Learning to Use Your Computer 21 Part 2 Practicing your new skills You should now have completed the Macintosh Basics tour. The second part of your training gives you an opportunity to think about what you’ve learned so far and to practice your new skills. Reviewing what you’ve learned Before continuing, take a few moments to answer these questions. They will help you summarize the information you learned in Macintosh Basics. You may want to write (or circle) your answers as appropriate. The correct answers are in the next section of this chapter. If you have any trouble answering the questions, look in Chapter 3, “Basic Skills.” Question: What is the name of the area where you do your work? (It’s shown below.) Answer:____________________________________________ 22 Chapter 2 Question: What are pictures on the Macintosh desktop called? Two examples are shown below. Answer:____________________________________________ What is the name for these pictures on the Macintosh desktop? Circle the hard disk window in the illustration below. Learning to Use Your Computer 23 Circle the hard disk icon in the illustration below. Question: Circle the active window on the desktop below. How do you make a window active? Answer:____________________________________________ 24 Chapter 2 Question: Which menu is the Save command in? Answer:____________________________________________ Question: How do you throw an item away? Answer:____________________________________________ Label the parts of this window. A. B. C. D. E. Learning to Use Your Computer 25 Answers to the review questions These are the answers to the review questions that you completed earlier. Question: What is the area called where you do all your work? Answer: the desktop Question: What are pictures called on the Macintosh desktop? Answer: icons Circle the hard disk window in the illustration below. Circle the hard disk icon in the illustration below. 26 Chapter 2 Question: Circle the active window shown on the desktop below. How do you make a window active? Answer: by clicking anywhere inside it Question: Which menu is the Save command in? Answer: the File menu Question: How do you throw an item away? Answer: by dragging it to the Trash Label the parts of this window. A. the close box B. the title bar C. a scroll arrow D. the scroll bar E. the size box Learning to Use Your Computer 27 Practice session Now you can practice what you learned in Macintosh Basics. You’ll be practicing your skills using real programs that came with your computer, rather than the sample ones in Macintosh Basics. IMPORTANT If you get lost at any point during the practice session, or if something unexpected happens, turn to “Clues on Your Screen” later in this chapter. These clues will help you get back on track. Creating a new document 1 Open the hard disk icon and then open the SimpleText program, as shown below. 1 Double-click the hard disk icon to open it. 2 If a window with the name of your hard disk doesn’t appear, click the disk icon again twice. 3 To open the SimpleText program, double-click the SimpleText icon. When the SimpleText program opens, a window appears with “Untitled 1” in the title bar. This is your blank document. 28 Chapter 2 2 Use the keyboard to type a few lines of text into the blank document. Type text in the blank document. It doesn’t matter what you type. If you make an error, press the Delete key to backspace over the incorrect letters, then retype. 3 Open the File menu and choose the Save command to save your new document. When you save a document, you are storing it on the hard disk. You need to save every document you create. If you don’t save it, the document is lost when you turn off the computer. Choose Save from the File menu. A box like the one in the next step appears, with “Untitled 1” near the bottom. This box lets you name and save your document. Learning to Use Your Computer 29 4 Don’t click anywhere. Just type the name “Practice File.” Then click the button labeled Save. Type the name of your document to replace “Untitled 1.” The name you type should replace “Untitled 1” in the box. If it doesn’t, place the pointer to the left of the U in “Untitled 1,” then press the trackball button and drag across the word. When “Untitled 1” is highlighted (the text is surrounded with a black box), type the new name. Click Save to save your Practice File on the hard disk. After you click Save, a copy of your document is stored on the hard disk in your computer. The new name appears in the title bar of the document. The name of your document appears in the title bar. 30 Chapter 2 5 Open the File menu and choose Quit to quit the SimpleText program. Choose Quit from the File menu to quit your program. The SimpleText program closes, along with your document. 6 Check for the file you saved in the hard disk window. You should see the icon for the document you saved in the hard disk window. If your Practice File icon doesn’t appear, it may be in a hidden part of the window. You can scroll through the window to find the icon if you need to. Here’s the new file you just created. If you don’t see your document, click the arrows to scroll through the window. That’s the end of the first exercise. You may want to take a break before you continue. Learning to Use Your Computer 31 Storing your work inside a folder You can organize your work on the Macintosh by creating folders and storing your documents inside them. 1 Open the File menu and choose New Folder. A folder icon named “untitled folder” appears in the active window on the desktop. A new folder icon appears in the hard disk window. 2 Without clicking anywhere, type “My Work” to name the folder. Notice that the words “untitled folder” are highlighted and boxed. That means the name you type will replace these words. The new name of your folder appears here. 32 Chapter 2 3 Drag the Practice File into the folder named “My Work.” Move the pointer to the Practice File. Then press and hold down the button while you drag the Practice File to the folder named “My Work.” When the tip of the pointer is on the folder icon and the folder becomes highlighted, release the button. Move the pointer to this icon. Then press and hold down the button while you move this icon to the folder named “My Work.” 4 Open the folder named “My Work.” You open a folder the same way you open any icon: double-click it, or click it and choose Open from the File menu. The “My Work” folder window opens, and you can see your Practice File. You have now completed the second practice exercise. You may want to take a break before continuing. Learning to Use Your Computer 33 Throwing an item away As you work, you will want to remove items you no longer need from the hard disk. You remove items by throwing them into the Trash. In this exercise, you will throw the Practice File into the Trash. 1 If the Macintosh HD window is not already open, open it by double-clicking the Macintosh HD icon. 2 If the folder named “My Work” is not already open, open it. Note: If you can’t see the Trash icon (which should be in the lower-right corner of your screen), move the windows so that the Trash icon is visible. To move a window, place the pointer in the window’s title bar (the stripes at the top of the window), and drag the window. 3 Drag the Practice File to the Trash icon. Place the pointer on the Practice File icon. Press and hold down the button as you move the pointer to the Trash icon. When the tip of the pointer is on the Trash icon and the Trash icon becomes highlighted, release the button. When you place an icon in the Trash, it is not immediately removed from your disk. The Trash icon bulges to show you that the Practice File is in the Trash, but still on your disk. 34 Chapter 2 4 Open the Trash icon (by double-clicking it) to see your Practice File there. Your Practice File is in the Trash. 5 Open the Special menu and choose Empty Trash. A dialog box appears. The computer displays a dialog box when it asks you to confirm an action. You must click OK or another button in the dialog box before you can take any other action. 6 Click OK. The Trash is emptied and the Trash icon returns to normal. The Empty Trash command permanently removes from your disk anything that is in the Trash. Always be sure that you know what you’re removing before you choose Empty Trash. Note: You can get an item back from the Trash by moving its icon back to your disk before you choose Empty Trash from the Special menu. After you choose Empty Trash, you can’t recover items you’ve thrown away. You have completed all of the practice exercises. Before you continue with your own work, you might want to skim Chapter 3, “Basic Skills,” for a summary of basic skills that you’ll need as you work. Learning to Use Your Computer 35 What’s next? The best way to get experience working with your computer is to begin to do your own work. You may have already purchased application programs to work with. Be sure to read the manuals that came with these programs for information on how to install them. You also have programs that came already installed on your computer. See the manuals that came with your computer for help on using these programs. Clues on your screen As you work, check the screen frequently for these important clues about where you are. If you are lost or if something unexpected happens, ask yourself these questions: Is this the right program? Check the menu bar. If it looks like this example, you are in the Finder. If any of these menu names are different or missing, you are inside another program. To get back to the Finder, click anywhere on the desktop pattern. The Finder menu bar 36 Chapter 2 Is the correct window active? Usually only the active window is affected when you type or use a menu. The active window has stripes in its title bar. To make a window active, click anywhere inside it. Is the icon or text you want to work with selected? Commands you choose in menus often work only if an icon or some text is selected. Check the item you want to work with to make sure it’s highlighted (which means it’s selected). Is it best to start over? If you get stuck or lost as you practice on the computer, try one or more of the following remedies and then start the practice session over again: m If an unwanted or confusing window is on your screen, click the Close box in the upper-left corner of the window to close it. m If an unwanted window or box contains a Cancel button, click it. m If the File menu contains the word Quit, choose it. m If you’re really stuck, restart your computer. To restart, click the desktop (the background pattern on your screen), and then choose Restart from the Special menu. This turns the computer off and then back on. When you restart a computer, problems often clear up. Learning to Use Your Computer 37 Refer to this chapter for information on basic Macintosh skills. 3 Basic Skills This section provides information on the following basic skills: m working with icons m working with windows m working with documents m working with disks m organizing your desktop m working with menus m keyboard shortcuts in the Finder and in directory dialog boxes 39 Working with icons An icon is a picture that represents something else. This icon represents the hard disk. These icons represent folders, programs, and documents that are stored on the hard disk. This icon represents the Trash. Selecting icons To do this Follow these steps Select the icon Click the item. Deselect an icon Click anywhere except the selected icon. Select multiple icons While holding down the Shift key, click each icon. Deselect an icon in a group of selected icons While holding down the Shift key, click the icon. Select multiple icons 1. Place the pointer at one corner of a group of icons. that are near each other 2. Drag diagonally to select the icons, then release the button. Select a list or partial list of icons 40 Chapter 3 1. Place the pointer to the left of the top icon or the bottom icon. 2. Drag up or down the list, releasing the button when the items are selected. Copying icons To do this Follow these steps Copy an icon onto another disk Drag the icon to the icon of the other disk or to a folder icon or a window that belongs to that disk. Copy an icon on the same disk 1. Click the icon to select it. 2. Choose Duplicate from the File menu, or press x-D. 3. If you wish, rename the new icon and drag it to a new location. You can also make a copy by holding down the Option key while you drag the icon to another folder or window. Opening icons To do this Follow these steps Open an icon (disk, folder, etc.) 1. Click the icon. 2. Choose the Open command from the File menu. Or double-click (click twice quickly) on the icon. Moving icons To do this Follow these steps Move an icon on a disk Drag the item to the location you want. Naming icons To do this Follow these steps Select text in an icon’s name Click the icon name (not the icon itself). Rename an icon 1. Select the text under the icon. 2. Type the new name. 3. Press the Return key. Basic Skills 41 Removing items from the disk and retrieving them from the Trash To do this Follow these steps Erase or remove an item from a disk 1. Drag the icon to the Trash. 2. Choose Empty Trash from the Special menu. Retrieve an item from the Trash 1. Open the Trash icon. 2. Before you choose Empty Trash from the Special Menu, drag the icon out of the Trash (and into the disk or folder window where you want to store it). Or, choose Put Away from the File menu to return the icon to its original place on a disk. Working with windows A window opens when you double-click an icon. A window usually shows you what’s inside an icon. Click the close box to close a window. Click the zoom box to resize a window. Click the scroll arrows to view contents that you cannot see. This is a window showing you what’s on the hard disk named “Macintosh HD.” 42 Chapter 3 Drag the size box to enlarge or reduce the window. Move the scroll box up or down to view the contents of a window that you can’t see. The gray in the scroll bar indicates that there are contents of the window that you cannot see. Viewing the contents of a window To do this Follow these steps View the contents of a window by name, date, size, or kind 1. Open the View menu. 2. Choose the menu item that corresponds to the way you want to view the contents of the window. View the contents of the window in outline form 1. Choose any list view from the View menu (any view except the icon and small icon views). 2. Click the triangle next to a folder name to display or hide the contents of the folder. Making a window active To do this Follow these steps Make a window active Click anywhere inside the window or double-click its icon. Opening higher level folders or disks 1 Hold down the x (Command) key as you press the title of the active window. 2 Drag to choose a higher-level folder (or disk) and then release the button. Basic Skills 43 Working with documents Opening and closing a document To do this Follow these steps Open a document 1. Click the icon for the document. 2. Choose the Open command from the File menu. Or double-click (click twice rapidly) on the icon. Close a document Choose Close from the File menu. Or click the close box of the document window. Opening a document from within a program To do this Follow these steps Open a document when you are working in an open program 1. Choose Open from the File menu. 2. Click the name of the document. (The illustration shows how to find a folder that you might not see.) 3. Click the Open button. Press this label to open a pop-up menu of folders and disks. The documents in the disk or folder you choose are listed here. 44 Chapter 3 Saving and naming documents To do this Follow these steps Save and name a document for the first time 1. Choose the Save command from the File menu. 2. Type a name for the document. 3. Click the Save button. Save the document under another name 1. Choose the Save As command from the File menu. 2. Type a new name for the document. 3. Click the Save button. Choosing a folder when saving a document To do this Follow these steps Save a document in a specific folder while working in a program 1. Choose Save or Save As from the File menu. 2. Click the name of the folder you want to save your document in. (The illustration shows how to find a folder that you might not see.) 3. Click Open to open the folder. 4. Name your document. 5. Click the Save button to save the document inside the folder. Press this label to open a pop-up menu of folders and disks. The documents in the disk or folder you choose are listed here. Basic Skills 45 Working with disks Preparing a new floppy disk for use See “Using Disks” in the Macintosh Reference manual. Ejecting a floppy disk To do this Follow these steps Eject a floppy disk Drag the disk’s icon to the Trash. Copying the contents of a disk 46 Chapter 3 To do this Follow these steps Copy the entire contents of one floppy disk onto another floppy disk (with one disk drive) 1. Insert the original floppy disk into the floppy disk drive. 2. Drag the floppy disk icon to the hard disk icon. (The floppy disk contents appear in a folder of the same name on the hard disk.) 3. Drag the floppy disk icon to the Trash. 4. Insert the floppy disk that you want to copy to. 5. Drag the icon of the newly created folder to the floppy disk icon. 6. Drag the floppy disk icon to the Trash. Copy an entire floppy disk onto a hard disk Drag the icon of the floppy disk to the icon for the hard disk. (The floppy disk contents appear in a folder of the same name on the hard disk.) Copy items from a hard disk onto a floppy disk 1. Select the items you want to copy. 2. Drag the selected icons to the floppy disk’s icon or window. Copy items from a floppy disk onto a hard disk 1. Select the items you want to copy. 2. Drag the selected icons to the hard disk’s icon or window. Erasing the contents of a disk To do this Follow these steps Erase the entire 1. Insert the disk you want to erase into a disk drive. contents of a floppy disk 2. Click the icon of the disk you want to erase. 3. Choose Erase Disk from the Special menu. 4. Respond to the messages on your screen by clicking the appropriate buttons. Organizing your desktop Creating a new folder To do this Follow these steps Create a new folder 1. Choose New Folder from the File menu. 2. Type a name for the folder. 3. Press the Return key. Placing an icon inside a folder To do this Follow these steps Place an icon inside a folder 1. Drag the icon to the folder where you want to store it. 2. Release the button when the folder icon becomes highlighted. Basic Skills 47 Working with pull-down menus To choose an item from a menu: 1 Point to the menu. 2 Press to pull down the menu. 3 Drag to the item you want to choose. 4 Release the button when the command is highlighted. This is the Help menu, which you use to display information about items on the screen. This is the Application menu, which you use to see which programs are open. Dimmed commands are not available. Keyboard shortcuts in the Finder and in directory dialog boxes Key Action Up, Down, Left, or Right Arrow key Selects the next item in the direction of the arrow Tab key Selects the next item alphabetically (except in a directory dialog box and the Chooser) Character key (a, b, c...) Selects the first item whose name begins with that character (or the character following closest to it in the alphabet) x–Down Arrow Opens the selected icon x–Option–Down Arrow Opens the selected icon and closes the current folder x–Up Arrow Opens the folder that contains the current folder x–Option–Up Arrow Opens the folder that contains the current folder and closes the current folder Return or Enter In a dialog box: the same as clicking the button with the bold outline In the Finder: selects the selected icon’s name for editing or saves the edited name 48 Chapter 3 Refer to this chapter for important health-related information and safety tips. 4 Health, Safety, and Maintenance Tips Important care and safety instructions For your own safety and that of your equipment, read and follow all the instructions in this section. Keep these instructions available for reference by you and others. Warning m Electrical equipment may be hazardous if misused. Operation of this product, or similar products, must always be supervised by an adult. Do not allow children access to the interior of any electrical product and do not permit them to handle any cables. m Do not use the computer in or near water. m Do not use cables that are frayed or otherwise damaged. Hold a cable by its connector (the plug, not the cord) when connecting or disconnecting it. m Always handle batteries carefully. m Do not drop, puncture, mutilate, or burn the computer or battery. m Recharge batteries only as described in this manual and only in ventilated areas. m Transport batteries either inside the computer or in the protective case provided with each battery. Do not transport unprotected batteries. m Do not short-circuit the battery terminals (that is, do not allow a metal object such as a paper clip or key chain to touch the terminals). Doing so may cause an explosion or a fire. 49 Caution m If you have a problem with your computer and nothing in the computer manuals solves the problem, take the computer to your Apple-authorized dealer or service provider. Attempting to repair the computer yourself may void the limited warranty. m Do not move the computer when you can hear its hard disk spinning. When you put the computer to sleep, wait until the screen is blank before moving the computer. m Use only the power adapter supplied with your computer. Adapters designed for other electronic devices may look similar, but they may not work with your equipment and may damage the computer. m Never force a connector into a port. Make sure that the connector matches the port and that it’s right side up. If the connector and port do not join easily, they do not match. m Do not use the computer in wet or dusty environments. m Keep dirt and liquids away from the ports on the back panel, the keyboard, and the trackball. If you spill any food or liquid onto the computer, shut it down immediately and unplug it before cleaning up the spill. Depending on what you spilled and how much got into the computer, you may have to bring the computer to an Apple-authorized service provider for cleaning. m Do not touch the screen with any sharp or pointed objects. m Use only the battery supplied with your computer. Batteries designed for other portable computers may look similar, but they may not work with your computer and may damage it. m When recharging the battery, use only the power adapter supplied with your computer. Adapters designed for other electronic devices may not work with your equipment and may damage the computer or the recharger. 50 Chapter 4 Important m If the computer has been in a cold place for several hours, let it warm up to room temperature before you use it. m Use the computer only in environments where the temperature range is between 50°F/10°C and 104°F/40°C. m Do not expose the computer to very low (less than –13°F/–25°C) or very high (more than 140°F/60°C) temperatures. m Clean the computer’s outside surfaces with a damp (not wet) cloth. Clean the screen with soft, lint-free paper or cloth and a mild glass cleaner. Do not spray the glass cleaner directly onto the screen. Caring for batteries m Always handle batteries carefully. m Do not short-circuit the battery terminals (that is, do not touch both terminals with a metal object). Doing so may cause an explosion or a fire. m Do not drop, puncture, disassemble, mutilate, or incinerate the battery. m Recharge batteries only as described in this manual and only in ventilated areas. m Do not leave batteries in hot locations (such as the trunk of a car) for more than a day or two. m Do not leave a battery in your computer for longer than a week without plugging in the power adapter. m Do not leave a battery in storage for longer than 6 months without recharging it. m Take dead batteries to an Apple-authorized service provider for recycling or proper disposal. The batteries contain hazardous chemicals and should not be thrown out with household or office trash. Health, Safety, and Maintenance Tips 51 Health-related information about computer use Muscle soreness, eye fatigue, and other discomforts and injuries sometimes associated with using computers can occur from performing any number of activities. In fact, misuse of the same muscles during multiple activities can create a problem that might not otherwise exist. For example, if you engage in nonwork activities that involve repetitive stress on the wrist—such as bicycling—and also use your computer’s keyboard improperly, you may increase your likelihood of developing wrist problems. Some individuals are at greater risk of developing these problems because of their health, physiology, lifestyle, and general exposure to stress. Work organization and conditions, such as workstation setup and lighting, also play a part in your overall health and comfort. Preventing health problems is a multifaceted task that requires careful attention to the way you use your body every hour of every day. The most common health effects associated with using a computer are musculoskeletal discomfort and eye fatigue. We’ll discuss each area of concern below. Musculoskeletal discomfort As with any activity that involves sitting for long periods of time, using a computer can make your muscles sore and stiff. To minimize these effects, set up your work environment carefully, using the guidelines that follow, and take frequent breaks to rest tired muscles. To make working with your computer more comfortable, allow enough space in your work area so that you can change position frequently and maintain a relaxed posture. Another type of musculoskeletal concern is repetitive stress injuries (RSIs), also known as cumulative trauma disorders (CTDs). These problems can occur when a certain muscle or tendon is repeatedly overused and forced into an unnatural position. The exact causes of RSIs are not totally understood, but in addition to awkward posture, such factors as the amount of repetition, the force used in the activity, the individual’s physiology, workplace stress level, and lifestyle may affect the likelihood of experiencing an RSI. 52 Chapter 4 RSIs did not suddenly arise when computers were invented; tennis elbow and writer’s cramp, for example, are two RSIs that have been with us for a long time. Although less common than other RSIs, one serious RSI discussed more often today is a wrist problem called carpal tunnel syndrome, which may be aggravated by improper use of computer keyboards. This nerve disorder results from excessive pressure on the median nerve as it passes through the wrist to the hand. This section offers advice on setting up your work area to enhance your comfort while you use your computer. Since the effects of repetitive movements associated with using a computer can be compounded by those of other work and leisure activities to produce or aggravate physical problems, proper use of your computer system must be considered as just one element of a healthy lifestyle. No one, of course, can guarantee that you won’t have problems even when you follow the most expert advice on using computer equipment. You should always check with a qualified health specialist if muscle, joint, or eye problems occur. Eye fatigue Eye fatigue can occur whenever the eyes are focused on a nearby object for a long time. This problem occurs because the eye muscles must work harder to view an object that’s closer than about 20 feet (6 meters). Improper lighting can hasten the development of eye fatigue. Although eye fatigue is annoying, there’s no evidence that it leads to permanent damage. Whenever you’re engaged in an activity that involves close-up work—such as reading a magazine, doing craft work, or using a computer—be sure to have sufficient glare-free lighting and give your eyes frequent rest breaks by looking up and focusing on distant objects. Remember to have your eyes examined regularly. To prevent discomfort and eye fatigue: m Arrange your work space so that the furniture is properly adjusted for you and doesn’t contribute to an awkward working posture. m Take frequent short breaks to give your muscles and eyes a chance to rest. Health, Safety, and Maintenance Tips 53 Arranging your work area and equipment The suggestions in this section can help you work more comfortably with your computer. Chair m An adjustable chair that provides firm, comfortable support is best. Adjust the height of the chair so your thighs are horizontal and your feet flat on the floor. The back of the chair should support your lower back (lumbar region). Follow the manufacturer’s instructions for adjusting the backrest to fit your body properly. Keyboard and trackball m When you use the keyboard and trackball, your shoulders should be relaxed. Your upper arm and forearm should form an approximate right angle, with your wrist and hand in roughly a straight line. This Not this m You may have to raise your chair so your forearms and hands are at the proper angle to the keyboard. If this makes it impossible to rest your feet flat on the floor, you can use a footrest with adjustable height and tilt to make up for any gap between the floor and your feet. Or you may lower the desktop to eliminate the need for a footrest. Another option is to use a desk with a keyboard tray that’s lower than the regular work surface. 54 Chapter 4 m Use a light touch when typing or using the trackball and keep your hands and fingers relaxed. When using the trackball or keyboard, avoid rolling your thumbs under your palms. This Not this Some computer users may develop discomfort in their hands, wrists, or arms after intensive work without breaks. If you begin to develop chronic pain or discomfort in your hands, wrists, or arms, consult a qualified health specialist. m Change hand positions often to avoid fatigue. m If you prefer, you can adjust the angle of the keyboard by lowering the legs until they snap into position. The back of the keyboard is slightly elevated when the legs are in use. Otherwise, the keyboard is level. Health, Safety, and Maintenance Tips 55 Built-in display m Adjust the angle of the display to minimize glare and reflections from overhead lights and windows. m If your display screen has manual brightness and contrast controls, you may need to adjust the brightness and contrast of the screen when you take the computer from one work location to another, or if the lighting in your work area changes. Avoiding fatigue m Change your seated position, stand up, or stretch whenever you start to feel tired. Frequent short breaks are helpful in reducing fatigue. m Allow adequate workspace so that you can work comfortably. Place papers or other items so you can view them easily while using your computer. A document stand may make reading papers more comfortable. m Eye muscles must work harder to focus on nearby objects. Occasionally focus your eyes on a distant object, and blink often while you work. m Clean your screen regularly. Keeping the screen clean helps reduce unwanted reflections. What about electromagnetic emissions? There has been recent public discussion of the possible health effects of prolonged exposure to extremely low frequency (ELF) and very low frequency (VLF) electromagnetic fields. Such fields are associated with electromagnetic sources such as television sets, electrical wiring, and some household appliances—as well as computer monitors. Apple has reviewed scientific reports and sought the counsel of government regulatory agencies and respected health organizations. Based on the prevailing evidence and opinions, Apple believes that the electric and magnetic fields produced by computer monitors do not pose a health risk. In response to those customers who wish to reduce their exposure to electromagnetic fields, Apple has lowered the emission levels of our products. We are also actively encouraging further scientific research so we can continue to promote the health and safety of our customers and employees. 56 Chapter 4 This chapter describes working with the Control Strip, the line of modules at the bottom of your screen. 5 The Control Strip What is the Control Strip? When you first turn on your PowerBook, a line of small pictures appears in the lower left of the screen. This is called the Control Strip. Each picture in the Control Strip is called a module. The Control Strip is a quick and easy way to monitor and update your PowerBook’s power management options. For instance, you can monitor the battery charge level and adjust such options as File Sharing and sound volume. Scroll arrows let you view Control Strip modules that are not visible. File Sharing Power Settings Sleep Now Scroll Arrow Close Box AppleTalk Switch Battery Monitor HD Spin Down Sound Volume Tab The Control Strip may look slightly different depending on the configuration of your PowerBook. To get a description of each module in the Control Strip, pull down the Help menu, choose Show Balloons, and point to the modules one at a time. 57 How does the Control Strip differ from control panels? Many features in the Control Strip work the same way as control panels. For the most part, however, control panels offer more options. The Control Strip gives you easy access to the features you use most often. You can still use the control panels anytime to fine-tune your settings. Closing, opening, and resizing the Control Strip Closing the Control Strip The Control Strip appears on the desktop until you close it. You can close the Control Strip one of two ways: 1 Click the tab at the end of the Control Strip. 2 Click the close box at the beginning of the Control Strip. The Control Strip appears on top of application programs. When you close the Control Strip, only the tab appears along the edge of the screen. Opening the Control Strip To open the Control Strip: m Click once on the tab. The Control Strip opens. 58 Chapter 5 Resizing the Control Strip You can shorten or lengthen the Control Strip to display fewer or more modules. m Click and drag the tab. The Control Strip shortens or lengthens as you drag the tab. If you shorten the Control Strip and can no longer see all the modules, you can use the scroll arrows to view the hidden modules. Hiding the Control Strip If you want to hide the Control Strip so it does not appear at all on the desktop: 1 Choose Control Panels from the Apple (K) menu and open the Control Strip control panel. 2 Click Hide Control Strip. The Control Strip automatically disappears from the screen. Click Show Control Strip in the Control Strip control panel when you want the Control Strip to reappear. The Control Strip 59 Moving the Control Strip You can drag the Control Strip to the right or left edge of your PowerBook screen or any monitor your PowerBook is connected to. You can also move the Control Strip up or down on the screen. To reposition the Control Strip: 1 Hold down the Option key and drag the Control Strip by its tab. An outline of the Control Strip shows where the Control Strip will move to. 2 Release the Option key and trackball button. The Control Strip appears in its new position and remains there until you move it again. Rearranging the modules in the Control Strip You can customize the order of the modules in the Control Strip. To rearrange the modules: 1 Hold down the Option key and drag each module you want to move. 2 Release the Option key and trackball button. The module you are moving snaps into place. The modules stay in the new order until you rearrange them. Using the Control Strip Monitoring the charge level of the battery Your computer draws power from a rechargeable battery. The Battery Monitor module in the Control Strip lets you easily monitor the battery charge level. The work time you get from your battery depends on how often you use the hard disk, how bright the screen is, and other factors. 60 Chapter 5 The Battery Monitor has two parts: m battery icon m battery charge level The battery icon tells you whether a battery is installed, is being used to power the computer, is being recharged, or is fully charged. If the battery is powering the computer, this icon appears. The charge level is displayed here. The battery charge level changes depending on the software, hardware, and power saving features you use. The battery icon changes depending on whether the battery is being charged, is fully charged, or is powering the computer. If the power adapter is plugged in and charging the battery, this icon appears. The charge level changes as the battery charges. If the power adapter is plugged in and the battery is fully charged, this icon appears. If the power adapter is plugged in and the battery is not in the computer, this icon appears. The Control Strip 61 Customizing the Battery Monitor module You can customize the Battery Monitor module to hide or show the battery level. Follow these steps: 1 Click the Battery Monitor module in the Control Strip. A pop-up menu appears. 2 Choose Hide Battery Level. You cannot hide the battery icon. Changing the battery conservation settings You can control your computer’s power consumption using the power conservation settings in the Power Settings module. You can also open the PowerBook control panel from the Power Settings module. 1 Click the Power Settings module in the Control Strip. A pop-up menu appears. Open the PowerBook control panel if you want to use the Custom settings. Better Conservation gives you longer work time. Better Performance allows you to work with the fewest interruptions. 2 Choose the feature you want from the pop-up menu. The battery conservation settings shown are identical to those shown in the Easy View area of the PowerBook control panel. For help with the PowerBook control panel, see “Adjusting the Battery Conservation Settings” in the “Maximizing Work Time” section of Chapter 6. 62 Chapter 5 Spinning down the hard disk The hard disk is one of the main consumers of battery power. To extend work time while you are using your battery, it is a good idea to turn off the hard disk when you are not using it. This is called “spinning down” the hard disk. To spin down the hard disk: 1 Click the HD Spin Down module in the Control Strip. A pop-up menu appears. 2 Choose Spin Down Internal Hard Disk. The icon shows that the hard disk is off. The hard disk automatically turns itself back on when the computer needs it. The Control Strip 63 Putting the computer to sleep Putting your PowerBook to sleep when you take a work break, even for a few minutes, can give you more work time from your battery. To put your PowerBook to sleep from the Control Strip: 1 Click the Sleep Now module in the Control Strip. A pop-up menu appears. 2 Choose Sleep Now. Your PowerBook goes to sleep. To wake the computer from sleep, press any key on the keyboard (except Caps Lock). There are two other ways you can put your PowerBook to sleep: m Choose the Sleep command from the Special menu in the Finder. m Hold down the x (Command) and Shift keys while you press and release the zero (0) key. For more information on sleep, see Chapters 1 and 6. Changing the file sharing options The icon of the File Sharing module tells you whether file sharing is on and whether users are connected. File Sharing is turned off. File Sharing is turned on and no users are connected. File Sharing is turned on and at least one user is connected. 64 Chapter 5 To change the file sharing option or open the File Sharing Setup control panel: 1 Click the File Sharing module in the Control Strip. A pop-up menu appears. 2 Choose the file sharing option you want from the pop-up menu. For more information on file sharing and working on a network, see the Macintosh Reference book. Changing the sound settings To change your computer’s sound volume from the Control Strip: 1 Click the Sound Volume module in the Control Strip. A pop-up menu appears. 2 Choose the volume setting you want from the pop-up menu. For more information on sound, see the Macintosh Reference book. The Control Strip 65 Turning AppleTalk on and off The icon for the AppleTalk Switch module shows if AppleTalk is on or off. AppleTalk is off. AppleTalk is on. Turning AppleTalk off can save you battery power. You can turn AppleTalk on and off from the Control Strip. 1 Click the AppleTalk Switch module in the Control Strip. A pop-up menu appears. 2 Choose the feature you want from the pop-up menu. For more information on AppleTalk and working on a network, see the Macintosh Reference book. 66 Chapter 5 Read this chapter to learn how you can maximize your PowerBook battery life. 6 Power Management Power sources Your computer can draw its operating power from two different sources: m Main battery Your computer’s main power source is a nickel-cadmium battery. Depending on the battery conservation features you choose, the battery provides power for about 3 hours of work time. m AC power You can run your computer from any standard electrical outlet by plugging in the power adapter. Your computer also has a backup battery that maintains the contents of RAM while you replace the main battery. The backup battery does not provide enough power to run the computer. These power sources are described in more detail in the following sections. Responding to low-power messages When the battery runs low, the computer displays a series of low-power messages. The work time remaining after you see the first message varies depending on how you are using the computer. It’s a good idea to act promptly. 67 What you should do When you see a low-power message, do one of the following: m Plug in the power adapter. m Save your work and replace the depleted battery with a charged one. m Save your work, then shut down the computer until you can plug in the power adapter. What you should know The first low-power message is a reminder that the battery will soon run out. If you continue to work without plugging in the power adapter or changing the battery, the computer displays a second low-power message. The second message is followed by a third and final message indicating that the computer is about to put itself to sleep. Within a few seconds, the computer goes to sleep automatically to protect the contents of RAM. All activities are interrupted. It’s a good idea to save your work when you see the first two low-power messages to make sure you don’t lose information. If you continue working until the computer goes to sleep automatically, you can wake it again as soon as you plug in the power adapter or replace the battery with a fully charged battery. If you can’t plug in the power adapter, the contents of RAM are retained in sleep for about a day. If you recharge or change the battery within a day, you should be able to wake the computer and resume work where you left off. IMPORTANT Recharge a depleted battery as soon as possible. Leaving a depleted battery in the computer for more than several months, or in a hot location (such as the trunk of a car) for longer than two weeks, may damage the battery so that it can’t be recharged. If this happens, you need to replace the battery. 68 Chapter 6 Recharging the battery There are two ways to recharge a battery: m Plug in the power adapter to recharge the battery without removing the battery from the computer. m Remove the battery and recharge it in the (optional) recharger. Recharge a battery shortly before you plan to use it. The battery does not retain its charge in long-term storage. Recharging in the computer Plug in the power adapter, as shown. ¯ Power adapter port WARNING Use only the power adapter that came with your computer (or a power adapter designed for use with other 100 series PowerBooks). Adapters for other electronic devices (including other portable computers) may look similar, but they may damage your computer. Power Management 69 You can continue to use the computer while the battery is recharging, but the battery will take longer to recharge if you do. With the computer in use, recharging time depends on how often you use the hard disk, how bright the screen is, whether you are using an external monitor, how deeply the battery is depleted, and other factors. If you recharge a fully depleted battery with the computer shut down, it takes about 2 to 3 hours to bring the battery to 80 percent of its capacity. It takes several more hours to bring the battery charge to 100 percent. While the computer is shut down and the power adapter is plugged in, you can remove a charged battery from the computer and replace it with a battery you want to charge. If you do this, disconnect and then reconnect the power adapter after inserting the second battery; otherwise the second battery will not recharge. Recharging in a recharger A battery recharger and additional batteries are available for purchase. If you purchase a recharger and an extra battery, you can charge one battery while you use the other, so you always have a fully charged battery on hand. The recharger can accommodate two batteries; it charges them one battery at a time. You can put batteries in or take them out at different times. The recharger must be plugged into an electrical outlet to charge a battery. You can plug it in using the power adapter that came with your computer, or you can purchase an additional (identical) power adapter from your Appleauthorized dealer. WARNING Use only the power adapter that came with your computer with the recharger (or a power adapter designed for use with other 100 series PowerBooks). Using other types of power adapters may damage the recharger, the power adapter, or both. 70 Chapter 6 To recharge a battery, follow these steps: 1 Place the recharger on a level surface. 2 Connect the recharger and the power adapter. 3 Place the battery in the recharger as shown. Recharging begins immediately. You can remove a battery from the recharger at any time. IMPORTANT To preserve a battery’s charge, don’t leave it in the recharger if the power adapter is not plugged into an electrical outlet. The lights on the recharger indicate the following: m No light Either the recharger is not plugged in, the other battery is being charged (if you have two batteries in the recharger), or the battery is defective. If the light goes off during recharging, there is a problem with the battery. m Yellow The battery is charging. m Green The battery is fully charged. Power Management 71 The table shows approximate recharging times for fully depleted batteries. 80% charge 100% charge 1 battery 2 batteries 2.5 hours 5 hours 5 hours 10 hours In the computer (shut down): 2–3 hours 6–8 hours In the recharger: Removing or replacing the battery You can remove or replace a battery only while the computer is asleep or shut down. To remove or replace the battery, follow these steps: 1 Save your work, and then choose Sleep or Shut Down from the Special menu. WARNING If you choose Sleep, and the power adapter is not plugged in, the backup battery will protect open programs and documents for only about 4 minutes after you remove the battery. 2 Close the display. Doing so will prevent you from inadvertently pressing any keys and waking the computer. 3 Open the battery door by sliding the door in the direction indicated by the arrow. The door is physically attached to the battery. 72 Chapter 6 4 Carefully pull the battery out of its compartment. 5 If you are inserting another battery, slide it into the battery compartment. Replacement batteries come with a door attached. 6 Close the battery door by pushing it back into place. 7 If you just inserted a new battery, it’s a good idea to plug in the power adapter in case the battery is not fully charged. Disposing of dead batteries If you have a battery that can no longer be recharged, you will need to buy a new battery and dispose of the dead battery properly. IMPORTANT Nickel-cadmium batteries contain metals that are hazardous when released to the environment. It is inappropriate, and in some cases unlawful, to throw batteries away with your household or business trash. There are other ways to dispose of them. In the United States: Return dead batteries to your Apple-authorized service provider, who will make sure they are included in Apple’s battery recycling program. Elsewhere: Many countries have government- or Apple-sponsored collection and/or recycling programs for dead batteries. Dispose of dead batteries in accordance with the mandatory or voluntary battery collection schemes in your country. Contact your Apple-authorized service provider for information about the recommended battery disposal procedures in your location. If there is no government- or Apple-sponsored return program, you can dispose of the batteries with your regular trash, but take care not to break them open or incinerate them. WARNING Damaged nickel-cadmium batteries may leak small amounts of potassium hydroxide. This substance can cause severe burns to the skin and eyes. If you touch a damaged battery, immediately wash your hands and any other affected areas with water for at least 5 minutes. Do not use soap. Power Management 73 Replacing the backup battery In addition to its main battery, your computer has a small backup battery that maintains the contents of RAM while you replace the main battery. The backup battery usually lasts for several years. You may need to have it replaced if you notice that some of your system settings changed after you removed or replaced the main battery. (You may notice, for example, that the clock time is different.) By replacing the backup battery you ensure that the contents of RAM will be preserved the next time you change the main battery. Your computer’s backup battery must be replaced by an Apple-authorized service provider. Reconditioning the battery To maximize battery life, you should recondition the battery once every 30 days. Reconditioning means letting the battery run all the way down before you recharge it. By regularly reconditioning your battery, you help it maintain its maximum charge. Follow these steps: 1 Use the computer as you normally would, but ignore the low-power messages that appear on the screen. Make sure to save your work when you see the low-power messages. 2 Allow the computer to go to sleep automatically after the third low-power message. 3 Recharge the battery completely before using it again. See “Recharging the Battery” earlier in this chapter for instructions. 74 Chapter 6 Maximizing work time Your PowerBook’s battery can provide several hours of work time before you need to recharge. The actual work time available depends on the equipment and power-saving features you’re using. Ways to conserve battery power To conserve battery power, follow these tips: m If you’re working near an electrical outlet, plug in the power adapter. m If you aren’t using the computer, either turn it off or put it to sleep and plug in the power adapter. m Turn down the screen brightness (¤) whenever possible. At its brightest level, the screen consumes about a third of the power your computer is using. m Keep virtual memory turned off in the Memory control panel. m If your computer has 8 MB of memory or more, you can use a RAM disk as your startup disk to minimize hard disk use. m Quit any modem-related program as soon as you are finished using it. As long as the program is open, your modem is consuming power even if you are not using the modem. m Keep screen dimming on in the PowerBook control panel. The lower settings dim your screen automatically if you haven’t used the computer for a few minutes. m Turn off AppleTalk in the AppleTalk Switch module of the Control Strip or in the Chooser. m Set the Battery Conservation slider in the PowerBook control panel at Better Conservation. The rest of this section describes these settings in detail. Adjusting the battery conservation settings The Battery Conservation section of the PowerBook control panel gives you several ways to control your computer’s power consumption. Power Management 75 The easiest approach 1 Choose Control Panels from the Apple (K) menu and open the PowerBook control panel. (Or use the Power Settings module in the Control Strip to open the PowerBook control panel.) The PowerBook control panel opens in Easy View. You can also choose Custom View for more detailed options. See “Choosing Custom Options” later in this chapter. 2 Drag the Battery Conservation slider to the setting you want. Battery Conservation slider Better Performance allows you to work with the fewest interruptions (that is, the computer going to sleep, the hard disk spinning down, or the screen dimming). If you can’t plug in the computer, Better Conservation gives you more work time. 3 Close the PowerBook control panel. If you don’t use the computer for several minutes, it goes to sleep without any action on your part. How many minutes pass before the computer goes to sleep depends on the battery conservation setting you chose. To put the computer to sleep before automatic sleep takes effect, choose Sleep from the Special menu or use the Sleep Now module in the Control Strip. To wake the computer from sleep, press any key (except Caps Lock). Automatic sleep does not take effect under the following circumstances: m AppleTalk is turned on in the Chooser and the power adapter is plugged in. m Your computer is connected to a shared disk on the network. m Your computer’s printer port is in use. m Your computer’s internal modem is in use. 76 Chapter 6 More about automatic sleep The Battery Conservation slider controls three power conservation features: system sleep, screen dimming, and hard disk spin down. m System sleep is a state in which your computer uses only the power it needs to maintain the contents of RAM (such as any open programs and documents, and various control panel settings). m Screen dimming saves battery power by automatically turning off the backlight of your PowerBook display screen. m Hard disk spin down stops your computer’s internal hard disk from spinning when it isn’t being used. If the PowerBook is in sleep, the hard disk automatically spins down. The Battery Conservation slider has five settings: The five settings on the Battery Conservation slider indicate the time it takes for your computer to go to sleep, the screen to dim, and the hard disk to spin down. The time it takes for each feature to take effect depends on the setting you choose. If you drag the slider toward Better Conservation, it takes less time for the system to sleep, the hard disk to spin down, and the screen to dim. The table indicates how much time passes at each setting before each power saving feature takes effect. Minutes it takes if you choose Conservation Performance System sleeps 2 3 6 8 15 Hard disk spins down 1 2 3 6 8 Screen dims 1 2 3 4 5 Power Management 77 Choosing Custom options For more options that affect your computer’s power consumption, slide the switch to Custom in the PowerBook control panel. Slide this switch to Custom view. In Custom view, you have these additional conservation options. Battery conservation settings The Battery Conservation slider works as described in the previous section. In Custom view, you can also use three individual sliders to control system sleep, screen dimming, and hard disk spin down. As you drag the Battery Conservation slider, the three individual sliders change. Likewise, when you drag one of the three individual sliders, the Battery Conservation slider is affected. To use the sliders: 78 Chapter 6 1 Choose Control Panels from the Apple (K) menu, and open the PowerBook control panel. (Or use the Power Settings module in the Control Strip to open the PowerBook control panel.) 2 Slide the switch to Custom. 3 Drag the sliders to choose the settings you want. The Battery Conservation slider reflects the changes you make. 4 Close the PowerBook control panel. Processor cycling If the computer is not doing anything for a few seconds, it turns off its microprocessor. The microprocessor comes back on the instant you resume work. This feature is called processor cycling. Processor cycling conserves battery power. Your computer automatically comes with processor cycling turned on, and it is highly recommended that you work with processor cycling on. In a few cases, processor cycling can cause programs to slow down. If a program performs very slowly, you can turn off processor cycling temporarily. Follow these steps: 1 Choose Control Panels from the Apple (K) menu and open the PowerBook control panel. (Or use the Power Settings module in the Control Strip to open the PowerBook control panel.) 2 Slide the switch to Custom. Power Management 79 3 Click the checkbox labeled “Allow processor cycling” to remove the X. 4 Close the PowerBook control panel. To turn processor cycling back on, click the “Allow processor cycling” checkbox again. IMPORTANT To conserve battery power, turn processor cycling off only when you are using programs that it interferes with. Turn processor cycling back on again as soon as possible. Processor speed You can gain work time by slowing the computer’s microprocessor speed (from 33 to 16 MHz). Although some programs may work more slowly, you can gain up to 10 to 15 minutes of work time before you need to recharge the battery. (The amount of time you gain depends on how you are using the computer.) To slow the processor speed, follow these steps: 1 Choose Control Panels from the Apple (K) menu, and open the PowerBook control panel. (Or use the Power Settings module in the Control Strip to open the PowerBook control panel.) 2 Slide the switch to Custom. 3 Click the checkbox labeled “Reduced processor speed” to select it. 4 Choose Restart from the Special menu. The computer runs at a lower microprocessor speed until you click the “Reduced processor speed” box again to remove the X and then restart the computer. 80 Chapter 6 Power conservation Your PowerBook keeps track of the power source you are using and can change the power conservation settings to maximize battery conservation and performance for both the battery and the power adapter. To change the power conservation settings, follow these steps: 1 Choose Control Panels from the Apple (K) menu and open the PowerBook control panel. (Or use the Power Settings module in the Control Strip to open the PowerBook control panel.) 2 Slide the switch to Custom. 3 If necessary, click the Auto button to select it. When Auto is selected, the computer will automatically use the settings you specify in step 5 whenever the selected power source is being used. (You can temporarily override your settings by returning to the PowerBook control panel and selecting Manual.) 4 Choose a power source in the pop-up menu. 5 Drag the sliders to the settings you want for the selected power source. To use the preset power conservation settings for the selected power source, click Default. See “Adjusting the Battery Conservation Settings” earlier in this section for more help. 6 Close the PowerBook control panel. Power Management 81 Read this chapter for help using custom options on your PowerBook and for tips on traveling with and storing your computer. 7 Customizing and Traveling With Your PowerBook Customizing your PowerBook There are several ways you can customize your PowerBook to make your dayto-day work easier: m Reconnecting to shared disks If you use your PowerBook on a network to connect to shared disks, the AutoRemounter control panel lets you reconnect automatically. m Using a RAM disk A RAM disk can save you time and battery power. When you create a RAM disk, its contents are saved in the System Folder when you shut down your PowerBook, and then copied back to the RAM disk the next time you turn the computer on. m Improving the pointer display You can set options to make the pointer more visible on the screen. m Printing later You can set up documents to print the next time you connect to the network printer. These features are described in the next sections. 83 Automatically reconnecting to shared disks Your PowerBook disconnects from any shared disks it’s connected to when you turn it off or restart it, or when it is in sleep. With AutoRemounter turned on, your PowerBook reconnects to shared disks automatically when you turn it back on (or wake it from sleep). In addition, if you connect a hard disk to your PowerBook while it’s in sleep, the hard disk appears on the desktop when you wake the computer. 1 Choose Control Panels from the Apple (K) menu and open the AutoRemounter control panel. 2 If you want to reconnect to shared disks only when you wake the computer from sleep, click After Sleep. If you want to reconnect when you restart the computer as well as after sleep, click Always. 3 If you want the computer to ask for your password before it reconnects to shared disks, click Always Entering Passwords. Otherwise click Automatically Remounting. For better privacy and security, have your computer ask for your password before it reconnects to shared disks. 4 84 Chapter 7 Close the AutoRemounter control panel. Setting up a RAM disk Using a RAM disk saves power because it avoids using the PowerBook’s hard disk while you are running the PowerBook from its battery. Any files that are copied to the RAM disk are saved in the System Folder on the hard disk when you shut down your PowerBook. The next time you start up your PowerBook, the files are copied back to the RAM disk automatically. A RAM disk lets you keep frequently used application programs and files in RAM. For maximum battery conservation, you can also use the RAM disk as your startup disk. To set up a RAM disk, you need 8 MB or more of RAM in your computer. Follow these steps. (If you don’t plan to use the RAM disk as your startup disk, skip steps 1 and 2.) 1 Select the System Folder on your hard disk and choose Duplicate from the File menu. This creates a folder called “System Folder copy.” 2 Remove any extra extensions, fonts, and control panels you don’t use. Do not delete the files called Finder, System, and System Enabler from the System Folder copy or the file called Assistant Toolbox from the Extensions folder in the System Folder copy. 3 Create a folder called RAM Disk Backup. 4 Put the System Folder copy (if you’ll be using the RAM disk as your startup disk), your favorite application program or programs, and files you frequently use into the RAM Disk Backup folder. Keep additions to this folder to a minimum. Customizing And Traveling With Your PowerBook 85 5 Select the RAM Disk Backup folder. Then choose Get Info from the File menu in the Finder to determine the size of your RAM Disk Backup folder. You’ll need to remember the size of your RAM Disk Backup folder to set up a large enough RAM disk. Write it down if you need to. 6 Choose Control Panels from the Apple (K) menu and open the Memory control panel. The Memory control panel appears. 7 86 Chapter 7 Click the On button under RAM Disk. 8 Drag the slider to set the percentage of memory to use for the RAM disk. As you drag the slider, the number in the RAM Disk Size box changes. Position the slider so that the number (the amount of memory) is larger than the size of your RAM Disk Backup folder. Be sure to make the RAM disk large enough to accommodate the contents of your folder, or you will have to repeat this step. 9 Close the Memory control panel and restart your computer. A RAM Disk icon appears on your desktop. 10 Copy the contents of your RAM Disk Backup folder to your RAM disk. 11 Choose Control Panels from the Apple (K) menu and open the Startup Disk control panel. 12 Select your RAM disk in the Startup Disk window and close the Startup Disk control panel. 13 Choose Restart from the Special menu. Now turn to the next section,“Using the RAM Disk,” for further instructions. WARNING When you need to turn off the computer, make sure you choose Shut Down from the Special menu. If you use the reset switch to turn off your computer, you will lose the contents of the RAM disk. Customizing And Traveling With Your PowerBook 87 Using the RAM disk When you work with the files on your RAM disk, you save battery power because you avoid using the PowerBook hard disk. WARNING If the computer “crashes” due to temporary software problems, you will lose any work on your RAM disk that you have not saved to the hard disk. In deciding how often you want to save to the hard disk, you should weigh the risk of losing your work against the battery savings. Once you have set up a RAM disk, follow these steps to use it: 1 Open the application programs and files on the RAM disk while your PowerBook is plugged into the power adapter. Using the power adapter saves your battery. 88 Chapter 7 2 Put your PowerBook to sleep before you begin working with your programs or files. 3 Unplug the power adapter. 4 While you are using the battery, avoid using any files that are not on the RAM disk. Improving pointer display You may notice that the pointer sometimes disappears from your PowerBook screen when you move the pointer quickly. If you set your trackball to have “tracks,” you can always see the pointer on the screen. You do this in the Mouse control panel. 1 Choose Control Panels from the Apple (K) menu and open the Mouse control panel. The following control panel appears: 2 Click the desired length of mouse tracks. 3 To display a thicker I-beam (the pointer that appears when you’re editing text), click the checkbox labeled “Thick I-beam.” This makes the I-beam more visible. 4 Close the Mouse control panel. Customizing And Traveling With Your PowerBook 89 Printing later If you use a PostScript™ laser printer on a network but are not currently connected, you can set up documents to print the next time you connect to the network. 1 Choose Print in the application program you are using. 2 Click Print in the dialog box. The following message appears: 3 Click Print Later. The next time you connect to an AppleTalk network, this document is printed. 90 Chapter 7 Traveling with the PowerBook The safety instructions in the first part of this book also apply when you are traveling. In addition, note these precautions: m Do not transport your PowerBook while it is turned on. Put your computer to sleep or shut it down before you move it. m Transport batteries either inside the computer or in the protective case provided. Do not transport unprotected batteries. m Do not check your computer as baggage. Carry it with you. m Have security officials manually inspect your computer and disks if you do not want to pass them through X-ray machines. m Be prepared to show security officials that your computer is working. Have a charged battery or a power adapter ready to use. m Some airlines may restrict or prohibit the use of computers in flight. Check ahead to find out what restrictions, if any, apply. m Take the necessary plug adapters if you’re traveling overseas. (You may need to use them with the power adapter.) You do not need a voltage transformer. The power adapter can handle 90 volts to 260 volts AC (48–62 Hz). The following illustrations show which plug adapters you’ll need for different countries. Ask your travel agent for more information. Outlet type Locations United States, Canada, parts of Latin America, Japan, Korea, the Philippines, Taiwan Most of Europe, the former Soviet Union, parts of Latin America, the Middle East, parts of Africa, Hong Kong, India, most of South Asia Mexico, United Kingdom, Ireland, Malaysia, Singapore, parts of Africa China, Australia, New Zealand Customizing And Traveling With Your PowerBook 91 Storing the PowerBook 1 Save your work on a hard disk or floppy disks. 2 Choose Shut Down from the Special menu. 3 Close the display. 4 Recharge the battery. Be sure your battery is fully charged if you are taking the computer places where you cannot plug it in. 5 Store the computer in a cool, dry place. Storage temperatures should remain between –13°F and 140°F (between –25°C and 60°C ). Avoid leaving the computer where temperatures may be extreme or unpredictable—in the trunk of a car, for example. Service and support If your computer is malfunctioning but does not appear to be physically damaged, shut it down (and leave the power adapter plugged in, if possible) until you can get help. If you know or suspect that your computer is physically damaged, disconnect the power adapter, remove the battery, and do not use the computer until it can be repaired. See the service and support information that came with your computer for numbers to call for assistance. 92 Chapter 7 This chapter describes the options available for expanding your PowerBook. 8 Connecting Other Equipment to Your PowerBook You can expand the work you do with your PowerBook by connecting other equipment to it, such as a printer, an external modem, or a SCSI device. Connecting a printer The printer port on the PowerBook can accept either a direct cable connection (to a printer such as the StyleWriter) or a network cable connection. Printer port icon Some printers, including the Personal LaserWriter SC, are connected through the SCSI port. If you are connecting a serial printer, make sure that the modem selection in the PowerBook Setup control panel is set to Internal. See “Connecting an External Modem” later in this chapter. Follow the instructions that came with your printer to connect it to your computer. 93 Connecting an external modem Your PowerBook has been designed to work most effectively with an internal modem. It is possible to connect an external modem to the printer port on the back panel of the computer, but the performance of an internal modem will be much better than that of an external modem. External modems running at a transmission rate of 9600 baud or higher will experience the most performance reduction. WARNING Avoid using the floppy disk drive when you are using an external modem. Floppy drive activity can interfere with the data transmission of the external modem. To connect an external modem, follow these steps: 1 Make sure the computer is asleep or shut down. 2 Connect the modem to a power source and to the phone line. See the documentation that came with the modem for instructions. 3 Make sure the modem is turned off. 4 Connect the modem cable to the printer port. Printer port icon 5 Turn on the modem. 6 Wake or restart the computer. 7 Choose Chooser from thne Apple (K) menu and set AppleTalk to Inactive. If your computer does not have an internal modem, the external modem is ready to use. If your computer does have an internal modem, continue with step 7. 94 Chapter 8 8 Choose Control Panels from the Apple menu and open the PowerBook Setup control panel. 9 Click the External Modem button. 10 Close the control panel. The external modem is ready to use. When you are connected to an external modem and the External Modem button is selected, you cannot use the printer port on your PowerBook for anything else. If you have both an internal and an external modem, remember to select the modem you want to use in the PowerBook Setup control panel before opening your telecommunications program. Connecting Other Equipment to your PowerBook 95 Connecting SCSI devices A SCSI device is any product—including hard disk drives, CD-ROM drives, scanners, and printers—that connects with your computer by means of a standard electronic interface called the Small Computer System Interface (SCSI). You can attach up to six SCSI devices to your computer by linking them together in a chain that starts at your PowerBook’s SCSI port. The SCSI port looks like this: SCSI port icon SCSI port To connect a SCSI device to the SCSI port on your PowerBook, you need an Apple HDI-30 SCSI System Cable. Connecting SCSI devices to your PowerBook may involve these steps: m installing software m setting SCSI ID numbers m checking that the SCSI chain is properly terminated m connecting cables These steps are described in the following sections. Installing software Most SCSI devices require software that allows your computer to communicate with them. This software is called a driver. To install a driver, follow the instructions that came with the device. 96 Chapter 8 Setting SCSI ID numbers Each device in a SCSI chain must have a unique ID number between 1 and 6 so the computer can identify it properly. Your computer has the SCSI ID number 7. WARNING Using two or more devices with the same SCSI ID number can cause your equipment to malfunction. You could lose information as a result. To set the ID numbers of Apple SCSI devices, follow these steps: 1 Make sure the SCSI device is turned off. If the device is already part of a SCSI chain, make sure that all devices in the chain are turned off, including the computer. 2 Locate the ID number indicator and switch (usually on the back panel of the SCSI device). ID number indicator ID number switch 3 Check the ID numbers of all the devices you want to connect. If all the devices have unique ID numbers, you can continue with the next section, “Checking That the SCSI Chain Is Properly Terminated.” Connecting Other Equipment to your PowerBook 97 4 If you need to change a device’s ID number, choose an available number between 1 and 6. 5 Press the appropriate button to increase or decrease the SCSI ID number until the number you want appears. If your SCSI device does not have an ID number switch like the one pictured, consult the manual that came with your SCSI device for details. Checking that the SCSI chain is properly terminated To ensure accurate transmission of information, a chain of SCSI devices must have a terminator at each end. Terminators are built into some SCSI devices. SCSI terminator m External SCSI devices from Apple do not have built-in terminators. m External SCSI devices from other vendors may have built-in terminators; see the documentation that came with the device. m The PowerBook 150 does not have a built-in terminator. If you are attaching one SCSI device The SCSI device needs two terminators. If the device has a built-in terminator, you need to attach only one external terminator. If the device does not have a built-in terminator, you need to attach two external terminators. 98 Chapter 8 If you are attaching more than one SCSI device Make sure that all of these conditions exist: m an internal terminator in, or an external terminator attached to, the first device you’re attaching to the computer m an internal terminator in, or an external terminator attached to, the last device you’re attaching to the computer m no other terminators (internal or external) in the chain If you have too many devices with internal terminators, your Appleauthorized service provider can remove extra terminators. SCSI chain configurations are shown in the illustration on the following page. Connecting cables WARNING When making SCSI connections, always turn off power to the computer and all other devices in the chain. If you don’t, you could lose information and damage your equipment. 1 Shut down your PowerBook and turn off all SCSI devices in the chain. 2 To connect the first device, use an Apple HDI-30 SCSI System Cable. Attach the smaller end of the cable to the SCSI port (marked with the icon g) on the PowerBook, and the larger end of the cable to either SCSI port on the device. 3 To connect the next device, use a SCSI peripheral interface cable. The connectors on the ends of the cable are the same. Attach one connector to the available SCSI port on the first device, and the other connector to either SCSI port on the next device. Connecting Other Equipment to your PowerBook 99 4 Repeat step 3 for each additional device you want to connect. The illustration shows where to add cable terminators. Terminator HDI-30 cable Terminator (If this SCSI device has an internal terminator, omit this external terminator.) Terminator (If this SCSI device has an internal terminator, omit this external terminator.) HDI-30 cable SCSI peripheral interface cables Terminator (If this SCSI device has an internal terminator, omit this external terminator.) IMPORTANT The total length of a SCSI chain should not exceed 20 feet (6 meters). Apple SCSI cables are designed to meet this restriction. If you are using SCSI cables from another vendor, check the length of the chain. WARNING Once your SCSI devices are connected, always turn them on before turning on your PowerBook. If you turn the computer on first, it may not be able to start up, or it may not recognize the SCSI devices. 100 Chapter 8 Refer to this chapter for solutions to some common problems. 9 Tips and Troubleshooting This chapter describes possible causes of and solutions for some common problems you may have with your PowerBook or with associated equipment provided by Apple. Try the possible solutions in the order they are listed until the problem is solved. Check explanations and instructions in this book and in the Macintosh Reference book for additional help. WARNING If you have a problem with your PowerBook and nothing presented in this chapter or in the manuals that came with your computer solves it, consult the service and support information that came with your computer for instructions on how to contact an Appleauthorized service provider or Apple for assistance. If you attempt to repair the computer yourself, any damage you may cause to the computer will not be covered by the limited warranty on your computer. Contact an Apple-authorized dealer or service provider for additional information about this or any other warranty question. 101 The PowerBook The computer won’t start. m The computer may be on, but the screen brightness or contrast may be turned down. Adjust the brightness and contrast controls. m The battery may be drained. Plug in the power adapter and then try to turn on the computer. m Take out the battery, unplug the power adapter, and use a pen, a paper clip, or a similar object to press the reset switch (at the back of the computer) for 10 seconds. Then replace the battery, plug in the power adapter, and try again. The computer won’t restart. Try to restart your computer using one of the following methods. Try them in the order given. WARNING If you are working with a RAM disk, the following methods of restarting the computer will cause you to lose the contents of the RAM disk. For this reason, you should periodically save your work to the computer’s hard disk—not just the RAM disk. m Press the Control key, Command (x) key, and Power On button at the same time. m Press and release the reset switch on the back of the computer. You can press the button with a pen, a paper clip, or a similar object. Reset switch 102 Chapter 9 m Restart from a floppy disk. 1. Insert the Utilities disk into the floppy disk drive. 2. Press the Power On button. If the computer restarts from a floppy disk, there may be a problem with your hard disk. You may be able to fix the problem yourself (using the Disk First Aid program or another disk repair program); see the Macintosh Reference book for help. The computer just stopped. m The computer may have gone to sleep. Press any key (except Caps Lock) or press the Power On button to wake the computer again. m The battery may have drained so far that the computer has put itself to sleep to protect the contents of RAM. Plug in the power adapter and then press any key (except Caps Lock). m The computer may have “crashed” due to temporary software problems. Click the Restart button on the screen (if you see one) or choose Restart from the Special menu. If these suggestions don’t work, restart the computer using the methods described in “The Computer Won’t Restart” earlier in this section. The computer exhibits odd behavior, such as unexplained system failures. m A common cause of unexplained problems is multiple System Folders on your computer’s startup disk. The icon for the System Folder that the PowerBook is using to operate looks like this: Use the Find command in the File menu to locate any other System Folders, and throw them in the Trash. (If you use a RAM disk as a startup disk, do not delete the System Folder from your RAM Disk Backup folder.) m You may have a virus on your hard disk. Obtain a virus-detection program, use it to check all your disks, and eliminate any viruses the program finds. Tips and Troubleshooting 103 m You may be using a program that’s not compatible with your computer’s system software. Check the manual that came with the program or contact the manufacturer. m You may have added a control panel or extension that is incompatible with other programs you use. Restart the computer, holding the Shift key down, until you see the message “Extensions off.” If this solves the problem, remove any control panels or extensions you recently installed. m You may need to reinstall your system software. See Chapter 1 for instructions on using the PowerBook 150 Restore program. Power The battery is draining too fast. m Turn down the screen brightness, turn off virtual memory, move the Battery Conservation slider in the PowerBook control panel to Better Conservation, or work with the power adapter plugged in. m Your computer supplies power to the modem whenever a communications program is open. Quit your communications program if you aren’t using it. m If you aren’t using network services, you can also save power by turning off AppleTalk in the Chooser or in the AppleTalk Switch module of the Control Strip. m Your battery may need to be reconditioned. See Chapter 6 for more information. m You may not have the correct power adapter. Make sure you are using the power adapter that came with your computer. m Old batteries do not hold a charge as well as new ones do. You may need to replace the battery. 104 Chapter 9 The battery can’t be recharged. m There may be a loose connection. Take the battery out and put it back in the computer. m If all connections are OK, then the battery is probably damaged or dead. You’ll need to obtain a replacement battery from an Apple-authorized dealer. The computer goes to sleep too often. m Open the PowerBook control panel and move the Battery Conservation slider to Better Performance. The PowerBook won’t run off the battery or the battery won’t charge. m Make sure your PowerBook is running system software version 7.1.1 or later. m There may be a loose connection. Take the battery out and put it back in the computer. The computer doesn’t go to sleep automatically. m You may have dragged the System Sleeps slider to Never in the Custom view of the PowerBook control panel. Drag the slider to a lower setting. m You may be connected to a shared disk on the network. If you are not using the information on the shared disk, disconnect from it. m The printer port or the internal modem (if one is installed) may be in use. Quit your telecommunications program or delay printing in the Chooser (if the documents you’re printing can wait until later). m When application programs are working in the background, the computer doesn’t go to sleep. In this case, choose Sleep from the Special menu. m The computer does not go to sleep if AppleTalk is active and the power adapter is plugged in. Turn AppleTalk off in the Chooser or in the AppleTalk Switch module of the Control Strip. See Chapter 6 for more information about batteries and power consumption. Tips and Troubleshooting 105 The screen The screen looks blurred or out of focus. m The viewing angle may not be optimal. Tilt the display on its hinge until the screen looks better. The screen is too dark. m The screen brightness or contrast may not be optimal for the surrounding lighting. Adjust the brightness or contrast setting. The screen flickers. m This problem sometimes occurs when your screen is set to display the maximum number of grays. Try adjusting the contrast control, or select Black & White in the Monitors control panel. There are ghost images or black dots on the screen. m When the computer is left on for many hours, temporary images may appear on the screen. Put the computer to sleep. The longer the computer was left on, the longer it will take for the images to fade, but they will eventually disappear. The pointer moves too fast or too slowly. m You need to adjust the pointer’s tracking speed. Open the Mouse control panel and choose a more comfortable setting. The pointer won’t move at all. m A software problem may have caused the computer to “freeze.” Restart the computer by following the steps in “The Computer Won’t Restart” earlier in this chapter. m Turn the computer off by pressing the reset switch on the back of the computer. Then turn the computer on again. You will lose any work that you have not saved, and you will also lose the contents of your RAM disk. 106 Chapter 9 A window has disappeared. m Another open window on the desktop may have covered the one you’re looking for. Move, resize, close, or hide windows you aren’t using until you see the one you want. m Windows belonging to open but inactive programs may be hidden. Choose Show All from the Application menu to show hidden windows, and choose the correct application program from the Application menu for the window you want to view. An icon is blinking in the menu bar. m A program needs attention. For example, you may have set the Alarm Clock to go off at a particular time, or PrintMonitor may be alerting you to a printing problem. Make the program active by choosing the icon for the application program in the Application menu, and take the necessary action. The trackball The trackball doesn’t work smoothly; it sticks or jumps when rolled. m There may be dust or dirt inside the trackball mechanism. To clean the trackball, follow these steps: 1. Remove the trackball by turning the trackball retainer ring counterclockwise and lifting the trackball out of its cavity. You may need to use a pen or your fingernail to lift the trackball out. 2. Locate the small rubber rollers at the left and bottom sides of the trackball cavity. The rollers look like small rings or wheels. 3. Use any reasonably clean, blunt object (such as your fingernail) to scrape any residue from the rollers. Do not use any liquid inside the computer. 4. Replace the trackball and its retainer ring. You just cleaned the trackball, and it feels worse than before. m This problem is related to the way the trackball is lubricated. After you use it for a few minutes, the problem should go away. Tips and Troubleshooting 107 Memory A “not enough memory” message appears when you try to open a program. m Quit any programs you aren’t using, then try again to open the program you want. If that doesn’t work, restart the computer. Sometimes restarting makes additional memory available. m If you are using a RAM disk or a disk cache, reduce its size in the Memory control panel and then restart the computer. m If you consistently want to open more programs than memory allows, you can purchase a memory expansion card from your Apple-authorized dealer. SCSI devices You can’t turn on the computer after connecting a SCSI device. m SCSI devices must be turned on before the computer itself. Turn on any SCSI devices first, and then turn on the computer. The computer doesn’t recognize your SCSI devices. m The devices may be off. Check to make sure that they are plugged in and turned on. m If the device is a disk drive, it may need to be initialized before you can use it. See the instructions that came with the device. m The software (driver) needed to run the device may not be installed in your System Folder. See the instructions that came with the device. m Two or more devices in the SCSI chain may have the same ID number. Check the ID number of each device to make sure each one has its own number between 1 and 6, and change any numbers that are not unique. m When connecting SCSI equipment, it’s important to use the right cables and the correct number and placement of cable terminators. Check the cables and terminators in the SCSI chain and make sure that all cables are firmly attached. The first and the last external device in a SCSI chain should be terminated. See Chapter 8 for more information about working with SCSI devices. 108 Chapter 9 Disk drives and disks The computer won’t start up from its hard disk, or the hard disk icon doesn’t appear on the desktop. m There may have been a temporary software problem. Turn off the computer, wait at least 10 seconds, and then turn it on again. m Make sure the hard disk is designated as the startup disk, as explained in Chapter 2 of the Macintosh Reference book. m There may be a problem with the system software on the hard disk. Start up the computer with the Utilities disk. If the hard disk’s icon appears, you need to reinstall your system software. (See Chapter 1 for instructions on using the PowerBook 150 Restore program). Disk repair programs can sometimes fix problems of this kind. m The information on the disk drive may be damaged. Try using a disk repair program (such as Disk First Aid on the Utilities disk) to repair or recover the information. m If using a disk repair program doesn’t work, you’ll need to reinitialize the internal hard disk. Doing so will erase all the data on the hard disk, so you’ll then need to restore the contents using your most recent backup floppy disks. Follow these steps: 1. Insert the Utilities disk into the floppy disk drive and restart the computer. 2. Double-click the Internal HD Format icon to start the utility program. 3. Click the Initialize button. A message appears, asking you to confirm that you really want to reinitialize your internal hard disk. 4. Click the OK button. A status bar shows the progress of reinitialization. A message appears to advise you when the process is complete. 5. Click OK to quit the Internal HD Format program. 6. Use your most recent backup floppy disks to restore the contents of your hard disk. For instructions, see “Restoring the Information on Your Hard Disk” in Chapter 1. Tips and Troubleshooting 109 m There may be a mechanical problem with the disk drive. If none of the previous suggestions works, call Apple (see the service and support information for the phone number), or take the computer to an Appleauthorized service provider. The hard disk keeps stopping and starting again. m The hard disk may be going to sleep to conserve power. Open the PowerBook control panel and move the Battery Conservation slider toward Better Performance. The icon of a floppy disk doesn’t appear on the screen. m There may be a problem with the disk or disk drive. Try inserting a different disk. If its icon does appear, the original disk is probably damaged. You may be able to repair the disk or recover some of the information on it. If the icon of the second disk does not appear either, the problem is probably in the disk drive. Take the computer to an Appleauthorized service provider for repair. m Restart the computer, holding the Shift key down until you see the message “Extensions off.” If this solves the problem, remove any control panels or extensions you recently installed. A high-density (1.4 MB) disk you use with your PowerBook computer is not recognized by another Macintosh. m Some disk drives cannot recognize high-density disks. Try inserting an 800K or 400K disk in the disk drive of the other Macintosh. If that works, copy your files to an 800K or 400K disk. If you regularly plan to use floppy disk drives of different types, use the lower-capacity disks in all drives. You can’t eject a disk from a floppy disk drive. There may be a temporary mechanical problem with the disk drive. Try the following solutions, in the order listed: m Hold down the Command (x) and Shift keys while you press and release the 1 key. m Restart the computer and hold down one of the trackball buttons while the computer starts up. 110 Chapter 9 m Carefully insert the end of a straightened paper clip into the small hole near the disk drive’s opening and push gently until the disk is ejected. Insert the end of a large straightened paper clip into this hole. A message says that a disk is not initialized—but you know that it is. m The disk may not be seated properly in the disk drive. Eject it and try inserting it again. m The disk may be damaged. If you insert another disk in the drive and the message does not appear, you can assume that the original disk needs repair. If the second disk is also not recognized, call Apple (see the service and support information for the phone number), or take the computer to an Apple-authorized service provider so the disk drive can be checked. You can’t delete a file. m The floppy disk may be locked. Unlock it by sliding the tab so that it covers the hole at the corner of the disk. m The file may be locked. You can unlock it in its Info window (choose Get Info from the File menu). Or you can hold down the Option key while you choose Empty Trash from the Special menu. m An application program may be using the file. Quit the program. You can’t save or copy files onto a floppy disk. m The disk may be locked. Unlock it by sliding the tab so that it covers the hole at the corner of the disk. m The disk may be full. Delete files you no longer need or use a different disk. See the Macintosh Reference book for more information about working with disk drives and disks. Tips and Troubleshooting 111 Modems An external modem doesn’t work. m The modem may be turned off or improperly connected. Make sure it is turned on and that all connections are correct. m The printer port may not be configured to work with an external modem. Open the PowerBook Setup control panel and make sure that External is selected. m AppleTalk may be active. Turn off AppleTalk in the Chooser or in the AppleTalk Switch module of the Control Strip. m Floppy disk drive activity can interfere with data transmission of external modems. Try using the modem again when the floppy disk drive is not in use. (If you intend to use communications programs frequently, Apple recommends using an internal modem; the internal modem port of the PowerBook 150 has been optimized for communciations programs.) m If you are transmitting data at a rate of 9600 baud or faster, try resetting your modem to transmit at a slower speed. An internal modem doesn’t work. m The modem connection may not be activated. Open the PowerBook Setup control panel and make sure that Internal is selected. See the modem manual for more information about using your modem. Printers Your computer can’t find the printer. m The printer may be turned off. Turn it on. m The printer may not be selected in the Chooser. Open the Chooser and select the printer you want to use. Your printer does not appear in the Chooser window. m The printer may not be connected properly. Check the connections between your computer and the printer, including relevant sections of the network if appropriate. 112 Chapter 9 m The printer software may not be in your System Folder. Close the Chooser and install the software you need. m AppleTalk must be active before you can use a network printer. Make sure that AppleTalk is active in the Chooser or in the AppleTalk Switch module of the Control Strip. m If your network has zones, the printer you want may not be in the currently selected zone. Make sure the correct zone is selected. m The printer port may be configured for use with an external modem. Open the PowerBook Setup control panel and make sure that Internal is selected. The network printer keeps restarting. m Someone on the network may be using a version of printer software that is different from the version used by others on the network. Everyone connected to a network should use the same printer software version. Consult the network administrator for more information. Nothing happens, or you see an error message, when you try to print. m The printer may not be selected in the Chooser. Open the Chooser and reselect the printer. m The printer may not be turned on. Make sure it is plugged in, turned on, and warmed up. m The printer may be out of paper or have some other problem. Check the printer status lights and any messages on your screen. m If an error message states that the printer could not print your document, turn the printer off for at least 10 seconds. Then turn it on again, wait for it to warm up, and try to print again. Your documents are printed with the wrong fonts. m The printer may not have your fonts in its memory and may be substituting other fonts. You may be able to add the necessary fonts to your printer (see the Macintosh Reference book for instructions), or print on a different printer that has the fonts you want. If you have a LaserWriter printer, you can turn off Font Substitution in the Page Setup dialog box. See the Macintosh Reference book for general information about printing documents. See your printer manual for more information about your printer’s features or problems with the printed output. Tips and Troubleshooting 113 Networks You can’t find or can’t open icons needed to set up file sharing. m One or more icons may be in the wrong place. Make sure that the Sharing Setup icon is in the Control Panels folder, and that the File Sharing Extension file, the Network Extension file, and the AppleShare file are in the Extensions folder. (Both folders are inside the System Folder.) m Some network software may not be installed. Use the Installer to custom install the appropriate network software. The shared disk you want to connect to does not appear in the Chooser window. m AppleTalk must be active before you can use a shared disk. Make sure that AppleTalk is active in the Chooser or in the AppleTalk Switch module of the Control Strip. m If your network has zones, the shared disk you want may not be in the currently selected zone. Make sure the correct zone is selected. m The computer that the disk is on must be turned on before the disk can be shared. Make sure that the computer is on and that it has file sharing turned on. You can’t open a shared disk or folder. m You may not have the access privileges needed to use the disk or folder. Ask the network administrator or the owner of the shared item to give you access. m You may have entered your name or password incorrectly when you tried to open the shared disk or folder. Check with the owner of the item to make sure you are entering your name and password correctly, and try again. You can’t connect to your own computer from another Macintosh. m Make sure that your computer is turned on, file sharing is turned on for both computers, you have the correct access privileges, and you entered your name and password correctly. See the Macintosh Reference book for general information about using your computer on a network. 114 Chapter 9 Application programs A program won’t open. m Some programs can’t be opened from a locked floppy disk. Make sure the disk is unlocked. (Unlock a disk by sliding the tab so that it covers the hole at the corner of the disk.) m The program may be damaged. Recopy it from a known good source (such as the original program disk). m There may not be enough memory available to open the program. Quit other programs or change this program’s memory size in the Info window. A program runs very slowly. m Some programs are slowed by processor cycling. You can turn processor cycling off; see Chapter 6. A message says that a program could not be found. m You may be trying to open a document created with a program you don’t have on your computer, or created with a different version of the program. Obtain the correct program and version. Or, open the document with another program that can read its format. (If another program can open a document, the program icon becomes highlighted when you drag the document icon on top of it.) A program doesn’t work, or it produces errors consistently. m You may have more than one copy of the program on your hard disk. Remove extra copies by dragging them to the Trash. m The program may be damaged. Recopy it from a known good source (such as the original program disk). m Your version of the program may be incompatible with your system software. Consult the software manufacturer to find out which version of the program you should be using. m The program may be using less memory than it needs to work with your documents. Choose Get Info from the File menu and increase the memory size. Tips and Troubleshooting 115 m You may have added a control panel or extension that is incompatible with other programs you use. Restart the computer, holding the Shift key down, until you see the message “Extensions off.” If this solves the problem, remove any control panels or extensions you recently installed. You just did something you didn’t mean to do. m If you have not yet taken any other action, you can usually undo your most recent action (even if you aren’t sure what it was). Most programs have an Undo command in the Edit menu. Choose Undo to go back one step in your work. In most programs, you cannot undo more than one action. See the documentation that came with your programs for more information about their operation and features. 116 Chapter 9 Refer to this chapter when you want to use the PowerBook File Assistant that came with your computer to synchronize files. Appendix A Using the PowerBook File Assistant The PowerBook File Assistant is software that synchronizes files on your PowerBook and desktop Macintosh by automatically updating files whenever you make changes. With File Assistant, you can always be sure that the file you are working on is the current version. What is file synchronization? If you use two Macintosh computers, you may often have the same file or folder on both computers. But you may have a problem keeping track of what files are on what computer. With the PowerBook File Assistant you can make sure you always have the most recent version of a file or folder on both your computers. The process of updating the files on both computers is called file synchronization. With the PowerBook File Assistant, you can synchronize individual files or folders. File synchronization can also provide a useful means of maintaining a backup copy of important documents. Before you can use the PowerBook File Assistant to synchronize files, you need to connect your PowerBook to another Macintosh. For instructions, see Chapter 7, “Using Your Computer on a Network,” in the Macintosh Reference book. 117 Starting the PowerBook File Assistant Once you have installed the PowerBook File Assistant, you are ready to decide which files you want to synchronize. m Double-click the PowerBook File Assistant icon. The File Assistant Setup window appears. Linking files or folders for synchronization Before you can synchronize files or folders, you need to link them. Linking joins two identical copies of a file or folder together so that when one file or folder in the pair is modified, the linked file or folder is also changed. IMPORTANT Files cannot be linked if they are not identical copies, but you can link folders with different names or contents. Before linking, make sure that each computer’s clock is set for the same time and date. See the Macintosh Reference book that came with your computer for information on how to set the time and date on your computer’s clock. 118 Appendix A To link files or folders, follow these steps: 1 Drag the icon of a file or folder you want to link to a selection box in the File Assistant Setup window. The selection box is this area on either side of the arrow. Drag the icon of a file or folder you want to synchronize to a selection box. 2 Drag the matching icon to the other selection box. Once you have two matching files or folders in the Setup window, you have a linked pair. Another pair of selection boxes appears. Repeat steps 1 and 2 to link more pairs of files or folders. The setup screen grows as you add to the list of linked pairs. Use the scroll bars on the right of the screen to see parts of the list that are not in view. Using the PowerBook File Assistant 119 Setting the direction of the link Notice the arrow between the two linked files; this is how you can tell the direction in which the files are linked. Normally the PowerBook File Assistant synchronizes files in both directions, but you can set the direction to be one way, from either left to right or right to left. A one-way link is helpful if you want to receive updated versions of a document from a file server on a network. 1 Click the pair of linked files to select it. Click the item selection box for either file or folder in the pair. 2 Choose the direction you want from the Synchronize menu. Choose two-way synchronization to update either file when the corresponding file in the pair changes. Choose one-way synchronization to update a file on your hard disk from a network server. The direction of the arrow between the two linked files in the Setup window changes to reflect your choice. The arrow changes to indicate the direction of the link. 120 Appendix A Linking non-matching folders PowerBook File Assistant lets you link folders that have different names and contain different files. 1 Choose Preferences from the File Menu. The following dialog box appears: Click here to be able to link folders with different names. 2 Click the checkbox to allow non-matching folder names. 3 Click OK. Now you can link folders that have different names and contents. The first time you synchronize a pair of non-matching folders, PowerBook File Assistant copies all the files from one folder to the other, so that the folders have identical contents. Using the PowerBook File Assistant 121 Deleting a linked pair If you don’t want to synchronize a linked pair anymore, you can delete the linked pair from the Setup window. 1 Click the pair you want to delete to select it. To select more than one pair, hold down the Shift key and click other pairs. To select all pairs, choose Select All from the Edit menu. 2 Choose Delete Pairs from the Edit menu. The pairs you selected are deleted from the Setup window. The files or folders that were linked remain intact on their respective computers; only the link between them has been deleted. 122 Appendix A Synchronizing linked folders or files To synchronize files or folders you linked in the Setup window, you must do two things: m Connect the disks containing the files you are synchronizing. m Open the PowerBook File Assistant. Now you are ready to synchronize the linked files or folders. Any time you make a change to either item, the same change is made to the linked item. If an item is deleted, you’ll be asked to confirm that you want to delete the corresponding file or folder. Information about each linked pair is displayed in the Setup window. The name of the disk appears here. If the files have been synchronized, the time and date appear here. You can set the PowerBook File Assistant to synchronize files either manually or automatically. You choose which you want when you link the items. Using the PowerBook File Assistant 123 Manual synchronization When you choose manual synchronization, you decide when you want to update a linked pair. 1 Select a pair, then choose Manual from the Synchronize menu. 2 Click the arrow in the File Assistant Setup window. Click the arrow to synchronize the pair. A message appears telling you that the files are being updated. You can also manually update files that are linked by selecting the pair and then choosing Synchronize Now from the Synchronize menu. Automatic synchronization To update linked files automatically whenever a change is made to either of the linked files: m Select the pair and then choose Automatic from the Synchronize menu. A message appears whenever files are being updated. You can also set pairs to be updated every time you connect with another disk. See “Setting Up Completely Automatic Synchronization” later in this appendix. 124 Appendix A Turning off the alert messages As you synchronize linked pairs, the PowerBook File Assistant displays alert messages about the synchronization. You can turn off the alert messages by following these steps: 1 Choose Preferences from the File menu. A dialog box appears. 2 Click the “Warn when can’t synchronize” checkbox to deselect it. The messages do not appear. If you don’t want the alert message to appear when a file or folder is put in the Trash, click the checkbox next to “Warn before deleting” to deselect it. Be very careful if you turn off the alert message that warns you when files are put in the Trash. Items are put in the Trash during synchronization whenever a linked item is deleted or renamed. 3 Click OK. Alert messages are turned off. If you want to turn them back on, choose Preferences from the File menu and click the checkboxes again to reselect them. To turn alert messages off temporarily, hold down the Option key. While you hold down the Option key, the alert messages for any commands you execute are turned off. Using the PowerBook File Assistant 125 Setting up completely automatic synchronization The PowerBook File Assistant needs to be running in order to synchronize your files. To set up your system to automatically synchronize linked files: 1 Select the pair and then choose Automatic from the Synchronize menu. 2 Use the AutoRemounter control panel to reconnect to shared disks. See Chapter 7 for instructions on automatically reconnecting to (“remounting”) shared disks. 3 Drag an alias of the PowerBook File Assistant icon to the Startup Items folder. The Startup Items folder is in your PowerBook’s System Folder. See the Macintosh Reference book for help on creating an alias. Now whenever AutoRemounter “mounts” your disks and the PowerBook File Assistant is open, all automatically linked pairs are synchronized. 126 Appendix A Refer to this appendix for information on using the Macintosh PC Exchange program that came with your computer. Appendix B Exchanging Files With DOS or Windows Macintosh PC Exchange is software included with your computer that lets you easily exchange documents between your Macintosh and a DOS or Windows computer. You can use Macintosh PC Exchange to create floppy disks compatible with DOS computers. Macintosh PC Exchange at a glance You can open, edit, and save DOS documents using your favorite Macintosh application programs. Using the PC Exchange control panel, you can specify which Macintosh programs are used to open DOS documents. You can use and create DOS-format disks. For example, DOS documents whose names end with this suffix . . . . . . are to be opened by this program . . . . . . as this type of document. 127 Using DOS-format disks on your Macintosh The format of a disk refers to the way the computer prepares the disk to receive information. Macintosh computers and DOS computers use different disk formats, but with Macintosh PC Exchange installed in your Macintosh system, your Macintosh can read disks of either format. To use a DOS-format disk on your Macintosh, simply insert the disk into your computer’s floppy disk drive. The disk’s icon appears on the desktop. You can open the disk by double-clicking its icon—the same way you would open an ordinary Macintosh disk. When you insert a DOS-format floppy disk, you see this icon. If you see a message that the disk is unreadable, see the Macintosh Reference book. WARNING Do not attempt to repair a DOS-format disk using disk repair utility programs intended for use on the Macintosh. Doing so is likely to destroy any information on the disk. If you must repair a DOS-format floppy disk, use a disk repair utility on your DOS computer. 128 Appendix B Creating a blank DOS-format disk When you erase or initialize a disk on the Macintosh, you can choose its format—either Macintosh or DOS. WARNING Before you erase or initialize a disk, be sure that the disk contains no information you want to save. To create a blank DOS-format disk on your Macintosh, follow these steps: 1 Insert a floppy disk. m If the disk has not been initialized, a dialog box appears in which you can specify the disk’s name and format. m If the disk has already been used, you’ll need to erase it. Select the disk, then choose Erase Disk from the Special menu. Exchanging Files with DOS or Windows 129 A dialog box appears in which you can specify the disk’s name and format. 2 Type a name for the disk. 3 Choose the disk format you want from the Format pop-up menu. The list of available formats varies depending on your disk drive and the capacity of the disk. Choose DOS if you plan to use the disk on both Macintosh and DOS computers. 4 Click Erase (or Initialize). If you’re initializing a disk, an alert box appears. Click the Continue button. The Macintosh prepares the disk in the format you chose. Usually it takes less than a minute to initialize or erase a floppy disk. However, if portions of the disk have been damaged, the initialization process may take several minutes. If you changed the disk’s format, the disk’s icon will change when you reinsert the disk. 130 Appendix B Opening DOS documents on your Macintosh Opening a document from within a Macintosh program The surest way to open a DOS document on the Macintosh is to use the Open command from within an application program. 1 Open the program you want to use. 2 Choose Open from the File menu. A directory dialog box appears. Many programs have buttons or pop-up menus that let you open or import documents of a particular file format. 3 Select the document you want, and click Open. If you have problems opening the document, see the Macintosh Reference book. Opening a document by double-clicking its icon Before you can open a DOS document by double-clicking its icon, you need to use the PC Exchange control panel to specify which Macintosh application programs will open DOS documents, as described next. Exchanging Files with DOS or Windows 131 Assigning Macintosh programs to DOS documents Using the PC Exchange control panel, you can assign Macintosh application programs to DOS documents. For example, you can specify that all DOS documents whose filenames end with the suffix .XLS are to be opened in the Macintosh program Microsoft Excel. The following figure shows the PC Exchange control panel with some assignments already created. DOS documents whose names end with this suffix… …are to be opened by this Macintosh program… 132 Appendix B …as this type of document. Before you can assign a Macintosh program to a group of DOS documents, you need to answer three questions: m What suffix do the documents have in common? Many DOS programs automatically add a three-letter suffix (or filename extension) to a document’s name. For example, these PageMaker documents all share the suffix .PM4: NEWS.PM4 REPORT.PM4 RESUME.PM4 m What Macintosh application program do you want to use to open the documents? Each Macintosh document has a creator—that is, the Macintosh program used to create the document. When you double-click a document’s icon, the Macintosh opens the program that created the document. Using the PC Exchange control panel, you can assign Macintosh programs to DOS documents as “creators.” m What type of document is it? Most programs are able to open or import some, but not all, types of documents. A document’s type is a three- or four-letter code (such as TEXT or PICT) that tells a program whether or not it can recognize the document. A program displays documents of types it can recognize in its directory dialog box. Unless you specify otherwise, the Macintosh assumes that all DOS documents have the document type TEXT. You can assign different types to some DOS documents. See the next section. A document’s type is different from its file format, which refers to the way information within the document is encoded. If a program is unable to accurately interpret a document’s file format, the document’s formatting may be displayed incorrectly. (To find out which file formats a program can understand, refer to the documentation for the program.) Exchanging Files with DOS or Windows 133 Recommended assignments for some widely used application programs The information in this section will help you assign documents from some widely used DOS/Windows programs to some widely used Macintosh programs. (For more information, see the documentation for your application programs.) AMI Pro (Windows), version 2.0 Documents in AMI Pro (Windows) version 2.0 are automatically saved with the suffix .SAM. To open these documents on the Macintosh, add one of the following assignments to the PC Exchange control panel: DOS suffix Macintosh application Document type .SAM MacWrite® II (version 1.1) TEXT .SAM Microsoft Word (version 5.0) TEXT .SAM WordPerfect (version 2.0) TEXT .SAM WriteNow (version 2.2) TEXT Lotus 1-2-3 (Windows), version 1.0 Documents in Lotus 1-2-3 (Windows) version 1.0 are automatically saved with the suffix .WK3. To open these Lotus 1-2-3 documents on the Macintosh, add one of the following assignments to the PC Exchange control panel: DOS suffix 134 Appendix B Macintosh application Document type .WK3 Lotus 1-2-3 (version 1.0) TEXT .WK3 Microsoft Excel (version 3.0) TEXT Microsoft Excel (Windows), version 3.0 Documents in Microsoft Excel (Windows) version 3.0 are automatically saved with the suffix .XLS. To open these Microsoft Excel documents on the Macintosh, add one of the following assignments to the PC Exchange control panel: DOS suffix Macintosh application Document type .XLS Lotus 1-2-3 (version 1.0) TEXT .XLS Microsoft Excel (version 3.0) TEXT Microsoft Word (Windows), version 2.0 Documents in Microsoft Word (Windows) version 2.0 are automatically saved with the suffix .DOC. To open these documents in Microsoft Word (Macintosh) version 5.0, add the following assignment to the PC Exchange control panel: DOS suffix .DOC Macintosh application Document type Microsoft Word (version 5.0) WDBN PageMaker (Windows), version 4.0 Documents in PageMaker (Windows) version 4.0 are automatically saved with the suffix .PM4. To open these documents in PageMaker (Macintosh) version 4.0, add the following assignment to the PC Exchange control panel: DOS suffix .PM4 Macintosh application PageMaker (version 4.0) Document type ALB4 Exchanging Files with DOS or Windows 135 Quattro (DOS), version 3.0 When saving documents in Quattro (DOS) version 3.0, be sure to save them with the suffix .WK1 (rather than the default suffix, .WQ1). Quattro saves documents ending in .WK1 in the Lotus 1-2-3 file format, which can be interpreted by many Macintosh spreadsheet programs. To open these Quattro documents on the Macintosh, add one of the following assignments to the PC Exchange control panel: DOS suffix Macintosh application Document type .WK1 Claris Resolve™ (version 3.0) TEXT .WK1 Lotus 1-2-3 (version 1.0) TEXT .WK1 Microsoft Excel (version 3.0) TEXT Ventura Publisher (Windows), version 3.2 Documents in Ventura Publisher (Windows) version 3.2 are automatically saved with the suffix .CHP. To open these documents in Ventura Publisher (Macintosh) version 3.2, add the following assignment to the PC Exchange control panel: DOS suffix .CHP Macintosh application Ventura Publisher (version 3.2) Document type VCHP WordPerfect (DOS) version 5.1 WordPerfect (DOS) version 5.1 does not automatically add a suffix to the names of documents. The easiest way to open WordPerfect (DOS) documents on the Macintosh is by choosing the Open command from within an application program. 136 Appendix B Adding an assignment to the PC Exchange control panel To add an assignment, follow these steps: 1 Choose Control Panels from the Apple (K) menu. The Control Panels folder opens. 2 Open the PC Exchange control panel. Double-click the PC Exchange icon, or select the icon and choose Open from the File menu. The PC Exchange control panel appears. Exchanging Files with DOS or Windows 137 3 Click the Add button. A dialog box appears in which you can specify a DOS suffix and its corresponding Macintosh application program and document type. 4 Type a three-letter DOS suffix in the DOS Suffix box. To specify which Macintosh program will open DOS documents with no suffix, click inside the box to set the insertion point, but leave it blank. 138 Appendix B 5 Select a Macintosh application program from the directory section of the dialog box. 6 Choose a document type from the Document Type pop-up menu. Document types are indicated by icons and four-letter codes whose meanings are seldom obvious. For help choosing the correct document type, see the information in the previous section, “Recommended Assignments for Some Widely Used Application Programs.” If you don’t know which document type to choose, try TEXT. 7 Once you’ve specified a DOS suffix, a Macintosh application program, and the appropriate document type, click OK. The assignment is added to the list in the control panel. Exchanging Files with DOS or Windows 139 Trying out an assignment To try out an assignment you’ve added to the PC Exchange control panel, follow these steps: 1 Insert a DOS-format floppy disk and open its icon. PC Exchange assignments take effect when you insert a floppy disk, or when you open a DOS-format floppy disk. (If the disk window was already open, you need to close it and open it again.) 2 Double-click the icon of a DOS document whose filename ends with the suffix you specified. The document is opened by the appropriate Macintosh application program. (You might see a message that the document’s file format is being converted.) If you have problems opening documents, see the Macintosh Reference book. Editing the list of assignments You can change, remove, and sort assignments in the PC Exchange control panel. To sort the list of assignments, click a category. To change an assignment, select it in the list, then click Change. 140 Appendix B To remove an assignment, select it in the list, then click Remove. Sharing assignment lists with other users The list of assignments is stored in the PC Exchange Preferences file. This file is stored in the Preferences folder inside the System Folder. You can make sure that every licensed user of Macintosh PC Exchange in your office uses the same assignments. Make copies of the PC Exchange Preferences file and place one copy in the Preferences folder (inside the System Folder) of each licensed user’s Macintosh. Do not change the name of the PC Exchange Preferences file. Saving documents onto a DOS-format disk You save documents onto a DOS-format disk the same way you save them onto a Macintosh disk––by choosing the Save command from the File menu. IMPORTANT Be sure to leave at least 5K of extra disk space when you save or copy files onto a DOS-format floppy disk. (The Macintosh needs this space to store Macintosh-specific information about files on the disk, such as the location of icons and windows on the Macintosh desktop.) Exchanging Files with DOS or Windows 141 Choosing a file format In some programs you’ll have the choice of saving the document in one of several file formats. The Save As dialog box may include buttons or pop-up menus for choosing a file format. A document’s file format refers to the way information within the document is encoded. If a program cannot accurately interpret a document’s file format, it may display the document incorrectly (as in the following figure). When you save a document that you plan to use with another program, be sure to save it in a file format that the other program can understand. (To find out what file formats a program is able to open, import, and save, see the documentation you received with the program.) Naming files for use on both Macintosh and DOS computers On DOS computers, filenames are limited to eight characters (plus a threeletter suffix) and may not contain spaces. The rules for naming Macintosh files are less restrictive. Therefore, when working on the Macintosh, it’s possible to give a file a name that would be “illegal” on DOS computers. 142 Appendix B For example, suppose you created a file on your Macintosh named July Budget.DOC If you viewed the same file on a DOS computer, its name would be !JULYBUD.DOC The exclamation mark (!) indicates that the name has been shortened. A file can thus have two names: a long name (for when the file is displayed on the Macintosh) and a short name (for when it’s displayed on a DOS computer). While using a DOS-format floppy disk on the Macintosh, you can see a document’s short name by selecting the document, choosing the Get Info command from the File menu, and clicking the document’s name in the Info dialog box. (For this procedure to work, you must have the File Sharing Extension installed.) Long name Short name Viewing the contents of a disk on your DOS computer When you view the directory of a disk on your DOS computer, you might notice additional directories named RESOURCE.FRK. These directories contain important information, known as resources, which are contained in some Macintosh documents. WARNING Do not delete or move any directories named RESOURCE.FRK, and do not move any files out of these directories. Exchanging Files with DOS or Windows 143 Index A active window 37, 43 airline restrictions on computer use 91 AMI Pro documents, opening on the Macintosh 134, 137–140 Apple-authorized dealer or service provider disposing of dead batteries 51, 73 obtaining memory expansion cards 108 removing extra terminators 99 repairing the computer 50, 101, 110 replacing the battery 74 Apple HDI-30 SCSI System Cable 96, 99–100 AppleTalk external modems and 94, 112 network printers and 113 power conservation and 75 shared disks and 114 turning on and off 66, 104 AppleTalk Switch module in Control Strip 57, 66, 104 Application menu 48, 107 Show All 107 application programs. See programs arrow keys 48 arrow pointer improving display of 89 moving 18–21 troubleshooting 106 assigning Macintosh programs to DOS/Windows documents 132–141 automatic sleep 14, 76–77 following low-power messages 68 troubleshooting 105 AutoRemounter control panel 84, 126 B backing up the hard disk 6–10 backup battery 67 replacing 74 backup disks 7, 9–10 restoring the hard disk from 11–13 145 batteries. See also power conservation backup 67, 74 changing power conservation settings 62, 81 conserving power 75–81 damaged 73 disposing of 51, 73 draining too fast 104 low-power messages 67–68 monitoring charge level of 60–61 preventing damage to 68 recharging 69–72 reconditioning 74 removing or replacing 72–73 safety instructions for 49, 50, 51 transporting 49, 91 troubleshooting 104–105 Battery Conservation slider 76, 77–79, 104, 105, 110 battery icons on Battery Monitor 61 Battery Monitor module in Control Strip 57, 60–62 battery recharger 70–72 blurred screen 106 brightness control adjusting 5, 56 illustration 16 troubleshooting 102, 104, 106 built-in terminators 98 burns caused by damaged batteries 73 C cables for connecting SCSI devices 99–100 safety instructions for 49 troubleshooting 108 Cancel button 37 care of the computer 49–51 146 Index carpal tunnel syndrome 53 chains of SCSI devices 96, 97 terminators for 98–100 chair, adjusting to minimize muscle soreness and fatigue 54 Chooser 112, 113 .CHP documents, opening on the Macintosh 136, 137–140 cleaning the computer 50, 51 close box 37, 42 Close Box module in Control Strip 57, 58 Close (File menu) 44 closing the Control Strip 58 documents 44 x (Command) key 43, 48 connecting to your computer from another, troubleshooting 114 conserving battery power 75–81 contrast control adjusting 5, 56 illustration 16 troubleshooting 102, 106 control panels AutoRemounter 84, 126 Control Strip 59 incompatible 104 Memory 86–87 Mouse 89 PC Exchange 132–140 PowerBook 62, 76, 78–81 PowerBook Setup 95, 112 Startup Disk 87 Control Strip changing file sharing options from 64–65 changing sound volume from 65 closing and opening 58 customizing the Battery Monitor module 62 hiding 59 modules in 57 rearranging 60 monitoring battery charge level from 60–61 moving 60 putting the computer to sleep from 64 resizing 59 spinning down the hard disk from 63 turning AppleTalk on and off from 66, 104 Control Strip control panel 59 copying the contents of a disk 46 files to a floppy disk, troubleshooting 111 icons 41 corrections to Macintosh Reference book ix-x cumulative trauma disorders (CTDs) 52–53 Custom options for battery conservation 78–81 D dead batteries, disposing of 51, 73 Delete key 29 deleting. See also erasing; removing files from floppy disks, troubleshooting 111 a linked pair of files or folders from synchronization 122 deselecting icons 40 dimmed commands 48 Disk First Aid program 103, 109 disks. See floppy disks; hard disk Disk Tools disk, corrections to the Macintosh Reference book ix display. See also screen adjusting 3, 56 opening 3 .DOC documents, opening on the Macintosh 135, 137–140 documents. See also files creating 28–30 naming 30, 45 opening and closing 44 opening DOS documents on a Macintosh 131 saving 29–30, 45 types of, for importing 133 DOS/Windows, exchanging files with. See Macintosh PC Exchange program double-clicking 19 drivers, installing for SCSI devices 96 Duplicate (File menu) 41, 85 Index 147 E ejecting floppy disks 46, 110–111 electromagnetic emissions 56 elevation feet, illustration 16 Empty Trash (Special menu) 35, 42 Enter key 48 equipment, arranging to minimize muscle soreness and eye fatigue 54–56 Erase Disk (Special menu) 47 erasing. See also deleting; removing floppy disks 47 exchanging files with DOS/Windows. See Macintosh PC Exchange program extensions, incompatible 104 external modem, connecting to the PowerBook 94–95 external terminators 98–99 eye fatigue related to computer use 53 F fatigue, avoiding 53–56 File Assistant. See PowerBook File Assistant file formats 133, 142 File menu Close 44 Duplicate 41, 85 Find 103 Get Info 86, 115 New Folder 32, 47 Open 41, 44 Put Away 42 Quit 31 Save 29, 45 Save As 45 148 Index filenames, rules for DOS filenames 142 files. See also documents linking for synchronization 118–120, 122 synchronizing 123–126 file sharing changing options 64–65 troubleshooting 114 File Sharing module in Control Strip 57, 64–65 file synchronization. See PowerBook File Assistant Finder 36 Find (File menu) 103 flickering screen 106 floppy disk drive external modems and 94, 112 illustration 16 troubleshooting 110–111 floppy disks copying 46 creating a blank DOS-format disk 129–130 ejecting 46, 110–111 erasing 47 inserting and labeling 10 locked 111, 115 for making backups 7 for restoring the hard disk 11–13 saving documents on a DOS-format disk 141–142 troubleshooting 110–111 using DOS-format disks on a Macintosh 128–130 using lower-capacity disks 110 folders. See also System Folder choosing when saving a document 45 creating 32–33, 47 linking for synchronization 118–122 naming 32 opening higher level folders or disks 43 placing icons in 47 RAM Disk Backup 85–87 Startup Items 126 storing files in 32–33 synchronizing 123–126 fonts 113 format of a disk, defined 128 HDI-30 SCSI System Cable 96, 99–100 HD Spin Down module in Control Strip 57, 63 health-related information about computer use 52–56 Help menu 48 hiding the battery level on Battery Monitor 62 the Control Strip 59 high-density 3.5-inch floppy disks 7, 110. See also floppy disks G I-beam pointer. See also arrow pointer displaying thicker pointer 89 icons blinking in menu bar, troubleshooting 107 placing in folders 47 working with 40–42 ID numbers for SCSI devices 97–98 initializing the hard disk 109 corrections to the Macintosh Reference book x interference with radio and television reception vii Internal HD Format utility x, 109 internal modem 94, 95 internal terminators 99 Get Info (File menu) 86, 115 ghost images on screen 106 H hard disk backing up 6–10 copying items to and from floppy disks 46 initializing 109 corrections to the Macintosh Reference book x reinitializing 109 removing items from 34–35 spinning down 63 troubleshooting 11, 109–110 hard disk spin down, power conservation and 63, 77, 78–79 I, J Index 149 K keyboard, positioning for optimal use 54–55 keyboard shortcuts 48 L labeling floppy disks 10 leakage from damaged batteries 73 linking files or folders for synchronization 118–122 Lotus 1-2-3 documents, opening on the Macintosh 134, 137–140 lower-capacity disks (800K or 400K) 110 low-power messages 67–68 M Macintosh Basics tour 17–21 review questions 22–27 Macintosh HD window 19, 34 Macintosh PC Exchange program assigning Macintosh programs to DOS documents 132–141 opening DOS documents on a Macintosh 131 overview 127 using DOS-format disks on a Macintosh 128–130 Macintosh Reference book, corrections to ix-x 150 Index memory. See also RAM increasing memory size 115 “not enough memory” message 108 opening programs and 115 setting percentage to use for RAM disk 87 Memory control panel 86–87 memory expansion card 108 menu bar 36 blinking icon in 107 menus, choosing items from 48 Microsoft Excel or Word documents, opening on the Macintosh 135, 137–140 modem port, illustration 16 modems connecting an external modem to the PowerBook 94–95 power conservation and 75 troubleshooting 112 modules in Control Strip 57 rearranging 60 monitor. See display; screen Mouse control panel 89 mouse tracks 89 moving the computer 50 the Control Strip 60 icons 41 N naming documents 30, 45 folders 32 icons 41 network printers printing documents later 90 troubleshooting 113 networks, troubleshooting 114 New Folder (File menu) 32, 47 nickel-cadmium battery. See batteries O Open (File menu) 41, 44 opening the Control Strip 58 documents 44 DOS/Windows documents on a Macintosh 131 higher level folders or disks 43 icons 41 windows 42 Option key 41, 48 P PageMaker documents, opening on the Macintosh 135, 137–140 PC Exchange control panel 132–140 PC Exchange Preferences file 141 plug adapters for overseas travel 91 plugging in the power adapter 1–2 .PM4 documents, opening on the Macintosh 135, 137–140 pointer. See arrow pointer; I-beam pointer ports illustrations of 16 power adapter 2, 69 printer 93, 94 safety instructions for 50 SCSI 96 PostScript network printer, printing documents later 90 power adapter for a battery recharger 70–71 plugging in 1–2, 69 safety instructions 50 troubleshooting 5, 102 power adapter port 2 illustration 16, 69 PowerBook 150 Backup program 6, 8–10 PowerBook 150 Restore program 11–13 PowerBook control panel 62, 76, 78–81 PowerBook File Assistant alert messages 125 linking files or folders 118–122 overview 117 synchronizing linked files or folders 123–124, 126 Index 151 PowerBook Setup control panel 95, 112 power conservation. See also batteries AppleTalk and 75 Battery Conservation slider and 76, 77–79, 104, 105, 110 changing settings 62, 81 Custom options for 78–81 modem use and 75 RAM disks and 85, 88 screen dimming and 75 slowing processor speed 80 troubleshooting 104–105 turning off processor cycling 79–80, 115 power management options, monitoring 57 Power On button 4, 5, 16, 103 Power Settings module in Control Strip 57, 62 power sources 67 printer port 16, 93 connecting an external modem to 94 selecting, corrections to the Macintosh Reference book x printers connecting to the PowerBook 93 troubleshooting 112–113 printing, setting up documents to print later 90 processor cycling, turning off 79–80, 115 processor speed, power conservation and 80 152 Index programs assigning Macintosh programs to DOS/Windows documents 132–141 compatibility issues 104 Disk First Aid 103, 109 Internal HD Format x, 109 Macintosh Basics tour 17–21 review questions 22–27 Macintosh PC Exchange 127–141 PowerBook 150 Backup 6, 8–10 PowerBook 150 Restore 11–13 SimpleText 28–31 troubleshooting 115–116 virus-detection 103 pull-down menus, working with 48 Put Away (File menu) 42 Q Quattro documents, opening on the Macintosh 136, 137–140 Quit (File menu) 31 R radio and television reception, interference with vii RAM protecting contents of. See also memory following low-power messages 68 while replacing the battery 74 RAM disk “not enough memory” message and 108 restarting the computer and 102 setting up 85–87 corrections to the Macintosh Reference book x turning off the computer and 87 using as startup disk 75, 85–87, 103 using for your work 88 RAM Disk Backup folder 85–87, 103 recharging the battery in a recharger 70–72 in the computer 69–70 estimated time for fully depleted batteries 72 troubleshooting 105 while using the computer 70 reconditioning batteries 74 reconnecting to shared disks automatically 84 recycling dead batteries 73 reinitializing the hard disk 109 removing. See also deleting; erasing the battery 72–73 items from the hard disk 34–35, 42 renaming icons 41 repetitive stress injuries (RSIs) 52–53 replacing the backup battery 74 the battery 72–73 Reset switch 16, 102 RAM disk and 87 resizing the Control Strip 59 Restart button 103 restarting the computer 15, 37 troubleshooting 15, 102–103 Restart (Special menu) 15, 37, 80, 87, 103 restoring information on the hard disk 11–13 retrieving items from the Trash 42 Return key 48 S safety instructions for batteries 51, 73 for the computer 49–51 for traveling with the PowerBook 91 .SAM documents, opening on the Macintosh 134, 137–140 Save As (File menu) 45 Save (File menu) 29, 45 saving documents 45 on a DOS-format disk 141–142 files to a floppy disk, troubleshooting 111 screen. See also display cleaning 51, 56 clues about where you are 36–37 troubleshooting 106–107 Index 153 screen dimming, power conservation and 75, 77, 78–79 Scroll Arrow modules in Control Strip 57 scroll arrows 42 scroll box 42 SCSI devices connecting to the PowerBook 96–100 troubleshooting 108 SCSI ID numbers setting 97–98 troubleshooting 108 SCSI port 16, 96 SCSI terminators 98–100 troubleshooting 108 selecting icons 40 service and support 92 setting up your PowerBook 1–5 shared disks reconnecting to 84 troubleshooting 114 Show All (Application menu) 107 Shut Down (Special menu) 13, 87, 92 SimpleText program 28–31 size box 42 Sleep Now module in Control Strip 57, 64 Sleep (Special menu) 14, 105 sleep state low-power messages and 68 putting the computer to sleep 14, 64, 76 troubleshooting 103, 105, 110 154 Index Small Computer System Interface. See SCSI software, installing drivers for SCSI devices 96 sound volume, changing 65 Sound Volume module in Control Strip 57, 65 speaker, illustration 16 Special menu Empty Trash 35, 42 Erase Disk 47 Restart 15, 37, 80, 87, 103 Shut Down 13, 87, 92 Sleep 14, 105 spinning down the hard disk 63 power conservation and 77, 78–79 startup disk, using a RAM disk as 75, 85–87 Startup Disk control panel 87 Startup Items folder 126 storing the PowerBook 92 suffixes for DOS filenames 133, 134–136 specifying in PC Exchange control panel 137–140 synchronizing files. See PowerBook File Assistant system failures, troubleshooting 103–104 System Folder backing up 6, 9 multiple System Folders on startup disk 103 printer software and 113 RAM disk and 85 restoring 11, 13 system sleep, power conservation and 77, 78–79 System Sleeps slider 105 system software, backing up 6 T Tab key 48 Tab module in Control Strip 57, 58, 59 television and radio reception, interference with vii temperature ranges for the computer 51, 92 terminators. See SCSI terminators text, typing 29 3.5-inch high-density floppy disks 7, 110. See also floppy disks trackball cleaning 107 illustration 16 learning to use 18–21 “tracks” for 89 troubleshooting 107 Trash dragging an item to 34, 42 emptying 35 retrieving items from 35, 42 viewing contents of 35 traveling with the PowerBook, precautions 91 troubleshooting application program problems 115–116 battery problems 104–105 blinking icon in menu bar 107 brightness control 102, 104, 106 computer doesn’t restart 102 computer doesn’t start 5, 102 computer malfunctions 92 computer stopped 103 connecting to your computer from another 114 contrast control 102, 106 floppy disk problems 110–111 hard disk problems 11, 109–110 low-power messages 67–68 modem problems 112 network problems 114 “not enough memory” message 108 pointer problems 106 power adapter problems 5, 102 power problems 104–105 printer problems 112–113 program problems 115–116 restarting the computer 15, 102–103 screen problems 106–107 SCSI device problems 108 sleep state 103, 105 system failures 103–104 trackball problems 107 window disappears 107 turning off the computer 13 turning off the hard disk 63 turning on the computer 4–5 after connecting SCSI devices 100, 108 tutorial Macintosh Basics tour 17–21 review questions 22–27 typing text 29 Index 155 U undoing actions 116 unlocking a floppy disk 115 Utilities disk corrections to the Macintosh Reference book ix restarting the computer from 103, 109 restoring information on the hard disk 11 Windows/DOS, exchanging files with. See Macintosh PC Exchange program .WK1 documents, opening on the Macintosh 136, 137–140 .WK3 documents, opening on the Macintosh 134, 137–140 WordPerfect documents, opening on the Macintosh 136, 137–140 work area, arranging to minimize muscle soreness and eye fatigue 54–56 V Ventura Publisher documents, opening on the Macintosh 136, 137–140 View menu 43 virtual memory, conserving battery power and 75 virus-detection programs 103 X, Y .XLS documents, opening on the Macintosh 135, 137–140 Z zoom box 42 W waking the computer 13, 14, 64, 76 warranty on the computer, voiding 50, 101 window disappeared, troubleshooting 107 enlarging or reducing 42 making active 37, 43 moving 34 opening 42 viewing contents of 42, 43 156 Index The Apple Publishing System This Apple manual was written, edited, and produced on a desktop publishing system using Apple Macintosh computers and QuarkXPress. Technical illustrations were drawn in Adobe™ Illustrator; screen shots were created and modified with system software, Exposure Pro, Aldus SuperPaint, and Adobe Photoshop. Proof pages were created on Apple LaserWriter printers and on QMS and Tektronix color printers. Final pages were output directly to separated film on a PostScript™-driven imagesetter. Text type is Times®, display type is Helvetica® Narrow, and cover type is Apple Garamond, Apple’s corporate font. Ornaments are custom symbols designed for Apple Computer. PostScript, the LaserWriter page-description language, was developed by Adobe Systems Incorporated.