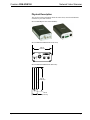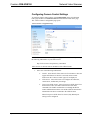
1
Crestron CEN-NVS100
Network Video Streamer
Operations & Installation Guide
This document was prepared and written by the Technical Documentation department at:
Crestron Electronics, Inc.
15 Volvo Drive
Rockleigh, NJ 07647
1-888-CRESTRON
Industry Compliance
As of the date of manufacture, the CEN-NVS100 has been tested and found to comply with specifications for CE
marking and standards per EMC and Radiocommunications Compliance Labelling.
Federal Communications Commission (FCC) Compliance Statement
This device complies with part 15 of the FCC rules. Operation is subject to the following conditions:
(1) this device may not cause harmful interference and (2) this device must accept any interference received,
including interference that may cause undesired operation.
CAUTION: Changes or modifications not expressly approved by the manufacturer responsible for compliance
could void the user’s authority to operate the equipment.
NOTE: This equipment has been tested and found to comply with the limits for a Class B digital device,
pursuant to part 15 of the FCC rules. These limits are designed to provide reasonable protection against harmful
interference in a residential installation. This equipment generates, uses and can radiate radio frequency energy
and if not installed and used in accordance with the instructions, may cause harmful interference to radio
communications. However, there is no guarantee that interference will not occur in a particular installation. If
this equipment does cause harmful interference to radio or television reception, which can be determined by
turning the equipment off and on, the user is encouraged to try to correct the interference by one or more of the
following measures:
Reorient or relocate the receiving antenna
Increase separation between the equipment and the receiver
Connect the equipment inot an outlet on a circuit different from that to which the receiver is connected
Consult the dealer or an experienced radio/TV technician for help
Crestron is a registered trademark of Crestron Electronics, Inc.
Crestron Toolbox is a trademark of Crestron Electronics, Inc.
Firefox is a registered trademark of the Mozilla Foundation.
Internet Explorer is a registered trademark of Microsoft Corporation in the United States and other countries.
QuickTime is a trademark of Apple Inc., registered in the U.S. and other countries.
RealPlayer is a registered trademark of RealNetworks, Inc.
Safari is a trademark of Apple Inc., registered in the U.S. and other countries.
©2009 Crestron Electronics, Inc.
Crestron CEN-NVS100
Network Video Streamer
Contents
Network Video Streamer: CEN-NVS100
1
Introduction ............................................................................................................................... 1
Features and Functions ................................................................................................ 1
Specifications .............................................................................................................. 2
Physical Description.................................................................................................... 3
Setup .......................................................................................................................................... 6
Network Wiring........................................................................................................... 6
Supplied Hardware ...................................................................................................... 6
Installation ................................................................................................................... 6
Hardware Hookup ....................................................................................................... 8
User Interface Overview............................................................................................................ 9
Accessing the CEN-NVS100 User Interface ............................................................... 9
Navigating the Home Page........................................................................................ 12
Configuration........................................................................................................................... 21
Configuring System Settings ..................................................................................... 22
Configuring Security Settings ................................................................................... 24
Configuring Network Settings................................................................................... 27
Configuring DDNS Settings...................................................................................... 34
Configuring Client Access Settings........................................................................... 34
Configuring Audio and Video Settings ..................................................................... 37
Configuring Motion Detection Settings..................................................................... 45
Configuring Camera Control Settings ....................................................................... 47
Configuring Home Page Layout Settings .................................................................. 51
Configuring Event, Server, and Media Settings ........................................................ 53
Configuring Recording Settings ................................................................................ 59
Configuring System Log Settings.............................................................................. 62
Viewing System Parameters...................................................................................... 63
Performing Maintenance Actions.............................................................................. 63
Problem Solving ...................................................................................................................... 66
Troubleshooting......................................................................................................... 66
Reference Documents................................................................................................ 67
Further Inquiries ........................................................................................................ 67
Future Updates .......................................................................................................... 67
Software License Agreement................................................................................................... 68
Return and Warranty Policies .................................................................................................. 70
Merchandise Returns / Repair Service ...................................................................... 70
CRESTRON Limited Warranty................................................................................. 70
Operations & Installation Guide – DOC. 6873A
Contents • i
Crestron CEN-NVS100
Network Video Streamer
Network Video Streamer:
CEN-NVS100
Introduction
The CEN-NVS100 provides a simple solution for streaming video from any
camera to Crestron® touchpanels throughout the home, school, or business.
Compatible with Crestron touchpanels that support the MJPEG Viewer
application, the CEN-NVS100 allows easy monitoring of door entry cameras,
nursery cameras, or any other video feed. Examples of compatible touchpanels are
the TPMC-3X, TPMC-4XG, TPMC-8L, TPMC-8T, and TPMC-8X.
Dual codecs allow the simultaneous streaming of signals with two different video
settings. Video settings include adjustable image size, quality, and bit rate.
Additional options include text and time stamp overlay and also privacy masking
that allows any portion of the video image to be obscured. Up to three motion
detection windows can be defined, enabling automated control events in response to
movement in specific areas on the screen. Events can also be triggered by an external
motion detector connected to the digital input or by detection of a total loss of
video signal.
An RS-485 control port is included, allowing remote control of a pant/tilt/zoom
(PTZ) camera with select drivers built in to support Pelco D and other popular
models.
Features and Functions
•
•
•
•
•
•
•
•
•
•
Real-time motion-JPEG compression
Up to D1 resolution (NTSC 704x480/PAL 704x576)
Supports simultaneous dual streams
Supports privacy masks
Triple-window motion detection
Includes digital I/O for external sensor and alarm
Enables RS-485 control of Pelco D and other popular PTZ cameras
PoE (Power over Ethernet) compatible
Includes bracket for surface or rack rail mounting
Compatible with Crestron touchpanels that support the MJPEG
Viewer application
Operations & Installation Guide – DOC. 6873A
Network Video Streamer: CEN-NVS100 • 1
Network Video Streamer
Crestron CEN-NVS100
Specifications
Specifications for a CEN-NVS100 are listed in the following table.
CEN-NVS100 Specifications
SPECIFICATION
DETAILS
Video
Input Signal Types
NTSC or PAL compatible
Compression
MJPEG video
Streaming
Simultaneously dual-streaming MJPEG
over HTTP
Resolutions
176x112, 352x240, 704x480 (NTSC);
176x144, 352x288, 704x576 (PAL)
Frame Rates
Up to 30 fps @ 352x240 or lower,
up to 12 fps @ 704x480 (NTSC);
Up to 25 fps @ 352x288 or lower,
up to 12 fps @ 704x576 (PAL)
Users
Live viewing for up to 10 clients
Ethernet
Standards
10BaseT/100BaseTX, auto-switching, autonegotiating, auto-discovery, full/half duplex,
IEEE 802.3u compliant
Protocols
IPv4, TCP/IP, HTTP, UPnP, IGMP, SMTP,
FTP, DHCP, NTP, DNS, DDNS, PPPoE, CIP
Security
Multi-level user access, password protection,
IP address filtering
Power Requirements
IEEE 802.3af Class 2 PoE Powered Device
Environmental
Temperature
32º to 104º F (0º to 40º C)
Humidity
20% to 80% RH (non-condensing)
Enclosure
Metal construction, freestanding, surface or
rack-rail mount (detachable mounting
bracket included)
Dimensions
Height
1.38 in (3.50 cm)
Width
2.96 in (7.50 cm),
3.95 in (10.04 cm) with mounting bracket
Depth
5.37 in (13.62 cm)
Weight
7.06 oz (200 g)
NOTE: Crestron software and any files on the website are for authorized Crestron
dealers and Crestron Authorized Independent Programmers (CAIP) only. New users
may be required to register to obtain access to certain areas of the site (including the
FTP site).
2 • Network Video Streamer: CEN-NVS100
Operations & Installation Guide – DOC. 6873A
Crestron CEN-NVS100
Network Video Streamer
Physical Description
This section provides information about the connections, controls and indicators
available on your CEN-NVS100.
CEN-NVS100 Physical View (Front and Rear)
CEN-NVS100 Overall Dimensions (Front View)
2.96 in
(7.50 cm)
VIDEO
NET
PWR
HW
RESET
CEN-NVS100 Overall Dimensions (Side View)
5.37 in
(13.62 cm)
1.38 in
(3.50 cm)
Operations & Installation Guide – DOC. 6873A
Network Video Streamer: CEN-NVS100 • 3
Network Video Streamer
Crestron CEN-NVS100
CEN-NVS100 Overall Dimensions with Mounting Bracket
3.95 in
(10.04 cm)
1.25 in
(3.18 cm)
CEN-NVS100 Connectors, Controls & Indicators (Front and Rear)
VIDEO
For Factory Use Only
1
2
12V DIO 485
P C I O +
NET
PWR
LAN PoE
HW
RESET
3
4 • Network Video Streamer: CEN-NVS100
-
4
5
6
Operations & Installation Guide – DOC. 6873A
Crestron CEN-NVS100
Network Video Streamer
Connectors, Controls & Indicators
#
CONNECTORS,
CONTROLS &
INDICATORS1
1
NET
(1) Green LED: Indicates system activity and
Ethernet link status.
2
PWR
(1) Red LED: Indicates power supplied from IEEE
802.3af-compliant PoE power source.
3
HW RESET2
(1) Recessed pushbutton that reboots the device.
Pressing the HW RESET button until the green
NET LED flashes rapidly resets the unit to
factory-default settings.
4
VIDEO
(1) BNC female, composite video input;
Maximum Input Level: 1 Vp-p nominal;
Input Impedance: 75 ohms nominal.
VIDEO
5
12V, DIO, 485
12V DIO 485
P C I O +
-
6
LAN PoE
LAN PoE
DESCRIPTION
(1) 6-pin 3.5 mm detachable terminal block;
connects to alarm, relay, and PTZ camera;
P: 12 VDC power, for factory use only
C: Common Ground
I: Digital Input, rated for 50 mA @ 12 VDC,
2 kV isolated, logic threshold 3 VDC
O: Digital Output, 400 mA sink from
maximum 40 VDC, 2 kV isolated
+: RS-485, T+/R+, PTZ camera control
–: RS-485, T-/R-, PTZ camera control
RS-485 camera control includes built-in drivers
for DynaDome/SmartDome, Pelco D, & LI-LIN
PIH-7x00 cameras.
(1) 8-wire RJ-45 female connector;
10BaseT/100BaseTX Ethernet port, 802.3af
PoE compliant;
Connects to IEEE 802.3af-compliant PoE
power source.
1. RCA connectors on the front panel of the CEN-NVS100 are reserved for future use.
The 12 VDC power jack on the rear panel of the CEN-NVS100 is for factory use only.
2. To press the HW RESET button, use the end of a paper clip.
Operations & Installation Guide – DOC. 6873A
Network Video Streamer: CEN-NVS100 • 5
Network Video Streamer
Crestron CEN-NVS100
Setup
Network Wiring
When wiring the Ethernet network, use CAT5 wiring. CAT5 wiring is a twisted pair
cable designed for Ethernet networks. These networks operate at speeds of up to 100
Megabits per second (Mbps) using the 100BaseT standard.
For information on connecting Ethernet devices in a Crestron system, refer to the
latest version of the Crestron e-Control® Reference Guide (Doc. 6052), which is
available for download from the Crestron website (www.crestron.com/manuals).
Supplied Hardware
The hardware supplied with a CEN-NVS100 is listed in the following table.
Supplied Hardware for a CEN-NVS100
DESCRIPTION
Mounting Bracket
PART NUMBER
QUANTITY
2022739
1
M3 x 5mm, Flat Head Phillips Screws
2022785
4
BNC-to-RCA-adapter
2022817
1
6-Pin Screw Terminal
2022818
1
Installation
Ventilation
A CEN-NVS100 should be used in a well-ventilated area. The venting holes should
not be obstructed under any circumstances. To prevent overheating, do not operate
this product in an area that exceeds the environmental temperature range listed in the
table of specifications.
Mounting
The CEN-NVS100 mounts onto a wall or a rack. The supplied mounting bracket
must be attached to the CEN-NVS100 before the device is mounted.
Attaching the Mounting Bracket
Attach the bracket to the bottom of the CEN-NVS100 using the four supplied
M3 x 5mm Phillips flat head screws as shown below.
Attachment of Mounting Bracket to CEN-NVS100
6 • Network Video Streamer: CEN-NVS100
Operations & Installation Guide – DOC. 6873A
Crestron CEN-NVS100
Network Video Streamer
Wall Mounting
Using four drywall screws (not supplied), mount the bracket and attached
CEN-NVS100 to the wall as shown below.
CEN-NVS100 Wall Mounting
Rack Mounting
The CEN-NVS100 can be mounted to a front or rear rail of a rack. Either the left or
right side of the attached mounting bracket can be used to mount the CEN-NVS100
to the rack (mounting of the right side of bracket is shown below).
To mount the CEN-NVS100 to a rack:
1.
Position either the left or right side of the bracket so that its holes align with
the holes in the rack.
2.
Secure the bracket to the rack using two rack-mount screws (not supplied).
CEN-NVS100 Rack Mounting
Operations & Installation Guide – DOC. 6873A
Network Video Streamer: CEN-NVS100 • 7
Network Video Streamer
Crestron CEN-NVS100
Hardware Hookup
Make the necessary connections as called out in the following sections. Apply power
after all connections have been made.
Hardware Connections for the CEN-NVS100 (Front View)
VIDEO
NET
PWR
HW
RESET
VIDEO:
FROM CAMERA
Hardware Connections for the CEN-NVS100 (Rear View)
For Factory Use Only
12V DIO 485
P C I O +
-
FROM ALARM,
TO RELAY,
AND TO/FROM
PTZ CAMERA
8 • Network Video Streamer: CEN-NVS100
LAN PoE
LAN PoE:
TO/FROM 10BaseT/100BaseTX
802.3af-COMPLIANT
POWER SOURCE
Operations & Installation Guide – DOC. 6873A
Crestron CEN-NVS100
Network Video Streamer
User Interface Overview
Have a question or comment about Crestron software?
Answers to frequently asked questions (FAQs) can be viewed in the Online Help
section of the Crestron website. To post a question or view questions you have
submitted to Crestron’s True Blue Support, log in at http://support.crestron.com.
First-time users will need to establish a user account.
The CEN-NVS100 user interface allows configuration of the CEN-NVS100, control
of basic camera functions, viewing of streaming video, viewing of system
parameters, and performance of system maintenance functions.
Accessing the CEN-NVS100 User Interface
NOTE: Access to the CEN-NVS100 user interface must be performed from a PC
whose IP address is in the same IP subnet. The default configuration of the
CEN-NVS100 allows the IP address of the network video streamer to be
automatically assigned by a DHCP (Dynamic Host Configuration Protocol) server on
the local area network.
If a DHCP server does not exist on the network and 45 seconds have elapsed since
the CEN-NVS100 was powered on, the IP address of the CEN-NVS100 defaults to
169.254.0.99 and the subnet mask defaults to 255.255.0.0. If another device uses that
address, another address in the local link address space is selected for the
CEN-NVS100 (169.254.xxx.xxx).
The CEN-NVS100 user interface can be accessed from a Web browser or from the
Crestron Toolbox™:
•
You can access the CEN-NVS100 from a Web browser if you know the IP
address or host name of the CEN-NVS100.
NOTE: The default host name of the CEN-NVS100 is CEN-NVS100.
For additional information, refer to “Using a Web Browser” on page 10.
•
You can access the CEN-NVS100 from the Crestron Toolbox if the
CEN-NVS100 is configured to operate in DHCP mode (default
configuration). The Crestron ToolBox automatically discovers the IP
address of the CEN-NVS100. For additional information, refer to “Using
the Crestron ToolBox” on page 11.
Operations & Installation Guide – DOC. 6873A
Network Video Streamer: CEN-NVS100 • 9
Network Video Streamer
Crestron CEN-NVS100
Using a Web Browser
The CEN-NVS100 user interface can be accessed from the following Web browsers:
•
Internet Explorer® 7.0 or higher
•
Firefox® 3.0 or higher
•
Safari® 4.0 or higher
NOTE: Some configuration parameters require the use of the Internet Explorer
Web browser.
To access the CEN-NVS100 from a Web browser:
1.
Start your Web browser.
2.
Go to the IP address or host name of the CEN-NVS100.
NOTE: If the default HTTP port number of 80 has been changed, you must
append the port number to the IP address by entering a colon followed by
the new port number. If, for example, the IP address is 192.168.10.225 and
the HTTP port number has been changed from 80 to 150, go to
http://192.168.10.225:150.
For information about changing the HTTP port number, refer to
“Configuring Network Settings” on page 27.
3.
If necessary, perform either of the following:
•
For initial access to the CEN-NVS100 using Internet Explorer, you
may be prompted for permission to install a new plug-in for the
CEN-NVS100. Click Yes to proceed. If Internet Explorer does not
allow you to continue installation of the plug-in, check the Internet
security option and lower the security levels or contact your IT or
networking supervisor for assistance. The plug-in must be installed to
display the video in the Web browser.
NOTE: The Internet Explorer request to install a plug-in for the
CEN-NVS100 depends on the Internet security settings of your PC.
If the highest security level is set, the PC may prohibit any installation
and execution attempt.
•
For initial access to the CEN-NVS100 using Firefox, install the
QuickTime® media player.
The user name and password window opens, allowing you to log in to the
CEN-NVS100. For log-in information, refer to “Logging In to the
CEN-NVS100” on page 11.
10 • Network Video Streamer: CEN-NVS100
Operations & Installation Guide – DOC. 6873A
Crestron CEN-NVS100
Network Video Streamer
Using the Crestron ToolBox
NOTE: To be able to use the Crestron Toolbox to access the CEN-NVS100, the
UPnP (Universal Plug and Play) Ethernet protocol configuration setting of the
CEN-NVS100 must be enabled. The UPnP protocol is enabled by default. For
additional information, refer to “Configuring Network Settings” on page 27.
To access the CEN-NVS100 from the Crestron Toolbox:
1.
Open the Crestron Toolbox.
2.
From the Tools menu, select Device Discovery Tool.
NOTE: You can also access the Device Discovery Tool by clicking the
Device Discovery Tool button ( ) in the toolbar.
NOTE: The security software running on your computer may send you a
program alert regarding the attempt of Crestron Toolbox to connect to the
network. You must allow the connection so that the Device Discovery tool
can be used.
3.
From the device list on the left-hand side of the screen, select the
UPnP name of the CEN-NVS100. The default UPnP name is
CEN-NVS100.
The user name and password window opens, allowing you to log in to the
CEN-NVS100. For log-in information, refer to “Logging In to the
CEN-NVS100” below.
Logging In to the CEN-NVS100
The user name and password window allows you to log in to the CEN-NVS100.
“User Name and Password” Window
Operations & Installation Guide – DOC. 6873A
Network Video Streamer: CEN-NVS100 • 11
Network Video Streamer
Crestron CEN-NVS100
To log in to the CEN-NVS100:
1.
Enter the user name and password.
NOTE: The user name of the Administrator is permanently assigned as
root. The default root password is blank. For enhanced security, it is
recommended that the Administrator change the default root password. For
information about changing the root password, refer to “Configuring
Security Settings” on page 24.
NOTE: The setup of user accounts must be performed by the
Administrator. For information about setting up user accounts, refer to
“Configuring Security Settings” on page 24.
NOTE: The user name and password are case sensitive.
2.
Click OK.
The home page of the CEN-NVS100 opens. Refer to “Navigating the Home
Page” below for information.
Navigating the Home Page
The home page of the CEN-NVS100 allows access to configuration of the
CEN-NVS100, control of basic camera functions, and display of streaming video.
The home page that is displayed varies depending on the following:
•
Display mode, which can be set to Image mode or Text mode.
⇒ Image mode allows display of graphical buttons on the home page.
⇒ Text mode prevents display of graphical buttons on the home page.
NOTE: Display mode and other parameters that affect the appearance of
the home page are configured on the “Home Page Layout” configuration
page. For additional information, refer to “Configuring Home Page Layout
Settings” on page 51.
•
Video mode, which can be set to MPEG-4 or JPEG streaming mode:
⇒ MPEG-4 allows video and audio transmission but requires a Web
browser for playback.
⇒ JPEG (motion JPEG) is compatible with Crestron TPMC
touchpanels that support the MJPEG Viewer application.
NOTE: Video mode is configured on the “Audio and Video” configuration
page. For additional information, refer to “Configuring Audio and Video
Settings” on page 37.
•
Web browser (Internet Explorer, Firefox, or Safari)
The following screen illustrates the home page in Internet Explorer when the
CEN-NVS100 is set to MPEG-4 streaming and the home page is set to Image mode.
Observe that graphical buttons, such as for PTZ directional buttons, are displayed in
the left column.
12 • Network Video Streamer: CEN-NVS100
Operations & Installation Guide – DOC. 6873A
Crestron CEN-NVS100
Network Video Streamer
CEN-NVS100 Home Page—Image Mode in Internet Explorer (MPEG-4 Streaming)
The following screen illustrates the home page in Internet Explorer when the
CEN-NVS100 is set to MPEG-4 streaming and the home page is set to Text mode.
Observe that graphical buttons are not displayed in the left column.
CEN-NVS100 Home Page—Text Mode in Internet Explorer (MPEG-4 Streaming)
The following sections discuss the various functional areas of the home page.
Operations & Installation Guide – DOC. 6873A
Network Video Streamer: CEN-NVS100 • 13
Network Video Streamer
Crestron CEN-NVS100
Snapshot
Clicking the Snapshot link allows a snapshot of streaming video to be taken. When
the link is clicked, a page opens displaying the snapshot.
To save a snapshot:
1.
Right-click the snapshot.
A menu opens.
2.
Click Save Picture As….
The “Save Picture” window opens.
3.
Browse to the desired location in which you want to save the snapshot,
rename the file if desired, select the file type, and then click Save.
Saving a Snapshot
Configuration
Clicking the Configuration link allows configuration of various types of settings,
such as system settings, security settings, and so on. For additional information, refer
to the “Configuration” section on page 21.
14 • Network Video Streamer: CEN-NVS100
Operations & Installation Guide – DOC. 6873A
Crestron CEN-NVS100
Network Video Streamer
Client Settings
Clicking the Client Settings link opens the “Client Settings” page.
NOTE: You can also access the “Client Settings” page by entering the following
URL address in your Web browser:
http://Video Streamer/clientset.html
Video Streamer is the host name or IP address of the CEN-NVS100.
When using Internet Explorer, the “Client Settings” page appears as shown below.
“Client Settings” Page Using Internet Explorer
NOTE: If Firefox or Safari is used, only the Stream Options pane appears on the
“Client Settings” page.
To configure client settings, refer to the guidelines that follow.
NOTE: You can also obtain configuration guidelines by placing your mouse over
the appropriate help icon ( ) on the “Client Settings” page.
Stream Options: Select the stream to view: Stream 1 or Stream 2.
NOTE: A minimal view of the video can be accessed at the following URL address
in your Web browser:
http://Video Streamer/setup/viewer.html
Video Streamer is the host name or IP address of the CEN-NVS100.
Operations & Installation Guide – DOC. 6873A
Network Video Streamer: CEN-NVS100 • 15
Network Video Streamer
Crestron CEN-NVS100
MPEG-4 Media Options: (Internet Explorer only) Select the MPEG-4 media for
playback: Video and Audio, Video Only, or Audio Only.
NOTE: Audio is not supported in CEN-NVS100 version 0100i.
Select the Enable deinterlace checkbox to improve image quality. When selected,
more CPU utilization is required.
MPEG-4 Protocol Options: (Internet Explorer only) Select the desired MPEG-4
connection protocol between client and server:
NOTE: After changing and saving the setting, close your Web browser and then
reopen it.
•
UDP Unicast: Allows for better real-time performance; however, some
packets may be lost due to network traffic. If there are no special
requirements, UDP Unicast is the recommended setting.
•
UDP Multicast: Identical to UDP Unicast except that it saves bandwidth
while serving multiple clients at the same time.
•
TCP: Not subject to packet loss and produces a more accurate video
display; however, real-time effect performance may suffer.
•
HTTP: Allows the same quality as TCP and may require less network port
configuration in some network environments.
MP4 Saving Options: (Internet Explorer only) Do the following:
1.
In the Folder: text entry box, enter the directory path or browse for the
directory to which you want to save MP4 recordings. The default path is
C:\Record.
2.
In the File name prefix: text entry box, enter the desired text to be added as
a prefix to the file name of the recording. The default prefix is CLIP.
3.
Select the Add date and time suffix to file name checkbox to append the
recording date and time as a suffix to the file name. If the checkbox is not
selected, file names are numbered consecutively.
Click Save to save the changes.
Digital Output
NOTE: If the Hide Digital Output Controls checkbox is selected on the “System”
configuration page, the Digital Output controls (ON and OFF) are not displayed on
the home page. For additional information about the “System” configuration page,
refer to “Configuring System Settings” on page 22.
To enable the digital output of the CEN-NVS100 to be triggered, click ON.
To return the digital output to the normal state, click OFF.
Video Window
The video window displays MPEG-4 or MJPEG streaming video. For information
about configuring video settings, refer to “Configuring Video Settings” on page 39.
16 • Network Video Streamer: CEN-NVS100
Operations & Installation Guide – DOC. 6873A
Crestron CEN-NVS100
Network Video Streamer
PTZ Directional Buttons
NOTE: If the camera is a fixed camera or does not support PTZ (Pan/Tilt/Zoom)
features, PTZ directional buttons are not displayed on the home page.
PTZ directional buttons as displayed in Image mode and Text mode are listed in the
following table.
PTZ Directional Buttons (Image Mode/Text Mode)
BUTTON
FUNCTION
Pan Left: Pans the camera to the left.
or
Pan Right: Pans the camera to the right.
or
or
Tilt Up: Tilts the camera upward.
or
Tilt Down: Tilts the camera downward.
Home: Returns the camera to the center
position if supported by the camera.
or
Zoom and Focus Control Buttons
NOTE: If the camera is a fixed camera or does not support PTZ features, Zoom and
Focus control buttons are not displayed on the home page.
Zoom and Focus control buttons as displayed in Image mode and Text mode are
listed in the following table.
Zoom and Focus Control Buttons (Image Mode/Text Mode)
BUTTON
FUNCTION
Zoom Wide: Allows the camera to zoom widely.
or
Zoom Far: Allows the camera to zoom telescopically.
or
Focus Near: Controls the focus near function.
or
or
Auto Focus: Controls the auto focus function. The
camera focuses automatically when using PTZ
functions.
Focus Far: Controls the focus far function.
or
Operations & Installation Guide – DOC. 6873A
Network Video Streamer: CEN-NVS100 • 17
Network Video Streamer
Crestron CEN-NVS100
PTZ Speed Control
NOTE: If the camera is a fixed camera or does not support PTZ features, PTZ speed
control buttons are not displayed on the home page.
The pan, tilt, and zoom speed drop-down lists allow fine-tuning of the aiming
position of the camera:
•
Pan speed: Controls the range of the horizontal movement of the camera.
The greater the value, the greater is the angular movement when performing
the Left or Right functions. Values range from –5 to +5.
•
Tilt speed: Controls the range of the vertical movement of the camera. The
greater the value, the greater is the angular movement when performing the
Up or Down functions. Values range from –5 to +5.
•
Zoom speed: Controls the range of the zooming. The greater the value, the
greater is the change in the viewing angle. Values range from –5 to +5.
Preset Selection
NOTE: If the camera is a fixed camera or does not support PTZ features, the Go to:
preset drop-down list is not displayed on the home page.
The Go to: drop-down list allows a camera preset to be selected.
Video and Audio Control Buttons
Video and audio control buttons are described in the following sections.
NOTE: Audio is not supported in CEN-NVS100 version 0100i.
NOTE: When Firefox or Safari is used as the Web browser and the CEN-NVS100
is in MPEG-4 or MJPEG streaming mode, video and audio control buttons are not
supported.
NOTE: When Internet Explorer is used as the Web browser and the CEN-NVS100
is in MJPEG streaming mode, only the Digital zoom and Start MP4 Recording
buttons discussed below are supported.
18 • Network Video Streamer: CEN-NVS100
Operations & Installation Guide – DOC. 6873A
Crestron CEN-NVS100
Digital Zoom
Network Video Streamer
Clicking the Digital zoom button (
) opens the digital zoom control panel.
Digital Zoom Control Panel
To change digital zoom settings in the digital zoom control panel:
Start MP4 Recording
1.
Deselect the Disable digital zoom checkbox.
2.
Adjust the Zoom Factors: slider to the desired percentage.
3.
Select the zoom-in area by moving the sliding window.
Clicking the Start MP4 Recording button (
) starts recording of the streaming
video in .mp4 file format. Clicking the button again stops MP4 recording. You can
configure related MP4 recording settings on the “Client Settings” page (refer to
“Client Settings” on page 15 for additional information).
Only some media player and format combinations are supported as listed in the
following table.
Video and Audio Formats and Associated Media Players
VIDEO AND
AUDIO SETTINGS
QuickTime
Media Player
RealPlayer®
Media Player
VLC Player
Media Player
MPEG-4 + AAC
MPEG-4 + AMR
MP4/3GPP
3GPP
MP4/3GPP
MP4/3GPP
MJPEG + AAC
Not supported
Not supported
MJPEG + AMR
Not supported
Not supported
MP4/3GPP
MP4/3GPP
(video only)
MP4/3GPP
(video only)
MP4/3GPP
(video only)
Operations & Installation Guide – DOC. 6873A
Network Video Streamer: CEN-NVS100 • 19
Network Video Streamer
Crestron CEN-NVS100
For information about configuring CEN-NVS100 video and audio settings, refer to
“Configuring Audio and Video Settings” on page 37.
Talk
(Not supported in CEN-NVS100 version 0100i) Clicking the Talk button ( )
enables talking to the camera by means of the microphone connected to the
CEN-NVS100. Clicking the button again disables the ability to talk to the camera.
Pause/Resume/Play
Clicking the Pause button ( ) stops the streaming video temporarily. Clicking the
Resume button ( ) resumes the streaming video. Clicking the Play button ( )
plays the video after it has been stopped by the Stop button (see below).
Stop
Clicking the Stop button (
Volume
(Not supported in CEN-NVS100 version 0100i ) Clicking the Volume control
button ( ) opens the volume control slider that allows you to adjust the volume of
the audio output.
Volume Mute
(Not supported in CEN-NVS100 version 0100i ) Clicking the Mute button (
turns off the audio. Clicking the button again turns on the audio.
Mic Volume
(Not supported in CEN-NVS100 version 0100i ) Clicking the Mic volume button
( ) opens the Mic volume control slider that allows you to adjust the volume of
the microphone connected to the CEN-NVS100.
Mic Volume Mute
(Not supported in CEN-NVS100 version 0100i ) Clicking the Mic volume mute
button (
) turns off the microphone. Clicking the button again turns on the
microphone.
) stops the streaming video.
)
PTZ Custom Command Buttons
PTZ custom command buttons appear on the home page when custom commands are
configured using the Custom Command button on the “Camera Control”
configuration page. For additional information, refer to “Configuring Camera
Control Settings” on page 47.
20 • Network Video Streamer: CEN-NVS100
Operations & Installation Guide – DOC. 6873A
Crestron CEN-NVS100
Network Video Streamer
Configuration
CEN-NVS100 configuration pages allow you to configure the following settings:
•
System settings (refer to “Configuring System Settings” on page 22 for
information)
•
Security settings (refer to “Configuring Security Settings” on page 24 for
information)
•
Network settings (refer to “Configuring Network Settings” on page 27 for
information)
•
DDNS settings (refer to “Configuring DDNS Settings” on page 34 for
information)
•
Client access settings (refer to “Configuring Client Access Settings” on
page 34 for information)
•
Audio and video settings (refer to “Configuring Audio and Video Settings”
on page 37 for information)
•
Motion detection settings (refer to “Configuring Motion Detection Settings”
on page 45 for information)
•
Camera control settings (refer to “Configuring Camera Control Settings” on
page 47 for information)
•
Home page layout settings (refer to “Configuring Home Page Layout
Settings” on page 51 for information)
•
Event, server, and media settings (refer to Configuring Event, Server, and
Media Settings” on page 53 for information)
•
Recording settings (refer to “Configuring Recording Settings” on page 59
for information)
•
System log settings (refer to “Configuring System Log Settings” on page 62
for information)
In addition, the CEN-NVS100 allows you to do the following:
•
View all system settings (refer to “Viewing System Parameters” on page 63
for information)
•
Perform maintenance actions (refer to “Performing Maintenance Actions”
on page 63 for information)
NOTE: In addition to the information provided in this manual, you can also view
configuration guidelines by placing your mouse over the appropriate help icon ( )
on the configuration pages.
Operations & Installation Guide – DOC. 6873A
Network Video Streamer: CEN-NVS100 • 21
Network Video Streamer
Crestron CEN-NVS100
Configuring System Settings
NOTE: Configuration of system settings must be performed by the Administrator.
System configuration settings consist of the following:
•
System host name
•
System time
•
DI (digital input) and DO (digital output) settings
To configure system settings, click Configuration on the CEN-NVS100 home page.
The “System” configuration page opens.
“System” Configuration Page
NOTE: The “System” configuration page can also be accessed by clicking System
in the left-hand column of configuration pages or by entering the following URL
address in your Web browser:
http://Video Streamer/setup/system.html
Video Streamer is the host name or IP address of the CEN-NVS100.
Refer to the following system configuration guidelines.
22 • Network Video Streamer: CEN-NVS100
Operations & Installation Guide – DOC. 6873A
Crestron CEN-NVS100
Network Video Streamer
System: Set system parameters as follows:
•
In the Host Name: text box, modify the default host name, CEN-NVS100,
using a unique name to identify the CEN-NVS100. The name appears on
the CEN-NVS100 home page and in the Device Discovery Tool of
Crestron Toolbox.
•
If desired, disable the Power and Network LEDs on the front of the unit by
selecting the Disable Power and Network LEDs checkbox. By default, the
Power and Network LEDs checkbox is deselected, allowing the LEDs to be
enabled.
System Time: Set system time parameters if the CEN-NVS100 is to be used without
the Crestron control system:
NOTE: System time control settings are not necessary when used with the Crestron
control system. The CEN-NVS100 system time automatically synchronizes with the
system time of the control system each time the CEN-NVS100 connects to the
control system.
•
From the Time Zone: drop-down list, select one of the time servers to
establish proper local time.
•
Configure the date and time of the CEN-NVS100 by selecting one of the
following radio buttons:
NOTE: After selecting and configuring the desired date and time
parameter, click Save immediately to validate your changes; otherwise, the
correct date and time will not be synchronized.
⇒ Keep current date and time: Keeps the current date and time of
the CEN-NVS100. An internal real-time clock maintains the date
and time even when the power of the system is turned off. After
syncing with the computer time or a manual time, this option is
reselected.
⇒ Sync with computer time: Synchronizes the date and time of the
CEN-NVS100 with the local PC. The read-only date and time of
the PC is displayed as updated.
⇒ Manual: Adjusts the date and time according to the time entered
by the Administrator. The date must be entered in yyyy/mm/dd
format. The time must be entered in hh:mm:ss format.
⇒ Automatic: Synchronizes the date and time of the CEN-NVS100
with the assigned NTP server over the Internet whenever the
CEN-NVS100 starts. Synchronization fails if the assigned time
server cannot be reached.
In the NTP Server: text entry box, enter the IP address or domain
name of the time server. If you do not assign an NTP server, the
CEN-NVS100 connects to the default time server.
In the Update Interval: drop-down list, select the interval that the
date and time of the CEN-NVS100 is to be updated with the date
and time of the NTP server.
Operations & Installation Guide – DOC. 6873A
Network Video Streamer: CEN-NVS100 • 23
Network Video Streamer
Crestron CEN-NVS100
DI and DO: Set digital input and digital output settings as follows:
•
Digital Input: From the drop-down list, select High or Low to define the
normal state of the digital input.
•
Digital Output: From the drop-down list, select Grounded or Open to
define the normal state of the digital output.
•
Hide Digital Output Controls: Select the checkbox to remove the Digital
Output controls (ON and OFF) from the home page. Deselect the checkbox
to show the Digital Output controls.
Click Save to save the changes.
Configuring Security Settings
NOTE: Configuration of security settings must be performed by the Administrator.
•
Security settings allow the Administrator to do the following:
•
Set a root password
•
Add user accounts
•
Manage user accounts
To configure security settings, click Configuration on the CEN-NVS100 home page
and then click Security in the left-hand column of the page. The “Security”
configuration page opens.
“Security” Configuration Page
24 • Network Video Streamer: CEN-NVS100
Operations & Installation Guide – DOC. 6873A
Crestron CEN-NVS100
Network Video Streamer
NOTE: The “Security” configuration page can also be accessed by entering the
following URL address in your Web browser:
http://Video Streamer/setup/security.html
Video Streamer is the host name or IP address of the CEN-NVS100.
Refer to the following sections for security configuration guidelines.
Setting a Root Password
The user name for the Administrator is permanently assigned as root. The default
root password is blank. Setting a root password is optional; however, doing so
prevents unauthorized use of the CEN-NVS100 by providing password protection.
It is recommended that the Administrator set a root password as a matter of prudent
security practice.
Set a root password in the Root Password pane of the “Security” configuration page.
“Security” Configuration Page – Root Password
1.
In the Root Password pane, do the following:
NOTE: The password is case sensitive.
2.
a.
In the Root Password: text box, enter a new root password. The
password is displayed as solid black circles.
b.
In the Confirm Root Password: text box, reenter the password. The
password is displayed as solid black circles.
Click Save.
A log-in window appears.
3.
Enter root as the user name, and then enter the password you entered in
step 1.
NOTE: Once the root password is set, the password cannot be recovered.
The only option is to restore the password to the factory-default setting.
Operations & Installation Guide – DOC. 6873A
Network Video Streamer: CEN-NVS100 • 25
Network Video Streamer
Crestron CEN-NVS100
Setting Up User Accounts
The CEN-NVS100 provides three user access levels that determine user privileges:
•
Administrator: Allows full access to the CEN-NVS100.
•
Operator: Allows partial access to the CEN-NVS100. Enables the user to
perform all functions except the configuration of system, network, and
security settings.
•
Viewer: Allows the most limited access to the CEN-NVS100. Enables the
user to view, listen, and talk to the camera and to control digital
input/output and PTZ camera functions.
Set up user accounts in the Add User pane of the “Security” configuration page.
Up to 20 user accounts can be set.
“Security” Configuration Page – Add User
1.
In the Add User pane, do the following:
NOTE: The user name and password are case sensitive.
NOTE: Setting a user password is optional; however, doing so prevents
unauthorized use of the CEN-NVS100 by providing password protection.
2.
a.
In the User Name: text box, enter a user name.
b.
In the User Password: text box, enter a password for the user.
c.
Set the user type by clicking the appropriate radio button:
Operator or Viewer. (The Administrator user type is used for
the Administrator only whose root user name is root.)
Click Add.
The user account is set.
3.
Repeat steps 1 and 2 for each account to be added.
26 • Network Video Streamer: CEN-NVS100
Operations & Installation Guide – DOC. 6873A
Crestron CEN-NVS100
Network Video Streamer
Managing User Accounts
Edit or delete user accounts in the Manage User pane of the “Security” configuration
page.
“Security” Configuration Page – Manage User
1.
2.
In the Manage User pane, do the following:
a.
From the User Name: drop-down list, select the user whose
account you want to edit or delete.
b.
(Optional) In the User Password: text box, edit the password.
c.
(Optional) Edit the user type by clicking the appropriate User
Type: radio button.
Click Save to save the changes to the user account, or click Delete to delete
the user account.
Configuring Network Settings
NOTE: Configuration of network settings must be performed by the Administrator.
Network configuration settings consist of the following:
•
Network type (LAN or PPPoE)
•
HTTP
•
Two Way Audio
•
FTP
•
RTSP Streaming
To configure network settings, click Configuration on the CEN-NVS100 home page
and then click Network in the left-hand column of the page. The “Network”
configuration page opens.
Operations & Installation Guide – DOC. 6873A
Network Video Streamer: CEN-NVS100 • 27
Network Video Streamer
Crestron CEN-NVS100
“Network” Configuration Page
NOTE: The “Network” configuration page can also be accessed by entering the
following URL address in your Web browser:
http://Video Streamer/setup/network.html
Video Streamer is the host name or IP address of the CEN-NVS100.
Refer to the following sections for network configuration guidelines.
28 • Network Video Streamer: CEN-NVS100
Operations & Installation Guide – DOC. 6873A
Crestron CEN-NVS100
Network Video Streamer
Configuring the Network Type
Configure the network type in the Network Type pane of the “Network”
configuration page.
“Network” Configuration Page – Network Type
1.
Select the network type by clicking the LAN or PPPoE radio button.
NOTE: Select PPPoE to connect to ADSL networks.
To configure LAN parameters, proceed to step 2. To configure PPPoE
parameters, skip step 2 and continue with step 3.
2.
If LAN was selected in step 1, configure LAN parameters:
a.
Click either of the following radio buttons:
•
Enable DHCP: (Default setting) Allows an IP address to
be obtained automatically from a DHCP server. You can
find the address of the server using the Device Discovery
tool of Crestron Toolbox.
•
Use Static IP Address: (Recommended setting) Provides
the benefit of a fixed IP address and related information
that you enter manually:
IP Address: Enter a unique IP address for the
CEN-NVS100. If the device is on a network with a DHCP
server, ensure that the IP address is not in the range of IP
addresses that the DHCP server will be assigning. In a
typical installation, the last number will start at 100 and
will increment.
Operations & Installation Guide – DOC. 6873A
Network Video Streamer: CEN-NVS100 • 29
Network Video Streamer
Crestron CEN-NVS100
Subnet Mask: Enter the subnet mask that is set on your
network.
NOTE: A class C network allows up to 255 devices to
communicate without a router and has a subnet mask of
255.255.255.0. A class B network allows up to 65,535
devices to communicate without a router and has a subnet
mask of 255.255.0.0.
Default router: Enter the IP address of your network’s
device (usually a router) that enables communication
between your network and the Internet.
Primary DNS: Enter the address of the primary domain
name server, which translates host names into IP
addresses.
Secondary DNS: Enter the address of the backup domain
name server.
b.
Enter WINS server addresses:
Primary WINS Server: Enter the address of the server that
maintains the database of computer name and IP address.
Secondary WINS Server: Enter the address of the backup server
that maintains the database of computer name and IP address.
Enable UPnP Presentation: Select the checkbox to enable access
of the CEN-NVS100 from the Device Discovery Tool of Crestron
Toolbox.
Enable UPnP Port Forwarding: Select the checkbox to enable the
CEN-NVS100 to automatically configure your router (if supported
by the router) to allow the video stream to be accessed remotely.
3.
If PPPoE was selected in step 1, configure PPPoE parameters:
User Name: Enter the user name that you received from your ISP.
Password: Enter the password that you received from your ISP.
Confirm Password: Reenter the password to confirm the password.
4.
Click Save.
NOTE: Clicking Save to save changes to the “Network” configuration
page restarts the system to validate the changes.
30 • Network Video Streamer: CEN-NVS100
Operations & Installation Guide – DOC. 6873A
Crestron CEN-NVS100
Network Video Streamer
Configuring HTTP Settings
Configure HTTP settings in the HTTP pane of the “Network” configuration page.
“Network” Configuration Page – HTTP
Refer to the following HTTP configuration guidelines.
Authentication: From the drop-down list, select either of the following
authentication mechanisms:
•
Basic: (Recommended setting) Authenticates a user based on user name
and password. The password is not encrypted; therefore, basic
authentication is not secure.
•
Digest: Authenticates a user based on user name and password.
The password is encrypted.
NOTE: Although Digest authentication is a more secure authentication
mechanism than Basic authentication, Digest authentication is not
currently supported by all Web clients.
HTTP Port: Enter the HTTP port number. The default port number is 80.
NOTE: If you do not use the default number of 80, you must append the port
number to the IP address of the CEN-NVS100 to be able to access the CEN-NVS100
from your Web browser. For example, if you set the HTTP port number to 8888, you
must enter http://192.168.0.100:8888 instead of http://192.168.0.100.
Secondary HTTP Port: Enter the secondary HTTP port number to allow the
configuration of an alternate port to access the HTTP server.
Access Name for Stream 1: Enter the name to be used by the Crestron MJPEG
Viewer application. For example, when using video.mjpg (default setting), the
HTTP command to be entered into the Crestron MJPEG Viewer is the following:
/video.mjpg?user=myuser&pw=secretpassword
video.mjpg is the default access name.
myuser is the user created for view access.
secretpassword is the password for this user.
Operations & Installation Guide – DOC. 6873A
Network Video Streamer: CEN-NVS100 • 31
Network Video Streamer
Crestron CEN-NVS100
Access Name for Stream 2: Enter the name to be used by the Crestron MJPEG
Viewer application. For example, when using video2.mjpg (default setting), the
HTTP command to be entered into the Crestron MJPEG Viewer is the following:
/video2.mjpg?user=myuser&pw=secretpassword
video2.mjpg is the default access name.
myuser is the user created for view access.
secretpassword is the password for this user.
Configuring Two Way Audio
Configure two way audio in the Two Way Audio pane of the “Network”
configuration page.
“Network” Configuration Page – Two Way Audio
Refer to the following two way audio port configuration guideline.
Two Way Audio Port: Enter the port number for the Talk Back feature when using
MPEG-4 streaming. Valid values range from 1025 to 65535. The default port
number is 5060.
Configuring the FTP Port
Configure the FTP port in the FTP pane of the “Network” configuration page.
“Network” Configuration Page – FTP
Refer to the following FTP port configuration guideline.
FTP Port: Enter the port number to communicate with an FTP server when saving
snapshots and recordings to a server. The default port number is 21.
32 • Network Video Streamer: CEN-NVS100
Operations & Installation Guide – DOC. 6873A
Crestron CEN-NVS100
Network Video Streamer
Configuring RTSP Streaming
Configure RTSP (Real Time Streaming Protocol) in the RTSP Streaming pane of the
“Network” configuration page.
“Network” Configuration Page – RTSP Streaming
Refer to the following RTSP streaming configuration guidelines.
Authentication: From the drop-down list, select disable or enable.
Access Name for Stream 1: Enter an access name for stream 1 for connections from
client software when the codec type of the stream is MPEG-4. For example, when set
to live.sdp (default setting), the following URL connects directly to the MPEG-4
video:
rtsp://ip address/live.sdp
ip address is the IP address of the CEN-NVS100.
live.sdp is the default access name.
Access Name for Stream 2: Enter an access name for stream 2 for connections from
client software when the codec type of the stream is MPEG-4. For example, when set
to live2.sdp (default setting), the following URL connects directly to the MPEG-4
video:
rtsp://ip address/live2.sdp
ip address is the IP address of the CEN-NVS100.
live2.sdp is the default access name.
Operations & Installation Guide – DOC. 6873A
Network Video Streamer: CEN-NVS100 • 33
Network Video Streamer
Crestron CEN-NVS100
RTSP Port: Enter the RTSP port number. The default port number is 554.
RTP Video Port: Enter the video channel port number for RTP (Real Time
Transport Protocol). The port number must be an even number. The default port
number is 5560.
RTCP Video Port: (Read only) Specifies the video channel port number for RTCP
(Real Time Transport Control Protocol). The port number is the port number of the
RTP video port plus 1. The default port number is 5561 (5560 + 1).
RTP Audio Port: Enter the audio channel port number for RTP. The port number
must be an even number. The default port number is 5558.
RTCP Audio Port: (Read only) Specifies the audio channel port number for RTCP.
The port number is the port number of the RTP audio port plus 1. The default port
number is 5559 (5558 + 1).
Multicast Settings for Stream 1/Stream 2:
Always Multicast: Select the checkbox to enable multicast.
Multicast Group Address: Enter the address to be used by sources to send
content and by receivers to receive content.
Multicast Video Port: Enter the video channel port number for multicast.
The port number must be an even number. The default setting is 5560.
Multicast RTCP Video Port: (Read only) Specifies the video channel port
number for multicast RTCP. The port number must be the port number of the
multicast video port plus 1. The default setting is 5560 plus 1 (5561).
Multicast Audio Port: Enter the audio channel port number for multicast.
The port number must be an even number. The default setting is 5562.
Multicast RTCP Audio Port: (Read only) Specifies the audio channel port
number for multicast RTCP. The port number must be the port number of the
multicast audio port plus 1.
Multicast TTL [1-255]: Enter the number of routers (hops) that multicast
traffic is permitted to pass through before expiring on the network. Valid
values range from 1 to 255.
Configuring DDNS Settings
NOTE: Version 0100i of the CEN-NVS100 is not compatible with the Crestron
DDNS (Dynamic Domain Name Service).
Configuring Client Access Settings
Configuration of a client access list provides one or more IP address ranges that are
allowed to access the CEN-NVS100. Ranges of addresses that are denied access to
the CEN-NVS100 can also be configured. Addresses can also be deleted from the
allowed or denied list of IP addresses.
To configure access list settings, click Configuration on the CEN-NVS100 home
page and then click Access List in the left-hand column of the page. The “Access
List” configuration page opens.
34 • Network Video Streamer: CEN-NVS100
Operations & Installation Guide – DOC. 6873A
Crestron CEN-NVS100
Network Video Streamer
“Access List” Configuration Page
NOTE: The “Access List” configuration page can be also be accessed by entering
the following URL address in your Web browser:
http://Video Streamer/setup/accesslist.html
Video Streamer is the host name or IP address of the CEN-NVS100.
Refer to the following sections for access list configuration guidelines.
Configuring the List of Allowed IP Addresses
Configure the range(s) of allowed IP addresses in the Allowed List pane of the
“Access List” configuration page.
“Access List” Configuration Page – Allowed List
1.
In the Allowed List pane, enter the Starting IP Address and Ending IP
Address of the range.
2.
Click Add.
3.
Repeat Steps 1 and 2 for each range to be added.
NOTE: You can delete a range of IP addresses from the allowed list. Refer to
“Deleting Allowed IP Addresses” below.
Operations & Installation Guide – DOC. 6873A
Network Video Streamer: CEN-NVS100 • 35
Network Video Streamer
Crestron CEN-NVS100
Deleting Allowed IP Addresses
Delete a range of IP addresses from the allowed list in the Delete Allowed List pane
of the “Access List” configuration page.
“Access List” Configuration Page – Delete Allowed List
1.
In the Delete Allowed List pane, select the range of IP addresses to be
deleted from the Allowed List drop-down box.
2.
Click Delete.
3.
Repeat Steps 1 and 2 for each range to be deleted from the allowed list.
Configuring the List of Denied IP Addresses
Configure the range(s) of denied IP addresses in the Denied List pane of the “Access
List” configuration page.
“Access List” Configuration Page – Denied List
1.
In the Denied List pane, enter the Starting IP Address and Ending IP
Address of the range to be denied access to the CEN-NVS100.
2.
Click Add.
3.
Repeat Steps 1 and 2 for each range to be denied access.
NOTE: You can delete a range of IP addresses from the denied list. Refer to
“Deleting Denied IP Addresses” below.
36 • Network Video Streamer: CEN-NVS100
Operations & Installation Guide – DOC. 6873A
Crestron CEN-NVS100
Network Video Streamer
Deleting Denied IP Addresses
Delete a range of IP addresses from the denied list in the Delete Denied List pane of
the “Access List” configuration page.
“Access List” Configuration Page – Denied Denied List
1.
In the Delete Denied List pane, select the range of IP addresses to be deleted
from the Denied List drop-down box.
2.
Click Delete.
3.
Repeat Steps 1 and 2 for each range to be deleted from the denied list.
Configuring Audio and Video Settings
NOTE: Audio is not supported in CEN-NVS100 version 0100i.
To configure audio and video settings, click Configuration on the CEN-NVS100
home page and then click Audio and Video in the left-hand column of the page.
The “Audio and Video” configuration page opens.
NOTE: The “Audio and Video” configuration page can also be accessed by
entering the following URL address in your Web browser:
http://Video Streamer/setup/audiovideo.html
Video Streamer is the host name or IP address of the CEN-NVS100.
Operations & Installation Guide – DOC. 6873A
Network Video Streamer: CEN-NVS100 • 37
Network Video Streamer
Crestron CEN-NVS100
“Audio and Video” Configuration Page
Refer to the following sections for video and audio configuration guidelines.
38 • Network Video Streamer: CEN-NVS100
Operations & Installation Guide – DOC. 6873A
Crestron CEN-NVS100
Network Video Streamer
Configuring Video Settings
Configure video settings in the Video Settings pane of the “Audio and Video”
configuration page.
“Audio and Video” Configuration Page – Video Settings
1.
(Optional) In the Video Title: text entry box, enter a video title to be
displayed on the video output.
2.
From the Color: drop-down list, select Color or B/W (monochrome) for the
video display.
3.
Select one or both of the Video Orientation: checkboxes:
4.
•
Flip rotates the video vertically.
•
Mirror rotates the video horizontally.
•
Select both Flip and Mirror if the camera is installed upside
down.
From the Modulation: drop-down list, select the video input modulation
type: NTSC, PAL, or Auto.
NOTE: You must reboot the CEN-NVS100 to activate the change.
5.
(Optional) Select the Overlay Title and Time Stamp on Video and Snapshot
checkbox to display the video title and time stamp on the video output.
Operations & Installation Guide – DOC. 6873A
Network Video Streamer: CEN-NVS100 • 39
Network Video Streamer
Crestron CEN-NVS100
6.
7.
Configuring Image Settings
Do any or all of the following:
•
Click the Image Settings button to set image settings. Refer to
“Configuring Image Settings” below for information.
•
Click the Privacy Mask button to block one or more areas of the
video from being viewed on the video output. Refer to
“Configuring Privacy Mask Settings” on page 41 for information.
•
Configure video settings for Stream 1/Stream 2. Refer to
“Configuring Video Quality Settings” on page 42 for information.
Click Save at the bottom of the “Audio and Video” configuration page to
save changes to video settings.
Configure image settings by pressing the Image Settings button in the “Video
Settings” pane of the “Audio and Video” configuration page. The “Image Settings”
configuration page opens.
“Image Settings” Configuration Page
NOTE: The “Image Settings” configuration page can also be accessed by entering
the following URL address in your Web browser:
http://Video Streamer/setup/image.html
Video Streamer is the host name or IP address of the CEN-NVS100.
On the “Image Settings” configuration page, adjust the Brightness, Contrast,
Saturation, and Hue settings as desired for video compensation. Values in the dropdown lists range from –5 to +5.
NOTE: A value of 0 for Brightness and Contrast auto tunes the video.
To preview the image with change(s) before saving the change(s), click Preview.
To recall the previous settings without saving the current settings, click Restore.
To save the change(s), click Save.
To close the page, click Close.
40 • Network Video Streamer: CEN-NVS100
Operations & Installation Guide – DOC. 6873A
Crestron CEN-NVS100
Configuring Privacy Mask
Settings
Network Video Streamer
Configure privacy mask settings by pressing the Privacy Mask button in the “Video
Settings” pane of the “Audio and Video” configuration page. The “Privacy Mask”
configuration page opens.
“Privacy Mask” Configuration Page
NOTE: The “Privacy Mask” configuration page can also be accessed by entering
the following URL address in your Web browser:
http://Video Streamer/setup/privacy.html
Video Streamer is the host name or IP address of the CEN-NVS100.
1.
Select the Enable privacy mask checkbox to enable privacy mask
window(s). A privacy mask window blocks viewing of an area on the video
output as determined by the privacy mask window settings.
NOTE: Up to five privacy mask windows can be created.
2.
Click New. A privacy mask window opens:
•
To adjust the size of the window, drag the top, bottom, left, and
right edges of the window frame as desired. The X, Y, Width, and
Height values automatically change as appropriate.
•
To move the window to block video in a desired location, click the
title bar and drag the window to the desired location. The X and Y
values automatically change as appropriate.
•
To delete the window, click X in the upper right-hand corner of the
window.
3.
In the Window Name text entry box, enter a name for the privacy mask
window. The name is displayed in the title bar of the window.
4.
Click Save to save the changes. The privacy mask appears in the video
window as shown below.
Operations & Installation Guide – DOC. 6873A
Network Video Streamer: CEN-NVS100 • 41
Network Video Streamer
Crestron CEN-NVS100
Privacy Mask
Configuring Video Quality
Settings
Configure video quality settings for Stream 1, Stream 2, or both in the Video
Settings pane of the “Audio and Video” configuration page.
“Audio and Video” Configuration Page – Video Quality Settings
NOTE: You can configure two streams to support multiple frame sizes or to set one
stream to MPEG-4 in order to support audio. The Crestron MJPEG Viewer
application does not support audio.
NOTE: The “Client Settings” page allows selection of the stream to be viewed.
For additional information, refer to “Client Settings” on page 15.
42 • Network Video Streamer: CEN-NVS100
Operations & Installation Guide – DOC. 6873A
Crestron CEN-NVS100
Network Video Streamer
Before configuring video settings, be aware of the following:
•
For the best real-time video images, the network bandwidth should be large
enough to allow a transmission rate of greater than 20 image frames per
second (fps).
⇒ If the broadband network is above 1 Mbps, set Constant Bit Rate
to 1000 Kbps or 1200 Kbps or set Fixed Quality to Excellent. Set
the Maximum Frame Rate to 30 fps.
⇒ If the network bandwidth is above 512 Kbps, set the Constant Bit
Rate according to the network bandwidth and set the Maximum
Frame Rate to 30 fps. If the images vary dramatically in your
environment, it may be preferable to slow the maximum frame rate
down to 20 fps in order to lower the rate of data transmission and
allow for better video quality.
⇒ If the network bandwidth is below 512 Kbps, set the Constant Bit
Rate according to the network bandwidth and fine-tune the
Maximum Refresh Rate to obtain the best performance. In a slow
network, a larger frame rate results in blurred images. In addition,
video quality varies depending on the number of users viewing on
the network. Performance may also suffer due to poor connectivity
because of the network’s burst constraint.
•
For the best video quality but less real-time performance, set Fixed Quality
to Detailed or Excellent and adjust the Maximum Frame Rate to match the
network bandwidth. If the network is slow and “broken” pictures result,
select TCP or HTTP as the MPEG-4 protocol option on the “Client
Settings” page as the more appropriate mode of transmission. The images
may suffer a time delay due to a slower connection. In addition, the delay
increases with an added number of users.
•
To compromise between real-time and video quality, set Fixed Quality to
Good or better. You can also set Constant Bit Rate according to the
network bandwidth and adjust the Maximum Frame Rate. To adjust the
Maximum Frame Rate, start with 30 fps for best results and adjust the
frame rate downward but not below 15 fps. If the image quality does not
improve, select a lower Constant Bit Rate setting.
Progressive Mode: Select the checkbox to convert interlaced pictures to progressive
pictures.
NOTE: Progressive mode must be enabled when using the largest frame size with
Firefox.
Mode: From the drop-down list, select MPEG-4 or JPEG:
•
MPEG-4 allows video and audio transmission but requires a Web browser
for playback.
NOTE: Most cell phones support media streaming with MPEG-4 video.
•
JPEG (motion JPEG) is compatible with Crestron TPMC touchpanels that
support the MJPEG Viewer application. Audio is not supported.
Operations & Installation Guide – DOC. 6873A
Network Video Streamer: CEN-NVS100 • 43
Network Video Streamer
Crestron CEN-NVS100
Frame Size: From the drop-down list, select one of the following frame sizes:
•
176x120 NTSC/176x144 PAL (QCIF)
NOTE: Due to the limitation of bandwidth for 3GPP, only QCIF is
supported for cell phone viewing.
•
352x240 NTSC/352x288 PAL (CIF)
•
704x480 NTSC/704x576 PAL (4CIF)
Maximum Frame Rate: From the drop-down list, select the maximum refresh frame
rate in frames per second (fps). Note that for the largest video sizes the maximum
frame rate is automatically set to 15 fps.
Intra Frame Period: (Applicable to MPEG-4 mode only) From the drop-down list,
select the interval in seconds at which full frames are to be transmitted. A larger
interval improves performance but takes longer for initial connection.
Video Quality: Do either of the following:
•
For MPEG-4 mode, select Constant Bit Rate or Fixed Quality:
⇒ Constant Bit Rate favors speed over smoothness. Select the
desired speed from the drop-down list.
⇒ Fixed Quality favors smoothness over speed. Select the desired
video quality from the drop-down list. Fixed quality ranges from
Medium to Excellent. Medium favors performance over image
quality. Excellent favors image quality over performance.
Performance is also subject to network bandwidth and the number
of users.
•
For JPEG mode: Select the desired video quality from the drop-down list.
Video quality ranges from Medium to Excellent. Medium favors
performance over image quality. Excellent favors image quality over
performance. Performance is also subject to network bandwidth and the
number of users.
Configuring Audio Settings
NOTE: Audio configuration is applicable to MPEG-4 mode only and is not
applicable to JPEG mode.
NOTE: Audio is not supported in CEN-NVS100 version 0100i.
Configure audio settings in the Audio Settings pane of the “Audio and Video”
configuration page.
“Audio and Video” Configuration Page – Audio Settings
44 • Network Video Streamer: CEN-NVS100
Operations & Installation Guide – DOC. 6873A
Crestron CEN-NVS100
Network Video Streamer
Mute: Select the checkbox to disable audio if desired.
Input Gain: From the drop-down list, select the desired number of decibels (dB) to
modify the gain of the audio input.
Audio Type: Select AAC or GSM-AMR.
NOTE: Most cell phones support media streaming with GSM-AMR audio.
AAC Bit Rate: If AAC is selected as the audio type, set the AAC bit rate based on
available bandwidth.
GSM-AMR Bit Rate: If GSM-AMR is selected as the audio type, set the GSM-AMR
bit rate based on available bandwidth
Configuring Motion Detection Settings
To configure motion detection settings, click Configuration on the CEN-NVS100
home page and then click Motion Detection in the left-hand column of the page.
The “Motion detection” configuration page opens.
“Motion Detection” Configuration Page
NOTE: The “Motion detection” configuration page can also be accessed by
entering the following URL address in your Web browser:
http://Video Streamer/setup/motion.html
Video Streamer is the host name or IP address of the CEN-NVS100.
1.
Select the Enable motion detection checkbox to enable motion detection
window(s).
NOTE: A maximum of three windows can be created.
2.
Click New to open a motion detection window:
•
To adjust the size of the window, drag the top, bottom, left, and
right edges of the window frame as desired.
•
To move the window to the desired location for motion detection,
click the title bar and drag the window.
To delete the window, click X in the upper right-hand corner of the
window.
•
Operations & Installation Guide – DOC. 6873A
Network Video Streamer: CEN-NVS100 • 45
Network Video Streamer
Crestron CEN-NVS100
3.
In the Window Name text entry box, enter a name for the window. The
name is displayed in the title bar of the window.
4.
Drag the Sensitivity slider to the desired percentage to set the motion
degree, that is, the endurable difference between two sequential images.
A higher sensitivity allows easier motion detection.
5.
Drag the Percentage slider to the desired percentage to set the space ratio of
moving objects in the monitoring window. A smaller percentage allows
easier motion detection.
6.
Click Save to save the motion detection settings.
The graphic bar on the “Motion detection” page rises or falls depending on
the image variation:
•
A green bar indicates that the image variation is under monitoring
level.
•
A red bar indicates that the image variation is over monitoring
level. When the bar goes red, the detected window is also outlined
in red.
On the home page, the motion detection window is hidden but the red frame is
shown when motion is detected as illustrated in the sample screen below.
Motion Detection on Home Page
NOTE: If the predefined motion detection is under privacy mask block, the
monitoring window is not triggered.
46 • Network Video Streamer: CEN-NVS100
Operations & Installation Guide – DOC. 6873A
Crestron CEN-NVS100
Network Video Streamer
Configuring Camera Control Settings
To configure camera control settings, click Configuration on the CEN-NVS100
home page and then click Camera Control in the left-hand column of the page.
The “Camera Control” configuration page opens.
“Camera Control” Configuration Page
NOTE: The “Camera Control” configuration page can also be accessed by entering
the following URL address in your Web browser:
http://Video Streamer/setup/camera_control.html
Video Streamer is the host name or IP address of the CEN-NVS100.
1.
Select one of the following radio buttons:
•
Disable: Select Disable if the camera is a fixed camera or does not
support PTZ features. If Disable is selected, camera control
functions on the “Camera Control” page are not displayed.
•
PTZ Camera: Select PTZ Camera to configure the camera ID,
camera driver, and RS-485 port settings.
•
Transparent HTTP Tunnel: Select Transparent HTTP Tunnel for a
PTZ camera to allow the CEN-NVS100 to forward UART
commands. The UART commands are sent through the HTTP
tunnel established between the user and the CEN-NVS100 and are
transmitted to the device connected to the CEN-NVS100.
When Transparent HTTP Tunnel is selected, only RS-485 port
settings can be configured.
Operations & Installation Guide – DOC. 6873A
Network Video Streamer: CEN-NVS100 • 47
Network Video Streamer
Crestron CEN-NVS100
2.
(Applicable only when PTZ Camera is selected) In the Camera ID text
entry box, enter the ID specific to the camera. The camera ID is necessary
for multiple camera control. Refer to the PTZ camera documentation for ID
settings.
3.
(Applicable only when PTZ Camera is selected) From the PTZ Driver:
drop-down list, select the desired PTZ driver. The CEN-NVS100 has three
built-in PTZ camera drivers: DynaDome/SmartDOME, Lilin PIH-7x00,
and Pelco D protocol. If desired, you can select Custom camera and
upload an alternative PTZ driver to the CEN-NVS100.
NOTE: If PTZ camera functions do not operate, refer to your PTZ camera
documentation to verify that the camera supports those functions.
NOTE: If you select Custom camera, refer to “Performing Maintenance
Actions” on page 63 for information about uploading your PTZ driver file.
In addition, you must configure pan, tilt, zoom, and focus functions by
setting custom commands. Refer to “Setting Custom Commands” on page
50 for additional information.
4.
(Applicable only when PTZ Camera or Transparent HTTP Tunnel is
selected) From the Port Settings: drop-down list, select the desired baud
rate, data bits, stop bits, and parity bit.
5.
Click Save.
To set preset positions and custom commands, refer to the sections that follow.
Setting Preset Positions
Configure preset positions by pressing the Preset Position button on the “Camera
Control” configuration page. The “Preset Position” configuration page opens.
“Preset Position” Page
To set presets, refer to the guidelines that follow.
NOTE: The CEN-NVS100 allows up to 20 preset locations.
48 • Network Video Streamer: CEN-NVS100
Operations & Installation Guide – DOC. 6873A
Crestron CEN-NVS100
Network Video Streamer
Camera Control Area: In the camera control area, click one of the following
buttons to control PTZ camera functions:
•
Left: Pans the camera to the left.
•
Right: Pans the camera to the right.
•
Up: Tilts the camera upward.
•
Down: Tilts the camera downward.
•
Home: Positions the camera to the center.
•
- (left side of Zoom): Allows the camera to zoom widely.
•
+ (right side of Zoom): Allows the camera to zoom telescopically.
•
- (left side of Auto Focus): Controls the focus near function.
•
Auto Focus: Controls the auto focus function.
•
+ (right side of Auto Focus): Controls the focus far function.
In addition, PTZ functions can be controlled by selecting the desired value from the
following drop-down lists:
•
Pan speed: Controls the range of the horizontal movement of the camera.
The greater the value, the greater is the angular movement when performing
the Left or Right functions.
•
Tilt speed: Controls the range of the vertical movement of the camera. The
greater the value, the greater is the angular movement when performing the
Up or Down functions.
•
Zoom speed: Controls the range of the zooming. The greater the value, the
greater is the change in the viewing angle.
Preset Function Area: Identifies and saves the current video view as a preset
location and also sets patrol stops:
•
Preset position name: In the text entry box, enter a short name for the
current video view, and the click Add.
NOTE: Entering a very long preset position name causes problems with
the positioning of the camera.
•
Dwelling time (sec): Specifies the number of the seconds for the following:
⇒ The stop time of each preset location during auto patrol of the
camera.
⇒ The stay time at the leftmost and rightmost positions when the
camera is auto panning.
In the Dwelling time (sec): text entry box, enter the desired number of
seconds, and then click Save in the bottom center of the page to save the
setting.
•
Preset Position: Provides a list of preset positions:
⇒ To move the camera to a certain preset position, select the desired
position from the drop-down list and then click Go to.
⇒ To delete a certain preset position, select the desired position from
the drop-down list and then click Delete.
Operations & Installation Guide – DOC. 6873A
Network Video Streamer: CEN-NVS100 • 49
Network Video Streamer
Crestron CEN-NVS100
•
Patrol selection: Provides a list of preset positions that corresponds to the
Preset Position: drop-down list and allows selection of desired preset
positions to be set as patrol stops:
⇒ Preset locations: From the list of preset positions, highlight the
desired position to be set as a patrol stop and then click Select. Up
to 20 preset positions can be set as patrol stops.
⇒ Selected locations: Provides a list of preset positions selected as
patrol stops:
•
To remove a preset position from the list of patrol stops,
click Remove.
•
To move a preset position upward in the list of patrol
stops, click Up.
•
To move a preset position downward in the list of patrol
stop, click Down.
To save the patrol selections, click Save.
NOTE: As mentioned above, you must click Save to save the Dwelling time and
Patrol selection settings. If you do not click Save, the Dwelling time and Patrol
selection settings do not take effect.
Setting Custom Commands
Set custom commands by pressing the Custom Command button on the “Camera
Control” configuration page. The “Custom Command” configuration page opens.
NOTE: Up to five custom commands can be set.
NOTE: If you selected Custom camera as the PTZ driver on the “Camera Control”
configuration page, you must configure pan, tilt, zoom, and focus functions by
setting custom commands.
“Custom Command” Page (Not Applicable to Custom Camera)
50 • Network Video Streamer: CEN-NVS100
Operations & Installation Guide – DOC. 6873A
Crestron CEN-NVS100
Network Video Streamer
“Custom Command” Page (Applicable to Custom Camera)
On the “Custom Command” configuration page, do the following:
1.
Enter the camera control commands into the text entry boxes. Refer to your
camera documentation to set up frequently used functions.
2.
Click Save, and then click Close to close the page.
Configuring Home Page Layout Settings
To configure home page layout settings, click Configuration on the CEN-NVS100
home page and then click Home Page Layout in the left-hand column of the page.
The “Home Page Layout” configuration page opens.
“Home Page Layout” Configuration Page
Operations & Installation Guide – DOC. 6873A
Network Video Streamer: CEN-NVS100 • 51
Network Video Streamer
Crestron CEN-NVS100
NOTE: The “Home Page Layout” configuration page can also be accessed by
entering the following URL address in your Web browser:
http://Video Streamer/setup/layout.html
Video Streamer is the host name or IP address of the CEN-NVS100.
Refer to the following home page layout configuration guidelines.
Logo Image: Sets the logo image to be displayed in the upper left-hand corner of the
CEN-NVS100 Web pages:
•
Click Blank if a logo is not desired.
•
Click URL and enter the URL of the desired logo image.
•
Click Default if the default setting is desired. The default setting is the
Crestron logo.
Logo Hyperlink: Sets the hyperlink when the logo is clicked:
•
Click Blank if no hyperlink is desired.
•
Click URL and enter the URL of the desired website.
•
Click Default if the default setting is desired. The default setting is the
Crestron website.
Background Image: Sets the background image:
•
Click Blank if no background image is desired and the Background Color
is to fill the Web browser window.
•
Click URL and enter the URL of the desired background image.
NOTE: The background image is limited by memory size. Images from external
resources can be larger than the default image but need more time to load.
•
Click Default if the default background image is desired.
Font Color: Sets the font color of the text. Select the desired color from the dropdown list. The font color is shown in the preview box to the right.
Background Color: Sets the background color. Select the desired color from the
drop-down list. The background color is shown in the preview box to the right.
Web Page Display Mode: Sets the Display mode of the Web page:
•
Click Image Mode to allow graphical buttons on the home page.
•
Click Text Mode to prevent graphical buttons on the home page.
NOTE: If Text Mode is selected, less download time is required.
Click Save to save the changes.
52 • Network Video Streamer: CEN-NVS100
Operations & Installation Guide – DOC. 6873A
Crestron CEN-NVS100
Network Video Streamer
Configuring Event, Server, and Media Settings
To configure event, server, and media settings, click Configuration on the
CEN-NVS100 home page and then click Events and Servers in the left-hand
column of the page. The “Events and Servers” configuration page opens.
“Events and Servers” Page
NOTE: The “Events and Servers” configuration page can also be accessed by
entering the following URL address in your Web browser:
http://Video Streamer/setup/application.html
Video Streamer is the host name or IP address of the CEN-NVS100.
NOTE: It is recommended that server and media settings be configured before
event settings are configured.
Refer to the following sections for server, media, and event configuration guidelines.
Configuring Server Settings
Up to five servers can be configured. To configure a server:
1.
In the Server Settings pane of the “Events and Servers” configuration page, click
Add.
The “Server Settings” page opens.
Operations & Installation Guide – DOC. 6873A
Network Video Streamer: CEN-NVS100 • 53
Network Video Streamer
Crestron CEN-NVS100
“Server Settings” Page
2.
In the Server Name: text entry box, enter a unique name for the server.
3.
Click one of the following Server Type radio buttons: Email, FTP, HTTP,
Network Storage, or Crestron Control System.
4.
For the selected server type, enter the appropriate information into the text entry
boxes:
Email configuration:
Sender Email Address: Enter the email address of the sender.
Recipient Email Address: Enter the email address of the recipient.
Server Address: Enter the domain name or IP address of the external email
server.
User Name: Enter the granted user name on the external email server.
Password: Enter the granted password on the external email server.
FTP configuration:
Server Address: Enter the domain name or IP address of the external FTP
server.
Server Port: If desired, replace the default port number with a value
ranging from 1025 to 65535. The default port number is 21.
User Name: Enter the granted user name on the external FTP server.
Password: Enter the granted password on the external FTP server.
FTP Folder Name: Enter the granted folder name on the external FTP
server.
54 • Network Video Streamer: CEN-NVS100
Operations & Installation Guide – DOC. 6873A
Crestron CEN-NVS100
Network Video Streamer
NOTE: The string of characters must conform to that of the external FTP
server. Some FTP servers cannot accept a preceding slash symbol before
the path without virtual path mapping. Refer to the FTP server
documentation for details.
NOTE: The folder privilege must be open for upload.
Passive Mode: Select the checkbox to enable Passive mode transmission.
Passive mode allows the flow of data to be set up and initiated by the
CEN-NVS100 (FTP client) rather than by the FTP server.
HTTP configuration:
URL: Enter the URL to upload the media.
User Name: Enter the granted user name on the external HTTP server.
Password: Enter the granted password on the external HTTP server.
Network storage configuration:
Network Storage Location: Enter the path to upload the media.
NOTE: Only one network storage is supported.
Workgroup: Enter the workgroup for network storage.
User Name: Enter the granted user name on the network storage.
Password: Enter the granted password on the network storage.
Crestron Control System configuration:
Server Address: Enter the domain name or IP address of the Crestron
control system.
Server Port: Enter the port number of the CEN-NVS100 module.
5.
Click Test to test whether the settings are correct. A window opens displaying
the test result.
6.
Close the window displaying the test result.
7.
If the settings are correct, click Save; otherwise, enter the correct information,
test it, and then click Save.
The server name, type, and address/location are shown in the Server Settings
pane on the “Events and Servers” configuration page. In the sample screen
below, one server named Server1 was added.
“Events and Servers” Configuration Page – Sample Server Settings Pane
To delete a server listed in the Server Settings pane, select the server in the dropdown list and click Delete.
Operations & Installation Guide – DOC. 6873A
Network Video Streamer: CEN-NVS100 • 55
Network Video Streamer
Crestron CEN-NVS100
Configuring Media Settings
Up to five media configurations can be set. To configure media:
1.
In the Media Settings pane of the “Events and Servers” configuration page,
click Add.
The “Media Settings” page opens.
“Media Settings” Page
2.
In the Media Name: text entry box, enter a unique name for the media.
3.
Click one of the following Media Type radio buttons: Snapshot, Video Clip, or
System Log.
4.
Configure the selected media type by entering the desired information:
Snapshot configuration:
Source: Select the source of the stream: Stream 1 or Stream 2.
Send pre-event image(s) [0-7]: Enter the number of pre-event images to be
sent. Valid values range from 0 to 7.
Send post-event image(s) [0-7]: Enter the number of post-event images to
be sent. Valid values range from 0 to 7.
File name prefix: Enter the prefix to be added to the file name of the
snapshot images.
Add date and time suffix to file name: Select the checkbox to add time and
date information as a suffix to the file name.
56 • Network Video Streamer: CEN-NVS100
Operations & Installation Guide – DOC. 6873A
Crestron CEN-NVS100
Network Video Streamer
Video Clip configuration:
Source: Select the source of the stream: Stream 1 or Stream 2.
Pre-event recording: Enter the interval of pre-event recording in seconds.
Valid values range from 0 to 9.
Maximum duration: Enter the maximum recording file duration in seconds.
Valid values range from 1 to 10.
Maximum file size: Enter the maximum file size in Kbytes. Valid values
range from 50-800.
File name prefix: Enter the prefix to be added to the file name of the video
clip.
System log: Refer to “Configuring System Log Settings” on page 62 for system
log configuration information.
5.
Click Save to save the settings.
The current media free space, media name, and media type are displayed in the
Media Settings pane of the “Events and Servers” configuration page. In the
sample screen below, three media configurations were added: Media 1,
Media 2, and Media 3.
“Events and Servers” Configuration Page – Sample Media Settings Pane
NOTE: After media is added, the value of free space is updated. Media whose
size is larger than free space cannot be added.
To delete media listed in the Media Settings pane, select the media in the dropdown list and click Delete.
Operations & Installation Guide – DOC. 6873A
Network Video Streamer: CEN-NVS100 • 57
Network Video Streamer
Crestron CEN-NVS100
Configuring Event Settings
Up to three events can be configured.
NOTE: If using the CEN-NVS100 with a Crestron control system, event parameters
are programmed automatically the first time the CEN-NVS100 connects to the
control system.
To configure an event:
1.
In the Event Settings pane of the “Events and Servers” page, click Add.
The “Event Settings” page opens.
“Event Settings” Page
2.
In the Event name: text entry box, enter a unique name for the event.
3.
Select the Enable this event checkbox to enable the event.
4.
In the Priority: drop-down list, select the priority of the event: High, Normal,
or Low. The event with the highest priority is executed first.
5.
Enter the number of seconds to wait before detecting the next event (applicable
to motion detection and digital input trigger types).
6.
In the Trigger pane, click one of the following radio buttons to set the trigger
type:
•
Video Motion Detection, which is configured on the “Motion
Detection” page (refer to “Configuring Motion Detection Settings” on
page 45 for information)
•
Periodically. If selected, enter the time interval in minutes at which the
event is to be triggered.
58 • Network Video Streamer: CEN-NVS100
Operations & Installation Guide – DOC. 6873A
Crestron CEN-NVS100
Network Video Streamer
7.
8.
•
Digital Input, which monitors digital input
•
System Boot, which triggers the event when the CEN-NVS100 boots
•
Video Loss, which triggers the event when the CEN-NVS100 does not
receive the video signal from the camera
•
Video Sync, which triggers the event when the CEN-NVS100 receives
the video signal from the camera
In the Event Schedule pane:
•
Select the day(s) of the week that the event is to occur.
•
Select the time of the event: Always or enter the desired time interval in
hh:mm format.
In the Action pane, select one or more of the following checkboxes:
•
Trigger digital output: In the text entry box, enter the number of
seconds to trigger digital output when an event is triggered.
•
PTZ camera patrol: Enables PTZ camera control and sends the
snapshot to the selected server(s) during dwelling time when the event
is triggered.
•
Server name(s): From the Attached media: drop-down list, select the
media to be sent to the selected server(s) when the event is triggered.
NOTE: It is recommended that different media be used in different
events to ensure that all media be produced and received properly.
If the same media is used in different events and the events trigger
almost simultaneously, the server(s) in the second triggered event will
not receive any media but will receive notifications only.
9.
Click Save to save the settings.
The event name, status, weekly schedule, time schedule, and trigger type are
displayed in the Event Settings pane of the “Events and Servers” configuration
page. In the sample screen below, one event named Event1 was added.
“Events and Servers” Configuration Page – Sample Event Settings Pane
To delete an event listed in the Event Settings pane, select the event in the drop-down
list and click Delete.
Configuring Recording Settings
The CEN-NVS100 supports recording on network storage. Up to two recording
entries can be configured.
NOTE: Before configuring recording entries, configure the network storage server
in the Server Settings pane of the “Events and Servers” configuration page. Refer to
“Configuring Server Settings” on page 53 for information.
Operations & Installation Guide – DOC. 6873A
Network Video Streamer: CEN-NVS100 • 59
Network Video Streamer
Crestron CEN-NVS100
To configure recording settings, click Configuration on the CEN-NVS100 home
page and then click Recording in the left-hand column of the page. The “Recording”
configuration page opens.
“Recording” Configuration Page
NOTE: The “Recording” configuration page can also be accessed by entering the
following URL address in your Web browser:
http://Video Streamer/setup/recording.html
Video Streamer is the host name or IP address of the CEN-NVS100.
1.
On the “Recording” configuration page, click Add.
The “Recording” settings page opens.
“Recording” Settings Page
2.
In the Recording name: text entry box, enter a unique name for the recording.
3.
Select the Enable this recording checkbox to enable the recording.
60 • Network Video Streamer: CEN-NVS100
Operations & Installation Guide – DOC. 6873A
Crestron CEN-NVS100
Network Video Streamer
4.
In the Priority: drop-down list, select the priority of the recording: High,
Normal, or Low. The recording with the highest priority is executed first.
5.
In the Source: drop-down list, select the source of the video stream: Stream1 or
Stream2.
6.
In the Recording Schedule pane:
7.
a.
Select the day(s) of the week that the recording is to occur.
b.
Select the time of the recording: Always or enter the desired time interval in
hh:mm format.
In the Destination pane, do the following:
a.
In the Server Settings: drop-down list, select Network storage (configured
in the Server Settings pane of the “Events and Servers” configuration page).
b.
In the Max recording capacity: text entry box, enter the maximum
recording capacity in Kbytes. Valid values range from 1000-200000000
Kbytes.
NOTE: Old files are overwritten after the maximum recording capacity is
reached.
9.
c.
In the File size for each recording: text entry box, enter the maximum file
size of each recording in Kbytes. Valid values range from 200-6000 Kbytes.
d.
In the File name prefix: text entry box, enter the prefix to be added to the
file name of the recording.
Click Save to save the settings.
The recording name, status, weekly schedule, time schedule, source and
destination are displayed in the Recording Settings pane of the “Recording”
configuration page.
“Recording” Configuration Page – Sample Recording Settings Pane
To view all .mp4 files on the destination server, click the server setting in the
Destination column of the Recording Settings pane. You can then delete some or
all files as desired.
To delete a recording listed in the Recording Settings pane, select the recording
in the drop-down list and click Delete.
Operations & Installation Guide – DOC. 6873A
Network Video Streamer: CEN-NVS100 • 61
Network Video Streamer
Crestron CEN-NVS100
Configuring System Log Settings
The CEN-NVS100 can log system messages on the remote server. The protocol is
compliant to RFC 3164. If you have an external Linux server with syslogd service,
use the “r” option to turn on the facility to receive a log from a remote machine.
You can also use Windows software that is compliant to RFC 3164.
To configure system log settings, click Configuration on the CEN-NVS100 home
page and then click System Log in the left-hand column of the page. The “System
Log” configuration page opens.
“System Log” Configuration Page
NOTE: The “System Log” configuration page can also be accessed by entering the
following URL address in your Web browser:
http://Video Streamer/setup/syslog.html
Video Streamer is the host name or IP address of the CEN-NVS100.
To enable the remote log facility:
1.
Select the Enable remote log checkbox.
2.
Enter the IP address and port number of the log server in the text entry boxes.
3.
Click Save.
In the Current log pane, the current system log file is displayed. The content of the
log provides useful information about configuration and connections after the system
boots.
62 • Network Video Streamer: CEN-NVS100
Operations & Installation Guide – DOC. 6873A
Crestron CEN-NVS100
Network Video Streamer
Viewing System Parameters
To view all system parameters, click Configuration on the CEN-NVS100 home
page and then click View Parameters in the left-hand column of the page. The
“Parameter List” page opens.
NOTE: The “Parameter List” page can also be accessed by entering the following
URL address in your Web browser:
http://Video Streamer/setup/parafile.html
Video Streamer is the host name or IP address of the CEN-NVS100.
“Parameter List” Page
Performing Maintenance Actions
Maintenance actions consist of the following:
•
Rebooting the NVS100
•
Restoring settings to factory-default settings excluding the Network type
settings on the ‘Network” configuration page
•
Restoring all settings to factory-default settings
•
Upgrading firmware
•
Uploading a PTZ driver
Operations & Installation Guide – DOC. 6873A
Network Video Streamer: CEN-NVS100 • 63
Network Video Streamer
Crestron CEN-NVS100
To perform maintenance actions, click Configuration on the CEN-NVS100 home
page and then click Maintenance in the left-hand column of the page. The
“Maintenance” page opens.
“Maintenance” Page
NOTE: The “Maintenance” page can also be accessed by entering the following
URL address in your Web browser:
http://Video Streamer/setup/maintain.html
Video Streamer is the host name or IP address of the CEN-NVS100.
Refer to the following sections for information about maintenance actions.
Rebooting the NVS100
To reboot the NVS100, click Reboot below the Reboot pane of the “Maintenance”
page.
Restoring Factory-Default Settings (Excluding Network
Settings)
To restore factory-default settings excluding the Network type settings on the
“Network” configuration page, click Restore below the Restore pane of the
“Maintenance” page.
64 • Network Video Streamer: CEN-NVS100
Operations & Installation Guide – DOC. 6873A
Crestron CEN-NVS100
Network Video Streamer
Restoring All Factory-Default Settings
To restore all factory-default settings, click Default below the Factory default pane
of the “Maintenance” page. The system restarts. Network settings must be
configured again on the “Network” configuration page (refer to “Configuring
Network Settings” on page 27 for information).
Upgrading Firmware
To upgrade CEN-NVS100 firmware, click Browse, locate and select the firmware
file, and then click Upgrade below the Upgrade firmware pane.
Uploading a PTZ Driver
To upload a PTZ driver, click Browse, locate and select the PTZ driver file, and then
click Upload. The uploaded PTZ driver is displayed as User uploaded driver in the
PTZ driver list on the “Camera Control” configuration page (refer to “Configuring
Camera Control Settings” on page 47 for information).
Operations & Installation Guide – DOC. 6873A
Network Video Streamer: CEN-NVS100 • 65
Network Video Streamer
Crestron CEN-NVS100
Problem Solving
Troubleshooting
The following table provides corrective actions for possible trouble situations.
If further assistance is required, please contact a Crestron customer service
representative.
CEN-NVS100 Troubleshooting
TROUBLE
POSSIBLE
CAUSE(S)
CORRECTIVE ACTION
NET LED does not
illuminate.
Network cable is not
connected to the
LAN PoE port on the
CEN-NVS100 or to the
10BaseT/100BaseTX
compatible device.
Verify network cable
connection to the LAN PoE
port on the CEN-NVS100 and
to the network device.
Network cable is not
the proper type.
Verify that network cable
complies with EIA/TIA 568
and the CAT5 specification.
Network cable is not
the proper length.
Verify that network cable is
the proper length. Cable
length must not exceed 328
feet (100 meters).
Fault exists with the
network cable.
Replace the cable.
10BaseT/100BaseTX
compatible device is
not powered on.
Power on the network device.
LAN PoE port is not
functioning.
Replace the CEN-NVS100.
Network cable is not
connected to the
LAN PoE port on the
CEN-NVS100 or to the
PoE power source.
Verify network cable
connection to the LAN PoE
port on the CEN-NVS100 and
to the PoE port on the PoE
power source.
PoE power source is
not powered on.
Power on the PoE power
source.
PWR LED does
not illuminate.
(NET LED also
does not
illuminate).
Note that if a PWE-4803RU
PoE injector is used and
connects only to the
CEN-NVS100, the NET LED
on the CEN-NVS100 does not
illuminate because no LAN
data is present.
(Continued on following page)
66 • Network Video Streamer: CEN-NVS100
Operations & Installation Guide – DOC. 6873A
Crestron CEN-NVS100
Network Video Streamer
CEN-NVS100 Troubleshooting (Continued)
TROUBLE
POSSIBLE
CAUSE(S)
No video
Cannot control
PTZ camera
functions or other
devices.
CORRECTIVE ACTION
Coaxial cable is not
connected to the
CEN-NVS100 or to the
camera.
Verify coaxial cable
connection to the
CEN-NVS100 and to the
camera.
Video settings of the
CEN-N VS100 are not
configured properly.
Verify video settings of the
CEN-NVS100.
Fault exists with
the camera.
Refer to camera
documentation for
troubleshooting information.
Camera PTZ driver
setting does not match
CEN-NVS100 driver
setting.
Verify PTZ driver settings on
the CEN-NVS100 and the
camera.
Fault exists with
RS-485 camera control
connections.
Verify RS-485 camera control
connections on the
CEN-NVS100 and on the
camera.
Reference Documents
The latest version of all documents mentioned within the guide can be obtained from
the Crestron website (www.crestron.com/manuals). This link will provide a list of
product manuals arranged in alphabetical order by model number.
List of Related Reference Documents
DOCUMENT TITLE
CEN-NVS100 Network Video Streamer Quickstart Guide
Crestron e-Control Reference Guide
Further Inquiries
If you cannot locate specific information or have questions after reviewing this
guide, please take advantage of Crestron's award winning customer service team by
calling Crestron at 1-888-CRESTRON [1-888-273-7876].
You can also log onto the online help section of the Crestron website
(www.crestron.com/onlinehelp) to ask questions about Crestron products. First-time
users will need to establish a user account to fully benefit from all available features.
Future Updates
As Crestron improves functions, adds new features and extends the capabilities of
the CEN-NVS100, additional information may be made available as manual updates.
These updates are solely electronic and serve as intermediary supplements prior to
the release of a complete technical documentation revision.
Check the Crestron website periodically for manual update availability and its
relevance. Updates are identified as an “Addendum” in the Download column.
Operations & Installation Guide – DOC. 6873A
Network Video Streamer: CEN-NVS100 • 67
Network Video Streamer
Crestron CEN-NVS100
Software License Agreement
This License Agreement (“Agreement”) is a legal contract between you (either an individual or a single business entity) and
Crestron Electronics, Inc. (“Crestron”) for software referenced in this guide, which includes computer software and as applicable,
associated media, printed materials and “online” or electronic documentation (the “Software”).
BY INSTALLING, COPYING OR OTHERWISE USING THE SOFTWARE, YOU REPRESENT THAT YOU ARE AN
AUTHORIZED DEALER OF CRESTRON PRODUCTS OR A CRESTRON AUTHORIZED INDEPENDENT PROGRAMMER
AND YOU AGREE TO BE BOUND BY THE TERMS OF THIS AGREEMENT. IF YOU DO NOT AGREE TO THE TERMS OF
THIS AGREEMENT, DO NOT INSTALL OR USE THE SOFTWARE.
IF YOU HAVE PAID A FEE FOR THIS LICENSE AND DO NOT ACCEPT THE TERMS OF THIS AGREEMENT,
CRESTRON WILL REFUND THE FEE TO YOU PROVIDED YOU (1) CLICK THE DO NOT ACCEPT BUTTON, (2) DO NOT
INSTALL THE SOFTWARE AND (3) RETURN ALL SOFTWARE, MEDIA AND OTHER DOCUMENTATION AND
MATERIALS PROVIDED WITH THE SOFTWARE TO CRESTRON AT: CRESTRON ELECTRONICS, INC., 15 VOLVO
DRIVE, ROCKLEIGH, NEW JERSEY 07647, WITHIN 30 DAYS OF PAYMENT.
LICENSE TERMS
Crestron hereby grants You and You accept a nonexclusive, nontransferable license to use the Software (a) in machine
readable object code together with the related explanatory written materials provided by Crestron (b) on a central processing unit
(“CPU”) owned or leased or otherwise controlled exclusively by You and (c) only as authorized in this Agreement and the related
explanatory files and written materials provided by Crestron.
If this software requires payment for a license, you may make one backup copy of the Software, provided Your backup copy
is not installed or used on any CPU. You may not transfer the rights of this Agreement to a backup copy unless the installed copy of
the Software is destroyed or otherwise inoperable and You transfer all rights in the Software.
You may not transfer the license granted pursuant to this Agreement or assign this Agreement without the express written
consent of Crestron.
If this software requires payment for a license, the total number of CPUs on which all versions of the Software are installed
may not exceed one per license fee (1) and no concurrent, server or network use of the Software (including any permitted back-up
copies) is permitted, including but not limited to using the Software (a) either directly or through commands, data or instructions from
or to another computer (b) for local, campus or wide area network, internet or web hosting services or (c) pursuant to any rental,
sharing or “service bureau” arrangement.
The Software is designed as a software development and customization tool. As such Crestron cannot and does not
guarantee any results of use of the Software or that the Software will operate error free and You acknowledge that any development
that You perform using the Software or Host Application is done entirely at Your own risk.
The Software is licensed and not sold. Crestron retains ownership of the Software and all copies of the Software and
reserves all rights not expressly granted in writing.
OTHER LIMITATIONS
You must be an Authorized Dealer of Crestron products or a Crestron Authorized Independent Programmer to install or use
the Software. If Your status as a Crestron Authorized Dealer or Crestron Authorized Independent Programmer is terminated, Your
license is also terminated.
You may not rent, lease, lend, sublicense, distribute or otherwise transfer or assign any interest in or to the Software.
You may not reverse engineer, decompile or disassemble the Software.
You agree that the Software will not be shipped, transferred or exported into any country or used in any manner prohibited
by the United States Export Administration Act or any other export laws, restrictions or regulations (“Export Laws”). By downloading
or installing the Software You (a) are certifying that You are not a national of Cuba, Iran, Iraq, Libya, North Korea, Sudan, Syria or
any country to which the United States embargoes goods (b) are certifying that You are not otherwise prohibited from receiving the
Software and (c) You agree to comply with the Export Laws.
If any part of this Agreement is found void and unenforceable, it will not affect the validity of the balance of the Agreement,
which shall remain valid and enforceable according to its terms. This Agreement may only be modified by a writing signed by an
authorized officer of Crestron. Updates may be licensed to You by Crestron with additional or different terms. This is the entire
agreement between Crestron and You relating to the Software and it supersedes any prior representations, discussions, undertakings,
communications or advertising relating to the Software. The failure of either party to enforce any right or take any action in the event
of a breach hereunder shall constitute a waiver unless expressly acknowledged and set forth in writing by the party alleged to have
provided such waiver.
68 • Network Video Streamer: CEN-NVS100
Operations & Installation Guide – DOC. 6873A
Crestron CEN-NVS100
Network Video Streamer
If You are a business or organization, You agree that upon request from Crestron or its authorized agent, You will within
thirty (30) days fully document and certify that use of any and all Software at the time of the request is in conformity with Your valid
licenses from Crestron of its authorized agent.
Without prejudice to any other rights, Crestron may terminate this Agreement immediately upon notice if you fail to comply
with the terms and conditions of this Agreement. In such event, you must destroy all copies of the Software and all of its component
parts.
PROPRIETARY RIGHTS
Copyright. All title and copyrights in and to the Software (including, without limitation, any images, photographs,
animations, video, audio, music, text and “applets” incorporated into the Software), the accompanying media and printed materials
and any copies of the Software are owned by Crestron or its suppliers. The Software is protected by copyright laws and international
treaty provisions. Therefore, you must treat the Software like any other copyrighted material, subject to the provisions of this
Agreement.
Submissions. Should you decide to transmit to Crestron’s website by any means or by any media any materials or other
information (including, without limitation, ideas, concepts or techniques for new or improved services and products), whether as
information, feedback, data, questions, comments, suggestions or the like, you agree such submissions are unrestricted and shall be
deemed non-confidential and you automatically grant Crestron and its assigns a non-exclusive, royalty-free, worldwide, perpetual,
irrevocable license, with the right to sublicense, to use, copy, transmit, distribute, create derivative works of, display and perform the
same.
Trademarks. CRESTRON and the Swirl Logo are registered trademarks of Crestron Electronics, Inc. You shall not remove
or conceal any trademark or proprietary notice of Crestron from the Software including any back-up copy.
GOVERNING LAW
This Agreement shall be governed by the laws of the State of New Jersey, without regard to conflicts of laws principles.
Any disputes between the parties to the Agreement shall be brought in the state courts in Bergen County, New Jersey or the federal
courts located in the District of New Jersey. The United Nations Convention on Contracts for the International Sale of Goods shall not
apply to this Agreement.
CRESTRON LIMITED WARRANTY
CRESTRON warrants that: (a) the Software will perform substantially in accordance with the published specifications for a
period of ninety (90) days from the date of receipt and (b) that any hardware accompanying the Software will be subject to its own
limited warranty as stated in its accompanying written material. Crestron shall, at its option, repair or replace or refund the license fee
for any Software found defective by Crestron if notified by you within the warranty period. The foregoing remedy shall be your
exclusive remedy for any claim or loss arising from the Software.
CRESTRON shall not be liable to honor warranty terms if the product has been used in any application other than that for
which it was intended or if it as been subjected to misuse, accidental damage, modification or improper installation procedures.
Furthermore, this warranty does not cover any product that has had the serial number or license code altered, defaced, improperly
obtained or removed.
Notwithstanding any agreement to maintain or correct errors or defects, Crestron shall have no obligation to service or
correct any error or defect that is not reproducible by Crestron or is deemed in Crestron’s reasonable discretion to have resulted from
(1) accident; unusual stress; neglect; misuse; failure of electric power, operation of the Software with other media not meeting or not
maintained in accordance with the manufacturer’s specifications or causes other than ordinary use; (2) improper installation by anyone
other than Crestron or its authorized agents of the Software that deviates from any operating procedures established by Crestron in the
material and files provided to You by Crestron or its authorized agent; (3) use of the Software on unauthorized hardware or (4)
modification of, alteration of or additions to the Software undertaken by persons other than Crestron or Crestron’s authorized agents.
ANY LIABILITY OF CRESTRON FOR A DEFECTIVE COPY OF THE SOFTWARE WILL BE LIMITED
EXCLUSIVELY TO REPAIR OR REPLACEMENT OF YOUR COPY OF THE SOFTWARE WITH ANOTHER COPY OR
REFUND OF THE INITIAL LICENSE FEE CRESTRON RECEIVED FROM YOU FOR THE DEFECTIVE COPY OF THE
PRODUCT. THIS WARRANTY SHALL BE THE SOLE AND EXCLUSIVE REMEDY TO YOU. IN NO EVENT SHALL
CRESTRON BE LIABLE FOR INCIDENTAL, CONSEQUENTIAL, SPECIAL OR PUNITIVE DAMAGES OF ANY KIND
(PROPERTY OR ECONOMIC DAMAGES INCLUSIVE), EVEN IF A CRESTRON REPRESENTATIVE HAS BEEN ADVISED
OF THE POSSIBILITY OF SUCH DAMAGES OR OF ANY CLAIM BY ANY THIRD PARTY. CRESTRON MAKES NO
WARRANTIES, EXPRESS OR IMPLIED, AS TO TITLE OR INFRINGEMENT OF THIRD-PARTY RIGHTS,
MERCHANTABILITY OR FITNESS FOR ANY PARTICULAR PURPOSE, OR ANY OTHER WARRANTIES, NOR
AUTHORIZES ANY OTHER PARTY TO OFFER ANY WARRANTIES, INCLUDING WARRANTIES OF
MERCHANTABILITY FOR THIS PRODUCT. THIS WARRANTY STATEMENT SUPERSEDES ALL PREVIOUS
WARRANTIES.
Operations & Installation Guide – DOC. 6873A
Network Video Streamer: CEN-NVS100 • 69
Network Video Streamer
Crestron CEN-NVS100
Return and Warranty Policies
Merchandise Returns / Repair Service
1.
No merchandise may be returned for credit, exchange or service without prior authorization
from CRESTRON. To obtain warranty service for CRESTRON products, contact an
authorized CRESTRON dealer. Only authorized CRESTRON dealers may contact the factory
and request an RMA (Return Merchandise Authorization) number. Enclose a note specifying
the nature of the problem, name and phone number of contact person, RMA number and
return address.
2.
Products may be returned for credit, exchange or service with a CRESTRON Return
Merchandise Authorization (RMA) number. Authorized returns must be shipped freight
prepaid to CRESTRON, 6 Volvo Drive, Rockleigh, N.J. or its authorized subsidiaries, with
RMA number clearly marked on the outside of all cartons. Shipments arriving freight collect
or without an RMA number shall be subject to refusal. CRESTRON reserves the right in its
sole and absolute discretion to charge a 15% restocking fee plus shipping costs on any
products returned with an RMA.
3.
Return freight charges following repair of items under warranty shall be paid by CRESTRON,
shipping by standard ground carrier. In the event repairs are found to be non-warranty, return
freight costs shall be paid by the purchaser.
CRESTRON Limited Warranty
CRESTRON ELECTRONICS, Inc. warrants its products to be free from manufacturing defects in materials
and workmanship under normal use for a period of three (3) years from the date of purchase from
CRESTRON, with the following exceptions: disk drives and any other moving or rotating mechanical
parts, pan/tilt heads and power supplies are covered for a period of one (1) year; touchscreen display and
overlay components are covered for 90 days; batteries and incandescent lamps are not covered.
This warranty extends to products purchased directly from CRESTRON or an authorized CRESTRON
dealer. Purchasers should inquire of the dealer regarding the nature and extent of the dealer's warranty, if
any.
CRESTRON shall not be liable to honor the terms of this warranty if the product has been used in any
application other than that for which it was intended or if it has been subjected to misuse, accidental
damage, modification or improper installation procedures. Furthermore, this warranty does not cover any
product that has had the serial number altered, defaced or removed.
This warranty shall be the sole and exclusive remedy to the original purchaser. In no event shall
CRESTRON be liable for incidental or consequential damages of any kind (property or economic damages
inclusive) arising from the sale or use of this equipment. CRESTRON is not liable for any claim made by a
third party or made by the purchaser for a third party.
CRESTRON shall, at its option, repair or replace any product found defective, without charge for parts or
labor. Repaired or replaced equipment and parts supplied under this warranty shall be covered only by the
unexpired portion of the warranty.
Except as expressly set forth in this warranty, CRESTRON makes no other warranties, expressed or
implied, nor authorizes any other party to offer any warranty, including any implied warranties of
merchantability or fitness for a particular purpose. Any implied warranties that may be imposed by law are
limited to the terms of this limited warranty. This warranty statement supersedes all previous warranties.
Trademark Information
All brand names, product names and trademarks are the sole property of their respective owners. Windows is a registered trademark
of Microsoft Corporation. Windows95/98/Me/XP/Vista and WindowsNT/2000 are trademarks of Microsoft Corporation.
70 • Network Video Streamer: CEN-NVS100
Operations & Installation Guide – DOC. 6873A
Crestron CEN-NVS100
Network Video Streamer
This page is intentionally left blank.
Operations & Installation Guide – DOC. 6873A
Network Video Streamer: CEN-NVS100 • 71
Crestron Electronics, Inc.
15 Volvo Drive Rockleigh, NJ 07647
Tel: 888.CRESTRON
Fax: 201.767.7576
www.crestron.com
Operations & Installation Guide – DOC. 6873A
09.09
Specifications subject to
change without notice.