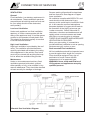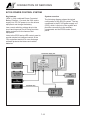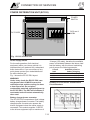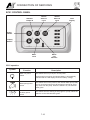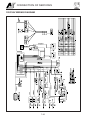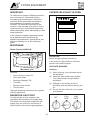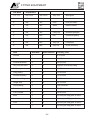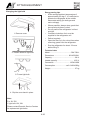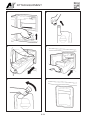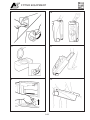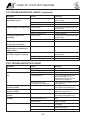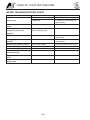
1
ADDENDUM
IMPORTANT
MARQUIS SUSSEX MODELS
The Marquis Sussex range are special editions of the Auto-Sleepers Warwick and Warwick Duo
models.
Features are:
•
Unique soft trim materials inside.
•
Unique graphics outside.
•
Habitation area air conditioning.
•
Fiamma external awning.
All other systems and features are the same as the equivalent Auto-Sleepers model.
Differences from the weight chart in the Auto-Sleepers handbook are:
MODEL
Sussex
Sussex Duo
Warwick
Warwick Duo
MTPLM
3500
3500
Mass in Running Order
2944
2917
Mass of the User Payload
556
583
Remainder for Personal Effects /
Options / Accessories
240
328
Front axle mass, in Running Order
1638
1643
Rear axle mass, in Running Order
1306
1274
Equivalent A/S model
(Weights in kg for 2.2 HDi models)
ADDENDUM
CONTENTS
Section
Introduction / Warranty / Body Construction............................. 1
Motorhome Code ..................................................................... 2
Preparing for the Road ............................................................. 3
On the Road ............................................................................. 4
Arrival on Site ........................................................................... 5
Safety & Security ...................................................................... 6
Connection of Services ............................................................ 7
Technical Specification ............................................................. 8
Fitted Equipment ...................................................................... 9
Care of your Motorhome ........................................................ 10
Useful Information ................................................................... 11
Service Section ...................................................................... 12
Index ...................................................................................... 13
Copyright © 2009 Auto-Sleepers Ltd. All rights reserved.
No part of this document may be reproduced or transmitted in any form or by any means, electronic
or mechanical, for any purpose, without the express written permission of Auto-Sleepers Ltd.
DATA RECORD
INTRODUCTION
Welcome.
Model
Congratulations on your purchase of an AutoSleeper motorhome. We are confident it will
give you many years of pleasure.
This Handbook covers the Peugeot Warwick
Duo, based on Peugeot Boxer 335 L3 H2
long wheelbase high roof window van.
This handbook has been compiled to enable
you to obtain the maximum pleasure from
your vehicle. It contains the appliance
instructions along with advice on safety
matters.
Gas System
Please read this Handbook thoroughly so that
you are conversant with all the motorhome
systems, operating instructions and
precautions.
Conversion Type
This handbook is for use on vehicles with a
30mbar gas system. The gas system
pressure is noted on a label in the gas locker.
Van conversion with an end lounge which
converts into two single beds or a large
double bed.
Failure to observe these recommendations or
precautions may result in incorrect operation
of equipment and subsequent risk to
occupants.
Climatic Conditions
The motorhome is designed for use in
temperate climates, and is certified Grade 1
in accordance with EN 1646-1: 2004.,
indicating an effective heating system is fitted
but has not been tested for thermal
performance.
Information leaflets and literature on safe
operation of appliances and equipment fitted
to your motorhome are included in the AutoSleeper Customer Pack. Please read these
carefully prior to use.
Handbook
Should you experience any difficulties contact
your dealer who will be pleased to offer
advise.
Any queries should be addressed to your
Auto-Sleeper dealer.
Appliance Instructions
It is the policy of Peugeot and Auto-Sleeper to
continually improve their vehicles, so whilst
the details contained in this Handbook are
correct at the time of going to press, they
reserve the right to alter the specifications at
any time without notice.
The appliance instructions included have
been extracted from those supplied from the
appliance manufacturers.
Automotive - Peugeot
For all automotive matters you should refer to
the Peugeot vehicle instructions manual. This
includes tyre pressures, referring to the type
of tyres fitted.
Auto-Sleeper motorhomes offer a variety of
customer uses and whilst each vehicle
features the optimum storage, fluid, seating
and sleeping capabilities, it is the customer’s
responsibility to select the proper
combinations of loads without exceeding
weight capacities.
The Auto-Sleeper conversion does not affect
the tyre pressures in any way as it is built
within the design envelope of the base
vehicle.
Your Auto-Sleeper motorhome conforms to
the European standard of EN 1646.
IMPORTANT:
In the interests of safety, replacements parts
for appliances must conform to the
manufacturer’s specification and should be
fitted by them or an authorised agent.
Your Auto-Sleeper conforms to the CEN
Standard EN1646-1/2004 for habitation
requirements relating to Health and Safety.
1-1
INTRODUCTION
To deal with your queries efficiently, always
quote your vehicle’s production number
which can be found in the glove
compartment.
Please read and complete the warranty
registration card supplied with your vehicle;
and return to the address below, without
delay.
Auto-Sleepers Limited,
Orchard Works,
Willersey,
Nr Broadway,
Worcestershire
WR12 7QF
Tele: 01386 853338
Fax: 01386 858343
E-mail: [email protected]
1-2
WARRANTY
Statement
This warranty applies only to the body
conversion and does not cover any failure or
defect in the chassis or engine.
Auto-Sleepers Limited (hereinafter called “the
Company”) hereby guarantees the body
conversion of the motorhome against failure
arising through defects in workmanship or
material under normal use and service for a
period of two years from the date of purchase
or registration whichever is the earliest.
Subject to the limitations and conditions
specified the Company will, during the
warranty period, repair free of charge any
defects which arise in the conversion part of
the motorhome and which are found on
inspection to result from faulty workmanship
or materials.
Where, under the terms of this warranty a
replacement item is supplied the conditions
of the warranty shall apply to that item for the
remaining period of the original warranty term
covering the defective part.
It is a condition of this warranty that the
Purchaser shall notify an authorised dealer or
distributor of the Company of the model,
type, and job number of the vehicle and
provide details of the alleged defect within 14
days of its discovery.
It is a condition of this warranty that the
conversion warranty is subject to an annual
Habitation Check, carried out by an
authorised dealer.
Condition
The benefit of this warranty shall apply only
to the Purchaser, including those subject to
hire purchase or credit sale agreements, and
can be transferred at a cost of £50 plus VAT
to subsequent owners until it expires. Note
that this is not the case with the optional third
year warranty package taken out at the time
of purchase the transfer of which is subject to
a charge.
Any disagreement between the Company
and the Purchaser as to the interpretation of
this warranty shall be referred for
determination to an independent arbitrator to
be appointed by mutual agreement or in the
event of no agreement by the Society of
Motor Manufacturers and Traders.
It is a condition of this Warranty that the
motorhome is delivered to an authorised
dealer or distributor of the Company (or the
Company’s factory at the Company’s
discretion) for inspection and afterwards
collected from there at the expense of the
Purchaser.
This warranty is valid only in the European
Union and the Company’s distributors,
dealers or agents have no authority to vary
its terms. The card must be received within
14 days of registration for the warranty to
be active.
This warranty becomes valid only when the
Company has received the completed
registration card.
This warranty does not extend to faults
attributable to wear and tear or to defects
repaired by or on the instructions of the
Purchaser without first obtaining the
Company’s written authorisation. Faults
attributable to wilful damage, negligence,
abnormal conditions and failure to follow the
Company’s instructions (whether oral or in
writing), misuse or alteration are excluded.
Ancillary equipment i.e. awnings, bicycle
racks, aerials etc are not covered by this
warranty.
The Purchaser’s attention is drawn to the
Motor Manufacturers Warranty that covers
the chassis, body and engine of the
motorhome.
The Purchaser’s attention is also drawn to
the fact that these terms and conditions do
not affect the Purchaser’s statutory rights.
This warranty does not apply to a motorhome
that has been subject to overloading or
otherwise misused or has not been
maintained in accordance with the
Company’s recommendations contained in
the handbook.
1-3
BODY CONSTRUCTION
BODY CONSTRUCTION:
Peugeot Boxer L3 H2 window van.
Body paint colours:
• White
• Metallic Silver
• Volcano Red
• Clipper Blue
• Horizon Yellow
• Silverstone Green
Floor Vinyl: Dark Wood Block.
Furniture: Linneman Cherry.
Furniture fittings: Chrome.
Work Surfaces and Table finish: Minstrel.
Carpet: Oasis Madrid.
Curtains, Cushions/Upholstery: Phoenix,
various colours.
Exterior Graphics: BS1770.
1-4
MOTORHOME CODE
THE COUNTRY & COASTAL
CODES
Upon arrival at your destination you should
be aware of the Country Code relating to
motorhome owners. This is entitled the Motor
Caravanners’ Code.
Code of Conduct - Camp Sites
•
Children should be restrained from
making excessive noise.
•
Flying kites and model aircraft and the
use of items like catapults or air-guns as
well as ball games should not be
permitted among, or close to,
motorhomes.
•
Musical instruments, record players,
radios and televisions should not be used
to the inconvenience of other people on
site.
•
Open and close doors quietly.
•
Power generators must be adequately
silenced and used with consideration.
Arrivals
•
Report to reception immediately on
arrival.
Vehicle Movement
•
Keep to roadways unless otherwise
directed.
•
Adhere to speed limits. Note that these
are generally 10 mph. (Remember that
the stopping distance on grass is
considerably greater than on tarmac).
•
Only a person in possession of a current
driving licence may drive on the site.
•
Park correctly as advised on your pitch.
Where possible leave 20ft of free space
around your vehicle.
Dogs and Pets
Use the electrical mains hook-up in the
correct manner and with caution.
•
Ensure that all fresh water taps/
connections are turned off after use.
•
Have care and consideration when using
all facilities (toilets and showers etc.) and
leave them clean and tidy. Young children
should be escorted.
•
Unless permission has been granted, no
animal should be allowed loose on the
site and leads must not exceed 10ft.
•
No animal should be allowed in the
shower/toilet blocks.
•
Do not let dogs foul the site.
Adhere to and make note of all fire
precautions concerning the whereabouts of
the fire points.
Although not compulsory, it is recommended
that a 1 kg (2lb) dry powder fire extinguisher
is carried. It should comply with BS 5423 and
be marked BSI or FOC approved. It is
important to check at regular intervals that
the extinguisher is working as is required by
types meeting BS 5423.
To avoid possible damage to sewage
purification works, only approved chemical
fluids must be used. Under no circumstances
may coal tar, phenol or caustic-based fluids
be used. Disposable napkins and similar
bulky items must not be put into chemical
closet emptying points but should be
wrapped in a polythene bag and placed in the
container provided. (Put all litter in containers
marked for the purpose).
Careful thought is necessary for the
positioning of the extinguisher, which should
be near the door but not too close to the
cooking equipment where sudden flames
could make it unreachable. In the kitchen
area, a fire blanket is a worthwhile
precaution.
Unless permission has been granted,
barbecues should not be used. When
permission has been given, consideration
should be given to the annoyance that can be
caused to other users of the site. Open fires
are not allowed.
Noise
•
All dogs and other pets should be kept
under control.
Fire Precautions
Use of Site
•
•
Do not make excessive noise.
2-1
MOTORHOME CODE
Awnings and Tents
that all passengers are seated and seat
restraint straps worn.
Awnings and tents should only be used when
permission has been obtained.
When on grass and staying for more than a
few days, the ground sheet and/or side flaps
of awnings should be periodically raised in
order to avoid damage to the ground.
Before moving off, elevating roofs MUST be
lowered and correctly secured, and top
hinged windows closed. Likewise all doors
and access lockers for gas containers and
chemical toilets must be properly closed.
Departure
Exterior steps should be properly retracted
and secured.
•
Leave the pitch clean and tidy.
•
On leaving, check out with the reception
paying the required dues.
When the vehicle is being refuelled, or on a
ferry, all gas systems must be turned off.
Gas appliances should only be used when
the vehicle is in motion when the
manufacturer of the appliance permits such
use.
Wild camping
Camping away from licensed sites, without
the permission of the landowner or his agent,
is not allowed in the United Kingdom. When
permission has been granted, all aspects of
this Code should be adhered to.
Handbook
Before using a motorhome all aspects of the
handbooks produced by the chassis
manufacturer and the converter must be read
and adhered to.
On no accounts should:
•
Litter be disposed of other than in
receptacles provided.
•
Water be allowed to escape from the
vehicle.
Care and consideration should be taken to
protect the environment.
•
Chemical toilets be emptied except into
the disposal places agreed with the
landowner.
Observe the Country and Coastal Codes
shown below:
•
Washing or similar be hung outside the
vehicle.
Environment
The Country Code
Enjoy the countryside but respect its life and
work.
Parking
More people than ever before are exploring
the countryside, interested in farming, plant
life, bird watching or just observing the
general wildlife. Whatever your interest, there
is a lot to learn, but please observe the
following code.
Motorhomes should only be parked in
approved places.
When using the facilities of a motorhome at
such times, care and consideration should be
given to those around them.
Guard against all risk of fires. Hay and heath
land catch alight easily and once ablaze are
very hard to put out. Remember: Fire
Spreads Quickly.
Driving
When using a motorhome on either the public
highway or private road, the Highway Code
should be complied with and full
consideration given to other road users.
In the event of a motorhome travelling slowly
and there being a queue of traffic behind, the
driver of the motorhome should, where
possible, pull over in order to let the other
traffic pass.
When the vehicle is in motion it is compulsory
2-2
•
Keep to public paths across farmland.
•
Use gates and stiles to cross fences,
hedges and walls.
•
Leave livestock, crops and machinery
alone. View from a distance.
•
Take your litter home - it is unsightly and
harmful to wildlife.
MOTORHOME CODE
•
Help to keep all water clean.
•
Take special care of country roads.
•
Make no unnecessary noise. Most
animals are very timid, noises can disturb
them unnecessarily. If you want to get the
best out of the country, go quietly.
The Coastal Code
As our coastlines are increasingly used for
recreation and education, the following
suggestions are made to enable us to enjoy
our inheritance and preserve it for posterity.
•
Do not trample about, or move rocks
unnecessarily.
•
Do not frighten seals or seabirds.
•
Do not spear fish.
•
Do not spill detergents, solvents or fuel
from boats as these can kill marine life.
•
When sailing, moderate your speed - the
wash from a fast boat can destroy banks
and nests.
•
Live mollusks and crustaceans need not
be collected as souvenirs - dead shells
can usually be found.
•
Shellfish can take years to grow and
fines can be imposed for not observing
national regulations.
•
Do not pull up seaweed unnecessarily.
•
Make your visit instructive - not
destructive.
•
Look at material, don’t remove it. Take
notes and photographs, not specimens.
•
Observe bye-laws and be considerate to
others.
•
National Trust property or Country Parks
have regulations to protect the wildlife.
Follow these.
Fire Precautions
You should also make yourself aware of the
local fire regulations.
2-3
MOTORHOME CODE
2-4
PREPARING FOR THE ROAD
YOUR MOTORHOME (Weights
explained)
LOADING AND DISTRIBUTION OF
WEIGHT IN THE MOTORHOME
Mass in Running Order (MRO)
SENSIBLE LOADING
The weight of your motorhome as it leaves
the factory, as new with standard fixtures and
fittings, plus an allowance for driver and 90%
fuel.
HOW TO APPORTION WEIGHT
Maximum Technically Permissible Laden
Mass (MTPLM)
The maximum weight of the vehicle when
fully laden for use on the road. See
specification section for actual figure.
User Payload
The load margin (payload), this represents
the difference between the Mass in Running
Order (MRO) and the Maximum Technically
Permissible Laden Mass (MTPLM). It shows
the maximum weight which can be loaded
into your motorhome, covering items such as
food, crockery, cutlery, clothing, bedding, gas
cylinders, etc. See Technical Specification for
actual figure.
Loading
Correct weight distribution is a major factor in
making your motorhome a balanced and
pleasant vehicle to drive without
compromising road-holding. Care should
therefore be taken to ensure that heavy items
are well spaced and are in as low a position
as possible, for example, low cupboards and
bed boxes.
Please take care to ensure that you have
allowed for the masses of all items you intend
to carry in the motorhome, e.g.. passengers,
optional equipment, essential habitation
equipment and personal effects such as
clothing, food, pets, bicycles etc.
DO NOT EXCEED THE STATED MAXIMUM
LOAD. ITEMS FITTED OTHER THAN
STANDARD EQUIPMENT WILL DEPLETE
THE PAYLOAD STATED IN THIS
HANDBOOK.
Although there are additional seat belts within
the motorhome, please refer to the stated
number of passengers that are allowed due
to the MRO and MTPLM.
WARNING: Under no circumstances
should the maximum permissible laden
mass of the motorhome be exceeded.
Roof Loading
DO NOT ALLOW CHILDREN TO CLIMB
ONTO THE ROOF.
Roof Rack Bars and Ladder (optional)
When using the optional roof rack, care
should be taken to see that all the items are
securely anchored. Apart from general
cleaning and polishing, the roof rack and
ladder require no special maintenance.
WARNING: Take special care when on the
roof in wet or frosty weather conditions,
which cause it to be particularly slippery.
Maximum load within the area encompassed
3-1
PREPARING FOR THE ROAD
by the roof rack should not exceed 75 kgs
(165 lbs) with a maximum loading of 8 kg (17
lbs) per square foot.
15. Check your external rear view mirrors
and adjust if necessary.
16. Check that all corner steadies are wound
up and that, if a step is used, it is put
away before moving off.
Before Moving Off
Whenever making a journey with your
motorhome, either setting off on holiday or
returning home, it is good practice to run
through this simple checklist.
17. Check wheel nuts are secure and tyre
pressures are correct.
18. Ensure, if required, that your fresh water
tank is full and your waste tank is empty.
1. Close and secure all cupboards and
drawers and check any loose articles. Do
not store tins, bottles, etc. in overhead
lockers.
19. Referring to your base vehicle manual,
check all fluid levels including automotive
fuel and tyre pressures. Remember to
check that your spare tyre is of the
recommended pressure.
2. Close and secure all windows and roof
lights.
20. Ensure that, on models fitted with an
elevating roof, the roof is securely locked
down with the exterior catches applied.
3. Leave all curtains and blinds open to aid
visibility.
4. Check that gas cylinders are securely
fastened and turn off all gas appliances,
except those heating appliances
designed to function while the vehicle is
in motion. Also, ensure that the gas
locker door is securely fastened.
21. The fridge vent covers should be fitted
when the vehicle is to be driven in order
to comply with European Type Approval
regulations for vehicle external
projections.
22. Ensure that the toilet flush tank only
contains a small amount of water (1-2
litres) in order to minimise the risk of
leaks or spillage whilst the vehicle is in
motion.
5. Ensure that there is sufficient gas to meet
your needs.
6. Switch off 230 volt supply at source,
disconnect mains cable and store in an
appropriate place.
7. Check your RCD’s/MCB’s for operation.
8. Check and if necessary, charge the
conversion battery.
9. Check battery selection switch is in the
OFF position.
10. Check that the battery is secure and that
the battery box lid is fastened.
11. Ensure the fridge is on 12V operation
and door lock is set. (Note: the electrical
relays will allow the fridge to be run on
the vehicle battery when the engine is
running.)
12. Remove any external fresh water
connections etc.
13. Make sure any heavy articles are stored
in accordance with the loading
procedure. Tables should also be made
secure.
14. Lock the motorhome exterior door
(remember to take out your keys).
3-2
ON THE ROAD
Pulling Off
Removing the Spare Wheel
Engage the clutch smoothly.
CAUTION: Exercise care when lowering
the wheel frame due to its weight.
Avoid wear and tear on clutch and
transmission by taking extra care.
Removal
Change gears smoothly.
a. The spare is located in front of the rear
step.
Try not to jerk the clutch.
MOTORWAY DRIVING
b. Tools - The jack, handle and wheel brace
are stored under the nearside rear seat.
Speed Limits (UK)
c. Follow the procedure for changing a
wheel as described and illustrated in the
base vehicle handbook.
If a speed limit is not in force, your
motorhome can be driven up to 70mph on
motorways and dual carriageways.
Replacement of Spare Wheel
1. Reduce Speed:
i)
Follow the procedure as described in the
base vehicle handbook.
In high or cross winds.
ii) Downhill.
Caravan Door Step
iii) In poor visibility.
Motorway Handling
Your vehicle is fitted with an electrically
operated side step. In the event of the step
being left extended a buzzer, positioned
under the dashboard, will sound (when the
ignition is switched on) and the step will selfretract.
Do not bump the kerb with the wheels.
Cycle Rack
When passing other vehicles allow more than
the normal clearance.
In the event of a cycle rack being fitted, the
cycle rack when folded will increase the
vehicle length by 400mm. Your Auto-Sleeper
dealer will give further advice or assistance if
required.
2. High sided vehicles cause air buffeting,
so extra care must be taken when
passing or being passed. As much space
as possible should be given.
Allow longer to get up speed to pass.
Do not swing out suddenly.
Carry out all manoeuvres as smoothly as
possible.
Whilst Driving
Whilst the vehicle is being driven ensure that:
Use nearside wing mirror to check
motorhome has cleared when overtaking.
•
Both the passenger and driver wear seat
belts - this is a legal requirement.
•
Heavy loads are not stored in top
cupboards or in areas from which they
may become detached. Please ensure
that heavy items are stored low down and
take care not to overload individual
wheels, the axles or the MTPLM.
•
Table(s) are stowed in the correct
position and table legs secured in their
retaining clips.
•
Furniture lids are lowered; cupboards
and flaps are closed and secured.
•
The refrigerator door is closed and
secured by its travelling catch.
Changing a Wheel
Refer to the vehicle handbook
WARNING: Ensure the wheel is of the
same construction and size as the one
that has been removed.
Jacking
Front and Rear - use the standard jacking
points as per the base vehicle handbook.
4-1
ON THE ROAD
•
The retractable rear step if fitted, is
folded away or, if a separate step is
supplied, it is safely stowed in the
vehicle.
•
Roof ventilators are closed and locked in
the down position.
•
The bathroom is not used whilst the
vehicle is in motion. (Note: Refers only to
models fitted with shower or toilet
compartment).
•
Top hinged windows are closed, and
securely fastened.
•
Children do not roam around the vehicle;
they may fall and injure themselves.
Front Seat Swivel (where fitted)
Your vehicle may be fitted with a swivel base
to either or both of the front seats, so that
they may be turned to face the rear of the
vehicle.
In order to release the swivel mechanism to
allow the seat to rotate, grasp the release
lever at the front of the seat and pull
upwards. The lever is located on the right
front corner of the passenger seat and the
left corner of the driver’s seat. (Note that the
lever on the opposite front corner of each
seat operates the back reclining mechanism.
Only operate this lever whilst sat in the seat,
in order to avoid sudden uncontrolled
movement of the backrest).
WARNING: It is important that while the
vehicle is in motion, any seat swivels are
locked in the forward facing position.
Map Storage
In the rear of each cab seat there is a map
pocket for storage of maps, periodicals and
light items.
4-2
ARRIVAL AT SITE
CHECK SITE REGULATIONS
Siting your Motorhome
When siting your motorhome, keep to the
roadways unless otherwise directed. Obey
the speed limit which, in general, is 10 mph.
Only a person in possession of a current
driving licence is permitted to drive on the
site. Stopping distances on grass are
considerably greater than on tarmac.
Selecting a Pitch
Carefully select where you wish to park your
motorhome. The site should be as level as
possible, well drained and away from boggy
areas and, preferably, not under or near
trees. Consider also, how you will move your
motorhome when leaving the site. For
example, on sloping ground in wet
conditions, pitch facing downhill.
Levelling
It is important to site your motorhome level to
ensure correct operation of the refrigeration,
cooker, etc.
Awning Light
The exterior awning light may be controlled
from key fob or the control panel.
5-1
ARRIVAL AT SITE
5-2
SAFETY & SECURITY
SAFETY
make any additional openings in the floor.
Important: Your attention is drawn to the
notice affixed in the motorhome advising on
fire prevention, ventilation and what to do in
case of fire.
Under no circumstances must these vents
be blocked or obstructed.
Additional night time ventilation is obtained
by releasing the window catches and placing
them in the second groove on the frame
catch.
Children
Do not leave children alone in the motorhome
in any event, keep potentially dangerous
items out of reach as at home. e.g. matches,
drugs, etc.
Awnings
There is no danger of pollution of an
enclosed awning space by the LPG exhaust
from the refrigerator venting into it.
WARNING: When upper bunks are used
by children especially under six years of
age care shall be taken against the risk of
them falling out.
WARNING: Space heaters may produce
sufficient exhaust gases to pollute the
awning space if it is totally enclosed (from
a general comfort, smell, and hygiene
point of view). In the extreme case, there
could be a build up of carbon dioxide to a
dangerous level.
Fire Extinguishers
It is recommended that a 1 kg (2lb) minimum
capacity dry powder fire extinguisher be
located by the main exit door at all times.
Note: Motorhome owners are advised to
allow some fresh air circulation into the
awning space when such appliances are in
use.
A pan fire should not have an extinguisher
aimed at it but be smothered with a fire
blanket (which should be stored by the
cooker).
In case of fire
1. Get everyone out of the motorhome as
quickly as possible using whichever exit
is the quickest including windows. Do not
stop to collect any personal items.
2. Raise the alarm — Call the fire brigade.
3. Turn off gas container valve if safe to do
so.
Ventilation and Condensation
The ventilation points on your motorhome are
fixed points of ventilation which are stated by
the European Standards. Under no
circumstances must these vents be blocked
or obstructed. It is advised that fixed
ventilation points and any protective screens
are checked and cleaned (if necessary) on a
regular basis.
Fresh air circulation should be allowed below
the motorhome when appliances are in use
and when flues terminate below the floor to
allow free evacuation of the products of
combustion. At least three sides of the
underfloor space should always be kept open
and unobstructed especially by snow. Do not
6-1
SAFETY & SECURITY
ELECTRICAL SYSTEMS
for appliances should conform to the
appliance manufacturer’s specification and
should be fitted by them or their authorised
agent.
Batteries
Battery terminals and connectors should be
firmly attached. Battery surfaces should be
free of moisture and dirt.
WARNINGS:
Where removable cell taps are fitted these
must be screwed firmly home.
When removing a battery always remove the
negative cable first. On re-connection the
negative cable should be connected last.
Switch off all lamps and appliances before
disconnecting the battery. Do not smoke
while working on or near to the battery.
1
Never use portable cooking or heating
equipment, other than electric heaters
that are not of the direct radiant type,
as it is a fire and asphyxiation hazard.
2
Do not use cookers as heaters or dry
clothes etc on the cooker or space
heater.
3
Make sure that combustible materials
can not come into contact with hot
surfaces or burners.
4
Surfaces of appliances may become
hot in use and the guard provided
does not give full protection to the
young and elderly.
5
Do not use additional independent gas
appliances inside the vehicle.
6
Never allow modifications of electrical
or LPG systems or appliances except
by qualified technicians.
Fuses
Always replace blown fuses with one of a
correct rating.
Overload
Never overload any electrical circuit,
especially the 12-volt socket outlet. The
rating of appliances should be checked
before connection.
Shower Compartment Light
Ensure that water does not ingress into the
light unit.
The water heater fitted to this vehicle is of the
“room sealed” type, any replacement should
be the same, i.e. “room sealed”.
Charger Unit
Turn off all gas equipment and cylinders/
tanks and any other heating appliances
before travelling.
Keep the charger unit well ventilated and
never allow material or bags to be in contact
with the unit casing which gets hot when the
unit is operating.
Before connecting to the supply, ensure that
the contacts in both the plug and the socket
are clean and dry and that the hook-up plug
is firmly located and locked into the socket.
The RCD must be easily accessible at all
times.
Ventilation openings are located below all the
gas appliances, and in the base of the gas
locker. In winter conditions make sure the
vents are clear of snow and mud. These
openings should be regularly checked and
any mesh covering them cleaned with a stiff
brush to prevent any risk of them becoming
blocked. The openings are provided for your
safety - please do not obstruct them.
GENERAL
Air Bags
Before using your Auto-Sleeper, you should
be fully conversant with the following safety
precautions; if you are in any doubt as to the
meaning of any of them you should contact
your supplying Auto-Sleeper dealer. Please
read the following carefully.
Do not fit rear-facing children’s seats to front
facing seat protected by air bags. It is
recommended that small children do not sit in
the front passenger seat whilst the vehicle is
in motion. Follow the advice given in your
base vehicle instruction book.
230 Volt Mains Operation
In the interests of safety, replacement parts
6-2
SAFETY & SECURITY
Smoke Alarm
SECURITY
Features
Chassis number
•
Battery operated.
•
Operating light (LED) flashes
approximately every 45 seconds
confirming unit is powered.
Record the chassis number and the factory
job number of your motorhome, and keep
them in a safe place at home.
•
Low battery warning. Unit “beeps”
approximately every 45 seconds for up to
30 days when the battery needs
replacing.
•
Sensitivity test button. Tests sensitivity,
circuitry, battery, horn (and emergency
light, model 350 only).
•
Loud 85 decibel Piezo electric alarm.
Automatically resets when hazardous
condition has passed.
The chassis number is a 17 digit number,
beginning with the letters VF3, and is found
stamped on a plate visible through a window
in the bottom left hand corner of the
windscreen, and also on a plate under the
bonnet attached to the bonnet closing
crossmember. (This plate also contains the
permissible weight data).
The factory job number is an alphanumeric
code consisting of a letter followed by four
numbers, and is found on a label inside the
glove box.
WARNING: Test smoke alarm operation
after vehicle has been in storage, before
each trip and at least once per week
during use.
Motorhome Theft
The theft of a motorhome can occur in the
most unlikely circumstances; from a
motorway service area, even from an owner’s
driveway.
Your alarm requires one 9 volt battery. Under
normal use, the battery should last
approximately one year.
Secure all windows and doors when your
motorhome is unoccupied even if only for a
short length of time.
Simple maintenance
Vacuum every six months to help keep the
unit working efficiently. Open cover and
gently vacuum interior of detector. Keep
vacuum nozzle from touching the unit.
Additional security
Consider fitting any device which might deter
or prevent intrusion by thieves. A wheel lock
prevents removal of the wheel.
Problems are indicated by two events:
Window etching of the chassis number is a
cost effective deterrent.
1. The alarm does not sound upon pressing
the test button.
Free crime prevention
2. The operating light remains steadily on or
off (i.e. does not flash approximately
once every 45 seconds, when the unit it
not in alarm).
Advice about securing your motorhome,
protecting your valuables, property marking,
either at home or whilst on site, can be
obtained from the Crime Prevention Officer
through your local Police Station.
Try the following:
1. Inspect for obvious damage.
2. Visually check that unit contains
recommended battery type.
3. Check that battery is properly connected.
4. Gently vacuum as recommended above.
5. Replace battery.
If these procedures do not correct the
problem, do NOT attempt repairs. Contact
the manufacturer.
6-3
SAFETY & SECURITY
6-4
CONNECTION OF SERVICES
Frost Precaution
Please read and become familiar with
operating instructions for equipment fitted in
your motorhome.
If the vehicle is not being used during
freezing conditions the water must be
drained. Whilst the vehicle is being used in
such conditions, and the water heater is at
risk of freezing, it should be drained by
opening the drain valve.
Connection of services are dealt with under
separate headings, Water, Electricity and
Gas.
WATER SYSTEMS
FRESH WATER PUMP
Fresh/Waste Tanks
A Flojet R3426-500 Triplex Diaphragm
automatic water system pump is fitted under
the offside settee adjacent to the combi
heater unit. This is a self priming pump,
mounted on noise absorbing mounts, which
has the ability to run dry without damage. It
has a flow rate of 5.3 litres (1.4 gallons) per
minute.
The fresh and waste water tanks are located
under the floor near the middle of the vehicle.
The drain taps for both tanks are clipped to
the underside of the vehicle on the offside,
with the waste drain being nearer to the rear
of the vehicle.
For capacities of both see the Technical
Specification Section.
The fresh water tank is filled through the
lockable cap on the exterior of the vehicle.
All pipe work is manufactured to food grade
material specification.
Operation
With pump switch off and battery fully
charged, fill water tank, open all taps, then
turn pump switch on. Water will begin to flow.
When the water is free of air, turn taps off.
Remember, you are filling the water heater
and the toilet and shower lines. When all
valves are shut-off, pump will stop.
Breathers
Both tanks are fitted with breathers, which
allow air displacement when filling. When
filling the fresh water tank, water may escape
through these breathers; this should give no
cause for concern.
Caution: Should pump fail to stop, turn
switch off and see the trouble shooting guide.
7-1
CONNECTION OF SERVICES
Sanitising
WARNING: Do not use automotive antifreeze to winterise potable water systems.
These solutions are highly toxic and may
cause serious injury or death if ingested.
Portable water systems require periodic
maintenance to delivery a consistent flow of
freshwater. Depending on use and the
environment the system is subject to,
sanitising is recommended prior to storing
and before using the water system after a
period of storage.
1. Drain the water tank. Open tank drain
valve. You may use the pump to drain the
tank by opening all the taps in the
system. Allow the pump to operate until
the tank is empty. Do not operate the
pump more than 15 minutes
continuously.
Systems with new components, or ones that
have been subjected to contamination,
should also be disinfected as follows:
2. Open all taps and purge the water from
the plumbing system. Turn power to the
pump off. Be sure that all the water from
the drain lines are drained.
1. Use of the following methods to
determine the amount of common
household bleach needed to sanitise the
tank.
(A) Multiply “gallon of tank capacity” by
0.13; the result is the ounces of bleach
needed to sanitise the tank.
(B) Multiply “litres of tank capacity” by
1.0; the result is the milli-litres of bleach
needed to sanitise the tank.
3. Remove quick connect inlet and outlet
fittings from the pump and turn the pump
on to pump out remaining water from the
pump head. Be sure to have a catch pan
or a rag under the pump to prevent water
from spilling onto the RV. Turn the pump
off once the plumbing is empty. Leave the
fittings disconnected from the pump until
the system is ready to be used again.
Make a note on your tank filler that the
plumbing is not connected.
2. Mix into solution the proper amount of
bleach within a container of water.
3. Pour the solution (water/bleach) into the
tank and fill the tank with potable water.
4. Open ALL taps (hot and cold) allowing
the water to run until the distinct odour of
chlorine is detected.
4. Be sure that all taps are left open to
protect against damage to the plumbing.
5. The standard solution must have four (4)
hours of contact time to disinfect
completely. Doubling the solution
concentration allows for contact time of
one hour.
6. When the contact time is completed,
drain the tank. Refill with potable water
and purge the plumbing of all sanitising
solution.
Winterising
Allowing water to freeze in the system may
result in damage to the pump and plumbing
system.
Non-toxic anti-freeze for potable water may
be used with Flojet pumps. Follow
manufacturers recommendations.
Refer to coach or equipment manufacturers
instructions for their specific winterising and
drainage procedures.
7-2
CONNECTION OF SERVICES
Troubleshooting
Vibration induced by road conditions can cause plumbing to loosen. Check for any system
components that are loose. Many symptoms can be resolved by simply tightening the hardware.
Failure to prime - motor operates, but no pump discharge - check:
•
Restricted intake or discharge line.
•
Air leak in intake line.
•
Debris in pump.
•
Punctured pump diaphragm (pump leaks).
•
Crack in pump housing.
Motor fails to turn on - check:
•
Loose wiring connection.
•
Pump circuit has no power.
•
Blown fuse.
•
Pressure switch failure.
•
Defective motor.
Pulsating flow - check:
•
Restricted pump delivery. Check discharge lines, fittings and valves for clogging or
undersizing.
Pump fails to turn off after all fixtures are closed - check:
•
Empty water tank.
•
Insufficient voltage to pump (low battery).
•
Punctured pump diaphragm (pump leaks).
•
Discharge line leak.
•
Defective pressure switch.
Low flow and pressure - check:
•
Air leak at pump intake.
•
Accummulation of debris inside pump and plumbing.
•
Worn pump bearing (excessive noise).
•
Punctured pump diaphragm (pump leaks).
•
Defective motor.
7-3
CONNECTION OF SERVICES
instance. Look for signs advertising
‘Autogas’.
If you have internet access, search for ‘LPG
filling stations’ and there are many sites
where input of your postcode will locate the
nearest filling station to your location.
There are many companies producing LPG
but all brands are suitable for use in your
vehicle.
GAS
GENERAL INFORMATION
The gas appliances in this vehicle are
powered by Liquified Petroleum Gas (LPG)
which is stored, under pressure, in a tank
located under the floor in the centre of the
vehicle. This tank is refilled, when required,
at a re-fuelling station using a nozzle and
hose in a similar way to refilling the engine
fuel tank. Make sure that heating and cooking
appliances are switched off before you move
the motorhome.
LPG Re-fuelling
LPG re-fuelling is simple and efficient, carried
out in much the same way as petrol and
diesel with a hose and nozzle designed to
lock onto the filling connector on the vehicle.
The refulling point is located behind a black
plastic cover on the nearside of the vehicle
behind the side door.
Once the connection is made, the customer
simply presses and holds down a button on
the dispenser until they have put the required
amount of fuel into the vehicle or until the
tank is full.
LPG tanks are fitted with a valve that stops
the flow once the tank has reached its
maximum safe filling level. Once the meter
stops the customer simply disconnects the
nozzle and returns it to the dispenser.
The regulator
Your motorhome is fitted with a regulator as
standard equipment. The gas regulator has a
working pressure of 30mbar and is suitable
for use with all commercially available brands
of LPG. It is fitted adjacent to the tank
installation under the vehicle and requires no
attention from the owner whilst using the
vehicle.
Availability
LPG is becoming more widely available as
more vehicle engines are converted to run on
it. Many garages now have an LPG pump
and other outlets are available in more rural
areas, often near farming communities for
7-4
CONNECTION OF SERVICES
Safety Note
Filling Nozzles
•
When pulling up to the Autogas
dispenser ensure the vehicle is parked
with the filling connector located nearest
to the dispensing pump.
•
Apply the handbrake and switch off the
engine.
•
No smoking, naked flames or mobile
phones are allowed on the Service
Station forecourt.
•
The use of an adaptor is not
recommended.
•
Refilling of portable LPG cylinders is not
allowed.
•
All dispensing nozzles should be fitted
with a nozzle shield. Please report to
staff if missing.
When connecting the nozzle to the filler valve
on your vehicle always check that the locking
pins are aligned.
There are two main types of filling nozzles
used in the UK - ‘Gas Guard’ and ‘De Visser’.
Gas Guard uses a rotating barrel to lock on
to the filler valve wherease De Visser uses a
lever.
1 - Gas Guard nozzle filling instructions
Ensure Gas Guard nozzles are fitted with protective nozzle shields. Report to site staff if missing.
(Nozzle shields have been removed from picture for clarity).
1
Connecting
(1) Push nozzle over
the lugs on the filler
valve and turn barrel a
quarter turn clockwise
to lock. Do not
squeeze lever before
nozzle is connected.
Caution: From this
moment onwards
ensure hands are
away from the nozzle
barrel.
2
(2) Pull back lever
and latch into place.
Ensure lever is
latched securely.
Follow instructions on
dispenser to
commence
dispensing.
3
Disconnect
(3) Ensure hands are
away from the nozzle
barrel.
Caution: When
dispensing has
ended, squeeze back
lever and release
latch. Release lever
fully. A small release
of gas will occur as
you release the lever.
This is normal! Do not
place hands on barrel
until after the gas has
been released.
7-5
4
(4) Turn barrel anti
clockwise a quarter
turn to release nozzle
from vehicle. Replace
nozzle in holder on
dispenser.
CONNECTION OF SERVICES
1 - De Visser nozzle filling instructions
Ensure De Visser nozzles are fitted with protective nozzle shields. Report to site staff if missing.
(Nozzle shields have been removed from picture for clarity).
1
2
4
Disconnect
Connecting
(1) Hold the hose
behind the nozzle and
the guard, keeping
lever pushed forward
with the handle at 12
o’clock position.
Locate the nozzle
over the lugs on the
filler valve and turn
the lever a quarter
turn clockwise to lock.
3
(2) Pull back lever
towards hose and
latch into place.
Ensure lever is
latched securely.
Follow instructions on
dispenser to
commence
dispensing.
(3) Ensure hands are
away from the nozzle
barrel.
Hold hose behind
guard and release
lever by pushing
forward. A small
release of gas will
occur as you release
the lever. This is
normal!
(4) Turn lever anti
clockwise a quarter
turn to release nozzle
from vehicle. Replace
nozzle in holder on
dispenser.
Caution: From this
moment onwards
ensure hands are
away from the nozzle
barrel.
GAS SAFETY ADVICE
Facts about LPG
•
LPG is not poisonous.
•
LPG has been given a smell by manufacturers in order to identify leaks.
•
Bi-products of combustion are harmless.
•
There is danger if all air and oxygen are excluded, therefore ventilation holes must be kept
clear at all times.
PRECAUTIONS
a) Never look for a leak with a match. Always use a soap solution or its equivalent when testing
connections. Do not operate any electrical apparatus whatsoever, especially light switches. If
the leak is not obvious, the vehicle should be evacuated and qualified personnel consulted.
b) Avoid naked lights when re-fuelling.
c) LPG is more dense than air. Consequently any vapour may flow along the ground and into
drains, sinking to the lowest level of the surroundings and be ignited at a considerable
distance from the source of leakage. In still air the vapour will disperse slowly.
7-6
CONNECTION OF SERVICES
VENTILATION
Screens and/or grilles should be kept clean
and free from dust. See diagram of upper/
lower ventilation.
General
Fixed ventilation is a statutory requirement in
all motorhomes. These ventilation apertures
are positioned at both high and low level and
for your safety should not be obstructed,
even partially.
All ventilation complies with BS EN 721 and
vents should not be obstructed in any
manner as this could lead to insufficient fresh
air. In this case the confined atmosphere
becomes depleted of oxygen which leads to
the formation of the highly poisonous gas
‘carbon monoxide’. Carbon Monoxide is
odourless, colourless and tasteless and will
rapidly cause unconsciousness and death
with little or no warning prior to collapse.
THERE IS NO DANGER WHEN ADEQUATE
VENTILATION IS PROVIDED.
Low Level Ventilation
Under each appliance is a fixed ventilation
aperture, of a size commensurate with the
rating of the appliance itself. It is either gauze
covered or incorporates a fixed plastic vent.
This should be checked regularly to see that
it has not become blocked.
When you are cooking, it is essential to
provide additional ventilation such as opening
windows near grill, cooker or oven.
High Level Ventilation
High level ventilation is provided by the roof
vents. The ventilation provided has been
carefully calculated and relates to the rating
of the appliances in the vehicle. Roof vents
must not be covered with anything that may
limit or affect the ventilation they provide.
Roof-mounted Flue installations
All flue installations should be inspected once
a year throughout their length for corrosion.
Flues should be replaced if any sign of
perforation is found. Ensure that the
replacement is of an approved type.
Maintenance
WARNING: Never allow modification of
LPG systems and appliances except by
qualified persons.
Under no circumstances should any fixed
ventilation aperture be blocked, covered,
either partially or fully, or be modified in any
manner whatsoever. They should be checked
at least annually for damage or blockage.
Warwick Duo Ventilation Diagram
7-7
CONNECTION OF SERVICES
Connection
Safe Usage
Before turning on the gas supply, ensure that
all gas operated equipment in the motorhome
is turned off.
To avoid accidents, the following fundamental
advice should be carefully read before using
gas appliances.
• Always read and follow the use and
maintenance instructions provided by the
manufacturers of gas equipment. Should
any soot accumulate on pans, fire
radiants, etc., or any smell be produced,
consult a competent installer on the
correct maintenance and adjustment of
burners.
• Never check for gas leaks with a naked
flame.
• Never use gas appliances without
adequate ventilation. All gas appliances
require a plentiful supply of fresh air for
correct operation. Fixed ventilators or air
inlets should not be stopped up. Where
practicable, turn off all appliances before
retiring to bed, preferably at the cylinder
or inlet to the motorhome or other
dwelling.
• Unless the appliance incorporates
automatic ignition, when lighting an
appliance always make sure you apply a
lighted match or taper to the burner
before turning on the gas.
• If any appliance is disconnected for
repair, maintenance, etc., ensure that the
gas line is capped off.
• If taps are stiff to operate or appear to be
a source of leakage, call in a competent
installer to rectify. LPG taps require a
special grease.
• Always seek advice when in doubt.
All gas equipment is supplied through a
central Gas Manifold System which has
individual isolation taps for each appliance
denoted by a symbol (see below).
WARNINGS:
1
Interior outlet sockets must only be
used with original appliances supplied
by manufacturer.
2
No appliance must be used outside
when connected to an internal socket.
3
No additional appliance must be used
inside the motorhome.
Never use portable cooking or heating
equipment other than electric heaters, that
are not of the radiant type as they are a fire
and asphyxiation hazard.
Input Ratings
Input rating for the gas appliances are as
follows:
Refrigerator ......................................... 0.1kW
Heater ................................................. 2.4kW
Grill ...................................................... 1.5kW
Water heater ....................................... 1.5kW
Oven ................................................... 1.5kW
Gas isolation valve
Hob burners (x3) ...................... 1.5kW (each)
Note: Amount and order of taps may vary from that
which is shown.
7-8
CONNECTION OF SERVICES
IT IS IMPORTANT THAT THE MAIN
SWITCH AT THE SITE SUPPLY POINT
SHOULD BE SWITCHED OFF, THE
SUPPLY FLEXIBLE CABLE
DISCONNECTED, AND ANY COVER
REPLACED ON THE SOCKET OUTLET AT
THE SITE SUPPLY POINT BEFORE
DISCONNECTING THE FLEXIBLE CABLE
FROM THE MOTORHOME. IT IS
DANGEROUS TO LEAVE THE SUPPLY
SOCKET OR SUPPLY FLEXIBLE CABLE
LIVE.
ELECTRICITY
As with electricity in the home, care must be
exercised when handling mains electricity.
Your attention is drawn to the following notice
as laid down by the Institute of Electrical
Engineers.
INSTRUCTIONS FOR ELECTRICITY
SUPPLY
On arrival at caravan site
The motorhome mains inlet flexible supply
cable and its limits are shown on page 7-12.
Note: Please check appliance manufacturers
handbook to see if suitable for use with
generator or charger.
1. Before connecting the motorhome
installation to the mains supply, check
that:
A generator may only be connected via the
mains socket. If using a generator you also
need to comply with the requirements/
instructions supplied with the generator.
(a) the mains supply is suitable for your
installation and appliances, i.e. whether it
is a.c. or d.c. and whether it is at the
correct voltage and frequency,
Because motorhomes are sometimes left
unused for long periods in the open, it is
strongly advised that the mains installation is
inspected periodically to ensure that it is safe
to use. The IEE Wiring Regulations
recommend that mains installations in
motorhomes are re-inspected every 3 years
by a qualified person (see list) who should
sign and issue a periodic inspection report.
(The manufacturer recommends annual
inspections).
(b) your installation will be properly earthed.
Never accept a supply from a socket
outlet or plug having only two pins, or
from a lighting outlet, and
(c) any residual current device (earth
leakage circuit breaker) in the mains
supply to the motorhome has been tested
within the last month.
In case of doubt, consult the site owner or his
agent.
2. MAKE SURE THAT THE SWITCH AT
THE SITE SUPPLY POINT IS OFF.
3. Lift the cover of the electricity inlet
provided on the motorhome, and insert
the connector of the supply flexible cable.
4. Remove any cover from the socket outlet
provided at the site supply point, and
connect the plug at the other end of the
supply flexible cable to this. Switch on the
main switch at the site supply point.
Suitably qualified persons acceptable to the
NCC to sign and issue inspection and
completion certificates are:
• an approved contractor of the National
Inspection Council for Electrical Installation Contracting* or
• a member of the Electrical Contractors’
Association
• a member of the Electrical Contractors’
Association of Scotland
• a qualified person acting on behalf of the
above (in which event it should be stated
for whom he is acting).
Note: Use mains cable fully uncoiled and
protect from traffic.
Caution: Be aware that the 12V appliances,
except the refrigerator, will not operate whilst
the ignition is switched on and the vehicle
engine running. The master switch on the
electrical control panel controls the 12 volt
supply.
7-9
CONNECTION OF SERVICES
OVERSEAS CONNECTION
*The names and addresses of Approved
Contractors in any locality (there are over
10,500 in the UK) can be obtained from
Electricity Shops, or direct from:
Note: Connection to a mains voltage supply
OVERSEAS requires particular attention.
Care must be taken when connecting
supplies abroad since the supplies can be of
REVERSE POLARITY.
NICEIC
Vintage House, 37 Albert Embankment,
London SE1 7UJ
Telephone: 0171 582 7746
The significance of REVERSE POLARITY is
that when equipment is switched off it may
not be electrically isolated.
The names and addresses of members of
the Electrical Contractors’ Associations can
be obtained direct from:
The only certain way of making equipment
safe is to unplug it.
ECA
Esca House
Palace Court
London W2 4HY
Telephone: 0171 229 1266
ECA of Scotland
23 Heriot Row
Edinburgh EH3 6EW
Telephone: 0131 225 7221
If electrical polarity indication is not included
in your motorhome electrical equipment, it is
useful to have a means of checking polarity
of the mains supply, especially when touring
overseas. There are available several
proprietary makes of equipment for testing
polarity.
If it can be achieved, it is preferable to
connect live to live, and neutral to neutral to
maintain full electrical protection.
WARNING: Current consumption in the
motorhome must not exceed 16 amps or
the pitch permitted maximum if this is
less than 16 amps.
It is dangerous to attempt modifications
and additions yourself. Never allow
modification of electrical systems and
appliances except by qualified persons.
Lampholder–plugs (bayonet-cap
adaptors) should not in any
circumstances be used.
CAUTION: The Truma Ultraheat has the
potential to draw 8 amps at 2kW. It is,
therefore, advisable to check the supply
rating before switching on two loads (items)
greater than the supply as this may cause an
overload and the circuit breaker to trip.
7-10
The legal length of the
mains inlet cable is 25
± 2 metres. When in
use it must be fully
uncoiled and
protected from traffic.
WARNING: It is
essential that
connections are made
exactly as shown. If
terminal markings are
not in accordance
with the diagram they
must be ignored. If in
doubt consult a
qualified electrician.
7-11
WIRING OF CONNECTING CABLE AND MOTORHOME MAINS INLET
MOTORHOME MAINS INLET
CONNECTION OF SERVICES
CONNECTION OF SERVICES
EC155 POWER CONTROL SYSTEM
Key features
System overview
150W (~12A) combined Power Converter/
Battery Charger - Converts the 230v mains
supply into 12V DC power to run the leisure
equipment and charge the battery.
The following diagram shows the typical
configuration of the EC155 system. The key
component is the EC155 power supply unit
(PSU), which is the hub of the system and
provides connectivity to the ancillary
components and the EC50 series control
panel.
Low current switching voltage drop in the
circuit and improved circuit fusing provides
better protection for the harness and
equipment.
Links to the EC50 series LED control panel to
provide simple but intelligent control of the
12V equipment and built in over discharge
software protects the leisure and vehicle
batteries.
7-12
CONNECTION OF SERVICES
POWER DISTRIBUTION UNIT (EC155)
POWER
SWITCH
RCD and 3
MCB's
DC FUSES
40A - 30mA
RCD
10A MCB 10A MCB 5A MCB
SOCKETS HEATER FRIDGE
EXTRA BOILER
HOB
SOCKETS CHARGER
Fig. 1 EC155 Control Unit
Power supply details
12 amps (155 watts), therefore the available
power is distributed between the leisure load
and the battery, with the leisure load taking
priority as per the following example:
For the safe operation of all electrical
equipment within your leisure vehicle it is
important that you read and fully understand
these instructions. If you are unsure of any
point please contact your dealer/distributor
for advice before use.
Leisure
load
3A
6A
9A
Fig. 1 shows the EC155 PSU layout.
WARNING
Available power for
battery charging
9 Amps
6 Amps
3 Amps
12A
Under heavy loads the EC155 PSU case
may become hot. ALWAYS ensure the
ventilation slots and the cooling fan have
a clear flow of air. Do not place
combustible materials against/adjacent to
the EC155 PSU. The PSU will shutdown if
overheated and will restart automatically
when cool.
0 Amps
Residual Current Device and Miniature
Circuit Breakers
Test Button
Battery charger/power converter
The EC155 PSU incorporates a fixed voltage
battery charger/power converter. The battery
charger/power converter also powers the
leisure equipment when the mains supply is
connected. This module supplies 13.8V DC
to the leisure equipment up to a maximum of
RCD
7-13
MCB’s
CONNECTION OF SERVICES
The following table shows the fuse allocation
for the 12 fuses fitted to the EC155 PSU.
The Residual Current Device (RCD) is
basically provided to protect the user from
lethal electric shock. The RCD will turn off
(trip) if the current flowing in the live
conductor does not fully return down the
neutral conductor, i.e. some current is
passing through a person down to earth or
through a faulty appliance.
FUSE/MCB TABLE
Fuse
1
2
3
4
5
6
7
8
9
10
11
12
Battery
To ensure the RCD is working correctly, the
test button should be operated each time the
vehicle is connected to the mains supply (see
page 7-20).
The Miniature Circuit Breakers (MCB’s)
operate in a similar way to traditional fuses
and are provided to protect the wiring
installation from overload or short circuit. If an
overload occurs the MCB will switch off the
supply. If this occurs you should investigate
the cause of the fault before switching the
MCB back on.
The following table shows the rating and
circuit allocation for the three MCB’s.
MCB
Rating
1
10 Amps
2
10 Amps
3
6 Amps
Fuses
WARNING
When replacing fuses always replace a
fuse with the correct value. NEVER
replace with a higher value/rating as this
could damage the wiring harness. If a
replacement fuse ‘blows’ do not keep
replacing the fuse as you could damage
the wiring harness. Please investigate the
fault and contact your dealer.
7-14
Rating
15 Amps
10 Amps
5 Amps
10 Amps
10 Amps
10 Amps
10 Amps
5 Amps
20 Amps
20 Amps
10 Amps
15 Amps
20 Amps
CONNECTION OF SERVICES
BATTERY
Discharging a battery below this figure can
cause permanent damage to one or more of
the cells within the battery.
Type/Selection
For optimum performance and safety it is
essential that only a proprietary brand
‘leisure’ battery is used with a typical capacity
of 75 to 120 Ah (ampere/hours). A normal car
battery is NOT suitable. This battery should
always be connected when the system is in
use.
To prevent over discharge, the EC155 PSU in
conjunction with the EC50 series control
panel incorporates a battery protect circuit
that warns and then disconnects the batteries
when they fall below the following conditions:
Vehicle battery voltage cut off point: 10.9V.
Action after cut off: Battery selection is
changed from vehicle battery to leisure
battery. If the leisure battery is below 9V then
a further warning will occur (see following).
The EC155 PSU is designed to charge
standard lead acid ‘leisure’ batteries,
however it may be used with Gel batteries
depending on their composition. Please
consult the battery documentation for further
advice.
Notes: This cut off level is designed to
protect the vehicle battery from over
discharge. The 10.9V level ensures there
is sufficient power in the battery to run
the vehicle electronics and start the
vehicle. This cut off only applies to power
drawn from the battery by the leisure
equipment; it will not protect the battery if
you leave the vehicle lights on.
The battery feed is fitted with an inline fuse
between the battery and the electrical
harness, and is usually located immediately
outside the battery compartment or within
500mm of the battery. The maximum rating of
this fuse is 20A per battery.
Installation & Removal
Leisure battery cut off point: 9V.
Always disconnect the 230V mains supply
and turn the EC155 PSU charger switch to
the OFF (0) position before removing or
installing the battery.
Action after cut off: Power is turned off.
Notes: This is an emergency cut off level
to protect the battery from severe
damage. You should not rely on this cut
off level during normal operation, but
manage your power consumption to a
discharge level of 10V.
When connecting the battery, ensure that the
correct polarity is observed (black is negative
[-] and red is positive [+]) and that the
terminals are securely fastened. Crocodile
clips must be used.
This cut off only applies to power drawn
from the battery by the leisure equipment
that is controlled by the control panel
power switch; it will not protect the
battery from discharge by the radio or
other permanently connected equipment.
WARNING
Explosive gases may be present at the
battery. Take care to prevent flames and
sparks in the vicinity of the battery and do
not smoke.
Operation/Servicing
Under normal circumstances it should not be
necessary to remove the battery other than
for routine inspection of the terminals and
“topping up” of the battery fluid where
applicable. Please see instructions supplied
with the battery.
Note: Do not over-discharge the battery. One
of the most common causes of battery failure
is when the battery is discharged below the
recommended level of approximately 10V.
7-15
CONNECTION OF SERVICES
EC51 CONTROL PANEL
Leisure
Select &
Level
Indicator
Lamps x5
Vehicle
Select &
Level
Level
Display
Power
ON/OFF
Pump(s)
ON/OFF
Waste
Full
Indicator
Water
Level
EC51 operation
Symbol
Function
Main 12V power
switch
Description
This switch turns on (or off) the 12-volt power.
As the power is turned on the leisure battery is automatically
selected and the LED display shows the battery voltage.
Water pump power
switch
This switch turns on the power to the internal water pump ready
for use. It can be used to turn off the pump overnight to avoid
any noise from the pump. When the switch is on, the LED will
show green.
Auxiliary power
switch
This switch turns the Awning or Entry light on (or off). When the
switch is on the LED will show green.
7-16
CONNECTION OF SERVICES
EC51 operation (continued)
Symbol
L
Function
Select LEISURE
battery and display
battery voltage.
Description
This switch is used to selected the Leisure battery and to display
the battery voltage level. Press once to select and display the
voltage. This display will turn off automatically after two seconds.
The LED next to the button will show that the battery has been
selected.
If the Leisure battery drops below 9V an alarm will trigger to warn
you that the battery is low. This alarm lasts for one minute and
then the power will be switched off to protect the battery.
V
Select VEHICLE
battery and display
battery voltage.
This switch is used to select the Vehicle battery and to display the
battery voltage level. Press once to select and display the voltage.
This display will turn off automatically after two seconds.
the LED next to the button will show that the battery has been
selected.
If the Vehicle battery drops below 10.9V an alarm will trigger to
warn you that the battery is low. This alarm lasts for one minute
and then the battery selection will automatically switch over to the
Leisure battery to protect the vehicle battery.
Water Level test.
This switch is used to display the fresh water level within the
onboard water tank. Press once to select the Fresh tank and
show the water level. The tank has five levels Empty, 1/4, 1/2, 3/4
and Full. This display will turn off automatically after two seconds.
Waste Full
indicator.
The LED adjacent to the water level button is used to show when
the Waste Water Tank is full. The tank is full when the LED is
illuminated.
7-17
CONNECTION OF SERVICES
System Disable
To meet EMC (Electro Magnetic
Compatability) directive 89/336/EEC the
EC50 series control panel will shutdown, and
the electrical accessories within the vehicle
will be disconnected while the vehicle is in
motion. When the engine is stopped the
control panel returns to standby mode ready
to be turned on by the power button.
This does not apply to the fridge, which will
continue to operate while the vehicle is in
motion provided that 12V is selected on the
fridge energy selection control.
5.
6.
Bar Graph technical data
LED
5
4
3
2
1
Voltage reading
13.5-14.4
12.5-13.5
11.5-12.5
10.5-11.5
<= 10.5
Water reading
100% full
75% full
50% full
25% full
Less than 25%
7.
8.
Operational and Safety Information
Mains connection
For your safety it is IMPORTANT that you
follow these connection instructions each
time your Motorhome is connected to a
mains supply.
turned off (lever in down position). Switch
the RCD back to the on position (lever in up
position). If the test button failed to operate
the RCD see the TROUBLE SHOOTING
section.
Check correct Polarity. Locate the
‘Reverse Polarity’ indicator on the EC155
PSU and ensure that the indicator is NOT
illuminated. If the indicator is illuminated see
the TROUBLE SHOOTING section.
Check Miniature Circuit Breakers. Locate
the MCB’s within the EC155 PSU (adjacent
to the RCD) and ensure they are all in the
ON (up) position. If any MCB’s fail to latch in
the on position see the TROUBLE
SHOOTING section.
Turn the EC155 PSU ON. Locate the red
power switch on the EC155 PSU and turn to
the ON (I) position. The switch will illuminate
when turned on.
Check operation of equipment. It is now
safe to check the operation of the 12V and
230V equipment.
Technical data
Input 230V: 230 Volts/0 to 12 Amps (+ / - 10%).
Output 230V: RCD protected, 3 x MCB outputs
of 10, 10 and 6A via 2 x 9 way connectors.
Input12V: 2 x 20A battery inputs via a single 9
way connector.
Output 12V: 20A total output via 4 x 16A
switched channels protected by 12 fused
outputs via a 12 way connector.
Integrated Charger: Input 220-230 volts AC +/19%, Frequency 50 Hz +/- 6%, Current 3A
max.
DC output 13.8 Volts nominal, Current 12
Amps (155 Watts).
Signal Input: 1 x Engine running via PSU
connector (4 x Fresh water level, 1 x Waste
water level on EC51 version).
Fresh water negative sensed. Waste waster
5V sensed.
Data In/Out: Data communication and power to
Control Panel via 8 way RJ45 connector.
IP rating: IP31.
Operating temperature: Ambient 0 to 35 deg
Centrigrade. PSU case temperature with full
load 65 deg Max.
Automatic shutdown and restart if
overheated/overloaded.
1. Ensure suitability of the Mains Supply.
Your Leisure Vehicle should only be
connected to an approved supply that meets
the requirement of BS7671. In most cases
the site warden will hold information
regarding suitability of supply. If using a
generator you also need to comply with the
requirements/instructions supplied with the
generator.
2. Switch the EC225 PSU internal Charger
unit OFF. Locate the red power switch on
the EC155 and ensure the switch is in the
OFF (0) position before connection to the
mains supply.
3. Connect the Hook-up Lead. Firstly
connect the supplied hook-up (orange cable
with blue connectors) to the Leisure Vehicle
and then connect to the mains supply.
4. Check Residual Current Device
operation. Locate the RCD within the
EC155 PSU and ensure the RCD is
switched on (lever in up position). Press the
‘TEST’ button and confirm that the RCD is
7-18
CONNECTION OF SERVICES
COMMON FAULT TABLE
Fault
Possible Cause
Proposed Fix
No 230 volt
output from
PSU.
Connecting lead between
the site and Leisure
Vehicle not connected.
Check and connect lead as per page 7-18, note 3.
Check also input connector at the base of the ED155 PSU.
RCD switched off.
Reset RCD as per page 7-18, note 4.
RCD not operating
correctly.
Check supply polarity; if the RCD continues to fail contact your
dealer, as there is probably an equipment or wiring fault.
MCB switched off.
Reset MCB by switching OFF (down position) then back ON (up
position), if the MCB continues to fail contact your dealer, as there is
probably an equipment or wiring fault.
No or deficient supply
from site.
Contact site warden for assistance.
Control
Panel Problems.
Other fault.
Contact your dealer.
Control Panel has no
display.
Check batteries and fuses, turn EC155 PSU charger switch on, and
ensure mains supply is connected.
Check control panel connecting lead at EC155 PSU and behind
Control Panel.
Contact your Dealer.
12V Power turns off.
Battery save feature has operated to protect the vehicle battery and
or the Leisure battery. See page 7-15.
Engine has been started, all equipment has been disconnected to
meet EMC requirements. See page 7-18.
Observe control panel handling instructions.
No 12 volt output
from PSU
Pump not working.
Control Panel display
corrup/erratic
function.
Control panel software may have crashed. Reboot control panel by
turning off the EC155 PSU charger switch and removing fuses 9 and 10
at the EC155 PSU (2x20A fuses for leisure and vehicle batteries).
Wait 30 seconds then replace the fuses and turn the charger switch on.
(Alternatively, remove the bezel at the control panel by pulling down
in the centre at the bottom, unplug the control panel multi-way
connector, wait 30 seconds, then plug back in and reassemble.
No 230V supply.
Check all above.
Charger not switched on.
Switch charger switch on (I) position, switch will illuminate.
Battery not connected and
/or charged.
Install charged battery as per page 7-15.
Power switch on control
panel not switched to ON.
Turn power on at control panel.
Battery flat/Battery fuse blown.
Recharge battery, check fuses, check voltage is present at battery.
Fuse blown.
Check all fuses are intact and the correct value fuse is installed as
per fuse table.
Equipment switched off/
unplugged.
Check equipment is switched on and connected to the 12V supply.
PSU overheated/auto
shutdown operated.
Reduce load on system. Allow PSU to cool down. PSU will
automatically restart when cool. See page 7-13.
Other fault.
Contact your dealer.
Fuse blown.
Replace fuse.
Pump turned off.
Turn pump on by pressing the pump button at the EC155 control
panel (tap symbol).
7-19
CONNECTION OF SERVICES
12V/230V WIRING DIAGRAM
7-20
TECHNICAL SPECIFICATION
Mass in Running Order (MRO)
TECHNICAL DATA
The Mass in Running Order is defined as the
mass of the standard converted vehicle with
bodywork including the following:
Base Vehicle Data
For all matters relating to the base vehicle,
and particularly tyre pressures, refer to the
base vehicle instruction book or if in doubt
consult your local base vehicle commercial
dealer.
•
Coolants (oil and water)
•
90% of automotive fuel
•
Spare wheel
Weights, Dimensions and Capacities
•
Crockery
Before using your Auto-Sleeper you should
be fully conversant with all matters relating to
weights. The following definitions should be
fully understood and then related to the
tabulated base vehicle weight data.
•
Washer fluid
•
Tools
•
Driver (at 75 kg, 11st 12lb)
•
Fire extinguisher
All other optional equipment whether on the
base vehicle or part of the conversion is
excluded from the mass in running order.
Weights
Details of vehicle weights are found below,
and are presented in the manner prescribed
in the European Standard EN1646-2 for
Payloads. All weights are in kilograms (kg).
Mass of the User Payload
The Mass of the User Payload is the
difference between the MPTLM and the
MRO. It is the motor caravans carrying
capacity for everything placed in or on the
vehicle, including the passengers. Please
note that a driver (at 75kg, 11st 12lb) is
included in the MRO. Everything listed in
italics below must be subtracted from the
payload.
Take care to ensure that heavy loads are
stored low down in bed boxes and low
cupboards, and distribute weight evenly side
to side as far as possible.
Note 1: Please take care to ensure that you
have allowed for the masses of all items you
intend to carry in the motor caravan, e.g.
passengers, optional equipment, essential
habitation equipment and personal effects
such as clothing, food, pets, bicycles,
sailboards, sports equipment, etc.
Mass of the Conventional Load
The Conventional Load is the mass of the
passengers carried and must be subtracted
from the payload. The “EC standard person”
weighs 75kg (11st 12lb). The user should
adjust the figure according to the mass and
number of passengers carried. Motorhome
Manufacturers designate passenger seats as
being suitable for travelling, and provide seat
belts accordingly. Multiplying the weight of
the passengers by the number of passengers
gives the Conventional Load. Please note
that a driver (at 75kg, 11st 12lb) is included in
the MRO.
Note 2: Warning - Under no circumstances
should the maximum technically permissible
laden mass of this motor caravan, or its
individual axles, be exceeded.
DEFINITIONS
Maximum Technically Permissible Laden
Mass (MTPLM)
The Maximum Technically Permissible Laden
Mass is a figure given by the manufacturer of
the base vehicle. It is the combined
maximum permitted weight of the vehicle and
all of its contents, both inside and out. The
MTPLM is unaffected by the Auto-Sleeper
conversion.
8-1
TECHNICAL SPECIFICATION
Essential Habitation Equipment
Gross Train Mass (GTM)
For the purpose of EN1646-2, the mass of
the Essential Habitation Equipment includes
the mass of the following:
If you are towing a trailer with your AutoSleeper, the Gross Train Weight is the
maximum allowable weight of the towing
vehicle, the trailer and the mass of every item
carried. The GTM is given by the base
vehicle manufacturer and is unaffected by the
Auto-Sleeper conversion. Please check your
driving licence to ensure you are allowed to
drive a vehicle combination at this weight.
•
the LPG cylinders, 90% full.
•
the freshwater tank, 90% full.
•
the water heater system, full.
•
the waste water tank, empty.
•
the toilet system flushing tank, full.
•
the toilet system holding tank, empty.
Maximum Braked Trailer Mass (MBTM)
This is the maximum allowable weight of the
trailer together with its load, provided the
trailer has a braking system, which complies
with the local Construction and Use
Regulations. The MBTM is given by the base
vehicle manufacturer and is unaffected by the
Auto-Sleeper conversion.
All of these must be subtracted from the user
payload.
Auto-Sleepers include the low voltage (230V)
connection cable and the second battery in
the mass in running order.
Options, Personal Effects and
Accessories
MTPLM of the Axles
When options, personal effects and
accessories are fitted or carried the mass
must be subtracted from the user payload. All
optional equipment whether on the base
vehicle or part of the conversion is excluded
from the mass in running order. Personal
effects are any items of any description
carried by the vehicle.
The individual axles also have MTPLM’s. The
sum of the two axle MTPLM’s usually
exceeds the overall vehicle MTPLM, but this
does not mean you can load each axle to its
maximum, because doing so would exceed
the overall MTPLM of the whole vehicle.
To determine accurately if a vehicle is
exceeding one of its maximum technically
permissible laden masses, the vehicle with all
of its load (that is passengers, contents,
luggage and external load) should be
weighed on a weighbridge.
You may wish to allocate the user payload to
suit your own use. For example, to increase
the available payload, the water system may
be emptied. If the vehicle is not being used
for camping the gas bottles can be left at
home to increase the mass available for
other items.
8-2
TECHNICAL SPECIFICATION
WEIGHT AND DIMENSION DATA
WEIGHT DATA TABLE
All weights in kg
WARWICK DUO
2.2 Hdi
3.0 Hdi
335 L3
335 L3
MTPLM
3500
3500
Mass in Running Order
2865
2915
Mass of the User Payload
635
585
Conventional Load @ 75kg per person)
75
75
Designated Passenger Seats (excluding driver)
1
1
Essential Habitation Equipment
100
100
Personal Effects (standard minimum figure)
80
80
Remainder for Personal Effects / Options /
Accessories
380
330
Awning
22
22
Cycle rack
9
9
Roof Rack + Ladder
10
10
Gross Train Mass
5500
6000
MBTM
2000
2500
Front, in Running Order
1615
1665
Rear, in Running Order
1250
1250
MTPLM Front
1850
1850
MTPLM Rear
2000
2000
Vehicle Designation
Axle Weights
8-3
TECHNICAL SPECIFICATION
WEIGHT AND DIMENSION DATA (continued)
DIMENSIONAL DATA
All dimensions in mm
MODEL
Warwick Duo
Base Vehicle Manufacturer
Peugeot
Base Vehicle Model
335 L3
Wheelbase
4035
METRIC DIMENSIONS
Overall Length
5998
Overall Width (mirrors extended)
2508
Overall Width (mirrors folded)
2260
Overall Height
2600
Internal Height (maximum)
1900
Internal Height (minimum)
1900
Single Bed (offside)
1850 x 680
Single Bed (nearside)
1850 x 680
Double Bed
1870 x 1850
Overcab Bed
n/a
Fresh Water Tank Capacity (litres)
69
Waste Water Tank Capacity (litres)
40
Gas, Refillable Tank, LPG
25 Litres
8-4
FITTED EQUIPMENT
IMPORTANT
CAPRICE Mk III BUILT IN OVEN
To maximise the usage of fitted equipment in
your motorhome it is essential that any
accompanying manufacturers’ literature is
read fully. All recommended maintenance
and preparation procedures should be
followed. The information provided in this
manual is only intended as a guide. If in any
doubt consult your manufacturer appointed
dealer, particularly before attempting to install
extra equipment.
In the interests of safety, replacement parts
for an appliance shall conform to the
appliance manufacturer’s specifications and
should be fitted by him or his authorised
agent.
MICROWAVE
Model: Daewoo KOR6L1B
OPERATION
Ensure the gas cylinder is turned on.
In the event of a gas smell turn off at the
cylinder and contact supplier.
HOTPLATE BURNERS
Microwave oven
Cautions:
Features:
•
Oven volume in Litres: 20.
•
Ten power steps.
•
Maximum Wattage: 700.
•
Turntable.
•
Electronic time control.
•
Touch control.
Separate operating instructions are supplied
with this equipment.
(1)
When cooking, young children should
be kept away.
(2)
Glass lids may shatter when heated.
Turn off all burners and grill before
shutting lid.
(3)
Spillage on the surface of the lid
should be removed before opening the
lid.
(4)
Do not use foil on the hob, as it creates
a fire hazard.
BARBECUE GAS POINT
OFF
An external gas point is located on the
nearside of the van behind a lockable flap.
The Reich unit has a tap to enable the gas
supply to be cut off prior to connection or
disconnection of an external gas appliance.
9-1
FULL
RATE
LOW
RATE
FITTED EQUIPMENT
THE GRILL
The door must be open when the grill is
used.
To light the grill, push in the control knob and
turn 90 degrees anti-clockwise to full rate.
Hold a lighted match or taper to the burner
and push the control knob in and hold. It is
necessary to hold the knob depressed after
the burner has ignited for approximately 1015 seconds, to allow the thermocouple probe
to reach temperature, before releasing the
knob. Should the flame go out when the knob
is released, the procedure should be
repeated holding the knob depressed for
slightly longer.
For models fitted with spark ignition the
procedure is similar except that the burner
can be ignited by depressing the ignition
button, which is located on the fascia. If the
burner has not lit within 15 seconds the
control knob should be released and the
burner left for at least one minute before a
further attempt to ignite the burner.
Cautions:
(1) When the grill is being used, accessible
parts may be hot, young children must be
kept away.
(2) Never cover the grill pan or trivet with
cooking foil, or allow fat to build up in the
grill pan as this causes a fire hazard.
For simmering, turn the knob further anticlockwise to the low rate position.
(3) Keep all flammable material away from
the appliance.
To turn off: Turn the control knob until the line
on the control knob is aligned with the dot on
the control panel. Always make sure the
control knob is in the off position when you
have finished using the hotplate burners.
To light the grill, push in the control knob and
turn 90 degrees anti-clockwise to full rate.
Hold a lighted match or taper to the burner
and push the control knob in and hold. The
burner should ignite and the control knob
should be held in for 10-15 seconds before
release. If the burner goes out, repeat
procedure holding control knob for slightly
longer.
IMPORTANT:
•
The pan supplied with the appliance is
multi functional, for use in grill or oven.
•
The handle design allows removal or
insertion whilst the pan is in use.
•
Always remove the handle when the pan
is in use.
For models fitted with spark ignition the
procedure is similar except that the burner
can be ignited by depressing the ignition
button, which is located on the fascia. Ignition
must be carried out with the door open, and if
the burner has not lit within 15 seconds the
control knob should be released and the grill
left for at least one minute before a further
attempt to ignite the burner.
On first use of the grill, it should be heated for
about 20 minutes to eliminate any residual
factory lubricants that might impart
unpleasant smells to the food being cooked.
A non-toxic smoke may occur when using for
the first time so open any windows and turn
on mechanical ventilators to help remove the
smoke.
9-2
FITTED EQUIPMENT
Although the grill does heat up quickly, it is
recommended that a few minutes preheat be
allowed.
the burner has not lit within 15 seconds the
control knob should be released and the
oven left off at least one minute before a
further attempt to ignite the burner.
Flame Failure Device (FFD): The grill burner
is fitted with a flame sensing probe, which will
automatically cut off the gas supply in the
event of the flame going out. In the event of
the burner flames being accidentally
extinguished, turn off the burner control and
do not attempt to re-ignite the burner for at
least one minute.
Place the oven shelf in the required position
and close the door. Set control knob to
approximately gas mark 5 and heat the oven
for about 30 minutes to eliminate any
residual factory lubricants that might impart
unpleasant smells to the meals being
cooked. A non-toxic smoke may occur when
using for the first time so open any windows
and turn on mechanical ventilators to help
remove the smoke.
It is normal for the flames on this burner to
develop yellow tips as it heats up, particularly
on butane.
Although the oven does heat up quickly, it is
recommended that a 10 minute preheat be
allowed. The oven should be up to full
temperature in about 15-20 minutes.
A reversible grill pan trivet enables the
correct grilling height to be achieved.
Fast toasting ...............
Grilling sausages ........
Grilling steak/bacon ....
Grilling chops, etc. ......
Slow grilling .................
trivet in high position
trivet in high position
trivet in high position
trivet in low position
trivet removed
To turn off: turn the control knob until the line
on the control knob is aligned with the dot on
the control panel.
To turn off, turn the control knob until the line
on the control knob is aligned with the dot on
the control panel. Always make sure the
control knob is in the off position when you
have finished grilling.
Shelf: The shelf has been designed to allow
good circulation at the rear of the oven and
are also fitted with a raised bar to prevent
trays or dishes making contact with the back
of the oven. To remove a shelf, pull forward
until it stops, raise at front and remove.
THE OVEN
WARNINGS:
Cautions:
All pans should be mounted centrally over
the burners, even when cooling, to protect
adjacent walls.
(1) When you are cooking, keep children
away from the oven.
Do not lower hob cover until hobs have
cooled.
(2) Do not use foil on the oven shelves, as
this creates a fire hazard and can hinder
circulation of heat.
On no account should these appliances
be used as a space heater.
To light: Open door, push in the control knob
and turn to gas mark 9. Hold a lighted match
or taper to the burner and push the control
knob in and hold. The burner should ignite
and the control knob should be held in for 1015 seconds before release. If the burner
goes out, repeat procedure holding control
knob for slightly longer.
Do’s and Don’ts
Do
read the user instructions carefully before
using the appliance for the first time.
Do
allow the oven to heat before using for
the first time, in order to expel any smells
before the introduction of food.
Do
clean the appliance regularly.
Do
remove spills as soon as they occur.
Do
always use oven gloves when removing
food shelves and trays from the oven.
Do
check that controls are in the off position
when finished.
For models fitted with spark ignition the
procedure is similar except that the burner
can be ignited by depressing the ignition
button, which is located on the fascia. Ignition
must be carried out with the door open, and if
9-3
FITTED EQUIPMENT
Do not allow children near the cooker when in
use. Turn pan handles away from the
front so that they cannot be caught
accidentally.
Do not allow fats or oils to build up in the oven
trays or base.
Do not use abrasive cleaners or powders that
will scratch the surfaces of the hotplate
and oven.
Do not under any circumstances use the oven as
a space heater.
similar dish in our guide and use our shelf
position and gas mark setting recommendation. Shelf positions are from the top
down. When roasting with aluminium foil care
must be taken that the foil does not impair
circulation or block the oven flue outlet.
Leaks
If a smell of gas becomes apparent, the supply
should be turned off at the cylinder
IMMEDIATELY. Extinguish naked lights
including cigarettes and pipes. Do not operate
electrical switches. Open all doors and
windows to disperse any gas escape. Butane/
Propane gas is heavier than air, any escaping
gas will therefore collect at low level. The
strong unpleasant smell of gas will enable the
general area of the leak to be detected. Check
that the gas is not escaping from an unlit
appliance. Never check for leaks with a naked
flame, leak investigation should be carried out
using a leak detector spray.
Temperature control
The temperature in the oven is controlled by
a thermostatic gas tap and is variable over
the range 130 deg C to 240 deg C.
Approximate temperatures for the settings on
the control knob are shown in the following
table. The temperatures indicated refer to the
centre of the oven and at any particular
setting the oven will be hotter at the top and
cooler towards the base. The variation
between the top and centre, and centre to
bottom is approximately equivalent to one
gas mark. Good use can be made of the
temperature variation in that several dishes
requiring different temperatures may be
cooked at the same time. In this way
maximum benefit can be obtained from the
gas used to heat the oven. Care should be
taken not to overload the oven, adequate
spacing being used to allow free circulation
for heat.
Cooking guidelines
IMPORTANT - The pan supplied with the
oven is multifunctional, for use in grill and
oven. The handle design allows for removal
or insertion whilst the pan is in use. Always
remove the handle when in use.
Larger items may adversely affect the
circulation and heat distribution. Best results
will be obtained by the shelf positions in this
guide. It is not necessary to preheat the oven
but advisable for a range of dishes. The oven
is capable of full temperature in 15-20
minutes.
Most cookery books give details of the shelf
positions and gas mark settings for each
recipe. If in doubt about a recipe you intend
to use, study the recipe carefully then find a
9-4
FITTED EQUIPMENT
Gas Mark
Temperature
1/4 - 1/2
265-275ºF
130-135ºC
Very cool
Meringues
1
285
140
Cool
Stewed fruit
2
300
150
Cool
Rich fruit cake
3
330
165
Warm
Baked custard
4
355
180
Moderate
Victoria sandwich
5
385
195
Fairly hot
Whisked sponges
6
410
210
Hot
Shortcrust pastry
7
430
220
Hot
Bread, scones
8
445
230
Very hot
Puff pastry
9
465
240
Very hot
Quick browning
Dish
Gas Mark
Shelf Position
Cooking Time
Scones
7
2
8-15 mins
Small cakes
5
2
15-25 mins
Victoria sandwich
4
2
20-30 mins
Very rich fruit cake
2
2
Approx. 60 mins per 500g
Puff pastry
8
2
15-30 mins
Flaky pastry
7
2
15-30 mins
Shortcrust pastry
6
2
15-55 mins
Shortbread fingers
3
2
25-30 mins
Ginger nuts
5
2
12-16 mins
Rice pudding
2
3
100-120 mins
Baked custard
3
3
50-60 mins
Fruit crumble
5
3
30-40 mins
Beef
3
3
25 mins per 500g plus 25 mins
7
3
15 mins per 500g plus 20 mins
3
3
30 mins per 500g plus 35 mins
7
3
25 mins per 500g plus 25 mins
Pork
9-5
FITTED EQUIPMENT
DOMETIC CK2000 AIR
CIRCULATING COOKER HOOD
SEITZ CONCERTINA BLINDS
The windows of the habitation area are fitted
with concertina blinds and flyscreens.
With 50 m3/h capacity ‘Circulair’ performs
more efficiently than conventional cooker
hoods - while offering a low DC-consumption
of only 5 watts.
The flyscreens pull down from the top, the
concertina blinds up from the base and a
combination of both may be achieved by
clipping both units together in the centre to
adopt the required position. It should be
remembered that both the flyscreens and
concertina blinds are relatively delicate and
those in the living area should be treated with
care. They should be kept in a dry and dustfree state, it is advised that the mechanisms
are only lightly lubricated when they become
a little stiff and inoperative - otherwise no
maintenance is needed.
A roof mounted ventilator is no longer
necessary as the cleaned air is returned
downwards while the suction is concentrated
along the edges. This creates an air-dome
which stops fumes escaping.
Features:
•
Lateral air suction ensures efficient
performance with 50 m3/h.
•
Easy installation as no roof-mounted
ventilator is necessary.
•
With 2 fan-speed regulation and
integrated halogen lights.
•
Washable grease filter and exchangeable
carbon filter.
•
The concertina blinds are manufactured from
a paper type material and thus cleaning
solvents and aerosols should be kept well
clear from them.
Unlike Seitz roller blinds, they will not need to
be re-tensioned - any problems that should
arise should be addressed to your AutoSleeper dealer or the Motorhome Service
Centre at Willersey.
Snap-on releases for easy access to
filters and lamps.
Technical data:
Weight ................................................ 2.2 kg
TV COAX AERIAL/SOCKET
Height ................................................ 55 mm
The TV aerial socket is positioned on the
pillar between the kitchen worktop and the
upper lockers.. The unit incorporates a twopin 12-volt plug and socket and is already
pre-wired to the TV aerial which is fitted as
standard fit on the vehicle.
Width ............................................... 400 mm
Depth .............................................. 280 mm
Halogen lamps ................................ 2 x 10W
Lamps (V) ................................................ 12
EXTERNAL
TV SOCKET
An external
weatherproof
cable entry point
for TV and
satellite cable is
fitted to the
offside of the
motorhome.
9-6
FITTED EQUIPMENT
operation is preferred if the power
requirement is low (e.g. for maintaining the
room temperature). The gas burner is not
enabled until the power requirement is
higher, and is the first to switch off during
heat-up operations.
WARM AIR & HOT WATER
HEATING
A Truma liquid gas Combi 4E warm-air
heater, with integrated hot water boiler, is
fitted under the forward end of the offside
sofa. It operates on LPG and/or 230V
electricity depending on the chosen mode of
operation.
Summer operation (boiler operation only)
Gas operation or 230V electrical operation is
used for hot water preparation. The water
temperature can be set to 40 degºC or 60ºC.
In winter operation the heater can be used to
heat the room and simultaneously warm
water. If only warm water is required, select
summer operation.
With gas operation the water is heated at the
lowest burner setting. Once the water
temperature is reached, the burner switches
off.
At a temperature of approximately 3 deg C
the automatic frost control safety/drain valve
will open and drain the boiler.
Depending on the fuse protection at the
camping site, power of 900W (3.9A) or
1800w (7.8A) can be manually selected for
electrical operation.
Three different options are available for
operating the unit.
Gas operation only: Propane/butane for
autonomous use.
Note: Mixed operation is not possible. With
this setting the unit automatically selects
electrical operation. The gas burner is not
enabled.
Electrical operation only: 230V for stationary
use on camp sites.
Mixed operation: Gas and electrical operation
- only possible in winter mode.
Winter operation
In winter operation, the unit automatically
selects the required power setting according
to the temperature difference between the
temperature set on the control panel and the
current room temperature. When the boiler is
filled, the water is automatically heated as
well. The water temperature depends on the
selected operation mode and the heater
output.
``
All three energy selection options can be
used for winter deployment.
With gas operation the unit automatically
selects the output level that is required.
Depending on the fuse protection at the
camping site, power of 900W (3.9A) or
1800W (7.8A) can be manually selected for
electrical operation.
If more output is required (e.g. heating up or
low outside temperatures) gas or mixed
operation should be selected so that enough
heating power is always available.
``
With mixed operation, 230V electrical
9-7
FITTED EQUIPMENT
OPERATING INSTRUCTIONS
Control panel
Caution: Always observe the operating
instructions and “Important operating notes”
prior to starting. The vehicle owner is
responsible for the correct operation of the
appliance.
Note: Before using for the first time, it is
essential to flush the entire water supply
through with clean warm water. If the heater
is not being used, always drain the water
contents if there is a risk of frost. There can
be no claims under guarantee for damage
caused by frost!
h = Rotary switch for room temperature (1-5)
k = green LED lit “Operation”
green LED blinking
“after-running” is active in order to reduce the unit’s
temperature
l = Summer operation (water temperature 40ºC or 60ºC)
m = Winter operation (heating without water temperature
monitoring or with drained water system)
n = Winter operation (heating with water temperature
monitoring)
o = Rotary “Off” switch
p = Yellow LED lit “Boiler heat-up phase”
r = Red LED lit, red LED blinking “Failure”
Power selector switch
Note: The LEDs are visible only when the
unit is switched on.
Room thermostat
a = Power selection rotary switch
b = Electric operation 230V, 1800W.
c = Electric operation 230V, 900W.
d = Gas operation.
e= Mixed operation* (gas and electricity, 900W).
f = Mixed operation* (gas and electricity, 1800W).
g = Yellow LED on = Electrical operation
s = Room temperature sensor
The thermostat setting on the control panel (1-5) must
be determined individually depending on the heating
requirement and the type of vehicle. For an average
room temperature of about 23ºC, we recommend a
thermostat setting of about 4.
* Winter mode only. In summer mode the unit
automatically selects electric operation at the preselected electrical power of 900W or 1800W.
Note: Switching on the electric heating
elements as well does not increase the
maximum heating power.
To measure the room temperature, an
external room temperature sensor is located
in the vehicle. The location of the sensor is
determined individually by the vehicle
manufactuer, depending on the vehicle type;
consult the operation instructions for your
vehicle for further details.
9-8
FITTED EQUIPMENT
FrostControl (safety/drain valve)
Manual opening of the drain valve
Turn the rotary switch by 180º until it
engages, whereby the push button moves
out (position w). The water in the boiler
drains out through the drainage muff (x).
The FrostControl drainage muff (x) must be
free of contamination (slush, ice, leaves, etc.)
at all times so the water can drain out easily.
No warranty given for frost damage.
Taking into operation
Note: Heating is possible without restrictions
with gas, electrical and mixed operation, with
or without water.
t = Rotary switch position “Operation”
u = Push button position “Closed”
w = Push button position “Drain”
x = Drainage muff (led outside through floor of vehicle)
Check to make sure the cowl is
unobstructed. Be sure to remove any covers
that may be present.
FrostControl is a currentless safety/drain
valve. When there is a danger of frost, it
automatically drains the contents of the boiler
through a drainage muff. If excessive
pressure is present in the system, pressure
will be automatically intermittently equalised
through the pressure relief valve.
Turn on the gas cylinder and open quickacting valve in the gas supply line.
Check whether the power supply fuse
protection on the camp site is adequate for
the 900W (3.9A) or 1800W (7.8A) that have
been selected using the power selector
switch.
Closing the drain valve
Check if the rotary switch is set to
“Operation” (position t), meaning that it is
parallel to the water connection and
engaged.
The cable drum must be fully unwound in
order to prevent the power cable from
overheating.
Summer operation (boiler operation only)
Close the drain valve by activating the push
button. The push button must engage in
position (u) “closed”.
Select gas or electrical operation using the
power selector switch. Illumination of the
yellow LED (g) on the power selector switch
indicates that the unit is operating with 230V.
It can be manually closed with the push
button (position u) and then the boiler filled
only when the temperature at the drain valve
is above approximately 7ºC.
Note: Mixed operation (gas and electrical) is
not possible in summer mode. With this
setting the unit automatically selects
electrical operation with a pre-selected power
setting of 900W or 1800W.
Truma can provide a heating element (part
no. 70070-01) as an accessory; it is inserted
into FrostControl and warms it up to about
10ºC when Combi is switched on. This
means that the boiler can be filled after a
shorter time, irrespective of the temperature
in the installation compartment.
Move the rotary switch on the control panel
to position (l - summer operation) 40ºC or
60ºC. The green (k) and yellow (p) LEDs light
up.
When the selected water temperature is
reached (40ºC or 60ºC) the heater shuts off
and the yellow LEd (p) goes off.
Automatic opening of the drain valve
When the temperature is below
approximately 3ºC at the drain valve, the
drain valve will open automatically, the push
button moves out (position w) and the water
in the boiler drains out through the drainage
muff (x).
9-9
FITTED EQUIPMENT
temperature selected on the control panel
and the current room temperature. Once
the room temperature selected on the
control panel has been reached, the heater
switches off. The warm air fan continues to
run at slow speed until the out-going air
temperature (on the unit) has fallen to
40ºC or less.
Winter operation
Heating with water temperature monitoring:
Select gas, electrical or mixed operation
using the power switch. Illumination of the
yellow LED (g) on the power selector
switch indicates that the unit is operating
with 230V.
Move rotary switch on control panel to
operating position (n).
If the boiler is filled, the water will
automatically be heated at the same time.
The water temperature is then dependent
on the heating output being given off, and
the duration of heating required to reach
the desired room temperature.
Set the rotary switch (h) to the desired
thermostat setting (1-5). the green LED (k)
for operation is lit and simultaneously
indicates the position of the selected room
temperature. The yellow LED (p) indicates
the water’s heat-up phase.
Heating with drained water system:
Select gas or electrical operation using the
power selector switch. Illumination of the
yellow LED (g) on the power selector
switch indicates that the unit is operating
with 230V.
The device automatically selects the
required power setting in accordance with
the temperature difference between the
temperature selected on the control panel
and the current room temperature. When
the room temperature selected on the
control panel is reached, the heater
switches back to the smallest setting and
heats the water to 60ºC. Once the water
temperature is reached, the heater
switches off and the yellow LED (p) goes
out.
Move rotary switch on control panel to
operating position (m).
Turn the rotary switch (h) to the desired
thermostat setting (1-5). The green LEd (k)
for operation is lit and simultaneously
indicates the position of the selected room
temperature. the yellow LED (p) will be lit
only when the temperature of the unit is
below 5ºC!
The warm air fan can continue to run in
order to cool the unit (after-run).
Depending on the operating mode, the unit
will automatically select the required power
level according to the temperature
difference between the setting on the
control panel and the current room
temperature. Once the room temperature
selected on the control panel has been
reached, the heater switches off. The
warm air fan continues to run at slow
speed until the outgoing air temperature
(on the unit) has fallen to 40ºC or less.
Heating without water temperature
monitoring:
Select gas, electrical or mixed operation
using the power switch. Illumination of the
yellow LED (g) on the power selector
switch indicates that the unit is operating
with 230V.
Move rotary switch on control panel to
operating position (m).
Turn the rotary switch (h) to the desired
thermostat setting (1-5). The green LED (k)
for operation is lit and simultaneously
indicates the position of the selected room
temperature. The yellow LED (p - water’s
heat-up phase) will be lit only when the
water temperature is below 5ºC!
The device automatically selects the
requires power setting in accordance with
the temperature difference between the
9-10
FITTED EQUIPMENT
Switching off
Note: When the temperature at FrostControl
is below about 7ºC, first switch on the heater
to warm the installation compartment and
FrostControl. After several minutes, when the
temperature at FrostControl is above 7ºC,
the drain valve can be closed.
Switch off heater at control panel using rotary
switch (position o). The green LED (k) goes
off.
Note: If the green LED (k) blinks after
switching off, then the unit’s after-running is
active in order to reduce the unit’s
temperature. This will end after a few minutes
and the green LED (k) will go off.
Switch on power for water pump (main or
pump switch).
Open hot water taps in kitchen and bathroom
(set pre-selecting mixing taps or single-lever
fittings to “hot”). Leave the fittings open for as
long as it takes for the boiler to displace the
air and fill up, and the water to flow without
interruption.
CAUTION: Always drain water contents if
there is risk of frost!
If the appliance is not to be used for a
prolonged period, close the quick-acting
valve in the gas supply line and turn off the
gas cylinder.
Note: If just the cold water system is being
operated, without using the water heater, the
heater tank also fills up with water. To avoid
frost damage, the boiler must be drained
through the drain valve, even if it was not
operated.
Gas operation fault
If a fault occurs during gas operation the red
LED (r) on the control panel illuminates.
Please consult the troubleshooting list for
possible causes.
WARNING: When connecting to a central
water supply (rural or city mains), a
pressure reduction valve must always be
installed to prevent pressures above 2.8
bar from developing in the water heater.
A reset (fault reset) is carried out by switching
off, waiting until all LED’s on the control panel
have stopped flashing, and then switching
the heater on again.
Note: If a window to which a window switch
has been fitted is opened, the heater stops
operating and the red LED (r) flashes. The
heater continues operating when the window
is closed.
Draining the water heater
Electrical operation fault
In order to check the water that is flowing out,
place an appropriate container (capacity 10
litres) beneath the drain valve (FrostControl)
drainage muff (x).
Switch off power to water pump (main or
pump switch).
Open hot water taps in kitchen and
bathroom.
If a fault occurs during electrical operation the
yellow indicator lamp (g) on the power
selector switch goes off.
Turn the rotary switch on the drain valve by
180º until it engages, whereby the push
button moves out and the drain valve opens.
Possible causes can be found in the
troubleshooting list.
Note: If the 230V power supply is interrupted
for just a brief period of approximately one
second during operation, the heater will
subsequently resume as normal.
Check whether all of the water in the boiler
(10 litres) has been drained into the container
via the drain valve.
There shall be no claims under guarantee for
damage caused by frost!
Filling the water heater
Check if the rotary switch for the drain valve
(FrostControl) is set to “Operation”, meaning
that it is parallel to the water connection and
engaged.
Maintenance
Only original Truma parts may be used for
maintenance and repair work!
Close the drain valve by pushing the push
button until it engages.
The materials in the device that come into
9-11
FITTED EQUIPMENT
contact with water are drinking water safe.
Fuses 12V
Bio-film, deposits and limescale must be
removed using chemicals to protect the unit
from infestation by micro-organisms. Only
Chloride-free products must be used in order
to prevent damage to the unit.
The effectiveness of the use of chemicals to
combat micro-organisms in the unit can be
increased by heating the water in the boiler to
70ºC at regular intervals.
Move power selector switch to gas operation
(d) to do this.
Move the rotary switch on the control panel to
position (l - summer operation) 60ºC. the
green (k) and yellow (p) LEDs light up.
The fuse is in the electronics beneath the
connection cover. Replace the unit’s fuse
only with an identical fuse.
Note: Once the water in the boiler has
reached a temperature of 60ºC, the burner
will switch off and the yellow LEd (p) will go
out. The unit must stay switched on for at
least 30 minutes and no warm water may be
removed. The residual heat in the heat
exchanger will heat the water up to 70ºC.
Device fuse: 10A - slow - (T 10A).
Fuses 230V
CAUTION: The fuse and the power supply
lines must only be replaced by an expert!
WARNING: The unit must be disconnected
from the mains (all poles) before opening
the electronic housing lid.
The fuse in the power electronics (16)
beneath the electronic housing lid.
This fine fuse must always be replaced with a
fuse of the same type: 10A, slow, interrupting
capacity “H”.
9-12
FITTED EQUIPMENT
Overheating protection 230V
The 230V heating facility has a mechanical
overheating switch. If the 12V power supply
is interrupted during operation or during the
after-run period, for example, the
temperatures within the unit could activate
the overheating protection.
To reset the overheating protection, allow
heater to cool, remove connection cover and
press red reset button.
9-13
FITTED EQUIPMENT
TROUBLESHOOTING LIST
Fault
Cause
Rectification
After switching on (winter and
summer operation) none of the
LEDs are lit.
- No operating voltage.
- Check battery voltage (12V).
- Check all electrical plug connections.
- Check the unit or vehicle fuse and replace if necessary
(see fuses).
- Device fuse or vehicle fuse
defective.
The green LED comes on when - The temperature setting on
the unit is switched on (by
the control panel is lower than
means of the ZUCB time switch), the room temperature.
but the heater does not operate.
- Select higher room temperature at the control panel.
The green LED comes on when - Open window above cowl.
the unit is switched on (by
(window switch).
means of the ZUCB time switch),
but the heater does not operate. - Battery voltage is too low
< 10.5V.
- Close window.
- Charge battery.
After the heater is switched on,
the green LED is lit and the red
LED blinks.
- Electronics are defective.
- Please contact the Truma Service Centre.
Approximately 30 seconds after
the heater is switched on, the
red LED is lit.
- Gas cylinder or quick-closure
valve in the gas line is closed.
- Check gas supply and open valves.
- Combustion air infeed or
exhaust outlet is sealed.
- Inspect openings for contamination (slush, ice, leaves, etc.) and
remove contamination if necessary.
- Hot-air outlets blocked.
- Check individual outlet apertures.
- Recirculated air intake
- Remove blockage from recirculated air intake.
After operating for a longer
period of time, the heater
switches to failure.
- Gas pressure regulator iced up. - Use regulator heating (EisEx).
- Butane content in the gas
cylinder too high.
- Use propane (at temperatures below 10ºC in particular, butane is
unsuitable for heating purposes).
Green and red LEDs blink
after heater is switched off.
- Unit was switched off during
failure. After-running is active
in order to reduce the unit’s
temperature.
- After-running will switch off after a few minutes. Only at that time
will a failure reset be possible (switch off and then back on).
Green LED blinks after heater is
switched off.
- After-running is active in
order to reduce the unit’s
temperature.
- No failure. After-running will switch off after approximately 5 minutes. The heater can be switched back on at any time during the
after-running phase in winter operation (in summer operation only
after two minutes).
When the device is switched on
in electrical operation the red
LED on the control panel flashes,
the yellow LED on the power selector switch does not illuminate
and the heater does not heat up.
- No 230 V operating voltage.
- Check 230 V operating voltage.
- 230 V fuse defective.
- Check 230 V fuse and replace if necessary.
- Overheating protection has
activated.
- Reset overheating protection. Allow heater to cool, remove
connection cover and press reset button.
9-14
FITTED EQUIPMENT
WATER SUPPLY
Fault
Cause
Rectification
After the heater is switched
off, the drain valve opens
(FrostControl).
- Temperature at drain valve
less than approx. 3ºC.
- Switch the heater on. If the temperature is below approximately
3ºC, the drain valve will open automatically! If the heater is not in
operation, the drain valve can be reclosed only when the temperature is approximately 7ºC or higher!
The drain valve (FrostControl)
can no longer be closed.
- Temperature at drain valve is
below approximately 7ºC.
- Switch the heater on. If the heater is not in operation, the drain
valve can be reclosed only when the temperature is approximately
7ºC or higher!
- Rotary switch is not at
“Operation”.
- Turn the drain valve’s rotary switch to “Operation”, then press the
push button until it engages.
- Water pressure too high.
- Check pump pressure (max. 2.8 bar). If connected to a central
water supply (rural or urban connection), a pressure reducer must
be used, which will prevent pressures higher than 2.8 bar entering
the boiler.
- Use heating element for FrostControl.
Water flows intermittently from
the FrostControl drain muff.
If these measures do not remove the failure, please contact the Truma Service Centre.
9-15
FITTED EQUIPMENT
REFRIGERATOR MODEL RM7271L
A = energy selector switch
B = gas/electric thermostat AC/DC
C = operating displays (3 LEDs)
Cleaning
CONTROLS
Before using the refrigerator, it is advisable
to clean the appliance both inside and out.
Energy Selection
•
Use a soft cloth and lukewarm water
with a mild detergent.
•
Then rinse the appliance with clean
water and dry thoroughly.
•
Remove dust from the refrigerator unit
at yearly intervals using a brush or soft
cloth.
12V Electrical Operation (DC)
•
The refrigerator will only operate while
the motor is running and the vehicle in
motion.
WARNING: To avoid deterioration of
materials:
1. Do not use soap or hard, abrasive or
soda-based cleaning agents.
2. Do not allow the door seal to come into
contact with oil or grease.
1. Set energy selector switch (A) to 12V.
Using the refrigerator
2. Operating display "C", 12V lights
"green". Appliance is in function.
•
The cooling unit is silent in operation.
•
When the appliance is first put into
operation, there may be a mild odour
which will disappear after a few hours.
Ensure the living area is well ventilated.
•
The refrigerator will take several hours
to reach its operating temperature in the
cooling compartment.
•
The freezer compartment should be cold
about one hour after switching on the
refrigerator.
3. Use rotary switch (B) to regulate the
temperature in the main refrigerator
compartment.
Note: An on-board battery is necessary to
run your re-igniter refrigerator on gas.
9-16
FITTED EQUIPMENT
Mains Power
Gas Faults
This option should only be selected where the
supply voltage of the connection for power
supply corresponds to the value specified on
the data plate. Any difference in values may
result in damage to the appliance.
1. Open the valve of the gas cylinder.
2. Open the shut-off valve to the gas
supply.
3. Set energy selector switch (A) to gas.
4. Set rotary switch (B) to "MAX"
position.
1. Set energy selector switch (A) to 230V.
2. Operating display "C"
, 230V lights
Remedies:
"green". Appliance is in function.
Set the energy selector switch (A) to position
“OFF”.
1. Is there any gas in the gas bottle?
2. Is the gas bottle valve open?
3. Is the on-board shut-off valve open?
4. Set the main switch (A) to “on”. The
reignition starts again.
3. Use rotary switch (B) to regulate
the temperature in the main
refrigerator compartment.
Gas Operation
The ignition process is activated automatically,
accompanied by a ticking sound approx. 30
sec. Upon successful ignition, the display LED
(C) “Gas” lights yellow. The refrigerator is in
function. Use rotary switch (B) to regulate the
temperature in the main refrigerator
compartment.
In the event of a gas fault (e.g. gas
cylinder empty), the operating display (C)
flashes yellow.
If after about 30 seconds the operating
display (C) starts flashing red again, the gas
fault has not been cleared (e.g. air in the gas
pipe).
9-17
FITTED EQUIPMENT
5. Briefly switch the refrigerator off and then
on again using main switch (A). To
remove air from the gas pipes, repeat
this procedure 3-4 times.
Making Ice Cubes
If these actions do not help, please call an
authorised Dometic Service Centre.
WARNING: Only use drinking water!
Ice cubes are best frozen overnight. At night,
the refrigerator has less work to do and the
unit has more reserves.
Defrosting
Temperature Setting Cooling
Compartment
•
The cooling unit’s performance is
influenced by ambient temperatures.
•
TIP: Please select the medium setting for
ambient temperatures between +15°C
and +25°C. The unit operates within its
optimum performance range.
As time goes by, frost builds up on the fins.
When the layer of frost is about 3mm thick,
the refrigerator should be defrosted.
1. Switch off the refrigerator, as described in
“Switching Off”.
2. Remove the ice cube tray and food.
3. Leave the refrigerator door open.
4. After defrosting (freezer compartment
and fins free of frost), wipe the cabinet
dry with a cloth.
5. Use a cloth to mop up the water from the
freezer compartment.
6. Switch the refrigerator back on again.
WARNING: The layer of ice must never be
removed forcibly, nor may defrosting be
accelerated using a heat source.
As shown, you are able to regulate the
temperature of the cooling compartment,
if necessary, by turning rotary knob (B).
Note: Water thawing in the main
compartment of the refrigerator runs into an
appropriate container at
the back of the
refrigerator. From there,
the water evaporates.
Storing food
•
Always store food in sealed containers,
aluminium foil or similar.
•
Never put hot food into the refrigerator,
always let it cool down first.
•
Products that could emit volatile,
flammable gases must not be stored in
the refrigerator.
•
Store quickly perishable foods directly
next to the cooling fins.
The freezer compartment is suitable for
making ice cubes and for short-term storage
of frozen food. It is not suitable as a means of
freezing foods.
9-18
FITTED EQUIPMENT
Positioning the storage rack
Switching off
Dismantling:
1. Set energy selector switch (A) to
position "0" (OFF). The appliance is
now fully switched off.
1. Loosen the front and
back securing
2. Secure the door open by means of
the door stop. The door will be
slightly ajar. This is to prevent mould
from forming inside the appliance.
2. Move the storage rack to
the left and remove it.
To fit the storage rack, the reverse order
applies.
Note: Switching off gas operation. If the
refrigerator is to be taken out of service for an
extended period of time, the on-board shutoff valve and the cylinder valve must closed.
Door locking
open
close
park-position / vent-position
9-19
FITTED EQUIPMENT
Changing the light bulb
Energy saving tips
1. Remove cover
•
At an average ambient temperature of
approximately 25 deg C, it is sufficient to
operate the refrigerator at the middle
thermostat setting (for both gas and
mains voltage).
•
Where possible, always store goods that
have previously been cooled.
•
Do not position the refrigerator in direct
sunlight.
•
Constant circulation of air must be
supplied to the refrigerator unit.
•
Defrost regularly.
•
Open the door only for a short time when
removing goods from the refrigerator.
•
Run the refrigerator for about 12 hours
before filling it.
Technical data
Model ............................................ RM 7291L
2. Detach defective light bulb
Dimensions ............................. 821x525x541
Capacity ................................................ 86 lit.
Usable capacity ................................. 10.5 lit.
Connection ................................ 125W/120W
Consumption ...................... ca 2.6 KWh/260g
Weight .................................................. 27 kg
3 Fit new light bulb
4. Clip the cover back in place
Note:
For 12V DC:
1 light bulb 12V, 2W
Please contact Dometic Service Centres
for replacement light bulbs.
9-20
FITTED EQUIPMENT
Winter operation
1. Check that the ventilation grills and the extractor have not been blocked by snow, leaves
or similar.
2. When the ambient temperature falls below +8°C, the optional winter covers should be
fitted. This protects the unit from excessively cold air.
TIP: It is also recommended that the
winter cover should be used when the
vehicle is taken out of service for an
extended period of time.
3. Affix the cover and fasten it.
Troubleshooting
Before calling the authorised Service Department please check whether:
•
The instructions in the section “Using the refrigerator” have been followed.
•
The refrigerator is not tilted excessively.
•
It is possible to operate the refrigerator with an available power source.
a) Gas bottle empty.
a) Change gas bottle.
b) Is the supply cut-out device open?
b) Open the cut-out device.
c) Air in the gas pipe?
c) Switch device off and on again 3-4 times
to remove air from the gas pipe.
Failure: The refrigerator does not work on 12V.
Possible cause
Action you can take
a) On-board fuse defective.
a) Fit new fuse.
b) On-board battery discharged.
b) Check battery, charge it.
c) Engine not running.
c) Start engine.
Failure: The refrigerator does not work on 230V.
Possible cause
Action you can take
a) On-board fuse defective.
a) Fit new fuse.
9-21
FITTED EQUIPMENT
Failure: The refrigerator does not work on 230V (continued)
Possible cause
Action you can take
b) No connection to supply voltage.
b) Establish power connection.
c) AES: gas operation despite
connection to the supply voltage?
c) Appliance switches to gas
operation due to insufficient supply voltage
(automatically switches back to 230V
operation).
Failure: The refrigerator does not cool sufficiently.
Possible cause
Action you can take
a) Inadequate ventilation to
the unit.
a) Check that the ventilation
grilles are not covered.
b) The thermostat setting is
too low.
b) Turn the thermostat to a
higher setting.
c) There is too much ice on
the condenser.
c) Check that the refrigerator
door seals when shut.
d) Too much warm food put
inside.
d) Let food cool down first.
e) Appliance running for a
short time.
e) Wait several hours, check
again.
Maintenance
• Works on gas components and electrical installation may only be carried out by authorised
personnel. We recommend to contact your Dometic Service Centre.
•
EN 1949 stipulates that the appliance’s gas equipment and its associated fume system must
be inspected after installation and a certificate issued.
Afterwards a qualified technician must inspect according to EN 1949 every two years and a
certificate issued.
It is the user’s responsibility to arrange for inspections after purchase.
•
It is recommended that the gas burner be inspected and cleaned as necessary at least once
a year.
We recommend maintenance following an extended shutdown of the vehicle.
FURTHER DETAILS
Consult the accompanying literature to obtain
the full benefit of your refrigerator.
In the event of failure, contact the Refrigerator
Service Department, details of which can be
found in your Yellow Pages Directory.
9-22
FITTED EQUIPMENT
8. After use, open the valve blade (if still
closed) by turning the handle anticlockwise. Flush the toilet by pressing the
flush knob for several seconds. Close the
valve blade after use.
THETFORD CASSETTE C-402
TOILET
Preparing for use
Open the access door on the outside of your
motorhome.
Note: Do not leave water in the bowl if the
toilet is not being used. This does not help to
reduce unpleasant smells and only leads to
flooding.
Turn the water filling funnel outwards, remove
the cap and add the stated amount of
Thetford toilet fluid for the water tank. This
ensures a better and cleaner flush and keeps
the water in the flush tank fresh. After this, fill
the water tank with clean water.
Comment: To avoid blockages we advise the
use of Thetford’s fast dissolving toilet paper,
Aqua Soft.
Screw the cap back onto the water filling
funnel and turn it back inwards towards the
side of the flush water tank.
Emptying
The waste tank has a capacity of 17 litres
and must be emptied at the latest when the
red light in the level display lights up. The
indicator lamp will light up when the waste
tank can still take about 2 litres, which is
about three uses. It is advisable to empty the
waste tank earlier.
Note: 150 ml water remains in the water
filling funnel when the water tank is empty.
1. Remove the waste tank by pulling the
safety catch upwards.
2. Pull the waste tank outward to the stop.
Tip it slightly and take the tank fully out.
Note: Do not allow the waste tank to become
too full.
3. Place the tank upright and turn the
emptying spout upwards.
9. Make sure that the valve blade is closed.
Open the access door located outside the
vehicle. Pull the safety catch upwards
and remove the waste tank.
4. Remove the cap, with the measuring cup
inside, from the emptying spout and pour
the stated quantity of toilet fluid into the
waste tank. This avoids unpleasant
smells in the waste tank and keeps the
inside of the waste tank clean. Next add
approximately 2 litres of water - enough
to ensure that the bottom of the waste
tank is covered. Screw the cap back onto
the emptying spout. Turn the emptying
spout back to its original position.
10. Stand the waste tank upright (Pull-out
handle at the top, wheels at the bottom).
Press the handle down and move it away
from the waste tank until it snaps out of
its locked position.
11. Pull the handle up and wheel the waste
tank to an authorised waste dump.
12. Push the handle back. Turn the emptying
spout upwards and remove the cap from
the spout. Hold the waste tank by the
upper handle with one hand, while
placing your other hand by the rear
handle so that during emptying you can
operate the vent plunger with your thumb.
To empty the tank without splashing,
depress the vent plunger while emptying
the tank. After emptying, flush the tank
thoroughly with water. Also clean the
valve blade with water.
WARNING: Never add toilet fluid via the
valve blade or via the toilet bowl.
5. Slide the waste tank back into its original
position via the access door.
Note: Never use force if you cannot get the
tank back into place easily. This may cause
serious damage.
6. Make sure that the waste tank is secured
with the safety catch. Shut the access
door and lock it.
7. Run water into the bowl by pressing the
flush knob briefly or open the valve blade
by turning the handle anti-clockwise. Your
Thetford toilet is now ready for use.
Note: The vent plunger should only be
pressed once the emptying spout is pointing
downwards!
9-23
FITTED EQUIPMENT
1
4
2
5
3
6
9-24
FITTED EQUIPMENT
7
10
8
11
9
12
9-25
FITTED EQUIPMENT
13
16
14
17
15
13. If required make the toilet ready for use
once again. Slide the waste tank into the
toilet and close the access door.
Storage
It is important that you follow the instructions
below if you do not expect to use the
Thetford toilet for a long period.
14. Open the valve blade by turning the
handle on the toilet anti-clockwise. Press
the blue knob until the water stops
flowing into the bowl. Close the valve
blade.
15. Open the access door on the outside of
your motorhome and turn the water filling
funnel outwards. Remove the cap and
9-26
FITTED EQUIPMENT
empty the water filling funnel by turning it
a quarter turn anti-clockwise.
hand. Push the float upwards, turn the
float a half turn and remove it from below.
Remove the rubber seal that is under the
float. Rinse the float and rubber seal
under a tap. Replace the rubber seal and
the float for the automatic pressure
release vent in the same way.
16. Remove the waste tank and empty this at
an authorised waste dump. Follow the
instructions for cleaning and
maintenance.
17. Replace the waste tank and open the
valve blade by moving the handle on the
toilet to the left.
The rubber seal in the toilet (the valve blade
seal, the mechanism seal, the automatic
pressure release vent seal and the cap seal)
should be regularly treated with Thetford High
Grade Seal Lubricant. This will ensure that
the seals remain supple and in good
condition. If the toilet is not to be used for any
length of time, it is important to treat the seals
with Thetford High Grade Seal Lubricant after
cleaning.
Cleaning and Maintenance
The toilet should be cleaned and maintained
regularly, depending on the amount of use.
To clean Thetford toilets, we advise using
water and Thetford Plastic Cleaner.
Note: Never use household cleaners
(bleach, solvents or other powerful cleaning
agents). These may cause permanent
damage to the seals and other toilet
components.
NOTE: Never use Vaseline or any vegetable
oil except olive oil. These may cause
leakage.
N.B.: The valve blade seal is a part of the
toilet that is subject to wear. Depending on
the extent and manner of service, after a
certain period the seal will become less
effective and must be replaced.
Toilet:
*
Squirt Thetford Plastic Cleaner in the
toilet.
*
Flush the bowl with water and wipe down
the rest of the toilet with a damp cloth.
Winter operation
TIP: For a really shining toilet, dry it with a
soft dry cloth after cleaning.
*
You can use your Thetford cassette toilet as
usual in cold weather, as long as the toilet is
situated in a heated location. If this is not the
case there is a risk of freezing. In that case
we advise that the toilet is drained by
following the instructions under ‘Storage’.
Clean seat and lid. The seat and lid can
easily be removed. Lift the lid and seat
together and pull upwards. After
cleaning, replace the seat and lid by
positioning the round pins above the
holes and then pushing the lid and seat
downwards.
For environmental reasons the use of
antifreeze, such as that used in a car radiator,
is not advised.
Waste Tank:
We advise a thorough cleaning of the waste
tank once each season.
*
Remove the mechanism from the waste
tank by turning it anti-clockwise, as
shown on the waste tank. Rinse the
complete mechanism under a tap.
*
Remove the cover plate from the
automatic pressure release vent by
prising it up using a screwdriver. Use one
hand to push the automatic pressure
release vent open, while holding the float
of the automatic pressure release vent
on the inside of the tank with the other
9-27
FITTED EQUIPMENT
LCD TV/DVD COMBI
Front panel
1.
Indicator (indicator is red when in standby
mode, green when working normally).
2.
IR sensor window.
The Avtex W102D 10.2” display screen has
both digital and analogue tuners allowing you
to watch TV and listen to radio stations with
digital clarity and if you are in a poor
reception area that does not benefit from a
digital signal, you can still receive normal
analogue TV and am/fm radio.
Top panel
3.
STANDBY (to switch from standby mode to
power-on mode).
4.
SOURCE (select power source).
5.
CH -/+ (increase or decrease channel number/
to move selected menu item.
6.
VOL -/+ (increase or decrease volume/
characteristics.
7.
SETUP (enter or exit setup menu).
8.
Play/Pause button
9.
Stop button.
Watch DVD, play CDs or view pictures taken
on your digital camera. The unit also has a
USB interface to view and listen to
information stored on a memory device.
The W102D operates on 12 volts DC, mains
AC or optional rechargeable battery.
Separate operating instructions are supplied
with this equipment.
10. Eject button.
Top panel
11. USB jack.
12. MEDIA CARD socket.
13. 12V DC power input socket.
14. AV audio video input jack.
15. AV audio video output jack.
16. Headphone jack.
17. Headphone jack.
18. FM antenna output.
19. RF input terminal.
Right panel
20. Disc in/out door.
9-28
FITTED EQUIPMENT
OMNI-STEP ELECTRIC STEP
The Warwick is fitted with an electrically
operated side step. In the event of the step
being left extended a buzzer, positioned
under the dashboard, will sound (when the
ignition is switched on) and the step will selfretract.
Maintenance
Dirt and frost can prevent the step from
operating properly. In this case the moving
parts should be cleaned or defrosted. All
points of movement are layered in
maintenance-free bearings.
Consult manufacturers literature for further
maintenance details.
REVERSING CAMERA
A wide angle, colour reversing camera is
fitted to your vehicle, adjacent to the high
mounted rear stop lamp.
The monitor is clipped over the original
interior mirror and is automatically activated
when reverse gear is selected.
Take care to avoid hard objects from
scratching the LCD surface of the screen.
9-29
FITTED EQUIPMENT
of this cupboard. They are coloured red with
their own identifying symbol and are from top
to bottom:
INTERNAL LAYOUT
General
The Warwick Duo is designed as a two berth
model, with an end lounge which easily
converts into two single beds or a large
double bed..
•
Refrigerator
•
Water heater
•
Cooker
The water filter, with changeable cartridge, is
also fitted in the bottom of this cupboard.
Cab Seats
Both the reclining cab seats have full forward
and rearward movement by releasing the
catch on the front of the seat and sliding it to
the required position.
The Dometic RM7271 tilt-tolerant refrigerator
is located beneath the kitchen unit worktop. A
red warning light on the refrigerator will
illuminate when it is operating on 12 volt.
Accommodation Seating
Next to the fridge is another storage
cupboard, with a folding door, which also
contains the 230V Residual Current Breaker
(RCB) and the Miniature Contact Brakers
(MCBs). A pull out, folding ironing board is
accessed via a handle at the side of this
cupboard.
The Warwick features a rear lounge with twin
bench seats with lift up seat bases giving
access to the under seat storage.
Please note that Auto Sleepers advise
against the retrofitting of additional seat belts.
Security
All kitchen shelves are coated with a plastic
material which is easily cleaned should a
spillage occur.
Passengers are reminded that it is a legal
requirement to wear the seat belts provided
whilst the vehicle is in motion.
A high level unit above the kitchen area
houses the microwave oven, and the cooker
hood with extractor fan which vents to the
outside of the vehicle. A switch next to the
microwave oven controls the three
downlighter lamps fitted into the ceiling above
the kitchen area.
Table
A table with folding legs is provided with the
vehicle. When not required this table should
be securely stowed in the overcab storage
area. When the table is needed, the legs
should be folded out and the table placed
where required.
An adjacent high level locker with two glass
fronted doors houses the crockery set and
wine glasses for four people.
Caution: The table must be stored when the
vehicle is in motion.
The vertical pillar above the sink unit houses
a 230V mains socket, a 12V socket and the
Truma heater controls on the front face. A
12V socket incorporating a TV coax
connection is fitted on the lounge side
surface.
Kitchen Area
The kitchen area, on the offside of the
vehicle, comprises a Spinflo cooker, which
has three gas hobs, a single 230V AC
electric hotplate and a storage cupboard
below. Adjacent to this is a stainless steel
sink and drainer concealed by a glass lid,
which may be used as a chopping board.
The sink is fed by a mixer tap mounted to the
left of the sink. Beneath the sink/drainer there
is a cupboard which gives access to storage
space, including a slideout cutlery tray, with
the electrical control box at the back. Each
gas appliance is protected by its own
isolation tap - these are found in the bottom
On the bulkhead adjacent to the side
entrance door is the electrical control panel
which controls all the vehicle’s electrical
services. It incorporates a fresh water level
indicator and master switches for the water
pump and 12 volt circuits. Below this panel
are two switches, one for the three main
interior lights and one for the exterior awning
light. A switch for the retractable side door
step is located below the light switches.
9-30
FITTED EQUIPMENT
ARRANGEMENT OF EQUIPMENT (WARWICK DUO)
9-31
FITTED EQUIPMENT
At the bottom of this bulkhead is a storage
cupboard, and a combined light and switch to
illuminate the entrance step area. The top of
this bulkhead is fitted with a coat hanger with
two hooks.
pairs of LED downlighters fitted into the
ceiling on each side of the lounge and these
are controlled by a switch on each rear door
pillar.
Radio speakers are fitted into each rear door,
and the offside rear pillar contains a 12V
power point. There is a warm air outlet and a
230V mains electricity socket fitted to the
front panel under the offside seat, along with
a large storage drawer at the rear.
The corner of the shower compartment
incorporates an umbrella storage rack, and a
smoke alarm is fitted on the ceiling above.
A fire extinguisher is fitted on the bulkhead
behind the driver’s seat on the side of the
cooker.
Under the nearside seat is a lockable safe,
set into the floor, which has a capacity of
approximately 7 litres and is suitable for small
valuables and documents. Fitted to the side
panel is the isolation tap for the external gas
socket. The front panel incorporates two
doors giving access to the underfloor storage.
On the rear nearside door is a fold up table
which can be slid into position between the
settees or single beds.
Shower Compartment
The shower compartment consists of a
Thetford cassette toilet, a drop-down hand
basin with mixer tap, a shower head with
mixer tap and a full length shower curtain.
There is also a vanity unit with sliding mirror
doors, a toothbrush holder and a towel rail. In
the roof is a ventilator with hinged flyscreen
and blind, along with a fluorescent light.
There is a blown warm air duct situated near
the floor and a plastic shower mat prevents
damage to the shower tray when not in use.
A flat screen digital TV on a swivel bracket is
fitted beneath the offside overhead lockers
and is visible from the lounge area.
The dropdown hand basin may be removed,
by lifting simultaneously upwards and
forwards, for cleaning and retrieval of items
(soap etc) that may have fallen into the
catchment basin. The toilet is fed through its
own integral water supply and is serviced
from the nearside of the vehicle by opening
the side door.
Storage
Storage is provided by the cupboards,
lockers and within the settee bases.
Additional storage is available in the overcab
locker.
Heavy items must not be stored in any
overhead locker, nor in any storage area from
which they could come free and cause injury
to the occupants of the vehicle. Ensure all
cupboards are securely fastened before
moving off (i.e. that the push buttons are in
the ‘locked’ position).
The inside of the shower compartment door
is fitted with a mirror, two hooks and a lift up
folding shelf incorporating a hairdryer handle
slot.
Wardrobe
Ensure any articles stowed below the cab
seats will not come loose when the vehicle is
being driven.
The wardrobe is situated adjacent to the
shower compartment and incorporates a full
width hanging rail.
Lounge Area
The lounge area is at the back of the vehicle
and consists of two inward facing bench
seats, with lift up cushions to give access to
the underseat storage areas.
Lighting is provided by twin spotlamps,
individually switched, fitted to the bottom of
each overhead locker unit. There are also
9-32
FITTED EQUIPMENT
SLEEPING ARRANGEMENTS
Single beds
In order to gain maximum width of the seat
cushion to make a single bed, stow the
backrest cushion in the front of the vehicle.
Transverse double bed
Slide out the seat base of each bench seat
until they meet in the middle of the vehicle,
and use the backrest to fill the space
betweeen the base cushion and the side of
the vehicle.
9-33
FITTED EQUIPMENT
NORMAL SEATING ASSEMBLY (WARWICK DUO)
9-34
FITTED EQUIPMENT
SINGLE BED ASSEMBLY (WARWICK DUO)
9-35
FITTED EQUIPMENT
DOUBLE BED ASSEMBLY (WARWICK DUO)
9-36
FITTED EQUIPMENT
PARTS LIST (WARWICK DUO)
Item
Part No
Description/Cushion type
Qty
Notes
1
CS0336
2
CS0336
BENCH SEAT BASE CUSHION
2
-
BENCH SEAT BACK REST
2
-
3
CS0336
BENCH SEAT INFILL CUSHION
2
-
9-37
FITTED EQUIPMENT
Stainless Steel Sink and Drainer
EQUIPMENT ARRANGEMENT
The stainless steel sink and drainer should
only be cleaned with light detergent. Under
no circumstances should bleach be used
since this will react adversely with the
stainless steel and may cause small holes in
the metal. Immediately beneath the sink is a
slide-out cutlery drawer. The chrome mixer
tap has a small rubber end cap to eliminate
water droplets marking the work surface
whilst in transit. A waste bin is incorporated
beneath the sink unit with a stainless steel
spice rack fitted on the adjacent wall.
Ventilation
The Warwick Duo is fitted with three roof
ventilators. A large Remis one is located
above the lounge area with a Seitz Mini Heki
fitted as standard above the kitchen area. A
Remis ventilator with an electrically operated
extractor fan is available as an option in this
position.
There is a small MPK roof ventilator in the
shower compartment.
Remis Roof Light
Habitation Battery
The Remis roof lights are operated by a
rotating handle which means they can be
opened to any required position. They
incorporate a separate sliding flyscreen and
night blind which can operate even if the
ventilator is left open.
This is located beneath the driver’s seat. The
battery is a 110AH 12V, low maintenance,
leisure battery which sould only require
attention at the annual habitation service.
If a replacement habitation battery should be
required then it is important that the
replacement be of the same type and
specification as that originally fitted.
Mini-Heki Roof Light
To operate the Mini-Heki roof light, press the
button and pull the handle to raise the cover.
Use the slotted channels to hold the roof light
open in the desired position.
WARNING: Switch off all appliances and
lamps before connecting or disconnecting
the habitation battery.
MPK Roof Light
The MPK roof light is fitted with a hinged
cover which incorporates a roller blind and a
fixed flyscreen. Opening the hinged cover
gives access to the adjustment handles for
the five way opening facility. Grasp the
handles and push upwards to fully open or tilt
in the required direction.
When the vehicle is being driven the roof
ventilators should be fully closed. Wind noise
may be reduced by closing the night blind.
The roof ventilators are designed to flow a
certain amount of air even fully closed. Do not
obstruct them - your safety depends on them.
Insulation
All body panels, except the front doors and
engine bulkhead, are insulated using
fibreglass insulation material, giving
protection against extremities of hot and cold,
and, at the same time, minimising
condensation.
9-38
FITTED EQUIPMENT
Electrical - General
Retrofit Options
Two 230V AC sockets are fitted, more
suitable for medium demand components
such as televisions and hairdryers. Safety/
overload protection is provided by the MCB
in the sink unit cupboard. A further 12 volt
socket and TV coaxial plug is provided; the
coaxial cable is fitted to the rear of the
coaxial socket and is connected to the
standard fit TV aerial.
Whilst this list is not comprehensive, below
are listed suitable retrofit options. Contact
either your local Auto-Sleeper dealer or the
Motorhome Service Centre, Willersey for
further details.
The mains hook up cable, provided as
standard with the vehicle, is stored under one
of the seats.
•
Cycle Rack. The Fiamma 200D or 200DJ
is recommended for fitment to the offside
rear door.
•
Top Box. A specific top box is not
recommended because of the small
amount of suitable space available on the
roof. If a box is fitted it should be bolted
through the roof, and the weight of it and
its contents must not exceed 50kg.
•
Air Conditioning. The Dometic B2200 is
recommended for air conditioning in the
habitation area.
•
Back Box. The Fiamma Ultrabox 180 or
320 would be suitable, and is fitted to the
cycle rack.
•
Rear Ladder. The Fiamma Deluxe 6 DJ
may be fitted to the nearside rear door to
combine with the 200 DJ cycle rack.
•
Towbar. The standard Peugeot towbar is
recommended.
A strip LED awning light is provided above
the side entrance door.
Factory Fitted Options
The following optional items are available at
the time of build:
•
Cycle rack.
•
Awning.
9-39
FITTED EQUIPMENT
9-40
CARE OF YOUR MOTORHOME
remove the flatting marks created by the
abrasive paper. For deep gouge type
scratches, where the paint or gel may have
been penetrated, you should first seek the
advice of your supplying Auto-Sleeper dealer.
GENERAL
In order to keep your Auto-Sleeper in first
class condition, periodic maintenance will be
required to both the bodywork, windows,
upholstery and other parts of the conversion.
This maintenance should be carried out as
follows:
Removing Scratches from Acrylic
Windows
All windows, except the chassis cab and
Luton, are manufactured in acrylic. Over time
these become scratched and their clarity
impaired. An Acrylic Window Polish removes
unwanted scratches and blemishes leaving a
clear, haze free finish. Minor scratches can
be polished out directly.
Servicing
Servicing of the conversion is the
responsibility of your local franchised AutoSleeper dealer to whom all queries should be
referred. Your local base vehicle commercial
dealer should carry out servicing of the base
vehicle.
Recommended Materials
GLASSFIBRE BODYWORK AND
ACRYLIC WINDOWS
G3 Paste Compound: This is a cutting
compound and polish, recommended for use
on painted surfaces and GRP. It is ideal for
removing the traffic film that builds up on
glassfibre coachwork and not only restores it
to its former glory, but adds a high level of
polish as well.
General Cleaning
At regular intervals, you should wash the
fibreglass bodywork with a recognised
cleaner for use on fibreglass gel coats.
Should marks remain, use a cleaner with
chemical and abrasion agents formulated for
use on gel coats.
G10 Extra Fine Grade Liquid: This is again
ideal for polishing surfaces and removes swirl
marks and very fine scratches. It is less
abrasive than G3 yet has the same polish
properties and cleans and restores
discoloured surfaces. It is ideal for use on
dark colours.
Discolouration
Fading or discolouration of the gel coat is a
natural ageing process caused by ultraviolet
light. To overcome this, use a mild abrasive,
which removes a thin layer of the discoloured
surface. This will restore the bodywork to its
original colour and surface lustre. Since
discolouration develops gradually, it should
not be necessary to carry out this procedure
more than every three years. Frequent use of
abrasive materials can reduce the thickness
of the gel coat, to a potentially harmful extent.
Black Top Hand Glaze: This is ideal for use
on stains, vinyls, body mouldings and
provides a long lasting high gloss finish. It is
resistant to car wash and abrasive solvents
and is easy to apply. Economical in use, only
a small amount is needed to give a very fine
finish.
Finishing Cloths: These are very fine grade
cloths, woven and thus easily washable that
are recommended by Farecia for use with
their materials.
Removing Scratches from Bodywork
Scratches can be removed from both gel and
painted surfaces. The method depends upon
the depth of the scratch, as care has to be
taken to avoid penetrating the paint or gel
coat. Very fine, hairline scratches can be
removed by rubbing across the line of the
scratch with rubbing compound. Slightly
deeper scratches should be lightly wet
sanded first using very fine (1200 grit or finer)
abrasive paper. Rubbing compound will then
The above can be purchased from our
Service Centre, Willerly (01386) 853511.
10-1
CARE OF YOUR MOTORHOME
UPHOLSTERY MAINTENANCE
STAINLESS STEEL
COMPONENTS
Cleaning
External
Upholstery should be brushed or vacuumed
regularly. Fabrics should be wiped every six
to eight weeks with a lint free cloth and fabric
cleaning fluid. Velour materials may be drycleaned.
In the event of discolouration of the stainless
steel ladder, this should be removed with TCut or any other mild abrasive and the
surface protected with WD40 or a similar
product.
Fabric Care
Internal
Fabric snags caused by sharp objects such
as toys, nails, etc., should be trimmed off
immediately. Never attempt to pull them off
since this could cause the snag to run.
Do not clean stainless steel fittings, i.e.
splash plate and sinks with bleach since this
reacts with the stainless steel and may lead
to corrosion.
Whenever possible, avoid exposing the
upholstery to direct sunlight which might
eventually cause the colour to fade.
Furniture
Furniture should be cleaned with a
proprietary furniture polish periodically. Any
watermarks that may occur on the hardwood
edging of the furniture units should be
removed by use of fine grade wire wool and
furniture wax.
Fabrics with a velour type pile finish will
develop crush marks in use - this is
unavoidable and does not affect the quality of
the product in any way.
Stain Removal
Heavy stains may need to be sanded out and
the edging re-polished with a proprietary
varnish (Ronseal etc.). The high gloss finish
is achieved by using wire wool and wax.
A proprietary dry cleaning fluid will remove
most household stains. However, stubborn
stains, such as coffee, wine or ice-cream
may need pre-treatment with a mild soap and
distilled water.
GAS INSTALLATION
Small marks in velour type fabrics can
usually be removed by stroking along the pile
using a small brush and warm water.
All gas vents and flue pipes should be
periodically checked for damage and should
be kept free from dirt.
We strongly recommend that before
commencing any treatment an inconspicuous
piece of material is tested for colourfastness
and shinkage. If in doubt, please contact a
professional dry cleaning company. Do not
apply cleaning solvents to velour piping,
otherwise the flock will be removed.
Blocking of vents or flues is extremely
hazardous and should be avoided at all
times.
Gas Appliance Igniters
It is advisable, periodically, to check visually
the igniters on hobs, grills and ovens are
sparking correctly.
Work Surfaces
Laminated work surfaces are fitted to the
tops of all furniture units. Whilst these are
hard wearing, hot pans should not be placed
directly on these surfaces, since damage
may result.
Annual Inspection
The gas installations should be inspected
annually by qualified personnel. If in doubt
contact your supplying Auto-Sleeper dealer.
Modifications to the gas systems should not
take place unless carried out by qualified
technicians.
10-2
CARE OF YOUR MOTORHOME
SEAT RESTRAINTS
WINTERISATION
WARNING: In the event of any impact of
25 mph or over in which seat belts have
been worn, they must be replaced before
the vehicle is used again.
General
WATER SYSTEM
This section contains information on the
winterisation of your Auto-Sleeper,
particularly when you may wish to lay up your
vehicle for the winter months.
Fresh Water Tank
Water System
At regular intervals, and at least every three
months, the fresh water system should be
flushed through with fresh water. Furthermore
it is advisable that prior to using your AutoSleeper, the fresh water system is thoroughly
flushed with fresh water.
The water system should be fully emptied
and the drain taps on both the fresh water
tank and waste water tank left in the open
position. Likewise, all internal taps should be
left open and the water pump run until the
last traces of water have come out of the
taps. Purely as a precaution, against very
severe freezing conditions, the water filter
that is attached to the water pump on the
outlet side should be removed and cleared of
all water. In doing so it will give you the
opportunity of cleaning it, if necessary, ready
for the coming season. Remove all sink plugs
to allow the water system to breathe.
Waste Water Tank
Since the waste water tank can hold foreign
matter, it should be regularly flushed with
fresh water. To prevent odours working back
through the shower and sink outlets, flush the
waste tank through with a small amount of
mild disinfectant.
Flush fully the waste water tank to remove
any excess debris and waste material. Flush
through again with disinfectant as part of the
final drain. Leave drain tap open.
Depending on the use of the waste tank, it is
possible that this will collect solid waste
matter, which in some instances may build up
and block the waste tank outlet tap. In this
case it will be necessary to drop the tank for
cleaning. Access is through a large diameter
fitting in the tank top. Once removed this will
allow the tank to be flushed out in an inverted
position and all solids removed.
Upholstery
We advise that any detachable upholstery is
removed and taken indoors during prolonged
winter storage, particularly detachable upper
bed mattresses and scatter cushions.
Curtains/Blinds
To prevent uneven bleaching, and possible
excess sunlight onto the furniture and fabrics,
we recommend that either the curtains or
blinds are left drawn.
Refrigerator
Leave the refrigerator door open, on its
intermediate lock position; this will allow the
refrigerator to breathe and prevent any
unpleasant odours in the storage department.
Ventilation
There is fixed upper and lower ventilation in
your Auto-Sleeper which is built-in in the
interests of safety. There is therefore no need
to leave any windows or roof ventilators ajar -
10-3
CARE OF YOUR MOTORHOME
indeed the roof ventilators have sufficient
fixed ventilation to allow the interior of the
vehicle to breathe satisfactorily.
Automotive
Exterior
•
Secure the vehicle using chocks.
Release the handbrake to prevent the
brake linings from seizing on.
•
Increase the tyre pressure (by
approximately 2 bar above the
standard pressure) to prevent the
tyres from becoming flat.
Follow the advice laid down by the base
vehicle manufacturer. In particular,
Fit, where appropriate, the Electrolux winter
covers to the fridge ventilators. Give your
Auto-Sleeper a good wash and polish before
laying up, and apply a small film of protective
oil to the stainless steel roof rack, ladder and
any other external polished metal
components.
WARNING: Do not exceed the
maximum pressure noted on the
sidewall of the tyre.
Electrical
Turn the electrical system off at the control
panel.
Alternatively, jack up the vehicle to
relieve the load on the tyres.
Peugeot recommend that if the vehicle is to
be parked up for a period of more than one
month then it is advisable to disconnect the
main vehicle battery. For full instructions on
the correct procedure refer to the Peugeot
handbook supplied with the vehicle and look
for the section covering the battery. If this
advice is followed, bear in mind that the
remote central locking will not function,
although it will still be possible to unlock and
lock the doors manually using the key.
To maintain the vehicle battery in good
condition it is recommended that it is fully
charged prior to storage and then recharged
every 3 months.
Windows
Open all windows fully. Check all window
seals are intact and shut firmly. Ensure locks
and over centre catches are applied as
appropriate.
10-4
•
Cover the tyres to protect from sunlight,
as they will deteriorate rapidly in ultraviolet light. A light proof cover will help to
prevent cracking of sidewalls and
premature ageing.
•
Check coolant for antifreeze protection,
correct as required.
•
Check windscreen and headlamp
cleaning systems for antifreeze
protection, correct as required.
CARE OF YOUR MOTORHOME
TROUBLESHOOTING
The following are a series of fault finding charts to which you should refer in the event of
problems you may have regarding 230/12V, LPG and water. This should be used as a guide only,
and in the case of an electrical fault, where a fuse has blown or an MCB tripped out, the fault
must be located before replacing the fuse. If a fault is suspected with the LPG system, consult a
CORGI registered technician.
If in doubt consult a qualified technician or your local Auto-Sleeper dealer.
12V TROUBLESHOOTING CHART
Symptom
Habitation 12V does not
operate
Habitation battery not
charging
Battery does not hold its
charge
Cause
Main 50A fuse blown
Battery Discharged
Switch on control panel in off
position
Vehicle ignition ‘on’
Main 50A fuse blown
Relay fault
Contacts dirty/loose on
battery terminals
Poor earthing
Failed battery
Current being drawn
Battery discharges over a
short time with appliances
operating
No power to one or more
12V appliances
Lights dull/only one tube
illuminating
Water pump not operating
No power on 12V socket
outlet
Poor battery cell condition
Failed battery
Battery not fully charged
Circuit fuse blown
Low battery charge
Faulty light unit/tube
Switch on panel ‘off’
Pressure switch on pump not
operating
Fuse 4 blown
Fuse 7 blown
12V plug incorrectly
connected/wired
10-5
Remedy
Check/Replace
Recharge
Switch to on
Switch ‘off’ ignition
Check/Replace
Refer to dealer
Clean and check for tightness
Check earthing to chassis point
Check cells with hydrometer
change electrolyte if necessary
Check all appliances are off
when not in use
Check cells with hydrometer
Change battery
Fully recharge battery
Find fault and replace fuse with
same rating
Check battery
Replace/Check
Switch it ‘on’
Refer to dealer
Find fault and replace fuse with
same rating
Find fault and replace fuse with
same rating
Check plug
CARE OF YOUR MOTORHOME
12V TROUBLESHOOTING CHART (continued)
Symptom
Water Heater not
operating/cuts out
Cooker ignition not operating
Fridge gas ignition not
operating
Fridge ignition switch flashes
but gas does not ignite
Ignition can be heard to be
sparking but no flashing on
fridge switch
Fridge does not operate on
12V when engine is running
Cause
Fuse 3 blown
Ignition control switch fault
Fault on fridge unit
Remedy
Find fault and replace fuse with
same rating
Recharge battery
Refer to dealer
Find fault and replace fuse with
same rating
Refer to dealer
Refer to dealer
Find fault and replace fuse with
same rating
Refer to dealer
Refer to dealer
Faulty fridge ignition switch
Refer to dealer
Fuse 8 blown
Find fault and replace fuse with
same rating
Refer to dealer
Refer to dealer
Low battery charge
Unit fault
Fuse 3 blown
Spark unit fault
Fault on cooker unit
Fuse 3 blown
Fault on fridge relay
Fault on fridge unit
230V TROUBLESHOOTING CHART
Symptom
230V system inoperative
RCD/MCB keeps tripping
out
Water heater does not
operate on 230V
Water heater does not
operate on 230V
Battery charger does not
operate
Refrigerator does not operate
on 230V
Cooker Hotplate
Cause
No site power
RCD/MCB switches tripped out
Fault on 230V supply
Faulty appliance
Overload on current
consumption by appliance
No power
Overtemperature trip activated
Charger switched off
Switch on refrigerator
thermostat dial not ‘on’
Element fault
Not heating up
10-6
Remedy
Check site supply
Reset circuit breakers
Check supply including polarity
Turn off all appliances, reset
circuit breakers, turn on
appliances until fault occurs.
Isolate faulty appliance
10A maximum available do not
use appliance
Switch on MCB isolator switch
and check 6amp MCB is on
Reset thermal cut-out (refer to
operating instructions)
Switch on MCB isolator switch
and check 6amp MCB is on
Check position of thermostat
dial
Refer to dealer
Make sure 230V is switched on.
at isolator
Check trip switch
Check 10amp MCB is on
CARE OF YOUR MOTORHOME
LPG TROUBLESHOOTING CHART
Symptom
Appliance will not light
Appliance lights but goes out
immediately the FSD override
is released
Odour
Yellow flame
Orange flame
Floating flame
Cause
No gas
Low battery (auto ignition)
Flame supervision device (FSD)
is not functioning correctly
Remedy
Check isolation valve is open
Charge battery
Refer to dealer
Gas leak
Turn off the gas at the isolation
valve and do not use the gas
system until the problem has
been rectified
Refer to dealer
Lack of primary air. please note
yellow tipping to the flame is
normal
Particles of dust or dirt in the
mixing tube being carried
through the burner ports
Burner ports partically blocked
Lack of secondary air
Blocked retention ports
If in an oven
10-7
Reduce the amount of dust in
air
Refer to dealer
Check all vents are clear (air
inlet to vehicle)
Check retention ports are clear
Check the flue way is clear
CARE OF YOUR MOTORHOME
WATER TROUBLESHOOTING CHART
Symptom
Continuous running of
water pump
Cause
1. No water
2. Major leak
Intermittent operation of water
pump
Intermittent operation of water
pump 20 second cycle
(approx).
Water pump does not operate
Minor leak in water system
Water gauge does not
operate
No hot water (mains system)
No hot water (gas system)
No hot water (gas system)
Slow drainage from
sink/shower tray
Tip-up handbasin slow to
drain
Unsatisfactory operation of
water pump
Water pump pressure release
valve reasserting itself
Remedy
1. Fill tank
2. Switch off immediately and
check system
Check push fit joints
No action - part of pump design
Fuse 4 blown
Find fault and replace fuse with
same rating
Probe fault
Refer to dealer (check probe
connections)
Water heater tripped
Check and press re-set button
Gas module not lighting
Refer to dealer
Igniter not working
Check 12V switched on
Blocked breathers in waste tank Drop tank and clear breathers
Blocked drain hole
Remove basin and clear
Filter blocked
Clean filter
10-8
USEFUL INFORMATION
DATA RECORD
We suggest that you record key details in the spaces below should you
accidentally mislay your keys or other vital documentation.
Vehicle Type ....................................................................................................................................
Vehicle Model ..................................................................................................................................
Auto-Sleepers Production Number .................................................................................................
Keys ................................................................................................................................................
Ignition Key .....................................................................................................................................
Door Key (if applicable) ...................................................................................................................
Fuel Filler (if applicable) ..................................................................................................................
Water Filler ......................................................................................................................................
Gas Compartment Key ...................................................................................................................
Toilet Compartment Key ..................................................................................................................
Alarm Code (if fitted) .......................................................................................................................
AA/RAC/etc. Membership Number .................................................................................................
Radio Security Code .......................................................................................................................
Supplying Dealer Contact Number .................................................................................................
11-1
USEFUL INFORMATION
AUTO-SLEEPER DEALERS
To find your nearest Auto-Sleepers dealer
please go to www.auto-sleepers.co.uk and
click on ‘Find a Dealer’.
11-2
SERVICE DETAILS
RECOMMENDED ANNUAL
SERVICE CHECK FOR MOTOR
CARAVAN BODIES AND
CONVERSIONS
SECTION 1 - BODY MOUNTING
Body to Chassis
Examine all fixings retaining the body to the
chassis - this may be direct or through a subframe. Where practical, all fittings should be
checked to ensure they are all present and
correctly secured.
It is recommended that the annual service is
carried out by an approved motorhome
service centre.
Body to Cab
Introduction
Examine joint between body and cab for
signs of movement and soundness of sealing
media.
This entire section offers guidelines for the
checking of a motorhome’s habitation area
and to ensure continual compliance with
EN1646-1.
Body Retention (dismountables)
Check serviceability and tightness of body
retaining gear.
It does not cover any part of the base vehicle,
although there may be minor overlapping
(such as tyre pressures, cab seats, internal
lights, battery and windows) in a van
conversion. The base vehicle must be
serviced in accordance with the chassis
manufacturer’s instructions.
Check serviceability of body support struts
and mountings. (Note: whether it will be
necessary to demount the body to check the
body supports must be agreed between
dealer and customer).
SECTION 2 - WINDOWS
Reference should also be made to:
•
Windows
Any owner’s manual or equivalent
supplied with the vehicle by the
motorhome converter.
•
Appliance manufacturer’s instructions.
•
Driver’s handbook or equivalent supplied
by the chassis manufacturer.
•
A vehicle is accepted for service at the
dealer’s discretion.
•
Any defects, repairs, adjustments,
cleaning or lubrication required will be
noted on the checklist. The customer’s
approval will be obtained before any work
is done.
Check window glazing rubber or sealing for
cracks and general condition. Check for
satisfactory operation and closing.
Check fixing of top hinge rail on top hung
windows.
Check for good weather seal when window is
closed and latched.
Check catches and stays for satisfactory
operation.
SECTION 3 - DOORS
EXTERNAL DOORS
Not including base vehicle doors.
Not all of the equipment mentioned in this
manual is fitted as standard to every
motorhome.
Security:
This guide is published as an aide de
memoire for dealers. Any work carried out
following the check, and the sufficiency of the
work in the check itself, is subject to the
contract between the customer and the
dealer.
12-1
•
Check that hinges and catches are
satisfactory and that, when latched,
doors are held securely shut.
•
Check that the keys or internal latches
lock the doors correctly.
•
Check that any device fitted to hold a
door in the open position is satisfactory.
SERVICE DETAILS
Sealing:
Spare Wheel
•
Check all door seals for cracking and
general condition.
Remove spare wheel. Check for damage.
Check typre pressure.
•
Check correct closing to give a weathertight seal.
Check mounting frame for security to body
and for secure retention of spare wheel.
Childproof Lock:
Wheel Boxes
•
Check for damage, corrosion, water
seepage, signs of tyre scrubbing.
Where a door is fitted with a childproof
lock check that an appropriate warning
notice is fixed adjacent to the door.
Appropriate warning notices are available
from motorhome manufacturers.
SECTION 5 - ATTACHMENTS TO
BODY EXTERIOR
INTERNAL DOORS
Roof Lights
Security:
Check security, general condition, and that
sealing has not deteriorated.
•
Check that hinges and catches are
satisfactory and that, when latched, the
door is held securely shut.
Roof Racks and Ladders
Check security to body and general
condition.
Safety:
•
Check roof for damage adjacent to rack.
Check that any device fitted to hold a
door in the closed position can be
operated from both sides to open the
door in an emergency.
Mouldings, Trims
Check security. Check sealing has not
deteriorated.
SECTION 4 - ATTACHMENTS TO
CHASSIS OR UNDERBODY
Flue Terminals, Air Vents
Check security. Check sealing has not
deteriorated.
Corner Steadies
Check that these are not blocked.
Check that attachments to chassis are
secure.
SECTION 6 - INTERNAL
Ensure steadies work freely and
satisfactorily.
Body Seepage Check
Examine for moisture/water staining of areas
under windows, at side of roof and at
corners, which could indicate water seepage
problems. A moisture meter should be used
where appropriate.
Lubricate screw to ensure correct operation.
Folding/Retractable Steps
Check that step pivots are satisfactory and
not worn. Check that, when closed, the
retaining mechanism holds the step securely.
If fitted, check device is working.
Furniture
Check furniture is securely fixed.
Underfloor Water Tank Mountings
Check door hinges, catches and stays for
satisfactory operation.
Check mounting frames are secure to body.
Any fastenings that require releasing to
remove the tank should be free of rust and
operate freely. (Removal, flushing, cleaning
and replacing of tanks will be carried out at
the prior request of the customer or will be
done subsequently with other work).
Dinette Seats/Beds
Check seat bases for security of fixings and
for damage.
Make up beds according to manufacturer’s
instructions and check for rigidity and safety.
12-2
SERVICE DETAILS
Upper Bunks
ADVICE TO USERS
Check there is a secure means of access to
upper bunks and that, where applicable,
protection against falling out and entrapment
is provided.
VENTILATION
Do not obstruct the ventilators which are
fitted; your safety depends on them.
Curtains/Blinds/Nets
IN CASE OF FIRE
Check track is secure and curtains draw
freely without snagging.
1. Get everyone out.
2. Turn off outside gas valve and/or oil
valve (if fitted).
Check blinds and/or nets for correct
operation.
3. Disconnect the mains electricity
supply.
Check flyscreens in roof lights and air vents.
Cab Seats
4. Raise the alarm and call the fire
brigade.
Where cab seats form part of the living area
and/or bed layout they should be checked for
security of attachment, smooth and easy
operation of seat slides, swivels and seat
back operation.
5. Tackle fire if safe to do so.
FIRE PRECAUTIONS
Children: Do not leave them alone.
Means of Escape: Make sure you know
the location and operation of the
emergency exits, keep all escape routes
clear.
Fire Extinguisher
Check condition and expiry date. If an
extinguisher is not fitted, inform the customer
of the advisability of such equipment
Combustible Materials: Keep them
clear of all heating and cooking
appliances.
Fire Blanket
Check position (should be near cooker).
Fire Fighting: Provide, at least, a 1kg
power fire extinguisher, that complies
with BS5423 by the main exit door, and
a fire blanket next to the cooker. Make
yourself familiar with the instructions on
your fire extinguisher and the fire
precaution arrangements on the caravan
park.
If one is not present, inform the customer of
the advisability of such equipment.
Advice to Occupiers/Warning Notice
Check presence and condition and advise
customers accordingly.
The wording and layout of the notice should
be set out as follows:
Portable or Open Flame Heating
Equipment
Check for its presence. The customer must
be advised against its use.
12-3
SERVICE DETAILS
SECTION 7 - ELEVATING ROOFS
Appliances
Solid Side Wall
In general, the checking of gas appliances
can be divided into the following:
Check sides and end panels fold up and
down correctly, that they seal against each
other where appropriate and that retaining
mechanisms are satisfactory. Check all
hinges for security and freedom from strain.
1. Cleaning.
Locking of Roof
5. Flame failure device.
It is important to ensure that, when the roof is
in the travelling position, it is safely and
positively locked down. Any locking retaining
mechanism should be carefully examined.
6. Security.
2. Operation of controls.
3. Correct flame structure.
4. Flues.
Cleaning
•
SECTION 8 - GAS SYSTEMS
Cylinders, Regulators and Feed Hoses
Establish that the cylinder and feed hose is
compatible.
Where apprpriate, remove cover(s) to
gain access to heat exchanger. Clean
away any fluff or foreign matter.
Reassemble and test. Clean flame
viewing window.
Controls
•
Since the introduction of BS EN1949 the gas
pressures for Butane (blue) cylinders and
propane (red) cylinders have been
harmonised across Europe. The gas system
pressure is now 30mbar for both gases.
The gas regulator is now fitted as standard
equipment by Auto-Sleepers. Your supplying
dealer will need to supply you with the correct
hose compatible with the cylinder to be fitted.
Check that all knobs etc. work smoothly
and are secure on their spindles. If gas
taps require greasing to ease stiffness,
use only approved LPG grease. Check
that appliances can be brought into
service using the normal controls.
Correct Flame Structure
•
Check cylinder compartment vents and gas
drop hole in floor are free from obstruction.
Check that all pilot flames burn quietly
and clearly.
Refrigerator: With the refrigerator gas control
turned to maximum, the colour of the flame
should be predominantly blue.
Check seals on internal doors.
Instantaneous Water Heating: The main
burner flame should be of even height and
blue in colour. A flame burning yellow will
allow sooting to occur.
Hose and Piping
Check any flexible hose is of an approved
type. Check its condition and any evidence of
cracking.
Ovens: The oven flame should burn quietly
and be of even height, mainly blue/green in
colour. If the gas is propane, the flame will
normally develop yellow tips as the burner
heats up. If the gas is butane, a small amount
of yellow tipping will be seen immediately
after lighting, increasing as the burner heats
up.
The maximum permissible hose length is
400mm, longer hoses should not be used.
The hose length is the length of the flexible
portion of the hose assembly. Do not use
external cylinders and or extension hoses.
Check piping for condition, damage and
correct support.
Carry out an overall leak test.
Grill Burners: It is normal for the flames on
this type of burner to develop yellow tips as it
heats up, particularly on butane.
General: A flame lifting away from the
burners is an indication of too high a
12-4
SERVICE DETAILS
pressure, although it may happen with grill
burners whilst the frets are heating up. A
yellow flame will cause sooting and is an
indication of too low a pressure. Providing
the regulator and piping have been checked
and found satisfactory, the above faults
should not appear.
SECTION 9 - WATER SYSTEM
Flues:
Check the external filter and filter pipe to
tank.
•
Before operating the water system, a visual
check of the following items may show up an
obvious leak source...
Fresh Water Tank/Container
Check condition, fill tank and check for leaks.
Flues should be examined for security of
fixing and for correct attachment to
appliances and flue terminals. They
should be free from damage and
corrosion. Check for leakage of flue
gases into the vehicle.
Check for satisfactory venting.
Check condition and presence of filter cap.
Waste Water Tank
Check drain tap is clear and working.
Flame Failure Device (FFD):
•
Check condition and presence of drain hose.
(The water tank will be drained, flushed,
cleaned and charged with a measure of toilet
fluid/disinfectant at the prior request of the
customer).
Where fitted, FFD should be checked to
ensure satisfactory operation. After the
appliance has been successfully
checked, allow time for the thermocouple
to cool. Attempt to relight the appliance
by turning it on wihtout pushing in the
gas control knob. (Do not override the
FFD). If appliance does not light, FFD is
satisfactory.
Filter Pump
When applicable, remove filter and replace.
Check the in-line pump for security and
condition. Remove the submersible pump
from tank, check condition.
Security:
•
Check pump inlet and outlet are clear and not
obstructed.
Check appliance is securely fixed to the
vehicle/furniture and will be free from
rattles. Where applicable, check that
water pipes are satisfactorily attached
with no sign of leakage.
Check delivery hose and electric cable are
secure and satisfactory.
System Check
Protection of adjacent surfaces:
Operate pump. Check all piping for leaks.
•
Operate taps and shower. If a hot water
system is fitted, it can be checked for leaks
etc., using cold water. (Note: Aerated water
from tap could be due to a leak on the
suction side of the pump).
Check that surfaces adjacent to open
flame cooking appliance have adequate
protection.
Inspections:
•
It is recommended that inspections are
carried out by a qualified fitter trained to,
for example, CORGI (Confederation of
Registered Gas Installers) or Calor
standards.
Waste Water System
With water running through the drain pipes,
check for leaks and satisfactory draining of
water from sinks etc.
Couplings and Fluids
Check that the appropriate markings are
used - blue for fresh water, grey for waste
water. Ensure a sealing off cover is supplied
for each coupling.
12-5
SERVICE DETAILS
Check that filler positions are designated
“petrol”, “diesel” or “water” as appropriate.
SECTION 11- VENTILATION
High Level
Toilet Waste Tank
Check all high level ventilators, including roof
lights, are free from obstruction and allow a
free flow of air.
Check that any fixed tank intended to receive
discharge from a toilet is fitted with either a
level or full indicator.
Low Level
SECTION 10 - ELECTRICAL
SYSTEMS
Check all low level ventilators are free from
obstructions and allow a free flow of air. If the
ventilator is manually adjustable then ensure
the mechanism is free and operating
correctly.
Extra Low Voltage 12 Volts (excluding
vehicle)
Battery/ies:
•
Check battery/ies for condition.
•
Check connections, wires, fuses and
relays appertaining to the habitation
electrics.
Wiring:
•
Examine all visible wiring.
•
Check all connections and joints are
sound and satisfactory.
Fuses/Fuse Holders:
•
Ensure that fuses and fuse holders used
to protect the habitation electrics are
satisfactory and that fuse ratings are
compatible with the circuit appliances
being protected.
Appliances:
•
Inspect all appliances for damage, signs
of overheating and secure fixing.
Function test all appliances.
Mains 230 Volt System
It is recommended that the inspection and
certification of the 230 volt system be carried
out by a qualified electrician who is an
approved contractor of the NICEIC (National
Inspection for Electrical Installation
Contracting) or in membership of the
Electrical Contractors Association 16th
Edition Wiring Regulations.
12-6
SERVICE DETAILS
You will see also that we check that key
components are serviceable (fire
extinguishers etc) and furthermore that
where appropriate, items are lubricated and
checked for serviceability.
AUTO-SLEEPERS SERVICE
CENTRE ANNUAL HABITATION
CHECK
Introduction
It is recommended that every 12 months the
habitation side of your motorhome is
inspected by qualified technicians. Attached
to this brief, is a list of all the points that are
checked.
A few customers are of the belief that this
check includes rectification of faults. It is
stressed that this is not the case, the annual
service is a check only of the habitation
aspect of the motorhome.
If faults are found, the technician will advise
you, the customer, of the fault and the
recommended course of action to resolve
this.
Servicing is not included in this check.
All facilities are run and tested through their
operational envelope. For example, the flame
propagation on the refrigerator and other
main gas appliances (where visible) is
checked. If the flame is burning a wrong
colour or burning too far from the jet, we
again advise you, the customer, as to how
this should be rectified.
We also recommend and are only too happy
to arrange for the refrigerator of your AutoSleeper to be checked here at the Service
Centre by a qualified Dometic engineer. In
this instance we call upon Leisure Appliances
and Repairs of Hereford who come, by
appointment, to carry out the necessary
work.
The only component that is changed during
the course of the annual check is the flexible
gas hose, the hose that leads from the
bulkhead fitting in the gas compartment to
the gas regulator.
A further aspect of the test is a gas pressure
test.
12-7
SERVICE DETAILS
MOTOR CARAVAN ANNUAL HABITATION SERVICE CHECK
CHECK SHEET
CUSTOMER COPY
A Class
Coachbuilt
High top conversion
Elevating Roof
Dismountable
Vehicle Reg. Mark
Make & Model
Year of Manufacture
Recorded Mileage
CHECK ITEM
Manual
SECTION 1: BODY MOUNTING
BODY TO CHASSIS
BODY TO CAB
BODY RETENTION
SECTION 2: WINDOWS
WINDOWS
SECTION 3: DOORS
EXTERNAL
INTERNAL
SECTION 4: CHASSIS
CORNER STEADIES
FOLDING STEP
WATER TANK MOUNTS
SPARE WHEEL
WHEEL BOXES
SECTION 5: BODY EXTERIOR
ROOF LIGHTS
ROOF RACK AND LADDER
MOULDINGS AND TRIM
FLUE TERMINALS, AIR VENTS
SECTION 6: INTERNAL
SEEPAGE CHECK
FURNITURE
DINETTE SEATS/BEDS
CURTAINS, BLINDS, NETS
CAB SEATS
FIRE EXTINGUISHER
FIRE BLANKET
WARNING NOTICE
HEATING EQUIPMENT
12-8
OK
Remarks - Advice to Customers
SERVICE DETAILS
CHECK ITEM
Manual
OK
SECTION 7: LIFT UP ROOFS
LIFTING MECHANISM
CANVAS SIDE WALLS
SOLID SIDE WALLS
LOCKING
SECTION 8: GAS SYSTEM
CYLINDERS & REGULATOR
HOSE & PIPING
APPLIANCES
SECTION 9: WATER SYSTEM
FRESH WATER TANK
WASTE WATER TANK
FILTER PUMP
SYSTEM CHECK
WASTE WATER SYSTEM
COUPLINGS & FLUIDS
SECTION 10: ELECTRICS
12 VOLT SYSTEM
BATTERIES
WIRING
FUSES, FUSE HOLDERS
APPLIANCES
MAINS 230 VOLT SYSTEM
SECTION 11: VENTILATION
HIGH LEVEL
LOW LEVEL
DEALER:
SIGNED:
DATE:
12-9
Remarks - Advice to Customers
SERVICE DETAILS
DEALER STAMP
DEALER STAMP
DATE:
/
/
/
/
/
/
/
/
/
/
/
/
DATE:
/
/
DATE:
/
/
DATE:
/
/
DEALER STAMP
DEALER STAMP
DATE:
/
DEALER STAMP
DEALER STAMP
DATE:
DATE:
DEALER STAMP
DEALER STAMP
DATE:
/
DEALER STAMP
DEALER STAMP
DATE:
/
DEALER STAMP
DEALER STAMP
DATE:
DATE:
/
DATE:
12-10
/
/
INDEX
A
R
Annual Service Checks .................................... 12-1
Awnings ............................................................. 6-1
Refrigerator
RM7271 ...................................................... 9-16
Reversing Camera ........................................... 9-29
Roof Rack Bars & Ladder .................................. 3-1
B
S
Barbecue point ................................................... 9-1
Bed Assembly .................................................. 9-36
Safety ................................................................. 6-1
Air Bags ........................................................ 6-1
Awnings ........................................................ 6-1
Children ........................................................ 6-1
Fire Extinguishers ......................................... 6-1
In case of fire ................................................ 6-1
Ventilation ..................................................... 6-1
Seat Swivel ........................................................ 4-2
Seating Arrangement ....................................... 9-34
Site Regulations ................................................. 5-1
Siting your Motorhome ....................................... 5-1
Sleeping Arrangement ..................................... 9-33
Smoke Alarm ...................................................... 6-3
Step, Electric .................................................... 9-29
C
Cleaning
General ....................................................... 10-1
Stainless Steel ............................................ 10-2
Upholstery ................................................... 10-2
Codes of Conduct .............................................. 2-1
Cooker Hood ...................................................... 9-6
Cycle Rack ......................................................... 4-1
D
Data Record ..................................................... 11-1
Dealer Addresses ............................................. 11-2
T
E
Technical Data ................................................... 8-1
Toilet
Thetford C-402 ............................................ 9-23
Troubleshooting Chart ...................................... 10-5
TV socket, external ........................................... 9-6
TV/DVD Combi ................................................ 9-28
Electricity ............................................................ 7-9
Instructions for Electricity Supply .................. 7-9
Overseas Connection ................................. 7-10
Power Control System ................................ 7-12
Power Distribution Unit ............................... 7-13
Equipment Arrangement ........................ 9-31, 9-38
V
G
Gas ....................................................................
Connection ....................................................
Gas Safety Advice ........................................
Gas System .......................................................
Ventilation .................................................. 6-1, 7-7
7-4
7-8
7-8
7-4
W
Warranty ............................................................. 1-3
Water System ..................................................... 7-1
Weight & Dimension Data .................................. 8-3
Weights .............................................................. 8-1
Wheel Changing ................................................ 4-1
Wheel, spare ...................................................... 4-1
Winterisation .................................................... 10-3
Wiring Diagram
12V/230V .................................................... 7-20
I
Internal Layout ................................................. 9-30
L
Levelling ............................................................. 5-1
Loading of Weight .............................................. 3-1
M
Marker Lights ..................................................... 4-1
Microwave .......................................................... 9-1
O
Oven
Caprice Mk 3 ................................................. 9-1
13-1
NOTES
© Designed and Printed by Preset Graphics. Tel: 01332 549278 (MY 2009. Ref: 21123)
13-2