1
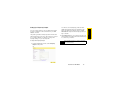
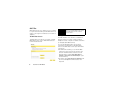
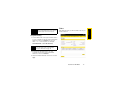
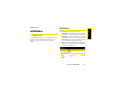
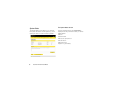
MiFi™ 2200 Mobile Hotspot Browser Interface
by Novatel Wireless
www.sprint.com
© 2009 Sprint. Sprint and the logo are trademarks of Sprint.
Other marks are the property of their respective owners.
User Trial: Draft Only
© 2008 Sprint. Sprint and the logo are trademarks of Sprint. Other marks are the property of their
respective owners.
© 2008 Novatel Wireless. All rights reserved. Novatel Wireless, Merlin, and the Novatel Wireless logo are
trademarks of Novatel Wireless.
Table of Contents
Your MiFi 2200 Device . . . . . . . . . . . . . . . . . . . . . . i
How to Use This Guide . . . . . . . . . . . . . . . . . . . . . i
Getting More Information . . . . . . . . . . . . . . . . . . ii
Section 1: Your Device’s Browser Interface . . 1
1A. Interface Basics . . . . . . . . . . . . . . . . . . . . . . 2
The Browser Interface . . . . . . . . . . . . . . . . . . . . . . . 2
Opening the Browser Interface . . . . . . . . . . . . . . . 3
The Home Screen . . . . . . . . . . . . . . . . . . . . . . . . . . 5
Section 2: Interface Settings . . . . . . . . . . . . . . . 7
2A. GPS Settings . . . . . . . . . . . . . . . . . . . . . . . . . 8
GPS Screen Sections . . . . . . . . . . . . . . . . . . . . . . . 8
2B. Password Settings . . . . . . . . . . . . . . . . . . . 11
Create a New Administrative Password . . . . . . . 11
2C. WiFi Menu . . . . . . . . . . . . . . . . . . . . . . . . . . 12
WiFi Menu . . . . . . . . . . . . . . . . . . . . . . . . . . . . . . . . 12
2D. WWAN Menu . . . . . . . . . . . . . . . . . . . . . . . . 19
WWAN Menu . . . . . . . . . . . . . . . . . . . . . . . . . . . . . 19
2E. Advanced Menu . . . . . . . . . . . . . . . . . . . . . 25
Advanced Menu . . . . . . . . . . . . . . . . . . . . . . . . . . 25
Section 3: Reference . . . . . . . . . . . . . . . . . . . . . 39
3A. Glossary . . . . . . . . . . . . . . . . . . . . . . . . . . . . 40
Index . . . . . . . . . . . . . . . . . . . . . . . . . . . . . . . . . . . . 43
Your MiFi 2200 Device
How to Use This Guide
Thank you for purchasing a Novatel Wireless MiFi 2200
Mobile Hotspot. This device offers more freedom than
ever before. No wires, no cables, no software —
configure it through your Web browser.
This guide explains the use of the browser interface
that allows you to configure your device as well as
access its many features.
The first section (page 1) gives an overview of
the browser interface capabilities, tells you how
to log in, and introduces the home page.
The second section (page 3) gives you
information about the menu options in the
browser interface.
The third section (page 39) contains a glossary
of technical terms and is followed by an index.
i
Getting More Information
This guide describes the browser interface that allows
you to configure the MiFi 2200. For information about
setting up your device on your Sprint account, device
maintenance and care, etc., consult the printed
Getting Started Guide that came with your device.
ii
Section 1
Your Device’s Browser Interface
Section 1A
The Browser Interface
Interface Basics
Your MiFi 2200 uses a browser interface to configure
the device. The browser interface lets you:
䢇 View the status of aspects of your network.
䢇 Set up wireless security, including MAC and port
filtering and port forwarding.
䢇 Set up a temporary hotspot to allow a maximum of
five connections to your device without having to
share your network name and network key.
䢇 Use GPS technology to search for stores,
restaurants, and other locations in your area.
⽧
The Browser Interface (page 2)
⽧
Opening the Browser Interface (page 3)
⽧
The Home Screen (page 5)
2
Section 1A. Interface Basics
How to Connect to the MiFi 2200
1. Use your normal WiFi manager on your computer
Initial Connection and Setup
Note
The battery should be fully charged before using the
MiFi 2200 for the first time.
When you press the power button:
䢇 The MiFi 2200 comes on and the power button LED
lights up.
䢇 A solid green LED indicates the device is in service
and ready to connect.
to locate the MiFi 2200 wireless network.
Tip
The steps to connect to a WiFi network vary
depending on your operating system and whether
you use the native application or third-party software.
Generally you click an icon (often in the Windows
notification area or System Preferences > Network
on a Mac) where you can select “View Available
Wireless Networks.” If you are unfamiliar with wireless
networking on your computer, consult the computer
help system.
2. If multiple wireless networks are found, highlight
the one that has “MiFi” in its name.
3. Click Connect.
If this is your first time connecting to the MiFi 2200, continue
with these steps.
4. From your computer’s Web browser, enter
http://192.168.1.1 into the address window and
press the Enter or Return key.
5. Enter the password “admin” when requested.
Section 1A. Interface Basics
3
Interface Basics
Opening the Browser Interface
An onscreen wizard will launch and guide you
through setting up security for your MiFi 2200.
Open the Browser Interface
1. Open your Web browser and enter
Important
Be sure to record both the administrative
password and the network key that you create
using the initial setup wizard.
If you cancel the wizard, your network will be
left unsecure (open). The wizard will re-launch
every time you start the browser interface.
6. Follow the instructions on the screen.
7. After you click Finish, your device will restart and
you must reconnect to your wireless network and
enter the network key you just created.
4
Section 1A. Interface Basics
http://192.168.1.1 into the address window. (If
this is the first time you have entered the browser
interface or if you have used the master reset
button, the Initial Setup Wizard will launch.)
2. Type the administrative password into the Login
box in the upper right corner and click Login.
The Home Screen
The Home screen is the first screen you see after
logging in to the browser interface. It is the main point
of entry for all your work in the browser interface.
The Menu Bar
The menu bar runs horizontally along the top of the
browser interface. Besides allowing you to select menu
items, the menu bar also displays information about
your device’s connection strength and battery level.
Section 1A. Interface Basics
5
Interface Basics
3. The Home screen will open.
Home Screen Sections
WiFi
The Home screen is divided into three sections that
you can expand or collapse. Click the solid black
pointer next to the section title to expand or collapse
that section.
Internet Connection
The Internet Connection section tells you:
䢇 The number of bytes received and transmitted
䢇 The duration of the current connection
䢇 The IP address of and subnet mask for the device
The WiFi section tells you:
䢇 The profile currently in use
䢇 The network name (also known as the SSID)
䢇 The security method in use
䢇 The number of users currently connected to the
device
䢇 The IP address of and subnet mask for the wireless
browser interface
To change WiFi settings, use the WiFi menu. See
“WiFi Menu” on page 17.
GPS Local Search
See “GPS Local Search” on page 10.
6
Section 1A. Interface Basics
Section 2
Interface Settings
Section 2A
GPS Screen Sections
GPS Settings
The GPS screen is divided into three sections. You
can expand or collapse the third section. Click the
solid black pointer next to GPS Local Search to
expand that section.
⽧
GPS Screen Sections (page 8)
GPS settings allow you to enable and configure GPS
searching for your device.
8
Section 2A. GPS Settings
Once a location fix has been made, the GPS Status
section of the GPS screen gives you the following
information:
䢇 Last fix — date and time of last fix
䢇 Horizontal accuracy — a measure of how close an
estimate of a GPS position is to the true location
䢇 Latitude
䢇 Longitude
䢇 Altitude
GPS Configuration
GPS Settings
GPS Status
Use this section to configure the GPS settings.
1. Select the check box to turn on GPS.
2. In the Search provider list, click a search provider.
3. Click Yes to accept the GPS privacy agreement.
4. Click Apply to confirm the settings.
Section 2A. GPS Settings
9
GPS Local Search
Tip
Once the GPS status changes from “Searching” to
“Acquired,” you can use search for Sprint stores,
restaurants, banks, hotels, gas stations, and coffee
shops or a specific address.
䊳
Click the button next to the type of business you
want to search for.
– or –
䊳
10
Enter a business name or an address in the
search box and click Search.
Section 2A. GPS Settings
If the GPS status does not change to Acquired, try
moving the device close to a window or outdoors.
Password Settings
Create a New Administrative
Password
Password Settings
Section 2B
1. Type your current password in the Current
⽧
Create a New Administrative Password (page 11)
Password settings allow you to change the
administrative password that gives access to the
browser interface.
Password box.
2. Type the new password (must have 4 to 64
characters) in the New Password box and then
again in the Verify New Password box.
3. Click Apply.
Important
Record your administrative password. If you
forget it, you will have to reset the device
before you can use the browser interface.
Section 2B. Password Settings
11
Section 2C
WiFi Menu
WiFi Menu
The WiFi menu has three components:
䢇 WiFi Profiles — to view or change settings for your
Secure profile or to set up a Temporary Hotspot.
䢇 MAC Filter — to allow only certain devices to connect
to the MiFi device.
䢇 Status — to view profile information, see who is
connected to the device, and view the WiFi Log.
You can also retrieve your Network Key from this
screen.
⽧
WiFi Menu (page 12)
The WiFi menu allows you to work with profiles, set up
a temporary hotspot, set MAC filters, and view status
information for the WiFi network.
12
Section 2C. WiFi Menu
䢇
Click WiFi Profiles on the WiFi menu to configure your
secure profile or set up a temporary hotspot.
䢇
The WiFi Profile Screen
The WiFi Profile screen displays the following
information:
䢇 Profile — The profile currently being used. (See
“Choosing a Profile” on page 14.)
䢇 Network Name (SSID) — Name of the network you
are connected to. You can change the name to
something more descriptive if you want, or if other
devices are in use within range of yours.
䢇 802.11 Mode — The type of wireless networking you
are currently using. The available modes are:
䡲 802.11g+802.11b
䡲 802.11g
䡲 802.11b
䢇 Channel — The radio channel that the device is
using. This should be usually set to Auto (default)
and left unchanged. Available channels are 1
through 11.
䢇
䢇
Security — The type of security the profile is using.
This applies to the secure and the temporary hotspot
profiles. (See “Setting Security” on page 14.)
Authentication — Locked to Open Access for all
profiles.
Encryption — Displays the type of encryption for the
Security type in use.
Network Key — Passcode or password used to
access the network. The required format varies by
type of security.
Section 2C. WiFi Menu
13
WiFi Menu
WiFi Profiles
Choosing a Profile
䊳
Select a profile from the Profile list:
Secure — This is the profile you should use most
of the time. You can set up this profile with the
security measures you need to use your device
safely.
䡲 Temporary Hotspot — This profile allows you set
up a temporary hotspot to allow others in your
work area (maximum of five) to go online at the
same time.
䡲 Open — This profile is not secure and should be
avoided.
䡲
Setting Security
You can use WEP (64- or 128-bit), WPA, or WPA2
security.
Tip
Some WiFi clients become confused if the security is
changed and the network name is not. If you change
security settings and do not get asked for the new
network key when you try to reconnect, delete the
existing “old” network name from your “Preferred
Networks” list. Then you can reconnect.
Important
Record your network key.
1. From the WiFi Profile screen, select Secure as the
Profile.
2. Select a security protocol from the Security list.
(The Encryption box displays the corresponding
encryption level.)
3. Enter a new network key in the Network Key box.
(Permissible characters are listed in gray just
under the box.)
4. Click Apply.
14
Section 2C. WiFi Menu
You can use the device to set up a temporary hotspot
to allow a maximum of five connections to your MiFi
2200 at one time.
You will see a new (temporary) network name
(SSID) and network key. In the example shown
above, the temporary network name is “Sprint
MiFi2200 A41 Temp” and the temporary network
key is “12345.”
This profile generates a temporary network name and
network key that you can use to allow others to connect
to your device without your having to change the
security settings on your secure profile.
2. Click Apply. Members of your workgroup can now
To set up the temporary hotspot
Tip
1. From the WiFi Profile screen, select Temporary
use the temporary network name and network key
to connect to your device.
Click “Generate new values” to create a new network
name and network key.
Hotspot as the profile.
Section 2C. WiFi Menu
15
WiFi Menu
Setting Up a Temporary Hotspot
MAC Filter
Important
MAC filtering allows you to limit access to your device
to only those devices with a specified MAC address (a
unique code assigned to hardware such as network
adapters).
The MAC Filter Screen
The MAC Filter screen allows you enable or disable
MAC filtering and to add or delete MAC addresses
from the trusted client list.
Do not enable MAC filtering unless you have
added your own MAC address to the trusted
client list. Otherwise you will be unable to
access the device.
Finding the MAC Address
The MAC Address is also known as a hardware or
physical address for a device, usually a network
adapter. It consists of six pairs of numbers and letters
(for example, 00-21-9B-1C-64-34).
You can view the MAC address for any device
connected to the MiFi device in the WiFi Clients
section of the WiFi Status screen. (See “WiFi Clients”
on page 26.)
䢇 On a Windows machine, you can find the MAC
address by running “ipconfig /all” from the cmd
window. The MAC address is referred to as the
Physical Address. (Select Start > All Programs (or
Programs) > Accessories > Command Prompt to open
the cmd window.)
䢇 On a Mac, open System Preferences > Network. In the
Show list, click Airport. The MAC address is the
Airport ID.
16
Section 2C. WiFi Menu
Make sure you get the MAC address for the
wireless network adapter and not the Ethernet
controller (NIC) if the machine has both.
WiFi Status provides you with information about your
wireless network.
Using MAC Filtering
1. From the MAC Filter screen, type the MAC address
for your computer into the Add Trusted Client MAC
Address box and click Add Client. You can use
either “:” or “-” as the separator (for example,
00:21:9B:1C:64:34 or 00-21-9B-1C-64-34).
Tip
You can cut-and-paste your computer’s address
from the WiFi Clients section of the WiFi Status
screen. (See “WiFi Clients” on page 18.)
2. If desired, type the MAC address for other
computers into the Add Trusted Client MAC
Address box and click Add Client.
3. Select the Enable MAC Filter check box and click
Apply.
Section 2C. WiFi Menu
17
WiFi Menu
Status
Important
The WiFi Status Screen
WiFi Clients
The WiFi Status screen is divided into three sections.
WiFi Network
The WiFi Network section of the WiFi Status screen
displays the following information:
䢇 Profile currently in use.
䢇 Name of the network you are connected to.
䢇 Number of clients connected to the device.
䢇 Maximum number of clients allowed to connect to
the device. You can select the maximum number
connections in the Clients Allowed box.
䢇 Channel being used.
䢇 Current wireless mode.
䢇 Security type and encryption for the current profile.
䢇 Network Key link (click to retrieve the network key).
18
Section 2C. WiFi Menu
The WiFi Clients section of the WiFi Status page
shows the clients that are currently connected to the
device. This is another way you can find the MAC
address for a particular device.
WiFi Log
䊳
Click the WiFi Log button to view a listing of WiFi
events (most recent first).
WWAN Menu
WWAN Menu
The WWAN Menu has three components:
䡲 Configuration — to reactivate your device, update
your PRL, or update the firmware of your device.
䡲 Diagnostics — to view the status of your connection
to the Sprint network, view information about your
MiFi 2200 device, and view an event log about
your connections to the Sprint network.
䡲 Status — to view information about your Internet
connection, to view traffic counters, and to view
an Internet connection log.
⽧
WWAN Menu (page 19)
The WWAN menu allows you to update your Preferred
Roaming List, and provides information about your
Sprint connection as well and tools for technical
support.
Section 2D. WWAN Menu
19
WWAN Menu
Section 2D
Configuration
The WWAN Configuration Screen
Click Configuration in the WWAN menu to reactivate
your device, update your PRL, or update the firmware
of your device.
Select from the following options on the WWAN
Configuration screen:
䊳
Click Activate Device to reactivate your device for
use on the Sprint network.
䊳
Click Update PRL to update your Preferred
Roaming List.
Tip
䊳
You should update your PRL about every three
months to make sure you have the latest
enhancements from Sprint.
Click Update Firmware to update the internal
software (firmware) that is embedded in the
device.
Note
You can use this function only if you have received
an MSL number from Sprint technical support.
WARNING
20
Section 2D. WWAN Menu
If Sprint technical support has you upgrade
the firmware, be very careful not to turn off the
device while the upgrade is in progress.
The WWAN Diagnostic Screen
Click Diagnostics in the WWAN menu to access status
information about your Internet connection and the
MiFi device.
The WWAN Diagnostic screen is divided into three
sections.
WWAN Connection
The WWAN Connection section displays the following
information:
䢇 Connection status:
䡲 Active — connected and transmitting data
䡲 Dormant — connected but not transmitting data
䡲 Disconnected — not connected to the network
䢇 Type of network (technology) you are connected to.
䢇 Roaming status
Important
Do not click Manual Device Setup unless you
have received an MSL number from Sprint
technical support.
Section 2D. WWAN Menu
21
WWAN Menu
Diagnostics
WWAN Modem
䢇
PRL Version — allows you to verify that your PRL
(preferred roaming list) is the most current.
Important
Do not click Reset Modem unless you have
received an MSL number from Sprint
technical support.
WWAN Event Log
The WWAN Modem section displays the following
information:
䢇 Manufacturer — manufacturer of your MiFi device
䢇 Model — model name or number of the device
䢇 Firmware version — current internal software
(firmware) version
䢇 ESN — unique number the network uses to identify
your device
䢇 MDN — public ID for your specific wireless service
䢇 MSID — internal ID Sprint uses to identify your
account
䢇 NAI — address of your device on the Sprint network
22
Section 2D. WWAN Menu
The WWAN Event Log section lists network
connection events and times when they occurred.
Sprint technical support uses the log as a
troubleshooting tool.
The WWAN Status Screen
The WWAN Status screen displays information about
your Internet connection.
The WWAN Status screen is divided into three sections.
Internet Connection
The Internet Connection section displays the following
information:
䢇 Number of bytes received and transmitted
䢇 Duration of the current connection
䢇 The device’s IP address and subnet mask
䢇 Gateway IP address
䢇 DNS server IP address
䊳
Click Disconnect to leave the Sprint network or
Connect to rejoin the Sprint network.
Section 2D. WWAN Menu
23
WWAN Menu
WWAN Status
Traffic Counters
Internet Connection Log
䊳
The Traffic Counters section displays the following:
䢇 Date and time connection was made
䢇 Total duration of connection
䢇 Total data bytes received and transmitted, plus the
total for both directions
This section displays both a cumulative (lifetime)
count and a count for the current session (which can
be reset).
䊳
24
Click Reset Counter to set all counts back to zero.
Section 2D. WWAN Menu
Click Internet Connection Log to display a log of
outgoing traffic showing these details:
䡲 Date/Time
䡲 Client IP Address (IP address of sender)
䡲 Destination (IP address of recipient)
䡲 Port (computer port through which data was
sent)
䡲 Type (connection protocol used)
Advanced Menu
Advanced Menu
The Advanced menu has seven components:
䡲 Advanced Options — to enable SSID broadcast,
auto-connecting the modem, DHCP, VPN
passthrough, or the System log.
䡲 Config File — to back up or restore a file
containing your device settings.
䡲 Port Filtering — to specify which applications can
access the Internet and through which port(s).
䡲 Port Forwarding — to specify which applications
can access your computer through the Internet
and through which port(s). You might use this if
you have an FTP server on your system or play
certain online games.
䡲 Power Management — to customize your device’s
power-saving settings.
⽧
Advanced Menu (page 25)
The Advanced menu allows you to back up and
restore your configuration, specify router settings such
as DHCP, port filtering, and forwarding, and to
customize power management settings.
Section 2E. Advanced Menu
25
Advanced Menu
Section 2E
TCP/IP — to view or change the IP address and
subnet mask for your device, and to view the
MAC address and DHCP address range for your
device.
䡲 System Status — to view information about your
device and to view the system log. You can also
restart the device or restore it to its factory default
settings.
䡲
26
Section 2E. Advanced Menu
Advanced Settings
Click Advanced Options in the Advanced menu to
configure your device or to enable the system log.
3G Modem
The Advanced Settings screen is divided into four
sections.
Access Point
Enabling auto-connect allows your device to connect
to the Sprint network automatically when it is turned on.
䊳
Enabling SSID broadcasting allows other nearby
computers to see your device’s network name (SSID).
This is what you see when you select “View Available
Wireless Networks.”
Disabling SSID broadcasting provides additional
security but you will have to re-enable it if you lose your
automatic connection.
䊳
Select the SSID broadcast enable check box to
enable SSID broadcasting, or clear the check box
to disable SSID broadcasting, and then click Apply.
Select the Auto-connect enable check box to
enable auto-connection, or clear the check box to
disable auto-connection, and then click Apply.
Router
Enabling the DHCP server allows the device to
automatically assign a local IP address to a new device
joining your network (such as a wireless printer or an
additional laptop). When the DHCP server is disabled,
you will have to assign static IP addresses to all devices
on your network.
䊳
Select the DHCP Server enable check box to
enable the DHCP server, or clear the check box to
disable the DHCP server, and then click Apply.
Section 2E. Advanced Menu
27
Advanced Menu
The Advanced Settings Screen
VPN passthrough is required if you are going to
connect to a VPN (such as a corporate system).
䊳
Select the VPN Passthrough enable check box to
enable VPN passthrough, or clear the check box
to disable VPN passthrough, and then click Apply.
System
You can view the system log from the System Status
screen (see page 36).
1. In the Language list, click the language you wish
to use. (Currently English is the only option.)
2. In the Date/Time list, click the date format (U.S. or
European) and the time system (12-hr or 24-hr)
that you want to use.
28
check box if you want to create a system log.
4. Confirm your selections and click Apply.
Config File
Click Config File in the Advanced menu to back up
your configuration file (device settings) to your
computer, or to restore a saved configuration file from
your computer.
The System section allows you to select the language
and the date and time format you prefer and to turn
on the system log.
Note
3. Optionally, you can select the System log enable
Section 2E. Advanced Menu
4. Click OK when the “Upload completed” message
Config File Download
Important
To back up your device's configuration file to your computer
1. Click Download File.
appears.
If your WiFi settings have changed since you
created a backup file, you may lose your
connection after restoring from the backup
file. You will need to reconnect using your new
(changed) settings.
2. Click Save to place the file “config.xml.savefile” on
your computer. You may rename the file. (If the file
opens in your browser instead of downloading,
use your browser’s File menu to save the file to
your computer.)
Config File Upload
To restore a configuration file backed up on your computer
to your device
1. Click Browse and navigate to the backup file on
your computer.
2. Click the file to highlight it and then click Open.
3. Click Upload File.
Section 2E. Advanced Menu
29
Advanced Menu
The Config File screen is divided into two sections and
allows you to back up and restore your MiFi
configuration settings.
Port Filtering
Click Port Filtering in the Advanced menu to enhance
the security of your system by controlling which
applications are allowed to access the Internet.
Port filtering allows you to conserve bandwidth by
preventing non-business applications from accessing
the Internet, and to prevent applications such as
online games from accessing the Internet.
30
Section 2E. Advanced Menu
Port Filtering for Custom Applications
The Port Filtering screen allows you to enable port
filtering, select common applications to allow access to
the Internet, and set up custom applications for access
to the Internet.
To set up port filtering for a custom application, you will
need to know the port numbers (up to five ports or port
ranges) and the protocol (TCP, UDP, or both) the
application uses for its outgoing traffic.
Port Filtering for Standard Applications
1. From the Port Filtering screen, select the Enable
Port Filtering check box.
2. Select the check boxes for the applications for
which you want to allow access to the Internet.
1. From the Port Filtering screen, select the Enable Port
Filtering check box.
2. Click Custom Applications.
3. Enter a name for the application and click the Ports
link.
3. Click Apply.
Note
The device uses standard ports for these
applications. If you have applications that do not use
the standard ports or that are not listed under
Allowed Applications, use Custom Applications.
Section 2E. Advanced Menu
31
Advanced Menu
The Port Filtering Screen
4. Enter the port or port range. You can enter up to
five ports or port ranges.
䡲 Single port — enter the port number in both
fields.
䡲 Port range — enter the beginning port number in
the left field and the ending port number in the
right field.
5. For each port number or range, select the
protocol (TCP, UDP, or both) used by that port or
port range.
Port Forwarding
Port forwarding allows designated users or
applications to reach specified servers, such as FTP
and DNS servers, on your computer. Also, some
online games require incoming access to work
properly.
Note
You cannot use port forwarding with a standard
Sprint data account. To use port forwarding, you
must request a static IP (sometimes called public IP)
address. Contact your direct sales representative or
Sprint Customer Service to purchase a static IP
address for mobile applications.
Important
6. Click Hide.
7. Click Apply.
32
Section 2E. Advanced Menu
You will need to set up static IP addresses on
your WLAN for each device that has an
application to which you want to forward.
The Port Forwarding screen allows you to enter the
local static IP address for each application that you
want to receive traffic from the Internet.
2. Type the local static IP address of the device
hosting the application into the IP Address on
WLAN box.
3. Click Apply when you have finished adding
applications.
Important
Port forwarding creates a security risk and
should be disabled when not needed.
Power Management
Your device can switch to a low-power mode when it is
idle. The Power Management screen allows you to set
the maximum time before the MiFi device switches to
low-power mode. You can set separate times for AC
power and battery power. When the device is on
battery power, you can also set the length of time at
which the device will shut down. You can also turn off
the device’s LEDs to save additional power.
1. From the Port Forwarding screen, select the check
box for the application you want to enable.
Section 2E. Advanced Menu
33
Advanced Menu
The Port Forwarding Screen
The Power Management Screen
Use the Power Management screen to set how long
the device is idle before it switches to low-power
mode.
1. From the Power Management screen, select the
Disable LEDs check box to disable or clear the
check box to enable the device’s LEDs.
2. In the AC Power section, click the time that
elapses before your device switches to lowpower mode when not in use (2 to 60 minutes) or
click Never to disable this feature when on AC
power.
3. In the Battery Power section, click the time that
elapses before your device switches to lowpower mode when not in use (2 to 60 minutes),
and the time before your device will shut down (2
to 60 minutes); or click Never to disable either or
both of these features when the device is on
battery power.
4. Click Apply.
34
Section 2E. Advanced Menu
The TCP/IP screen allows you to view the local (WLAN)
IP address and the MAC address for your device.
The TCP/IP Screen
From the Advanced menu, click TCP/IP to display the
following information about your device:
䢇 Local IP address
䢇 Subnet mask
䢇 MAC address of the device
䢇 DHCP address range used by the device’s DHCP
server
The IP address and subnet mask can be changed by
entering new numbers and clicking Apply. If you have
devices with local static IP addresses, those addresses
should not be within the DHCP range.
Section 2E. Advanced Menu
35
Advanced Menu
TCP/IP
System Status
The System Status Screen
The System Status screen allows you to view realtime system information and the system log, and to
restart your device or restore it to factory defaults.
From the Advanced menu, click System Status to
display the following information about your device:
䢇 Manufacturer
䢇 Model
䢇 Serial number
䢇 AP (access point) version
䢇 Router version
䢇 Modem version
䢇 System log (if enabled)
36
Section 2E. Advanced Menu
Advanced Menu
Restarting or Resetting Your Device
In addition viewing status information, you can restart
your device or reset it to factory defaults from the
System Status screen.
䊳
Click Restart to re-initialize the device (same as
turning device off and on again).
䊳
Click Reset to Factory Defaults to reset the device WiFi
settings to the original state it was in when you
purchased it.
– or –
Important
After executing either step you may lose your
connection and have to reconnect, and after
clicking Reset to Factory Defaults you will
need to rerun the startup wizard and reset
your security.
Section 2E. Advanced Menu
37
Section 3
Reference
Section 3A
䢇
Glossary
䢇
䢇
䢇
䢇
䢇
䢇
40
802.11 (b, g, n) — A set of WLAN communication
standards in the 2.4, 3.6 and 5 GHz frequency
bands.
Access Point — A device that allows wireless
communication devices to connect to a wireless
network using a standard such as WiFi.
DHCP — Dynamic Host Configuration Protocol. A
network application protocol used to obtain
configuration information for an Internet Protocol
network.
DHCP Server — A server that uses DHCP to obtain
configuration information for operation in an Internet
Protocol network.
DNS — Domain Name System. A system for
converting host names and domain names into IP
addresses on the Internet or on local networks that
use the TCP/IP protocol.
Section 3A. Glossary
䢇
䢇
䢇
䢇
䢇
䢇
䢇
䢇
ESN — Electronic Serial Number. A unique 32-bit
number embedded in a wireless device that
identifies the device.
Firmware — A program that internally controls an
electronic device.
FTP — File Transfer Protocol. A network protocol for
exchanging files over a TCP network.
Gateway — A network point that acts as an entrance
to another network that uses a different protocol.
Host Name — The unique name by which a networkattached device is known on a network.
Hotspot — A WiFi access point or area for connecting
to the Internet.
HTTP — Hypertext Transfer Protocol. An applicationlevel protocol for accessing the World Wide Web
over the Internet.
IMAP — Internet Message Access Protocol. An
Internet standard protocol for email retrieval.
IP Type — The type of service provided over a
network.
IP address — Internet Protocol address. The address
of a device attached to an IP network (TCP/IP
network).
䢇
䢇
䢇
䢇
䢇
䢇
䢇
䢇
LAN — Local Area Network. A type of network that lets
a group of computers, all in close proximity (such as
inside an office building), communicate with one
another.
MAC Address — A number that uniquely identifies a
given network adapter on a LAN. MAC addresses are
12-digit hexadecimal numbers.
MSID — Mobile Station ID. A number provisioned by a
service provider to a mobile phone that identifies that
phone to the network.
MSL — Master Subsidy Lock. A numeric code for
accessing certain phone settings.
NAI — Network Access Identifier. A standard way of
identifying users who request access to a network.
Network Mask — A number that allows IP networks to
be subdivided for security and performance.
NNTP — Network News Transfer Protocol. An Internet
application protocol for reading and posting Usenet
(newsgroup) articles.
POP — Post Office Protocol. An Internet protocol for
retrieving email from a remote server over a TCP/IP
connection.
Port — A virtual data connection used by programs to
exchange data.
䢇
䢇
䢇
䢇
䢇
䢇
䢇
䢇
䢇
䢇
Port Forwarding — A process that allows remote
devices to connect to a specific computer within a
private LAN.
Port Number — A number assigned to a user session
and server application in an IP network.
Protocol — A standard that enables connection,
communication, and data transfer between computing
endpoints.
PPTP — Point-to-point Tunneling Protocol. A method
for implementing virtual private networks that does not
provide confidentiality or encryption.
PRL — Preferred Roaming List. A list that your wireless
phone or device uses to determine which networks to
connect with when you are roaming.
RFB — Remote Frame Buffer. A protocol for remote
access to graphical user interfaces.
Router — A device that connects two networks.
RTP — Real-time Transport Protocol. A packet format
for streaming multimedia over the Internet.
SMTP — Simple Mail Transfer Protocol. An Internet
standard for email transmission across IP networks.
SSID — Service Set Identifier. The name assigned to a
WiFi network.
Section 3A. Glossary
41
Glossary
䢇
䢇
䢇
䢇
䢇
䢇
䢇
䢇
䢇
䢇
42
TCP — Transmission Control Protocol. A core protocol
for transmitting and receiving information over the
Internet.
TCP/IP — Transmission Control Protocol/Internet
Protocol. A communications protocol developed
under contract from the U.S. Department of Defense
to internetwork dissimilar systems.
Telnet — Telecommunication Network. A network
protocol used on the Internet or on local area
networks.
TFTP — Trivial File Transfer Protocol. A file transfer
protocol with a subset of FTP functionality.
UDP — User Datagram Protocol. A simple transport
protocol used to transfer information on the Internet.
VNC — Virtual Network Computing. A graphical
desktop sharing system that uses the RFB protocol
to remotely control another computer.
VPN — Virtual Private Network. A secure private
network that runs over the public Internet.
VPN Passthrough — A feature that allows a client to
establish a tunnel only with a specific VPN server.
WAN — Wide Area Network. A public network that
extends beyond architectural, geographical, or
political boundaries (unlike a LAN, which is usually a
Section 3A. Glossary
䢇
䢇
䢇
䢇
䢇
䢇
private network located within a room, building, or
other limited area).
WEP — Wired Equivalent Privacy. An IEEE standard
security protocol for 802.11 networks. Superseded by
WPA and WPA2.
WiFi — Wireless Fidelity. Any system that uses the
802.11 standard developed and released in 1997 by
the IEEE (Institute of Electrical and Electronics
Engineers).
WiFi Client — A wireless device that connects to the
Internet via WiFi.
WLAN — WiFi LAN. A typically low-power network
that transmits a wireless signal over a span of a few
hundred feet and usually only to stationary devices.
WPA/WPA2 — WiFi Protected Access. A security
protocol for wireless 802.11 networks from the Wi-Fi
Alliance.
WWAN — Wireless Wide Area Network. Wireless
connectivity to the Internet achieved using cellular
tower technology. This service is provided through
cellular providers. WWAN connectivity allows a user
with a laptop and a WWAN device to surf the Internet,
check email, or connect to a virtual private network
(VPN) from anywhere within the regional boundaries
of the cellular service.
Index
A
Activation 20
Address
MAC 16
Physical 16
F
Factory Defaults
Reset 36
Firmware 20
Version 22
B
Backup
Configuration 29
Browser Interface
Opening 4
G
GPS
Accuracy 9
Configure 9
Enable 8
Search Provider 9
Status 9
C
Configuration
Backup 29
Restore 29
Connections
Number of users 6
D
Index
Device Activation 20
DHCP
Range 35
Server 27
DNS server 24
H
Home Page
Icons 5, 6
Date/Time
Format 28
Index
43
MiFi 35
MAC Filter 16
Setup 17
Manufacturer 22
Menu Bar 5, 6
MiFi
MAC address 35
Serial number 36
Versions 36
Multiple Users 15
I
Icons
Home Page 5, 6
Incoming traffic
Allowing 32
Internet Connection
Status 6
IP address 6
Device 24
Local 35
N
L
Language
Selection 28
Logs
Sprint Network 22
System 28, 36
WiFi 18
M
MAC Address
Currently Connected 18
Locating 16
MAC address
44
Index
Network Key 14
Network Name 6
O
Outgoing traffic
Blocking 30
P
Password
Administrative 11
Browser Interface 11
Port Filtering 30
Port forwarding 32
R
Reset device 36
Restore
Configuration 29
Roaming 21
PRL version 22
T
Temporary Hotspot
Setup 15
Traffic Counters 24
S
Security
MAC Filter 16
Port Filtering 30
Port Forwarding 32
Setup 14
Index
Types 14
Sprint Network
Automatically connect 27
Connection 21
Status 19
SSID 6
SSID broadcast 27
Status
Connection to Sprint Network 21
Internet Connection 6
Roaming 21
Sprint Network 19
WiFi 6
WWAN 19
Preferred Roaming List
Update 20
PRL
version 22
Profile
Choosing 14
Network Key 14
Secure 13
Security 14
Set Up 13
U
Users
Number connected 6
Index
45
V
VPN
Passthrough 27
Setup 27
W
WiFi
Current Clients 18
Current Network 18
Log 18
Maximum Clients 18
Profiles 13
Status 6, 18
Workgroup 15
46
Index