1
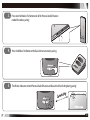
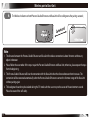
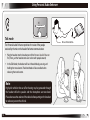
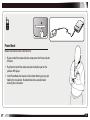
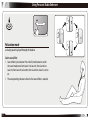
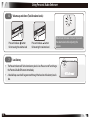
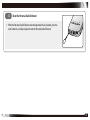
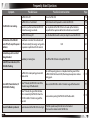
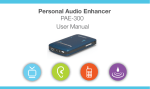
Personal Audio Enhancer PAE-300 User Manual IMPORTANT PRODUCT SAFETY AND OPERATION INSTRUCTIONS THIS INSTRUCTION MANUAL HIGHLIGHTS KEY INFORMATION ABOUT SAFETY, OPERATION AND MAINTENANCE OF THE PERSONAL AUDIO ENHANCER. PLEASE READ THROUGH THIS MANUAL IN ITS ENTIRETY BEFORE STARTING TO USE THE PRODUCT. IT PROVIDES VALUABLE INFORMATION FOR HOW TO UTILIZE AND MAINTAIN THE PRODUCT AND FOR HOW TO PROTECT USER’S SAFETY DURING OPERATION. PLEASE CAREFULLY FOLLOW THE INSTRUCTIONS OUTLINED IN THIS MANUAL. Note : • This product is not a hearing instrument. Anyone who is experiencing hearing loss is recommended to consult with a doctor. • This product will not restore normal hearing nor reduce hearing loss. • This product has a sound amplifying function and the sound level can cause discomfort or damage hearing if the product is used improperly. Always turn the volume down to a low level before putting on the headset. • To ensure child safety, please keep the package and small parts included in this product out of reach of children. IMPORTANT PRODUCT SAFETY AND OPERATION INSTRUCTIONS Operating Your Personal Audio Enhancer • Do not drop, disassemble, burn, paint or insert foreign objects into this product. • Do not use this product if it has been cracked, punctured or damaged by water. Cleaning the Surface of Your Personal Audio Enhancer • Disconnect all power cables and turn off the system before cleaning this product. • Use a soft slightly damp, lint-free cloth to clean this product. • Do not use window cleaners, household cleaners, aerosol sprayers, solvents, alcohol, ammonia, or abrasives to clean this product. Charging • This product use re-chargeable Lithium-ion battery. • This product must be fully charged before the first use. • Only the Base Unit or Micro-USB charger provided with this product should be used for charging. • The battery must be replaced by qualified personnel. • It may cause explosion if the battery is replaced improperly. • Battery charging should be performed at the temperature of 5 °C (41°F) to 40 °C (104°F). Charger • If some trouble occurs while using the charger, immediately shut off the power by disconnecting the plug from the wall outlet. • To reduce the risk of fire or electric shock, avoid wetting, exposing under water, or placing containers with water on the product. • To completely disconnect the power, unplug the charger from the AC power source. • The rating of the charger is shown on the back of the charger. Maintenance • This product should be repaired by VitaSound authorized dealers, or service center staff only. • Unauthorized persons should not attempt to repair or modify this product. • Any attempted disassembly or repair of the product by a user or unauthorized party will void the product warranty and may irreparably damage the product. Avoid Water or Direct Heat • Do not expose the product into water or under rain. • Do not expose under a temperature over 60 ˚C (140°F) such as directly under sunlight or in a car parked under sunlight. • Do not burn, throw into fire, or heat by microwave. Table of contents Introduction VitaSound Personal Audio Enhancer 1 Getting started Checking the accessories supplied Identifying parts Installation of Base Unit to television Charging Personal Audio Enhancer Wireless pair with Base Unit 2 3-4 5-6 7-8 9-11 Using The Personal Audio Enhancer Power-on Power-off General Operation Select Function Mode Select EQ Mode Adjust Volume Low Battery Reset The Personal Audio Enhancer 12 12 13 14-17 18 19 19 20 Other Frequently Asked Questions Technical specification 21-23 24 Personal Audio Enhancer Introduction Thank you for choosing the Personal Audio Enhancer by VitaSound Audio Inc. This is a multi-functional communication device which delivers high-definition sound for everyday listening situations. Powered by patented neural-based technology, the Personal Audio Enhancer allows users to benefit from improved sound quality where background noise or low volume levels make listening and communication difficult. POWERED BY: ® 1 Using leading-edge brain science, patented Neuro-Compensator® technology enforces an optimal electrical signal from the root of the auditory nerve to the brain. Improving the listening experience by delivering a clear and natural sound. Getting started Checking the accessories supplied Standard package (Including Base Unit) Other accessory (Optional): • Personal Audio Enhancer x 1 • Micro-USB charger for travel • Headset with microphone x 1 • Leather case (for Personal Audio Enhancer) • Stereo cable x 1 • Travel case • Neck strap x 1 • Headphone case x 1 • Ear tips (Size: S/M/L) • Base Unit x 1 • A/C adaptor x 1 • RCA audio cable x 1 • Optical audio cable x 1 • Coaxial audio cable x 1 • User manual (this manual) x 1 (For connecting with cell phone or MP3 player) Visit www.vitasound.com for more information. 2 Identifying parts Personal Audio Enhancer 1 2 34 1. 2. 3. 4. 5 6 7 89 10 5. 11 12 13 14 3 15 16 6. 7. 8. Power button Hook for neck loop Headset port (Connect to headset) Power indicator: Red: Solid Red: System is on Off: System is off Blinking Red: Low battery: Device needs charging. During Charging: 1. Solid Red: Charging 2. Off: Charging completed Green: Solid Green: Device is paired successfully with the Base Unit. Blinking Green: Connection problem occurring, please re-pairing the device with the Base Unit. After pressing wireless pairing button: Under pairing process with Base Unit. (Refer to “Wireless Pair with Base Unit” on P.9) EQ mode indicator 1- Normal 2/3/4 - High pitch frequency boost EQ mode button Wireless pair button Function mode indicator 9. Function mode buttons TV Mode Talk Mode Phone Mode Relaxation Mode 10. Volume level indicator 11. Reset button 12. Stereo port (For connecting with cell phone or MP3 player) 13. Charging port for Base Unit 14. Micro-USB charger port 15. Volume buttons Volume up Volume down 16. Lock switch: Lock mode: All buttons will not be taken effect while being pressed (except power button) Unlock Mode: All buttons can be taken effect when pressed. 17. Power indicator Solid Red: Base Unit is ON Off: Base Unit is OFF 18. 19. 20. Power button Wireless pair button 20. Wireless/Audio source indicator Solid Green: Receiving audio signal from TV Fast flashing: Under pairing process with Personal Base Unit Audio Enhancer. (Refer to “Wireless Pair with Base Unit” on P.9) 21. 22. Charging port for Personal Audio Enhancer Analog (RCA) audio-in port 23. Audio input mode switch 24. 25. 26. 17 18 19 20 Optical audio input Coaxial audio input Optical audio-in port Coaxial audio-in port A/C adaptor port 21 22 2 3 24 25 26 4 Installation of Base Unit to television 1. Connect Base Unit with TV: Connect with analog (RCA) audio cable: 1. 2. AUDIO OUT Connect the Base Unit with one end of the analog (RCA) audio cable; L (Red connector to Red port; White connector to White port) R COAXIAL OPTICAL COAXIAL DC IN DIGITAL AUDIO IN TV back panel Connect the other end of the analog (RCA) audio cable with the analog (RCA) audio-out port of the TV. 2 1 (Red connector to Red port; White connector to White port) Connect with optical audio cable: 1. 2. 3. Switch “Audio input mode switch” into “Optical audio input”; Connect one end of the optical audio cable with the optical audio-in port of the Base Unit; Connect the other end of the optical audio cable with the optical audio-out port of the TV. AUDIO OUT 3. 5 Switch “Audio input mode switch” into “Coaxial audio input”; Connect one end of the coaxial audio cable with the coaxial audio-in port of the Base Unit; Connect the other end of the coaxial audio cable with the coaxial audio-out port of the TV. DIGITAL AUDIO OUT OPTICAL L R COAXIAL OPTICAL COAXIAL 1 DC IN DIGITAL AUDIO IN OPTICAL TV back panel 2 COAXIAL 3 Connect with coaxial audio cable: 1. 2. DIGITAL AUDIO OUT OPTICAL AUDIO OUT DIGITAL AUDIO OUT OPTICAL L OPTICAL 1 COAXIAL R COAXIAL OPTICAL COAXIAL DIGITAL AUDIO IN DC IN 2 TV back panel 3 2. Plug the A/C power adaptor into the wall socket; 3. Connect the A/C power adaptor with the Base Unit; Note: 1. The Base Unit should be placed firmly. 2. The Base Unit will take the signal from optical or coaxial audio cable as higher priority when both of the analog (RCA) cable and the optical or coaxial audio cable connect to the Base Unit. To use analog audio cable as audio source, please first disconnect the optical and coaxial audio cables. 3. The types and positions of the audio output port equipped on the television are dependent on the brand and model of the television. Please read the television manual provided or contact the television supplier for details. 4. The optical and coaxial audio input ONLY support 44.1 kHz and 48 kHz PCM audio coding. 5. The Base Unit does NOT support Dolby Digital 2.1/5.1/7.1 audio coding. 6 Charging The Personal Audio Enhancer: Through The Base Unit: 1. 2. 3. 4. Plug the A/C adaptor into the wall socket. Connect the Base Unit with A/C adaptor. Insert the Personal Audio Enhancer into charging port of the Base Unit; and Unplug the Personal Audio Enhancer from Base Unit when charging is completed. 3 Note: The Base Unit can still charge the Personal Audio Enhancer when the Base Unit is off. 1 2 Through micro-USB charger: 1. 2. 3. 4. Plug the micro-USB charger into the wall socket. Connect the Personal Audio Enhancer with the micro-USB charger for charging. Disconnect the Personal Audio Enhancer from the micro-USB charger after charging; and Unplug the micro-USB charger from the wall socket. Warning: 1 The product can be only charged through the micro-USB charger from VitaSound. 7 2 Complete charging time: Through Base Unit or micro-USB charger: 5 hours Note: The above time required to fully charge is based on charging the battery at a temperature of 25 ˚C (77 °F). The actual charging time may be different depending on the remaining battery level, environment, and temperature. Battery Life: Talk Mode and Phone Mode: TV Mode: 12 to14 hours 6 to 8 hours Note: The battery life depends on the conditions of use and circumstances after the battery is fully charged. 8 Wireless pair to Base Unit Note: The Personal Audio Enhancer and Base Unit in the same package are paired with each other in advanced. Unless the Base Unit after being installed to the TV cannot connect with the Personal Audio Enhancer automatically, the following pairing process is not necessary to be performed. An additional Personal Audio Enhancer purchased is required to be paired with the Base Unit by the following procedures below. The Lock switch MUST be switched to unlocked mode before pairing. 9 1. Press once the Power Button on the Base Unit. 2. Press once the TV mode button on the Personal Audio Enhancer. (The Personal Audio Enhancer MUST be in TV mode before pairing) 3. Press once the Wireless Pair Button on all of the Personal Audio Enhancers needed for wireless pairing; 4. Press the Wireless Pair Button on the Base Unit to start wireless pairing; 5. The Wireless Indicators on both Personal Audio Enhancer and Base Unit will be flashing during pairing; c Conne ting 10 Wireless pair to Base Unit 6. The Wireless Indicators on both Personal Audio Enhancer and Base Unit will be solid green after pairing succeeds; c Conne ted Note: 1. The distance between the Personal Audio Enhancer and Base Unit for wireless connection is about 10 meters without any object in between. 2. Please follow the exact order of the steps to pair the Personal Audio Enhancer and Base Unit; otherwise, please repeat the steps from the beginning. 3. The Personal Audio Enhancer will lose the connection with the Base Unit when the distance between them increases. The connection will be recovered automatically when the Personal Audio Enhancer re-enters the 10-meter range of the Base Unit without pairing again. 4. The background sound may be isolated during the TV mode such that users may not be aware of the environment around. Please be aware of the self-safety. 11 Using Personal Audio Enhancer 1. Power On • Press and hold the power button until the RED power indicator is on; • The function mode and volume will be automatically set to Talk Mode and Volume level 2 respectively every time the Personal Audio Enhancer is turned on. 2. • Power Off Press and hold the power button until all four function mode indicators are lit, then release the power button to turn off the Personal Audio Enhancer. 12 Using Personal Audio Enhancer 3. General Operation Lock mode: All buttons (except the Power Button) will be locked after sliding the lock switch downward in order to prevent any change of the setting. The lock mode will be cancelled when sliding the lock switch upward. Note: Before operating the Personal Audio Enhancer, please sliding the lock switch upward; otherwise, no effect will be taken when pressing any buttons. Energy Save Mode for indicators: All indicators will be off after no operation is performed for 40 seconds for energy saving. Wake up the indicators: To wake up function and EQ mode indicators to indicate the current statues of the Personal Audio Enhancer, press any buttons during the energy save mode. This operation does not do any change on the status of the Personal Audio Enhancer. Taking effect by operation: All operations (Ex: switching function or EQ mode, adjusting volume) will ONLY take effect after the indicators wake up. 13 4. Select function mode: • Press the function mode button desired: TV Mode Audio source of TV is transmitted to the Personal Audio Enhancer through the Base Unit for watching the TV program and movie, and playing TV game. • Connect the Base Unit with the television (Refer to “Installation of the Unit Base to television” on P.5) • Wireless pair the Personal Audio Enhancer and Base Unit (if necessary) GAME (Refer to “Wireless pair with the Base Unit” on P.9) • Plug the headset into the Personal Audio Enhancer, and then put on the headset into the ears for listening to the TV program. Note: First time user is recommended to use TV mode first for watching TV for 1 to 2 hours in order to get familiar with the operation and function of the Personal Audio Enhancer. 14 Using Personal Audio Enhancer Talk mode The Personal Audio Enhancer optimizes the voice of the people received by the mic on the headset for better communication. • Plug the headset into the headset port of the Personal Audio Enhancer first; Then, put the headset onto ears to chat with people around; • In the Talk Mode, the headset will be in Mute Mode by pressing and holding the mute button. The Mute Mode will be cancelled when releasing the mute button. Note: High pitch whistler that can affect hearing may be generated through the headset while the speaker and the microphone are too closed. Please decrease the volume of the device before putting on the headset to reduce or prevent the whistle. 15 Mic and Mute Button Phone Mode Receive and chat on call or listen to music • Plug one end of the stereo cable into stereo port on the Personal Audio Enhancer; • Plug the other end of the stereo cable into the headset port on the phone or MP3 player. • In the Phone Mode, the headset will be in Mute Mode by pressing and holding the mute button. The Mute Mode will be cancelled when releasing the mute button. 16 Using Personal Audio Enhancer Relaxation mode a relaxing sound is played through the headset Select sound effect: • Sound effect Cycle Selection: Press the EQ mode button to switch the sound mode once: from Sound 1 to Sound 2; from Sound 2 to Sound 3; from Sound 3 to Sound 4; from Sound 4 to Sound 1, and so on. • 17 The corresponding indicator will be lit after sound effect is selected. 5. Select EQ mode The Personal Audio Enhancer is equipped with four different EQ modes, each of which provide a different quality of sound in each function mode: EQ mode 1: EQ mode 2: EQ mode 3: EQ mode 4: Normal Low frequency boost Medium frequency boost High frequency boost Select one of the sound modes according to the personal preferences of the user. EQ Mode Cycle Selection: Press the EQ mode button to switch the EQ mode once: from Mode 1 to Mode 2; from Mode 2 to Mode 3; from Mode 3 to Mode 4; from Mode 4 to Mode 1, and so on. The corresponding indicator will be lit after sound mode is selected. Note: • • The EQ Mode can be switched anytime desired depending on the different environment. First time user is recommended to try each EQ mode for 1 minute to find the most suitable EQ mode. 18 Using Personal Audio Enhancer 6. Volume up and down (Total 8 volume levels) Press and release button for increasing the volume level 7. • • 19 Press and release button for lowering the volume level. Volume level indicators will be lit to present the volume level while adjusting the volume. Low Battery The Power Indicator will flash when battery level is low. Please turn off and charge the Personal Audio Enhancer immediately. A double Beep sound will be generated through the headset while battery level is low. 8. • Reset the Personal Audio Enhancer When the Personal Audio Enhancer cannot be operated in any situation, press the reset button by a small pin object to reset the Personal Audio Enhancer. 20 Frequently Asked Questions Symptom The PAE-300 is not working. All indicators of the PAE-300 turns off itself, except the power indicator. A double beep alert is emitted through headset. Red LED (Power indicator) of the PAE-300 is flashing. Green LED (Power indicator) of the PAE-300 is flashing. Acoustic feedback is produced. 21 Possible Cause Possible Corrective Action Page P.12 P.13 The PAE-300 is off. Turn on the PAE-300. The PAE-300 is in "Lock Mode". Switch the lock switch upward to unlock the PAE-300. Operation is performed while the PAE-300 is under the energy save mode. Press any button of the PAE-300 once to wake up the indicators, then perform the operation before the indicators are turned off. P.13 The PAE-300 is hang off. Press the Reset Button with a small pin object to reset the PAE-300. P.20 The behavior is normal. The indicators will be off automatically for energy saving when no operation is performed for 40 seconds. N/A The battery is running low. Turn off the PAE-300 and recharge the PAE-300. The PAE-300 is under pairing process with the Base Unit. Wait until the pairing process is completed and the green LED on the PAE-300 will then be solid lit; otherwise, please process wireless pairing again. Under TV mode, the PAE-300 is out of the 10 meters range of the Base Unit. Make sure the PAE-300 is within 10 meters range of the Base Unit. Under TV mode, No signal from the Base Unit is received by the PAE-300 when the PAE-300 is within 10 meters range of the Base Unit. Process wireless pairing the PAE-300 with the Base Unit. The volume level of the PAE-300 is too high. 1) Pull the speaker away from the mic on the headset. 2) Decrease the volume level of the PAE-300. N/A P.19 P.9-11 P.11 P.9-11 P.19 Symptom Possible Cause Possible Corrective Action Page P.12 P.15 The PAE-300 is off. Turn on the PAE-300 by pressing the power button. The mute mode of the PAE-300 is on. Release the Mute button on the mic. The headset is not plugged into the PAE-300 properly. Make sure the plug of the headset is securely connected with the PAE-300. P.15 Make sure the headset is plugged into the port on the top of the PAE-300. P.15 The volume level of the PAE-300 is too low. Increase the volume level of the PAE-300. P.19 Make sure the television is turned on. Make sure the volume of the television is on N/A Make sure the mute mode of the television is off. No sound is produced. Under TV mode, no audio signal from the Base Unit is received by the PAE-300. (Green LED on the PAE-300 is solid lit.) When using the analog (RCA) audio cable to connect the Base Unit and television, make sure both of the optical and coaxial cables are disconnected with the Base Unit and television. P.5 When using the analog (RCA) audio cable, make sure the cable is plugged into the "Audio Out" port of the television. P.5 When using the optical audio cable to connect the Base Unit and television, make sure: 1) the optical cable is connected with the Base Unit and television properly; and 2) the "Audio input mode switch" is switched into "optical audio input". P.5 22 Symptom Possible Cause Under TV mode, no audio signal from the Base Unit is received by the PAE-300. (Green LED on the PAE-300 is solid lit.) No sound is produced. Under Phone mode, no audio signal is received from the phone. Green LED (Wireless/Audio source Indicator) on the Base Unit is flashing. 23 Possible Corrective Action Page When using the coaxial audio cable to connect the Base Unit and television, make sure: 1) the coaxial cable is connected with the Base Unit and television properly; and 2) the "Audio input mode switch" is switched into "coaxial audio input". P.5 Make sure the plug of the stereo cable is securely connected with both of the device and phone. P.16 Under Phone mode, the volume level of the Increase the volume level of the phone or increase the volume of the phone is too low. device. P.19 The device and Base Unit are wireless pairing. P.9-11 Wait until the pairing process is completed and the green LED on the Base Unit will then be solid lit; otherwise, please process wireless pairing again. Technical specification Base Unit Personal Audio Enhancer Dimension: Weight: Batteries: Operating time: Charging time: Microphone: Stereo audio source input: Headset socket: Output signal frequency range: EQ mode: Volume control: Output power: Function mode: Digital signal processing: Radio communication frequency: Radio communication range: Radio communication characteristics: Topology: Antenna Type: 100.20 mm x 60 mm x 19.10 mm 94.6 gram Built in rechargeable lithium-ion, 2000 mAh 12 - 14 hours (fully charged, except in TV mode) Dimension: Weight: Power: Audio source input: 6 - 8 hours (TV mode) 4 - 5 hours Built in omnidirectional microphone on headset 3.5 mm stereo jack plug 3.5 mm stereo jack plug 200 -16,000 Hz 4 modes 8 steps (4 dB/step) 60 mW (16 ohm load) Separate function mode select buttons 32 kHz sampling frequency 16 bit resolution in stereo 2.4 GHz, ISM band 10m indoor, clear line of sight Automatic channel searching Coexists with other radio transmitters operating on the 2.4GHz frequency band Point-to-point Internal SMD antenna Digital radio transmission: 120.30mm x 94.10mm x 40.10mm 111.8 gram 9V 2A (18W) Analog (RCA) Jack (Red / White) Optical jack 44.1kHz PCM / 48kHz PCM Coaxial jack 44.1kHz PCM / 48kHz PCM 2.4GHz ISM band Coexists with other radio transmitters using the 2.4GHz ISM band Radio communication range: 10m indoor, clear line of sight Radio communication characteristics: Automatic channel searching Topology: Transmitter output: Coexists with other radio transmitters operating on the 2.4GHz frequency band Point-to-Multipoints 8dBmW Environmental requirements Operating temperature: Relative humidity: 0 °C to 35 °C (32 °F to 95 °F) 5 % to 95 % Regulatory requirements Complies with the following requirements: CE, FCC, RoHS and C-Tick 24 Certification and Compliance FCC Statement: This device complies with Part 15 of the FCC Rules. Operation is subject to the following two conditions: (1) this device may not cause harmful interference, and (2) this device must accept any interference received, including interference that may cause undesired operation. ----Changes or modifications not expressly approved by the party responsible for compliance could void the user’s authority to operate the equipment. This equipment has been tested and found to comply with the limits for a Class B digital device, pursuant to Part 15 of the FCC Rules. These limits are designed to provide reasonable protection against harmful interference in a residential installation. This equipment generates, uses and can radiate radio frequency energy and, if not installed and used in accordance with the instructions, may cause harmful interference to radio communications. However, there is no guarantee that interference will not occur in a particular installation. If this equipment does cause harmful interference to radio or television reception, which can be determined by turning the equipment off and on, the user is encouraged to try to correct the interference by one or more of the following measures: Reorient or relocate the receiving antenna. Increase the separation between the equipment and receiver. Connect the equipment into an outlet on a circuit different from that to which the receiver is connected. Consult the dealer or an experienced radio/TV technician for help. www.vitasound.com [email protected] 1-877-967-0742 Version 1.1