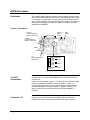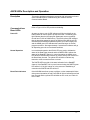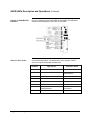
1
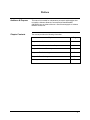
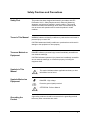
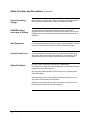
User’s Manual Edition 1/2007
ADVANCE NETWORK COMMUNICATIONS
BOARD/DATANET (ANCB/DN)
pro
ces
s
p
GAS CHROMATOGRAPHY
Advance Network Communications
Board/DataNET (ANCB/DN)
Revised Printing – January 2007
User’s Manual
2000592-001
Copyright Notice
© 2002-2007 by Siemens
All rights reserved.
This publication is for information only. The contents are subject to change without notice and should not
be construed as a commitment, representation, warranty, or guarantee of any method, product, or device
by Siemens.
Reproduction or translation of any part of this publication beyond that permitted by Sections 107 and 109
of the United States Copyright Act without the written consent of the copyright owner is unlawful.
Inquiries regarding this manual should be addressed to:
Siemens Energy & Automation, Inc.
7101 Hollister Road
Houston, TX 77040
U.S.A.
Table of Contents
Preface
Technical Support
Safety Practices and Precautions
Chapter 1:
Installation
Overview
ANCB/DN Specifications
ANCB Installation
Site Wiring Requirements
CE Installations
DataNET Connections
DataNET Copper Connections
DataNET Fiber Optic Connections
Chapter 2:
Data Communications Setup
Configuring Your PC
Establishing a Connection
Setting Network Address
Assigning an IP Address
Firmware Updates
Chapter 3:
Command Summary
Command Descriptions
Troubleshooting
Chapter 4:
ANCB Description
ANCB LEDs Description & Operation
DataNET Troubleshooting Guide
Chapter 5:
Parts Catalog
Glossary
2000592-001
iii
iv
v
1
1
3
5
7
11
13
14
16
21
22
27
30
32
33
35
35
45
46
49
52
Introduction
Available Parts
55
55
56
Definitions of Important Terms
57
Table of Contents • i
Preface
Audience & Purpose
This manual is intended for maintenance personnel and describes how
to install the Advance Network Communication Board/DataNET
(ANCB/DN) into an Advance Maxum™ Gas Chromatograph or Advance
Network Access Unit.
Chapter Contents
The manual provides the following information:
Topic
2000592-001
Page
Chapter 1. Installation
1
Chapter 2. Data Communications Setup
21
Chapter 3.Command Summary
35
Chapter 4. Troubleshooting
45
Chapter 5. Parts Catalog
55
Glossary
57
Preface • iii
Technical Support
Getting Help
At Siemens Energy & Automation, Inc. we take pride in the on going
support we provide our customers. When you purchase a product, you
receive a detailed manual, which should answer your questions;
however, our technical support service provides a special “hot” line as an
added source of information.
If you require assistance call:
In the United States: (800) 448-8224
Internationally: 001-918-662-7030
Before You Call
Before you call one of our technical support lines, please have the
following information available to help our representative answer your
questions:
1. Unit Serial Number and Date of Installation
2. Installed software version number (if applicable)
3. Description of problem
4. LEDs status on ANCB.
iv • Preface
2000592-001
Safety Practices and Precautions
Safety First
This product has been designed and tested in accordance with IEC
Publication 1010-1, Safety Requirements for Electronic Measuring
Apparatus, and has been supplied in a safe condition. This manual
contains information and warnings, which have to be followed by the
user to ensure safe operation and to retain the product in a safe
condition.
Terms in This Manual
WARNING statements identify conditions or practices that could result in
personal injury or loss of life.
CAUTION statements identify conditions or practices that could result in
damage to the equipment or other property.
Terms as Marked on
Equipment
DANGER indicates a personal injury hazard immediately accessible as
one reads the markings.
CAUTION indicates a personal injury hazard not immediately accessible
as one reads the markings, or a hazard to property, including the
equipment itself.
Symbols in This
Manual
This symbol indicates where applicable cautionary or other
information is to be found.
Symbols Marked on
Equipment
DANGER - High voltage
Protective ground (earth) terminal
ATTENTION - Refer to Manual
Grounding the
Product
2000592-001
A grounding conductor should be connected to the grounding terminal
before any other connections are made.
Safety Practices and Precautions • v
Safety Practices and Precautions, Continued
Correct Operating
Voltage
Before switching on the power, check that the operating voltage listed on
the equipment nameplate agrees with the available line voltage.
DANGER Arising
from Loss of Ground
Any interruption of the grounding conductor inside or outside the
equipment or loose connection of the grounding conductor can result in a
dangerous unit. Intentional interruption of the grounding conductor is not
permitted.
Safe Equipment
If it is determined that the equipment cannot be operated safely, it should
be taken out of operation and secured against unintentional usage.
Use the Proper Fuse
To avoid fire hazard, use only a fuse of the correct type, voltage rating
and current rating as specified in the parts list for your product. Use of
repaired fuses or short-circuiting of the fuse switch is not permitted.
Safety Guidelines
DO NOT open the equipment to perform any adjustments,
measurements, maintenance, parts replacement or repairs until all power
supplies have been disconnected.
Only a properly trained technician should work on any equipment with
power still applied.
When opening covers or removing parts, exercise extreme care since
"live parts or connections can be exposed".
Capacitors in the equipment can retain their charge even after the unit
has been disconnected from all power supplies.
vi • Safety Practices and Precautions
2000592-001
Chapter 1
Installation
Overview
Description
The Advance Network Communications Board DataNET (ANCB/DN)
board plugs into the backplane of an Advance Maxum or Advance
Network Access Unit (NAU) System Controller (SYSCON). All I/O wiring
is made directly to the board. The ANCB/DN functions as a translator for
converting signals and communication protocols. This conversion allows
Advance Maxum GC’s, Advance Network Access Unit (NAU) and
Advance Optichrom GC’s to communicate with each other via an
Advance Maxum DataNET link.
ANCB
Backplane Slot 1
What is DataNET
DataNET is a communications protocol that can be used in place of
Ethernet for connecting all installed Maxum and Advance GC’s. As
compared to Ethernet, DataNET provides true network redundancy at
both the hardware and software levels and uses the existing network
wiring.
The DataNET link can use either copper and/or fiber optic cables. In an
existing Data Hiway installation the Data Hiway cable can be used.
2000592-001
Installation • 1
Overview, Continued
Figure 1 shows Advance Maxum and Advance Optichrom GC’s
communicating on an ACS via a DataNET link.
Figure 1-1: Advance
Communication System
(ACS)
NAU
Advance Network
Access Unit
AA
Applied Aut oma tion
Workstation
DNH
Advance DataNET
Hub
AA
Applied Aut oma tion
APC
Advance Personal
Computer
PCI
AA Applied Aut oma tion
AA
AA
ANG
Advance Network
Gateway
Advance Maxum
AA Applied Aut oma tion
Advance Maxum
IOU(s)
Advance
Communications
System
The Advance Communication System (ACS) is a high-speed
communications system that uses TCP / IP protocols and addressing to
interconnect chromatographs and other process analyzers in a common
network. Figure 1-1 shows the Advance DataNET Hub (DNH), Advance
Network Access Unit (NAU) and Advance Network Gateway (ANG)
connected to the ACS. The NAU connects to the ACS and provides a
method to access information coming from Advance process analyzers
including Advance Maxum and Advance Optichrom GC’s. The ANG is
used to connect Siemens’ equipment residing on an Advance Data
Hiway to the ACS.
Advance Optichrom
GC’s
Advance Optichrom Service Panels and older APC workstations can
display Advance Maxum GC information over the Gateway link. They
are, however, limited to only accessing and changing basic operational
status. This data includes alarms, run/hold/calibrate, view, analysis
results etc.
2 • Installation
2000592-001
ANCB/DN Specifications
Protocol and Addressing
Open Systems standard TCP/IP protocol and addressing
(Transmission Control Protocol/Internet Protocol); Full Class A, B and
C addresses and subnet masking supported
Wiring Connections
•
•
•
DataNET Option, Standard
Cable
•
•
•
•
DataNET Option, Fiber Optic
Cable
Two part connectors with screw-terminals provided for cable
connection
Fiber Optic Coupler for Fiber Optic Connections
Cable connection by Belden 9182 (single pair) or Belden
SSD1743 (two pairs) or equivalent; two pairs of wires are
required to support redundancy
Two pairs of cable is required to support redundancy
Shielded cable or unshielded cable in conduit is required for
conformance to CE certified installation
Two part connectors with screw-terminals provided for field
connection
•
Fiber optics connection by 62.5 multi-mode cable corresponding
to 10BaseFL Ethernet specification
Two pairs of fibers are required to support redundancy
Type ST mating connectors provided for field connection
Approximately 3 mbps base transmission rate; uses dedicated
transmission technique that does not require collision detection to
achieve high data throughput efficiency
Maximum Length 5000 feet ( 1.7km)
Fiber Optic Coupler
•
Two (Tx, Rx) ST-Style Connectors (Amp type 2.5mm Bayonet)
Serial Port
•
Standard RS-232 port for attachment of a laptop computer, for
configuring IP Addresses and troubleshooting.
•
•
•
The Table below compares key communication features between using
Advance Data Hiway, Ethernet, or DataNET.
Communication
Comparisons
Feature
2000592-001
Advance Data Hiway
Ethernet
DataNET
Speed
14.2 KB/Sec
10 M baud
2. 048 M baud
Redundant
Yes
No
Yes
Number of Units in
Maxum System
248
1200
1200
Installation • 3
ANCB/DN Specifications, Continued
Cable Types
The following Table should be used when evaluating or selecting cable
for an existing or new installation.
Cable Type
Vendors & P/N
Installation Notes
Fiber Optic
SEA P/N 1270002-002
MM 62.5/125; 2 Fiber Conductors
Industry Available from
Multiple Vendors
New Installation as an
alternative to copper cable
2- Conductor Copper Wire
SEA P/N 1686002-001
Belden P/N 9182
For
Belden Armored Cable
Order
SEA P/N 1680000-002
4-Conductor Copper Wire
SEA P/N 1681000-003
Belden P/N SSD1743
Max distance from Analyzer
to Hub or between Hubs
1520 meters (5000 ft)
Recommended for Single
Channel
Max distance from Analyzer
to Hub or between Hubs
1520 meters (5000 ft)
Recommended for Dual
Channel
Max distance from Analyzer
to Hub or between Hubs
1520 meters (5000 ft)
Ethernet Cat 5 Unshielded Twisted
pair (UTP)
4 • Installation
SEA P/N 1681003-006
Industry Available from
Multiple Vendors
Recommended for short
distances or within shelters.
Max distance from analyzer
to hub or between hubs 600
meters (2000 ft)
2000592-001
ANCB Installation
Description
The ANCB is installed into slot 1 of the Advance Maxum’s or NAU’s
System Controller (SYSCON). To install the ANCB it is not necessary to
disconnect interface cables or to remove the SYSCON from the unit.
Slot 1
WARNING
Voltage dangerous to life exists. Before performing the removal and
installation procedures, it is important that primary AC power to the
unit be turned off from the main circuit breaker. Observe all plant
safety requirements before performing any repair or maintenance
on any unit
NAU Installations
For rack mount NAU units the SYSCON connections are visible at the
rear of the NAU. If you have a wall mounted unit you must first remove
the front or side safety box access covers to see the SYSCON
connections.
Instructions
Step
1.
Procedure
Locate backplane Slot 1, and remove the screw that holds
the metal strip in place. Keep the screw.
SLOT 1
2000592-001
Screw
Metal
Plate
Installation • 5
ANCB Installation, Continued
Instructions,
continued
Step
Procedure
4.
Press the ANCB straight into slot 1. Make sure that you push
evenly on both edges of the board until the ANCB is firmly
seated
5.
Secure the board to the cage with the screw you removed in
step 1.
6.
Connect Ethernet crossover cable from 10BaseT connector
on SYSCON to 10BaseT connector on ANCB.
ETHERNET
CROSSOVER
CABLE
7.
6 • Installation
Make a selection from the following Table.
To make…….
THEN goto……..
DataNET Copper
Connections
Page 14
Fiber Optic Connections
Page 16
2000592-001
Site Wiring Requirements
Description
AC Mains Wiring
The type of wiring is dependent upon the site requirements:
•
CE (Conformite Europeene) Certified Areas
•
NEC Division 2 or Non-Hazardous Areas
•
Cenelec Zone 1 or Zone 2 Areas
•
Rack Mounting Non-Hazardous Area
The installation should have a power disconnect external to the
enclosure.
No voltage dependent selections need to be made on the power supply,
as it has a universal input.
CE Installations
See Page 11, CE Installations.
NEC Div 1, Div 2 or Non
Rated Areas
Use Metal Conduit wiring method.
Conductor type: Power cable sized for circuit protection chosen.
Cenelec Zone 1 or Zone 2
Rated Areas
Use Cable Gland wiring method:
Conductor type: Power cable sized for circuit protection chosen, and
must be shielded.
Non Rated Areas or Rack
Mounting
Use Metal Conduit wiring method.
Conductor type: Power cable sized for circuit protection chosen.
2000592-001
Installation • 7
Site Wiring Requirements, Continued
DataNET Channels
The DataNET channel connections can be either copper wire or fiber
optic cable. The wiring method and cable type for DataNET is dependent
upon the site requirements. For cable requirements see Table 1-1.
Table 1-1:
Recommended DataNET
Cable
The following Table should be used when evaluating or selecting cable
for an existing or new DataNET installation.
Cable Type
Vendors & P/N
Installation Notes
Fiber Optic
SEA P/N 1270002-002
MM 62.5/125; 2 Fiber
Conductors
Industry Available from
Multiple Vendors
New Installation as
an alternative to
copper cable
Max distance from
Analyzer to ANG or
between Hubs
1520 meters (5000
ft)
2- Conductor Copper
Wire
SEA P/N 1686002-001
Belden P/N 9182
For
Belden Armored Cable
order
SEA P/N 1680000-002
4-Conductor Copper
Wire
SEA P/N 1681000-003
Belden P/N SSD1743
Recommended for
Single Channel
Max distance from
Analyzer to ANG or
between Hubs
1520 meters (5000
ft)
Recommended for
Dual Channel
Max distance from
Analyzer to ANG or
between Hubs
1520 meters (5000
ft)
8 • Installation
2000592-001
Site Wiring Requirements, Continued
Table 1-1: Recommended
DataNET Cable,
Continued
Cable Type
Vendors & P/N
Installation Notes
Twisted Pair Copper
Wire used in SEA
2100 Installations
SEA P/N C00128
Not Recommended for
New Installations
Belden P/N 9462
Nominal capacitance
155 pF/m (50 pF/ft.)
Max distance from
analyzer to ANG or
between hubs 225
meters (750 ft)
Copper Wire Site
Requirements
The following information pertains when using copper wire.
CE Installations
See Page 11, CE Installations.
NEC Div 2 or NonHazardous Rated Areas
Use approved Conduit wiring method. Conduit may contain multiple
cables. Adhere to all Federal and local electrical code requirements.
Cable Type: Refer to Table 1-1.
Cenelec Zone 1 or Zone 2
Rated Areas
Use Cable Gland wiring method. Each cable gland allows entry of one
cable.
Cable Type: Recommend Belden 9182 or armored Belden 9182 or
equivalent. The proper cable gland must be used to connect the armor or
shield to the enclosure. Other cables with individually shielded pairs can
be used, but decreased distance is allowed (typically ~800-1000 feet for
typical instrumentation cable).
2000592-001
Installation • 9
Site Wiring Requirements, Continued
Non-Hazardous Areas or
Rack Mounting
Use approved flexible non-metallic conduit wiring method. Conduit may
contain multiple cables. For CE installations use only cable gland wiring
method.
Cable Type: Recommend Belden 9182 or equivalent. Other cables with
individually shielded pairs can be used, but decreased distance is
allowed (typically ~800-1000 feet for typical instrumentation cable).
DataNET Fiber Optic
Cable Connections
The DataNET channel connections can be either copper wire or fiber
optic cable. The wiring method and cable type for DataNET is dependent
upon the site requirements. The following pertains when using copper
wire.
CE Installations
See Page 11, CE Installations.
NEC Div 2 or NonHazardous Areas
Use approved Conduit wiring method. Conduit may contain multiple
cables. Adhere to all Federal and local electrical code requirements.
Cable Type: Duplex fiber, 62.5/125 micron; see Table 2-1.
Connection: Type ST fiber connectors. Connect these to the appropriate
transmitter and receiver ports for the respective channel.
Cenelec Zone 1 or Zone 2
Rated Areas
Use Cable Gland wiring method. Each cable gland allows entry of one
duplex fiber cable.
Cable Type: Duplex fiber, 62.5/125 micron.
Connections: Type ST fiber connectors. Connect these to the
appropriate transmitter and receiver ports for the respective channel.
Non-Hazardous Areas or
Rack Mounting
Use approved flexible non-metallic conduit. Conduit may contain multiple
cables. Conduit may contain multiple. This method is suitable for CE
installations.
Cable Type: Duplex fiber, 62.5/125 micron.
Connection: Type ST fiber connectors. Connect these to the appropriate
transmitter and receiver ports for the respective channel.
10 • Installation
2000592-001
CE Installations
Description
This section should be used for installation sites that must conform to CE
(Conformite Europeene) Certification. Typically, this does not apply to
installations outside the EC unless the equipment was purchased with
the explicit requirements and expectations that it shall conform to EC
Electromagnetic and Radio Frequency Interference (EMI/RFI) rejection
specifications.
CE Installation Kit
Available from Siemens is the CE Installation Kit P/N 2020264-001. This
kit has all the parts for all the installations referenced in this section.
Instructions
The following information pertains to CE Installation of General Purpose,
Zone 1 and Division 2 Equipment. For Zone 1 Installations, all cabling is
terminated in the ANG Zone 1 Enclosure.
Installation with Metallic
Conduit
The preferred method is to route the field wiring in metallic conduit. If
metallic conduit is used, unshielded power and the signal wires can be
used. The power and signal wires (DataNET or Ethernet) must be routed
in separate conduit.
Using flexible conduit and/or armored cable is equivalent to using “steel
conduit”. Flexible conduit or armored cable must have its flexible conduit
and/or armoring conductivity 360-degree terminated at its entry to the
enclosure (or bulkhead).
Installation without
Metallic Conduit
If conduit is not used, the following installation practices must be used to
ensure that the CE certification remains valid:
1. A shielded power cord or cable must be used for the input power
wiring. The shield must be terminated at the unit in a 360-degree
termination at the enclosure (bulkhead); use P/N 2015729-001
contained in the CE Installation Kit or an equivalent part. For Zone 1
Installation use P/N 1311001-014 Installation Kit.
2. The DataNET copper cables shields must be terminated in a 360degree termination at the enclosure (or bulkhead; use P/N 2015729001 contained in the CE Installation Kit or an equivalent part). For
Zone 1 Installation, use P/N 13111001-014 Installation Kit.
2000592-001
Installation • 11
CE Installations, Continued
3. A split ferrite filter must be clamped to DataNET copper wire and
fixed immediately to the outside of the unit; use part number
1173000-013 ferrite contained in the CE Installation Kit. This is
required to meet the Conducted Immunity requirement for CE/EMC
Heavy Industrial. All other CE/EMC Heavy Industrial requirements
are met without the use of a ferrite clamp.
4. Shielded Ethernet cable must be used for all Ethernet connections,
in and outside the GC, and coupled through the enclosure using a
shielded RJ-45 coupler; use part number 1183200-003 contained in
the CE Installation Kit. A mounting plate (part number 2020261-001)
is also available to accomplish this. If needed for Zone 1 installation,
part numbers 2017984-001 and 2017985-001 is available to maintain
purge. If a PG gland is used to make the 360-degree termination of
the Ethernet shield at the enclosure, the Installation Kit and other
parts are not required.
12 • Installation
2000592-001
DataNET Connections
Description
Instructions
This section provides instructions for connecting a Maxum or NAU to a
DataNET network. All DataNET connections are made to the ANCB. The
DataNET connections can be either copper or fiber optic cables.
IF you are wiring for …
THEN go to …
DataNET Copper Connections
14
DataNET Fiber Optic Cable Connections
16
2000592-001
Installation • 13
DataNET Copper Connections
Before You Begin
This section provides instructions for connecting the Maxum to a
DataNET network. All DataNET connections are made to the ANCB. The
DataNET connections can be either copper or fiber.
The ingress wiring method (conduit or cable glands) and which cable
type you use is dependent upon the site requirements. Review the Site
Wiring Requirements page 8 to ensure that you are using the correct
cable and wiring method.
Figure 1-1: ANCB Board
Jumper Settings
Refer to ANCB Description page 46.
J 10 P ort 1
For ANCB: Ju mpers on
Botto m 3 Position s O nly
O peration LED S
Config Port
RS232
57.6 KB
Board
RESET
J12
J11 Port 2
For ANCB Ju mp ers on
Botto m 3 po sitions On ly
J4
10B ase2
10B aseT
J5
Default on Pins 1 &2
•
•
•
•
•
•
J2 Ju mper Co nn ection s
• 150 Ohm
Port 2 (DN)
• 120 Ohm
• 100 Ohm
• 150 Oh m
Port 1(DN)
• 120 Ohm
• 100 Ohm
Default S etting on150 o hm
Position s
NAU Installations
Instructions
14 • Installation
For rack mount units the SYSCON connections are visible at the rear of
the NAU. If you have a wall mounted unit you must first remove the front
or side safety box access covers to see the SYSCON connections.
Step
Action
1.
Turn off AC Power (Mains) to the unit.
2.
Route incoming the DataNET copper cables to the ANCB
in accordance with national or local electrical codes and
regulations.
2000592-001
DataNET Copper Connections, Continued
Instructions,
continued
Step
Action
3.
Strip the insulation ¼ -inch back from each of the incoming
copper leads.
4.
To make the connections easier we have made the ANCB
port connector a removable connector. Grasp the top
portion of the connector and pull it straight out from the
base connector. Loosen all the top wire retaining screws
from the removed connector. All connections will be made
to this connector.
5.
Connect Channel A leads to pins 1 through 3 and Channel
B leads to pins 4 through 6. Tighten down the retaining
screws.
DataNET PORT
CONNECTIONS
Pin 1 +
Pin 2 −
Pin 3- Ground
Pin 4- +
Pin 5 −
Pin 6- Ground
6.
2000592-001
Plug Port connector back into its base.
Installation • 15
DataNET Fiber Optic Connections
Description
The Fiber Optic Coupler is mounted in a threaded, potted, gas tight fitting
assembly designed for use in hazadrous areas when properly installed in
a approved enclosure. Two Fiber Optic Couplers are required, one for
DataNET Channel A and one for DataNET Channel B. The couplers are
mounted through pre-drilled holes located in the top or side of the wiring
acess plates or safety box.
Required Parts
All mounting hardware is supplied with the DataNET Fiber Optic parts kit.
These parts are also available as spares and can be ordered from us.
Electrical/Mechanical
Description
Description
Part Number
Fiber Optic Coupler Assembly
2015828-001
Fiber Optics Coupler Seal Nut
N8005
Fiber Optic Coupler Cable
2020947-0011
The DataNET Fiber Optic Coupler performs translation of signals
between a DataNET Hub and Advance Maxum. The Fiber Optic Coupler
converts between electrical signals and optical signals. The conversion is
transparent to the network. Fiber Optic signals are impervious to
distubances caused by electrical interference from nearby equipment,
ground loops, power surges, or nearby lightning strikes.
DataNET Fiber Optics Couplers can drive up to 5000 feet of fiber optic
cable.
16 • Installation
2000592-001
DataNET Fiber Optic Connections, Continued
Figure 1-3: Fiber Optic
Coupler
The DataNET Fiber Optic Couplers use ST-style connectors (twist &
lock). Always insure that the TX (Transmit) on one end of the link is
connected to the RX (Receive) at the other end of the link. Some duplex
fiber optic cables are coded to help monitor the direction of data travel. If
the fibers are not coded, special attention must be paid to insure a
proper connection.
Receive
Darker Gray Color
Pin 5 GND
Transmit
Pin 3 Receive
Pin1 +5V
Pin 2 GND
Pin 4 XMIT
Ping 6 GND
Connector End View
2000592-001
Fiber End View
Installation • 17
DataNET Fiber Optic Connections, Continued
Installation
Instructions
Step
Action
1.
Ensure that the ANCB is installed in slot 1 of the SYSCON.
2.
Connect the Fiber Optic cable, 10-pin connector to J12 on
the ANCB.
10-PIN FIBER
OPTIC
CONNECTOR
3.
18 • Installation
Route each of the other 6-pin connectors marked J1 and J2
through the holes drilled in the access plate and connect to
the Fiber Optic Coupler Assemblies. Mount the Fiber Optic
Coupler Assembly using the hardware that came with it.
2000592-001
DataNET Fiber Optic Connections, Continued
Instructions,
continued
Step
4.
Action
Connect the incoming Fiber Optic cable transmit and
receive lines to the ST connectors on the assembly; see
figure 1-3.
The DataNET Fiber Optic Couplers use ST-style
connectors (twist & lock). Always insure that the TX on one
end of the link is connected to the RX at the other end of
the link. Some duplex fiber optic cables are coded to help
monitor the direction of data travel. If the fibers are not
coded, special attention must be paid to insure a proper
connection.
2000592-001
Installation • 19
Chapter 2
Data Communications Setup
Introduction
Overview
This chapter provides maintenance personnel instructions for making the
operational settings for the Advance Network Communications Board
(ANCB).
Command Line
Definitions
Review Chapter 3, Command Line Summary. Chapter 3 provides
definitions for all of the commands you will be using in this chapter.
Chapter Preview
This chapter provides the following information:
Topic
2000592-001
Page
Configuring Your PC
22
Establishing a Connection
27
Setting Network Address
30
Assigning an IP Address
32
Firmware Updates
33
Data Communications Setup • 21
Configuring Your PC
Description
The Advance Network Communications Board (ANCB) has a built-in
utility for configuring the unit. The Windows® HyperTerminal program,
which resides on most PCs, can be used to access the utility. Other
serial communication packages that support the following settings can
also be used.
Baud rate:
Data bits:
Parity:
Stop bits:
Flow control:
Instructions
57.6k baud
8
none
1
none
This procedure uses the Windows Hyper Terminal program to configure
your PC to communicate with the ANCB.
1. Click the Start button, and then click on Programs.
2. Click the HyperTerminal icon to start the Program.
Connection Description dialog box will open.
3. In the Name field, type in a Connection Name. Example: Advance
Maxum ANCB.
4. In the Icon field select an Icon to represent the name selected.
22 • Data Communications Setup
2000592-001
Configuring Your PC, Continued
5. Click OK.
The Connect To dialog box opens.
6. From the Connect using scroll list choose the COM port you will be
using on the PC to connect to the Advance Maxum configuration
port.
7. Click OK to save the selection.
The COM Properties box opens.
2000592-001
Data Communications Setup • 23
Configuring Your PC, Continued
8. Scroll each field and select the following Port Settings:
Bits per second: 57600
Data Bits: 8
Parity: None
Stop bits: 1
Flow Control: None
9. Click OK.
The Main Menu will appear.
10. Click File and choose Properties from the drop-down menu.
The Advance Maxum ANCB Properties box will appear.
24 • Data Communications Setup
2000592-001
Configuring Your PC, Continued
11. Click Settings tab.
The settings screen will appear.
12. From the Emulation scroll list select VT100. Do not change the
default settings for the other parameters.
13. Click Terminal Setup button.
The Terminal Settings dialog box will appear.
2000592-001
Data Communications Setup • 25
Configuring Your PC, Continued
14. Ensure that the following default settings are set:
Cursor:
• Underline
√ Blink
Terminal Mode: none
Character set:ASC11
15. Click OK.
The Advance Maxum Properties box will appear dialog box will
appear.
16. Click OK to return to main menu.
17. From the main menu select File/Save As.
18. Enter the short cut name. Click Save to complete the setup.
Your PC is now setup to connect to and configure the Advance Maxum
ANCB.
To create a shortcut to the new connection you just entered and place it
on your Desktop, select the file name you entered in step 18 and click
the right mouse button. From the pop-up menu select Create Shortcut.
Once the shortcut is created it can be moved to the Desktop. Simply click
the shortcut icon and drag the icon while holding down the left mouse
button. Release the mouse button to place the icon.
26 • Data Communications Setup
2000592-001
Establishing a Connection
Description
Once your PC is set up, as described in Configuring Your PC, you are
ready to connect to the Advance Maxum or NAU to configure the ANCB.
Connect PC to
Maxum
Connect a standard 9-pin COM cable from your PC COM port to RS232
Configuration Port located on the SYSCON.
RS232 PORT
Password Protection
2000592-001
All utility programs on the ANCB are password protected. This insures
the data integrity of all configuration data and limits unwanted access of
the User’s network. To access any of the programs you must have a
logon password. The default password is password.
Data Communications Setup • 27
Establishing a Connection, Continued
Password Format
A password name can consist of any combination of alphanumeric
characters. The alphanumeric name must have a minimum of five and a
maximum of twenty characters. The ANCB is shipped from the factory
with the word “password” entered as the default password name.
How to Change
Password
The user can change the password name at any time. To do this login
using the current password then type: “password stand stand”. Where
the word stand is your new password entered twice to verify that it was
properly entered.
How to Log Out
You may log out or close the Configuration and Diagnostic program at
any time by typing logout. However, the Configuration and Diagnostic
program will automatically log you out after five minutes.
How to Log On
The following procedure assumes that a PC is connected to the ANCB
Configuration port (Figure 4-1), and the PC HyperTerminal program has
been configured to communicate with the ANCB; see Configuring Your
PC, page 22
1. Open Windows HyperTerminal program.
2. Press ↵ Enter twice.
The following dialog box appears:
28 • Data Communications Setup
2000592-001
Establishing a Connection, Continued
3. At the > prompt type: login password and press ↵ Enter.
The Connect Screen will appear with the login information and the
local prompt. The local prompt indicates that you are communicating
with the ANCB connected directly to the PC.
You are now ready to configure the ANCB, go to page 30.
Remote Connection
Log On
Once your PC is connected to a network device you can connect to any
other device on the same network if you know the IP address of the
Maxum.
1. Open Windows HyperTerminal program on your PC.
2. Press ↵ Enter twice, the Command Request dialog box will appear.
3. At the > prompt type: login password [IP Address].
Example: login password 192.167.0.1
Once the password is verified the system responds with the login
information and displays the remote prompt which includes the IP
address of the connected device.
2000592-001
Data Communications Setup • 29
Setting Network Address
Description
This section provides instructions to configure the ANCB/DN.
Command Line
Definitions
Chapter 3, Command Line Summary, provides definitions for all of the
commands you will be using in this chapter.
Instructions
1. Connect a standard 9-pin COM cable from the designated PC COM
1 to the RS232 Configuration Connector on the ANCB (see Figure
4-1).
2. Open Windows HyperTerminal program on your PC; reference
Configuring Your PC, page 22.
3. Connect and Log on to Advance Maxum ANCB; reference
Establishing a Connection, page 27.
The Connect Screen will appear with the login information and the
local prompt. The local prompt indicates that you are communicating
with the unit connected directly to the PC.
Ver 1.0
30 • Data Communications Setup
2000592-001
Setting Network Address, Continued
Learning Hint
See Assigning an IP Address, page 32 to learn how to assign an IP
Address.
4. To configure the ANCB address, at the Local > prompt type:
config address ip xxx.xxx.xxx.xxx
Where xxx.xxx.xxx.xxx should be replaced with a 12-digit unique
network address. See Assigning an IP (Internet Protocol) Address
page 32.
5. Press ↵ Enter.
6. The following message appears: Configuration change verified
7. To configure the ANCB subnetwork, at the Local > prompt type:
config netmask xxx.xxx.xxx.xxx
8. Where xxx.xxx.xxx.xxx is the subnet mask for your network.
Typically, this would be in the range 255.255.0.0 through
255.255.255.0.
9. Press ↵ Enter.
10. To configure the ip router address at the Local > prompt type: config
iproute x
An IP router address is not always required. This command sets the
address of the IP router. Your network administrator can help you
choose an address.
This field can be left to the default setting of 000.000.000.000 if an IP
router is not used
11. Press ↵ Enter.
This completes the necessary ANCB Configuration. To display the
current settings, type at Local > prompt: config display
2000592-001
Data Communications Setup • 31
Assigning an IP Address
Overview
Each DataNET device must have a unique IP address. This 32-bit
number defines each devices network ID and host ID. The IP address
must be assigned by the user before the unit is network operational.
See Setting Network Address page 30, for instructions on how to enter
the IP address.
IP Address
The IP Address consists of a 32-bit number divided into four 8-bit fields.
Each field is expressed as a decimal number from 1 to 255 with each
field separated by periods. This is referred to as “dotted decimal”
notation. For example, 192.16.9.52 is an IP address.
How to Assign an IP
Address
Ask your network administrator to assign you an IP Address, or if the
device will be in a closed plant area and not connected to the Internet
you can select an address from Table 2-1.
Table 2-1: Available IP
Addresses
192.165.0.1
192.165.0.2
192.165.0.3
192.165.0.4
192.165.0.5
192.165.0.6
192.165.0.7
192.165.0.8
192.165.0.9
192.165.0.10
192.165.0.11
192.165.0.12
192.165.0.13
192.165.0.14
32 • Data Communications Setup
192.165.0.15
192.165.0.16
192.165.0.17
192.165.0.18
192.165.0.19
192.165.0.254
192.165.1.254
192.165.2.254
192.165.3.1 - 192.165.3.254
2000592-001
Firmware Updates
Description
Periodically we will provide our users with firmware upgrades. Perform
the following instructions to download a new firmware upgrade to the
Communications board ANCB. A firmware upgrade will take
approximately 5 minutes.
Instructions
The following procedure assumes that the HyperTerminal program is
residing on your PC and has been configured.
1. Connect a standard 9-pin COM cable from the PC COM port to
RS232 connector located on the ANCB/DN board.
2. Open HyperTerminal program on your PC; reference Configuring
Your PC, page 22.
3. Connect and Log on to the Maxum.
4. At the > prompt type: download
You should see the following response on the screen. At this point
the ANCB is ready to receive the new firmware version.
5. From the Main Menu bar click on Transfer.
2000592-001
Data Communications Setup • 33
Firmware Updates, Continued
6. Click on Send Text File.
The Send Text File dialog box will appear. Choose the directory on
your PC where the ANCB files reside.
7. Under Files of type select All files (*.*).
8. Under File name type in the upgrade version file name
(ANCB_DN.mot).
This will start the down loading of the files. Once the download has
begun the block numbers will be displayed as they are transmitted.
The upload will take approximately 5 minutes to complete.
34 • Data Communications Setup
2000592-001
Chapter 3
Command Summary
Command Descriptions
Description
This chapter is intended for maintenance personnel.
This chapter provides definitions for all of the commands you will be
using for setup purposes or for performing test diagnostics.
Unique Commands
2000592-001
These are the commands that are unique to the ANCB.
config address ip
ipaddr
Set the ANCB IP address.
config address
ethernet eaddr
Set the ANCB Ethernet hardware address.
config display
Display the current ANCB non-volatile
parameters.
config netmask
xxx.xxx.xxx.xxx
Set the ANCB IP subnetwork.
config iproute
routeaddr
Set the default router IP address.
display links
Display link state table.
hdlc setuptime
Display and/or change the hdlc setuptime in
microseconds.
hdlc window
Display and/or change the hdlc window.
download
Download new software via Configuration
port.
list
List next 22 log events.
list nnn
List 22 events, starting with number nnn.
list nnn, xxx
List xxx events, starting with number nnn.
list on
Continuously list events from the log buffer,
as they are added (terminate by pressing any
key).
list clear
Clear all events from log buffer.
login password
Log in to device via Configuration port.
login password
remoteaddr
Log in to remove device (ANCB or HUB).
Command Summary • 35
Command Descriptions, Continued
36 • Command Summary
logout
Log out of device.
netstat hdlc
Display DataNET link statistics for all ports.
netstat hdlc clear
Display and clear all DataNET link statistics
for all ports.
netstat hdlc port# clear
Display and clear DataNET link statistics for
the specified port (1 or 2).
netstat hdlc port#
Display DataNET link statistics for the
specified port (1 or 2).
netstat clear
Clears the Ethernet statistics counters.
netstat pna
Display OS memory buffer statistics.
password newword
newword
Change login password for ANCB.
port start port
Enable specified DataNET port (1 or 2).
port stop port
Disable (stop all activity) on specified
DataNET port (1 or 2).
reset
Reset and Save Configuration data.
test port#
Place a port into hardware test mode.
test off
Take a port out of test mode.
timeout on
Enable user login timeout.
timeout off
Disable user login timeout.
2000592-001
Command Descriptions, Continued
config address ip
This command sets the device IP address. Each device in the system
must have a unique IP address. Your TCP/IP network administrator can
help you choose appropriate addresses for your network. IP addresses
are entered in “dotted-decimal” notation. For example:
config address ip 192.10.6.123
The IP address is not automatically stored in non-volatile memory until
the reset command is entered. You can display the current IP address
with the config display command.
config display
This command displays the configuration parameters for the device.
config netmask
This command sets the IP subnet mask for the device. Your TCP/IP
network administrator can help you choose appropriate subnet mask for
your network. Subnet masks are entered in “dotted-decimal” notation.
For example:
config netmask 255.255.192.0
The subnet mask is not automatically stored in non-volatile memory until
the reset command is entered. You can display the current subnet mask
with the config display command.
config iproute
This command sets the address of the IP router to which the device
should send TCP/IP messages whose destinations do not reside on the
devices’ own network. Your TCP/IP network administrator can help you
choose appropriate router addresses for your DataNET hubs (a router
address is not required). Addresses are entered in “dotted-decimal”
notation. For example:
config iproute 192.10.6.1
2000592-001
Command Summary • 37
Command Descriptions, Continued
display links
This command displays the ANCB/DN link state table. The link state
table indicates, for each link, whether or not the link is currently “up,”
“down,” or undergoing link validation (“check”). For DataNET links, the
table also gives the device to which the link connects. Devices are
identified by IP address. For example:
local> display links
Port status for 172.16.9.239, Port1 - DataNET A, Port2 - DataNET B
Port:
Medium: Status:
Connected to:
1
Copper
Connected
172.016.099.003, 4A
2
Copper
Connected
172.016.099.003, 4B
Ethernet
dn” Command
Up
This command may be used to override default values for several
parameters related to the DataNET protocol. Specific forms of the
command are:
dn setuptime
Displays the current “setup time” value, in
microseconds. This is the time that the
ANCB_DN board will transmit a
“preamble” pattern on a DataNET link
before starting the actual data frame. The
preamble allows time for the receiver
circuitry at the far end of the link to adjust
to the incoming signal’s amplitude, phase,
and frequency. The default setup time is
3.5 milliseconds.
dn setuptime time
Sets the DataNET setup time to the value
given, in microseconds. The new setup
time value is saved in non-volatile
memory.
Time is entered in microseconds.
Example: 3.5 milliseconds is entered as
3500.
38 • Command Summary
2000592-001
Command Descriptions, Continued
“hdlc” Command
2000592-001
This command may be used to override default values for several
parameters related to the DataNET protocol. Specific forms of the
command are:
hdlc setuptime
Displays the current “setup time” value, in
microseconds. This is the time that the
ANCB/DN board will transmit a “preamble”
pattern on a DataNET link before starting
the actual data frame. The preamble
allows time for the receiver circuitry at the
far end of the link to adjust to the incoming
signal’s amplitude, phase, and frequency.
The default setup time is 2500
microseconds.
hdlc setuptime time
Sets the DataNET setup time to the value
given, in microseconds. The new setup
time value is saved in non-volatile
memory.
hdlc window
Displays the transmit “window” size used
by DataNET. This is the number of Iframes (Information frame) that a station
may send before it must receive a lowlevel acknowledgment from the receiving
station.
hdlc window num
Sets the transmit window used by ports 1
and 2 on the ANCB. The parameter “num”
must be a number 1 through 7. The
default window size is 7.
Command Summary • 39
Command Descriptions, Continued
download
Use this command to load new software into the device via the RS-232
Configuration port. The procedure for software download is:
1. Make sure you have a “rom.mot” file available for download.
2. Log into the target Hub through the RS-232 port, using HyperTerm.
3. Type “download” at the hub’s prompt (“>”). The hub will print with
some messages and will then prompt to begin transmitting the
download file.
4. Transmit the download file. Use the HyperTerm “Transfer --> Send
Text File…” command. Find the “rom.hex” file using the browser
window. You may have to select “Show all files” in the “Files of type”
window to see the “rom.mot” file.
5. After you have selected the “rom.mot” file and click on “OK,”
HyperTerm will begin transmitting records to the Hub. The Hub will
respond by periodically displaying addresses as the file downloads.
6. After about 4 minutes 30 seconds, the download will be complete.
The hub will then display messages indicating that the download has
completed, and it is erasing and programming the FLASH memory.
7. Finally, the Hub will reset, and display a new login prompt.
list
40 • Command Summary
Enter the list command at any time from the Configuration Management
interface to see event buffer messages. The list command has an
internal current sequence number that is set to 1 each time a
Configuration Management login occurs. The list command will show 10
messages each time it is entered, beginning with the current sequence
number. The current sequence number is updated each time list is used.
A new current sequence number can be entered with the list command:
2000592-001
Command Descriptions, Continued
local>
msg |
155 |
156 |
157 |
158 |
159 |
160 |
161 |
162 |
163 |
164 |
list 155
source
|
destination
Trace enabled
IP-172.16.9.211
| IP-172.16.9.210
IP-172.16.9.211
| IP-172.16.9.210
IP-172.16.9.210
| IP-172.16.9.211
IP-172.16.9.211
| IP-172.16.9.210
Station detected IP-172.16.9.014
IP-172.16.9.014
| IP-172.16.9.210
IP-172.16.9.211
| IP-172.16.9.210
IP-172.16.9.210
| IP-172.16.9.211
IP-172.16.9.211
| IP-172.16.9.210
| size | source port |
|
|
64 | 2
|
|
64 | 2
|
|
64 | Ethernet
|
|
64 | 2
|
|
| 1536 | 5
|
| 1536 | 2
|
| 1132 | Ethernet
|
|
64 | 2
|
time stamp
00:01:48.23
00:01:48.29
00:01:49.00
00:01:49.75
00:01:50.11
00:02:00.00
00:02:18.29
00:02:18.00
00:02:19.75
00:02:20.11
The event display gives a time-stamp, and an event description. All
events other than frame-capture events are always shown as single
lines. Captured frames may be summarized as single lines, or expanded
into a multi-line display.
Time stamps are shown as elapsed time from the last board reset or
power-on.
The user can view more than 22 messages by supplying at sequence
number and list length:
list 1, 300
List message numbers 1 – 300.
The list length may appear by itself:
list , 32
This lists the next 32 trace buffer entries and increments the current
message number by 32.
All the messages in the internal trace buffer can be viewed by listing
sequence number one then entering the list command until the last
message is displayed. When the current message number is
incremented to the last message in the internal buffer, it is automatically
set to 1.
There is a continuous listing mode for monitoring all the messages in the
internal trace buffer. It is set by entering list on. All the messages in the
internal buffer will be displayed and any new messages will be listed as
soon as they are collected into the buffer. Hitting any key terminates the
continuous listing mode.
To clear all events from the event buffer, use
list clear
2000592-001
Command Summary • 41
Command Descriptions, Continued
login
The login command allows the user to access all the ANCB parameters
and diagnostic information. The format is:
login password
Where password is the user password.
A password can contain any alphanumeric character and must be
between 5 and 20 characters in length. See the password command for
information on how to change the user password.
Users can login to a remote ANCB or DataNET HUB by first logging out
of the local device and then typing:
login password xxx.xxx.xxx.xxx
Where xxx.xxx.xxx.xxx is the IP
address of the remote device.
logout
The logout command is used to log the user out of either the local or
remote device. Note: User’s will be automatically logged out after five
minutes of non-activity unless the user has issued the timeout off
command. Also the user must be logout of the local device before
logging into a remote device. See the login command.
netstat
This command is used to display statistics for the DataNET, Ethernet, or
OS memory buffers.
The command netstat hdlc displays the total statistics for all DataNET
ports.
The command netstat hdlc1 displays the statistics for DataNET port
one only.
42 • Command Summary
2000592-001
Command Descriptions, Continued
Example:
local> netstat dn 1
DataNET Statistics for DN link 1
Frames Sent
Frames Sent/Retried
Frames Sent/Redirected
Frames Sent w/ Errors
Frames Sent UnACKnowledged
Frames Received
Frames Receiver Not Ready
Frames Received w/ Errors
Link down
855
0
0
0
0
859
0
0
2
The command netstat hdlc clear resets all DataNET statistics
counters.
The command netstat hdlc 2 clear resets only the port 2 statistics
counters.
password
The password command is used to change the user assigned password.
The password can be any alphanumeric character and it must be
between five and twenty characters in length. Example:
password newpassword newpassword
Note the newpassword is entered twice to verify that the password was
entered correctly.
“port” Command
This command will enable or disable normal DataNET communication on
individual ports. Before placing a port into “test” mode (see test
command below), the port must first be taken off-line with:
port stop num
where num is a port number, 1 through 2.
port start num
Will re-start normal DataNET communications on a port.
2000592-001
Command Summary • 43
Command Descriptions, Continued
reset
This command resets and saves the configuration parameters in nonvolatile memory.
test
This command places a selected port into a hardware diagnostic mode.
The test mode can be used to verify cable continuity and DataNET signal
levels when used in conjunction with an Oscilloscope or other test
device.
The command:
test 1
places port 1 into test mode. The device will generate poll messages on
port 1 every 50 milliseconds. The other port continues to operate
normally. The command:
test off
turns off test mode. Only one port at a time may be in test mode.
timeout
44 • Command Summary
This command may be used to disable the user login timeout. Normally,
if a user has not issued a CLI command for five minutes, the device will
automatically shut down the user’s login session. This command may be
used to defeat (and re-enable) this timeout:
timeout off
Disables timeout. The device will not automatically
log out the user; regardless of the time elapsed since
the user last issued a CLI command.
timeout on
Re-enables the five-minute CLI timer.
2000592-001
Chapter 4
Troubleshooting
Introduction
Overview
This chapter provides installation personnel with troubleshooting
information to solve problems associated in the setup of the Advance
Network Communications Board.
Chapter Highlights
Before beginning the installation process read through this Chapter to
familiarize yourself with the information provided.
Topic
2000592-001
See Page
ANCB Description
46
ANCB’s LEDs Description and Operation
49
DataNET Troubleshooting Guide
52
Troubleshooting • 45
ANCB Description
The DataNET ANCB (Advance Network Communication Board) provides
the communications electronics for the unit. The ANCB plugs into the slot
1 of a Maxum or NAU System Controller Unit (SYSCON) located on the
power supply assembly. A bracket fastens it to the chassis. The ANCB is
factory set and programmed either for DataNET or Ethernet operation
(ANCB/DN or ANCB/EN).
Description
Figure 4-1: ANCB Board
J 10 Port 1
For ANCB: Jumpers on
Bottom 3 Positions Only
J11 Port 2
For ANCB Jumpers on
Bottom 3 positions Only
Operation LEDS
Config Port
RS232
57.6 KB
Board
RESET
J12
J4
10Base2
10BaseT
J5
Setting is Application
Dependent
•
•
•
•
•
•
J2 Jumper Connections
• 150 Ohm
• 120 Ohm Port 2 (DN)
• 100 Ohm
• 150 Ohm
• 120 Ohm Port 1(DN)
• 100 Ohm
Default Setting on150 ohm
Positions
J10 &J11
Connections
Jumpers J10 & J11 select the ANCB/DN network interface provided to
connector J4.
Jumper J10 connects Port1 (pins 1-3) on J4 to either the Optichrom Data
Hiway or the Advance DataNET Channel A interface. Jumper J11
connects Port 2 (pins 4-6) on J4 to either the Optichrom Data Hiway or
the Advance DataNET Channel B interface. Jumpers J10 and J11 is
factory configured in accordance with the ANCB type (DataNET or
Ethernet).
Connector J12
46 • Troubleshooting
Connector J12 is used to connect the ANCB ports to an Advance
DataNET Fiber Optic network using Advance Fiber Optic Couplers.
2000592-001
ANCB Description, Continued
Jumper J2 Settings
The ANCB provides a set of impedance matching jumpers to simplify the
cable interfacing process. Jumper J2 is a six-position header used to
select the proper cable impedance matching circuit for each ANCB
DataNET port. Jumper J2 is logically partitioned into two groups of three
positions, see Figure 4-1. There are two jumpers provided on J2. The
lower jumper configures Port1 and the upper configures Port2. Each
jumper can be placed in one of three positions, see Figure 4-1. The three
positions match cable impedance of 100, 120, and 150 ohms. If the
characteristics of the cable you are using are unknown check with the
cable manufacturer for the resistance setting. The manufacturer’s name
is usually printed on the cable cover.
Connector J5
Connector J5 is the impedance matching jumper for the 10Base2 (BNC)
connector labeled P1 on the ANCB board. The connector is a 2-position
(4-pin) connector. Pin 1 is denoted by a dog-ear that is silk-screened in a
rectangle near J5. The pins are numbered 1 to 4 in the clockwise
direction.
Impedance termination for
Ethernet 10Base2:
End point devices should be terminated with a 50-ohm resistor.
Devices that are not on the end point require no termination resistors.
When the 10Base2 connector is not in use (i.e. no cable connected) the
connector should be terminated with a 25-ohm resistor to prevent
spurious errors from being generated on the 10BaseT connector. This is
necessary since both the 10Base2 and 10BaseT connectors are
connected to the same Ethernet Hub chip on the ANCB board.
2000592-001
Troubleshooting • 47
ANCB Description, Continued
Jumper J5 Settings
More Information
48 • Troubleshooting
The ANCB jumper settings for J5 are factory set and dependent upon the
product the ANCB will be used in.
Product Type
ANCB J5 Jumper Settings
Advance Network Gateway
Ethernet (ANG-EN)
Pins 3&4 are shorted, switch in 25ohm position. 10Base2 connector is
not normally used (not connected)
Advance Network Gateway
DataNET (ANG-DN)
Pins 1&2 are shorted, switch in 50ohm position. 10Base2 connector is
used as an end point for crossover
cable.
Advance Plus Analyzer
Pins 1& 2 are shorted, switch in 50ohm position. 10Base2 connector is
used as an end point for crossover
cable.
Maxum Analyzers with ANCB/DN
Installed
Pins 3&4 are shorted, switch in 25ohm position. 10Base2 connector is
not normally used (not connected)
See ANCB LEDs Description and Operation, page 49.
2000592-001
ANCB LEDs Description and Operation
Description
This section provides maintenance personnel with information on how to
use the ANCB LEDs for troubleshooting the Advance Network
Communications Board.
Communications
Board LEDs
Refer to Figure 4-2 for LED position and labeling.
Power-UP
At power-up the top row of LED indicators will blink on briefly as the
board passes its various power-up sequence tests. The ADHA green
light indicates that the initial program parameters were successfully
moved from FLASH to RAM memory. The ADHA yellow LED indicates
that the board has passed its power-up RAM test, the ADHA red LED
indicates that the board has passed its power-up FLASH integrity test,
and the ADHB green LED indicates the board has begun its normal
program execution. After approximately 5 seconds the indicators will go
off depending upon the current board conditions.
Normal Operation
In normal board operation the ADHA LED’s are used to indicate the
status of the Data Hiway channel and the DNETB LED’s indicate the
status of the DataNET channel. In normal operation the ADHA green
LED blinks to indicate either transmit or receive activity has occurred on
the Data Hiway channel. The yellow LED will blink to indicate any
transmit or receive errors that have occurred.
The DNETB LED’s provide a link status indication for the DataNET
channel. If the DataNET link is up and communicating the DNETB green
LED will be lit. If the link is down or in the process of establishing a
connection the DNETB red LED will be lit.
Board Fault Indicators
2000592-001
If the ANG/DN board has a power-up failure or other catastrophic failure
during normal operation the red Fault LED will light to indicate that a fault
has occurred and the yellow LED will blink an error code, see Table 3-1
Error Codes.
Troubleshooting • 49
ANCB LEDs Description and Operations, Continued
Figure 4-2: ANCB/DN LED
Indicators
Figure 4-2 shows the edge visible LEDs on the ANCB. The LED labels
are silk-screened adjacent to each LED on the ANCB.
CL
Table 4-1: Error Codes
Use the following Table 4-1 to determine the error condition. FAULT
errors can only be cleared with a board reset.
NUMBER
of Blinks
Corrective Action
1
RAM FAILURE
Replace Board
2
FLASH FAILURE
Reload Firmware or
Replace Board
3
ETHERNET FAILURE
Replace Board
4
DataNET FAILURE
Replace Board
6
DUPLICATE IP
Change Board IP address
8
WRONG LOOP
Change Loop Number
9
WRONG JUMPER
CONFIGURATION
Check J10 and J11
Connections
DUPLICATE UNIT NUMBER
Change Unit Number
10
50 • Troubleshooting
Type of Error
2000592-001
ANCB LEDs Description and Operations, Continued
ANCB Ethernet
Controller LEDs
Each ANCB provides two Ethernet ports a 10BaseT and 10Base2. Each
port is connected directly to an onboard Ethernet hub. The three LED’s
labeled HUB in figure 4-2 (CL, BNC, TP) is the status indicator for this
internal hub. The Hub LED’s are bi-colored LEDs and require careful
observation of both the color and blink rate to determine the device
status. Table 4-1 describes the color and blink rate to determine device
and port status.
The on-board Ethernet controller provides four status LED’s in Figure
4-2. (Tx, Rx, CL, JAB) The Green TX LED blinks whenever a message is
transmitted on the Ethernet channel. The Green RX LED blinks
whenever a message is received on the Ethernet channel. The Red CL
LED indicates there was a collision on the Ethernet. Note: collisions are
a normal occurrence on an Ethernet network. However, excessive
collision’s can be indication of a potential problem on the Ethernet. The
Red JAB LED indicates that the Ethernet controller has determined that
the transmitter has remained on for longer than allowed and indicates a
possible hardware failure.
10BaseT/10Base2
Ethernet LED
2000592-001
CL
Steady Green indicates a FIFO error
Steady Red indicates a Collision on the HUB ports
(Receiving on one port while transmitting another)
BNC
Blinking Red indicates a packet is being transmitted.
Blinking Green indicates a packet is being received.
Alternating Red/Green indicates the 10Base2 port is
Partitioned Out (Disabled).
TP
Steady Green indicates the 10BaseT port is receiving the Link
Integrity Pulse (Keep Alive signal)
Blinking Red indicates a packet is being transmitted.
Blinking Green indicates a packet is being received.
Steady Red indicates the Polarity is reversed on the 10BaseT
port.
Alternating Red/Green indicates the 10BaseT port is
Partitioned Out (Disabled).
Troubleshooting • 51
DataNET Troubleshooting Guide
Instructions
If a DataNET communications link fails to establish check for a:
•
configuration conflict,
•
link signal quality problem.
Configuration
Conflicts
If the ANCB_DN port DNETA or DNETB LED is never green, or
intermittently flashes between green and red, a configuration conflict
exists. Configuration conflicts can be caused by cabling or improper
software configuration parameters.
Cable Connected to
Wrong Hub or Port
Verify that the Channel A DataNET link is connected to the A Hub half
and that the Channel B DataNET link is connected to the B Hub half.
Verify that both Channels A & B utilize the same port number on their
respective Hub half. Then display the Port Status screen by connecting a
PC to the Configuration Port, logging in, and typing display links. Verify
that the two Ports are connected as expected.
Example
The following example shows that port #1 (DataNET Channel A) is
connected to the DataNET Hub whose IP address is 172.016.099.003 on
port #4, Hub half A and port #2 (DataNET Channel B) is also connected
to the DataNET Hub whose IP address is 172.016.099.003 on port #4,
Hub half B.
local> display links
Port:
Medium:
Connected to:
1
Copper Connected
172.016.099.003,4A
2
Copper Connected
172.016.099.003, 4B
Ethernet
52 • Troubleshooting
Status:
UP
2000592-001
DataNET Troubleshooting Guide, Continued
Configuration
Parameter Errors
The device may have an invalid or duplicate IP address, Subnet mask or
iproute. Each ANCB must have a unique IP address. Verify the
configuration parameters by connecting a PC serial port to the
Configuration Port, Logging in and typing config display.
local> config display
Config:
Device
ANCB_DN
address ip
172.16.9.239
netmask
255.255.0.0
address ethernet
00.c0.c9.00.d2.3b
iproute
0.0.0.0
time server ip
0.0.0.0
port1
DataNET Copper
port2
DataNET Copper
Device ID
The ANCB/DN device id is automatically assigned and is not user
configurable as it is on the DataNET Hub. Th ANCB/DN device ID is
automatically set to the board IP address at power up or reset. :
Broadcast Status
Information
The Advance Network device periodically broadcast their status for
diagnostic and network routing purposes.
2000592-001
Troubleshooting • 53
DataNET Troubleshooting Guiding, Continued
Signal Quality
Problems
If the ANCB_DN port LED is never green, or intermittently flashes
between green and red, there may be a signal quality problem. Signal
levels should be examined to determine if a particular port has a signal
too large or too small relative to the other ports on the HUB. If a link fails
to connect at all, place the port in a test mode which will cause activity to
occur every ~50 milliseconds instead of every ~5 seconds as on an
unconnected link.
Placing Unit in Test Mode
To place the unit in a test mode use the CLI commands to take the link
offline (port stop n) and initiate the test mode (test n). At this time, an
oscilloscope may be taken to the site of the slave device and connected
to monitor the signal. The signal received at the slave should be between
~0.75 v p-p and 5 v p-p. A signal smaller than ~0.75 v p-p is generally
not adequate. The impedance matching jumpers can be changed to
correct some signal level issues.
If the condition of excessive signal loss can not be corrected by jumper
settings, it may indicate inadequate cable properties (i.e. too long or
wrong type of cable).
The port can be taken off test mode and put back to normal operation
with the “test off” and “port start n” commands.
54 • Troubleshooting
2000592-001
Chapter 5
Parts Catalog
Introduction
Overview
This chapter is intended for maintenance personnel.
The Chapter provides a list of replaceable parts and assemblies for the
Advance Network Gateway with DataNET option. Subsequent
information includes how to remove and replace the replacement part or
assemblies.
How to Place an
Order
Parts can be ordered from:
Siemens Energy & Automation, Inc.
408 US Highway 60
Bartlesville, Oklahoma 74003
Tel: (800) 448-8224 (USA)
Tel: 001 918-662-7030 (International)
Fax: (918) 662-7482 (USA)
Fax: 001 918-662-7482
To ensure an immediate response to your request, you should provide
the following:
2000592-001
•
Purchase order number. If ordering by phone, a confirming P.O.
should be sent.
•
Address where the parts are to be shipped.
•
Address where the invoice is to be sent.
•
Part numbers as listed.
•
Quantity needed of each part.
•
Equipment Serial number or project number of the system
(especially for warranty related orders).
•
Preferred method of shipment.
Parts Catalog • 55
Available Parts
Description
56 • Parts Catalog
The following spare parts are available.
Part Description
Ordering Number
ANCB Communication Board; DataNET
2020951-004
Cable, 10Base2, 2 Ft., 90 degree BNC/ 90degreee BNC
1681011-014
Cable 10BaseT Crossover, 6-inch
1681011-022
Fiber Optics Coupler Assembly
2015828-801
Cable DataNET Fiber Optics to ANCB
2020947-001
Cable Clamp ¼-inch dia. Nylon Black
C55004
2000592-001
Glossary
Definitions
Overview
This section defines important Terms.
Advance Network
Gateway Ethernet
The Advance Network Gateway Ethernet (ANG_EN) is a wall- (or rack-)
mounted unit that is self-contained with power supply and all electronics.
It provides internal field termination points to connect standard Advance
Data Hiway cable “on one side” and Ethernet 10BaseT cabling
(Unshielded Twisted Pair) “on the other side”. The Gateway unit requires
120 VAC power wired directly to it.
Ethernet
A data link level protocol comprising the OSI model’s bottom two layers.
It is a broadcast networking technology that can use several different
physical media, including twisted-pair cable and coaxial cable. Ethernet
usually used CSMA/CD. TCP/IP is commonly used with Ethernet
networks.
Collisions
The result of two or more LAN stations attempting to use the same
transmission medium at the same time. Collisions are a normal
occurrence on Ethernet. A properly functioning Ethernet will experience a
relative small percentage of collisions. Typically the collision rate should
be less than 5% of the available bandwidth. Most collisions occur during
the preamble portion of the frame. Most Ethernet controllers
automatically retry, up to 15 times, any packet that has a collision during
transmission. (Except for Late Collisions)
CRC - Cyclic
Redundancy Check
CRC is a method to detect errors. A number is derived from the data that
will be transmitted. By recalculating the CRC at the remote end and
comparing it to the value originally transmitted, the receiving node can
detect errors.
DataNET
The name “DataNET” is used to mean the high-speed communication
system inclusive of our application software.
Data Hiway
The term “Data Hiway” refers to the Advance Optichrom Network. The
Advance Network Gateway and DataNET Gateway are used to bridge
the Advance Optichrom network and the Advance DataNET network.
2000592-001
Glossary • 57
Definitions, Continued
Late Collision
A Late Collision is one that occurs after the first 64 bytes in a frame or
packet. Since the smallest Ethernet frame (packet) is 64 bytes in length,
late collisions will not be detected on small packets. Ethernet controllers
do not retransmit packets with late collisions resulting in lost packets.
Late Collisions usually appear as a bad FCS frame. The only time a late
collision can be detected on a 10BaseT network is when the detecting
device is transmitting at the same time.
FCS - Frame Check
Sequence Error
The CRC (Cycle Redundancy Check) remainder transmitted at the end
of a frame. A FCS error is a legal sized Ethernet frame with a bad frame
check sequence.
Ghosts
Ghosts are energy on the cable that appears to be a frame, but does not
have a valid beginning of frame pattern (start delimiter 10101011).
Ground loops and other wiring problems cause some repeaters to
believe that a frame is being received. Since the repeater is only reacting
to an AC voltage riding on the cable, there is not a valid frame to pass
along. The repeater, however, transmits this energy along the network.
This may be a jam pattern or a very long preamble. Ghosts events
consume bandwidth and can slow down a network. Ghosts are the result
of network elements reacting to noise. The effect of noise on network
wiring is indeterminate. Some network devices will react while others will
not. Ghosts cause random events and can be hard to correct.
Jabber
The term Jabber refers to an Ethernet frame that is greater than the
maximum legal size (Greater than 1518 bytes). Many 10BaseT HUBS
will partition a port that is jabbering.
58 • Glossary
2000592-001
Siemens Energy & Automation, Inc.
7101 Hollister Road, Houston, TX 77040
Phone 713-939-7400, Fax 713-939-9050
1/2007 Edition 2000592-001
Siemens Energy & Automation, Inc.
7101 Hollister Road, Houston, TX 77040
United States
Phone +1 (713) 939-7400
Fax +1 (713) 939-9050
www.usa.siemens.com/ia