1
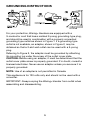
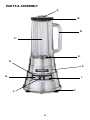
75th anniversary
blender
MBB1000 Series
For your safety and continued enjoyment of this product,
always read the instruction book carefully before using.
CONTENTS
Important Safeguards ....................................................................... 3
Grounding Instructions....................................................................... 5
Parts & Assembly .............................................................................. 6
How to Use Your Blender Controls ................................................... 8
Operating Instructions ....................................................................... 9
Hints & Tips.......................................................................................10
Important Hot Blending Instructions ................................................10
Cleaning & Maintenance ..................................................................11
IMPORTANT UNPACKING
INSTRUCTIONS
1. Place the box containing your Waring® blender on a flat sturdy
surface before unpacking.
2. Open corrugated flaps.
3. Remove Instruction Book and any printed materials from
top of box.
4. Pull up corrugation and remove. Remove container and
padding.
CAUTION: Sharp blade inside blender container.
5. Lift corrugated insert, remove unit from box.
6. Replace all corrugated inserts in the gift box and save the box
for repacking.
REPACKING INSTRUCTIONS
1. Place the unit on a large, sturdy flat surface.
2. Place unit in corrugated insert in bottom of box.
3. Place long corrugated insert over base.
4. Insert blender container and padding.
5. Close and seal box for shipping.
2
IMPORTANT SAFEGUARDS
When using electrical appliances, basic safety precautions should
always be taken, including the following:
1.READ
ALL INSTRUCTIONS.
2. Unplug from outlet when not in use, before putting on or
taking off parts, and before cleaning.
3. To protect against electrical hazards, do not immerse the
blender base in water or other liquids.
4. Close supervision is necessary when any appliance is used by
or near children or individuals with certain disabilities.
5. Do not use carbonated liquids in the blender container, or in
any blending container. Using carbonated liquids in a blender
container may result in injury.
6. Avoid contact with moving parts.
7. Do not operate this Waring® blender or any other appliance
with a damaged cord or plug, or after the appliance
malfunctions or is dropped or damaged in any manner.
Return appliance to the nearest authorized service facility for
examination, repair, or electrical or mechanical adjustment.
8. The use of attachments not recommended or sold by Waring
may cause fire, electric shock, or injury.
9. Do not use outdoors.
10. Do not let cord hang over edge of table or counter, or touch
hot surfaces.
11. Keep hands and utensils out of container while blending to
prevent the possibility of severe personal injury and/or damage
to the blender. A rubber scraper may be used, but must be
used only when the blender is not running.
12. Blades are sharp. Handle carefully.
13. Always operate blender with cover in place. NOTE: Use caution
when the center piece of the two-piece lid is removed.
3
14. When blending hot liquids, remove the center piece of twopiece lid. See Hot Blending Instructions on page 8.
15. See Cleaning and Maintenance Instructions. NOT FOR
WATERJET CLEANING.
16. Do not operate your appliance in an appliance garage or under
a wall cabinet. When storing in an appliance garage, always
unplug the unit from the electrical outlet. Not doing so
could create a risk of fire, especially if the appliance touches
the walls of the garage or the door touches the unit as it
closes.
SAVE THESE INSTRUCTIONS
For Household Use Only
4
GROUNDING INSTRUCTIONS
For your protection, Waring® blenders are equipped with a
3-conductor cord that has a molded 3-prong grounding-type plug,
and should be used in combination with a properly connected
grounding-type outlet as shown in Figure 1. If a grounding-type
outlet is not available, an adapter, shown in Figure 2, may be
obtained so that a 2-slot wall outlet can be used with a 3-prong
plug.
Referring to Figure 3, the adapter must be grounded by attaching
its grounding lug under the screw of the outlet cover plate.
CAUTION: Before using an adapter, it must be determined that the
outlet cover plate screw is properly grounded. If in doubt, consult a
licensed electrician. Never use an adapter unless you are sure it is
properly grounded.
Note: Use of an adapter is not permitted in Canada.
This appliance is for 120 volts only and should not be used with a
converter.
IMPORTANT: Always unplug the Waring® blender from outlet when
assembling and disassembling.
5
Parts & Assembly
A.
B.
D.
C.
E.
G.
F.
H.
I.
K.
J.
6
A. Measuring Cup (2 oz.) – Center part of the two-piece lid
is removable for adding ingredients while blending, and for
releasing steam while puréeing soup. Made from copolyester
and is BPA free.
B. Lid – Two-piece PVC lid is BPA free and dishwasher safe.
C. Container – Large 64 oz. copolyester inverted container with
trademark cloverleaf design. Includes easy-to-read English
graduations.
D. Handle
E. Blades – Stainless steel cutting blades.
F. Base – Die-cast metal waterfall design.
G. Operating Lights – Blue LED lights indicate that the blender is
plugged in and ready for use.
H. START/STOP Button – Starts and stops speeds 1 through 10.
I. PULSE Button – Creates a burst of power for quick blending
at 27,000 RPM.
J. Variable Speed Control Knob – Blend smoothies, whipped
cream, soups and more.
K. Non-Slip Rubber Feet – Provide stable operation.
All parts that come in contact with food are BPA free.
7
HOW TO USE YOUR BLENDER CONTROLS
Waring has designed the controls of your new variable speed
blender to be extremely user friendly. For general blending
procedures, follow the instructions below.
Continuous Blending
Turn the VARIABLE SPEED CONTROL KNOB to the right to
select speed 1 through 10. Press the START/STOP button to start
blending. When blending is complete, press START/STOP button to
stop blending.
Pulse Blending
The pulse feature overrides the maximum variable speed 10 at
27,000 RPM. To use this feature, press PULSE and release when
you have achieved your desired results. Pulse blending can be used
for crushing ice.
BEFORE FIRST USE
1.Follow the cleaning and maintenance instructions on page 8
before first use.
2. Thoroughly dry the container before placing it on the base.
8
OPERATING INStRUCTIONS
1. When placing the container on the blender base, make sure
that the unit is unplugged. Do not put the container on or take
it off while the unit is running. Doing so may damage your
blender.
2. Plug it into a convenient outlet. The LED lights will illuminate
over the control panel when the unit has been properly
plugged in.
3. Put ingredients into the container and place the cover on top.
Do not fill over max fill line.
NOTE: Do not use a container other than the one provided.
4. Depending on what you are blending, choose speed 1–10 or
PULSE to blend ingredients to desired consistency.
FOR CONTINUOUS BLENDING
Turn the variable speed control knob clockwise to set the speed
from 1 to 10 based on the ingredients you wish to blend.
Press the START/STOP button to begin blending. The LED lights
above the START/STOP button will begin flashing. When you
have achieved the desired results, press the START/STOP button
to stop.
FOR PULSE BLENDING
Press and hold the PULSE button until ingredients have achieved
the desired results. The LED lights above the PULSE button will
flash when the PULSE button is pressed.
llow blades to come to a complete stop before removing the
A
container from the blender base.
WARNING: Never place the container on the blender base or
remove it from the blender base while the motor is running.
9
Hints & Tips
•For puréeing soups- always start blending on lowest speed
setting and then progress to desired speed, unless otherwise
instructed in the recipe book.
•Use the PULSE feature for foods that only require short bursts of
power, e.g., when blending frozen fruits or ice cubes.
•Ensure all foods are cut into cubes (approx. 1 square inch) where
appropriate to achieve an even result.
•When blending multiple ingredients, place liquid ingredients in
the blender container before solid ingredients, unless otherwise
specified in the recipe.
IMPORTANT HOT BLENDING INSTRUCTIONS
To minimize the possibility of being scalded when blending hot
materials, the following precautions and procedures must be
observed.
• Hot materials are those which are 100°F (38°C) or hotter
• Limit the amount of materials processed to 1 pint
• Completely remove the center part of the two-piece lid before
starting motor. (This will allow venting of the rapidly heated and
expanding air inside the container when blender is running.)
• Always start blending on lowest speed setting, and then progress
to desired speed.
• Never stand directly over blender when it is being started or
while it is running. DO NOT put your hand on top of blender while
blending. Hot steam may be escaping.
10
CLEANING AND MAINTENANCE
The container must be cleaned and dried after each use.
CAUTION: Never immerse blender base in water or other
liquids.
CAUTION: Be extremely careful when cleaning around the
blades. They are very sharp.
1. Remove the container from the blender base and remove
the lid.
2.To clean the container, you can place it on the top rack of the
dishwasher or clean it by hand.
3. To clean the container by hand:
A. M
ix a few drops of dishwashing detergent with 1 cup of cool
water and add it to the container. Scrub and rinse out the
interior of the container and the lid to dislodge and remove
as much residue as possible. Empty the container.
Add another few drops of dishwashing detergent to the
container with 1 cup of cool water. Put lid on container,
place container on blender base, plug the blender in and run
on high speed for two minutes.
B.To clean the blender base, unplug the power cord. Wipe the
exterior surfaces with a soft cloth or sponge dampened with
cleaning solution. Rinse with clean water. Do not immerse
the base in cleaning solution or water. Wipe the base with a
dry towel.
4. Always wash and rinse the container prior to initial use, and
whenever blender has not been used within a period of one
hour.
Any other servicing should be performed by an authorized service
representative.
11
Any other trademarks or service marks of
third parties referred to herein are the trademarks or
service marks of their respective owners.
©2013 Waring Consumer Products
150 Milford Road
East Windsor, NJ 08520
www.waringpro.com
Printed in USA
MBB1000 Series IB
13WR140113
033543