1
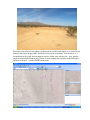
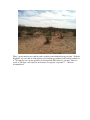
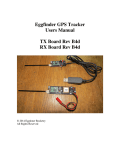
Eggfinder GPS Tracker
Users Manual
TX Board Rev B4d
RX Board Rev B4d
© 2014 Eggtimer Rocketry
All Rights Reserved
California Proposition 65 Warning
WARNING: This product contains chemicals (lead) known to the State of
California to cause cancer and birth defects or reproductive harm.
This kit includes a special low-temperature ultra-fine leaded solder wire.
Including the solder with the kit ensures that you will have solder that can be
used to mount the surface-mount parts in the kit. Leaded solders have been used
for over a century in electronic assembly, but you should take the following
precautions when using it (or just about any chemical, for that matter):
• Do not eat or drink while using it
• Wash your hands after handling it
• Keep it in the protective bag when you’re not using it
The MSDS can be found at
http://www.kester.com/download/245%20FluxCored%20Wire%20Lead%20Allo
y%20SDS.pdf
The European Union RoHS (Restriction on Hazardous Substances) regulations
exempt kits such as the Eggfinder from its regulations, because they are not for
resale and since it is well known that hand soldering with non-leaded solder is
much more difficult and more damaging to heat-sensitive components.
Nevertheless, we do not certify the Eggfinder as RoHS, and we cannot ship them
to EU countries. Since the Eggfinder’s RF module runs on the 902-928 MHz
band which is not an unlicensed band in the EU, we couldn’t sell there anyway.
Important Regulatory Information
This device complies with Part 15 of the FCC Rules. Operation
is subject to the following two conditions: (1) this device may
not cause harmful interference, and (2) this device must
accept any interference received, including interference that
may cause undesired operation.
It is intended to be used ONLY for educational and
experimental use in Class II/III amateur High Power Rockets
which are classified as aircraft by the Federal Aircraft
Administration (CFR 14 §101.25), and which must by FAA and
NFPA regulations be operated at least 1,500’ away from any
populated buildings. Although unlikely, this device may cause
interference with consumer devices that run on the
unlicensed 902-928 MHz band, and therefore must not be
used in residential areas.
The Eggfinder uses RF modules in the 902-928 MHz ISM band manufactured by Hope RF,
model HM-TRP-915. They are intended to be used only in the United States. These modules
have been tested by Hope RF to be compliant with the FCC Part 15 regulations for nonlicensed intentional emitters, and as such have been permitted to be imported into the US.
However, Hope RF (at the time of this document) has not obtained formal certification with the
FCC. As a hobby kit, designed for educational and experimental purposes, the Eggfinder is
considered by the FCC to be “generally exempt” from authorization requirements.
Nonetheless, we have made a good faith attempt to comply with all technical regulations, and
you should too by building it exactly as per the instructions, and by using only the antenna on
the transmitter module that we recommend in the instructions, or a suitable replacement as
outlined in the Appendix.
Because the Eggfinder runs on an unlicensed band, there is no protection against interference
from other sources; basically, you get what you get. We’ve done substantial testing and are
confident that your Eggfinder system is unlikely to be significantly affected by outside radio
sources, but there’s no guarantee.
If your Eggfinder causes interference in a residential setting, or with licensed radio systems
(such as TV or ham radio), you must stop using it until you correct the problem. This is
extremely unlikely given the small amount of power and the “tightness” of the transmitter’s
output, and in particular the distance from any population that HPR rockets must be flown.
Nevertheless, you need to be aware of this, and be willing to abide by the rules. These are the
same rules that govern other non-licensed transmitters, such as cordless phones, WiFi and
Bluetooth® devices, and garage door openers.
Important Links:
FCC Part 15 (governing unlicensed intentional emitters)
http://www.ecfr.gov/cgi-bin/textidx?SID=adb12f74b498e43ec453f7899d9df0fd&node=47:1.0.1.1.16&rgn=div5
Hope RF HM-TRP Documentation (FCC test documentation)
http://www.hoperf.com/upload/rf/HM-TRP-915(20dBm)-FCC.pdf
FAA Regulations for Amateur Rocketry (Part 101)
http://www.ecfr.gov/cgi-bin/textidx?c=ecfr&rgn=div5&view=text&node=14:2.0.1.3.15&idno=14
~~~~~~~~~~~~~~~~~~~~~~~~~~~~~~~~~~~~~~~~~~~~~~~~~~~~
Before You Start…
• If you bought a Starter Set (both Eggfinder TX and RX kits), make sure that both of them are
on the same frequency (it’s marked on the package label). If they are not, do not open the kits;
contact us immediately so we can send you a replacement kit and a no-charge return label.
• Go to our web site at www.Eggtimerrocketry.com and download the latest Release Notes.
• Go to our web site at www.Eggtimerrocketry.com and download the latest Assembly/Users
Guide..
• Read them thoroughly before starting… it will save you some grief later, we promise!
~~~~~~~~~~~~~~~~~~~~~~~~~~~~~~~~~~~~~~~~~~~~~~~~~~~~~~~~~~~~~~~~~~~~~~
Thanks for buying an Eggfinder GPS Tracker! The Eggfinder is a hobby rocketry GPS tracker
that uses a GPS module and a 900 MHz license-free transmitter module to broadcast your
rocket’s location in real-time to a computer or tablet. With appropriate GPS tracking software,
which is available for free on the Internet, you can actually track your rocket in flight, and
ultimately find out exactly where it landed.
Like other Eggtimer Rocketry products, we sell it as a kit, to keep costs down and provide an
outstanding value. This means that you have to do a little work, of course, but considering that
most hobby rocketeers that would use our products have some degree of electronics expertise,
this should not be much of an impediment. If you do not have any experience soldering kits
such as the Eggfinder, we recommend that you ask around… chances are that somebody in
your rocketry club would be more than happy to assist you for a small bribe (beverages work
well!).
There are actually two separate Eggfinder boards, the Eggfinder TX that goes into your rocket,
and the Eggfinder RX board that receives the data from your Eggfinder TX board and displays
it on your computer or tablet. They are similar in that they both have a radio module and
power supply, but only the TX board has a GPS module. We recommend that you build the
TX board first, because it’s easier to tell if it’s working, and when you have the RX board
completed it will be easy to tell if that one is working too since both boards have LEDs that tell
you if they are transmitting/receiving data.
An Introduction to Rocket Tracking
Once upon a time it was a big deal for a model rocket to go out of sight, especially if it was a
relatively large one (say, the size of an Estes Big Bertha). Rockets like that would go out of
sight at maybe 1,000’, but unless your field was surrounded by trees or tall grass there was a
good chance that you would get it back because it’s not going to stray more than a few hundred
feet away from the launch pad.
With mid-power and high-power rockets, that’s a different story. To begin with, your field has
to be much larger, particularly with high-power (the rules call for a minimum size of 1500’ on
either side, or ½ the estimated altitude whichever is greater). If your rocket is flying to 6,000’,
you may have to walk at least 3,000’ to find your rocket. Even with multiple-deployment
using a flight computer (like the Eggtimer), you may find that once the rocket gets out of sight
you have no idea where it went, and the field is too large to simply walk around looking for it.
Trust us, we’ve all done this… for longer than we like to admit.
The need to be able to find “lost” rockets has created a number of electronic tracking methods.
The simplest rocket finding device is a simple “sounder” that creates a loud audible tone. The
idea is that as you get close to the rocket, you will be able to hear it and hone in on the source
of the sound. The advantage of sounders is that they are simple and inexpensive; the primary
disadvantage is that you have to be close enough to the rocket to be able to hear the tone. If
you don’t know where the rocket landed, or if it drifted in a direction other than what you were
expecting, the sounder isn’t going to be of much help.
A more sophisticated approach is to use some sort of radio system. This is a two part system:
There must be some kind of transmitter in the rocket that sends out some kind of signal, and
there must also be some kind of receiver to pick up the signal and somehow help you find the
rocket. There are a few different ways of doing this.
The simplest radio tracking device is a “beacon”, which sends out a tone to a receiver that you
carry with you as you wander around looking for the rocket. You point the antenna of the
receiver in different directions noting the signal strength, and the direction of the greatest
signal strength is going to be where your rocket landed. These systems can be relatively
inexpensive (a few hundred dollars), or they can be very expensive (up to a thousand dollars),
depending on many factors; primarily, the range of the transmitter. Ranges for beacon systems
can be from a mile or two, up to tens of miles. Most of these beacon systems require a FCC
Technician class amateur radio license (a “ham” license), and using the signal strength to
determine position (also known as “DXing”) requires patience and practice.
In the past several years, the advent of affordable GPS location technology has made it
possible to create a rocket finding device that uses a GPS in conjunction with a radio telemetry
data link to send the location of you rocket to a ground receiver, so that it actually tells you
where your rocket landed. Early GPS-based rocketry transmitters were relatively large and
heavy, expensive, and required a FCC ham license. With recent advances in semiconductor
technology, the cost of GPS receiver chips has dropped enough so that they are now
commonplace in consumer device such as smartphones, tablets, and portable navigation
systems. Some of these same advances have also filtered down to radio-frequency devices,
such as FRS radio units and various consumer devices using the unlicensed 2.4 GHz and 900
MHz bands. These advances have made it possible to create GPS-based rocket tracking system
for a fraction of what they would have cost 10 years ago.
Meet the Eggfinder
The Eggfinder is a GPS-based rocket tracking system that transmits using the license-free 900
MHz band. The radio modules used in the Eggfinder use the maximum legally-permissible
output power for this band, 100 mW. There are actually two pieces to the Eggfinder system,
the TX (transmitter) module and the RX (receiver) module. The Eggfinder TX board is about
3” long x 1” wide (+ 3” for the antenna), and weighs about 20 grams without the battery. It is
mounted in your rocket, preferably in the nose cone or payload bay area, and sends out a data
stream with GPS location data once per second. The Eggfinder RX board has a USB data
cable that plugs into your laptop or tablet, and receives the signal from the TX board in your
rocket. Optionally, you can connect a Bluetooth®-Serial board and a battery to the Eggfinder
RX board, so you can wirelessly connect it to a tablet.
Using readily-available (and mostly free!) software on your laptop or tablet, you can “read” the
transmitted GPS location data from your rocket and use that data to plot its location in realtime. Once the rocket lands, you record the landing coordinates, and you can either draw a
track line (compass direction/distance) to the landing spot and follow that heading, or you can
plug the coordinates into a smartphone app and have your GPS-enabled smartphone draw a
track that takes you right to your rocket.
The Eggfinder is a no-frills system designed for one purpose: getting your rocket back. It does
not have any kind of built-in recording capability (although you can, and most likely will,
record the received data onto your laptop/tablet). The range is adequate for the vast majority
of sport rocketry flights; we have tested it to over 8,000’ range line-of-sight with good signal
strength. This does not necessarily mean that you will be able to maintain a GPS signal
throughout the entire flight; in fact, it’s fairly normal to lose the signal while the rocket is
under boost and through the initial coasting phase, because the GPS module isn’t going to be
able to keep a fix on the GPS satellites while it’s moving fast. Once the rocket starts slowing
down, you’ll see it pick up again, and you will probably keep a lock on it until it gets fairly
close to the ground (well under 100’). Even if you lose the GPS data at that altitude, it’s so
close to the ground by then that finding it is not going to be a problem.
If your rocket does go out of the range of the Eggfinder, once it starts to come down you will
most likely be able to pick up the signal again, unless your rocket has drifted about 2 miles
downrange. That’s not something that happens very often, because you’re already going to
know about how high your rocket is going to go before you launch, and you’re not going to fly
if there’s too much wind. Even with a tracking transmitter, it’s still possible to lose rockets…
if you try hard enough.
A few guidelines…:
• Fly sensibly: If you KNOW that you’re going to fly out of the Eggfinder’s range, use a
higher-gain receiver antenna, or position yourself so that you will be most likely to pick up the
signal as the rocket comes down.
• Follow NAR/TRA guidelines… if it’s too windy to fly, an Eggfinder isn’t going to help the
situation.
• Having a transmitter doesn’t mean that you don’t need to pay attention to your rocket, a
visual fix on your rocket is still the best way to help get it back.
Mounting Your Eggfinder TX in a Rocket
The Eggfinder TX board is about 3” long and .9” wide; with its “stick” antenna it’s about 6”
long and .9” wide. It will fit into just about any rocket with a BT-50 or larger payload bay,
although some of the batteries may not fit in a space that small. (9V batteries and 7.4V 2S
LiPo packs are about the same size, and require a BT-55 or larger body tube.).
The cardinal rule of tracking transmitter mounting is
KEEP METAL AWAY FROM THE ANTENNA.
This means that if you have an A/V bay with two allthreads running the length of the bay, this
is going to be a really bad place to mount your Eggfinder. Large metallic or conductive items,
including batteries, hardware, and other electronics will significantly reduce the range of your
Eggfinder TX. Note that this also applies to metallic paints, and metallic film trim as they can
also block out radio signals. So can carbon fiber nose cones and body tubes. If you have any
of these, your best bet would be to mount the antenna outside of the body tube/nose cone.
If you HAVE to mount it somewhere near metal, you should keep the metal at least 2” away
from the antenna, farther is better. You may be able to get away with this in a very largediameter rocket, but if you’re putting it in a minimum-diameter mach-buster, you will be very
disappointed in the range that you get out of it.
The best place to mount a telemetry tracker is in the nose cone. There are many ways that you
can mount it, we have had good success with simply mounting it on a small piece of
basswood/plywood located in the nose cone, with either a bulkhead or a piece of BT-55-sized
tubing to hold it in. This works very well for plastic and fiberglass nose cones. (It will work
for wood nose cones too, if you can still find one…)
Note that if you have a metal-tipped fiberglass nose cone and have the antenna pointing
towards the tip, it should not be a problem; the signal from the tip of the antenna is relatively
weak, it’s the long side of the antenna what we’re concerned with. Even so, you should try to
keep the tip of the antenna at least 2” away from the metal tip if possible.
We’ve seen some people wrap them in bubble wrap and stuff them into the nose cone. If you
do this, be aware that bubble wrap can generate static electricity, so be warned. Better would
be the natural foam rubber that is used in RC airplanes to cushion receivers, it does not
generate static electricity. Use a zip tie to anchor the battery connector wires to the mounting
hole next to the regulator, to prevent them from coming loose in flight. You will also need to
make sure that it can’t slide out at ejection, and that it’s sealed off from corrosive ejection
charge gases. If you have a removable bulkhead in the shoulder of your nose cone, it will be
fine.
We’ve also seen them mounted inside coupler tubes attached to the nose cone or shock cord.
This works fine, as long as you seal up the coupler so no ejection gases can get in. Also we
strongly recommend that if you tape it to the shock cord, you do not use plastic electrical tape;
the heat of the ejection charge gases can melt it, and you may end up finding your Eggfinder
sans the rocket. A few layers of duct tape works fine.
Important points to note are:
• The mounting holes are sized for a 4-40 screw. Since the Eggfinder TX is relatively
lightweight, you can use a self-tapping or wood screw into a plywood sled, if you do that we
recommend that you put a drop of epoxy in the hole on the sled first so it won’t come loose.
• You can also use double-stick foam tape, “servo tape” is the best because the adhesive is
very strong and it won’t come loose accidentally. If you cover the entire bottom side of the
Eggfinder TX with servo tape, it isn’t going to go anywhere, no matter how many G’s you pull.
• Use zip ties or wire clips to strain-relieve the battery lead, you don’t want it to flop around in
flight and have the solder joint get pulled out.
• Ditto for the battery connector, and it won’t hurt to wrap some masking tape around the
connector to prevent it from coming apart, too.
• The Eggfinder TX board requires about 70 mA, with a start-up peak of up to 200 mA for a
few seconds or so. We recommend that whatever battery you use provide at least 200 mAH of
capacity, which will keep it going for about 3 hours. If you’re flying somewhere that may take
a little more hunting (i.e. a field of tall grass), you should bump the capacity up so that it
doesn’t run down before you can find it. Since the Eggfinder should tell you within a
relatively small distance where your rocket landed, it shouldn’t take you very long to find it,
but an extra hour or so of power is a good thing.
• There really isn’t any reason for having a battery switch, a simple connector such as a JST
will work fine; you can turn it on by connecting the battery. Since you have to hold the button
down to turn on the GPS and start transmitting, you can simply wait until shortly before your
flight to press the button, and save about 60 mA of power draw while you wait since the GPS
is in “standby” mode and the transmitter isn’t sending out any data and therefore isn’t drawing
much power.
Using Your Eggfinder TX and RX
Note: If you have the Eggfinder LCD receiver, see the Eggfinder LCD User’s Guide for
instructions on using it with the Eggfinder TX.
To use your Eggfinder effectively, you’ll need:
• An Eggfinder TX board (to send the GPS data from your rocket)
• An Eggfinder RX board (to receive the signal from the Eggfinder TX)
• A computer/tablet with a USB port to connect the Eggfinder RX board
• Some kind of software to record and/or interpret the data from the Eggfinder RX board
• Some way of figuring out where you are so you can get to your rocket’s location
The Eggfinder RX board uses a standard USB Type A plug, compatible with virtually every
laptop PC. Tablets with USB ports usually have a USB “Mini” or “Micro” jack, so if you want
to use a tablet with the cable you may have to get an adapter; they can be readily found at
electronics retailers.
You will also need an appropriate USB-Serial driver for your platform. The Eggfinder cable
uses a Prolific PL2303HX USB-Serial chip, the drivers can be found on the Eggtimer Rocketry
web site at:
http://www.eggtimerrocketry.com/page29.php
We recommend that you use the Prolific drivers for Windows from the Eggtimer Rocketry web
site rather than the current “unified” driver that’s on Prolific’s web site, we have found that
there are issues with Windows 8 with the newer drivers. The ones on our web site have been
tested with Windows XP, Vista, 7, 8, and 8.1 so we know they work.
Prolific also offers serial-mode drivers for MacOS, Linux, and an SDK for Android; there may
be some pre-built Android drivers available. Those will be on Prolific’s web site, at
http://prolificusa.com/pl-2303hx-drivers/
Whatever software you use to connect to your Eggfinder RX receiver, you will need to find the
COM port that is used to communicate, and set the data format to:
9600 baud, 8 bits, 1 stop bit, no parity, no flow control (or, no handshaking)
Turning Your Eggfinder On and Off
We recommend that you turn on the Eggfinder RX receiver first. When you plug the RX into a
USB port on your laptop/tablet, the RED LED should come on, and you should see NO lights
on the Hope RF module. If the GREEN LED on the Hope RF module starts blinking when you
plug in the USB cable, that means that another Eggfinder is transmitting on your frequency.
BEFORE you turn on your Eggfinder TX transmitter, you need to determine who it is, and
coordinate with them so you don’t bump into each other. Fortunately, if your receiver is
picking up their transmitter, you can use your GPS program to find the transmitter, and most
likely its owner as well.
Assuming that your frequency is clear, connect your Eggfinder TX to the battery. The RED
PWR LED should come on, indicating that you have power. Like the Eggfinder RX receiver,
if the GREEN LED on the Hope RF module starts blinking that means that somebody else is
transmitting on your frequency… figure out who it is before you start transmitting.
If your frequency is clear, hold the button on the Eggfinder TX down until the GREEN RDY
LED comes on (it should take about a second), then release it. The GPS module will start
searching for satellites to get a position lock, typically this will take about 30-60 seconds
outdoors, but if you are testing indoors it may take as long as 10 minutes. The RED LED on
the Hope RF module will start flashing immediately, and the GREEN LED on your Eggfinder
RX receiver’s Hope RF module will start flashing in sync with your Eggfinder TX. Once the
GPS module has a good GPS lock (at least 4 satellites), the AMBER 1S LED will start
blinking, once per second, indicating that you have lock. Once this happens, you can start up
the software on your laptop/tablet to start tracking your Eggfinder TX’s movements.
After you find your rocket, you should turn off the Eggfinder TX by holding the button down
for at least one second, until the GREEN RDY LED turns off. You may then disconnect the
battery. Depending on your software on the laptop/tablet, you may want to turn off the
Eggfinder RX (by unplugging the USB cable) before you retrieve your rocket, or after you
return to your launch site. If you have interfaced the Eggfinder RX board to a Bluetooth
module so you can use it with a tablet, you’ll probably want to take it with you as your retrieve
your rocket, and turn it off after you’re done.
GPS Software
The software that you use to help find your rocket can be as simple as a terminal program that
you use to simply download the NMEA data stream (using the “last received” $GPGGA record
to give you the coordinates of your rocket’s landing spot), or as sophisticated as a GPS
mapping program that shows you in real-time where your rocket is going, with a satellite map
overlay. The requirement is that it must be able to handle NMEA-formatted GPS input from a
serial port. In the case of a serial terminal program, it’s just going to spit it out on the screen;
it’s up to you to interpret the data. Most people will want to use a mapping program, it makes
life much easier. On the other hand, may map programs require Internet access, and that may
not be available at your launch site, so simply having the landing coordinates in most cases is
all you need to find your rocket.
Some programs that we’ve tried include:
Serial terminal programs
PuTTY
Hyperterm
Simple GPS data display programs (limited mapping capabilities)
VisualGPS
Satellite Mapping Software
MapSphere
GooPs (with Google Earth)
The goal here is to find out where the LAST place that your Eggfinder ended up… this is going
to be very close to your actual landing spot, unless for some reason your rocket drifts way out
of range. Even then, you’re going to be able to get an idea of the direction that it was going
before you lost radio contact, so you’re still likely to get your rocket back.
The NMEA-Formatted Data Format
If you’re a software minimalist, you can use a simple terminal program such as PuTTY
( http://www.chiark.greenend.org.uk/~sgtatham/putty/ ) to display the raw GPS data. There’s a
lot of GPS “noise”, i.e. records that you don’t want, but if you simply focus on what you’re
looking for it’s not that difficult to pick out the last received location. First though, you need
to know a little about the NMEA data format.
NMEA (National Maritime Electronics Association) GPS data is a simple text display, with a
number of records that give you information about the location of the GPS unit and the satellite
environment. Realistically, the only records that you need to have are the $GPGGA records:
these are the ones that display latitude and longitude. From gpsinformation.org, a really easy
to understand and well-formatted source on NMEA data formats:
GGA - essential fix data which provide 3D location and accuracy data.
$GPGGA,123519,4807.038,N,01131.000,E,1,08,0.9,545.4,M,46.9,M,,*47
Where:
GGA
123519
4807.038,N
01131.000,E
1
Global Positioning System Fix Data
Fix taken at 12:35:19 UTC
Latitude 48 deg 07.038' N
Longitude 11 deg 31.000' E
Fix quality: 0 = invalid
1 = GPS fix (SPS)
2 = DGPS fix
3 = PPS fix
4 = Real Time Kinematic
5 = Float RTK
6 = estimated (dead reckoning) (2.3 feature)
7 = Manual input mode
8 = Simulation mode
08
Number of satellites being tracked
0.9
Horizontal dilution of position
545.4,M
Altitude, Meters, above mean sea level
46.9,M
Height of geoid (mean sea level) above WGS84
ellipsoid
(empty field) time in seconds since last DGPS update
(empty field) DGPS station ID number
*47
the checksum data, always begins with *
As an example, some “real” records taken during a flight looked like this:
$GPGGA,171634,3406.6883,N,11757.4427,W,1,9,0.9,181.1,M,-33.2,M,,0000*6A
This record was taken at 17:16:34 UTC (actually 9:16:34 PST), at 34°6.6883’’ N,
117°57.4427’W. There was a valid GPS fix (the “1” after the “W”), from 9 satellites. You
can pretty much ignore the rest of the data, including the altitude; GPS altitudes are only
accurate when the ellipsoid is taken into account, and they tend to lag behind the
latitude/longitude for several seconds at least; that’s why they’re not generally used to measure
real-time altitude in rockets except at extreme altitudes. Also, consumer-grade GPS units have
a velocity and altitude lockout feature that suppresses data when you get moving quickly
and/or at high altitudes; barometric altitude and accelerometer data have no such limitations, so
they tend to be better real-time indicators of altitude.
Now that you know a little about the GPS records, all you need to do is to look at the $GPGGA
records, and if you either a) stop getting records, or b) see that nothing is changing, then use
the last $GPGGA record to figure out where your rocket landed.
Of course, you’ll still need to figure out how to get to your rocket… that’s a little further on.
Using MapSphere to Track Your Rocket
MapSphere is a really good Windows program for taking the GPS input from the Eggfinder
RX’s serial cable and displaying a real-time track of where your rocket is going. Best of all,
it’s free. You can download maps ahead of time, so that when you get out to the range where
there is most likely no cellular Internet coverage, you still have a nice satellite or street map to
help guide you. You can save your track, and it’s a simple text file (although it’s not the raw
NMEA data), so you can go back and look at it with a text editor if you wish, and you can load
and “play” them back to retrace your flight.
To use MapSphere, turn on your Eggfinder TX board, plug in your Eggfinder RX board to the
USB port, and launch MapSphere. (You must load the serial drivers for the USB-Serial cable
first, of course). MapSphere has a “community” function that you can use with their web site
to share tracks; if you want to use that, read about it on their web site, otherwise we
recommend when the “Login” box displays you should simply cancel out of it. Go to the
Toolbar, click on the GPS tab, then Connect. It should automatically find the serial port that’s
being used to receive the Eggfinder data, and as soon as valid location data is available you’ll
start seeing a track on the map.
There are a number of map sources that you can choose from, we recommend Microsoft Live
Search Maps - Aerial. Having a satellite map will help in many cases, but if the location that
you are flying is surrounded by roads then you may want to use the “Microsoft Live Search
Maps – Streets” map instead. Sometimes the streets provide better visual clues of where your
rocket went than the satellite map.
This is an example of what a “real” flight track looks like, this is from a J-class flight with a
Giant Leap Escape Velocity to about 8,300’ at the TRAPHX Eagle Eye site near Aguila, AZ
(using an Eggtimer Flight Computer, of course).
This is what the field looks like: (you can see why you’d need a tracker there…)
The rocket went relatively straight up, weathercocked into the wind slightly as is slowed down,
drifted a little on the drogue chute, and drifted more on the main chute. Note that there is a
discontinuity in the graph, that can happen once the rocket starts moving fast. Also note the
small movement before launch, that’s when we were walking the rocket out to the RSO table
and then to the pad… it tracks EVERY movement.
Overlaying the road map instead of the satellite map… not very interesting here because it’s
about 8 miles to the nearest road.
Now, this is interesting and pretty, but it doesn’t tell you exactly where your rocket landed. If
you have a smartphone, you can use the coordinates to tell you where to go (more on that in a
bit). If you do not have a smartphone, MapSphere does provide a relatively easy way to tell
you which direction to go. Simply use the Ruler tool from the first location (your launch site)
the last location (the landing spot), and it will give you the compass heading and the distance.
If you take off in the general direction of the compass heading, chances are very good that you
will find your rocket, as long as the rocket has landed out in a relatively open area.
If you have trees, tall grass, or in this case sagebrush, you are definitely going to need to have
some kind of GPS-assisted help to take you to the landing spot. What you need to do is to save
the track by exiting out of MapSphere (it will give it a name with the date and time in the
filename, so it will be easy to find). It would be nice if this data were a simple NMEA data
dump, unfortunately they have their own format, but it is fortunately easy to get the location
from it since it’s a text file.
Open up the saved .gpx track file file with a text editor like Notepad or Notepad++ (highly
recommended!), and it will look something like this:
<?xml version="1.0" encoding="UTF-8"?>
<gpx version="1.1" creator="MapSphere" xmlns="http://www.topografix.com/GPX/1/1"
xmlns:xsi="http://www.w3.org/2001/XMLSchema-instance"
targetNamespace="http://www.topografix.com/GPX/1/1" elementFormDefault="qualified"
xsi:schemaLocation="http://www.topografix.com/GPX/1/1 http://www.topografix.com/GPX/1/1/gpx.xsd">
<trk>
<trkseg>
<trkpt lat="33.822127" lon="-113.138178">
<ele>690.00</ele>
<time>2014-02-22T19:14:43Z</time>
<extensions>
<valid>0</valid>
</extensions>
</trkpt>
<trkpt lat="33.822127" lon="-113.138178">
<ele>690.00</ele>
<time>2014-02-22T19:14:44Z</time>
<extensions>
<valid>0</valid>
</extensions>
</trkpt>
ETC ETC ETC…
The lines that start with “<trkpt” are track points, containing the latitude and longitude of your
rocket’s position. Note that the entry at the beginning of the file will most likely be repeated
many time, since it should be giving you the exact same location of the launchpad for as long
as your rocket is sitting there; since it’s one record per second, you could easily have a few
thousand of the same record, so don’t be alarmed.
Note that these values are in DECIMAL units, not Degree-Minute-Second (DMS) units.
In this case, the first trackpoint is
<trkpt lat="33.822127" lon="-113.138178">
so your rocket’s starting position is 33.822127, -113.138178. This will probably be a little
different from your starting position, since you are going to be standing some distance away
from the rocket.
Now, go to the end of the file, and look for the last <trkpt…> record. The latitude figure is the
one that starts with “lat=”, and the longitude value starts with “lon=”.
<trkpt lat="33.828873" lon="-113.130500">
<ele>683.70</ele>
<time>2014-02-22T19:17:59Z</time>
</trkpt>
</trkseg>
</trk>
</gpx>
In this case:
Latitude = 33.828873 (North), Longitude = -113.130500 (West)
This is the last position that your Eggfinder reported, and should be very close to your actual
landing position.
Using the Latitude/Longitude Data to Find Your Rocket
Now that you have the coordinates of your rocket’s resting place, you need to able to get to it.
The easiest way is to use some kind of tracking app on your GPS-enabled smartphone. We’ve
used Motion-X on the Apple iPhone with good results. Basically, you set a waypoint for your
current location, add the latitude/longitude of your rocket as a waypoint, and use the Go To
function to take you right to it. You don’t need a satellite map, all you need to do is follow the
track on your smartphone.
In this example, we’re going to use MotionX on an iPhone. iPhones are nice, but one annoying
thing about them (for our use, at least) is that they generally won’t take input from an external
GPS, so you’re going to have to enter the coordinates into the iPhone manually. (If you’re
using an Android device, and you have interfaced the Eggfinder RX to a Bluetooth-Serial
board, you can actually capture the last location from your Eggfinder without having to enter it
manually.) Before you start using it, we recommend that you download and read the user’s
manual for MotionX; it wouldn’t hurt to have a copy on-hand an your launch site for reference,
either. You can find it at gps.motionx.com/iphone/gpsmanual.
What you want to do BEFORE you launch is to set wherever you are standing right now as
your “Home” location. After you get the landing coordinates, you simply tell it
So, from the MotionX menu, go to Waypoints. Hit the “+” key to add a waypoint, then select
Current Location. Give it a name, like the name of your launch site, and save it. Select Edit
This Waypoint after you save it, click on the menu bar, and select “Make this my Home”.
Here are some step-by-step instructions, click on the links to display screenshots from the
Eggtimer Rocketry web site.
Tap on Waypoints, then “+” for “add waypoint”…, then select My Position.
http://www.eggtimerrocketry.com/page16.php?view=preview&category=9&image=133
Give it a name, then save it…
http://www.eggtimerrocketry.com/page16.php?view=preview&category=9&image=134
Then make it your Home waypoint…
http://www.eggtimerrocketry.com/page16.php?view=preview&category=9&image=135
Once you have done that, you launch, and when you get the last location of your rocket (for
example, from MapSphere as detailed above), you create a new waypoint with those
coordinates. Once you’ve done that, simply click on Navigate to Waypoint, and bring up
either the Map or the Compass function to show you where you are in relation to your rocket
and how far you need to go. Note that the distance and direction are generally calculated from
your GPS position, not from your actual compass position. The compass in an iPhone can be
thrown off by stray magnetic fields, so this is not a bad thing, but it means that you need to be
walking in order to get a reasonably accurate direction and distance. Once you are pointed in
the general direction of your rocket, you will find that the map or compass pointer will pretty
much stay pointed in that direction, that’s a good indication that you’re walking (or driving, if
it’s a big field) in the right direction.
OK, here’s what the screens look like in MotionX…
Add the destination Waypoint…
http://www.eggtimerrocketry.com/page16.php?view=preview&category=9&image=137
http://www.eggtimerrocketry.com/page16.php?view=preview&category=9&image=138
..using coordinates…, first Latitude…
http://www.eggtimerrocketry.com/page16.php?view=preview&category=9&image=139
…then Longitude…
http://www.eggtimerrocketry.com/page16.php?view=preview&category=9&image=140
Save, then Start Navigation. Click on the Map…
http://www.eggtimerrocketry.com/page16.php?view=preview&image=141&category=9
You will also get a track with a pointer (it’s not on this picture, because we were so excited
about getting the data that we forgot to take the pictures… these are from the saved data). Start
walking in the direction of your rocket, and the pointer will show you which direction you need
to go to get to it. Note again that you must be moving for it to be accurate, because it’s using a
delta GPS position to figure out your track direction.
In the case of this flight, it landed about .64 miles away from the launchpad, in a big field of
sagebrush. This is what it looked like when it landed:
There’s pretty much no way that the rocket could be found without having a tracker. With the
Eggfinder, we were able to walk right up to the landing spot without really looking around for
it. We actually saw it on the ground in a clearing about 200’ before we got there, when we
stood at “The Spot” and looked at our distance to waypoint, it reported 2’… Mission
Accomplished!
Using External Antennas with Your Eggfinder System
With the included ¼ wave stick antennas, the Eggfinder system has been tested to over 8,000’
range line-of-sight with no loss of signal at apogee. This is adequate for most hobby rocketry
sport flights, since it’s OK if you lose the signal as long as you pick it back up as the rocket is
coming down… after all, the goal is to find out where your rocket landed, not necessarily to be
able to track its flight (although it is very cool when you can do it!).
However, there may be cases in which you need to extend the range of your Eggfinder. Since
the output power is fixed at 100 mW (20dBm), the way that you’re going to do this is by
improving on the antennas. The Eggfinder is designed so that you can solder an edge-mount
RP-SMA connector (RP-SMA female, which means that the edge connector has a center pin
rather than a jack). This allows you to use a variety of other antenna option that will
significantly improve the reception, with some caveats.
First, you need to understand how antennas work. A transmitter antenna converts the electrical
output of the transmitter to electromagnetic waves, and on the receiver side converts the
electromagnetic waves to an electrical signal that can be amplified, filtered, and decoded so
that it is the same as the electrical signal that was fed into the transmitter’s antenna. The
transmitter has a fixed amount of power available, and when that power is converted to radio
waves they propagate in free space in a certain pattern that is dependent on the type of antenna.
Think of the total radio output power as being like a round balloon, the distance from the
center at any given point is the power in that direction and the air in the balloon is the total
output power. If you squish the balloon in the center, it will bulge and flatten out at the center,
so the power output is higher there at the cost of being less at the top and bottom where you
squished it. That’s basically what a dipole or “stick” antenna does… the output strength in free
space looks like a donut, about the same all around the sides but much lower at the extreme top
and bottom. The total output power is still the same, it’s just distributed differently.
Now, if we take that round balloon and squeeze it so that it’s long and narrow, you have the
same amount of power of course, but it’s much higher in one direction, at the cost of being
much less in the other directions. The harder you squish, the longer it gets, but also the
narrower it gets. An antenna with a pattern like this is called a directional antenna, they have
high gain (signal amplification power), but only in one direction. The angle in which the
signal can be propagated before it starts to drop off sharply is called the “beamwidth” of the
antenna. Typically, gain and beamwidth are opposites; the higher a directional antenna’s gain,
the narrower the beamwidth. Very high gain antennas, like satellite dishes used for TV, have a
very narrow beamwidth; you need to aim them directly at the satellite or you won’t get any
signal at all.
Since you can’t tell ahead of time which direction your rocket may be going, it doesn’t make
sense to put a high-gain directional antenna into the rocket itself. In the rocket, you’re going to
use an omnidirectional antenna, but it you’re flying relatively high (over 10,000’) you can get
some extra range by using a higher gain omnidirectional antenna, that puts out a stronger signal
over a narrower “donut”. Since you’re going to be relatively far away, the fact that the
beamwidth is narrower doesn’t matter as much as the extra gain.
On the receiver end, you can either go with an omnidirectional antenna, or if you have an idea
which direction your rocket went you can point a higher gain directional antenna at it and get
significantly more range. There are two basic types of commonly used directional antennas for
rocketry applications, the panel antenna and the Yagi. A panel antenna is basically two
conductive sheets of a certain size, separated by a space; the forward-facing panel is connected
to the antenna signal lead, and the opposite panel (which is usually a little bit larger) is
connected to ground. They are relatively easy and cheap to make, and the gain and
directionality can be controlled by varying the sizes of the panels. They typically have a
beamwidth of 30° to 120°, depending on the gain and bandwidth (how sharply the antenna is
tuned to your specific frequency). A Yagi antenna looks like a stick with perpendicular
“sticks” coming out of it, they are a high-gain antenna but tend to be very directional. Yagis
are very popular for beacon type rocket finders, because you need to find out as closely as
possible where the source of the signal is.
In our case, you want the antenna on the transmitter to be an omnidirectional antenna, since the
signal needs to propagate in all directions because the rocket is moving so the radio signal may
be moving around in relation to the antenna. An omnidirectional antenna ensures that you will
get a good signal regardless of the orientation of the rocket (unless it’s directly overhead).
Therefore, there’s not much point in messing with the antenna that comes with the TX board,
unless you have to use an external antenna (for example, because you have a carbon fiber
rocket). In that case, you will want to get an omnidirectional antenna with a RP-SMA
“pigtail”, so it can be connected directly to the RP-SMA connector on the TX board.
You can also use a “rubber duckie” type antenna that screws directly onto the RP-SMA
connector on the Eggfinder TX board. Some of these antennas will improve your transmit
range, but be careful when you look at the specs; if the gain is over 5 dB, chances are that the
beamwidth is narrower too, so you may have trouble picking up the signal as the rocket gets
close to you, even though it’s technically stronger.
The receiver antenna is where you’re going to be able to make the most range improvement.
Using a higher-gain directional antenna, it’s possible to get twice the range of the standard
stick antenna, at the cost of having to point the receiver’s antenna in the general direction of
the rocket. A panel antenna is ideal for this purpose, because it has a good balance of gain and
beamwidth; you don’t want the bandwidth to be much less than about 60°, or you may have
trouble getting a signal if your rocket goes out of sight and you don’t know which way it went.
We’ve used commercial panel antennas such as this one made by Arc Wireless:
http://www.streakwave.com/mmSWAVE1/Video/ARC-PA0910B01.pdf
This particular model has 10dB gain with a 60° beamwidth, which is ideal for picking up the
Eggfinder RX’s signal from out-of-sight rockets. It costs under $20. You can also make your
own panel antenna, there are some good references out there on the Internet, such as
http://www.rc-cam.com/gp_patch.htm
which shows you how to make a patch antenna for under $5.
With any external antenna, you will need some kind of cable between the antenna and your
Eggfinder RX board. You may need to put some kind of connector on the antenna side of the
cable, particularly for a commercial antenna; for example, in the case of the Arc Wireless panel
antenna, you will need a “N” connector. On the Eggfinder side, you will need a RP-SMA
FEMALE connector on the cable (INSIDE threads with a JACK in the center). We
recommend that you use the shortest cable that you can practically use, if you mount the
receiver just behind the rear of the antenna you can generally keep this cable to under 6”. Be
sure to get a cable that’s rated for the 900 MHz band; WiFi cables work fine, since WiFi runs
at 2400 MHz, so the loss will actually be less than the cable’s specifications. Some cable types
that are commonly used for these frequencies are LMR-400 and RG-174; if you have a local
electronics store nearby, you can usually get them for under $1 per foot.
We generally recommend that you purchase a pre-made cable for connecting to an external
antenna, coaxial cables are a pain to work with if you don’t have the tools and don’t do it all
the time, and a commercially made cable is generally going to have lower loss than a
homemade cable. Look around on the Internet, you should be able to find a 500mm RP-SMAto-N cable for well under $20.
Specifications:
Eggfinder TX
GPS:
Maestro Wireless A2235H
48 track verification channels
Low power, 35 mA typical operating, 5 mA standby
Transmitter Module:
Hope RF HM-TRP
Output Power: 20 dBm (100 mW)
Center Frequency: 905.000 Mhz – 925.000 Mhz, in 2.000 MHz steps per channel
Modulation: FSK
Modulation Delta: 35 KHz
Antenna Options:
• 80 cm (1/4 wave) “Stick” permanent antenna
• RP-SMA connector for external or other removable antenna
Eggfinder RX
Receiver Module:
Hope RF HM-TRP
Center Frequency: 905.000 Mhz – 925.000 Mhz, in 2.000 MHz steps per channel
Modulation: FSK
Modulation Delta: 35 KHz
Antenna Options:
• 80 cm (1/4 wave) “Stick” permanent antenna
• RP-SMA connector for external or other removable antenna
Eggfinder Quick Reference Guide
Eggfinder TX (Transmitter):
Battery:
300 mAh (min.), 7.4V (2S) LiPo battery recommended
Mounting Tips:
• AVOID MOUNTING THE ANTENNA NEAR ANY METALLIC OBJECTS
• Mounting it rigidly on a sled is much better than wrapping it in foam
• Zip-tie all wires to prevent the battery connector from coming loose or pulling out of the
board
Operating:
Powering On:
•Press the button until the GREEN light comes on, then release
• Wait for the AMBER light to start blinking before closing up your rocket
(this means that the Eggfinder has acquired enough satellites to start sending location data)
Powering Off:
• Press the button until the GREEN light goes out, then release
• Disconnect the battery and/or turn off your power switch
Eggfinder RX (Receiver):
Serial driver: Prolific PL2303HX
Powering On: Just plug it into a USB port
Format: 9600 baud, 8 bits, no parity, 1 stop bit, no flow control (handshaking)