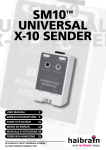
1
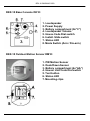
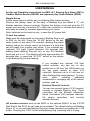
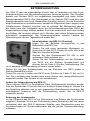
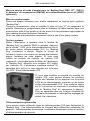
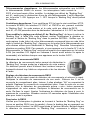
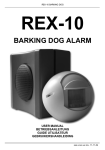
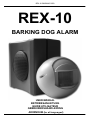
REX-10 BARKING DOG
REX-10
BARKING DOG ALARM
USER MANUAL
BETRIEBSANLEITUNG
GUIDE UTILISATEUR
GEBRUIKERSHANDLEIDING
ADDENDUM (for all languages!)
REX-10 BARKING DOG
CE Declaration of Conformity
UK
We, X10 Europe, 3 Rue de Penthièvre - 75008 Paris - France, herewith declare that the following
designated product: REX-10, is in compliance with the essential requirements and other relevant
provisions of Directive 1999/5/EC.
DE
Wir, X10 Europe, 3 Rue de Penthièvre - 75008 Paris – France, erklären hiermit die Übereinstimmung
des Gerätes REX-10 mit den grundlegenden Anforderungen und anderen relevanten Festlegungen
der Richtlinie 1999/5/EC.
FR
Nous, X10 Europe, 3 Rue de Penthièvre - 75008 Paris - France, déclarons que le produit suivant:
REX-10 les exigences essentielles et aux autres dispositions pertinentes de la directive 1999/5/CE.
NL
Hierbij verklaart X10 Europe, 3 Rue de Penthièvre - 75008 Paris - France dat het toestel REX-10 in
overeenstemming is met de essentiële eisen en de andere relevante bepalingen van richtlijn
1999/5/EG
S
Por medio de la presente X10 Europe, 3 Rue de Penthièvre - 75008 Paris - France, declara que el
REX-10 cumple con los requisitos esenciales y cualesquiera otras disposiciones aplicables o exigibles
de la Directiva 1999/5/CE.
IT
Con la presente X10 Europe, 3 Rue de Penthièvre - 75008 Paris - France, dichiara che questo REX10 è conforme ai requisiti essenziali ed alle altre disposizioni pertinenti stabilite dalla direttiva
1999/5/CE.
SE
Härmed intygar X10 Europe, 3 Rue de Penthièvre - 75008 Paris - France - att denna REX-10 står I
överensstämmelse med de väsentliga egenskapskrav och övriga relevanta bestämmelser som
framgår av direktiv 1999/5/EG.
SAFETY WARNINGS
•
To prevent short circuits, this product (except the outdoor specified products) should only be used ins ide and
only in dry spaces. Do not expose the components to rain or humidity. Do not use the product close to a bath,
swimming pool etc.
•
Only connect the adapter to the mains after checking whether the mains voltage is the same as the values on
the rating labels. Never connect an adapter or power cord when it is damaged. In that case, contact your
supplier.
•
Do not expose the components of your systems to extremely high temperatures, high humidity, strong
mechanical tear, wear and strong vibrations.
•
The appliance must not be changed or dismantled. The entire product may not be modified. It is prohibited to
open the housing, the device contains live parts. Defected pieces must be replaced by original parts. Any
operation on the appliances must be done by qualified technicians. In case of damages due to a non-respect of
the user guide, the guarantee does not apply.
•
Adapters: Only connect the adapters to the mains after you have checked whether the mains voltage
corresponds with the value on the type tags. Never connect an adapter or cable when it is damaged. In that
case, contact your supplier.
•
Batteries: keep batteries out of the reach of children. Dispose of batteries as chemical waste. Never use old
and new batteries or different types of batteries together. Remove the batteries when you are not using the
system for a longer period of time. Check the polarity (+/ -) of the batteries when inserting them in the product.
Wrong positioning can cause an explosion.
•
In case of improper usage or if you have opened, altered and repaired the product yourself, all guarantees
expire. The manufacturer does not accept responsibility in the case of improper usage of the product or when
the product is used for purposes other than specified.
•
The manufacturer does not accept res ponsibility for additional damage other than covered by the legal product
responsibility.
REX-10 BARKING DOG
REX-10 Base Console DK10:
1. Loudspeaker
2. Power Supply
3. Battery compartment (9x”C”)
4. Loudspeaker Volume
5. House Code Dial switch
6. Install. Slide switch
7. Status LED
8. Mode Switch (Arm / Dis-arm)
REX-10 Outdoor Motion Sensor DM10:
1. PIR Motion Sensor
2. Dusk/Dawn Sensor
3. Battery compartment (4x“AA”)
4. House- Unit Code Dial switch
5. Test button
6. Status LED
7. Mounting clips
REX-10 BARKING DOG
USER MANUAL
Set-Up and Operating Instructions for REX-10™ Barking Dog Alarm (DK10),
Outdoor Motion Sensor (DM10E) and (optional) Key Chain Remote (KR22).
Simple Set-up
Follow these steps to quickly get your Barking Dog system working.
Remove the battery cover on the back of Barking Dog and install 9 “C” cell
alkaline batteries (observe polarity). Replace the battery cover and plug the AC
power cord into any convenient AC outlet near a window or outside door where it
will easily be heard by someone approaching your home.
Note: batteries are for back up only, in case the AC power fails.
To test the system
Make sure the slide switch on the back of Barking Dog is set
to RUN (to the left). Press the “A1-ON” button on the key
chain remote or any other X10 controller. Barking Dog starts
barking. Adjust the volume control on the back to a level that
can be heard from outside your home. If you installed any
(optional) X10 Light Control Modules, five seconds after
barking starts Barking Dog will turn on any X10 Modules
which are set to A1. The barking will stop approximately 30
seconds later, or press the “A1-OFF” button on the remote
to tell Barking Dog to stop barking.
If you installed any optional X10 light
control modules, you can turn on any
module set to A2 from the 2-ON button on
the key chain remote or other X10
controller. (Modules set to A1 will turn on
when Barking Dog starts barking). To learn
more
about
installing
additional
accessories or changing any of the default
settings, read on:
Optional Remote Controls
You can use several types of X10 (remote)
controls to activate Barking Dog. These
controllers fall into different categories:
Home Automation (HA) wireless remotes,
HA plug-in controllers, and security
wireless remotes.
HA wireless remotes such as the KR22 or the optional SH624, or any X10 RF
Wall Switch like SS13 do not need to be installed. The default setting for Barking
Dog is A1 so you activate Barking Dog from these remotes by pressing the 1-ON
button. Pressing the 1-OFF button while Barking Dog is barking tells it to stop.
REX-10 BARKING DOG
HA plug-in controllers: ANY X10 controller such as the MT10 Mini Timer,
SC9000 Console, CM11 Computer Interface, CM15Pro Computer interface, etc.
can control Barking Dog. The default House Code and Unit Code for the DK10 is
A1 so A1-ON tells Barking Dog to bark, and A1-OFF tells it to stop barking.
To change Barking Dog's default setting of A1 so you can activate Barking
Dog with a different code: Move the slide switch on the back of Barking Dog to
INSTALL. Make sure the House Code dial on the Remote Control matches the
letter you set on the back of Barking Dog. Press any button on the Remote
Control. Set the slide switch back to RUN. For example if you pressed button
number 5 on the Remote Control, Barking Dog will now be activated by 5-ON and
silenced by 5-OFF, and it will turn on X10 modules set to number 5, five seconds
after it is tripped.
Motion Detector Model DM10E
The included outdoor battery operated Motion Detector will
tell Barking Dog to start barking whenever someone
approaches your home. This motion detector can also turn
lights on at dusk and turn them off again at dawn.
To set up the DM10E Motion Detector
Remove the screw from the front cover on the Motion Detector and remove the
cover. Unclip the Motion Detector from the back plate. Remove the 2 screws from
the battery compartment cover. Insert 4 “AA” alkaline batteries (observe polarity).
Replace the battery cover. Attach the back plate to an exterior wall in a location
where the Motion Detector will see any intruder who approaches your home. Clip
the Motion Detector onto the back plate. Refit the cover. Adjust the swivel up and
down for best coverage. Wait for approximately 60 seconds after installing the
batteries to let the sensing circuitry settle before testing the unit.
To test the DM10 Motion Detector
Make sure the slide switch on the back of Barking Dog is set to RUN (to the left).
Arm Barking Dog, by pressing the button on the back. The small red light on the
back turns on. Walk past the Motion Detector. Barking Dog starts barking. Five
seconds after barking starts Barking Dog will turn on Lamp Modules (which are
set to A1). The barking will stop approximately 4 minutes later. If the Motion
Detector is tripped again the sequence repeats itself, if no motion is detected for 4
minutes, Barking Dog goes quiet, and the Lamp Module set to A1 will turn off.
Note: after the Motion Detector has been tripped it will not trip again for a period
of 30 seconds (for longer battery life). Press the button on the back of Barking
Dog to disarm it, the red light goes off.
REX-10 BARKING DOG
Note: the key chain remote normally controls X10 codes A1 to A4.
To change the key chain’s House Code
• Press and hold the first (top) ON button. The red LED blinks once. 3 seconds
later, the LED blinks the current setting: 1 blink for House Code A, 2 blinks for
B..... 16 blinks for P.
• Release the first (top) ON button.
• Press and release the first (top) ON button the appropriate number of times
for the House Code you want to set. Once for A, twice for B, etc. The LED
blinks for each press.
IMPORTANT: Hold the button on your last press. 3 seconds later, the red LED
blinks back the new setting, e.g. 3 blinks for House Code C. If you do not follow
this programming sequence, the LED will stay on for 1 second and your existing
setting will not be changed.
To change the Unit Code for the key chain's remote (the second pair of
buttons are always one # higher than the first pair, i.e. if you set the first button to
6, the second button controls 7, etc.).
• Press and hold the top OFF button. The red LED blinks once. 3 seconds later,
the LED blinks the current setting: 1 blink for Unit Code 1, 2 blinks for 2, 16
blinks for 16.
• Release the top OFF button.
• Press and release the top OFF button the appropriate number of times for the
Unit Code you want.
IMPORTANT: Hold the button on your last press. 3 seconds later new code blinks
back. If you do not follow this programming sequence, the LED will stay on for
1second and your existing setting will not be changed.
To change the battery: Pry the unit apart and fit a CR2025 Lithium 3V battery.
Observe polarity. You will also need to change the code that Barking Dog
responds to; see To change Barking Dog's default setting of A1.
NOTE: NO CHANGES OR MODIFICA TIONS MAY BE MADE TO THE UNITS.
ANY CHANGES MADE TO THE UNITS WILL VOID THE USER'S AUTHORITY
TO OPERATE THE EQUIPMENT.
REX-10 BARKING DOG
BETRIEBSANLEITUNG
Der REX-10 kann als eigenständige Einheit oder in Verbindung mit dem FunkSicherheitssystem und Haussteuerungssystem betrieben werden. Das Grundset
besteht aus Zentrale DK10 mit eingebautem Hundegebell und einen AußenBewegungsmelder DM10. Das Hundegebell in der Zentrale DK10 wird über den
Bewegungsmelder oder Funk-Handsender (Zubehör) aktiviert. Um die Simulation
einer Anwesenheit zu perfektionieren, besteht die Möglichkeit über Lampen- oder
Schaltermodule (Zubehör) Leuchten usw. zu schalten. Bei Abwesenheit oder in
der Nacht kann das Hundgebell durch die Außen-Bewegungsmelder DM10 bei
eingeschalteter Anlage aktiviert werden. Auch hier werden kurz nach dem Anfang
des Bellens die Leuchten aktiviert und 4 Minuten nach letzter Erfassung wieder
automatisch ausgeschaltet. Der Dämmeungsschalter schaltet Lampen bei
Dämmerung ein und bei Tagesanbruch wieder aus.
Inbetriebnahme des REX -10 (Grundset)
Legen Sie die Batterien polungsrichtig in das
Batteriefach des DK10 ein.
Suchen Sie sich einen geeigneten Montageort im
Innenraum für den DK10. Dieser Ort sollte sich in der
Nähe der Haustüre befinden.
Stecken Sie das Steckernetzteil PS 500 in eine
vorhandene Netzsteckdose ein.
Stellen Sie den Schiebeschalter auf der Rückseite
von DK10 auf die Stellung Eingabe/Install und
drücken Sie die Taste A1 Ein der Fernbedienung. Der
DK10 bestätigt diese Anmeldung mit einem kurzen bellen.
Stellen Sie nun den Schiebeschalter auf der Rückseite von DK10 wieder in
Stellung Betrieb/Run zurück.
Testen Sie nun die Funktion des DK10 durch Drücken der Taste A1 Ein und A1
Aus. Die Lautstärke des Hundes kann durch drehen des Lautsprecherknopfes
eingestellt werden. Das System ist nun betriebsbereit.
Ändern der Hauscodierung am REX -10
Wenn mehrere REX-10 in unmittelbarer Nähe (Nachbarschaft) betrieben werden
oder der Systemcode A1 bereits durch ein anderes System belegt ist, können Sie
die Einstellung abändern und so eine gegenseitige Beeinflussung vermeiden. Bei
nachträglicher Änderung muß die Fernbedienung wieder neu im REX-10
eingebucht werden.
Änderung des Systemcodes
An der Rückseite des DK10 ist ein Drehschalter zum Ändern des Systemcodes
eingebaut. Beachten Sie bei der Veränderung dieser Einstellung, daß die (wenn
vorhanden) über den REX-10 aktivierten Schalter- oder Wandmodule sowie die
Fernsteuerungen mit Systemcodeschalter alle die gleiche Systemcodestellung
aufweisen.
REX-10 BARKING DOG
Änderung des Gerätecodes
Der Gerätecode ist in der Grundstellung 1. Das bedeutet, daß DK10 über die
Fernsteuerungen (KR22, SH624, etc.) durch Druck auf die Taste Kanal 1 ein oder
ausgeschaltet werden kann. Wollen Sie diese Einstellung ändern, so gehen Sie
wie folgt vor:
1. Nehmen Sie eine bereits an der Zentrale DK10 angemeldete
Funkfernbedienung KR22.
2. Die Zentrale DK10 muß ausgeschaltet sein (LED dunkel).
3. Stellen Sie den Betriebsartenschalter auf der Rückseite der Zentrale in die
Stellung Eingabe/ Install).
4. Drücken Sie nun auf die gewünschte Ein-Taste auf der Fernbedienung auf
dessen Kanal Sie den DK10 einstellen wollen.
5. Stellen Sie nun den Betriebsartenschalter an der Zentrale wieder zurück in die
Stellung Betrieb/ Run.
6. Die Zentrale ist nun auf den entsprechenden Kanal umgestellt und läßt sich
durch Drücken auf der entsprechenden Kanal Ein und Aus-Taste ein- und
ausschalten.
Hinweis: Achten Sie bitte darauf, daß nach einer Umstellung des Geräte und
Systemcodes auch die entsprechenden Wand und Schaltermodule auf den
gleichen Hauscode eingestellt sind.
Erweiterung durch Wand- oder Steckermodule (Zubehör)
Um die Abschreckung noch zu erhöhen, werden über ein oder mehrere
Steckeroder Wandmodule (Zubehör) Leuchten ca. 5 Sekunden nach Aktivierung
des Hundegebells automatisch eingeschaltet und nach ca. 4 Minuten nach letzter
Erfassung wieder automatisch ausgeschaltet. Diese Funktion wird von REX-10
automatisch ausgelöst. Durch Drücken der Tasten Lampen Ein oder Lampen Aus
an der Funk-Fernbedienung können die entsprechenden Lampen auf Adresse 2
auch manuell geschaltet werden.
Hinweis: Die verwendeten Lampenmodule müssen auf die gleiche
Hauscodierung wie die Zentrale eingestellt werden.
Erweiterung mit PIR Bewegungsmelder DM10
Der Bewegungsmelder wir einfach in der Nähe der
Eingangstüre im Außenbereich montiert und meldet somit jede
Bewegung in seinem Erfassungsbereich über Funk an den
DK10 weiter. Ist der REX-10 nun über den Taster
eingeschaltet (LED leuchtet) dann beginnt DK10 unverzüglich
nach einer Erfassung durch den Bewegungsmelder an zu
bellen. 5 Sekunden danach werden die Leuchten über die
Lampenmodule auf Adresse 1 Grundeinstellung eingeschaltet. Das Bellen
verstummt nach 4 Minuten nach letzter Erfassung einer Bewegung durch den
Bewegungsmelder DM10. Wird für die Dauer von 4 Minuten keine Bewegung
mehr wahrgenommen stellt REX-10 seine Tätigkeit ein und die Lampen werden
durch die Lampenmodule automatisch wieder ausgeschaltet. Nach jeder
Erfassung einer Bewegung, stellt der Bewegungsmelder seine Tätigkeit aus
Stromspargründen für 30 Sekunden ein.
REX-10 BARKING DOG
Installation und Inbetriebnahme des Bewegungsmelders DM10
Lösen Sie die Schraube auf der Frontseite des Melders und nehmen Sie die
Frontabdeckung ab und nehmen Sie den Bewegungsmelder durch seitliches
Drücken auf die Halterung (7) von der Rückplatte ab. Öffnen Sie das Batteriefach
auf der Rückseite durch Lösen der zwei Schrauben und nehmen Sie den Deckel
ab. Stellen Sie den Systemcodeschalter und Geräteadresse (Grundeinstellung
A1) gleich wie beim DK10 ein. Setzen Sie die Batterien polungsrichtig in das
Batteriefach ein, schließen Sie das Batteriefach und drehen die beiden
Schrauben wieder ein. Warten Sie nach dem Einlegen der Batterien und Montage
ca. 60 Sek. ab, danach ist der Bewegungsmelder einsatzfähig. Stellen Sie den
Schiebeschalter auf der Rückseite der eingesteckten Zentrale DK10 in die
Stellung Eingabe (Install) und drücken Sie die Taste “Test” auf der Rückseite des
Bewegungsmelders DM10. Die Zentrale DK10 bestätigt diese Einstellung mit
einem Bellen (Zentrale muß ausgeschaltet sein, LED leuchtet nicht). Setzen Sie
das Frontgehäuse wieder auf den Melder auf und befestigen Sie dieses. REX-10
ist nun betriebsbereit und kann nur im eingeschalteten Zustand (LED leuchtet)
über den Bewegungsmelder aktiviert werden. Eine Aktivierung über die
Fernbedienungen ist in jeder Betriebsart möglich.
KR22 Fernbedienung (Zubehör)
Die KR22 wird werksseitig mit HausCode A geliefert. Die oberste Taste bedient
UnitCode 1, die nächste 2, 3 und 4. Die zwei untersten Tasten sind Dimmtasten.
Ändern des Hauscodes (Systemcodes)
1. Drücken Sie auf die oberste Taste AN und halten diese fest. Die rote
Leuchtanzeige blinkt kurz. Nach 3 Sekunden wird die aktuelle Einstellung
angezeigt: 1x blinken ist HausCode A, 2x blinken ist HausCode B, usw.
2. Die oberste Taste loslassen.
3. Drücken Sie nun jeweils kurz auf die gleiche oberste AN-Taste um den
gewünschten HausCode einzustellen (1x=A, 2x=B, usw.) Die rote Leuchtanzeige
blinkt jedesmal, wenn Sie die Taste drücken.
4. Halten Sie beim letzten Drücken die Taste fest. Nach 3 Sekunden zeigt die
Leuchtanzeige den eingestellen HausCode an. Lassen Sie die Taste wieder los.
Ändern des Unitcodes (Gerätecodes)
1. Drücken Sie auf die oberste AUS-Taste und halten diese fest. Die rote
Leuchtanzeige blinkt kurz. Nach 3 Sekunden wird die aktuelle Einstellung
angezeigt: 1x blinken ist UnitCode 1, 2x blinken ist UnitCode 2, usw.
2. Die oberste AUS -Taste loslassen.
3. Drücken Sie nun jeweils kurz auf die gleiche oberste AUS-Taste um den
gewünschten UnitCode einzustellen (1x=1, 2x=2, usw.) Die rote Leuchtanzeige
blinkt jedesmal, wenn Sie die Taste drücken.
4. Halten Sie beim letzten Drücken die Taste fest. Nach 3 Sekunden zeigt die
Leuchtanzeige den UnitCode an. Lassen Sie die Taste wieder los.
Wechseln der Batterie
Entfernen Sie die Rückseite des Gehäuses der Fernbedienung. Schieben Sie die
Batterie aus dem Halter auf der Printplatte und ersetzen Sie die Batterie mit einer
identischen 3 V Lithium-Batterie (KR22; 2 x Typ CR2016). Achten Sie hierbei auf
die Polarität (Oberseite ist +).
REX-10 BARKING DOG
Mise en service et mode d’emploi pour le “Barking Dog” REX 10™ (DK10),
le détecteur de mouvements (DM10E) et la télécommande porte clé (KR22,
optionnel).
Mise en service simple
Suivez les étapes suivantes pour mettre rapidement en service votre système
“Barking Dog”.
Ouvrez le compartiment piles et installez 9 piles de type “C” en respectant la
polarité. Refermez le compartiment piles et branchez le câble secteur dans une
prise secteur près d’une fenêtre ou d’une porte d’où les personnes approchant de
votre maison pourront facilement l’entendre
Note: Les piles sont présentes uniquement dans le cas d’une panne secteur.
Test du système
Mettre l’interrupteur à glissière situé à l’arrière du
“Barking Dog” en position RUN (à gauche). Appuyez
sur la touche “1-ON” de la télécommande porte clé ou
de toutes autres télécommandes X10. Le “Barking
Dog” commence à aboyer. Réglez le niveau du
volume à l’arrière à un niveau qui puisse être entendu
depuis l’extérieur de votre maison. Si vous avez
installé un module de contrôle de lumière X10
(optionnel), 5 secondes après le début de l’aboiement,
le “Barking Dog” allumera tous modules X10 réglés
sur l’adresse A1. L’aboiement s’arrêtera environ 30
secondes plus tard ou si vous appuyez sur la touche
“A1-OFF” d’une télécommande X10.
Si vous avez installez un module de contrôle de
lumière X10, vous pouvez allumez les modules
réglés sur l’adresse A2 en appuyant sur la touche
2-ON de la télécommande porte-clé ou de toutes
autres télécommandes X10. (Les modules réglés
sur A1 se mettent en marchent 5 secondes après
que le “Barking Dog” ait commence à aboyer).
Pour en apprendre plus sur la façon d’installer de
nouveaux accessoires ou changer les réglages par
défaut, lire ci-dessous:
Télécommandes optionnelles
Vous pouvez utiliser différents types de télécommandes X10 pour déclencher le
“Barking Dog”. Ces télécommandes se trouvent dans différentes catégories de
produits : Télécommandes domotiques, contrôleurs domotiques reliés au secteur,
et télécommandes de sécurité.
REX-10 BARKING DOG
Télécommandes domotiques: les télécommandes optionnelles que la KR22,
la télécommande SH624 ou encore les interrupteurs radio comme le
SS13 n’ont pas besoin d’être installés. Le réglage par défaut du “Barking Dog”
est A1, aussi pour le déclencher d’une de ces télécommande il suffit d’appuyer
sur la touche 1 - ON. Appuyer sur 1 - OFF lorsque le “Barking Dog” aboie permet
de l’arrêter.
Contrôleurs domotiques: Tous contrôleurs X10 tel que le mini-contrôleur MT10,
la console SC9000, les interface PC CM11 et CM15Pro etc. peuvent contrôler
le “Barking Dog”. Le code maison et le code unité par défaut du DK10
sont A1, A1-ON permettra donc de déclencher l’aboiement et A1- OFF de l’arrêter.
Pour modifier le réglage par défaut A1 du “Barking Dog” de façon à activer le
“Barking Dog” à l’aide d’un code différent: mettez l’interrupteur à glissière se
trouvant à l’arrière du “Barking Dog” dans la position INSTALL. Vérifiez que le
code maison (code lettre) de votre télécommande correspond bien au code lettre
réglé à l’arrière du “Barking Dog”. Appuyez sur la touche de la télécommande que
vous désirez utilisez pour déclencher le “Barking Dog”. Remettez l’interrupteur à
glissière en position RUN. Par exemple, si vous appuyez sur la touche N° 5 de la
télécommande, le “Barking Dog” sera activé lorsque vous appuierez sur la touche
5-ON (les modules X10 réglés sur l’adresse 5 seront aussi activés 5s après la
commande) et s’arrêtera lorsque vous appuierez sur la touche 5-OFF,.
Détecteur de mouvements DM10
Le détecteur de mouvements inclus permet de déclencher le
“Barking Dog” lorsque quelqu’un s’approche de votre maison.
Ce détecteur permet aussi d’allumer des lumières lorsque la
luminosité devient trop faible au crépuscule et de les éteindre
à l’aube.
Réglage du détecteur de mouvements DM10
Enlevez la vis du capot avant du détecteur de mouvements et enlevez le capot.
Déclipsez le détecteur de mouvements de son socle. Enlevez les 2 vis du
couvercle du compartiment piles. Insérez 4 piles alcalines “AA” en respectant la
polarité. Replacez le couvercle du compartiment piles. Fixez le socle sur un mur
extérieur d’ou le détecteur de mouvements pourra « voir » toutes personnes
s’approchant de votre maison. Reclipsez le détecteur de mouvements sur le
socle. Re-fixez le capot. Ajustez l’inclinaison du détecteur de façon à avoir le
maximum de couverture. Attendez environ 60 secondes après l’installation des
piles pour tester le système.
Pour tester le DM10
Vérifiez que l’interrupteur à glissière se trouvant à l’arrière du “Barking Dog” se
trouve en position RUN (vers la gauche). Armez le barking dog en appuyant sur
le bouton situé à l’arrière. La LED rouge située à l’arrière s’allume. Bougez devant
le détecteur de mouvements, le “Barking Dog” commence à aboyer. Cinq
REX-10 BARKING DOG
secondes plus tard, le “Barking Dog” allumera les modules X10 réglés sur
l’adresse A1. Le “Barking Dog” s’arrêtera environ 4 minutes plus tard. Si le détecteur
de mouvements est déclenché de nouveau, la séquence complète se répètera
de nouveau. Si aucun mouvement n’est détecté dans les 4 minutes, le “Barking Dog”
éteint les modules X10 réglés sur A1. Note: après son déclenchement, le
détecteur de mouvements est inactif pour une période de 30s. Appuyez sur le
bouton à l’arrière du “Barking Dog” pour le désarmer.
Télécommande porte-clés KR22
Par défaut, le "code Maison" de la KR22 est A. Les 2 touches situées en haut du
KR22 commande l'adresse 1, les touches suivantes commande 2, 3 et 4 touches
suivantes commande l'adresse 2 et les 2 boutons inférieurs permettent de faire
varier l'intensité du dernier module commandé.
Pour changer le "Code Maison"
1. Maintenez appuyer la première touche coté ON. La LED rouge clignote une
fois puis 3 secondes plus tard elle clignote pour indiquer le "Code Maison" actuel:
1 clignotement pour le code A, 2 clignotements pour le code B, …, 16
clignotements pour le code P
2. Relâchez la touche.
3. Appuyez et relâchez la 1ère touche (coté ON) autant de fois que nécessaire
pour le code que vous voulez entrer. Une fois pour A, 2 fois pour B, …, 16 fois
pour P.
IMPORTANT: Maintenez la touche lors du dernier appui. 3 secondes plus tard la LED
rouge va clignoter indiquant le code que vous venez d'entrer, ex.: 3 clignotements pour le
code C. Si un problème survient durant cette procédure, la LED s'allume durant une
seconde et le code reste inchangé.
Pour changer le "Code Unité"
Il est possible de programmer un nouveau "Code Unité" pour la première touche,
la touche suivante commandant alors automatiquement cette adresse plus 1 (ex:
si l'on reprogramme l'adresse 6 pour la première touche, la seconde touche aura
l'adresse 7).
1. Maintenez appuyez la première touche coté OFF. La LED rouge clignote une
fois puis 3 secondes plus tard elle clignote pour indiquer le "Code unité" actuel: 1
clignotement pour le code 1, 2 clignotements pour le code 2, …, 16 clignotements
pour le code 16
2. Relâchez la touche .
3. Appuyez et relâchez la 1ère touche autant de fois que nécessaire pour le code
que vous voulez entrer: une fois pour le code 1, deux fois pour le code 2, …,
seize fois pour le code 16.
IMPORTANT: Maintenez la touche lors du dernier appui. 3 secondes plus tard la LED
rouge va clignoter indiquant le code que vous venez d'entrer, ex.: 3 clignotements pour le
code 3. Si un problème survient durant cette procédure, la LED s'allume durant une
seconde et le code reste inchangé.
Pour changer la pile
Ouvrir la télécommande. Remplacez la pile usagée par une pile (3V lithium) du
même type (KR22: 2 x CR2016) en respectant les polarités.
REX-10 BARKING DOG
GEBRUIKERSHANDLEIDING
Gebruikershandleiding voor REX-10™ Barking Dog Alarm (DK10),
Bewegingsmelder voor buitengebruik (DM10E) en (optionele) Key Chain
Afstandsbediening (KR22).
Eenvoudige opstelling
Volg deze stappen om eenvoudig het Barking Dog systeem in werking te stellen.
Open het batterijvak aan de achterzijde van de Basisconsole en installeer 9 stuks
1,5V “C” batterijen (let op het + en – teken). Sluit het batterijvak en steek de
stekker van de PS500 voedingsadapter in een stopcontact nabij een raam of
buitendeur, zodat de luidspreker goed hoorbaar is wanneer iemand het huis
nadert.
Opmerking: batterijen zijn alleen geschikt voor back-up in geval van een
stroomstoring.
Het systeem testen
Zorg ervoor dat de Mode-schakelaar aan de
achterzijde in de RUN-stand staat. Druk op de A1ON toets van een willekeurige X10 controller en de
Barking Dog start met blaffen. U kunt het volume
instellen aan de achterzijde van de unit, zodat het
geluid buiten goed te horen is. Wanneer u ook
(optionele) lamp en apparaat modules geïnstalleerd
heeft op adres A1, zullen deze ongeveer 5
seconden nadat het blaffen begon aangeschakeld
worden. De Barking Dog zal ongeveer na 30
seconden automatisch stoppen met blaffen, of direct
wanneer u het commando A1 OFF zendt.
Wanneer u de optionele X10 lamp en apparaat
modules in uw huis heeft geïnstalleerd, kunt u
deze bedienen met de overige toetsen van uw
afstandsbediening. Bijvoorbeeld de A2 ON toets
schakelt alle modules op adres A2 aan. (Modules
die op adres A1 ingesteld zijn, zullen
aanschakelen zodra de Barking Dog begint te
blaffen). Wanneer u meer wilt weten over
toevoegen van optionele accessoires en het
veranderen van fabrieksinstellingen, lees dan
verder:
Optionele afstandsbedieningen
U kunt diverse verschillende typen X10 controllers en afstandsbedieningen
gebruiken om de Barking Dog te activeren. Deze (afstands)-bedieningen zijn in
verschillende categorieën in te delen:
REX-10 BARKING DOG
Home Automation afstandsbedieningen: zoals bijvoorbeeld de KR22 key-chain
remote, de 16 kanaals afstandsbediening SH624 en de draadloze schakelaar
SS13 behoeven niet geïnstalleerd te worden. De standaard adres code voor de
Barking Dog is A1, dus wanneer A1 aangestuurd wordt vanaf bovenstaande
afstandsbedieningen zal Barking Dog direct reageren.
Home Automation plug-in controllers: zoals bijvoorbeeld MT10 Mini Timer,
SC9000 Controller, CM11 Computer Interface, CM15Pro Computer interface
etc. kunnen de Barking Dog bedienen.
Om het standaard adres A1 van de Barking Dog te wijzigen, zodat deze
reageert op een andere code dient u de volgende stappen te volgen: Zet de
Mode-schakelaar in de stand INSTALL. Zorg dat de Huis Code van de
afstandsbediening overeenkomt met die van de DK10 basisconsole. Zend de
nieuwe Unit Code met uw afstandsbediening. Zet de Mode-schakelaar terug in de
RUN stand. Wanneer u bijvoorbeeld toets 4-ON van uw afstandsbediening
gebruikt heeft, zal de Barking Dog vanaf nu reageren op 5-ON en 5-OFF, en zal
alle modules met adres HC5 aanschakelen 5 seconden nadat de Barking Dog
geactiveerd is.
Bewegingsmelder voor buitengebruik DM10E
De bijgevoegde batterij gevoede bewegingsdetector is
bedoeld om, zodra iemand in de buurt van uw huis komt, de
aanwezigheidsdetectie door te geven aan de Barking Dog
zodat deze begint te blaffen. De bewegingsmelder bevat
tevens
een
geïntegreerde
schemerschakelaar
die
automatisch lampen aanstuurt.
Instellen van de DM10 Bewegingsmelder
Neem de schroef aan de voorzijde van de DM10 los en haal de afdekkap van de
bewegingsmelder af. Neem de rugplaat van de melder af. Haal de schroeven van
het batterijvak los. Installeer 4 “AA” batterijen in het vak en let daarbij op de
polariteit. Plaats het batterij klepje terug. Bevestig de rugplaat van de
bewegingsmelder op een plaats waar deze een groot detectie bereik heeft. Klik
de bewegingsmelder terug op de rugplaat en schroef de afdekplaat weer vast op
de melder. Verdraai de PIR lens voor een beter en specifieker bereik. De unit zal
ongeveer 60 seconden in rust stand moeten zijn na het installeren van de
batterijen, voordat de melder getest kan worden.
Testen van de DM10 Bewegingsmelder
Zorg dat de Mode-schakelaar op de achterzijde van de Barking Dog in de RUN
stand staat. Alarmeer de Basis Console door op de ARM/DISARM toets te
drukken die op de achterzijde van de Barking Dog zit. De rode LED naast de
knop licht op ter confirmatie. Beweeg voorlangs de DM10 bewegingsmelder, de
Basis Console zal beginnen met blaffen. Vijf seconden later zal de Basis Console
lamp en apparaatmodules op adres A1 (of herziene adres) aanschakelen. Het
REX-10 BARKING DOG
blaffen stopt na ongeveer 4 minuten. Wanneer de bewegingsmelder weer
beweging detecteert begint de procedure opnieuw.
Wanneer geen beweging is gedetecteerd voor 4 minuten zal de Basis Console de
lampen en apparaten op A1 uitschakelen. Opmerking: om batterijen te sparen zal
NA een detectie de bewegingsmelder niet opnieuw detecteren binnen een tijd van
30 seconden. Om de test af te sluiten, drukt u de ARM/DISARM toets in.
Opmerking: De KR22 key chain afstandsbediening bedient standaard X10
adres A1 tot A4.
Het veranderen van de Huis Code
1. Druk op de bovenste toets AAN en houd deze ingedrukt. De rode LED knippert
kort. Na 3 seconde wordt de huidige instelling weergegeven: 1x knipperen is Huis
Code A, 2x knipperen is Huis Code B, enz.
2. Laat de bovenste AAN toets los.
3. Druk nu voor de gewenste Huis Code telkens kort op dezelfde bovenste AAN
toets (1x =A, 2x=B, etc.). De LED knippert bij iedere keer dat u de toets indrukt.
4. Houd bij de laatste keer de toets ingedrukt. Na 3 seconden geeft de LED de
ingestelde Huis Code weer. Laat nu de toets los.
Het veranderen van de Unit Code
Bij het instellen van de Unit Code wordt de bovenste toets ingesteld op de
gewenste Unit Code. De volgende toets is altijd automatisch één Unit Code hoger
dan de eerste (b.v. wanneer u de eerste toets instelt op Unit Code 6, dan is de
volgende toets automatisch Unit Code 7).
1. Druk op de bovenste UIT toets en houd deze ingedrukt. De rode LED knippert
kort. Na 3 seconde wordt de huidige instelling weergegeven: 1x knipperen is Unit
Code 1, 2x knipperen is Unit Code 2, enz.
2. Laat de bovenste UIT toets los.
3. Druk nu voor de gewenste Unit Code telkens kort op dezelfde bovenste UIT
toets (1x =1, 2x=2, etc.). De LED knippert bij iedere keer dat u de toets indrukt.
4. Houd bij de laatste keer de toets ingedrukt. Na 3 seconden geeft de LED de
ingestelde Unit Code weer. Laat nu de toets los.
Het verwisselen van de batterij
Verwijder de achterzijde van de behuizing van de afstandsbediening. Schuif de
batterij uit de houder op de printplaat en vervang de batterij met een identieke 3V
lithium batterij (KR22: 2 x type CR2016). Let hierbij op de polariteit (bovenzijde is
+).
REX-10 BARKING DOG
Troubleshooting
In general X10 products are extremely easy to install and very reliable. Like other
electronic equipment, they do require proper set-up for correct operation. If you experience
any problems, first go through this troubleshooting guideline.
Having trouble with just one device...
- Does the X10 controller work with other modules? If it doesn’t refer to «Things to check if NOTHING
works…».
- Is the module you are trying to control completely plugged into the wall outlet?
- Is the switch for the light or appliance you are trying to control turned on?
- Does the light or appliance work OK if y ou plug it directly into an outlet?
- Is the module plugged into a surge protector? A surge protector might block signals from your
interface or controller!
- Noise on your house wiring could cause a module not to work at all or only work intermittently.
Although not very likely, as special circuitry has been designed into the X10 modules and CE product
standards require that electrical devices do not generate noise, check to see if any of these (noisy)
devices are operating when you are having problems :
Wireless intercoms in transmit (talk) mode, Baby Monitors that transmit over your
house wiring, Wireless Doorbells that use the house wiring, Laser Printers, Electric
Motors (old ones), Electric hair dryers, Electric shavers, Vacuum cleaners, Floor
scrubbers, Electric Carving Knives, Food Processors, Blenders, Mixers, Micro-wave
ovens.
To determine if you have an interference (noise) problem, unplug anything that you
suspect might be causing the problem and try controlling your device again. Noisy
devices could be anywhere in your house, but start looking around the area that you
are having a problem.
There is a device available called a Plug-in Noise Filter (FM10) that will reduce the
noise injected into the house wiring from a noisy device. You plug the noisy device
into the filter and then plug the filter into the wall outlet. Contact X10 Europe for your
nearest supplier.
- If you cannot locate any things that are interfering with your system, try using a different module of
the same type at this same location in your home. Remember to set the correct House Code/Unit
Code on the new module. If this fixed the problem, the original module is possibly defective.
- If no modules work in that location, you may have a problem with the wall outlet, you may have a
noise problem as describe above, or you may have a problem with your house wiring. Contact your
local electrician.
Things to check if NOTHING works......
- Is the X10 controller plugged into a working outlet? Is the outlet controlled by a wall switch? If so, is it
turned on?
- Is the House Code set correctly?
- If you still cannot control any modules, plug your controller and module into the same outlet (using a
non surge protected outlet strip, if necessary). See if you can control this module. If not, contact your
supplier for help.
- If it does work correctly with the controller and the module into the same outlet, try plugging the
module in where you originally had it. If it doesn’t work when you plug the module in somewhere else
in your home (try sev eral different locations and several modules of the same type), contact your
supplier for help.
PLC Auto Tester
A PLC Auto Tester, containing a Signal Strength Indicator and Test Transmitter, is available for
checking if the X10 PLC signals arrive in good shape at the point where the receiver modules are.
Please contact your supplier for more details.
Amendments/Additions to 2007 manual included with the DK10
PLC = Power Line Communications – X10 Communications on the Mains Wiring
RF = Radio Frequency – Wireless Transmitters (DM10E, MS13E, KR22E, etc)
House Code = X10 House Code A – P
Unit Code = X10 Unit Code 1-16
PIR HA = Passive Infra-Red Movement Detector HA (DM10E, MS13E)
PIR Secured = Passive Infra-Red Movement Detector Security (MS18E/MS90)
You can assign optional security remotes and sensors (Motion and Door/Window) to the console.
These can be used to arm/disarm respectively trip the console.
(The operation of the tamper switch on the PIR and door/window sensors: Currently, this will operate
as if the sensor has been tripped – so, with these changes, the tamper switch will trigger the 4
minute barking sequence when the dog is armed).
Home Automation modes:
1) Home Automation Mode (ARM LED not lit):
• When sent X10 RF commands on the correct X10 HOUSE CODE/X10 UNIT CODE
combination, the dog does not bark
•
When sent X10 PLC commands on the correct X10 HOUSE CODE/X10 UNIT CODE
combination, it starts/stops the barking – The DK10 will bark for 30 SECONDS with commands
received via PLC
•
Console works as X10 PLC Transceiver for dusk/dawn detection from PIR to control e.g. a
light on PIR X10 HOUSE CODE/X10 UNIT CODE+1 on(dusk)/off(dawn).
•
Console works as standard RF/PLC transceiver. All X10 UNIT Codes/Commands to the set
X10 HOUSE CODE are passed on to the power line.
2) Home Automation Mode (ARM LED lit, manual control):
• When sent X10 RF commands (via the DM10E or optional KR22E) on the correct X10 HOUSE
CODE/X10 UNIT CODE combination, it starts/stops the barking – The DK10 will bark for 4
MINUTES with commands received via RF. Please see Trigger Period on page 2 for further
information about the time length of barking
Note: (If you see only a 30 second bark length, then your premises/neighbor must have a
X10 Transceiver module set to the same HOUSE CODE – to fix this, change the DK10/DM10
HOUSE CODE to another letter)
•
When sent X10 PLC commands on the correct X10 HOUSE CODE/X10 UNIT CODE
combination, it starts/stops the barking – The DK10 will bark for 30 SECONDS with commands
received via PLC
•
With RF the unit does respond and is tripped to all the set X10 HOUSE CODE/X10 UNIT CODE.
So default X10 HOUSE CODE=A/X10 UNIT CODE=1, and this can be set by changing the
code wheel for the X10 HOUSE CODE, and sliding the switch to INSTALL and send the
respective X10 UNIT CODE via any X10 standard RF code.
•
When tripped, after a couple of seconds the Console sends the PLC ON command on the
Console Address; After 4 minutes the PLC OFF command is send to the same address. This is
to switch on a lamp or X10 Unit Code.
Secured Modes:
3) Secured mode 1 (unit set to RUN, and ARMED LED off, disarmed by security remote DISARM, or
manually):
• Console works as X10 PLC Transceiver for dusk/dawn detection from PIR to control e.g. a
light on PIR X10 HOUSE CODE/X10 UNIT CODE+1 on(dusk)/off(dawn).
• Console works as standard RF/PLC transceiver. All X10 UNIT Codes/commands to the set X10
HOUSE CODE are passed on to the power line.
• When sending X10 PLC command on the correct X10 HOUSE CODE/X10 UNIT CODE
combination, it starts/stops the barking.
• Console works as X10 PLC Transceiver for security lights, in case of security lights light on/of
button KR18/KR10/21, the console sends X10 HOUSE CODE/X10 UNIT CODE+1 on/off. SH600
does not have this button
• Console responds to PANIC button of assigned security remotes; Panic RF will trip the
console for 30 seconds.
4) Secured mode 2 (unit set to RUN, and ARMED LED lit, armed by security remote ARM, or
manually):
• Idem as Secured Mode 1 +
• With RF the unit does respond and is tripped to the set X10 HOUSE CODE/X10 UNIT CODE. So
default X10 HOUSE CODE=A/X10 UNIT CODE=1, and this can be set by changing the code
wheel for the X10 HOUSE CODE, and sliding the switch to INSTALL and send the respective
X10 UNIT CODE via any X10 standard HA RF code.
Trigger Periods:
The trigger period operates as follows:
• When triggered, the unit will immediately start barking
• 5 seconds after a trigger, the unit code (X10 UNIT CODE) + On power line signal will be sent
• 4 minutes later, the unit will cease barking and X10 UNIT CODE + Off power line signal will be
sent
If the unit is triggered and then receives another trigger a minute later, the response will be as
follows:
• When initially triggered, the unit will immediately start barking
• 5 seconds after a trigger, the unit code (X10 UNIT CODE) + On power line signal will be sent
• When the new trigger is received (assume after a minute) the alarm timer will be reset to 4
minutes
• 5 seconds after the new trigger, the unit code (X10 UNIT CODE) + On power line signal will
be sent
• 4 minutes after the new trigger, the unit will cease barking and X10 UNIT CODE + Off power
line signal will be sent
So, in this example, the barking time has been extended by one minute as a result of the new
trigger.
In case of PANIC code:
Panic
Panic
30 seconds - the second panic does not retrigger
Panic
Sensor
max: 30 seconds plus 4 minutes for the alarm
Sensor
Panic
4 minutes, the panic is ignored
Sensor
Sensor
max: 7:59 minutes if the second alarm was received at 3:59
Panic
Panic
Sensor
Sensor
Panic
Sensor
Panic
Sensor
max: 60 seconds - the second panic DOES retrigger
max: 30 seconds plus 4 minutes for the alarm
4 minutes, the panic is ignored
max: 7:59 minutes if the second alarm was received at 3:59