1
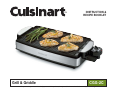
TM
Grill & Griddle
INSTRUCTION &
RECIPE BOOKLET
CGG-2C
For your safety and continued enjoyment of this product, always read the instruction book carefully before using.
IMPORTANT SAFEGUARDS
14. Always attach plug to appliance first, then plug cord into the wall
outlet. To disconnect, turn control to OFF setting, then remove
plug from wall outlet.
When using an electrical appliance, basic safety precautions should
always be followed, including the following:
1.
READ ALL INSTRUCTIONS.
2.
Unplug from outlet when not in use and before cleaning. Allow
to cool before putting on or taking off parts, and before
cleaning appliance.
3.
Do not touch hot surfaces. Use handles and knobs. Always use
oven mitts when handling hot material.
4.
To protect against risk of electrical shock, do not immerse the
product housing in water or any other liquid. If housing falls into
liquid, unplug the cord from outlet immediately. DO NOT reach
into the liquid
5.
To avoid possible accidental injury, close supervision is necessary
when any appliance is used by or near children.
6.
Do not operate any appliance with a damaged cord or plug or
after the appliance has malfunctioned or has been dropped or
damaged in any way or is not operating properly. Return the
appliance to the Customer Service Centre (see Warranty for
details) for examination, repair or mechanical or electrical
adjustment.
7.
The use of accessory attachments not recommended by CuisinartTM may result in fire, electrical shock or injury to persons.
8.
Do not use outdoors, or anywhere the cord or unit housing might
come into contact with water while in use.
9.
Do not let power cord hang over edge of table or counter, or touch
hot surfaces.
15. WARNING: TO REDUCE THE RISK OF FIRE OR ELECTRIC
SHOCK, ONLY AUTHORIZED PERSONNEL SHOULD DO
REPAIRS.
16. Do not operate your appliance in an appliance garage or under a
wall cabinet. When storing in an appliance garage always unplug
the unit from the electrical outlet. Not doing so could create a risk
of fire, especially if the appliance touches the walls of the garage or
the door touches the unit as it closes.
ATTENTION: AS A PRECAUTION PLEASE CHECK TO ENSURE
THE CORD PLUG IS NOT LOOSELY CONNECTED TO THE
ELECTRICAL OUTLET. LOOSE FITTING CONNECTIONS CAN
LEAD TO OVERHEATING.
SAVE THESE INSTRUCTIONS FOR
HOUSEHOLD USE ONLY
SPECIAL CORD SET INSTRUCTIONS
A short power-supply cord is provided to reduce the risks resulting from
becoming entangled in or tripping over a longer cord. Longer extension
cords are available and may be used if care is exercised in their use.
If a long extension cord is used, the marked electrical rating of the
extension cord should be at least as great as the electrical rating of the
appliance, and the longer cord should be arranged so that it will not
drape over the countertop or tabletop where it can be pulled on by
children or animals, or tripped over.
10. Do not place on or near a hot gas or electric burner, or in a heated
oven.
CONTENTS
11. Unplug the unit when finished using.
This appliance has a polarized plug (one blade is wider than the other).
To reduce the risk of electric shock, this plug will fit in a polarized outlet
only one way. If the plug does not fit fully in the outlet, reverse the plug.
If it still does not fit, contact a qualified electrician. Do not modify the
plug in any way.
12. Do not use appliance for other than intended use.
13. Extreme caution must be exercised when moving an appliance
containing hot oil or other hot liquids.
2
TABLE OF CONTENTS
PARTS AND FEATURES:
Introduction . . . . . . . . . . . . . . . . . . . . . . . . . . . . . . . . . . . . . . Page 3
1.
Base – Elegant brushed stainless steel housing.
Parts and Features . . . . . . . . . . . . . . . . . . . . . . . . . . . . . . . . . Page 3
2.
Reversible Cooking Plate – Extra large 18” (45cm) nonstick
cooking surface. One side is a grill surface; the other side is a
griddle surface.
3.
Temperature Control – Five adjustable settings, OFF position
and indicator light. Plugs into cooking plate when on base.
4.
Drip Tray – Collects grease and removes from base for cleanup.
5.
Cleaning/Scraping Tool – Helps clean grill or griddle after
cooking.
6.
Convenient Handles – For reversing cooking plate.
Before the First Use . . . . . . . . . . . . . . . . . . . . . . . . . . . . . . . . Page 3
Assembly Instructions . . . . . . . . . . . . . . . . . . . . . . . . . . . . . . Page 4
Operating Instructions . . . . . . . . . . . . . . . . . . . . . . . . . . . . . . Page 4
Cleaning and Care . . . . . . . . . . . . . . . . . . . . . . . . . . . . . . . . . Page 5
Storage. . . . . . . . . . . . . . . . . . . . . . . . . . . . . . . . . . . . . . . . . . Page 5
Temperature Chart . . . . . . . . . . . . . . . . . . . . . . . . . . . . . . . . . Page 5
Tips and Hints . . . . . . . . . . . . . . . . . . . . . . . . . . . . . . . . . . . . Page 6
Warranty . . . . . . . . . . . . . . . . . . . . . . . . . . . . . . . . . . . . . . . . . Page 7
BEFORE THE FIRST USE:
Recipes. . . . . . . . . . . . . . . . . . . . . . . . . . . . . . . . . . . . . . . Page 8-15
Remove all packaging materials and any promotional labels or stickers
from your grill. Be sure all parts (listed above, Parts and Features) of
your new appliance have been included before discarding any
packaging materials. You may want to keep the box and packing
materials for use at a later date. Before using your CuisinartTM Grill &
Griddle for the first time, remove any dust from shipping by wiping the
base and temperature control with a damp cloth. Thoroughly clean
both sides of the cooking plate, drip tray and scraping tool. The
cooking plate can be submerged in water for cleaning. The drip tray
and scraping tool are dishwasher safe.
INTRODUCTION
Congratulations on your purchase of the CuisinartTM Grill & Griddle.
This product is the ultimate kitchen appliance, with a large 18”
(45cm) reversible, nonstick plate that makes it two appliances in
one.
The cooking plate has been designed with an internal heating element for even heat transfer while cooking. Use the grill surface to
evenly grill poultry, meats, seafood, vegetables and much more. Or
flip the cooking plate to the griddle surface and set the electric thermostat to perfectly cook pancakes, eggs, hash browns or toasted
cheese sandwiches.
Never place the temperature control with power cord in the dishwasher,
nor should you immerse it in water. Always use a damp cloth to clean
these parts.
2
7
4
3
1
5
3
ASSEMBLY INSTRUCTIONS:
1.
2.
3.
4.
5.
Place base on a clean, flat surface
where you intend to cook.
One end of the base has a slot
provided for the drip tray. Slide the
drip tray into the base. (see figure A.)
The cooking plate has two sides: The
Grill side with ribbed surface is
intended for grilling steaks, hamburgers, chicken, seafood and vegetables.
(see figure B.) The Griddle side with
smooth surface is perfect for frying
bacon and eggs, pancakes, French
toast and toasted sandwiches. (see
figure C.) Choose the side you intend
to cook on and place the cooking
plate on the base with the chosen side
facing up. Make sure that the drip
holes in the cooking plate line up over
the drip tray.
Insert the temperature control probe
into the socket in the cooking plate on
the end opposite the drip holes. It will
click into place. (see figure D.)
surface. Temperatures range from about 150°F (66°C) on the Warm
setting to 450°F (232°C) on the Sear Setting. You may vary the setting
of the control knob at any time during cooking, and may wish to do
so, depending on the types of foods on the cooking plate. Refer to
the Cooked Food Temperature Chart on page 5 for recommendations.
A.
CAUTION: Handles will become hot during use. The cooking plate
should not be removed from the base or flipped over while hot. Allow
unit to cool down for at least 30 minutes before handling.
The Grill & Griddle has a built-in safety feature that prevents the unit
from operating when the cooking plate is not on the base. If the
cooking plate is removed from the base while in use, the power will
shut off.
B.
NOTE: The first time you use your Grill & Griddle, it may have a slight
odour and smoke a bit. This is normal and common to appliances
with a nonstick surface.
To flip over to use reverse side of
plate:
C.
1. Turn temperature control knob to
OFF setting.
2. Unplug appliance from wall outlet.
3. Pull out temperature control probe
from cooking plate.
D.
Plug the cord into a standard electrical
outlet. As a precaution please check to ensure the cord plug is
not loosely connected to the electrical outlet. Loose fitting
connections can lead to overheating.
4. Allow unit to cool down completely.
5. Carefully slide out the drip tray and dispose of its contents. Clean
tray and replace in base. (see Cleaning, care and maintenance).
6. Thoroughly clean cooking plate. (see Cleaning, care and
maintenance).
OPERATING INSTRUCTIONS:
Once the Grill & Griddle is assembled properly and you are ready to
begin cooking, turn the temperature control knob to the desired
temperature level. The indicator light will illuminate to indicate that the
power is on. It may take 10-12 minutes to reach operating temperature, depending on the temperature level that has been set. When the
thermostat has reached the desired temperature, the indicator light
will turn off, indicating that the Grill & Griddle is ready for cooking.
7. Hold cooking plate by the handles when removing from base,
flipping plate over, and returning to base.
During operation, the light will continue to turn on and off as the
thermostat regulates the temperature. This is normal. The temperature
control is used to set and maintain the temperature of the cooking
r /FWFSVTFNFUBMVUFOTJMTBTUIFZXJMMTDSBUDIUIFOPOTUJDLHSJMM
plate. Instead, use only wooden or heat-proof plastic utensils.
8. Make sure that holes in plate line up over drip tray.
9. Reconnect the temperature control and plug the cord into a
standard electrical outlet.
User Maintenance:
r /FWFSMFBWFQMBTUJDVUFOTJMTJODPOUBDUXJUIUIFIPUHSJMMQMBUF
4
r "GUFSVTJOHTDSBQFFYDFTTGPPECVJMEVQUISPVHIIPMFTBOEJOUPESJQ
tray, then wipe off any residue with a paper towel before proceeding
with next recipe.
the probe, as this can cause damage.
Rare
Bright red centre, lighter pink
to outside
140°F (60°C)
CLEANING, CARE AND MAINTENANCE
Medium
160°F (71°C)
CAUTION: BEFORE CLEANING APPLIANCE, MAKE SURE IT HAS
COOLED DOWN COMPLETELY.
Light pink centre, brown to
outside
Well-done
Brown consistently throughout
170°F+ (77°C)
Once you have finished cooking, allow the unit to cool down completely and then turn the temperature control knob to the OFF setting.
Unplug the appliance from wall outlet and remove the temperature
control probe from cooking plate.
COOKED FOOD TEMPERATURE CHART
Carefully slide the drip tray out from the base and dispose of its
contents. The drip tray can be cleaned by hand or in the dishwasher.
Beef
The USDA recommends cooking all ground beef to at least
Medium (160°F/ 71°C) doneness, or until centre is no longer pink.
Use the cleaning/scraping tool to remove any leftover food from the
cooking plate. The scraping tool can be washed by hand or in the
dishwasher.
Pork
Always grill using an instant read thermometer until the internal temperature reaches 160°F (71°C) when tested.
If you have been cooking seafood, wipe the cooking plate with lemon
juice to prevent seafood flavour from transferring to the next recipe.
Poultry
Boneless poultry breast should be cooked to an internal temperature
of 170°F (77°C).
Check internal temperature, using an instant read thermometer.
Hold cooking plate by handles when removing. The cooking plate
can be washed by hand, using a soft sponge or cloth and hot water.
The cooking plate may be submerged in water, but DO NOT wash in
the dishwasher. Do not use metallic objects such as knives or forks
for cleaning. Do not use a scouring pad for cleaning. The nonstickcoating can be damaged.
Ground poultry should be cooked to an internal temperature of 165170°F (74-77°C).
(The CuisinartTM Grill & Griddle is not recommended for cooking
bone-in poultry.)
Seafood
The temperature control can be wiped clean with a damp cloth.
Never submerge the temperature control or plug in water. Do not
place it in a dishwasher. Wipe it clean with a damp cloth.
Fin Fish
– Cook until opaque and easily flaked with a fork.
Scallops – Cook until opaque and firm.
The housing base can be wiped clean with a soft, dry cloth. For
tough stains, dampen cloth. Never use an abrasive cleaner or harsh
pad.
Shrimp
– Cook until shrimp turn orange/red and flesh is pearly
opaque.
Bacon
Cook bacon until crispy to taste.
Any other servicing should be performed by an authorized service
representative.
Hot Dogs/Smoked Sausages
Although they are “precooked”, we recommend cooking hot dogs
and smoked sausages until the internal temperature is 165°F (74°C)
when tested with an instant read thermometer.
STORAGE
Always dry and assemble the grill (without controller) before storing.
Ensure that the base, cooking plate and drip tray are correctly
positioned.
Store the temperature control in a safe place. Do not knock or drop
5
Tips & Hints for Using the CuisinartTM
Grill & Griddle
r 'SFODI5PBTUJTTJNQMFUPQSFQBSFPOUIF(SJEEMF6TFZPVSGBWPVSJUF
recipe using egg and milk mixture to soak bread, then cook on
Griddle preheated to Medium heat.
r 5SJNFYDFTTGBUTGSPNNFBUCFGPSFHSJMMJOHHSJEEMJOH
r *GQSFQBSJOHBDPNQMFUFCSFBLGBTUVTJOHUIF(SJEEMFGPSBDSPXE
cook meats first and keep them warm in a Low (200°F/ 93°C) oven
after draining. Then cook hash browns, pancakes or French toast;
keep warm in low oven on a rack placed over a baking sheet.
Lastly, prepare and cook eggs.
r %POPUQSFTTEPXOPONFBUTQPVMUSZPSTFBGPPEXIFOHSJMMJOH
griddling – this will press out the juices, which keep the texture of
the meat moist and tender.
r 5PDSFBUFBiEJBNPOEuQBUUFSOPONFBUTBOEàTIXIFOHSJMMJOH
brush or pat item lightly with olive oil. Cook on the first side without
turning, for 2 to 3 minutes. Then rotate 45 degrees (a quarter turn)
and cook for 2 to 3 minutes longer or until that side is done. Repeat
the procedure for the second side.
r 5PQSFQBSFCBDPOQMBDFUIFCBDPOTUSJQTPOUIFDPME(SJEEMF)FBU
to Medium-High, and cook until desired crispiness is reached,
turning once or twice while cooking.
r 4JNQMJGZDIPQQJOHBOECMFOEJOHUBTLTXIJMFQSFQBSJOHUIFGPMMPXJOH
recipes, by using a CuisinartTM Food Processor, Chopper/Grinder or
Blender.
r 'JSNáFTIFEàTIDBOCFDPPLFEEJSFDUMZPOFJUIFSUIF(SJMMPS
Griddle surface. Smaller items such as shrimp or scallops can be
skewered if desired (if using wooden skewers, soak first to prevent
burning).
r 'PSUIFCFTUCVSHFSTIBOEMFUIFNFBUBTMJUUMFBTQPTTJCMF1SFTT
to 6 ounces (141-170g) lean ground meat into 4-inch (10cm) rounds
– a large round cookie cutter makes a good template. Grill, then
season with salt and pepper to taste.
r 5IF(SJMMDBOCFVTFEUPHSJMMGPPETPUIFSUIBONFBUT(SJMMFE(BSMJD
Bread or “Texas” Toast can be made by brushing melted butter
seasoned with garlic and herbs on thickly sliced artisan breads,
then grilling until golden brown. Vegetables can be grilled as an
entrée or side dish, and fruits can be grilled for desserts. Firm tofu
can also be marinated and grilled.
r 5IF(SJEEMFJTUIFQFSGFDUBQQMJBODFGPSQSFQBSJOH(SJMMFE$IFFTF
Sandwiches for a group. Using 2 slices per sandwich of your
favourite bread, lightly brush one side of each slice with melted
butter or olive oil, add your favourite fillings, and “Grill” on the
Griddle side, preheated to Medium High. Turn when toasty, crisp
and deep golden, about 3 to 4 minutes per side.
6
WARRANTY
LIMITED THREE-YEAR WARRANTY
To facilitate the speed and accuracy of your return, please enclose:
rGPSTIJQQJOHBOEIBOEMJOHPGUIFQSPEVDUDIFRVFPSNPOFZPSEFS
r3FUVSOBEESFTTBOEQIPOFOVNCFS
We warrant that this Cuisinart product will be free of defects in materials or
workmanship under normal home use for 3 years from the date of original
purchase. This warranty covers manufacturer’s defects including
mechanical and electrical defects. It does not cover damage from
consumer abuse, unauthorized repairs or modifications, theft, misuse, or
damage due to transportation or environmental conditions.
Products with removed or altered identification numbers will not be
covered.
r%FTDSJQUJPOPGUIFQSPEVDUEFGFDU
r1SPEVDUEBUFDPEFDPQZPGPSJHJOBMQSPPGPGQVSDIBTF
r"OZPUIFSJOGPSNBUJPOQFSUJOFOUUPUIFQSPEVDUTSFUVSO
1SPEVDUEBUFDPEFDBOCFGPVOEPOUIFVOEFSTJEFPGUIFCBTFPGUIF
product. The product date code is a 4 or 5 digit number. Example,
120630 would designate year, month & day (2012, June 30th).
This warranty is not available to retailers or other commercial purchasers
or owners. If your Cuisinart product should prove to be defective within the
warranty period, we will repair it or replace it if necessary. For warranty
purposes, please register your product online at www.cuisinart.ca to
facilitate verification of the date of original purchase and keep your original
receipt for the duration of the limited warranty.
Note: We recommend you use a traceable, insured delivery service for
added protection. Cuisinart will not be held responsible for in-transit
damage or for packages that are not delivered to us.
To order replacement parts or accessories, call our Customer Service
Centre at 1-800- 472-7606.
This warranty excludes damage caused by accident, misuse or abuse,
including damage caused by overheating, and it does not apply to
scratches, stains, discolouration or other damage to external or internal
surfaces that does not impair the functional utility of the product. This
warranty also expressly excludes all incidental or consequential damages.
For more information, please visit our website at www.cuisinart.ca
Your Cuisinart product has been manufactured to the strictest
specifications and has been designed for use only in 120 volt outlets and
only with authorized accessories and replacement parts.
This warranty expressly excludes any defects or damages caused by
attempted use of this unit with a converter, as well as use with
accessories, replacement parts or repair service other than those
authorized by Cuisinart.
If the appliance should become defective within the warranty period, do
not return the appliance to the store. Please contact our Customer Service
Centre:
Toll-free phone number:
1-800-472-7606
Address:
Cuisinart Canada
100 Conair Parkway
Woodbridge, Ont. L4H 0L2
Email:
[email protected]
Model:
CGG-2C
7
RECIPES FOR THE GRILL:
Grilled Vegetable Salad
Rinse and dry the eggplant slices. Brush all vegetables lightly with
the seasoned olive oil mix – there will be oil mixture left over.
Makes about 8 cups (1.9 L)
Eggplant – about 6-8 minutes per side; peppers – about 8-10
minutes per side; onions – about 5-7 minutes per side; squashes
– about 6-8 minutes per side; and Portobellos – about 4-5 minutes
per side. As the vegetables are done, let cool slightly on a prep
board. When cool enough to handle (but still warm), cut into 1-inch
(2.5 cm) pieces and transfer to a large bowl. When all vegetables
have been grilled and cut, toss gently to combine. Add the vinegar
(to taste), olives, parsley, sun-dried tomatoes, and capers; toss
gently to combine.
Grill the vegetables on both sides until tender and nicely marked:
½ cup (125 ml) extra virgin olive oil
1
tablespoon (15 ml) herbs de Provence or Italian herbs
1
clove garlic, peeled and finely chopped
1
pound (454 g) small eggplant, rinsed
1
teaspoon (5 ml) kosher salt, divided
12 ounces (340 g) red and/or yellow bell peppers, rinsed
12 ounces (340 g) yellow or sweet onions, peeled
Season with remaining ½ teaspoon (2 ml) salt and pepper; toss
gently to combine. Cover and refrigerate until ready to serve. Just
before serving, sprinkle with toasted pine nuts if desired.
12 ounces (340 g) small zucchini, rinsed
12 ounces (340 g) yellow squash or yellow summer squash, rinsed
8
ounces (227 g) Portobello mushrooms
Nutritional information per serving:
$BMPSJFTGSPNGBU
tDBSCHtQSPHtGBUHtTBUGBUH
tDIPMNHtTPENHtDBMDNHtGJCFSH
2-3 tablespoons (30 - 45ml) white balsamic vinegar or rice vinegar
½ cup (125ml) imported or domestic pitted olives, halved
¼
cup (59 ml) chopped Italian parsley
¼
cup (59 ml) slivered/chopped oil-packed (drained)
sun-dried tomatoes
Makes 6 servings
¼
cup (59 ml) capers, rinsed and drained
6
½
teaspoon (2 ml) freshly ground pepper
boneless, skinless chicken breast halves (5-6 ounces/141-170 g
each)
¼
cup (59 ml) toasted pine nuts (optional)
1
green onion, trimmed, finely chopped
(include several inches of green)
Lemon Herb Grilled Chicken
1
tablespoon (15ml) fresh parsley leaves, finely chopped
Combine the olive oil, herbs and garlic in a small bowl. Let stand
while preparing the vegetables.
½
tablespoon (7ml) fresh rosemary, finely chopped
Cut the eggplant in ½ inch (1.25 cm) slices, sprinkle with ½ teaspoon
(2 ml) salt and place in a colander to drain. Cut the red/yellow
peppers into flat slabs.
½
teaspoon (2ml) kosher salt
½
teaspoon (2ml) freshly ground pepper
1/3 cup (75ml) extra virgin olive oil
3 tablespoons (45ml) fresh lemon juice
Cut the onions into ½ inch (1.25 cm) thick slices; slide a toothpick or
short wooden skewer into the slice horizontally (this will help to hold
it together while grilling). Cut the zucchini and yellow squash into
½ inch (1.25 cm) thick slices. Cut the Portobello mushrooms into
½ inch (1.25 cm) thick slices.
Trim all fat from chicken. Place a chicken breast between 2 sheets of
plastic wrap and use the flat side of a meat pounder to pound to an
even thickness, about ½ inch (1.25 cm). Repeat with remaining
chicken.
Preheat the Grill side to High.
Combine green onion, parsley, rosemary, salt, pepper, olive oil and
8
lemon juice in a bowl; whisk to blend. Pour over the chicken and stir
to coat completely.
1
tablespoon (15 ml) Asian sesame oil (toasted sesame oil)
2
teaspoons (10 ml) Wasabi powder
Allow to marinate for 15 minutes – no longer. (This is important, as
the citrus will begin to “cook” the chicken and toughen it.)
1½ teaspoons (7 ml) powdered ginger
Five minutes before grilling, preheat the Grill side to High. When Grill
is hot and chicken has finished marinating, drain the chicken.
Arrange the chicken on the hot Grill, spacing evenly. Grill for 5 to 6
minutes on each side.
Place ginger, shallot and garlic in a blender and cover. Set on Low;
pulse 5 times. Scrape sides of jar; pulse 5 times.
½ teaspoon (2 ml) freshly ground black pepper
Add remaining ingredients in order given. Blend for 20 seconds.
Transfer to a resealable container and let stand for 30 minutes before
using to allow flavours to develop. Unused portions may be refrigerated for up to a week. Stir before using.
Do not move while on the Grill, to allow nice grill markings to
develop.
Check internal temperature of chicken with an instant read thermometer — the temperature should be 170 - 175°F (77 - 79°C). Let
chicken rest for 5 minutes before slicing and serving.
Trim excess visible fat from steak, and lightly score with a sharp knife
on both sides in a diagonal crosshatch pattern — the cuts should be
about 1 - 1½ inches (2.5 - 3.75 cm) apart. This will prevent the meat
from curling when heated on the Grill. Place the meat in a resealable,
heavy-duty food storage bag and the mushrooms in a second bag.
Nutritional information per serving:
$BMPSJFTGSPNGBU
tDBSCHtQSPHtGBUHtTBUGBUH
tDIPMNHtTPENHtDBMDNHtGJCFSH
Add ½ cup (125 ml) of the marinade to the flank steak and seal; add
½ cup (125 ml) of the remaining marinade to the Portobellos; seal the
bag and toss to coat. Allow both to marinate for about 30 minutes.
Place remaining 1 cup (250 ml) of marinade in a resealable container
and refrigerate for use at a later time. Marinade will keep for 2 weeks
refrigerated.
Ginger Wasabi
Grilled Flank Steak & Portobellos
Makes 8 servings
1
flank steak, 1½ to 1¾ pounds (680 - 794g)
1
pound (454 g) Portobello mushrooms, cleaned, sliced ½ inch (1.25
cm) thick
Preheat the Grill side to Med-High heat. Drain excess marinade from
flank steak. Grill for 5 to 8 minutes per side, depending on preferences. When tested with an instant read thermometer, meat will
register 120 - 125°F (49 - 52°C) for rare, 125 - 140° F (52 - 60°C) for
medium rare, 145 - 155° F (63 - 68°C) for medium, and 160° F+
(71°C+) for well-done. Do not move steak while on grill, except to
turn. Remove meat to a cutting board or platter and let rest for 10 to
15 minutes before slicing.
½ ounce (14 g) fresh ginger, peeled, cut in ½ inch (1.25 cm) or
smaller pieces
1
small shallot (½ ounce/14g), peeled, cut in ½ inch (1.25 cm) or
smaller pieces
1
clove garlic, peeled
While steak is resting, grill the Portobello slices. Arrange the mushroom slices in a single layer on the grill and grill for 2 to 3 minutes on
each side, until tender with nice grill markings – do not move
mushrooms while grilling.
2/3 cup (150 ml) medium dry sherry
2/3 cup (150 ml) low-sodium soy or tamari sauce
3
tablespoons (45 ml) seasoned rice or wine vinegar
2
tablespoons (30 ml) dark molasses
1
tablespoon (15 ml) brown sugar, packed
Remove and transfer to a bowl, with any remaining marinade from
the mushrooms.
To serve, slice the flank steak into thin slices on a slight diagonal
against the grain. Arrange meat on platter and surround with grilled
9
Turkey Burgers with Cranberry Mustard
Portobellos. Pour accumulated juices from meat and Portobellos over
the meat. Serve.
Makes 6 servings
Nutritional information per serving:
$BMPSJFTGSPNGBU
tDBSCHtQSPHtGBUHtTBUGBUH
tDIPMNHtTPENHtDBMDNHtGJCFSH
½ cup (125 ml) dried cranberries
2
tablespoons (30 ml) boiling water
½ cup (125 ml) Dijon-style mustard
Spicy Grilled Pork Chops
1½ pounds (680 g) lean ground turkey
Makes 8 servings
1
1
tablespoon (15 ml) kosher salt
¼ cup (50 ml) fresh breadcrumbs
1
tablespoon (15 ml) sweet paprika
1
1
tablespoon (15 ml) thyme
½ teaspoon (2 ml) kosher salt
1½ teaspoons (7 ml) granulated garlic
cup (250 ml) (5-oz. / 150g) finely chopped mushrooms
teaspoon (5 ml) thyme
½ teaspoon (2 ml) freshly ground pepper
1½ teaspoons (7 ml) dried powdered onion
1
teaspoon (5 ml) freshly ground (coarse) black pepper
Place cranberries in a small bowl and add boiling water; cover and let
stand until softened and cooled, about 20 to 30 minutes. Place
softened cranberries in a blender. Blend until smooth – mixture will
resemble “grainy” type mustard. Reserve. Makes about ¾ cup (175 ml)
Cranberry Mustard.
¾ teaspoon (3 ml) cayenne pepper
½ teaspoon (2 ml) white pepper
8
boneless pork loin chops, 5 ounces (141 g) each, about ¾ inch
(1.88 cm) thick
Place turkey, mushrooms, breadcrumbs, thyme, salt, and pepper in a
large bowl. Mix gently to combine (do not overwork mixture). Form into
six burgers of equal size. Cover and refrigerate if not grilling immediately.
Place the salt, paprika, thyme, garlic, onion, black pepper, cayenne,
and white pepper in a bowl and mix together. Makes about ¼ cup
(59 ml) Spicy Rub.
Preheat the Grill side to High setting. Arrange the turkey burgers evenly
spaced on the Grill. Grill for 6 to 7 minutes per side, until internal
temperature reaches 165°F (74°C) when tested with an instant read
thermometer. It is important to cook ground turkey (or chicken) to this
temperature, but do not overcook – it will dry out.
Sprinkle each pork chop with ½ teaspoon (2 ml) of the Spicy Rub. Rub
in to distribute evenly over both sides of the chops. Let stand 15
minutes or longer.
Preheat the Grill side to High. When hot, arrange the pork chops on the
grill, spacing them evenly - they should not be crowded together. Grill
for 9 to 12 minutes per side, moving them only to turn, until the internal
temperature of the pork chops reads 160°F (71°C) when tested with an
instant read thermometer. Let pork chops rest for 5 minutes before
serving.
Serve with Cranberry Mustard. Turkey Burgers can be served alone, or
are delicious when served on grilled whole wheat buns or sour dough
rolls.
/VUSJUJPOBMJOGPSNBUJPOQFSTFSWJOHPOFCVSHFSUBCMFTQPPONM
NVTUBSE
$BMPSJFTGSPNGBU
tDBSCHtQSPHtGBUHtTBUGBUH
tDIPMNHtTPENHtDBMDNHtGJCFSH
Nutritional information per serving:
$BMPSJFTGSPNGBU
tDBSCHtQSPHtGBUHtTBUGBUH
tDIPMNHtTPENHtDBMDNHtGJCFSH
10
Saga Blue Stuffed Beef Fillets
with Herb Crust
Grilled Fresh Pineapple
Makes 8 servings (1 slice per serving)
Makes 6 servings
MBSHFGSFTIQJOFBQQMFQFFMFEDPSFEDVUJOUPTMJDFT
3
8 teaspoons (40ml) powdered sugar
tablespoons (45 ml) herbes de Provence
1¼ teaspoons (6 ml) kosher salt
Preheat the Grill side to High. Sprinkle the pineapple slices lightly with
powdered sugar, using ½ teaspoon (2 ml) per side. Arrange pineapple
slices evenly on preheated Grill. Grill for 4 to 5 minutes per side, turning
once.
½ teaspoon (2 ml) freshly ground black pepper
6
beef tenderloin fillets, each about 6 ounces (170 g) - 1 inch (2.5 cm)
thick
6
tablespoons (90 ml) cold Saga Blue cheese (may also use Brie,
mushroom Brie or Cambazola cheese)
1
tablespoon (15 ml) good quality olive oil
Serve warm or cool.
Grilled Fresh Pineapple makes a wonderful base for dessert – just add
a scoop of vanilla ice cream or frozen yogurt. You may drizzle it with a
little rum or liqueur and add a sprinkling of chopped toasted nuts for a
Grilled Pineapple Sundae.
Place the herbes de Provence, salt and pepper in a small bowl. Stir to
blend; reserve.
.BOZHSPDFSZTUPSFTTFMMQFFMFEBOEDPSFEQJOFBQQMFTJOUIFQSPEVDF
sections.
Using a sharp knife, cut a horizontal slit in the side of a fillet, then
carefully cut into the centre of the fillet to create a pocket – do not cut
all the way through to the sides. Repeat for each fillet. Place one
tablespoon (15 ml) of the cheese in each pocket – press the open sides
together tightly. Drizzle the fillets with the olive oil and rub in to coat
completely and evenly. Sprinkle the fillets on both sides with the herb
mixture and press mixture on. Refrigerate for 20 to 30 minutes before
grilling. (Fillets may be prepared up to 8 hours ahead and refrigerated.)
Nutritional information per serving:
$BMPSJFTGSPNGBU
tDBSCHtQSPHtGBUHtTBUGBUH
tDIPMNHtTPENHtDBMDNHtGJCFSH
Preheat Grill side to Sear. When Grill is hot (indicator light will go out)
arrange the fillets evenly spaced on the Grill. Grill on each side for 3
minutes. Lower the heat to High and continue to cook for another 4 to
8 minutes on each side, depending on preference for doneness – less
time for rare and more time for well done. For a cross-hatch grill pattern
on the meat, turn the meat 45° when placing it on the grill after turning
over. (Note: this type of beef has more flavour and better texture when
cooked rare to medium.) Let meat rest for 5 to 10 minutes before
serving.
Nutritional information per serving:
$BMPSJFTGSPNGBU
tDBSCHtQSPHtGBUHtTBUGBUHt
DIPMNHtTPENHtDBMDNHtGJCFSH
11
RECIPES FOR THE GRIDDLE:
Blueberry Ricotta Pancakes
Multigrain Pancakes
Makes about 14 pancakes
Makes 18 pancakes, about 4 inches (10 cm) each
3
large eggs, lightly beaten
1
cup (250 ml) reduced fat milk
2
cups (500 ml) all-purpose flour
2
cups (500 ml) fresh or frozen thawed blueberries
½ cup (125 ml) plain yogurt (may use fat-free)
2
teaspoons (10 ml) baking powder
1
cup (250 ml) all-purpose flour
½ teaspoon (2 ml) baking soda
½ cup (125 ml) whole wheat flour
1
½ cup (125 ml) oatmeal (regular or quick oats)
tablespoon (15 ml) sugar
½ teaspoon (2 ml) salt
½ cup (125 ml) yellow cornmeal
2
large eggs, separated
UBCMFTQPPOTNM
QPXEFSFECVUUFSNJMLEPOPUBEEMJRVJE
2
cups (500 ml) reduced fat milk
1
tablespoon (15 ml) brown sugar
½ cup (125 ml) part-skim ricotta cheese
1
tablespoon (15 ml) baking powder
3
1
teaspoon (5 ml) salt
Preheat the Griddle side to Medium.
2
tablespoons (30 ml) melted butter, cooled slightly
Toss blueberries in 1 tablespoon (15 ml) of the flour; reserve. Place the
remaining flour, baking powder, baking soda, sugar, and salt in a large
bowl and stir to combine.
Preheat the Griddle side to Medium.
tablespoons (45 ml) unsalted butter, melted and cooled
Place the eggs, milk, and yogurt in a small bowl and whisk to blend
until smooth; reserve.
In a smaller bowl, combine the egg yolks, milk, ricotta cheese and
unsalted butter; reserve. Beat the egg whites until they are stiff but not
dry. With a spoon, stir the liquid mixture into the dry mixture until
blended. Stir about one fourth of the beaten egg whites into the batter
to lighten, then gently fold in the remaining egg whites, using a rubber
spatula. Gently stir in the reserved blueberries.
Place the flours, oatmeal, cornmeal, buttermilk powder, brown sugar,
baking powder, and salt in a medium bowl. Stir with a whisk to blend.
Add the egg/milk mixture and stir until just blended. Stir in the melted,
cooled butter.
Do not overmix.
Using a ¼ cup (59 ml) measure/ladle, pour batter for six pancakes onto
the preheated Griddle. Cook for 2½ to 3 minutes, until bubbles form on
the surface, then flip the pancakes over, using a heatproof nonstick
spatula. Cook on the other side until golden brown and fluffy, about 2½
to 3 minutes. Transfer to warm plates to serve. As you finish each
batch of pancakes, you can keep them warm on a wire rack placed on
a baking sheet in a low oven (200°F / 93°C). Repeat until all the batter
is used.
Using a quarter cup (59 ml) measure, drop batter evenly spaced (six
pancakes fit very nicely) onto the preheated griddle. Cook pancakes
until bubbles form, about 2 to 2½ minutes; flip and cook until done,
about 2 to 2½ minutes longer. Transfer to warm plates to serve. As you
finish each batch of pancakes, you can keep them warm on a wire rack
placed on a baking sheet in a low oven (200°F - 93°C). Repeat until all
the batter is used.
Serve with warmed maple or fruited syrup.
Serve with warmed maple syrup
/VUSJUJPOBMJOGPSNBUJPOQFSTFSWJOHQBODBLFT
$BMPSJFTGSPNGBU
tDBSCHtQSPHtGBUHtTBUGBUH
tDIPMNHtTPENHtDBMDNHtGJCFSH
12
Challah French Toast
/VUSJUJPOBMJOGPSNBUJPOQFSTFSWJOHQBODBLFT
$BMPSJFTGSPNGBU
tDBSCHtQSPHtGBUHtTBUGBUH
tDIPMNHtTPENHtDBMDNHtGJCFSH
Makes 6 servings (2 slices per serving)
12 ¾ inch (1.88 cm) thick slices day-old challah or brioche type bread
MPBGTIBQF
Hash Brown Potatoes
Makes 4 servings
8
2
½ cup (125 ml) chopped onion
1½ cups (375 ml) evaporated fat free milk (do not add liquid) or use ¾
cup (175 ml) skim or 1% milk and ¾ cup (175 ml)
half-and-half
½ cup (125 ml) chopped bell pepper (red, yellow, or green)
½ cup (125 ml) half-and-half (may use fat free)
1
¼ teaspoon (1 ml) salt
8-10 ounce (227 - 284 g) russet potatoes, baked and cooled
teaspoon (5 ml) kosher salt
¼ teaspoon (1 ml) freshly ground black pepper
1
½ teaspoon (2 ml) thyme
3
tablespoons (45 ml) melted butter
1
tablespoon (15 ml) chopped fresh parsley
large eggs
teaspoon (5 ml) cinnamon
pinch nutmeg (freshly grated)
1
tablespoon (15 ml) vanilla extract
Tart Cherry Maple Syrup, warm (recipe follows)
Preheat the Griddle side to Medium-High.
Preheat oven to 200°F (93°C). Place a rack on a baking sheet and
place in oven.
Cut the potatoes into ½ inch (1.25 cm) cubes (no need to remove the
skins). Place the potatoes in a medium bowl with the onion, bell
pepper, salt, pepper, and thyme. Stir gently to combine. Drizzle with the
melted butter and stir to coat.
Arrange the challah slices in two 13 x 9 - inch (32.5 x 22.5 cm) glass
baking dishes. Blend eggs, half-and-half, salt, spices, and vanilla until
smooth but not foamy. Pour the batter around the bread slices. Turn
the bread slices over and let sit 5 minutes; turn the bread over again.
Place the potato mixture on the hot griddle in a single layer. Allow to
cook for 15 minutes, turning the mixture every 2-3 minutes, until
browned, crispy and hot. After the potatoes have cooked for about 12
minutes, sprinkle with the chopped parsley.
Preheat the Griddle side to Medium (300°F / 148°C). When the Griddle
is hot (indicator light will turn off), arrange 6 of the soaked slices on the
Griddle surface.
Transfer the potatoes to a bowl and keep warm in a low oven (about
250°F - 120°C) if not serving immediately. Serve hot.
Cook until deep golden brown on each side, about 3 to 4 minutes per
side.
Tip: When preparing baked potatoes for a meal, bake 2 extra. Cool,
wrap and refrigerate to make hash brown potatoes.
Remove from Griddle and serve or keep warm in low oven while
preparing the remainder of the French Toast. Serve with warm Tart
Cherry Maple Syrup.
If serving hash brown potatoes with eggs & bacon, cook bacon first.
Keep warm in low oven, then prepare hash brown potatoes and keep
warm in low oven. Prepare eggs just before serving.
-PBGTUZMFDIBMMBIPSCSJPDIFCSFBEJTBWBJMBCMFJOUIFJOTUPSFCBLFSZPG
most well-stocked grocery stores or in a bakery. Use a serrated knife to
slice the bread.
Nutritional information per serving:
$BMPSJFTGSPNGBU
tDBSCHtQSPHtGBUHtTBUGBUH
tDIPMNHtTPENHtDBMDNHtGJCFSH
Nutritional information per serving:
$BMPSJFTGSPNGBU
tDBSCNHtQSPHtGBUHtTBUGBUHt
DIPMNHtTPENHtDBMDNHtGJCFSH
13
Tart Cherry Maple Syrup
/VUSJUJPOBMJOGPSNBUJPOQFSTFSWJOHCBTFEPOTJYTFSWJOHT
$BMPSJFTGSPNGBU
tDBSCHtQSPHtGBUHtTBUGBUH
tDIPMNHtTPENHtDBMDNHtGJCFSH
Makes 2 cups (500 ml)
1½ cups (375 ml) real maple syrup
Salmon Burgers
with Lemon Tarragon Sauce
¾ cup (175 ml) dried tart cherries (may substitute dried apples,
blueberries, or cranberries)
Makes 6 servings
Place the maple syrup and dried tart cherries in a 1½ quart (1.4 L)
saucepan.
2
Bring to a simmer over medium low heat. Reduce heat to low and keep
syrup warm until ready to serve. Leftover syrup may be placed in a
resealable container and refrigerated to use at another time. Reheat to
serve.
2
1¾ pounds (794 g) boneless, skinless salmon fillet, chopped into ¼ inch
(0.63cm) pieces
ounces (56 g) smoked salmon, finely chopped
½ tablespoon (7 ml) Dijon-style mustard
½ teaspoon (2 ml) kosher salt
/VUSJUJPOBMJOGPSNBUJPOQFSTFSWJOHDVQNM
$BMPSJFTGSPNGBU
tDBSCHtQSPHtGBUHtTBUGBUH
tDIPMNHtTPENHtDBMDNHtGJCFSH
¼ teaspoon (1 ml) freshly ground black pepper
Lemon Tarragon Sauce
Seared Scallops
Place the shallots, salmon and smoked salmon in a bowl. Stir in the
mustard, salt and pepper. Divide the mixture into 6 equal portions and
shape into 4-inch (10 cm) “burgers”. Chill, if not cooking immediately.
Makes 4 to 6 servings
2
ounces (56 g) shallots, peeled, finely chopped
pounds (907 g) large sea scallops (dry preferred)
1½ tablespoons (25 ml) extra virgin olive oil
Preheat the Griddle side to Med-High. When the Griddle is hot, arrange
the Salmon Burgers evenly spaced on the Griddle. Cook for 3 (3½ if
mixture is chilled after preparing) minutes per side – do not overcook.
Serve on toasted sourdough rolls or bread, with Lemon Tarragon
Sauce.
½ teaspoon (2 ml) kosher salt
¼ teaspoon (1 ml) freshly ground black pepper
¼ teaspoon (1 ml) sweet paprika
lemon wedges
/VUSJUJPOBMJOGPSNBUJPOQFSTFSWJOHPOFTBMNPOCVSHFS
$BMPSJFTGSPNGBU
tDBSCHtQSPHtGBUHtTBUGBUH
tDIPMNHtTPENHtDBMDNHtGJCFSH
Remove the tough “foot” (muscle) from the side of each scallop – it is
slightly more opaque in appearance and comes off easily. Place the
scallops in a shallow bowl, drizzle with olive oil, and sprinkle with
seasonings. Stir gently to coat evenly.
Preheat the Griddle side to Sear setting. When hot, arrange the
scallops evenly over the Griddle, shaking off excess oil. Cook for 2 to 3
minutes (depending upon size), turn once and cook until deep golden
in colour, opaque and slightly firm to the touch. Serve hot or chilled.
14
Lemon Tarragon Sauce
Makes ½ cup (125 ml)
½ cup (125 ml) fat free plain yogurt
zest of ½ lemon – strips, bitter white pith removed, finely chopped
½ teaspoon (2 ml) kosher salt
1/3 cup (75 ml) low-fat mayonnaise
1 teaspoon (5 ml) Dijon-style mustard
1
teaspoon (5 ml) tarragon
Place the yogurt in a yogurt strainer or fine mesh strainer lined with a
paper coffee filter. Allow yogurt to drain for 30 to 40 minutes; discard
whey (liquid).
Combine yogurt, mayonnaise, mustard, tarragon, lemon zest, pepper
and salt in a bowl. Whisk until smooth and blended. Cover and
refrigerate for 30 minutes or longer to allow flavours to blend.
/VUSJUJPOBMJOGPSNBUJPOQFSTFSWJOHPOFUBCMFTQPPONM
$BMPSJFTGSPNGBU
tDBSCHtQSPHtGBUHtTBUGBUH
tDIPMNHtTPENHtDBMDNHtGJCFSH
15
TM
S A V O U R
Coffeemakers
Food
Processors
T H E
Toasters
G O O D
Blender
L I F E
Cookware
TM
Ice Cream
Makers
CuisinartTM offers an extensive assortment of top quality products to make life in the kitchen
easier than ever. Try some of our other countertop appliances and cookware,
and Savor the Good LifeTM.
www.cuisinart.ca
©2012 Cuisinart Canada
100 Conair Parkway,
Woodbridge, Ontario L4H 0L2
Printed in China
12CC132439
Any other trademarks or service marks of third parties used herein are
the trademarks or service marks of their respective owners.
IB-5059-CAN-D