1
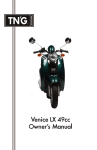
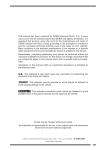
Owner’s Manual Baja 150cc (BJ150) Revised 11/08 LOCATING YOUR VIN# The serial numbers of the frame and engine are used for vehicle registration. The VIN# and label are located in the glove box. Then engine # is located on the back of the engine. VIN # Engine # 2 A: INTRODUCTION Thank you for purchasing a CMSI Manufactured TNG motor scooter. CMSI has invested over 15 years in establishing the facilities, technical infrastructure and nationwide sales and service network that exists today as TNG, a trademark of CMSI. TNG Scooters is growing rapidly due to its reputation in quality research, styling & design, production and service. We recommend genuine TNG products for replacement parts and accessories as they have been specifically designed for your scooter and manufactured to meet CMSI’s demanding standards. With the intention of achieving our goal to provide complete customer support, detailed parts catalogs are available for you to view at our web site, www.tngscooters.com. We continuously keep a large inventory of parts and accessories in stock to support our TNG dealers, service centers and ultimately, TNG scooter owners. Your local TNG dealer knows your scooter the best and always is interested in your satisfaction! We advise your local TNG dealer make all repairs on your scooter. You can find a complete list of dealers and service centers on our website. This Owner’s Manual contains important information on safety, operation, and maintenance. Anyone who operates a TNG Scooter should carefully read and understand the contents of this manual before use. TNG Scooters are street legal vehicles in all 50 states. You need to check with your state requirements on license and registration to ride this scooter legally on public roads. Do not operate the scooter in off-road conditions. 3 SPECIAL SYMBOLS Significant safety messages are provided both in this manual and on the scooter. For your safety and the safety of others please pay special attention to all warnings preceded by !. ! WARNING - Indicates risk of severe injury or DEATH may result to the scooter operator, a bystander or a person inspecting or repairing the scooter if failure to follow these instructions. CAUTION - Indicates that special precaution must be taken to avoid damage to the scooter. NOTE - A NOTE provides key information to make procedures easier to spot. This Owner’s Manual should be considered as a permanent part of the scooter as it contains important information for operation and maintenance of the scooter. It should remain with the scooter at all times. This Owner’s Manual contains the most current product information at the time of approval for printing. TNG Scooters reserves the right to make changes at any time without notice and without incurring any obligation. If you have any questions about the manual, please consult your TNG dealers, or our web site www.tngscooters.com. 4 B: TABLE OF CONTENTS A: B: C: D: E: F: G: H: I: J: K: L: INTRODUCTION TABLE OF CONTENTS WARRANTY INFORMATION SAFETY INSTRUCTIONS SPECIFICATIONS COMPONENT DESCRIPTIONS & FUNCTIONS PRE-RIDE CHECKLIST PROPER OPERATION SERVICE MAINTENANCE SCHEDULE WINTERIZING TROUBLESHOOTING FULL WARRANTY INFORMATION Page 3 Page 5 Page 6 Page 7 Page 13 Page 14 Page 22 Page 24 Page 30 Page 40 Page 43 Appendix 5 C: WARRANTY INFORMATION WARRANTY: CMSI, Inc., warrants to the first retail purchaser of all TNG vehicles from an Authorized CMSI Dealer, and each subsequent owner, that the vehicle is free from defects in materials and workmanship for the period stated in this warranty section. For complete warranty information see the Warranty Appendix. NOTE: Your scooter performs best when run weekly. Running the engine for a minimum of 20 -30 minutes per week ensures that your battery remains fully charged and the fuel system doesn’t foul. NOTE: For the best performance from your TNG scooter have a TNG dealer perform all service maintenance. Failure to follow the service maintenance schedule may void your warranty coverage. 6 D: SAFETY INSTRUCTIONS RIDING SCOOTERS IS FUN ONLY IF YOU PUT SAFETY AS YOUR TOP PRIORITY. ! WARNING: Before you start operating your scooter: • Be sure you read this owner manual completely and understand all operating features. • Take sufficient time training with safe and proper riding technique. • Practice until you are knowledgeable and comfortable with your scooter. • Become knowledgeable with all road signs. ! WARNING Failure to follow any SAFETY INSTRUCTION could cause severe injury or even death to the scooter operator, passenger or a bystander. Protective Gear Riding a scooter leaves the rider exposed. Therefore, wearing appropriate protective gear can prevent or diminish injuries from accidents. 1. An Approved Helmet The majority of serious scooter injuries and deaths are the direct result of a head injury. Therefore, drivers and passengers should always wear an approved helmet to prevent or reduce the chance of head injury. An approved helmet needs to: 7 • • • Meet U.S. Department of Transportation (DOT) and state standards. In addition with labels from the Safety Helmet Council of America, the American National Standard Institute (ANSI), or the Snell Memorial Foundation to assure the integrity of the product. Fits snugly on your head. Have no obvious defects such as cracks, loose padding or frayed straps. 2. Eye and Face Protection • A plastic face shield can help prevent accidents by guarding the face from debris, allowing the rider to devote full attention to the road. • Goggles can protect your eyes in the same manner. Never use eyeglasses or sunglasses in place of a face shield or goggles. 3. Clothing • Bright clothing should be worn by the driver so as to be easily seen by other motorists. • Jacket and pants should cover your arms and legs completely, but not too loose to flap in the wind or catch on the levers or wheels which could result in an accident. • Leather or heavy denim clothing is preferred as these materials help to prevent or reduce abrasion. • Boots or shoes should be high enough to cover your ankles and sturdy enough to provide support. • Gloves give you a better grip and help protect your hands from the elements. 8 Safe Riding • Keep enough distance from the other vehicles around you as this gives you time to react. • Ensure that you have a driver’s license with correct classification to ride this scooter in your state. • Always observe the rules of the road. Observe the posted speed limit, and signal your turns well in advance. • Know your limits. Do not go faster then you are able to control. Always travel at a speed that is proper for the terrain, operating conditions, and your experience. • Always inspect your scooter each time you use it to make sure it is in safe operating condition. • Always follow the inspection and schedule maintenance procedures described in this manual. • Test your brakes after operation in wet conditions. If necessary, apply the brakes several times to let friction dry out the linings. • Never attempt wheelies, jumps and other stunts, as these could cause damage to the scooter and loss of control. • Always keep both hands on the handlebars and feet on the floor board during operation. • Never consume alcohol or drugs before or while riding scooter. • Limit the travel distance to avoid fatigue that can affect your performance. Being seen Many scooter accidents are caused by car drivers who do not see scooter riders on the road. Therefore you need to ensure to follow these guidelines: • Wear bright clothing to increase visibility. Bright orange, yellow or green jackets or vests and brightly colored helmet can help others see you. 9 • • • • Always use turn signals when you are planning to turn or merge to main road and turn it off after you have made your turn. Flash brake lights whenever you are going to slow down more quickly or where others may not expect you are going to slow down. Stay out of blind spot of other motorists. When you come to an intersection, move to the portion of your lane that will bring you into another driver’s field of sight at the earliest possible moment. Carrying Passengers & Loading ! WARNING: • This scooter is rated for 2 people; total weight of the rider and the passenger must not exceed 330 lbs. • Do not exceed 17.5 lbs of cargo. • Attach the load securely since a loose load can catch in the wheel or rack causing skidding. • You should avoid carrying passengers or large loads until you have gained sufficient experience riding alone. Extra weight changes handling, stability, braking performance, turns, acceleration and deceleration. To carry passengers safely you must: 1. Instruct the passenger before you start • Must wear a helmet. • Get on the scooter after you have started the engine. • Sit as far forward as possible without crowding the driver. 10 • • • • • Hold firmly to your waist, hips, or belt or passenger handle. Keep both feet on the pegs at all time, even when the scooter is stopped. Keep legs away from the muffler. Stay directly behind you, leaning as you lean. Avoid any unnecessary talking or motion. 2. • • • • Adjust your riding technique with passenger Go slower Start slowing earlier as you approach a stop. Maintain a larger cushion of space ahead and to the sides. Wait for larger gaps when you want to cross, enter, or merge with traffic. LOADS • A scooter is not really designed to carry cargo. However, small loads can be carried safely if they are positioned and fastened properly. • The rear luggage rack can carry 11 lbs max. The compartment under the seat can carry 6.5 lbs max. No more than 17.5 lbs. total. • Keep the load low and distribute the load evenly. An uneven load can cause the scooter to drift to one side. 11 Gasoline & Exhaust Fumes ! WARNING Gasoline is highly flammable and exhaust fumes are poisonous: • Turn off engine before refueling. • Do not to spill any gasoline on the engine, exhaust system or the plastic body. • Do not refuel while smoking or near any open flame. • Do not operate your scooter in a closed area as the exhaust fumes may cause loss of consciousness or death within a short time. • Do not park the scooter near any flammable source. • If you swallow gasoline, inhale gasoline vapor or spill gasoline into your eyes, see doctor immediately or call American Association of Poison Control Centers at 1-800-222-1222 for assistance. • If you spill gasoline on your clothes, change and wash the affected area immediately with soap. Modification Any modifications to this scooter or removal of original equipment without approval from TNG Scooters may cause it to be unsafe for use and may trigger severe accident. Modifications may also make your scooter illegal to use and will void any and all warranty coverage. ACCESSORIES • We recommend ISS Soft Storage scooter bags for your scooter. See www.cmsiinc.com for the ISS website and information. • TNG custom accessories are also available on the www.tngscooters.com website. 12 E: SPECIFICATIONS Model Baja 150 Tire Size (Rear) 130/60x13 Model Number BJ150 Tire Pressure (Front) 29psi Length 75 inches Tire Pressure (Rear) 33psi Width 23 inches Idle RPM 1500 Height 48 inches Exhaust Valve Gap (Cold) 0.15mm / 0.006 inch Dry Weight (no fuel) 249 lbs Intake Valve Gap (Cold) 0.10mm / 0.004 inch Max. Load 330 lbs Spark Plug Type Autolight 4194 Most Economical Speed 30 mph Battery Type 12V 8Ah Noise 80dB(A) Headlight (Hi/Lo Beam) 35W / 35W Engine Type Air Cooled - 4 Stroke Front Running Light 3W Cylinder Arrangement Single Cylinder Brake/Tail Lights 21W / 5W Displacement 150cc Turn Signal Light 10W Ignition Type CDI Turn Signal Indicators ( Dash) 3W Transmission CVT Instrument Illumination 3W Front Brake Disc Fuses 15 Amps Rear Brake Drum Fuel Type 90 Octane Tire Size 130/60x13 Fuel Capacity 5.5L / 1.45 gal Lubricating Oil SAE 10W40 Opti-4 Required for Engine Warranty 13 F: COMPONENT DESCRIPTIONS & FUNCTIONS 13 7 5 4 14 6 15 7 12 3 9 1 11 2 1. Battery 2. Center Stand 3. Muffler 4. Seat 14 5. Handle Bars 6. Turn Signals 7. Headlight 8. Rearview Mirrors 10 9. Air box & Filter 13. Instrument Panel 10. Kick Starter 14. Ignition Switch 11. Side Stand 15. Fuel Cap 12. Electrical Compartment 4 9 5 2 6 3 7 1 8 1. Horn Button 2. Rear Brake 3. Turn Signal Switch 4. Hi / Lo Beam Switch 5. Speedometer 6. Front Brake Lever 7. Throttle 8. Electric Starter Button 9. Engine Stop Switch 15 Ignition Switch / Steering & Seat Lock TABLE 1.1 Key Position Power to Electric Circuits Ignition Steering Storage Compartment Key Removable ON Yes On Unlocked Locked No Off No Off Unlocked Locked Yes Lock No Off Unlocked Unlocked No Clockwise (seat lock) N/A N/A N/A Unlocked No Counter Clockwise (seat lock) N/A N/A N/A Locked Yes NOTE: Steering can only lock when the handle bar is turned left. CAUTION: Make sure key is in ‘OFF’ position after riding or opening seat. When key is left in ‘ON’ position and engine is off you will drain your battery. 16 ! WARNING DO NOT CHANGE THE KEY POSITION WHILE THE SCOOTER IS IN MOTION. IT MAY RESULT IN LOSS OF CONTROL OR AN ACCIDENT. Instrument Panel 2 7 3 4 1 6 5 • • • • 1. Turn Signal Indicator 2. Speedometer 3. Odometer, Clock 4. Hi Beam Indicator 5. Gas Gauge 6. Volt Meter 7. Trip Meter Turn Signal Switch and Indicator To assign right turn, push the switch to and the right turn indicator light flashes. To assign left turn, push the switch to and the left turn indicator light flashes. To cancel turn signal, push in the button on the switch. (White) 17 Lo / Hi Beam Switch and Hi Beam Indicator • When illuminated high beam is selected. • See page 15 for Lo/Hi beam switch location. • See page 17 for indicator location. CAUTION: Be sure to always use LO BEAM light when facing oncoming traffic. Speedometer (See page 17) - Indicates the operating speed. Odometer (See page 17)- Indicates accumulated distance in kilometers. CLOCK (See page 17) - Toggle between the left and right buttons until the desired time/date is achieved. Gas Gauge (see page 17) - Indicates the fuel Level. The needle moves towards “E” – (empty) as the gas level is decreasing. TRIP METER (see page17) - Indicates kms for a trip. The trip meter is able to be reset. Throttle Control (see page 15) • Control speed by rotating the throttle. (Right Grip) • To accelerate speed, rotate the throttle towards you. • To decelerate speed, rotate the throttle away from you. 18 Electric Starter (see page 15) • Starts Engine using battery power. • NOTE: Never engage starter for more than 3-5 seconds at a time to avoid possible damage. Horn Button (see page 15) - To sound the horn, press this button. Engine Stop Switch (see page 15) • Set the switch to on before starting the engine. • Set the switch to off for EMERGENCY STOP. • For example, if the scooter overturns or you cannot decrease speed with the throttle. Rear Brake Lever/ Front Brake Lever (see page 15) • To decrease speed and stop the scooter from moving. • To apply rear brake, pull the left brake lever gradually. • To apply the front brake, pull the right lever towards throttle grip gradually. 19 ! WARNING: • The storage compartment can carry 6.5 lbs max. • Do not exceed maximum 17.5 lbs for cargo. • Ensure the storage compartment is locked before riding. CAUTION: • Do not store anything susceptible to heat inside storage compartments. • Do not let humidity spread from storage compartment. • Do not put anything valuable or breakable in storage compartment. • The compartment is not waterproof. Use plastic bags to store stuff when washing the scooter. Luggage Rack ! WARNING: • Luggage rack can carry 11 lbs max. • Do not exceed maximum 17.5 lbs for cargo. Fuel Tank Cap (see page 14 for location) • To remove the gas tank cap, slide the latch located on the back of the rear seat laterally to release the hinging seat. Lift the rear seat to expose the fuel cap. Turn the gas cap ¼ counter-clockwise to remove. • Fill the tank up to the bottom of the filler tube. Do not fill past that point. • When finished filling gas tank, replace the gas cap ¼ clockwise to its locked position. Swing seat down and make sure latch has engaged to lock the seat in place. 20 Seat Latch Hinge Seat Forward to Access Gas Cap ! WARNING: • Always turn the engine off prior to refueling the scooter. • Ensure the fuel tank cap is properly installed before riding. • Do not overfill the tank as it may overflow when the fuel warms up and expands. • Avoid spilling fuel on a hot engine. CAUTION: • Wipe off the spilled fuel immediately as fuel may deteriorate the paint on the scooter or any plastic parts. • Always use 90 octane or higher gasoline when refueling the scooter. Do not use E85 or fuel containing more than 10% ethanol. 21 G: PRE-RIDE CHECKLIST 1. Check the fuel level • Remove the gas cap by turning the cap counterclockwise. • Fill the tank up to the bottom of the filler tube. Do not fill past that point. • Replace the gas cap and turn it clockwise until it is secure. NOTE: Always turn the engine off prior to refueling the scooter. Always use 90 octane or higher gasoline to refuel the scooter. Do not use E85 or fuel containing more than 10% ethanol. 2. Check the brake light • Turn the ignition key to the “ON” position. • Grip the front brake lever or rear brake lever while watching the rear brake light to make sure that it illuminates. 3. Check the Turn Signals • Turn the ignition key to the “ON” position. • Move the turn signal control to the left and right positions. Check the front and rear turn signal lamps flash, as well as the turn signal indicators on the instrument panel. 22 4. Check the Tires • Measure the pressure in each tire. The correct pressures are: Front 29 PSI Rear 33 PSI • Visually inspect the tires for damage and wear. Look for nails, glass or stones what are cutting into the tire casing. • Look for partial or abnormal tread wear. The middle of the tread should have: Front Tire 1.5 mm minimum tread depth Rear Tire 2 mm minimum tread depth CAUTION: This Scooter uses tubeless tires on the front and rear wheels. These tires must always be replaced with tires of the same type. 5. Check the Brakes Front Brake- Compress the front brake lever and measure the distance traveled before the brake begins to slow the front wheel. The lever should travel between 10 to 20 mm before the wheel begins to drag. Rear Brake - Depress the rear brake lever and measure the distance travelled before the brake begins to slow the rear wheel. The lever should travel between 10 to 20 mm before the wheel begins to drag. 7. Check the Brake Fluid Level See page 32 23 8. Check the Spark Plug • The spark plug will need to be checked if you find the scooter hard to start. The gap should be between 0.023 & 0.032 inches. The electrode should be a light brown color. • Incorrect gap can cause many problems for the scooter engine. Make sure it is correct! • If the spark plug is fouled or damaged, replace it with another of similar type. • Replacing the spark Plug. CAUTION: Allow the engine to cool down before attempting to replace the spark plug. For replacement instructions see page 34. 8. Check the Engine Oil See Page 34. 9. Check the TRANSMISSION Oil See Page 35. H: PROPER OPERATIONS & TECHNIQUES ! WARNING: • Be sure you have read this owner manual completely and understand all operating features. • Do not start the engine or operate the scooter in closed areas , as the exhaust fumes are poisonous and inhaling them can cause loss of consciousness and /or even death shortly. • This scooter is rated for two persons, total weight with rider and passenger must not exceed 330 lbs. 24 1. • • • • ENGINE STARTING PROCEDURE Normal Start - Place scooter on the center stand Turn the ignition key to the “ON” position. While holding brake lever, firmly push the electric start. Repeat 5 second intervals of starter motor activation and 5 second rest. Do NOT twist throttle open to start. NOTE: • It is recommended to always “prime” the fuel system by kick-starter when starting the scooter in the following situation (DO NOT ADVANCE THE THROTTLE WHILE KICK STARTING): • Cold or wet weather . • If the fuel has run dry . • If the scooters has been stored for any length of time . • If electric start does not work. If bike does not start, please refer to trouble shooting section. ! WARNING: Do not change the position of the ignition switch while the vehicle is in motion, only when the vehicle has come to a complete stop. CAUTION: • When scooter is not running, do not leave the ignition switch in the “ON” position for extended periods 25 of time. The battery may become depleted to the point that the vehicle cannot be started. • To preserve the scooter, each starting attempt should be less than 5 seconds. • To maximize the engine life, warm up the engine for 2 to 3 minutes prior to riding. No fast acceleration when the engine is still cold. NOTE: The engine will not start unless either the front or rear brake is activated. 2.RETRACTING THE STAND • Center Stand – Holding the left handle with your left hand and grasping the rear rack with your right hand, push the scooter forward and move the stand back with your foot until the stand retracts under the scooter. See Fig. 1 • Side Stand – Grasp the handlebars with both hands and tip the scooter upright. Move the stand back with your foot until the stand retracts under the scooter. See Fig. 2 3. RIDING POSITIONS See Fig. 3 • Place your hands on the handle bars and step onto the scooter from the left side. • Sit down on the seat while keeping your left foot on the ground for balance. • Place your right hand on the rear lever or left hand on rear brake lever. 26 Fig. 1 Fig. 2 4. ACCELERATION & DECELERATION • Speed can be adjusted by twisting the throttle control. Twist the throttle slowly towards you to increase speed and twist the throttle away from you quickly to decrease speed. CAUTION: Fast acceleration when the engine is cold can damage transmission. Fig. 3 5.PULLING AWAY FROM THE CURB • Sit with a leg on each side of the scooter adjust the rear view mirrors. • Put on your turn signal before pulling away from the curb. • Look over both shoulders for oncoming traffic; be sure that it is safe to pull out into the traffic. • Release the rear brake and accelerate the scooter slowly to take off. 6.USING THE BRAKES • The brakes work best when the front and rear brakes are applied simultaneously. • To apply the brake, release the throttle quickly, and squeeze the front brake lever while putting pressure on the rear brake lever. 27 ! WARNING: • Do not apply the brakes too quickly or while in a turn as this may result in loss of traction and control. • Wet conditions will affect braking. Give twice the normal braking distance in wet or slippery conditions. Take extra care while riding in these conditions. CAUTION: Test your brakes after washing your scooter or riding through a large pool of water. When this happens, apply the brakes gently until they dry themselves and work effectively again. 7. STOPPING & PARKING • Release the throttle and steer the scooter to the side of the road. Gently apply the front brake using the right brake lever, and at the same time gently applying the rear brake using the left brake lever. • Extend your left foot just before coming to a complete stop so as to keep the scooter upright when it stops. • Turn off the ignition key and dismount the scooter on the left side. • Use your right foot to extend the side stand of the scooter. ! WARNING: Do not touch the engine and the exhaust system as they can become very hot. CAUTION: • If the scooter will be parked for an extended period of time, use the center stand instead. • Do not park on a slope or soft ground as the scooter may overturn. • Do not park near to any flammable material. 28 8.BREAK IN PROCEDURES • It is very important to follow this procedures during the first 300km to achieve the best performance from the scooter. • Limit full throttle operation and avoid any condition that may result in engine overheating. • Always keep the speed below 40 mph. • Do not overload the scooter or carry a passenger during this period. • Change oil at 300 km (use Opti-4 to maintain engine warranty). CAUTION: Have your TNG Scooter dealer check the vehicle, if any engine trouble occurs during this period. 29 I: SERVICE MAINTENANCE SCHEDULE Item Fuel Line Fuel Filter Air Filter Spark Plug Valves Engine Oil Oil Filter Carburetor Drive Belt Transmission Oil Braking System Wheels Wheel Bearings Steering Bearings Rear Shock Absorber 30 Initial 300 km I I R I I 1000 km 4000 km or Every 6 Months I R I I R R R I R R R R R REPLACE EVERY TWELVE MONTHS R I I I I I I I I I I Item Initial 300 km Chassis Fasteners R Control Meter Cables R Throttle Grip Housing/Cable Centerstand/Sidestand I Headlight and Other Lights Additional Fasteners R: Replace or Service/Adjustment Due 1000 km 4000 km or Every 6 Months R R R R R R I I I I I I I: Inspect and Replace as Necessary NOTE: For the best performance from your TNG scooter have a TNG dealer perform all service maintenance. Failure to follow the service maintenance schedule may void your warranty coverage. RECOMMENDED: If regular driving is in arid or coastal condition, air filter and engine oil may need to be replaced more frequently. TIRE PRESSURE / TREAD Measure the pressure of each tire. The correct pressures are: Front 29 PSI / Rear 33 PSI. Visually inspect the tires for damage and wear or abnormal tread wear. Look for nails, glass, stones or any sharp object cutting into the tire casing. The middle of the tread depth should have: Front 1.5mm / Rear 2mm 31 CAUTION: This scooter uses tubeless tires on the front and rear wheels, always replaced with tires of the same type. Fig. 4 Fig. 5, Brake Adjustment Nut REAR BRAKE ADJUSTMENT Total free play for brake lever should not exceed 30 mm. See Fig. 4. To firm up brake, turn nut clockwise until you reach the acceptable level. See Fig. 5. Turn it counterclockwise to soften brake. HYDRAULIC BRAKE FLUID LEVEL - Front Brake • Check the fluid level by looking at the reservoir. See Fig. 6. The fluid level must be between the two lines. If it is below the lower line, check the brake line and cylinder for a possible leak. • Check the brakes for excessive wear. The middle groove of the brake should still be visible. If it isn’t, the pads should be replaced. • To replace the brake fluid, open the reservoir and add fluid as required. See Fig. 7. 32 Fig. 6, Reservoir Level Fig. 7, Opening the Reservoir CAUTION: • Be sure not to introduce any water or air into the brake system when changing the fluid. • Do not spill any brake fluid on any other scooter parts as the fluid can damage metal and paint. • Always replace the brake fluid with type DOT 3 brake fluid. RECOMMENDATION: An authorized TNG Dealer or Service Center should complete all brake fluid adjustments. 33 SPARK PLUG REPLACEMENT Check spark plug if scooter is hard to start. 1. The gap should be between 0.023 & 0.032 inches. 2. The electrode should be a light brown color. 3. Replacing the spark plug, • Remove the plug cover and remove the spark plug using the spark plug wrench in the tool kit. • After setting the gap of the new plug, insert it into the cylinder & tighten firmly by hand, then by using provided wrench tighten another ½ to ¾ turns. • Reattach the spark plug cover. ! WARNING: Do not change spark plug while engine is hot. CAUTION: • Incorrect gap can cause problems to the scooter engine. Make sure it is correct! • If the spark plug is fouled or damaged, replace it with (Autolight 4194) or like plug. RECOMMENDATION: Most spark plugs are self-cleaning. After replacing its best to ride the scooter for a minimum of 10 min. CHECKING ENGINE OIL LEVEL When the scooter is new, the oil will need to be replaced after the first 300 km. (Please review regular maintenance schedule) Engine oil requires changing every 4000 km or 6 months which ever comes first. 34 1. Stop the scooter on a level surface and turn the engine off. 2. Put the scooter on its center stand and let the engine sit for a few minutes. 3. Remove the oil dipstick, wipe it with a clean towel and replace it. Just rest the dipstick on the threads, do not screw it down into place when measuring the oil level. 4. Remove the dipstick again and observe the oil level. It should be between hi and low-level marks on the dipstick. 5. If the oil level is near the low mark, please add enough Opti-4 lubricating oil to bring the level up near the hi mark. CAUTION: If the scooter is being used under more severe conditions such as gravel roads or lots of stop & go traffic, then the oil should be changed more frequently than every 4000 km. CHECK THE TRANSMISSION OIL Inspect the transmission oil after the first 300 km and then after every 4000 km or six months which ever comes first. NOTE: Must use Opti-4 oil in transmission to maintain warranty 1. Place the scooter on its center stand on a level surface. Let the engine warm up for three minutes and then shut the engine off. 2. Remove the oil fill plug and the oil drain plug and allow the oil to drain completely. 3. Inspect the sealing washer on the drain plug, and if it’s OK reinstall the drain plug. 35 4. 5. Refill the gearbox until full. Reinstall the oil fill plug. Transmission Oil Fill Plug Transmission Oil Drain Plug ! WARNING: Use caution when changing oil to avoid burns! CAUTION: • If the scooter is used in excessively wet areas, or used in severe conditions replace the transmission oil more often than recommended. • Make sure that the fill and drain plugs are tight and not leaking. • Make sure that no foreign substances fall into the transmission box. 36 AIR FILTER MAINTENANCE • The air filter should be inspected and cleaned every 1000 km interval. • Remove left body cover. • Remove the screws that hold the cover of the air cleaner in place and lift off the air cleaner cover. (See page 13 for air box location) • Lift out the air filter screen and cartridge. • Clean the screen and cartridge with compressed air. • Reassemble the air filter components and back end of the scooter. CAUTION: • If riding in an excessively dusty location, the air filter should be inspected more often than the recommended. • When remounting the air cleaner cover components onto the scooter. Be careful to fit all pieces into their correct place. Failure to achieve proper fit will cause leaks in the air intake system that can cause engine damage. • Handle the air filter cartridge carefully so that it does not become deformed. • Never allow water to enter the air filter assembly. NOTE: Clean and/or replace the air filter components if you experience a decrease of engine power. 37 Battery Maintenance Your Scooter uses a calcium sealed, maintenance free, VRLA battery and you should not remove the sealing strip once the battery has been installed and prepped by a TNG dealer. NOTE: To protect your battery against failure it is important to keep your battery fully charged. This applies primarily if you are not riding your scooter on a regular basis or are traveling only short distances while you ride. In these limited use situations you should charge your battery at least once a month using the included battery charger for a minimum of 6 hours. Additionally, it is important that your scooter be stored in a dry area and protected from extreme temperatures. Battery Replacement 1. The scooter battery is self-sustained by electric current generated by the alternator within the scooter. It’s a good idea to replace the battery every three years. 2. Always turn the ignition system off prior to replacing the battery. 3. Observe correct polarity when replacing the battery. The RED wire is connected to the positive battery terminal and the BLACK wire is connected to the negative battery terminal. 4. Make sure that the battery posts are kept clean at all times and have good contact area. Use a wire brush to remove any signs of corrosion if required. 5. Avoid sparks or flame when handling the battery. 38 Fuse Replacement Main Fuse 1. The main fuse is located next to the battery in the floorboard; it is rated at 15 Amps. 2. A visual inspection of the fuse will tell if the fuse is “open” (burned out). 3. If the fuse is open, then it needs replacement. NOTE: Check fuse for good tight contact within fuse housing. ! WARNING: Always turn the ignition off before inspecting the fuses. CAUTION: • When removing the fuse from the fuse box do not squeeze the fuse puller or it will release the fuse. • When inserting the new fuse be sure that it fits snugly into the fuse socket. A loose fit will cause 39 • • • intermittent electrical problems and possible overheating of the fuse contacts. Always replace the open fuse with another of the same type! When washing your scooter, be sure not to get water into the fuse box as this could cause electrical problem. Do not use a fuse of higher amperage than recommended; this will cause extensive damage to the electrical system and possibly a fire. NOTE: If the new fuse burns out immediately, have a TNG dealer check scooters complete electrical system. J. WINTERIZING INSTRUCTIONS Proper preparation of your scooter for winter storage will make it more likely that you will be able to get out and enjoy that first spring ride. There are five basic areas that should be considered when preparing to put your TNG Scooter into storage. The five areas of focus are: 1. 2. 3. 4. 5. 40 Battery Fuel System Engine Tires Cover 1. BATTERY Maintaining the state of charge of your scooter battery during an extended period of storage is essential to insure the maximum service life of the battery. If at all possible, remove the battery from the vehicle. Clean the battery and terminals using a solution of baking soda and water, making sure that none of the solution enters the battery during cleaning. After the battery is cleaned, inspect it for any signs of damage or extraordinary wear that may have occurred while in service. At this time you should also use a baking soda and water solution to clean the battery compartment of the vehicle to help neutralize any electrolyte that may be present. Rinse with clean water and dry thoroughly. You may return the battery to the battery compartment, or you may store it separately. If it is put back into the battery compartment for storage it is best that you do not hook up the battery cables until you are ready to take the scooter out of storage. Charge the battery to 100%. If the battery is stored at temperatures below 60°F, recharge to 100% every month. If stored in a warm area above 60°F, recharge the battery every two weeks. Before you connect your charger to the battery, make sure that you know how your battery charger operates. Some chargers will not stop charging when the battery reaches 100%, while others will stop automatically. Some automatic chargers will begin charging again when the battery level drops, while others will not begin 41 charging again until power to the charger has been disconnected and reconnected. If your charger is one that will continue to charge even after the battery reaches 100%, you must manually disconnect power to the charger when charging is complete or the battery may be damaged from overcharging. These chargers should normally be connected for only a few hours at a time. If your charger is one that must be disconnected in order to reset it to charge, you must manually do so at the proper intervals. CAUTION! During charging of a small scooter battery, a low volume of hydrogen gas will be emitted. While opening a window in the room is not generally required, battery charging should always be done far away from any source of flame or electrical spark. 2. FUEL SYSTEM Properly preparing the fuel system before putting your scooter into storage will reduce potential problems due to a plugged or corroded system. There are two ways this can be accomplished. A. DRY FUEL SYSTEM This technique is suitable if you are going to store your bike in a heated location where condensation due to temperature fluctuations is not a problem. This requires you to fully drain the entire fuel system including the fuel tank and carburetor. Generally, you will need to remove the float bowl of the carburetor, and then blow all of the fuel out of the jets with compressed air to ensure that everything is perfectly dry. 42 B. WET FUEL SYSTEM This technique is suitable if you are going to store your bike in a heated location where condensation due to temperature fluctuations is not a problem. Purchase fuel stabilizer and add it to a nearly full tank of gasoline in the concentration indicated on the label for long-term storage. Opti-Mizer Fuel Stabilizer is the recommended additive. Opti-Mizer is available through your local TNG Dealer. After adding the fuel stabilizer, run the engine for at least 10 minutes to allow the stable fuel to make its way through the entire fuel delivery system and into the carburetor. Top off the tank with gasoline to vacate all of the air. This will reduce or eliminate chances of condensation due to temperature fluctuations. Do not use E85 or fuel containing more than 10% ethanol. 3. TIRES It is best if the weight of the scooter can be kept off the tires so that a flat spot or cracked sidewall does not develop. With nearly all TNG Scooters, when the bike is on the center stand the front wheel is on the ground while the rear wheel is slightly off the ground. You may simply be able to lift he front wheel of the scooter off the ground and place something under the frame of the scooter and have both wheels off the ground. Make sure that the scooter is stable and cannot fall or be knocked over easily. 43 In most cases it will require a little more work to get both wheels off the ground. Place a thick wooden plank or other object on the floor, making sure that the plank is long enough to easily accommodate the width of your center stand. Roll the scooter over the plank and put the bike on the center stand, with the stand sitting on top of the plank. Then lift the front wheel of the scooter off the ground and place something underneath the frame to support the front of the scooter. Make sure the scooter is stable and cannot fall or be knocked over easily. 4. ENGINE (OPTIONAL) If you are placing your scooter into storage in an unheated area, temperature fluctuations may cause condensation inside the cylinder of the engine. Condensation could cause rust and corrosion to the cylinder wall. To reduce the chance of getting rust or corrosion, perform the following steps: • Remove the spark plug. • Squirt about 2 ounces of 2-cycle oil into the cylinder. (This applies to both 2 and 4-cycle engines.) • With the spark plug still out, turn the engine over a few times. • Reinstall the spark plug. 5. COVER TNG Scooters come standard with a nylon weather cover. Placing the cover over the scooter while it is in storage will reduce the dirt and dust, which would naturally accumulate on the scooter. 44 K. TROUBLESHOOTING ENGINE WON’T START Check For Fuel Ignition Key Must be to the Right Check Kill Switch is in the Run Position Depress Either Brake Lever Push Start Button on the Right Handle Bar If the Engine Doesn’t Turn Over Charge or Replace the Battery ENGINE IS DIFFICULT TO START 1. Check for Type of Gasoline Use of E85 or Fuel Containing Replace with Non-Ethanol Gasoline more than 10% Ethanol 2. Check for Fuel in Carburetor Out of Fuel Fill Fuel Tank Clean or Replace Fuel Switch or Fuel Filter or Petcock Blocked Petcock With Fuel Check Spark Plug 45 3. Check Compression No Compression With Compression Have TNG Dealer Inspect the Scooter Check Spark Plug 4. Spark Plug No Spark Spark Plug Wet or Fouled Intermittent Spark Plug Lead Spark Plug Dirty or Wrong Gap Loose Spark Plug Spark Plug OK 46 Remove Plug & Prime Kick the Start Pedal without Fuel & Ignition. Re-install Spark Plug Replace Lead Replace Plug or Correct Gap Tighten Spark Plug Check Carburetor 5. Carburetor Carburetor Defective Blocked Idle Jet Dirty Float Bowl Low Fuel in Bowl Carburetor OK Engine Overheated Air Inlet System Blocked or Leaky KNOCKING SOUND IN CYLINDER Causes 1. Engine Overheating 2. Spark Plug Defective 3. Ignition Timing Too Early 4. Carbon Build-up In Cylinder In Exhaust Pipe & Muffler Clean Jet Clean Bowl Adjust Bowl Check & Replace Lubricating Oil Remove Blockage or Leak Solutions Check & Replace Lubricating Oil Replace the Spark Plug Adjust Ignition Timing Remove Carbon Build-up Remove Carbon Build-up 47 LOW POWER OUTPUT FROM ENGINE Causes 1. Air Cleaner Blocked 2. Fuel Line in Carburetor Blocked 3. Excessive Carbon Deposit on Piston in Cylinder & Exhaust System 4. Piston & Cylinder Excessively Warn 5. Ignition Timing Incorrect 6. Clutch Slipped 7. Belt is Loose 8. Use of E85 or Fuel Containing more than 10% Ethanol Solutions Clean Air Filter Remove Residue Remove Carbon Build-up Replace Piston & Cylinder Adjust Timing Adjust Clutch Replace Belt Replace with Non-Ethanol Gasoline BLACK OIL & EXHAUST FROM EXHAUST PIPE Causes 1. Carburetor Not Atomizing Fuel Properly 2. Air Cleaner Blocked 48 Solutions Check & Adjust Carburetor Clean Air Filter POOR FUEL ECONOMY Causes 1. Fuel System Leaks 2. Spark Plug Worn 3. Air Cleaner Blocked 4. Idle Speed Too High 5. Riding at Excessive Speeds 6. Use of E85 or Fuel Containing more than 10% Ethanol Solutions Repair Leak Replace Spark Plug Clean Air Filter Adjust Idle Speed Ride at More Economical Speeds Replace with Non-Ethanol Gasoline FUEL DRAINING FROM CARBURETOR OVERFLOW TUBE Causes Solutions 1. Float Bowl Residue Clean the Float Bowl 2. Float Bowl Needle Valve Not Completely Closed Replace Needle Valve 3. Occasional Fuel Overflow Tap the Fuel Bowl Lightly PETCOCK / FUEL FILTER LEAKS Causes 1. Fuel Switch Loose 2. Broken Seal Solutions Tighten the Fuel Switch Replace Fuel Switch 49 WARRANTY 2008 and 2009 Models CMSI, Inc., warrants to the first retail purchaser of all TNG vehicles from an Authorized CMSI Dealer and each subsequent owner that the vehicle is free from defects in materials and workmanship for the period stated in this warranty section. TO QUALIFY FOR THIS WARRANTY • The CMSI vehicles must be purchased from a dealer within the United States, Canada or Mexico who is authorized by CMSI to sell CMSI products. • Dealer must be signed up and be familiar with CMSI warranty policy. WARRANTY VERIFICATION METHOD Owner and dealer sign Owner Registration Card at time of purchase. This information is kept in CMSI’s warranty system and can be requested thru an authorized dealer. In the case of a transfer of ownership during the warranty period, the new owner must submit a written request to update the owner registration data on file for that particular vehicle. VIN#, Full Name, Address, & Phone # are required. Appendix 50 WARRANTY RESPONSIBILITY THE MANUFACTURER CMSI Inc. To repair or replace , at its option, any part which is proven to be defective in material or factory workmanship under normal use for the applicable warranty period. • The repair or replacement of defective parts under this limited warranty must be made by an Authorized CMSI Dealer or service center. Warranty repairs will be made at no charge to you for parts or labor. • Parts repaired or replaced under warranty are warranted only during the balance of the applicable warranty period. THE AUTHORIZED DEALER To give you complete warranty documentation when you pick up your vehicle. To perform warranty repairs on any CMSI product that qualifies for such repairs. The selling dealer shall sign the Acceptance Certificate and a Card of Delivery upon delivery of the vehicle. The Card of Delivery outlines the steps your dealer has taken to fulfill his responsibility to properly assemble and service your new vehicle and inform you of proper break-in, warranty, periodic maintenance and maximum load and other riding and safety rules. Appendix 51 YOU, THE OWNER • The customer should retain all service records for future reference. • Service inspections and replacements in accordance with the time and mileage intervals given in the Maintenance Schedule are essential. • You are responsible for paying all maintenance costs, including service interval costs. • Failures which occur due to improper maintenance as determined by TNG are not covered under this warranty. • The engine warranty requires the owner to purchase and use the Interlube Opti engine lubricant at the time of purchase of the new scooter and use only that lubricant during the entire warranty period. • Following this manual for proper use and break-in procedures. An authorized CMSI dealer is your best source for scheduled maintenance on your vehicle. If warranty repairs are needed, your dealer may ask you for documentation which may consist of one or more of the following: • A Maintenance Record showing the odometer mileage and service date. Each entry should be signed or stamped by a person who is qualified to service your motorcycle or yourself if you have performed the maintenance. • Copies of repair orders or other receipts for required maintenance that include the odometer mileage and service date. NOTE: All maintenance receipts should be kept by the owner. Appendix 52 WARRANTY COVERAGE TABLE COVERAGE BEGINS The date the motorcycle is delivered to the first retail purchaser WARRANTY CMSI shall repair or replace, at its option, any part (including parts of the emission control system) that is found defective in material or workmanship under normal use for the applicable time period. PARTS OR LABOR No charge to you. 2008/2009 MODEL YEAR 2008/2009 Warranty Information Engine Parts Labor 50cc and below* 24 months 24 months 51cc and above* 24 months 24 months Emission Components Parts Labor Less than 170cc lesser of 30 months or 12,000 Km lesser of 30 months or 12,000 Km 170cc to 280cc lesser of 5 years or 18,000 Km lesser of 5 years or 18,000 Km 280cc and above lesser of 5 years or 30,000 Km lesser of 5 years or 30,000 Km Basic (non-engine) Parts Labor 50cc and below 24 months 24 months 51cc and above 24 months 24 months Body Parts Parts Labor All models 12 months 1 month Battery Parts Labor All models 6 months from battery manufacturer N/A *NOTICE: Basic engine warranty covers 12 months. Use of Opti-2 oil for all 2-stroke vehicles, and Opti-4 oil for all 4-stroke vehicles, purchased, registered with CMSI, and used throughout the entire warranty period, will double the engine warranty period to 24 months. Appendix 53 WARRANTY DISCLAIMERS, LIMITATIONS & EXCLUSIONS Disclaimer of Consequential Damage & Limitation of Implied Warranties CMSI INC. DISCLAIMS ANY RESPONSIBILITY FOR: • Loss of time • Loss of use of vehicle • Transportation expenses (rental and /or towing) • Any other incidental or consequential damage • Any other incidental or consequential expenses (storage) DURATION OF IMPLIED WARRANTIES Any Implied Warranties, including the implied warranty of merchantability and fitness for a particular purpose are limited to the duration of this written warranty. STATE LAWS MAY VARY The previously listed limitations or exclusions may not apply to a motor scooter because of state laws. Some states may not allow limitations on how long an implied warranty lasts. Some states may not allow exclusion or limitation of incidental or consequential damages. Appendix 54 YOUR LEGAL RIGHTS These warranties give you specific legal rights. You may also have other rights which vary from state to state. It is the responsibility of the owner to be aware of state laws which pertain to this issue in your particular state. THESE WARRANTIES DO NOT COVER Failures which are not due to a defect in material or factory workmanship. Parts or accessories affected or damaged by: • Lack of required maintenance • Owner abuse or misuse • Accident and/or collision • Normal wear • Neglect • Improper installation • Unsuitable use in an application for which the part was not designed • The incorporation or use of unsuitable attachments or parts • The unauthorized alteration of any part • The incorporation or use of unsuitable attachments or parts • Deterioration from the elements • Failure to follow “break-in” procedures Appendix 55 Replacement of expendable maintenance item including, but not limited to: Spark Plug Hoses Gaskets Lubricants Coolant Fuses Belts Tires Filters Light Bulbs Battery Hand Grips Floor Mats Fuel Filters Seat Covers (See Owner’s Manual) • Paint and/or decals fading, peeling, blistering, chipping or rusting. • Plastic body parts and panels, See “Warranty Time Table” USE FOR THE FOLLOWING ACTIVITIES, SHALL VOID COVERAGE: • Racing • Competition • Rental or other commercial uses • Towing another vehicle, trailer or similar device • Alteration to the engine or drive train • Any operation or use outside of that described in this Owner’s Manual • Alteration of the odometer so that the actual mileage cannot be determined; alteration may VOID coverage • Any off-road use will void coverage. Appendix 56 Replacement parts refer to Distributors Limited Warranties – Replacement Parts DISTRIBUTORS LIMITED WARRANTY – NEW MOTORCYCLE CMSI warrants to the first retail purchaser and subsequent purchasers of this vehicle that the motorcycle is free from defects in materials and workmanship for the period stated in “Warranty Time Table.” TO QUALIFY FOR THIS WARRANTY • The vehicle must originally have been purchased from a dealer within the United States, Canada, or Mexico who is authorized by CMSI to sell CMSI products. • Prior to delivery to the purchaser, setup and pre-delivery service must be performed by a dealer or service center who is authorized by CMSI to deliver it vehicles. DISTRIBUTOR’S LIMITED WARRANTY- MOTORCYCLE TIRES WARRANTY TIME PERIOD 90 days, or until the center tread is worn to a depth of 3/32”, whichever occurs first. Appendix 57 COVERAGE BEGINS • Original tire on motorcycle - date of delivery • Tire purchased as replacement - date of purchase WARRANTY COVERAGE • Tires distributed and sold by CMSI which are either • Original equipment on CMSI vehicles, or • Specified by CMSI for the model the tire is installed on and purchased from an Authorized Dealer for replacement use. • To qualify for this warranty • The tire must have been purchased from an Authorized CMSI Dealer. • The tire was part of the original factory equipment. • The tire must have been used for its designed purpose. THE OBLIGATION OF CMSI INC To replace any tire which is proven to be defective in material or factory workmanship under normal use – until the tire center tread is worn to a depth of 3/32”. At that point, there will be no further warranty consideration, regardless of the tire’s age or mileage. Appendix 58 YOUR OBLIGATION To practice proper tire care and prudent motorcycle operation. You must maintain tire inflation pressure and load in accordance with information in the manual, the tire information label on the motorcycle, and restrictions molded into the tire sidewalls. The replacement of a defective tire under this warranty must be made by an Authorized CMSI Inc Dealer. REPLACEMENT CHARGES – UP TO 50% TREAD WEAR Tire: No charge for a new direct replacement tire. Labor: No charge for mounting and balancing – to the tire’s original purchaser if the tire was factory or dealer installed. You pay for mounting and balancing - if the tire was not sold installed. REPLACEMENT CHARGES – AFTER 50% TREAD WEAR Tire : 50% charge for a new direct replacement tire. Labor : 50% charge for mounting and balancing. THIS WARRANTY DOES NOT COVER • Tires installed on non-CMSI vehicles • Tires worn beyond the service limit specified in the appropriate Owners Manual. Appendix 59 • Tires rendered unserviceable by road hazard damage, such as impact breaks, punctures, cuts, or snags. • Tires rendered unserviceable by running while flat, spinning, improper inflation, overloading, misalignment, improper mounting during replacement of after repair, or installation on unsuitable rims. • Tires rendered unserviceable due to abuse or misuse such as towing a trailer. • Tube-type tires fitted without inner tubes. • Tires which have been repaired. • Tires whose sidewalls have been modified by the addition or removal of material. • Tires with superficial weathering, checking, or cracking. • Tires used in racing or other competition. DISTRIBUTOR’S LIMITED WARRANTY – REPLACEMENT PARTS WARRANTY TIME PERIOD: See “Warranty Coverage Table” on page 4 of Warranty Section. Coverage begins: The date of purchase from an Authorized CMSI Dealer. To qualify for this warranty, the genuine CMSI part • Must have been purchased from an Authorized CMSI Dealer. • Must have been used in an application for which it was designed. Appendix 60 WARRANTY COVERAGE • CMSI Inc will repair or replace, at its option, any genuine CMSI part that is defective in material or workmanship under normal use. • Proof of date of purchase is required. Parts installed by an Authorized CMSI Dealer: Parts & Labor: No charge. Parts not installed by an Authorized CMSI Dealer: Parts: No charge Labor: You pay for removal/installation charges THIS REPLACEMENT PARTS WARRANTY DOES NOT COVER The following exclusions apply specifically to replacement parts in addition to the exclusions listed: • Tires (Refer to Distributor’s Limited Warranty – Motorcycle Tires) • The motorcycle in which the part is installed. • The color match of painted components (CMSI makes no warranty, expressed or implied, regarding the color match of painted components.) Appendix 61 REPORTING SAFETY DEFECTS If you believe that your vehicle has a defect which could cause an accident or could cause injury or death, you should immediately inform the National Highway Traffic Safety Administration (NHTSA) in addition to notifying CMSI Inc. If NHTSA receives similar complaints, it may open an investigation, and if it finds that a safety defect exists in a group of vehicles, it may order a recall and remedy campaign. For this reason it is very important for you to notify CMSI of any change of address or ownership. NHTSA cannot become involved in individual problems between you, your dealer or CMSI. To contact NHTSA, you may either call the Auto Safety Hotline toll-free at 1-800-424-9393 (or 202-366-0123 in Washington DC area) or write to: NHTSA, US Department of Transportation, Washington DC 20590. You can also obtain other information about motor vehicle safety from the hotline. Appendix 62 YOUR WARRANTY RIGHTS AND OBLIGATIONS The California Air Resources Board, the U.S. Environmental Protection Agency, and CMSI Inc. (Hereinafter CMSI) are pleased to explain the emission control system warranty on your 2008/2009 motorcycle. New on-road motorcycles must be designed, built and equipped to meet U.S. EPA Federal and California anti-smog standards. CMSI must warrant the emission control system on your vehicle for 30 months or 12,000 kilometers, whichever comes first, provided that there has been no abuse, neglect or improper maintenance of your vehicle. Your emission control system may include parts such as the carburetor, the ignition system, catalytic converter and engine computer, if it is so equipped. Also included may be hoses, belts, connector and other emission-related assemblies. Where a warrantable condition exists, CMSI will repair your vehicle at no cost to you, including diagnosis, parts and labor. If an emission-related part on your vehicle is defective, the part will be repaired or replaced by CMSI. This is your emission control system DEFECTS WARRANTY. Appendix 63 NOTICE! Use of any CMSI vehicle in any type of competitive event completely and absolutely voids this and all other warranties offered by CMSI. OWNER’S WARRANTY RESPONSIBILITIES As the vehicle owner, you are responsible for the performance of the required maintenance listed in your owner’s manual. CMSI recommends that you retain all receipts covering maintenance on your vehicle, but CMSI cannot deny warranty solely for the lack of receipts or for your failure to ensure the performance of all scheduled maintenance. You are responsible for presenting your vehicle to the CMSI authorized dealer as soon as a problem exists. The warranty repairs should be completed in a reasonable amount of time, not to exceed 30 days. As the vehicle owner, you should be aware that CMSI may deny your warranty coverage if your vehicle or a part has failed due to abuse, neglect, improper maintenance or unapproved modifications. If you use your vehicle in any type of competitive event, this warranty is immediately and completely void. Appendix 64 If you have any questions regarding your warranty rights and responsibilities, you should contact CMSI Inc., PO Box 969, Preston, WA 98050, Phone 425-222-7738. CMSI warrants that each new 2008 and later TNG Brand vehicle: A. Is designed, built and equipped so as to conform at the time of initial retail purchase with all applicable regulations of the United States Environmental Protection Agency, and the California Air Resources Board; and B. Is free from defects in material and workmanship which cause such vehicle to fail to conform to applicable regulations of the United States Environmental Protection Agency, and the California Air Resources Board for the periods specified above. I. Coverage. Warranty defects shall be remedied during customary business hours at any authorized CMSI dealer located within the United States of America in compliance with the Clean Air Act and applicable regulations of the United States Environmental Protection Agency, and the California Air Resources Board. Any part or parts replaced under this warranty shall become the property of CMSI. Appendix 65 II. Limitations. following: This Emission Control System Warranty shall not cover any of the A. Repair or replacement as a result of: 1. Accident, 2. Misuse, 3. Repairs improperly performed or replacements improperly installed, 4. Use of replacement parts or accessories not conforming to CMSI specifications which adversely affect performance and/or, 5. Use in competitive racing or related events. B. Inspections, replacement of parts and other services and adjustments for required maintenance. C. Any vehicle equipped with an odometer on which the odometer mileage reading has been changed so that actual mileage cannot be readily determined. III. Limited Liability. A. The liability of CMSI under this Emission Control System Warranty is limited solely to Appendix 66 the remedying of defects in material or workmanship by an authorized CMSI dealer at its place of business during customary business hours. This warranty does not cover inconvenience or loss of use of the vehicle or transportation of the vehicle to or from the CMSI dealer. CMSI SHALL NOT BE LIABLE FOR ANY OTHER EXPENSES, LOSS OR DAMAGE, WHETHER DIRECT, INCIDENTAL, CONSEQUENTIAL OR EXEMPLARY ARISING IN CONNECTION WITH THE SALE OR USE OF OR INABILITY TO USE THE VEHICLE FOR ANY PURPOSE. SOME STATES DO NOT ALLOW THE EXCLUSION OR LIMITATION OF CONSEQUENTIAL DAMAGES, SO THE ABOVE LIMITATIONS MAY NOT APPLY TO YOU. B. NO EXPRESS EMISSION CONTROL SYSTEM WARRANTY IS GIVEN BY CMSI EXCEPT AS SPECIFICALLY SET FORTH HEREIN. ANY EMISSION CONTROL SYSTEM WARRANTY IMPLIED BY LAW, INCLUDING ANY WARRANTY OF MERCHANTABILITY OR FITNESS FOR A PARTICULAR PURPOSE, IS LIMITED TO THE EXPRESS EMISSION CONTROL SYSTEM WARRANTY TERMS STATED IN THIS WARRANTY. THE FOREGOING STATEMENTS OF WARRANTY ARE EXCLUSIVE AND IN LIEU OF ALL OTHER REMEDIES. SOME STATES DO NOT ALLOW LIMITATIONS ON HOW LONG AN IMPLIED WARRANTY LASTS, SO THE ABOVE LIMITATIONS MAY NOT APPLY TO YOU. Appendix 67 C. No dealer is authorized to modify this CMSI Limited Emission Control System Warranty. IV. LEGAL RIGHTS. THIS WARRANTY GIVES YOU SPECIFIC LEGAL RIGHTS, AND YOU MAY ALSO HAVE OTHER RIGHTS WHICH VARY FROM STATE TO STATE. V. THIS WARRANTY IS IN ADDITION TO THE CMSI LIMITED MOTORCYCLE WARRANTY. VI. ADDITIONAL INFORMATION. Any replacement part that is equivalent in performance and durability may be used in the performance of any maintenance or repairs. However, CMSI is not liable for these parts. The owner is responsible for the performance of all required maintenance. Such maintenance may be performed at a service establishment or by any individual. The warranty period begins on the date the motorcycle is delivered to an ultimate purchaser. Appendix 68 Inc. Motorsports CMSI Inc., Motorsports 8146 304th Ave. SE, P .O. B ox 969 Preston, WA 98050, USA Phone: 425-222-7738 Fax: 425-222-7739