1
•
•
•
•
•
Air Filter
Before removing the old oil filter, clean around its
base to prevent debris from entering the crankcase.
Grasp the oil filter and remove it from the engine by
turning it counterclockwise. Use an oil filter wrench,
if necessary.
Place a new replacement filter in a shallow pan with
the open end up and pour new oil of the proper type
(see chart on page 19), in through the threaded
center hole. Stop pouring before the oil reaches the
bottom of the threads and allow a minute or two for
the oil to be absorbed by the filter material.
Put a drop of oil on your fingertip and apply a light
coating to the gasket of the new oil filter.
Install the replacement oil filter on the engine by
turning it clockwise until the rubber gasket contacts
the mounting surface. Hand tighten the filter an
additional 3/4 turn after the gasket first makes
contact.
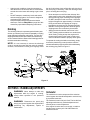
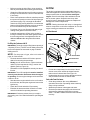
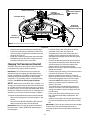
The engine is equipped with a replaceable foam precleaner and paper air cleaner element. See Figure 19.
Always examine the air cleaner before starting the
engine. Check for a buildup of dirt and debris around
the air cleaner system. Keep this area clean. Also
check for loose or damaged components. Replace all
damaged air cleaner components.
NOTE: Starting the tractor with loose or damaged air
cleaner components could allow unfiltered air into the
engine causing premature wear and failure.
Air Filter Removal
Tab
Paper Element
Re-filling the Crankcase with Oil
Wing Nut
IMPORTANT: The engine (with oil filter) has a capacity of
1.8 quarts (57.6 oz.). Do NOT overfill. Always check the
level on the dipstick as instructed on page 19 before
adding more oil.
NOTE: For the proper oil type, refer to the chart on
Air Cleaner Base
page 19 of this manual.
•
•
•
Foam Precleaner
Clean the area around the oil fill tube to prevent
debris from entering the crankcase.
Slowly pour oil into the fill tube. Fill the crankcase
until the oil level reaches the full (F) mark on the
dipstick (Refer to Figure 16).
Reinstall the oil fill cap/dipstick securely into the oil
fill tube.
Clasps
Figure 19
•
IMPORTANT: The oil fill cap/dipstick must be installed
securely onto the tube at all times when the engine
is operating. Severe engine damage could result from
a failure to do so.
•
•
•
Air Cleaner Cover
•
Pull the two clasps away from the sides of the air
cleaner cover; then unhook the clasps from the
tabs on the air cleaner base. See Figure 19.
Unthread the wing nut to remove the paper element
and precleaner from the air cleaner base.
Service the Foam Precleaner
Start the tractor engine and allow it to run for about
three minutes, then stop the engine and remove the
ignition key.
Check the oil level and add oil if necessary.
Examine the area around the oil filter the oil drain
valve for leaks before operating the tractor.
•
•
•
IMPORTANT: If leaks are present, have your engine
serviced by your Cub Cadet dealer before operating the
tractor.
21
Clean the precleaner after every 25 hours of
operation. More often if operating under extremely
dusty or dirty conditions.
Wash the precleaner in detergent and water.
Rinse the precleaner thoroughly until all traces of
detergent are eliminated. Squeeze out excess
water — DO NOT WRING. Allow the foam element
to air dry.