1
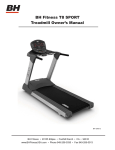
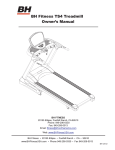
BH FITNESS RS5 RECUMBENT CYCLE
OWNER’S MANUAL
BH FITNESS
20155 Ellipse, Foothill Ranch, CA 92610
Phone: 949-206-0330
Fax: 949-206-0013
Email: [email protected]
Web: www%+)LWQHVV86$FRP
RS5 RECUMBENT CYCLE
INTRODUCTION
Congratulations for selecting the RS5 Recumbent Cycle as a fitness resource. The BH Fitness
RS5 offers many exercise programs that benefit users of all levels and ages. The RS5 is
designed to make your workouts more effective and enjoyable.
Please read this manual carefully before using the RS5. This will allow you to get a full
understanding of all the features the BH Fitness Recumbent Cycle provides. If you have
questions or concerns, please contact BH FITNESS or any authorized BH FITNESS distributors
in your area.
BH FITNESS
20155 Ellipse, Foothill Ranch, CA 92610
Phone: 949-206-0330
Fax: 949-206-0013
Email: [email protected]
Web: www.%+)LWQHVV86$FRP
BEFORE YOU BEGIN
It is very important to become familiar with the frequently used components of your RS5.
BH Fitness • 20155 Ellipse • Foothill Ranch • CA • 92610
www.%+)LWQHVV86$.com • Phone 949-206-0330 • Fax 949-206-0013
1
RS5
RS5 RECUMBENT CYCLE
TABLE OF CONTENTS
SECTION
PAGE
1. IMPORTANT SAFETY INSTRUCTIONS ..................................................... ..3
2. PRE & ASSEMBLY INSTRUCTIONS....................................................... . 5
3. PARTS LIST................................................................................................. 15
4. EXPLODED VIEW ....................................................................................... 18
5. COMPUTER CONSOLE.............................................................................. 20
6. HEART RATE CALCULATION..................................................................... 25
7. MAINTENANCE .......................................................................................... 26
8. WARRANTY ................................................................................................ 27
BH Fitness • 20155 Ellipse • Foothill Ranch • CA • 92610
www.%+)LWQHVV86$.com • Phone 949-206-0330 • Fax 949-206-0013
2
RS5
RS5 RECUMBENT CYCLE
SECTION 1 - IMPORTANT SAFETY INSTRUCTIONS
Read all instructions before using the Unit.
User Safety:
Before using this or any other exercise equipment consult your family physician or health care
professional in order to develop a well-planned exercise program to fit your health needs. If you
encounter any pain or breathing discomfort while working out, STOP!, and consult a physician before
continuing.
1. Close supervision is necessary when this unit is used by or near children, invalids or disabled
persons. Children are curious and vulnerable to accidents. Do not use the unit as a toy.
2. Do not wear loose or dangling clothing while using the unit.
3. Maximum user weight is 350 lbs.
4. Only one person can use the unit at a time.
5. Keep hands away from moving parts.
6. The owner is responsible for explaining safety instructions to each user.
Unit Safety:
WARNING: To reduce the risk of fire, electric shock, injury to persons or inflicting the
harm of a burn:
7. Never leave the unit unattended when plugged in. Unplug the unit from the electrical power before
leaving the room, when unused and before cleaning, servicing or adding or removing parts.
8. Unplug the unit prior to cleaning to reduce the risk of electric shock, serious burns, and the risk of
injuries.
9. Never operate this unit if it has a damaged electrical cord or plug. Do not operate this unit if it is not
working properly. Do not operate this unit if it has been dropped or damaged. Do not operate this unit
if it has been immersed into water. Return the unit to a service center for examination and repair.
10. Do not pull or carry the unit by the electrical cord. Do not use the cord as a handle.
11. Keep the electrical cord away from heated surfaces.
12. Connect this unit to a properly grounded 110-120V, 15 or 20 Amp dedicated outlet only.
13. Call your service center or BH Fitness with your concerns before taking your unit in for repair.
14. Do not place sharp objects near the unit. Never drop or insert any object into any opening.
15. Do not use outdoors.
16. Do not operate where aerosol (spray) products are being used or where oxygen is being
administered.
BH Fitness • 20155 Ellipse • Foothill Ranch • CA • 92610
www.%+)LWQHVV86$.com • Phone 949-206-0330 • Fax 949-206-0013
3
RS5
RS5 RECUMBENT CYCLE
IMPORTANT SAFETY INSTRUCTIONS (cont’d)
17. Use the unit only as described in this manual. Only use attachments recommended by the
manufacturer.
18. For safety, keep a minimum clearance of 18” on the front and each side and 24” at the rear of the unit.
Place the unit on a flat stable surface.
Please save these Instructions
ELECTRICAL POWER CONNECTOR
Your RS5 Recumbent Cycle has a two prong external electrical power connector for use on a
nominal 110-120 volt circuit. Use only the electrical power connector provided with your RS5
Recumbent Cycle. If you misplace the electrical connector, please contact BH Fitness for an
original replacement. Use of the wrong electrical connector may cause damage to your RS5
Recumbent Cycle. Do not use an adapter or extension cords with this product.
CLEANING
Clean with soap and slightly damp cloth only; never use solvents.
BH Fitness • 20155 Ellipse • Foothill Ranch • CA • 92610
www.%+)LWQHVV86$.com • Phone 949-206-0330 • Fax 949-206-0013
4
RS5
RS5 RECUMBENT CYCLE
PRE-ASSEMBLY INSTRUCTION
GENERAL INSTRUCTIONS
Carefully read through the instructions contained in this manual. It provides you with important
information about assembly, safety and use of the machine.
1. This unit has been designed for light commercial use. The weight of the user must not exceed
350 lbs. (156 kg.)
2. Keep your hands well away from any of the moving parts.
3. Parents and/or those responsible for children should always take their curious nature into
account and how this can often lead to hazardous situations and behavior resulting in
accidents. Under no circumstances should this appliance be used as a toy.
4. The owner is responsible for ensuring that anyone who uses the machine is duly informed
about the necessary precautions.
5. Your unit can only be used by one person at a time.
6. Use suitable clothing and footwear. Make sure all laces/cords are tied correctly.
KEEP THESE INSTRUCTIONS SAFE FOR FUTURE USE
BH North America Corporation
20155 Ellipse
Foothill Ranch, CA 92610
Phone: (949) 206-0330
Fax: (949) 206-0013
Email: [email protected]
Web: www.bhnorthamerica.com
Mon - Fri 8am - 5pm PST
BH Fitness • 20155 Ellipse • Foothill Ranch • CA • 92610
www.%+)LWQHVV86$.com • Phone 949-206-0330 • Fax 949-206-0013
5
RS5
RS5 RECUMBENT CYCLE
SECTION 2 - PRE- ASSEMBLY INSTRUCTIONS
Slider Lock/Release Handle
A11
BH Fitness • 20155 Ellipse • Foothill Ranch • CA • 92610
www.%+)LWQHVV86$.com • Phone 949-206-0330 • Fax 949-206-0013
6
RS5
RS5 RECUMBENT CYCLE
PRE ASSEMBLY INSTRUCTIONS (cont’d)
J1-(L)
BackP
ad
Support Tube
M1 Accessory
tray(LEFT)
J2-(R)
Saddle
Tube
(S5)Strap(L)
(S4)Strap(R)
M2 Accessory
tray(RIGHT)
M8X15
M8X16X1.2T
M8X35
1/4"x40L
M6X10
M8X16X1.2T(BLACK)
M8X105
M8X20
M4X15
M6X8
8X4.5
BH Fitness • 20155 Ellipse • Foothill Ranch • CA • 92610
www.%+)LWQHVV86$.com • Phone 949-206-0330 • Fax 949-206-0013
7
RS5
RS5 RECUMBENT CYCLE
ASSEMBLY INSTRUCTIONS
FIGURE 1: FRONT STABILIZER ASSEMBLY
Step1.Attach the front stabilizer(B) to the main
frame(A1) using two ,spring(N2), washer(N3)
and screw(N7).
N2
B
N3 N7
C1
A1
FIGURE 2: REAR STABILIZER ASSEMBLY
Step1. Attach the rear stabilizer(C) to the main
frame(A2) using two ,spring(N2),
washer(N3) and screw(N4).
HOW TO KEEP THE MACHINE STABLE
**Following the assembly of Figure 1 & Figure 2
and the machine is unstable or rocking, adjust the footpads
(C1) under the stabilizers by tightening (turning clockwise) or
loosening (turning counterclockwise)
until stability is achieved
A2
N2
C
N3
C1
N4
BH Fitness • 20155 Ellipse • Foothill Ranch • CA • 92610
www.%+)LWQHVV86$.com • Phone 949-206-0330 • Fax 949-206-0013
8
RS5
RS5 RECUMBENT CYCLE
ASSEMBLY INSTRUCTIONS (cont’d)
FIGURE 3: FRONT & REAR MAIN FRAME ASSEMBLY
Step1. Connect hand pulse sensor wire (A3) to (A4).
Step2. Slide the front(A1) and rear(A2) main frames
onto each other and secure the joint with 6 screws (N1)
6 washers (N2) and 6 washers (N3)
Make sure not to pinch the cables
A1
N1
A2
A3
N2
N3
A4
C1
FIGURE_4 CENTER SUPPORT ASSEMBLY
Step1. Slide the tube cover(I) onto the main support tube(D).
Step2. Connect hand pulse sensor cable(A33) coming
from main support tube to cable(A36) from the main frame
Connect power cable(A34) coming from main support
tube(D) to cable(A4) of the main frame
Step3. Secure main support tube to main frame(A1) using 3 bolts(N7)
and 3 spring washer(N2) and 3 washer(N3).
Slide main support tube cover down until it covers the joint completely
D
N7
ATTENTION: TAKE CARE NOT TO PINCH THE
THE CABLES DURING THE ASSEMBLY
PROCESS.
I
N2
N3
A4
A34
A1
A33
A36
BH Fitness • 20155 Ellipse • Foothill Ranch • CA • 92610
www.%+)LWQHVV86$.com • Phone 949-206-0330 • Fax 949-206-0013
9
RS5
RS5 RECUMBENT CYCLE
ASSEMBLY INSTRUCTIONS (cont’d)
FIGURE 5: BACKREST TUBE & LEFT HANDLE BAR ASSEMBLY
Step1. Place backrest tube(P) on the seat base slider
tube(P1) and secure tightly with
N1
washer(N3) and screw(N1).
Step2. Secure seat tube(P1) with
seat base slider (A10)
with screw(N1).
N1
N3
P
A2
P1
J1-1
N8
A10
Step3. Connect sensor cable (J1-1) to
to sensor cable (A3)
Slide handle bar (J1) onto
seat base slider (A10) and secure
using 4 screws (N8).
J1
R
A3
For Cosmetic
Purposes Only
G
FIGURE_6 SLIDER HANDLE & RIGHT
HANDLE BAR ASSEMBLY
Step1. Use the same assembly step
P
in Figure 5 to attach the right
handle bars.
Step2. Insert the slider handle (A11)
into the round peg and use set
A2
A3
N8 J2-1
screw N10 to fix it in place
N3
P1
N1
J2
Step3. Secure the seat cushion(G)
onto base slider(P1) from underneath
with 4 bolt(N1),washer(N3)
A11
N10
BH Fitness • 20155 Ellipse • Foothill Ranch • CA • 92610
www.%+)LWQHVV86$.com • Phone 949-206-0330 • Fax 949-206-0013
10
RS5
RS5 RECUMBENT CYCLE
ASSEMBLY INSTRUCTIONS (cont’d)
for top and N6-1 for bottom
-1
FIGURE_8-1 ASSEMBLY FOR SMALL HANDLE
N5
N11
Step 1.Attach the small handle bar(E)
onto the plate of the console tube(D) and use 2
E bolt(N5) and 2 washer (N11) to secure tightly.
F
FIGURE_8-2 ASSEMBLY FOR COMPUTER
Step1: Locate console(F) and connect sensor cables(A33,
A34) to the cables coming from the console.
Step2: Gently tuck all excess wires into the console
cavity. Slide console onto the console bracket and secure
using two screws(D1)
A34
D
A33
Remove screws(D1)before sliding onto console bracket
BH Fitness • 20155 Ellipse • Foothill Ranch • CA • 92610
www.%+)LWQHVV86$.com • Phone 949-206-0330 • Fax 949-206-0013
11
D1
RS5
RS5 RECUMBENT CYCLE
ASSEMBLY INSTRUCTIONS (cont’d)
FIGURE_9 PEDAL ASSEMBLY
Install the strap on each pedal
Step1:Thread the right pedal(L-R) onto the right crank
Secure in place by turning it clockwise.
Note: Right pedal(L-R) is marked with an “R”
L-(L)
A1
Step2:Thread the left pedal(L-L)
onto the left crank. Secure in place
by turning it counter-clockwise
.
Note:Left Pedal(L-L) is marked with an "L".
FIGURE_10 SEAT ADJUSTMENTS
Push the seat slide adjustment handle forward, then slide the seat back or forth
as desired. Pull the adjustment handle back up to lock the slider in place.
PULL UP
(LOCK)
PULL DOWN
(RELEASE)
BH Fitness • 20155 Ellipse • Foothill Ranch • CA • 92610
www.%+)LWQHVV86$.com • Phone 949-206-0330 • Fax 949-206-0013
12
RS5
RS5 RECUMBENT CYCLE
ASSEMBLY INSTRUCTIONS (cont’d)
Backrest position is controlled by a pneumatic cylinder (A13-2) which can be activated
to change backrest angles. Pull the left side handle forward and lean on the backrest to change angle.
FIGURE_12 HOWTO MOVE THE MACHINE
The front stabilizer has built-in mobility wheels. Stand at the rear of the
machine and lift it up until the weight of the machine is transferred to the
wheels. Push or pull to move the machine to a new location.
Mobility
Wheels
BH Fitness • 20155 Ellipse • Foothill Ranch • CA • 92610
www.%+)LWQHVV86$.com • Phone 949-206-0330 • Fax 949-206-0013
13
RS5
RS5 RECUMBENT CYCLE
ASSEMBLY INSTRUCTIONS (cont’d)
FIGURE_13 USING THE ADAPTOR
S
Position the machine near a wall outlet
Plug the adaptor(S) in to the outlet and plug the DC end (round plug) to the jack on the machine
Be sure not to damage the cord and the plugs to avoid electrical shocks
BH Fitness • 20155 Ellipse • Foothill Ranch • CA • 92610
www.%+)LWQHVV86$.com • Phone 949-206-0330 • Fax 949-206-0013
14
RS5
RS5 RECUMBENT CYCLE
SECTION 3 – PARTS LIST
P/N
Part
DESCRIPTION
Q’TY
P/N
Part
DESCRIPTION
Q’TY
A1
FRONT MAIN FRAME
1
A10-6
PULLBAR
A2
REAR MAI N FRAME
1
A10-7
NUT
1
A2-1
ALUMINUMTRACKING52.4*104.8*587L
1
A10-8
SPRI NG
1
A2-2
SCREW M8* 10
4
A10-9
AXLE FOR BACKREST TUBE
1
A2-3
SCREW M8* 22
4
A10-10
FI XI NG PI N
1
A2-4
WHEEL
4
A10-12
ROAT ATE RECIPROCATOR
1
A2-5
SCREW
2
A10-13
ENDCAP25*50
1
A2-6
SCREW M4* 12
4
A11
SEAT ADJUSTMENT HANDLE
A2-7
SLIDE FIXING SUPPORT (RIGH T)
1
A11-1
PLASTICWRAP
A2-8
SLIDE FIXING SUPPORT (LEFT)
1
A11-2
CONNECTING HOUSING
.8* 37.5*11L
15* 22
9.3*66.8
1
12*236
1
1
8*71L
12*50
1
2
A3
HAND PULSE SENSOR REAR
1
A11-3
CCLIPC10
A4
HAND PULSE SENSOR MIDDLE
1
A11-4
AXLE FOR BRAKING
A5
NUT 3/8”* 26* 7mm
2
A11-5
BUSHING
A6
FLYWHEEL
1
A11-6
BRAKE PAD 40.5*65
1
A6-1
C CLI P C10
2
A11-7
SCREWS TOPPING M6*10
2
A6-2
BEARI NG 6000ZZ
1
A11-8
BUSHING
1
A6-3
NUT 3/8”* 0.5T
1
A11-9
BRAKINGSTOPPERT2.0*28*58
1
A6-4
NUT 3/8”* 26* 3mm
1
A12
SENSOR WI RE
1
A6-5
AXL E
10* 120L
1
A13
GAS CYLI NDER 600N
1
A6-6
BEARI NG 6003ZZ
2
A13-1
SCREWM8*86
1
A6-7
BEARI NG 6300ZZ
1
A13-2
PLASTICWRAP
A6-8
PULLY 37* 17* 60.9
1
A13-3
PLASTIC BUSHING
2
260*9KGS
12*
12*122
24*33.2
12*
24*33.2
8*71L
1
1
1
A6-9
ONE WAY BEARI NG
1
A13-5
NUTM8
1
A7
BEARI NG 6203ZZ
2
A13-6
SCREWM8*30
1
A8
HOUSI NG-MAGNET
1
A13-7
NUTM8
1
A8-1
WASHER M6* 19*T1.5
1
A14
NUT
1
A8-2
NUT M6
1
A14-1
POWERCORD
1
A8-3
WASHER
1
A15
SENSOR PIPE HOUSING
1
A8-4
NUT M6
SCREW#6*32*12L
1
6*
2*T1.0
1
A16
A8-5
SCREW M6* 60
1
A17
CRANKRIGHT170L
1
A8-6
TENSI ON CABLE 177L
1
A17-1
SCREWM8*25
1
A8-7
SPRING
10.2*
1
A17-2
ENDCAP
1
A9
SPRI NG
3* 101L
1
A17-3
BELT6PJ46”
1
A10
SLI DI NG TRACK
1
A18
BELT PULLY
A10-3
WASHER M8* 25* 2.0
2
A18-1
CCLIPC17
.2*11*55L
A18-2
A10-4
A10-5
AXLEFOR BACKREST TUBE
16*79L
260
1
2
NUTM6
4
MAGNET
1
SCREWM8*52
1
BH Fitness • 20155 Ellipse • Foothill Ranch • CA • 92610
www.%+)LWQHVV86$.com • Phone 949-206-0330 • Fax 949-206-0013
15
RS5
RS5 RECUMBENT CYCLE
PARTS LIST (cont’d)
A19-1
NUTM8
1
H
BACKREST
1
A20
AXLE FOR BELT PULLEY
1
I
COVER
1
A 20-1
SCREW M6*16
4
J1(L)
LEFT SIDE HANDBAR
1
A21
PRESSING PIPE
1
J1-1
HAND PULSE SENSOR WIRE
1
A 21-1
SCREW M8*25
1
J1-2
PLASTIC CIRCUIT BOARD LEFT
1
A 21-2
W A SHER M8*22*1.5
2
J1-3
PAD FOR HAND PULSE
2
A21-3
W A SHER 10*24*0.3T
2
J1-4
SCREW M3*35L
2
A21-4
NUT M8
1
J1-5
HAND PULSE
1
A21-5
C CLIP C12
1
J1-6
HAND PULSE
1
A21-6
WHEEL
1
J1-7
NUT M3
2
A21-7
BEA RING 6001ZZ
1
J1-8
ENDCAP
1
A22
CRA NK LEFT 170L
1
J1-9
ENDCAP
1
SCREW M8*52
1
J1-10
CONTROLLER FOR RIGHT HANDLE BAR
1
A22-1
17*153
44* 39*21.9L
26*
42*60.6
A22-2
END CA P
1
J1-11
CONTROLLER FOR RIGHT HANDLE BAR
1
A23
FRONT LEF T CHAIN COVER
1
J2-(R)
RIGHTSIDE HAND BAR
1
A24
SCREW M4*20
11
J2-1
HAND PULSE SENSOR WIRE
1
A25
SCREW M5*20
12
J2-2
PLASTICCIRCUITBOARDRIGHT
1
A26
FRONT RIGHT CHAIN COVER
1
J2-3
PAD FORHAND PULSE
2
A27
REAR RIGHT CHAIN COVER
1
J2-4
SCREWM3*35L
2
A28
REAR LEFT CHAIN COVER
1
J2-5
HAND PULSE
1
HAND PULSE
1
NUTM3
2
1
A33
J2-6
A34
SNNSOR W IR
A36
MOTOR
1
J2-8
ENDCAP
1
B
FRONT STA BILIZER
1
J2-9
ENDCAP
1
A DJUSTED END
5
J2-10
CONTROLLER FOR RIGHT HANDLE BAR
1
B1
26*
42*60.6
B2
END CA P
2
J2-11
CONTROLLER FOR RIGHT HANDLE BAR
1
B3
TRA NSPORA TION WHEEL
2
K
W A TER BOTTLE
1
B4
SCREW #8*32*5/8
”
4
L-(L)
PEDA L RIGHT JD-22A 9/16”
1
C
REA R STA BILIZER
1
L-(R)
PEDA L LEFT JD-22A 9/16”
1
C1
ADJUSTED END M8* 29*42.5
5
M1
ACCESSORY TRAY(LEFT)
1
C2
ENDCAP
2
M2
ACCESSORY TRAY(RIGHT)
1
D
MAIN SUPPORTING TUBE
1
N1
SCREW M8*15
20
D1
SCREW
2
N2
W A SHER M8
13
D2
SCREW M5*10
4
N3
W A SHER M8*16*1.2T
21
E
FRONT SMALL HANDLE BAR
1
N4
SCREWM8*105
2
BH Fitness • 20155 Ellipse • Foothill Ranch • CA • 92610
www.%+)LWQHVV86$.com • Phone 949-206-0330 • Fax 949-206-0013
16
RS5
RS5 RECUMBENT CYCLE
PARTS LIST (cont’d)
E1
CED CA P
4
N5
SCREW M8*35
2
F
MONITOR
1
N6
SCREW1/4”*40L
2
G
SEAT
1
SCREW M6*10
N6-1
N7
SCREW1/4”*46L
N8
SCREW M8*20
2
5
N9
SCREW M4*15
6
U SHAPE PLASTIC
2
N10
SCREW M6*8
2
S
ADAPTOR
1
N11
WASHER M8*16*1.2T
2
S1
ENDCAP
1
N12
WASHER 8*4.5
6
S2
ENDCAP
1
P
BACK PAD SUPPORT TUBE
1
S3
ENDCAP
1
SADDLE TUBE
1
S4
STRAP(R)
1
S5
STRAP(L)
1
BH Fitness • 20155 Ellipse • Foothill Ranch • CA • 92610
www.%+)LWQHVV86$.com • Phone 949-206-0330 • Fax 949-206-0013
17
RS5
M1
N1
2
N6
C1
B1
L
J1-( )
N9
J1 4
-
J1 6
- J1 7
-
C
J1 3
-
P
P2
J1- 1
1
N2
N3
J1 1
N8 -
J1 8
-
J1- 0
J1 9
-
N4
1
A10-5
A10- 2
A1
0
A10-4
A10-3
N1
S3
A10-9
A10-8
A10-6 A10-7
J1 2
-
J1 5
-
H
A10- 3
1
N3
N1
1
C1
B1
S2
A3
A10- 0
N1
N1
N3
C2
J2 1
J2- R)
(
N8
N9
-
-
A13 7
A11 9
-
N1
2
D
-
M1
-
A11 4
-
A11 2
J2 9 J2 6
J2-
J2 5
- J2- 1
J214
-
A13 6
F
J2- 0
1
J2 2
-
A13 1 A13 3
A1 N3 A1 -5
3
3
A11-7 2 A11-3 2
A11 5
N1
*
*
0
-
-
A13 2
N1
1
J2 8 J2 7
-
- A11 6
A11 8
-
R
A11 7
A2 3 A2 4
-
P1
G
E
N5
E1
SECTION 4 –EXPLODED VIEW
-
A1
1
A11 1
A3
4
D1
S1
C1 N7
B1
A3
3
N2
N3
B
I
B3
N7
B4
N2
N3
C1
B1
B2
RS5 RECUMBENT CYCLE
BH Fitness • 20155 Ellipse • Foothill Ranch • CA • 92610
www.BHFitnessUSA.com • Phone 949-206-0330 • Fax 949-206-0013
www.bhnorthamerica.com
18
RS5
RS5 EXPLODED VIEW
RS5 RECUMBENT CYCLE
BH Fitness • 20155 Ellipse • Foothill Ranch • CA • 92610
www.bhnorthamerica.com
www.BHFitnessUSA.com • Phone 949-206-0330 • Fax 949-206-0013
19
RS5
RS5 RECUMBENT CYCLE
SECTION 5 –CONSOLE
FUNCTION BUTTONS:
To confirm all setting values.
MODE
RESET
To reset all setting values.
Press and hold for 2 seconds, monitor will resume to power-up mode.
START/STOP To start or stop training.
When time countdown to 0:00,the computer will stop automatically and beep for
8 seconds. Time will resume to previous setting value.
When user stop training by themselves, the computer will remain all the setting
values and display heart rate chart
UP
To make upward setting.
DOWN
To make downward setting.
RECOVERY In stop or start mode, press the button will start heart rate recovery status
measurement. Time will count down from 60 seconds.
FAN
To turn on or turn off the fan
P1
Switch to program profile 1.
P2
Switch to program profile 2
P3
Switch to program profile 3
P4
Switch to program profile 4
P5
Switch to program profile 5
P6
Switch to program profile 6
P7
Switch to program profile 7
P8
Switch to program profile 8
P9
Switch to program profile 9
P10
Switch to program profile 10
P11
Switch to program profile 11
P12
Switch to program profile 12
FUNCTIONS:
Count up–no preset target, time will count up from 0:00 to maximum 99:59
TIME
Count down–with preset target, time will count down from preset to 0.
SPEED
Display training speed from 0.0 to maximum 99.9 km or mi.
RPM
Display training rotation per minute
CALORIES
Count up – no preset target, calories will count up from 0 to maximum 9990.
Count down–with preset target, calories will count down from preset to 0.
Countdown–withpresettarget,calorieswillcountdownfrompresetto0.
BH Fitness • 20155 Ellipse • Foothill Ranch • CA • 92610
www.BHFitnessUSA.com • Phone 949-206-0330 • Fax 949-206-0013
20
RS5
RS5 RECUMBENT CYCLE
CONSOLE (cont’d)
DISTANCE
PULSE
Count up – no preset target, distance will count down from 0.00 to 99.50.
Countdown – with preset target, distance will count up from preset to 0.
The monitor will detect heart rate, if the user holds on to the handgrip sensors
and, at the same time, wears chest belt, the handgrip reading takes priority and displays.
When the monitor cannot detect pulse signal, it will display “P”.
OPERATING PROCEDURE:
Power On
As power applied to the system, the monitor will display all segments with a long beep for
2 seconds. Use (+) or (-) buttons to select U1 (User #1) to U4 (User #4) as the user’s identification.
Press MODE to accept and all program LED’s will flash. Press (+) or (-) buttons to scroll through
the programs. Press MODE to select from top to bottom (WATT, HRC, USER, PROGRAM, MANUAL)
Training mode
Training mode selection in order top to bottom:
1-1 WATT Control Mode
User may change preset WATT value by pressing (+) or (-) buttons in 5W increment and
press MODE to confirm.
TIME : when blinking, user may press (+) or (-) buttons to set up target training time from
00:00 to 99:00. Press MODE to confirm setting.
DISTANCE: when blinking, user may press (+) or (-) buttons to set up target distance
from 0.00 to 99.50 Press MODE to confirm setting..
CALORIES: when blinking, user may press (+) or (-) buttons to set up target calories
from 0 to 350. Press MODE to confirm setting
PULSE: the monitor will detect user’s heart rate. Please hold on to the handgrip sensors
or wear chest belt during exercise.
Press START button to start training:
Screen displays profile automatically according to the preset target Watt data, current
RPM and training speed. This profile is not available to be adjusted. If the training
speed is too fast, resistance level will decrease. Otherwise, it will increase. The adjustment is to
maintain the preset Watt for training.
1-2 HRC Mode (Heart Rate Control)
User may preset different target heart rate from 55%, 75%, 90% and Target by pressing
(+) or (-) buttons. Press MODE to confirm.
TIME : when blinking, user may press (+) or (-) buttons to set up target training time from
00:00 to 99:00. Press MODE to confirm setting.
DISTANCE: when blinking, user may press (+) or (-) buttons to set up target distance
from 0.00 to 99.50 Press MODE to confirm setting..
CALORIES: when blinking, user may press (+) or (-) buttons to set up target calories
from 0 to 350. Press MODE to confirm setting
PULSE: the monitor will detect user’s heart rate. Please hold on to the handgrip sensors
or wear chest belt during exercise.
Press START button to start training:
The resistance level will adjust accordingly to the user’s current heart rate reading as preset. If the
heart rate read is below target, the resistance will increase one level every 30 seconds automatically.
On the contrary, the resistance will decrease one level every 15 seconds until reaching the lowest level.
At this level, if user’s heart rate continues to exceed target for more than 30 seconds, the program
will stop and start sounding audible beeps to warn user.
BH Fitness • 20155 Ellipse • Foothill Ranch • CA • 92610
www.BHFitnessUSA.com • Phone 949-206-0330 • Fax 949-206-0013
21
RS5
RS5 RECUMBENT CYCLE
CONSOLE (cont’d)
1-3 User Profile Mode
User may create their own profile in this mode. The first segment of the profile will start
blinking, then user may press UP or DOWN button to adjust resistance level of each
segment and press MODE to confirm. There are 16 segments for each profile.
TIME : when blinking, user may press (+) or (-) buttons to set up target training time from
00:00 to 99:00. Press MODE to confirm setting.
DISTANCE: when blinking, user may press (+) or (-) buttons to set up target distance
from 0.00 to 99.50 Press MODE to confirm setting..
CALORIES: when blinking, user may press (+) or (-) buttons to set up target calories
from 0 to 350. Press MODE to confirm setting
PULSE: the monitor will detect user’s heart rate. Please hold on to the handgrip sensors
or wear chest belt during exercise.
Press START button to start training:
The first segment starts blinking and switches to the next segment according to the preset time
which is divided into 16 equal segments. Once the preset target data counting down to 0
the program stops automatically. User may press START button to start training again.
Other preset data will keep counting down from previous data.
1-4 Program Mode
There are 12 program profiles (P1~P12) for training selection. User may press program
buttons from P1 to P12 to select profiles in stop mode.
Or press UP or DOWN button to select each profiles you want and press MODE to
confirm. Then you may press UP or DOWN button to adjust the resistance level from 1 to 16.
TIME : when blinking, user may press (+) or (-) buttons to set up target training time from
00:00 to 99:00. Press MODE to confirm setting.
DISTANCE: when blinking, user may press (+) or (-) buttons to set up target distance
from 0.00 to 99.50 Press MODE to confirm setting..
CALORIES: when blinking, user may press (+) or (-) buttons to set up target calories
from 0 to 350. Press MODE to confirm setting
PULSE: the monitor will detect user’s heart rate. Please hold on to the handgrip sensors
or wear chest belt during exercise.
Press START button to start training:
The first LED segment starts blinking and switch to the next segment according to preset time
which is divided into 16 equal segments. Once the preset target data counting down to 0, the
program stops automatically. You may press START button to start training again. Other
preset data will keep counting down from previous data.
BH Fitness • 20155 Ellipse • Foothill Ranch • CA • 92610
www.BHFitnessUSA.com • Phone 949-206-0330 • Fax 949-206-0013
22
RS5
BH Fitness • 20155 Ellipse • Foothill Ranch • CA • 92610
www.BHFitnessUSA.com • Phone 949-206-0330 • Fax 949-206-0013
23
RS5
RS5 RECUMBENT CYCLE
CONSOLE (cont’d)
1-5 Manual Mode
User may preset their own resistance level from1 to 16 by pressing UP/DOWN button.
The default resistance is level 1. Press MODE to confirm setting.
TIME : when blinking, user may press (+) or (-) buttons to set up target training time from
00:00 to 99:00. Press MODE to confirm setting.
DISTANCE: when blinking, user may press (+) or (-) buttons to set up target distance
from 0.00 to 99.50 Press MODE to confirm setting..
CALORIES: when blinking, user may press (+) or (-) buttons to set up target calories
from 0 to 350. Press MODE to confirm setting
PULSE: the monitor will detect user’s heart rate. Please hold on to the handgrip sensors
or wear chest belt during exercise.
Press START button to start training:
The first LED segment starts blinking and switches to the next according to the preset time
(divided into 16 segments). Once the preset target data counting down to 0, the monitor will
stop automatically. User may press START button to start training again. Other preset data
will keep counting down from previous data.
NOTE:
1. The display monitor will shut off if the training is stopped or none of the buttons is
pressed after 90 seconds.
2. Error message: E2
When the monitor displays this information, the control board connection failed.
This message will disappear after the failure is corrected.
BH Fitness • 20155 Ellipse • Foothill Ranch • CA • 92610
www.BHFitnessUSA.com • Phone 949-206-0330 • Fax 949-206-0013
24
RS5
RS5 RECUMBENT CYCLE
SECTION 7 – MAINTENANCE
MAINTENANCE INSTRUCTIONS
CLEANING
WARNING: Always unplug your Bike prior to cleaning or servicing your unit, in order to avoid
electrical hazard or shock.
Care has been taken to assure that your Bike has been properly adjusted and lubricated at the factory. It is
not recommended that the user attempt service on the internal components instead seek service from an
authorized service center. However, from time-to-time the outer surfaces may appear dull or dirty, following
the instructions listed below will restore and preserve the original finish.
Cleaning metal surfaces may be accomplished by using a soft cotton or terry cloth rag with a light application
of car wax. Do not use aerosol sprays or pump bottles as they may deposit wax upon the console surface.
From time-to-time the console surface may collect dust or fingers prints. The use of harsh chemicals will
destroy the protective coating and cause a static build up that will damage the components. This surface may
be cleaned with specially prepared chemicals found in most computer supply stores especially made for antistatic surfaces. It is strongly recommended that you purchase such a cleaning compound.
BH Fitness • 20155 Ellipse • Foothill Ranch • CA • 92610
www.BHFitnessUSA.com • Phone 949-206-0330 • Fax 949-206-0013
25
RS5
RS5 RECUMBENT CYCLE
SECTION 6 – CALCULATING YOUR TARGET HEART RATE
Heart Rate (HR) training has become one of the most popular forms of monitoring your
workouts. Nothing tells you how your body is feeling like your own heart. By using your heart
rate to tell you how hard to train, you can maximize your workout results.
STEP ONE
Determining your Maximum Heart Rate:
The standard calculation for determining your maximum heart rate, Beats per Minute (BPM), is
to subtract your age from the number 220.
Example: If you are 30 years of age, your maximum heart rate is:
220 – 30 = 190 BPM.
STEP TWO
Select your ideal workout HR Zone:
Once you have your maximum heart rate you can use it to determine your Target HR Zone
based on your fitness goal(s).
Recent studies have shown:
60-70% of your maximum HR will allow you to lose weight.
70-80% of your maximum HR will improve your aerobic fitness.
80-85% of your maximum will increase your athletic performance.
NOTE: DO NOT exceed 85% of your maximum heart rate.
STEP THREE
Calculate your ideal Target HR:
Using the above percentages, you can calculate your ideal Target Heart Rate for your specific
goal.
As an example, the average 30 year old can:
Maximize burn fat / weight loss, by maintaining ~123 BPM during your workout
190 * 0.65 =123 BPM.
Improve aerobic fitness, by maintaining ~142 BPM during your workout
190 * 0.75 =142 BPM.
Do not exceed 190 * 0.85 = 161 BPM
Remember to consult your family physician or health care professional to develop a
well-planned exercise program to fit your health needs.
BH Fitness • 20155 Ellipse • Foothill Ranch • CA • 92610
www.BHFitnessUSA.com • Phone 949-206-0330 • Fax 949-206-0013
26
RS5
WARRANTY
LIMITED RESIDENTIAL WARRANTY
BH North America will repair or replace, free of charge, at its option, parts that are
defective as a result of material or workmanship. Lifetime replacement warranty coverage
on frame and five (5) years on other parts. Labor warranty coverage is one (1) year.
Warranty covers the original consumer purchaser only.
THIS WARRANTY DOES NOT COVER
• Pre-delivery set-up.
• Components that require replacement due to dirt or lack of regular maintenance.
• Expendable items which become worn during normal use.
• Repairs necessary because of operator abuse or negligence or the failure to operate
and maintain the equipment according to the instructions contained in the Owner’s
Manual.
For more detailed warranty information or to register your product warranty easily
online, visit our website at: www.BHFitnessUSA.com
FOR WARRANTY REPAIRS, PLEASE DO NOT TAKE YOUR MACHINE
BACK TO THE RETAIL STORE. CONTACT BH FITNESS FIRST.
BH North America Corporation
20155 Ellipse
Foothill Ranch, CA 92610
Phone: 949.206.0330; Toll Free: 866.325.2339; Fax: 949.206.0013
Web: www.BHFitnessUSA.com
Mon - Fri 8am - 5pm PST