1
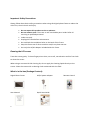
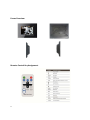
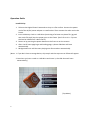
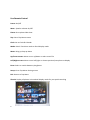
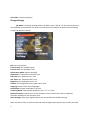
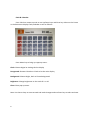
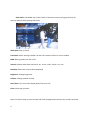
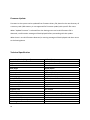
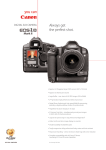
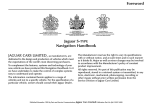
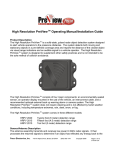
Digital Photo Frame With 3‐D Effect (EF3D08) User Manual 0 Table of Content Safety Precautions What is in the box Introduction Frame Overview & Remote Control Key Assignment Operation Guide Install & Play Use Remote Control Change Settings Top Menu Clock & Calendar Slide show Firmware Update Technical Specification Trouble Shooting 1 2 2 3 4 5 5 6 7 7 8 9 10 10 11 Important Safety Precautions Always follow these basic safety precautions when using this digital photo frame to reduce the risk of fire, electric shock and injury. Do not expose this product to rain or moisture. Do not remove cover. There are no self‐serviceable parts inside. Refer all servicing to qualified personnel. Indoor use only. Unplug this frame before maintenance. Do not block the ventilation holes on the back of this frame. Keep this frame out of direct sunshine and/or any heat sources. Use only the AC/DC adapter included with this frame. Cleaning the LCD screen Treat the screen gently. To clean fingerprint or dust, use a soft, non‐abrasive and lint free cloth to clean the screen. When using a commercial LCD cleaning kit, do not apply the cleaning liquid directly to the screen. Clean the screen with a cleaning cloth moistened with the fluid. What is in the box (Package Content): Digital Photo Frame User Manual 2 AC/DC power adapter Quick Start Guide Remote Control Introduction Congratulation and thank you for choosing the Digital Photo Frame with multi 3‐D transition effects. Now you can enjoy your digital photos with background music directly from your memory cards and/or USB drives without a computer. You will be surprised to the realistic 3‐D transition effects. This Digital Photo Frame includes these key features: Display digital photos (.jpg) without a computer. Simply insert a compatible memory card and/or USB drives into the frame to show photos and play background music. 8” Digital LCD Panel High Resolution (800x600) Support SD/MMC/MS/xD cards and CF card. Multi 3‐D effect transition Slide show with Mp3 background music. Thumbnail display/searching. Control buttons on the frame and full function Remote Control. Bright high resolution LCD screen. Earphone jack USB 2.0 high speed connection. Firmware Updatable To learn more about your new Digital Photo Frame’s features, please take a few minutes to read this User Manual. Keep this manual for your future references. 3 Frame Overview Remote Control Key Assignment 4 Operation Guide Install & Play 1. Take out the Digital Photo Frame and set it up on a flat surface. Connect the power cord of the AC/DC power adapter to a wall outlet. Then connect the other end to the Frame. 2. Insert a Memory Card or a USB drive (consisting of at least one photo file .jpg and one music file mp3) into the proper port on the frame. (Don’t force it in. Flip over the Card or USB drive if it does not fit.) 3. Power on by pressing the power button on the frame or on the remote. 4. After a brief home page logo and loading page, a photo slideshow will start automatically. 5. Background music will also start playing one after another automatically. (Note: 1. If you don’t have a storage device, skip step 2 and the top menu as follow will appear. 2. But when you have a card or a USB drive and insert it, the slide show will start automatically.) (Top Menu) 5 Use Remote Control Power: On/Off Mute: Speaker volume On/Off Photo: Go to photo slide show Top: Go to Top Menu screen Clock: Go to Clock & Calendar Mode: Switch Transition mode or Clock display mode Menu: Bring up Pop‐up Menu Up/Down arrows: Move cursor up/down or select music file Left/Right arrows: Move cursor left/right or choose previous/next photo to display Enter: Select or switch between play/pause Setup: Go to Top Menu Setting screen Exit: Return to Top Menu Thumb: Display all photos in thumbnail display mode for your quick searching 6 VOL+/VOL‐: Volume Up/Down Change Settings Top Menu: To change settings under Top Menu, press “SETUP” on the remote control or use Up/Down keys and Enter key either on the Frame or the Remote to enter into the Settings on the Top Menu as follows: Exit: Exit to Top Menu Current Date: Set up/Adjust Date Current Time: Set up/Adjust Time Switch Hour Mode: Choose 12H/24H Date Order: Three orders to choose from ON Timer: Set “Automatic On” time OFF Timer: Set “Automatic Off” time Brightness: Set brightness level 1‐10 Volume: Set background music volume level 1‐10 Language: Choose from three languages Orientation: Choose Landscape or Portrait Trimming Mode: Switch photo display format, “Fit” or “Crop” Update Firmware: Display your current firmware version and check if there is updated firmware available on your memory card Reset Settings: Reset your digital photo frame to manufacturer default settings Note: Use Cursor keys to move around and make changes and use Enter key to select and save. 7 Clock & Calendar: Press Clock on remote control or use Up/Down keys and Enter key either on the Frame or the Remote to display Clock/Calendar screen as follows: Press Menu key to bring up a pop‐up menu: Clock: Choose Digital or Analog clock to display Foreground: Choose Calendar or Clock to be the main display Background: Choose Bright, Dark or Photo background Brightness: Change brightness on the scale of 1 to 10 Close: Close pop‐up menu Note: Use Cursor keys to move around and make changes and use Enter key to select and save. 8 Slide show: Use MENU key on the Frame or Remote Control to bring up the Pop‐up menu as follows while playing slide show. Slide show: Play or Pause Transition: Switch among multiple 2‐D and 3‐D transition effects or set to random BGM: Back ground music On or Off Interval: Choose slide show intervals‐5 sec. 10 sec. 15sec. 30 sec. or 1 min. Rotation: Rotate the current photo displayed Brightness: Change brightness Volume: Change speaker volume Date/Time: Turn on‐screen‐display Date/Time on or off Close: Close pop‐up menu Note: Use Cursor keys to move around and make changes and use Enter key to select and save. 9 Firmware Update: Firmware in the system can be updated from firmware binary file placed in the root directory of a memory card (USB memory is not supported for firmware update) with specific file name. When “Update firmware” is selected from the Setting menu and a valid firmware file is detected, a confirmation message will be displayed before proceeding with the update. When there is no valid firmware detected, a warning message will be displayed and then return to the Setting Menu. Technical Specification Screen Size/Mode (Diagonal) Resolution Brightness Contrast Ratio View Angle Interface Memory Card Format File Format OSD Language Clock/Calendar Thumbnail Display Photo Slide Show Firmware Update USB connection Earphone Jack Built‐in Speakers Power Adapter Power Consumption Remote Control Unit Dimension(WxHxD) Unit Weight 10 8.0” LCD/ 4:3 800RGBx600 (SVGA) 200cd/m2 300:1 50/65/65/65 Digital SD/MMC/MS/xD, CF JPEG, MP3 English, French, Spanish, German Yes Yes Multiple 2‐D and 3‐D transition effects Support USB 2.0 Yes, Stereo 1w x 2 AC100V ~ 240V, 50Hz / 60Hz, DC 5V <10w Full function 9.65x7.72x1.44 inches 1.52 lbs 11