1
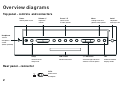
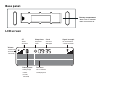
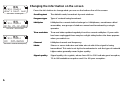
Owner’s Manual
Éla
n
DX 2
0
Warranty information
Imagination Technologies Ltd. warrants to the end user that this product will be free from defects in materials and workmanship in the
course of normal use for a period of two years from the date of purchase. This guarantee covers breakdowns due to manufacturing or design
faults; it does not apply in cases such as accidental damage, however caused, wear and tear, negligence, adjustment, modification or repair
not authorised by us. Please register your product on our website at www.pure.com/register or by filling in and returning your warranty card.
Should you have a problem with your unit please contact your supplier or contact PURE Support at the address shown on the rear of this
manual.
Copyright
Copyright 2005 by Imagination Technologies Limited. All rights reserved. No part of this publication may be copied or distributed,
transmitted, transcribed, stored in a retrieval system, or translated into any human or computer language, in any form or by any means,
electronic, mechanical, magnetic, manual or otherwise, or disclosed to third parties without the express written permission of Imagination
Technologies Limited.
Disclaimer
Imagination Technologies Limited makes no representation or warranties with respect to the content of this document and specifically
disclaims any implied warranties of merchantability or fitness for any particular purpose. Further, Imagination Technologies Limited reserves
the right to revise this publication and to make changes in it from time to time without obligation of Imagination Technologies Limited to
notify any person or organization of such revisions or changes.
Trademarks
Élan, the Élan logo, PURE, the PURE logo, PURE Digital, the PURE Digital logo, Imagination Technologies, and the Imagination Technologies
logo are trademarks or registered trademarks of Imagination Technologies Limited. All other product names are trademarks of their
respective companies. Version 1
January 2005
Contents
Introduction .............................................................................................................1
Safety instructions .............................................................................................................................. 1
Overview diagrams..................................................................................................2
Top panel - controls and connectors .................................................................................................. 2
Rear panel - connector........................................................................................................................ 2
Base panel........................................................................................................................................... 3
LCD screen .......................................................................................................................................... 3
Getting started ........................................................................................................4
Switching on and off ............................................................................................................................ 4
Listening to DAB ......................................................................................................5
Changing stations................................................................................................................................ 5
Using presets ...................................................................................................................................... 5
Changing the information on the screen ............................................................................................. 6
Setup options ...................................................................................................................................... 7
Using the Sleep timer ............................................................................................10
Set the sleep timer ............................................................................................................................ 10
Cancel the sleep timer ...................................................................................................................... 10
Using batteries ...................................................................................................... 11
Hints and Tips ........................................................................................................ 12
Technical Specifications ........................................................................................13
Introduction
Thank you for buying the PURE Élan DX20 portable stereo DAB radio.
This manual provides guidance on using your radio and what to do if you have
problems.
Éla
n
DX 2
0
Please take a minute or two to read through this manual to help you get the most
out of your radio, read the safety instructions below, and register your product on our
website at www.pure.com/register or by filling in and returning your warranty card.
Safety instructions
Keep the radio away from heat sources.
Do not use the radio near water.
Avoid objects or liquids getting into the radio.
Do not remove screws from or open the radio casing.
Remove batteries if exhausted or if they will not be used again for a long period.
Use only the supplied 9V power adapter if connecting the radio to the mains.
1
Overview diagrams
Top panel - controls and connectors
Power
Volume +/-
Preset 1-5
Menu
Aerial
Switch power on/off
Adjust the
volume
Quick access
to radio presets
Change audio and
general setup options
Adjustable
telescopic aerial
Headphone
3.5mm
headphone
socket
(Mutes speakers)
Power
-
Sleep
Volume
+
1
3
4
5
--
Select
+
Menu
Info
Sleep
LCD screen
+/- and Select
Info
Set and cancel
Sleep timer
Backlit LCD screen
Scroll through and select
stations or menu options
Switches between
display modes
Rear panel - connector
9V DC
9V DC
2
2
power socket
for adapter
Base panel
Battery compartment
Takes 6 size 'C' batteries.
Slide cover and lift off.
LCD screen
ST
Sleep timer
Clock
Signal strength
Stereo
broadcast
sleep timer
active
time from
DAB signal
for current station
7 levels, full shown
Volume
volume level
(14 levels,
full shown)
Battery level
Text area
battery charge
monitor
(5 levels,
full shown)
16 x 2 character
text display area
3
Getting started
Here’s how to get up and running quickly using your Élan DX20.
1
Fully extend the telescopic aerial, connect the mains adapter and plug in to your power supply or fit six size ‘C’
batteries. The LCD lights up, the display shows ‘PURE Elan DX20’ and a progress bar on the bottom line indicates
the progress of a full autotune to find the DAB stations available in your area. The number of stations found is
displayed, they are stored in alphanumeric order and the first station on the list is selected.
2
3
4
Adjust the volume if required.
Use the +/- buttons to see all the stations available. Push Select to change to another station.
Push the Info button and repeat to cycle through the optional display modes.
Switching on and off
When you first plug in or put batteries in your Élan DX20 it will switch itself on as described above.
To switch on at any other time press the Power button.
To switch your Élan DX20 from on to standby press the Power button. In standby state your Élan DX20 uses a very
small amount of power from the mains or batteries.
Note To switch off your Élan DX20 completely, unplug the power adapter and remove the batteries. Your preset
stations and other settings will be saved.
4
Listening to DAB
If this is the first time you have switched your radio on, or you have just completed an autotune,
you hear the first station on the list, otherwise you hear the last station you were listening to.
Changing stations
Change stations using the +/- and Select button or by pressing a numbered preset button.
1. Press the + or - buttons to scroll through the list and find the station you want.
The current station is shown at the top of the screen.
2.
Press the Select button to change the station.
1Xtra - BBC
Bringing you hot
Default screen
1Xtra - BBC
Virgin
Changing stations
A station with ‘?’ before its name is currently unavailable either because you have lost
reception or the station is not currently broadcasting. You can use the ‘Trim stn. list ’ option
to remove them from the station list, see page 8.
Using presets
The numbered preset buttons enable you to assign up to five stations to presets for easy
one-touch access. You can also automatically transfer your five favourite stations to presets,
see Station order on page 7.
You can store a station to a preset while listening to it or when you see the station name
at the bottom of the screen while scrolling through the station list. Press and hold down a
numbered button to store the station under that number.
When you save a station as a preset, the station name shows the preset number next to it on
the station list. To recall a preset press the relevant numbered button.
Virgin Radio
Preset 1 saved
Storing a preset
5
Changing the information on the screen
Virgin Radio
oday's best musi
Info mode - Scrolling text
Virgin Radio
18:36 23-12-2004
Press the Info button to change what you see on the bottom line of the screen.
Scrolling text
The default mode, broadcast by most stations.
Program type
Type of content being broadcast.
Multiplex
Multiplex the current station belongs to. Multiplexes, sometimes called
ensembles, are groups of stations owned and broadcast by a single
operator.
Time and date
Time and date updated regularly from the current multiplex. If your radio
has been unplugged there may be a slight delay before the time appears
when you switch on.
Channel
Multiplex channel and frequency.
Mode
Stereo or mono indicator and data rate at which the signal is being
transmitted. This rate is set by the broadcaster to suit the type of material.
Higher rates generally mean higher quality.
Signal quality
Signal quality. As a guide, values from 85 to 100 indicate good reception,
70 to 84 borderline reception and 0 to 69 poor reception.
Info mode - Time and date
Virgin Radio
11D 222.06MHz
Info mode - Channel and frequency
6
Setup options
Press the Menu button, scroll using the +/- buttons and push Select to choose one of the
following setup options.
LCD backlight
Change whether the screen backlight stays on all the time or remains on only for a short
period after a button is pressed.
Press the +/- buttons to view the options and push Select to choose one:
5 seconds
Backlight will turn on when a button is pressed and turn off again after
no button has been pressed for around five seconds. This setting is
recommended if you are using batteries.
Always on
Backlight will remain on all the time.
Station order
Changes the order of stations on your station list. Use the +/- buttons to scroll through the
following options and push Select to choose one:
Alphanumeric Displays all stations in alphanumeric order.
Fav station
Displays your five most listened to stations at the top of the station list and
the rest below, in alphanumeric order. Your favourite stations are displayed
with a ♥ next to their names.
Active station Displays active stations at the top of the station list and inactive ones at
the bottom in alphanumeric order. Inactive stations are those on the station
list but not currently available, marked with a ’?’.
5 seconds
Always on
LCD backlight options
Alphanumeric
Fav station
Station order menu
7
Multiplex
Trim stn. list
♥ → presets
Lists stations in groups according to their multiplex. Multiplexes, sometimes
called ensembles, are groups of stations owned and broadcast by a single
operator.
Removes inactive stations from the station list.
Available only when Fav station order (above) has been selected. Transfers
your favourite stations to the five presets.
Autotune UK
Autotune...
12
Autotune UK Band III option
Scans all UK frequencies for DAB stations and adds any new ones to the station list.
Autotune full
Scans the full range of digital frequencies in Band III. This option is for use outside the UK
where other Band III stations may be available.
Manual tune
Shows signal level which you can use to find the best position for your radio and aerial.
12B
225.64MHz
1.
Use the +/- buttons to scroll through different channels and push Select to choose one
(UK stations are in channels 11B to 12D). You see a signal level display.
The empty block indicates the minimum required level for reception and the filled blocks
indicate the current level.
2.
Move your aerial while watching the display and to try to raise the current level to the
empty block or beyond. Once you have a good signal the display will show the multiplex
name and add the stations in that multiplex to the station list.
3.
Push the Menu button to exit or +/- and Select buttons to change channel.
Manual tune - channel
12B
225.64MHz
Manual tune - low signal
12B
BBC DAB
Manual tune - good signal
8
Note You can display the signal level at any time by pushing the Select button.
DRC value
DRC (Dynamic Range Control) value makes the quieter sounds in a broadcast easier to hear
at low volume or in a noisy environment. The DRC level of a broadcast is set by the station
and sent with the signal. At the time of writing in the UK only BBC Radio 3 and 4 regularly use
DRC. Check with the broadcasters to find out if they use DRC on their stations. Press the +/buttons to scroll through the following options and push Select to choose one:
DRC 0
DRC is switched off. Any DRC level broadcast will be ignored.
DRC ½
DRC level is set to ½ that sent with the broadcast.
DRC 1
Applies the DRC level as sent with the broadcast.
DRC 0
DRC 1
DRC value
Sw version
Displays the version of the software in your radio. You may be asked to quote this if you
contact Technical Support.
V 1.0
Sw version
Software version
9
Classic FM
Sleep 30
Sleep Timer - setting
Classic FM
stress-free mix
Sleep Timer - set icon
Classic FM
Remain 28
Sleep Timer - time remaining
Using the Sleep timer
You can set a Sleep timer after which Élan DX20 will switch itself into standby mode, ideal if you
want to fall asleep listening to the radio.
Set the sleep timer
Press the Sleep button and repeat to choose between 15, 30, 45, 60 or 90 minutes or select
Sleep off to set no sleep time.
Leave your unit for a couple of seconds to return to what you were listening to. You will see
the Sleep Timer icon displayed on screen indicating that the timer is set.
Press the Sleep button again to view the time remaining until Élan DX20 will switch off or to
change the sleep time.
Cancel the sleep timer
Classic FM
Sleep off
Sleep Timer - switching off
10
Press the Sleep button, you will see the remaining time. Press again and repeat until the
Sleep off option is selected. In a couple of seconds Élan DX20 will return to what you were
listening to, with sleep timer cancelled.
Using batteries
To use battery power as an alternative to a mains power supply, slide and lift off the battery
compartment cover on the base and insert six size ‘C’ batteries. The label inside the
compartment shows the correct way to insert the batteries.
JAZZFM
Best Variety Of
Using batteries - fully charged
When using batteries the Battery Charge monitor icon on the screen shows the charge
remaining in the batteries.
If you use rechargeable batteries (NiMh or NiCd), connecting the unit to the mains will not
recharge the batteries. Use a separate charger such as the BC-CD6 battery charger available
from PURE to recharge your batteries.
talkSPORT
- the nation's f
Using batteries - charge low
The battery supply is switched off when your Élan DX20 is connected to the mains. To switch
to battery supply remove the power adapter plug from the rear of the unit.
11
Hints and Tips
(<</>>) Secondary services
Secondary services accompany some stations, providing extra information or alternative content and may only be broadcast at certain
times. At the time of writing not many secondary services are available. If a station has secondary services available, the station shows
‘>>’ next to its name in the station list and the secondary service appears next to the station in the list. A secondary service has a ‘<<’
before its name in the station list.
(?) Inactive or unavailable stations
Inactive or unavailable stations are those which appear on the station list but are not currently available because either you are outside
the broadcast area, have lost reception or the station is not currently broadcasting. Unavailable stations have a ‘?’ before their name on
the station list. If you select a station which has this symbol, Élan DX20 returns to the last station you were listening to.
I hear a ‘burbling’ sound on some stations
Although DAB is excellent at providing quality audio from very little signal, the quality can suffer if the signal strength is too low. If that
happens, a ‘burbling’ sound can sometimes be heard. To help reduce this, check that your aerial is fully extended and upright. If the
problem persists try moving your radio or repositioning your aerial using manual tuning.
Display says ‘No stations available’
Check that your aerial is fully extended. Use Autotune to search for stations. Use manual tuning to adjust your aerial or radio position.
Clock shows the wrong time
This may happen if the multiplex you are tuned to broadcasts an incorrect time signal, try tuning to a station in another multiplex.
Resetting your radio
Resetting your Élan DX20 removes all presets, stored stations and favourite station settings and resets all options to defaults. To reset:
1. Press and hold the Menu button for three seconds. The screen shows ‘Press Select to confirm reset’.
2. Push the Select button to confirm the reset or press no buttons to cancel the reset.
12
Technical Specifications
General
Stereo DAB digital radio with full Band III DAB reception capability, for
reception of all UK DAB broadcasts. Fully compliant with ETS 300 401
and capable of decoding all DAB transmission modes 1-4 up to and
including 256 kbps.
Speakers
Two full-range 3 inch drive units
Frequency range
Band III (174-240 MHz), with fast Autotune feature
Aerial
Integral telescopic aerial
Input connectors
9V DC power adapter socket (230V adapter supplied)
Output connectors
3.5mm socket for headphones
LCD display
Custom, easy to read LCD with 16 x 2 character display plus status icons.
Mains power supply 230V AC to 9V DC external power adapter
Battery power
6 size 'C' batteries. Battery life up to 30 hours at normal listening levels.
Ultra low-power standby mode.
Approvals
CE marked. Compliant with the EMC and Low Voltage Directives (89/336/
EEC and 73/23/EEC)
Dimensions
280 mm (width) x 168 mm (height) x 80 mm (depth)
13
www.pure.com
PURE Digital, Imagination Technologies Ltd., Imagination House, Home Park Estate, Kings Langley, Herts, WD4 8LZ, UK
+44 (0)1923 277477 support
+44 (0)1923 277488 sales
12J59
+44 (0)1923 270188
[email protected]
[email protected]