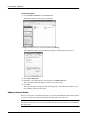
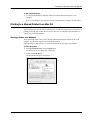
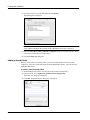
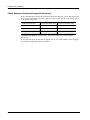
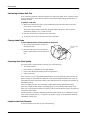
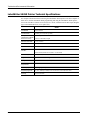
1
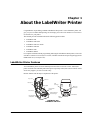
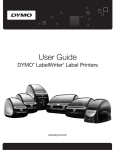
User Guide
DYMO LabelWriter Label Printers
®
®
Copyright
© 2009-2010 Sanford, L.P. All rights reserved. Revised 1/10.
No part of this document or the software may be reproduced or transmitted in any form or by any
means or translated into another language without the prior written consent of Sanford, L.P.
Trademarks
DYMO and LabelWriter are registered trademarks of Sanford, L.P. All other trademarks are the
property of their respective holders.
Contents
About the LabelWriter Printer . . . . . . . . . . . . . . . . . . . . . . . . . . . . . . . . . . . . . . . . . . . . . . . . . . . . . . . . . . . 1
LabelWriter Printer Features . . . . . . . . . . . . . . . . . . . . . . . . . . . . . . . . . . . . . . . . . . . . . . . . . . . . . .
System Requirements. . . . . . . . . . . . . . . . . . . . . . . . . . . . . . . . . . . . . . . . . . . . . . . . . . . . . . . . . . . .
Printing Labels . . . . . . . . . . . . . . . . . . . . . . . . . . . . . . . . . . . . . . . . . . . . . . . . . . . . . . . . . . . . . . . . .
Developer and SDK Information . . . . . . . . . . . . . . . . . . . . . . . . . . . . . . . . . . . . . . . . . . . . . . . . . . .
1
3
3
3
About Labels. . . . . . . . . . . . . . . . . . . . . . . . . . . . . . . . . . . . . . . . . . . . . . . . . . . . . . . . . . . . . . . . . . . . . . . . . . . . . . . . 5
Loading Labels. . . . . . . . . . . . . . . . . . . . . . . . . . . . . . . . . . . . . . . . . . . . . . . . . . . . . . . . . . . . . . . . . 5
Ordering Labels . . . . . . . . . . . . . . . . . . . . . . . . . . . . . . . . . . . . . . . . . . . . . . . . . . . . . . . . . . . . . . . . 7
Printing Over a Network . . . . . . . . . . . . . . . . . . . . . . . . . . . . . . . . . . . . . . . . . . . . . . . . . . . . . . . . . . . . . . . . . . 9
Printing to a Shared Printer from Windows. . . . . . . . . . . . . . . . . . . . . . . . . . . . . . . . . . . . . . . . . . . 9
Sharing a Printer on a Network . . . . . . . . . . . . . . . . . . . . . . . . . . . . . . . . . . . . . . . . . . . . . . . . . . 9
Adding a Network Printer . . . . . . . . . . . . . . . . . . . . . . . . . . . . . . . . . . . . . . . . . . . . . . . . . . . . . 10
Printing to a Shared Printer from Mac OS . . . . . . . . . . . . . . . . . . . . . . . . . . . . . . . . . . . . . . . . . . . 11
Sharing a Printer on a Network . . . . . . . . . . . . . . . . . . . . . . . . . . . . . . . . . . . . . . . . . . . . . . . . . 11
Adding a Shared Printer . . . . . . . . . . . . . . . . . . . . . . . . . . . . . . . . . . . . . . . . . . . . . . . . . . . . . . . 12
Using a Print Server . . . . . . . . . . . . . . . . . . . . . . . . . . . . . . . . . . . . . . . . . . . . . . . . . . . . . . . . . . . . 13
Printer Firmware Versions that Support Print Servers . . . . . . . . . . . . . . . . . . . . . . . . . . . . . . . . 14
Caring for Your Printer . . . . . . . . . . . . . . . . . . . . . . . . . . . . . . . . . . . . . . . . . . . . . . . . . . . . . . . . . . . . . . . . . . . 15
Getting Help . . . . . . . . . . . . . . . . . . . . . . . . . . . . . . . . . . . . . . . . . . . . . . . . . . . . . . . . . . . . . . . . . . . . . . . . . . . . . . . 17
Troubleshooting . . . . . . . . . . . . . . . . . . . . . . . . . . . . . . . . . . . . . . . . . . . . . . . . . . . . . . . . . . . . . . .
Status Light. . . . . . . . . . . . . . . . . . . . . . . . . . . . . . . . . . . . . . . . . . . . . . . . . . . . . . . . . . . . . . . . .
Performing a Printer Self-Test . . . . . . . . . . . . . . . . . . . . . . . . . . . . . . . . . . . . . . . . . . . . . . . . . .
Clearing Label Jams . . . . . . . . . . . . . . . . . . . . . . . . . . . . . . . . . . . . . . . . . . . . . . . . . . . . . . . . . .
Correcting Poor Print Quality. . . . . . . . . . . . . . . . . . . . . . . . . . . . . . . . . . . . . . . . . . . . . . . . . . .
Labels Do Not Feed Correctly . . . . . . . . . . . . . . . . . . . . . . . . . . . . . . . . . . . . . . . . . . . . . . . . . .
Printer Does Not Print or Stops Printing . . . . . . . . . . . . . . . . . . . . . . . . . . . . . . . . . . . . . . . . . .
Limited Warranty . . . . . . . . . . . . . . . . . . . . . . . . . . . . . . . . . . . . . . . . . . . . . . . . . . . . . . . . . . . . . .
Obtaining Technical Support . . . . . . . . . . . . . . . . . . . . . . . . . . . . . . . . . . . . . . . . . . . . . . . . . . . . .
17
17
18
18
18
18
19
20
20
Technical and Environmental Information . . . . . . . . . . . . . . . . . . . . . . . . . . . . . . . . . . . . . . . . . . . . 21
Technical Specifications . . . . . . . . . . . . . . . . . . . . . . . . . . . . . . . . . . . . . . . . . . . . . . . . . . . . . . . .
LabelWriter SE450 Printer Technical Specifications . . . . . . . . . . . . . . . . . . . . . . . . . . . . . . . . . .
Declaration of Conformity . . . . . . . . . . . . . . . . . . . . . . . . . . . . . . . . . . . . . . . . . . . . . . . . . . . . . . .
Device Certification . . . . . . . . . . . . . . . . . . . . . . . . . . . . . . . . . . . . . . . . . . . . . . . . . . . . . . . . . . . .
Environmental Information . . . . . . . . . . . . . . . . . . . . . . . . . . . . . . . . . . . . . . . . . . . . . . . . . . . . . .
Documentation Feedback. . . . . . . . . . . . . . . . . . . . . . . . . . . . . . . . . . . . . . . . . . . . . . . . . . . . . . . .
21
22
23
23
24
24
iii
iv
Chapter 1
About the LabelWriter Printer
Congratulations on purchasing a DYMO LabelWriter label printer. Your LabelWriter printer will
give you years of reliable label printing. We encourage you to take a few minutes to review how to
use and care for your printer.
This manual provides information about the following printer models:
•
•
•
•
•
•
LabelWriter 450
LabelWriter 450 Turbo
LabelWriter 450 Twin Turbo
LabelWriter 450 Duo
LabelWriter 4XL
LabelWriter SE450
For complete information about programming and using the LabelWriter SE450 printer, refer to the
LabelWriter SE450 Technical Reference Guide, available from the Developers Program page on the
DYMO Web site (www.dymo.com).
LabelWriter Printer Features
Your LabelWriter printer is a direct thermal printer and does not use ink or toner. Instead, the
printer uses heat from a thermal print head to print on specially treated, heat-sensitive labels. Labels
are the only supplies you will ever need to buy.
Become familiar with the major components of the printer.
Top cover
Label roll
Label spool
USB
connector
Label guide
DC power
connector
Reverse label
button
Label release
S/N 00000-0000000
Form-feed button
and status light
Label feed path
and tear bar
Serial number
Cable
channel
LabelWriter 450
LabelWriter 450 Turbo
1
About the LabelWriter Printer
Serial number
Top cover
Label guide
Label roll
USB
connector
DC power
connector
Reverse label
button
Label spool
S/N 00000-0000000
Form-feed button
and status light
Label release
Label feed path
and tear bar
Cable channels
LabelWriter 450 Twin Turbo
Top cover
Label roll
USB
connector
DC power
connector
Label spool
Reverse label
button
Label release
Label feed path
and tear bar
Form-feed
button and
status light
Label exit
slot
LabelWriter 450 Duo
Top cover
Serial number
Label roll
USB
connector
Reverse label
button
Label feed path
and tear bar
S/N 00000-0000000
Label spool
DC power
connector
Label release
Form-feed
button and
status light
LabelWriter 4XL
2
Cable channel
System Requirements
Label spool
Label roll
Serial
connector
USB
connector
Cable
channel
Label release
USB
10101
S/N 00000-0000000
Top cover
24VDC
DC power
connector
Serial number
Form-feed button
and status light
Label feed path
and tear bar
LabelWriter SE450
The form-feed button on the front of the printer advances a single label. The reverse label button is
used to remove labels from the printer when changing rolls. The LabelWriter SE450 does not
include a reverse label button.
The status light visually shows the current state of the printer. Refer to "Status Light" on page 17
for a complete description of the status light.
System Requirements
The LabelWriter printer requires a USB 1.1 or USB 2.0 connection and one of the following:
•
•
•
•
Windows® XP 32-bit
Windows Vista®
Windows® 7
Mac OS® v10.4 or later
Printing Labels
Your LabelWriter printer was shipped with DYMO Label v.8 software to make designing and
printing labels easy. You can also print labels directly from the desktop with QuickPrint, and from
Microsoft Word, Excel, Outlook, ACT! (US only), and QuickBooks (US only) with DYMO Label
Add-ins that are installed when you install DYMO Label v.8 software. See the DYMO Label v.8
online Help or Software User Guide for more information on using these features.
Developer and SDK Information
DYMO provides various types of information designed to help developers create products that
work with the LabelWriter printers and DYMO Label software. Below are some notes for those
interested in developing products that work with LabelWriter printers.
• Keep in mind that LabelWriter printers use standard printer drivers. Therefore, printing to a
LabelWriter is no different than printing on a laser printer, except that the pages are smaller.
• In cases where you want to automate printing and take advantage of the label printing power
built into DYMO Label software, a Software Developer’s Kit (SDK) is included in your
3
About the LabelWriter Printer
LabelWriter CD. The SDK provides COM and .NET interfaces. For more information, visit
the Developer Program page on the DYMO web site. www.dymo.com.
You can check the Developer’s forum on the DYMO Web site at www.dymo.com for the latest
news. Also, you can join the Developer’s mailing list to obtain developer-specific news and
announcements.
For complete information about connecting the LabelWriter SE450 printer to the host computer or
other device, and for information about programming and using the LabelWriter SE450 printer,
refer to the LabelWriter SE450 Technical Reference Guide, available from the Developers Program
page on the DYMO Web site (www.dymo.com).
4
Chapter 2
About Labels
DYMO LabelWriter printers use advanced thermal printing technology to print on specially
treated, heat-sensitive labels. This means you will never have to replace toner, ink cartridges, or a
ribbon to print labels.
Note DYMO’s warranty does not cover malfunction or damage that may be caused by the use of
labels other than DYMO-branded labels. Because DYMO LabelWriter printers use thermal printing
technology, you must use specially designed and manufactured labels. The thermal coatings used
on labels other than DYMO-branded labels may not be compatible, and may provide unsatisfactory
printing or cause the printer to malfunction.
How long your labels will last depends on how the labels are used. Thermal paper labels, such as
those printed by the LabelWriter printer, are susceptible to fading in two ways:
• Exposure to direct sunlight, to fluorescent light for an extended period of time, or to extreme
heat will cause fading.
• Contact with plasticizers (for example, labels placed on plastic ring binders) will cause fading.
In the original packaging, the shelf life for LabelWriter labels is 18 months. When labels are used
for short-term applications (envelopes, packages, and so on), fading is not a problem. When labels
are used to label files in a file cabinet, fading is very gradual over many years. Labels applied to the
edge of a notebook that is then placed on a shelf in the sun will show signs of fading within a few
months.
To prolong label life when labels are not in use, store the labels in a cool, dry place and in the black
bag in which they were originally packaged.
Loading Labels
Each label roll comes in a black plastic bag. Make sure to store the label roll in this bag when the
labels are not being used.
The LabelWriter Twin Turbo printer holds two label rolls, so you can print two types of labels
without having to change the label roll. For example, load address labels on one side and DYMO
Stamps postage labels on the other side.
The LabelWriter Duo printer prints two types of labels: die-cut paper labels (such as Address or
Shipping labels) and D1 plastic labels.
5
About Labels
Important!
In order for the labels to feed properly during printing, pay attention to the following when loading
labels on the spool and into the printer:
• The label spool guide must be pushed flush against the label roll, with no gap. See Figure 2.
• The labels must be loaded with the left edge of the label inserted against the left edge of the
label feed slot. See Figure 4.
Figures 3 and 4 in this section show loading labels in a LabelWriter 450 printer. However, the
instructions apply to loading labels in any LabelWriter printer model.
To load a label roll
Spool
guide
Spool
spindle
1
With the printer plugged in, press the form-feed button to
eject the labels that protected the printer during shipment.
2
Open the top cover and remove any packing material inside
the label compartment.
3
Remove the label spool from inside the cover and separate
the spool guide from the spindle.
4
Hold the spool spindle in your left hand and place the label roll
on the spindle so that the labels feed from underneath and the
left edge of the label roll is firmly against the side of the spool.
See Figure 1.
5
Slide the spool guide onto the right side of the spool and press
the guide tightly against the side of the label roll, leaving no
gap between the roll and the spool. See Figure 2.
Figure 1
Figure 2
Note To ensure proper feeding of labels during printing, the
label roll must fit snugly against both sides of the label spool,
with no gaps.
6
Insert the label spool into the slot in the printer cover with the
labels extending from underneath the roll. See Figure 3.
7
Align the left edge of the label with the left edge of the label
feed slot and insert the label into the slot. See Figure 4.
Figure 3
The printer automatically feeds the labels, stopping at the
beginning of the first label.
If the printer does not feed the labels, make sure the first
label is fully inserted and then press the form-feed button.
Slide label
guide against
labels
If the first label on the roll is not a full label, press the
form-feed button to eject the partial label.
Note Regardless of the label width, the left edge of the
label must be aligned with the left edge of the label feed
slot for the labels to feed properly.
8
Align labels
against left edge
(450, 450 Turbo, Duo, and Twin Turbo Only) Slide the
label guide to the left until the label guide aligns with the
right edge of the label. See Figure 4.
Make sure that the label guide does not pinch the label.
6
9
(Twin Turbo Only) Repeat steps 3-8 to load a second roll of labels.
10
Carefully lower the top cover.
Figure 4
Ordering Labels
To load a label cassette (LabelWriter Duo)
1
Remove
cardboard
insert
Press the button on the front of the printer to open the label
cassette tray.
Note The first time you use the printer, remove the
protective cardboard insert from the label exit slot. See
Figure 5.
2
Make sure the label and ribbon are taut across the mouth of
the cassette and that the label passes between the label
guides.
Figure 5
If necessary, turn the ribbon rewind spool clockwise to
tighten the ribbon.
3
Insert the cassette and press firmly until the cassette clicks
into place. Make sure label and ribbon are positioned
correctly. See Figure 6.
4
Press the button on the front of the printer to close the label
cassette tray.
Push down gently
Figure 6
Ordering Labels
DYMO offers a full range of labels for the LabelWriter printers, including labels suited for
addressing envelopes, shipping packages, naming file folders, labeling all sorts of media, printing
name badges, and much more. A complete listing can be found in the label catalog that was
supplied with this printer and at the DYMO Web site: www.dymo.com.
Caution DYMO’s warranty does not cover malfunction or damage that may be caused by the use
of labels other than DYMO-branded labels. Because DYMO LabelWriter printers use thermal
printing technology, you must use specially designed and manufactured labels. The thermal
coatings used on labels other than DYMO-branded labels may not be compatible and may provide
unsatisfactory printing or cause the printer to malfunction.
Custom Labels
DYMO also offers several ways to customize your LabelWriter labels. You can order labels
preprinted with text or graphics in any color. For example, shipping labels can be preprinted with
your return address and logo to match your corporate letterhead. Labels are also available in custom
sizes and with special adhesives.
You can obtain details on our custom label program by calling the Custom Label Sales department
at 1-800-426-7827 or send an email to [email protected].
7
About Labels
This page intentionally left blank for double-sided printing.
8
Chapter 3
Printing Over a Network
This chapter describes how to print to a DYMO label printer over a network. The topics covered in
this chapter are:
• “Printing to a Shared Printer from Windows”
• “Printing to a Shared Printer from Mac OS”
• “Using a Print Server”
The following are the general steps you need to follow to set up a printer for printing over a
network. These steps are provided as a general overview and reminder that you must be able to
print locally to the printer before you can share it.
The term local computer refers to the computer to which the printer is physically connected. The
term remote computer refers to the computer from which you wish to print to a printer on the
network.
Note When printing to a shared printer, any messages generated by the printer, including error
messages, are displayed on the local computer, not on the remote computer.
To print to a shared printer over a network, the remote computer must be able to access the local
computer over the network. Contact your System Administrator for more information.
1. Install the printer to be shared on the local computer.
2. Confirm that you can print to the printer locally.
3. Share the printer on the local computer.
4. Install the printer on the remote computer that will be printing to the shared printer.
See "Using a Print Server" on page 13 for information on printing through a print server.
Printing to a Shared Printer from Windows
This section describes how to print to a shared DYMO label printer in a Windows workgroup. For
information on printing to a shared printer under Windows Server or other versions of Windows,
see your Windows documentation or contact your System Administrator.
Sharing a Printer on a Network
These instructions assume that you have already installed DYMO Label Software on the local
computer. See the printer’s Quick Start Guide for information.
Before printing to a shared printer from Windows, you first need to share the printer on the local
computer.
9
Printing Over a Network
To share the printer
1
Choose Printers and Faxes from the Start menu.
The Printers and Faxes control panel is displayed.
2
Right-click the printer you want to share and select Sharing.
The DYMO label printer Properties dialog boxappears with the Sharing tab selected.
3
Select Share this printer.
4
Optionally, enter a different name for the printer in the Share name box.
This is the printer name that appears to other users on the network.
5
Click OK.
The share icon (hand) is displayed under the shared printer. This indicates that other users in
the workgroup can print to this printer.
Adding a Network Printer
Before you can print to a shared network printer, you need to install DYMO Label Software (DLS)
on your local computer and then add each network label printer you wish to use.
Note The LabelWriter Duo printer is actually two printers (label and tape) so you must run the
Add Printer Wizard twice; once for the LabelWriter Duo label printer and once for the LabelWriter
Duo tape printer.
10
Printing to a Shared Printer from Mac OS
To add a network printer
♦ Use the standard Windows Add Printer Wizard to add the shared label printer to your
computer.
Refer to your Windows documentation for more information about adding a network printer.
Printing to a Shared Printer from Mac OS
This section describes how to print to a shared printer in a Mac OS workgroup. For information on
printing to a shared printer under other versions of Mac OS, see your Mac OS documentation or
contact your System Administrator.
Sharing a Printer on a Network
These instructions assume that you have already installed DYMO Label Software on the local
computer. See the printer’s Quick Start Guide for information.
Before printing to a shared printer, you first need to share the printer on the local computer.
To share the printer
1
Select System Preferences from the Apple menu.
The System Preferences dialog box is displayed.
2
Double-click Print & Fax.
The Print & Fax dialog box is displayed.
11
Printing Over a Network
3
Select the printer you want to share and then click Sharing.
The Sharing pane is displayed.
Note To share the DYMO LabelWriter Duo printer, which can print on both labels and tape,
select both the LabelWriter DUO Label and the LabelWriter DUO Tape 128 printers.
4
Select the Share these printers with other computers check box and then select the check
box in front of each printer you wish to share.
5
Close the Print & Fax dialog box.
Adding a Shared Printer
Before you can printer to a network printer, you need to install DYMO Label on the remote
computer. If you want to install more than one shared DYMO label printer, you must add each
additional label printer.
To install a shared network printer
12
1
Install DYMO Label software. (See the Quick Start Guide for information.)
2
From the Finder, select Applications>Utilities>Printer Setup Utility.
The Printer List dialog box is displayed.
3
Click Add. The Printer Browser dialog box is displayed.
Using a Print Server
4
Select the printer and then click Add.
The shared printer is added to the Printer List dialog box.
Note The LabelWriter Duo printer is actually two printers (Label and Tape), so you must add
both printers separately.
5
Close the Printer List dialog box.
Using a Print Server
You can print over a network to a DYMO label printer connected to a wired or wireless USB print
server. DYMO now offers a LabelWriter Print Server to easily share your LabelWriter printer on a
network. Visit the DYMO Web site to learn more about our print server.
A DYMO label printer works the same as any other printer connected to a print server and requires
no special configuration. The steps for installing and printing with print servers vary by print server
type and manufacturer. See the documentation provided with the print server for detailed
installation and printing instructions.
DYMO label printers support printing from Windows XP (Service Pack 2), Windows Vista,
Windows 2000 (Service Pack 2), and Mac OS X.
The following are notes and tips for the print server installation:
• Make sure that your print server supports the type of operating system installed on your
computer (Windows or Mac OS).
• Most print servers only support the LabelWriter DUO Label printer. However, the DYMO
LabelWriter Print Server does support both the LabelWriter DUO Label and Tape printers.
• DYMO label printers with older firmware versions do not support print servers. See Printer
Firmware Versions that Support Print Servers.
In general, during print server installation, if you are prompted for the printer or printer driver,
select the option for installing a printer driver from a disk and insert the DYMO Label Software CD
in the computer’s CD-ROM drive. If the installer doesn’t automatically locate the printer drivers,
navigate to the printer drivers on the CD. If prompted to select your printer, select the printer
physically connected to the print server.
To connect your label printer to a print server
1
Connect one end of a USB cable to the USB connector on your label printer and the other end
to the USB connector on the print server.
2
Connect the print server to your network.
3
Connect power to the label printer and print server.
4
Install and configure the print server on your network.
5
Confirm that you can print to the label printer from the computer you are using to install and
configure the print server.
6
Add the printer connected to the print server to other computers in the workgroup.
13
Printing Over a Network
Printer Firmware Versions that Support Print Servers
Refer to the table below for information about the label printer firmware versions that support print
servers. You can determine your printer’s firmware version by checking the serial number printed
on the bottom of the printer.
DYMO Label Printer Model
Serial Numbers Greater Than
Firmware Version Greater Than
DYMO LabelWriter 400
xxxxx-2046321
93089v0T, 93490v0T
DYMO LabelWriter 400 Turbo
xxxxx-2096232
93176v0T, 93491v0T
DYMO LabelWriter Twin Turbo
xxxxx-2013955
93085v0M, 93492v0M
LabelWriter 450 Printers: All LabelWriter 450 printers include firmware that supports
print servers.
If your printer has firmware that does not support print servers, contact DYMO technical support
for assistance on updating the printer’s firmware.
14
Chapter 4
Caring for Your Printer
The LabelWriter printer is designed to give you long and trouble-free service, while requiring very
little maintenance. You will get the best possible performance from your LabelWriter printer if you
follow the setup instructions that appear in the Quick Start Guide and the procedures described in
this section.
You can easily clean your LabelWriter printer using the following items:
• Lint-free cloth.
• Isopropyl alcohol, diluted dishwashing detergent, or diluted glass cleaner.
Caution If you use glass cleaner, make sure it does not contain ammonia.
• Small, soft brush, such as a tooth brush or child’s paint brush.
• LabelWriter cleaning card.
One cleaning card is included in your printer package. To purchase additional cleaning cards,
visit www.dymo.com or call (800) 426-7827.
To keep your LabelWriter printer working properly, you should clean it from time to time. Dusting
the outside of the printer occasionally will help keep foreign matter from getting inside the printer.
However, it is still a good idea to periodically perform some basic interior maintenance, such as
cleaning the label path with the cleaning card.
To clean the exterior of your printer and the label roll compartment
1
Disconnect the power cord.
2
Use the lint-free cloth to wipe the exterior of the printer.
3
Remove dirt and smudges with one of the cleaning solutions mentioned above.
4
Open the top cover.
5
Use a small, soft brush or cotton swab to whisk away paper dust and other stray particles from
the inside of the printer.
6
Remove the roll of labels and clean under the roll.
7
If you have a LabelWriter cleaning card, follow the instructions printed on cleaning
card packaging.
8
Reconnect the power cord.
9
Reload the roll of labels and carefully close the top cover.
15
Caring for Your Printer
To clean the tape print head (LabelWriter Duo only)
1
Press the button on the front of the label cassette tray.
2
Remove the label cassette.
3
Use a small, soft brush or cotton swab to wipe away paper dust and other stray particles from
the inside of the tray.
4
Remove the cleaning tool from the inside of the tray.
5
Gently wipe the print head with the tool.
The print head is very delicate, so use care when cleaning.
6
Replace the cleaning tool, insert the label cassette, and press the button to close the tray.
To clean the cutter blade (LabelWriter Duo only)
1
Press the button on the front of the label cassette tray.
2
Remove the label cassette.
3
Quickly press the Form Feed and Label Eject buttons at the same time.
The cutter blade will move into view.
4
Use a cotton swab and alcohol to clean both sides of the cutter blade.
The cutter blade is extremely sharp. Use caution when cleaning.
5
After cleaning the blade, press the Label Eject button once to return the blade to its home
position.
You can also follow this procedure if the cutter blade becomes lodged in the forward position and
will not move.
16
Chapter 5
Getting Help
Your LabelWriter printer should offer years of trouble-free printing with very little maintenance.
However, in the event that you encounter a problem, this chapter offers suggestions for resolving
problems that can occur when using the printer. If you are unable to solve a problem, this chapter
also describes how to contact DYMO Technical Support.
For complete information about programming and using the LabelWriter SE450 printer, refer to the
LabelWriter SE450 Technical Reference Guide, available from the Developers Program page on the
DYMO Web site (www.dymo.com).
Troubleshooting
This section provides information on how to detect and correct problems you might encounter
while using your LabelWriter printer.
Status Light
The status light visually shows the current state of the printer:
Status Light
Description
Solid Blue
Power is on and printer is ready.
Dimmed Blue
Printer is in power saving mode.
Flashing Blue
Labels are not loaded properly or the label roll is empty.
For the LabelWriter SE450, the status light shows the current state of the printer as follows:
SE450 Status Light
Description
Solid Blue
USB cable is connected. Power is on and printer is ready.
Dimmed Blue
USB cable is connected and printer is in power saving mode.
Flashing Red
Labels are not loaded properly or the label roll is empty.
Solid Green
Serial cable is connected. Power is on and printer is ready. Printer will also show
solid green when both USB and Serial cables are connected or when no cables
are connected.
Dimmed Green
Serial cable is connected and pirnter is in power saving mode.
Flashing Green
Serial cable is connected and printer is in configuration mode. For complete
information about programming and using the LabelWriter SE450 printer, refer
to the LabelWriter SE450 Technical Reference Guide, available from the
Developers Program page on the DYMO Web site. www.dymo.com
17
Getting Help
Performing a Printer Self-Test
If you experience problems with broken characters or other print quality issues, perform a printer
self-test. The self-test verifies that all elements of the print head and printing mechanism are in
working condition.
To perform a self-test
1
With a roll of labels in the printer, press and hold the form-feed button on the front of the
printer for five to ten seconds.
The printer begins printing vertical lines along the width of the printer. The test pattern
automatically changes every 3/4 inch (19 mm).
2
Once the self-test begins, release the form-feed button.
3
To stop the self-test, press and release the form-feed button.
Clearing Label Jams
To clear labels that have become jammed in the printer
1
2
Tear off any labels that have already fed
through the printer.
Press the label release lever forward and
pull the jammed label out of the label feed
slot.
Press label release
forward
Correcting Poor Print Quality
Poor print quality is most frequently caused by one of the following:
•
•
•
•
An old roll of labels
Labels made by a manufacturer other than DYMO
Labels where the thermal coating has been compromised
A dirty print head
First, make sure you are using DYMO-branded labels. Do not use third-party labels because the
thermal coating on other labels has a different sensitivity than DYMO-branded labels. Also, the
perforated holes between the labels made by other manufacturers are frequently not detectable by
LabelWriter printers.
If the print quality becomes faint, small dots of white appear scattered through the printed
characters, or light and dark patches of printing appear, you are probably using a faulty roll of
labels. Try using a different roll from a fresh box. If the second roll prints correctly, the problem is
with the first roll of labels.
Another possibility is that the LabelWriter print head needs cleaning. Every LabelWriter printer
comes with a cleaning card. See "Caring for Your Printer" on page 15 for information about the
LabelWriter cleaning card.
Labels Do Not Feed Correctly
If your labels do not feed correctly, check the following:
18
Troubleshooting
• Make sure your labels are loaded properly and that the left edge of the label is aligned with the
left edge of the label feed slot. See "Loading Labels" on page 5.
• Make sure you are using DYMO-branded labels. The perforated holes between the labels made
by other manufacturers are frequently not detectable by DYMO printers. When the
perforations are not detected, the labels will not feed correctly. Using third-party labels may
also void your warranty.
Printer Does Not Print or Stops Printing
If your printer does not print or stops printing while in use, follow the steps below to track down the
problem.
1
Make sure the printer is still getting power and that the power cable has not been disconnected.
If the status light on the front of the printer is not lit, check to make sure the power cable is
plugged in, and that your power strip is working.
To make sure the problem is not with the outlet or power strip, try plugging something else into
the wall outlet and power strip.
2
Confirm that the printer is feeding labels properly by pushing the form feed button while the
printer is on.
If the labels are jammed, the status light will blink. Refer to "Clearing Label Jams" on page 18.
3
Make sure that your USB cable has not come loose from the back of your printer or from
your computer.
Refer to the installation instructions in the Quick Start Guide to make sure the cable is
connected properly.
4
(Windows) Check that your LabelWriter printer driver is installed correctly.
The LabelWriter printer driver takes print data from your software and directs it to the
LabelWriter printer. The driver is automatically installed when you install the software that
comes with your printer. However, the driver may have been changed or deleted by mistake.
a
From the Start menu, choose Printers and Faxes.
b
Right-click the LabelWriter printer icon, and then choose Properties.
c
From the Properties dialog box, click Printing Preferences.
d
From the Preferences dialog box, click Advanced.
The Advanced dialog box appears.
If no errors are displayed the Advanced dialog box, the printer driver is installed correctly.
If you are still having problems after checking the above items, contact Customer Service to
arrange for a Return Authorization (RA). See "Obtaining Technical Support" on page 20.
19
Getting Help
Limited Warranty
Your DYMO® LabelWriter® printer comes with a warranty against defects in materials, design, or
workmanship, for two years from the original date of purchase (LabelWriter SE450 for one year
from the original date of purchasea), when used in accordance with all operating instructions.
Normal wear and tear is not covered, nor is excessive use, abuse or damage caused by a user either
intentionally or accidentally.
DYMO LabelWriter printers are warranted for use only with DYMO-branded labels. Sanford, L.P.
will not be responsible for malfunction or damage caused by the use of other media.
EXCEPT AS PROVIDED HEREIN, SANFORD MAKES NO OTHER WARRANTIES,
EXPRESS OR IMPLIED, AND SANFORD SPECIFICALLY EXCLUDES WARRANTIES OF
MERCHANTABILITY AND FITNESS FOR A PARTICULAR PURPOSE. SANFORD’S
LIABILITY UNDER THIS WARRANTY SHALL BE LIMITED TO REPAIR OR
REPLACEMENT OF THE PRINTER. SANFORD SHALL NOT BE RESPONSIBLE FOR ANY
INCIDENTAL OR CONSEQUENTIAL DAMAGES, WHETHER OR NOT FORESEEABLE.
THIS WARRANTY GIVES YOU SPECIFIC LEGAL RIGHTS, AND YOU MAY ALSO HAVE
OTHER RIGHTS WHICH VARY FROM STATE TO STATE AND COUNTRY TO COUNTRY.
Obtaining Technical Support
If you experience problems with the setup or use of your printer, carefully read this manual to make
sure you have not missed something that is covered in the documentation.
If you cannot resolve your problem by consulting the documentation, you can obtain additional
information and assistance from DYMO.
DYMO maintains an Internet Web site at www.dymo.com that includes the latest support
information for your LabelWriter printer.
You can also contact DYMO Technical Support by phone or fax from 9 am to 8 pm, Eastern time.
Phone: (203) 588-2500
Fax: (203) 588-2560 or (203) 355-7060
Visit the Support area of our Web site at www.dymo.com to contact us by email.
20
Chapter 6
Technical and
Environmental Information
This chapter contains technical and certification information for the LabelWriter printer.
Technical Specifications
450
Print Method
Print Resolution
Print Speed
(labels/min for address
label in text mode)
450
Turbo
450 Twin Turbo
4XL
450 Duo
(Label Printer)
450 Duo
(Tape Printer)
Direct Thermal
Thermal Transfer
300 dots per inch (11.8 dots per mm)
180 dots per inch
(7.09 dots per mm)
51
71
71
53
71
N/A
Maximum Print Width
2.25 in (56 mm)
4.16 in (105.73 mm)
2.25 in (56 mm)
0.71 in (18.1 mm)
Maximum Media Width
2.44 in (62 mm)
4.53 in (115 mm)
2.44 in (62 mm)
0.95 in (24 mm)
Maximum Label Length
User-definable
Interface
USB 2.0 Printer Class Device
Dimensions (WHD)
4 7/8 in (124 mm) x 8 1/2 in (217 mm) x
5 ¾ in (146 mm) x 5 1/3 in (135 mm) x
7 ¼ in (184 mm)
7 3/8 in (187.5 mm)
7 in (178 mm) x
5 1/3 in (135 mm) x
7 3/8 in (187 mm)
5 1/2 in (140 mm) x
8 in (203 mm) x
7 ¼ in (184 mm)
Weight
1 1/2 pounds (0.68 kg)
1 ¾ pounds (0.78 kg)
3 pounds (1.35 kg)
787,000 linear inches (124 miles) 200,000 linear meters
Minimum 200
cassettes (7 meters
each) 4,590 feet
(1.4 km) of label tape
Average Print Head Life
Printer Power
Requirements
24 VDC 1.75 A
Rated Duty Cycle
1000 shipping labels per hour
Regulatory Approvals
CE, FCC, TUV CB, cTUVus, TUV GS, and C-Tick
Warranty
Two Year Limited
24 VDC 3.75 A
24 VDC 1.75 A
21
Technical and Environmental Information
LabelWriter SE450 Printer Technical Specifications
For complete information about connecting the LabelWriter SE450 printer to the host computer or
other device, and for information about programming and using the LabelWriter SE450 printer,
refer to the LabelWriter SE450 Technical Reference Guide, available from the Developers Program
page on the DYMO Web site (www.dymo.com).
SE450
Print Method
Direct Thermal
Print Resolution
200 dots per inch (8 dots per mm)
Print Speed
(labels/min for address
label in text mode)
USB: 48 lpm
Maximum Print Width
2.13 in (54 mm)
Maximum Media Width
2.44 in (62 mm)
Maximum Label Length
User-definable
Interface
Serial (115.2K baud): 40 lpm
USB 2.0 Printer Class Device
Bi-directional, RS232 Serial (1200 to 115.2K baud)
Dimensions (WHD)
4 7/8 in (124 mm) x 5 3/4 in (146 mm) x 7 3/8 in (187 mm)
Weight
1 pound 13 ounces (0.817 kg)
Average Print Head Life 2,000,000 linear inches (50 km)
22
Printer Power
Requirements
24 VDC 1.7 A
Rated Duty Cycle
1000 shipping labels per hour
Regulatory Approvals
CE, FCC, Industry Canada, TUV CB, cTUVus, TUV GS, and C-Tick
Warranty
One Year Limited
Declaration of Conformity
Declaration of Conformity
Description: Direct Thermal Printer
Model: DYMO LabelWriter 450, 450 Turbo, 450 Twin Turbo, and 4XL
This equipment has been tested and found to comply with the limits for a Class B digital device,
pursuant to Part 15 of the FCC (Federal Communications Committee) rules. These limits are
designed to provide reasonable protection against harmful interference in a residential installation.
This equipment generates, uses, and can radiate radio frequency energy, and, if not installed and
used in accordance with the instructions, may cause harmful interference to radio communications.
However, there is no guarantee that interference will not occur in a particular installation. If this
equipment does cause harmful interference to radio or television reception, which can be
determined by turning the equipment off and on, the user is encouraged to try correcting the
interference by one or more of the following measures:
• Reorient the receiving antenna.
• Increase the separation between the equipment and the receiver.
• Connect the equipment to an outlet on a circuit different from that to which the receiver
is connected.
• Use shielded cables to connect this device to computers.
• Consult the dealer or an experienced radio/TV technician for help.
You may find helpful the following booklet, prepared by the FCC: Interference Handbook. This
booklet is available from the U.S. Government Printing Office, Superintendent of Documents,
Washington, DC 20402-9325.
Note Changes or modifications to this unit not expressly approved by the party responsible
for compliance could void the user’s authority to operate the equipment and void the
manufacturer’s warranty.
Device Certification
This device has been tested and complies with the requirements of:
TUV CB Test Certificate
cTUVus Certificate
TUV GS Certificate
INTERNATIONAL STANDARD IEC 60950 Safety of information technology equipment
FCC Part 15 Class B
RoHS 2002/95/EC
This device is not intended for use in the direct field of view at visual display workplaces. To
avoid incommoding reflections at visual display workplaces, this device must not be placed in
the direct field of view.
23
Technical and Environmental Information
Environmental Information
The equipment that you bought has required the extraction and use of natural resources for its
production. It may contain hazardous substances for the health and the environment.
In order to avoid the dissemination of those substances in our environment and to diminish the
pressure on the natural resources, we encourage you to use the appropriate take-back systems.
Those systems will reuse or recycle most of the materials of your end life equipment in a sound
way.
The crossed-bin symbol marked in your device invites you to use those systems.
If you need more information on the collection, reuse and recycling systems, please contact your
local or regional waste administration.
You can also contact DYMO for more information on the environmental performances of our
products.
Documentation Feedback
We are constantly working to produce the highest quality documentation for our products. We
welcome your feedback. Send us your comments or suggestions about our online Help, printed, or
PDF manuals.
Please include the following information with your feedback:
•
•
•
•
Product name and version number
Type of document: printed manual, PDF, or online Help
Topic title (for online Help) or page number (for printed or PDF manuals)
Brief description of content (for example, step-by-step instructions that are inaccurate,
information that requires clarification, areas where more detail is needed, and so on)
• Suggestions for how to correct or improve the documentation
We also welcome your suggestions for additional topics you would like to see covered in the
documentation.
Send email feedback to:
[email protected]
Please keep in mind that this email address is only for documentation feedback. If you have a
technical question, please contact Customer Service.
24