1
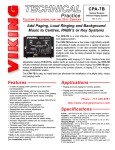
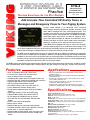
TECHNICAL
Practice
Practice
TELECOM SOLUTIONS
FOR THE
CTG-2
Advanced Clock
Controlled Tone /
Message Generator
2 1 S T C E N T U RY
July 7, 2010
Add Accurate Time Controlled CD Quality Tones or
Messages and Emergency Tones to Your Paging System
Viking’s model CTG-2 is an advanced clock controlled
tone/message generator designed to provide accurately timed
tones and/or messages over your existing paging system. This
provides a cost effective way of signaling school period changes,
factory shifts, breaks, lunch periods, etc. The CTG-2 has four programmable trigger inputs which are ideal for triggering emergency alert tones/messages to indicate fire evacuation, severe
weather, lock down, all clear or can be used in store castor applications for “customer service required” announcements, etc.
The CTG-2 comes equipped with up to 6 minutes of CD quality
WAV file audio storage for up to 14 different tone/messages. The
unit is factory loaded with common school, business and factory tones but can be programmed with your
custom tones/messages or updated from the list of Wav files from the Viking web site.
The CTG-2 can be programmed with up to 14 schedules and up to 1,000 events allowing you to program
an entire year or multiple years of schedules in advance. Once programmed you can change the CTG-2’s
schedules or turn the unit on or off remotely from any touch tone phone. The CTG-2’s extremely accurate
time base can be manually synchronized, synchronized with 50 or 60 Hz power or can be programmed to
periodically synchronize to the Atomic clock via its internal modem.
The CTG-2 comes with programming software and a USB port to allow PC programming of timed events, schedules, Atomic
clock synchronization, wave file down load, message volume, day light savings time, leap year, auxiliary relay control, etc.
Features
Applications
•
•
•
•
•
•
•
•
•
•
• Signal the beginning and end of class periods, breaks and lunch
periods for schools
• Signal the beginning and end of shifts, breaks and lunch periods for
factories/businesses
• Provide trigger controlled emergency alert messages for fire, flood,
severe weather, lock down, etc.
• Provide messages at specific times for store sales, promotions,
closing times, airport loading zones, etc.
• Provide Auxiliary contact activation at specific times for specific
durations for controlling lights, cameras, unlocking doors/gates, etc.
•
•
•
•
•
•
•
•
•
•
•
Up to 14 Schedules and up to 1,000 Events
6 minutes of CD quality WAV file record time
Up to 14 different tones or messages
4 programmable trigger inputs for emergency tones, etc.
Automatic Day light savings time and leap year correction
Programmable Atomic Clock synchronization
USB PC programming software included
Non-volatile memory with 4 hour clock back up
Factory loaded with school & factory tones
Remote phone programming for on/off and schedule
change
Page trigger outputs (12VDC and DPDT relay)
Programmable Auxiliary relay contacts (DPDT)
24 hour digital clock displays hours & minutes
One mono line level pre-amp input and two audio
outputs
Built-in 2 watt mono audio amplifier
Master volume control
Programmable volume control per tone/message
Time base selection: Atomic clock, 50/60Hz or internal
Internal clock +/- accuracy adjustment
Programmable message repeat count for trigger inputs
RS485 clock SYNC terminals for future remote clock
control
Specifications
Internal Clock Backup Time: 4 hours
Power: 120V AC/13.8V AC 1.25A UL listed adapter provided
Dimensions: 210mm x 159mm x 45mm (8.25” x 6.25” x 1.75”)
Weight: 1.5 Kg (3.2 lbs)
Environmental: 0°C to 32°C (32°F to 90°F) with 5% to 95% non-condensing humidity
Paging Amplifier Output: 2 watts - powers up to (3) 8 ohm or (16) 45 ohm speakers
Sound Pressure: 100 dB @ 1 meter (loud electronic warble from 25AE paging horn)
REN: 0.0 B
Maximum Speaker Output Wire Run: 91m (300 ft), 18 AWG
Maximum Load on Page Trigger Output: 1K ohm
WAV File Resolution: 16 bit or 8 bit
WAV File Sampling Rate: 44.1K, 22K or 11K
Time Base: 50/60 Hz or internal with atomic clock sync
Internal Time Base Accuracy: +/- 1ppm (32 seconds per year) without atomic sync or
accuracy adjustment
Connections: 33 screw terminal block positions, (1) type B USB jack
IF YOU HAVE A PROBLEM WITH A VIKING PRODUCT, PLEASE CONTACT: VIKING TECHNICAL SUPPORT AT (715) 386-8666
Our Technical Support Department is available for assistance Monday 8am - 4pm and Tuesday through Friday 8am - 5pm central time. So that we can give you better service, before you call please:
1. Know the model number, the serial number and what software version you have (see serial label).
2. Have your Technical Practice in front of you.
3. It is best if you are on site.
RETURNING PRODUCT FOR REPAIR
RETURNING PRODUCT FOR EXCHANGE
The following procedure is for equipment that needs repair:
1. Customer must contact Viking's Technical Support Department at 715-386-8666 to obtain a Return Authorization (RA)
number. The customer MUST have a complete description of the problem, with all pertinent information regarding the
defect, such as options set, conditions, symptoms, methods to duplicate problem, frequency of failure, etc.
2. Packing: Return equipment in original box or in proper packing so that damage will not occur while in transit. Static
sensitive equipment such as a circuit board should be in an anti-static bag, sandwiched between foam and individually boxed. All equipment should be wrapped to avoid packing material lodging in or sticking to the equipment. Include
ALL parts of the equipment. C.O.D. or freight collect shipments cannot be accepted. Ship cartons prepaid to:
Viking Electronics, 1531 Industrial Street, Hudson, WI 54016
3. Return shipping address: Be sure to include your return shipping address inside the box. We cannot ship to a PO Box.
4. RA number on carton: In large printing, write the R.A. number on the outside of each carton being returned.
The following procedure is for equipment that has failed out-of-box (within 10 days of purchase):
1. Customer must contact Viking’s Technical Support at 715-386-8666 to determine possible causes for the problem. The
customer MUST be able to step through recommended tests for diagnosis.
2. If the Technical Support Product Specialist determines that the equipment is defective based on the customer's input
and troubleshooting, a Return Authorization (R.A.) number will be issued. This number is valid for fourteen (14)
calendar days from the date of issue.
3. After obtaining the R.A. number, return the approved equipment to your distributor, referencing the R.A. number. Your
distributor will then replace the product over the counter at no charge. The distributor will then return the product to
Viking using the same R.A. number.
4. The distributor will NOT exchange this product without first obtaining the R.A. number from you. If you haven't
followed the steps listed in 1, 2 and 3, be aware that you will have to pay a restocking charge.
LIMITED WARRANTY
Viking warrants its products to be free from defects in the workmanship or materials, under normal use and service, for a period of one year from the date of purchase from any authorized Viking distributor or 18 months from the date manufactured, which ever is greater. If at any time during the warranty period, the product is deemed defective or malfunctions, return the product to Viking Electronics, Inc., 1531 Industrial Street, Hudson, WI., 54016. Customer must contact Viking's
Technical Support Department at 715-386-8666 to obtain a Return Authorization (R.A.) number.
This warranty does not cover any damage to the product due to lightning, over voltage, under voltage, accident, misuse, abuse, negligence or any damage caused by use of the product by the purchaser or others.
NO OTHER WARRANTIES. VIKING MAKES NO WARRANTIES RELATING TO ITS PRODUCTS OTHER THAN AS DESCRIBED ABOVE AND DISCLAIMS ANY EXPRESS OR IMPLIED WARRANTIES OR MERCHANTABILITY OR FITNESS FOR ANY PARTICULAR PURPOSE.
EXCLUSION OF CONSEQUENTIAL DAMAGES. VIKING SHALL NOT, UNDER ANY CIRCUMSTANCES, BE LIABLE TO PURCHASER, OR ANY OTHER PARTY, FOR CONSEQUENTIAL, INCIDENTAL, SPECIAL OR EXEMPLARY DAMAGES ARISING OUT OF OR RELATED TO THE SALE OR USE OF THE PRODUCT SOLD HEREUNDER.
EXCLUSIVE REMEDY AND LIMITATION OF LIABILITY. WHETHER IN AN ACTION BASED ON CONTRACT, TORT (INCLUDING NEGLIGENCE OR STRICT LIABILITY) OR ANY OTHER LEGAL THEORY, ANY LIABILITY OF VIKING SHALL
BE LIMITED TO REPAIR OR REPLACEMENT OF THE PRODUCT, OR AT VIKING'S OPTION, REFUND OF THE PURCHASE PRICE AS THE EXCLUSIVE REMEDY AND ANY LIABILITY OF VIKING SHALL BE SO LIMITED.
IT IS EXPRESSLY UNDERSTOOD AND AGREED THAT EACH AND EVERY PROVISION OF THIS AGREEMENT WHICH PROVIDES FOR DISCLAIMER OF WARRANTIES, EXCLUSION OF CONSEQUENTIAL DAMAGES, AND EXCLUSIVE REMEDY AND LIMITATION OF LIABILITY, ARE SEVERABLE FROM ANY OTHER PROVISION AND EACH PROVISION IS A SEPARABLE AND INDEPENDENT ELEMENT OF RISK ALLOCATION AND IS INTENDED TO BE ENFORCED
AS SUCH.
FCC REQUIREMENTS
This equipment complies with Part 68 of the FCC rules and the requirements adopted by the ACTA. Inside the front panel
of this equipment is a label that contains, among other information, a product identifier in the format US:AAAEQ##TXXXX.
If requested, this number must be provided to the telephone company.
The REN is used to determine the number of devices that may be connected to a telephone line. Excessive REN's on a
telephone line may result in the devices not ringing in response to an incoming call. In most but not all areas, the sum of
the REN's should not exceed five (5.0) To be certain of the number of devices that may be connected to a line, as determined by the total REN's, contact the local telephone company. For products approved after July 23, 2001, the REN for
this product is part of the product identifier that has the format US:AAAEQ##TXXXX. The digits represented by ## are the
REN without a decimal point (e.g., 03 is a REN of 0.3). For earlier products, the REN is separately shown on the label.
The plug used to connect this equipment to the premises wiring and telephone network must comply with the applicable
FCC Part 68 rules and requirements adopted by the ACTA. If your home has specially wired alarm equipment connected
to the telephone line, ensure the installation of this E-65 does not disable your alarm equipment. If you have questions
about what will disable alarm equipment, consult your telephone company or a qualified installer.
If the E-65 causes harm to the telephone network, the telephone company will notify you in advance that temporary discontinuance of service may be required. But if advance notice isn't practical, the telephone company will notify the customer as soon as possible. Also, you will be advised of your right to file a complaint with the FCC if you believe it is necessary.
The telephone company may make changes in its facilities, equipment, operations, or procedures that could affect the
operation of the equipment. If this happens, the telephone company will provide advance notice in order for you to make
2
the necessary modifications to maintain uninterrupted service.
If trouble is experienced with the E-65, for repair or warranty information, please contact:
Viking Electronics, Inc., 1531 Industrial Street, Hudson, WI 54016 (715) 386-8666
If the equipment is causing harm to the telephone network, the telephone company may request that you disconnect the
equipment until the problem is resolved.
Connection to Party Line Service is subject to State Tariffs. Contact the state public utility commission, public service commission or corporation commission for information.
WHEN PROGRAMMING EMERGENCY NUMBERS AND (OR) MAKING TEST CALLS TO EMERGENCY NUMBERS:
Remain on the line and briefly explain to the dispatcher the reason for the call. Perform such activities in the off-peak
hours, such as early morning or late evenings.
It is recommended that the customer install an AC surge arrester in the AC outlet to which this device is connected. This
is to avoid damaging the equipment caused by local lightning strikes and other electrical surges.
PART 15 LIMITATIONS
This equipment has been tested and found to comply with the limits for a Class A digital device, pursuant to Part 15 of the
FCC Rules. These limits are designed to provide reasonable protection against harmful interference when the equipment
is operated in a commercial environment. This equipment generates, uses, and can radiate radio frequency energy and,
if not installed and used in accordance with the instruction manual, may cause harmful interference to radio communications. Operation of this equipment in a residential area is likely to cause harmful interference in which case the user will
be required to correct the interference at his own expense.
Features Overview
Audio Output 2: Unswitched line level audio output
to extenal amplifier. For locations that do not require
background music from audio input.
P.M. LED
Aux. Relay Output Contacts: DPDT relay contacts
that can be programmed as a timed event.
Run LED: Lights to indicate unit
is in run (operation) mode.
Internal 2-Watt Amp Gain Control: Adjusts
speaker output volume.
Set Time LED: Lights to
indicate unit is in set time mode.
Aux. Relay Active LED
Secondary Aux. Relay Output Contacts:
Available on J9 solder pads.
Set Schedule LED: Lights to
indicate unit is in set schedule
mode.
Page Trigger Output Contacts: DPDT relay
contacts that activate when tones/messages are
played. Used for triggering paging amplifier, etc.
Force Time Sync LED: Lights
to indicate unit is ready for a
manual force time sync.
VIKING ©
Page Activity LED:
Lights during tone/
message playback.
USB Programming Port: Type
B USB jack for programming
and downloading WAV files.
CO/Phone Line Input: Connect to
an unused phone line or PABX
station for atomic clock sync and/or
touch tone programming.
Trigger Inputs 1-4: Programmable
for NO, NC, momentary, continuous,
alternate action or activate only.
Page Trigger 12VDC Output: Connect to paging
amplifiers requiring a switched 12VDC signal for
enabling the paging source input.
Speaker Output: 2 Watt maximum connect up to
three 8-ohm speakers in parallel. This port is useful
for monitoring WAV file audio during programming.
FORCE TIME SYNC
SET SCHEDULE
SET TIME
- + - +
18 19 20 21
P.M.
- + - +
1 2 3 4 5 6 7 8 9 10 11 12 13 14 15 16 17
RUN
AUDIO
OUTPUT
AUDIO
INPUT
PAGE TRIGGER
12VDC OUTPUT
SPEAKER
OUTPUT
PAGE TRIGGER
CONTACTS
N.0.
N.C.
TRIGGER
INPUT 4
TRIGGER
INPUT 3
TRIGGER
INPUT 1
TRIGGER
INPUT 2
PHONE LINE
INPUT
COM
USB LED: Lights
indicating USB cable is
connected to a computer.
ADVANCED CLOCK CONTROLLED
TONE / MESSAGE GENERATOR
PWR 13.8 VAC
R5485 Clock Sync
Output: For synchonizing time on multiple
clocks (future use).
VIKING
ELECTRONICS
HUDSON, WI 54016
USB
PROGRAMMING
PORT
Audio Output LED:
Flashes to indicate tone/
message audio output.
MODEL CTG-2
LED Display: Shows clock
time, schedule, force time
sync, and on/off modes.
Mode Switch: Press to
advance through modes
(run, set time, set schedule
or force time sync).
Time "+" Switch: Press to advance
through time, schedules, initiate a
force time sync or turn unit back on.
Time "-" Switch: Press to decrement
time, select schedules or turn unit off.
Master Volume: Used to adjust overall
pre-amp volume level output.
Audio Output 1: Line level audio output to
external amplifier. This output is switched for
use with existing paging or background music.
Audio Input: Line level pre-amp input for
paging, background music, etc.
3
Installation
!
IMPORTANT: Electronic devices are susceptible to lightning and power station electrical surges from both the AC outlet and the
telephone line. It is recommended that a surge protector be installed to protect against such surges.
A. Typical Installation Automatically Switching Paging Audio to the CTG-2 for Time Activated
or Externally Triggered Messages and/or Tones
VIKING ©
MODEL CTG-2
VIKING
ELECTRONICS
HUDSON, WI 54016
FORCE TIME SYNC
SET SCHEDULE
SET TIME
- + - +
18 19 20 21
P.M.
- + - +
1 2 3 4 5 6 7 8 9 10 11 12 13 14 15 16 17
RUN
AUDIO
OUTPUT
Adjust master volume to match
paging level from phone system.
CO Line or Analog
PABX/KSU Station
(optional: for atomic
clock sync or remote
schedule change, etc.)
Paging Amplifier (PA-30 shown,
not included - see DOD# 489)
VIKING ©
MODEL PA-30
MASTER
VOLUME
2
3 4
5
6
7
8
LED2
NIGHT
TRANSFER
CONTACT
CLOSURE
PAGE
CONTACT
LED3
LED5
C
C
on
C
Page Contact
Output (if
provided)
LED1
Severe Weather
9 10 11 12 13 14 15 16 17
LED4
C
C
Lock Down Message
LINE IN
PAGE IN
SPKRS
SPKRS
1
MAX
LOUD RINGING
70V OUT
Evacuation Signal
MIN
30 WATT TELECOM
PAGING AMPLIFIER
AUX IN
Paging Port
Output of
PABX/KSU
600 OHM
OUTPUT
Trigger Examples:
PWR 15 VAC
VIKING
ELECTRONICS
HUDSON, WI 54016
BACKGROUND
MUSIC IN
AUDIO
INPUT
PAGE TRIGGER
12VDC OUTPUT
SPEAKER
OUTPUT
PAGE TRIGGER
CONTACTS
N.0.
N.C.
COM
TRIGGER
INPUT 4
TRIGGER
INPUT 3
TRIGGER
INPUT 2
TRIGGER
INPUT 1
PHONE LINE
INPUT
USB
PROGRAMMING
PORT
PWR 13.8 VAC
ADVANCED CLOCK CONTROLLED
TONE / MESSAGE GENERATOR
+ SPKR - + SPKR 70V OUT
1
600 OHM
OUTPUT
AUX IN
PAGE IN
2
3
4
PAGE
CONTACT
RINGING
LINE
CC
NT
All Clear
and / or
4
Background Music
Source (not included)
PC Programming Definitions
ACTS Phone Number: “ACTS” is the abbreviation for “Automated Computer Time Service” provided by NIST (National
Institute of Standards and Technology).
ACTS Sync: Clicking ACTS Sync will activate a forced Atomic Clock Sync.
Audio/CTG-2 Wave Files: Programming screen where you can Upload, Download, Erase, Set volume and message start
delay for the wave files stored in the CTG-2.
Calendar/View Calendar: Opens the PC programming screen “Change Schedule Calendar” where you can select which
schedule you would like the CTG-2 to run on which days during the year.
Cal Err: “Cal”, “Err” will flash on the clock display any time the CTG-2 has lost power long enough to deplete its internal
capacitor clock back up (approximately 4 hours) and has one or more programmed events with specific dates. To correct
this you must upload the current date and time via the “Set Up Clock” screen.
Clear Com: If you are experiencing multiple error messages while manipulating features in the “CTG-2 Wave Files”, select
“Clear Com” and reattempt the previous programming causing the error. If this does not clear the errors, we recommend
closing the program, disconnect the USB cord then reconnect the USB and reopen the program.
Close: Closes the currently open programming screen.
Conflicts/Check for Conflicts: PC programming screen where you can have the software review the programmed Events
and Schedule changes in your dat file to determine date or time conflicts.
Diagnostics: This is for use by qualified Viking Technical support personnel only to few firmware memory, factory clock calibration, etc.
Download: Downloads internal programming data from the CTG-2 to the PC screen you have open.
Event Programming Screen: PC programming screen where you enter/program individual events to activate at specific
times during the day, week or specific dates.
Help File: Selecting the “Help” pull down menu and clicking on “Instructions” will open the “CTG-2 Help File”. Open this file
for detailed instructions on PC programming the CTG-2.
Print and Print Data: Print simply prints the current screen you working with. Print Data prints the entire Event
Programming Data.
Save: Saves changes to the current open screen to the PC dat file.
Security Code: This is a programmable 6 digit touch tone code for entering remote touch tone programming. This code is
to be entered after the CTG-2 has answered the line and given a confirmation beep.
Upload: Uploads all data from the current open PC screen to the CTG-2. Note: Uploading from the main “Event
Programming” menu will upload data from all programming screens to the CTG-2 and automatically save data from all
menus to the PC dat file.
PC Programming
A CD ROM is included with each CTG-2. The CD contains the application CTG2 used to program the unit using a PC running Windows
XP or Vista. Install the application on your PC by placing the CD ROM
into your PC’s drive. The installation should start automatically.
Follow the directions on the screen. When installation is completed,
be sure to restart the computer. If you are reinstalling CTG2 software
you must uninstall the original version first via “Add and Remove
Programs”. To start the CTG2 application, click on the CTG2 icon on
your desk top. The Main screen will appear that allows the user to
create new CTG-2 files, and
5
To start the CTG-2 application, click on the CTG-2 Programmer icon on your desk top. The Event Programming screen will
appear that allows the user to enter/program individual events to activate at specific times during the day, week or specific
dates. Events include: Play specific Wave file, Turn system On/Off, Activate Time Sync, Turn Aux Relay On/Off, Activate
programmable timed Aux Relay and Change Schedule on specific dates. The Event Programming example shown below
is included on the CD ROM and factory loaded into the CTG-2 allowing you to get familiar with programming or modify this
file for your own use.
Programming Steps: The CTG-2 should be programmed in the following order.
1. Create any unique wave file sounds or messages required for your application. The CTG-2 is factory loaded with common school and factory shift change sounds.
2. In the “File” pull down menu click “New File” and enter a name for your dat file and unit.
3. Click on “Audio” and upload the wave files into the CTG-2.
4. Program your events line by line in the “Event Programming” screen. Entering the events in chronological order is helpful during programming but not required as you can select “Sort Events” when you have finished.
5. Check for any programming conflicts by clicking on the “Conflicts” button.
6. Program the Time and Date in the “Set Up Clock” screen.
7. Program Triggers 1 - 4 to play your desired wave sounds.
8. If more than one schedule has been programmed, click on “Calendar” to open the “Change Schedule Calendar” screen
and select the dates that you would like to run each schedule.
9. Save your programming changes and upload the dat file to the CTG-2.
10. Exit the programming software and run a specific schedule or select “Calendar Mode” to have the unit automatically
switch schedules at 12:00 AM on your programmed dates.
6
Run: Click this button to exit PC programming and place the CTG-2 in run mode. Simply
press the “Run” button, select the desired schedule or Calendar mode and press start (right).
Exit: Clicking “Exit” with a dat file open will prompt you “Do you want to start running?”
Selecting “Yes or No” will exit and close the CTG-2 programming software. If “no” was selected the CTG-2 will display “OFF” and will not activate any programmed events. The 4 trigger
inputs will remain functional. If “Yes” was selected the “Run” menu will appear allowing you
to select the “Calendar Mode” or any preprogrammed schedule. Click on “Start” and the
CTG-2 will begin running the selected schedule.
Upload: Uploads all data from the current open PC screen to the CTG-2. Note: Uploading
from the main “Event Programming” menu will upload data from all programming screens to
the CTG-2 and automatically save data from all menus to the PC dat file.
Download: Downloads internal programming data from the CTG-2 to the PC screen you have open.
Calendar Mode: If more than one schedule is programmed you can run the unit in the calendar mode. In the Calendar
mode the CTG-2 will automatically switch on/off and to different schedules per the dates programmed in the “Change
Schedule Calendar”. Schedule changes will take place at 12:00 AM. Multiple schedule changes on a particular day are not
supported in calendar mode. Automatic schedule changes will be disabled if a start time of other than 12:00am is selected.
Connect: Allows you to select the PC Com port the CTG-2 is connected to for On Line programming of the CTG-2. This
is normally used if you are programming “Off Line” (CTG-2 not connected to PC) then want to connect to the unit and upload
the updated programming data.
Change Unit Name: This is useful if you have several units in multiple locations with
the same “dat” file. For single unit applications we recommend using the “dat” file name
for the unit name.
Diagnostics: This is for use by qualified Viking Technical support personnel only to
view internal memory, factory clock calibration, etc
Sort Events: When you are finished programming all your events in your dat file, you
can select this feature to automatically sort all of the events in chronological order starting with all your change schedules events for schedule 1. In the Event Programming
screen select the Tools pull down menu and click “Sort Events” (right).
Edit Event: Screen opened when double
clicking in the Event row. This is used to program or edit that one specific event (right).
Task: This pull down menu allows you to program a specific event such as play a preprogrammed (uploaded) wave file, Change
Schedule, turn the Aux relay on or off, activate
a timed Aux relay or turn the system (CTG-2)
on or off at a specific time and/or date.
Start Date/Stop Date: Double click in the
event row to open the “Edit Event” screen. The
Start and Stop pull down menus allow you to
program Start and Stop dates for that specific
event. Example: You would like to let your
employee’s off work an hour early during the
week before Christmas. Simply program an event to play your normal 5:00 end of shift tone at 4:00 with Start and Stop
dates for the week before Christmas.
Notes: This field is useful for entering notes explaining what the event is signaling such as “Period 2 Start”, “Lunch End”,
“Shift 3 Start”, etc. Note: The first character in the “Note” field should NOT start with a number as it will right justify the text.
7
Block Edit: Screen opened when single clicking in the Event row. By clicking and highlighting, entire blocks of events can be selected.
This is used to Copy, Cut, Paste, Insert or
Delete single or multiple Event rows. This can
be useful for copying an entire schedule then
modifying the event times slightly for early
release, late start, etc.
Conflicts: Clicking the “Conflicts” button will open the Conflicts
screen where you can have the software review the programmed
Events and Schedule changes in your dat file to determine date or
time conflicts. This will also check for conflicts if a wave file is not
finished playing before another event is scheduled to activate.
When you have finished programming your dat file, click on
“Conflicts”, and select Calendar Mode or which schedule you
would like to check for conflicts then click “Review”. The “Conflicts”
screen will display all the events with conflicts and the “Event
Programming” menu will highlight the events with conflicts in yellow. Make corrections to the highlighted events then review conflicts again. (right)
Calendar: Clicking the “Calendar” button will open the “Change Schedule Calendar” programming screen where you can
select which schedule you would like the CTG-2 to run on which days during the year. This is programmable out to the year
2098 allowing you to program multiple years in advance if required. Simply select a preprogrammed schedule and click on
the dates you would like that schedule to run. By clicking and highlighting, multiple dates can be changed at once. When
utilizing the “Change Schedule Calendar” schedule changes will take place at 12:00 AM. Note: Schedules must be programmed in the “Event Programming” menu first, then the schedules can be programmed for specific dates utilizing the
“Change Schedule Calendar”.
8
CTG-2 Wave Files: Clicking the “Audio” button will open the “CTG-2 Wave Files” programming screen where you can
Upload, Download, Erase, Set volume and message start delay for the wave files stored in the CTG-2.
Message Delay (sec): Adjustable from 0 to 9 seconds in half sec increments. This is the delay from when the page trigger output is activated until the start of the wave file is played. Adjusting this can eliminate cutting off the first section of the
wave file in applications where certain paging amplifiers require a second or two to power up and/or switch to that audio
source.
Memory Usage: The CTG-2’s wave file memory storage is separated into 14 memory blocks and is displayed after each
wave file name under the column titled “Memory Usage”. The memory blocks will fill with color after uploading a wave file
showing how much memory space was required for that file. Larger wave files will require multiple memory blocks. To conserve memory storage space you can reduce the sampling rate of the wave file from 44K to 22K or 11K. Note: Reducing
the sampling rate will decrease the sound quality of the message/sound.
Missing Wave Files: If the CTG-2 does not have a wave file in its internal memory that is required by the PC dat file you
have open, “Missing Wave Files will be highlighted in red. To upload the missing wave file to the CTG-2, open the drop down
menu and click on the missing wave file. The file will then be automatically uploaded to the CTG-2.
Volume: The “Volume” drop down menu allows you to adjust and set the volume level of each individual wave file. This is
useful for matching the volume levels of each wave file or increasing the volume on specific wave files such as evacuation
sirens, etc.
Load All: In the “Tools” drop down menu, selecting “Load All” will upload all the missing wave files into the correct memory locations in the CTG-2.
Erase All: In the “Tools” drop down menu, selecting “Erase All” will erase all 14 wave file memory locations in the CTG-2.
Save Vol: After adjusting the wave file volume levels (adjusted volume settings will be highlighted in red) select “Save Vol”
to save the volume settings for all wave files.
Play: Clicking on “Play” will signal the CTG-2 to play the selected wave file. This is useful for setting the volume levels for
each wave file.
9
Change Rate: In the “Tools” drop down menu, clicking on “Change Rate” opens the
“Rate/Size Calculator” which allows you to reduce the sampling rate of the selected wave
file to reduce memory storage capacity. Note: It is not possible to reduce the rate of a file
occupying only one block. (right)
WAV File Guidelines:
1. For best results, the WAV file should be 16 bit / 44.1K / mono.
2. Resolution down to 8 bits is acceptable but audio quality will not be optimal.
3. Sampling rates of 22k and 11k are also acceptable.
4. The WAV file may be stereo or multi-channel, but only the Left Channel will be loaded.
5. Each of the 8 Memory Locations can hold up to 44 seconds of recorded audio (at 11k
sample rate).
6. Total recording time of 5 minutes 52 seconds available (at 11k sample rate).
7. Longer recordings are allowed to spill over into additional memory locations.
Note: Audio CDs use “Red Book” audio. The commonality is that both audio CDs and
WAV files have the audio data encoded in PCM. The Audio Red Book standard is essentially a WAV file along with additional coded information such as title, track, and time information. Applications such as
Sound Forge, Audacity, and Windows Sound Recorder can be used to generate WAV files out of Audio CD and/or MP3
audio recordings.
Set Up Clock: Clicking the “Clock” button will open the “Set
Up Clocks” programming screen where you can
enter/program Clock Parameters such as Time base
(Internal, 50 Hz or 60Hz), Time Zone and Set Clock (Manual,
PC time or Sync to ACTS). Program Clock Time (Year,
Month, Day, Time and +/- Calibration) and Modem
Parameters such as Security Code, Auto Answer Ring Delay
(1-99) and ACTS Phone Number.
Set Clock: Clicking this pull down menu will allow you to
select the method used for setting the CTG-2’s internal
clock. Selecting “Manual” will allow you to manually adjust
the time and date parameters then click “Set” or “Upload” to
set the time and date in the CTG-2’s internal memory.
Selecting “Use PC Time” will load the current time and date
from your PC into the “Clock Time” parameters then click
“Set” or “Upload” to set the time and date in the CTG-2’s
internal memory. Selecting “Sync to ACTS” will allow you to
force an Atomic Clock Sync from your PC by clicking “Set”
or “Upload”. This process will take approximately 30 seconds. The current time and date will then be loaded into the CTG2 and displayed under Clock Time”.
Set: Clicking “Set” will upload the CTG-2 with only the time and date parameters displayed in the “Clock Time” section of
the “Set Up Clock” screen. Note: Clicking “Upload” will send clock time and all other parameters in the “Set Up clock”
screen.
Read: Clicking “Read” will display the current internal CTG-2 clock time and date.
Time Base: In the “Set Up Clock” screen, click this pull down menu to select the CTG-2’s time base. With “Internal Clock”
selected the CTG-2 will base its time off its internal crystal controlled (quartz) real time clock with an accuracy of approximately 2 ppm which is +/- 63 seconds per year without atomic clock sync. Note: This accuracy can be greatly increased
with periodic Atomic Clock Synchronization or periodic manual clock corrections. With AC Line 50 or 60 Hz selected the
CTG-2 will base its time off the AC voltage powering the unit. The clock accuracy will then follow the power company fluctuations. This can be useful for matching the CTG-2 time to existing AC powered clocks.
Time Zone: Clicking this pull down menu will allow you to select the correct USA time zone for your region.
Set Clock: Clicking this pull down menu will allow you to select the method used for setting the CTG-2’s internal clock.
10
ACTS Phone Number: “ACTS” is the abbreviation for “Automated Computer Time Service” provided by NIST (National
Institute of Standards and Technology). This field is factory loaded with the typical phone system line access number 9 and
a comma (1 sec pause) then the 10 digit number for the ACTS. This number can be user programmed with up to 50 digits,
allowing the use of calling cards, etc. to reduce long distance charges. The telephone number for ACTS is: 1-303-494-4774.
ACTS Sync: Clicking ACTS Sync will activate a forced Atomic Clock Sync. This process will take approximately 30 seconds. The current time and date will then be loaded into the CTG-2 and displayed under Clock Time”.
Security Code: This is a programmable 6 digit touch tone code for entering remote touch tone programming. This code is
to be entered after the CTG-2 has answered the line and given a confirmation beep.
Daylight Savings Time Enabled: Check this field to enable automatic daylight savings time correction. The CTG-2’s internal clock will then be advanced 1 hour at 2:00 AM of the Starting Sunday and dropped back 1 hour at 2:00 AM of the Ending
Sunday.
Daylight Savings Time: In the “Tools” pull down menu. This screen
allows you to program the starting and ending month and Sunday for
the automatic change to Daylight Saving Time. Use the pull down
menus to select the starting and ending month and Sunday then click
upload to send the data to the CTG-2. The CTG-2’s internal clock will
then be advanced 1 hour at 2:00 AM of the Starting Sunday and
dropped back 1 hour at 2:00 AM of the Ending Sunday. (right)
Triggers: Clicking the “Triggers” button will open the “Set Up
Triggers” programming screen where you can enter/program the
parameters for Trigger Inputs 1 – 4 such as Which wave file to play,
Contact (N.O./N.C.), Trigger Mode (Alt Action/Activate Only), Play
Count (1-99 or Continuous), Volume setting, Type (Mom / Cont) and
Playback Mode (Interrupt/stack).
11
Push Button Programming
The push buttons on the front of the CTG-2 are limited to allow you to program only the following functions: Set time, Set
schedule, Force an Atomic Clock sync, Turn the unit ON (RUN) or OFF and exit and Run. See PC programming for all other
functions.
MODE switch: Press this to cycle through the following modes “RUN”, “SET TIME”, “SET SCHEDULE” and “FORCE TIME
SYNC”. LED’s above the display will light indicating which mode the unit is in.
+/- TIME switches: RUN Mode: Press the “-“ button to place the unit in the OFF mode. Press the “+” button to place the
unit in the RUN mode. Note: When the CTG-2 is in the OFF mode, programmed events will not be transmitted. Unit will
display “OFF”, the internal clock will continue to run and the 4 trigger inputs will remain functional.
SET TIME Mode: Use “+/-“ buttons to increment or decrement clock time.
SET SCHEDULE Mode: Use “+/-“ buttons to select a schedule or Calendar mode (CAL).
FORCE TIME SYNC Mode: Press the “+” button to initiate a “Forced Time Sync” to the Atomic Clock (ACTS). The internal
Modem in the unit will then seize the phone line, speed dial ACTS and down load the current time and date. This process
will take approximately 30 seconds in which time the unit will flash “Snc” on the clock display. Note: Unit must be connected
to a phone line or analog phone system station port for time sync.
To u c h To n e P r o g r a m m i n g
The CTG-2 has limited Touch Tone programming allowing you to call the unit remotely and program the following functions:
Turn unit ON or OFF, Select a Schedule or Calendar mode or Force a Time Sync.
Accessing the Programming Mode Remotely
Step 1. Call into the CTG-2 from a touch tone phone.
Step 2. The CTG-2 will automatically answer and provide 1 beep.
Step 3. Enter the 6-digit security code (factory set to 845464, see PC Programming section).
Step 4. A double beep will indicate that you have accessed the programming mode.
Step 5. You can now touch tone program the features listed below.
Note: Programming from a cell phone may not be suitable in areas with weak coverage.
Touch Tone programming commands:
Turn unit ON ------------------------ #1
Turn unit OFF ---------------------- #0
Force a Time Sync ---------------- #8
Select Schedule 1 – 14 ----------- 01 – 14 then enter #7
Select Calendar Mode ----------- 99 then enter #7
Confirmation beeps: 2 beeps will be heard indicating a correct entry. 3 beeps will be heard indicating an incorrect entry or
error. If 3 beeps are heard simply re-enter the command. The CTG-2 has a 20 second inter digit Touch Tone time out. If you
exceed 20 seconds between Touch Tone entry the unit will output 3 beeps and hang up. Note: Slow deliberate Touch Tone
entry is recommended.
Force a Time Sync: After entering “#8” two beeps will be heard, the unit will drop the line and then initiate a “Forced Time
Sync” to the Atomic Clock (ACTS). The internal Modem in the unit will seize the phone line, speed dial ACTS and down
load the current time and date. This process will take approximately 30 seconds in which time the unit will display “Pro” on
the clock display. If the CTG-2 was unable to sync with ACTS the display will rotate between flashing the clock time, “Snc”
and “Err”. The unit will then redial the call every 5 minutes until it has a successful sync or reaches a maximum call attempt
of 15. If the units was unable to sync after 15 attempts, the display will continue to rotate between flashing the clock time,
“Snc” and “Err”.
12
Operation
After all PC programming is completed, saved to the dat file and uploaded to the CTG-2 you can now exit programming and
place the unit in the “RUN” or “OFF” mode. To exit PC programming and place the unit in the RUN mode click on “RUN”
in the “Event Programming Screen”, select “Calendar Mode” (automatically switches schedules per Calendar programming)
or select which specific “Schedule” you would like the CTG-2 run. If you select a specific schedule the CTG-2 will only run
that schedule and will not change schedules until reprogrammed. The CTG-2 will now display the current time with a flashing colon and light the “RUN” LED. When placed in the “RUN” mode the CTG-2 is now ready to play and/or activate the
next scheduled event*.
To exit PC programming and place the unit in the OFF mode click on “Exit” in the “Event Programming Screen” then click
“NO”. This will close PC programming and place the CTG-2 in the OFF mode. The unit’s clock display will display “OFF”.
With the CTG-2 in the “OFF” mode the unit will not play or activate any programmed events. The 4 trigger inputs will remain
fully functional for emergency signaling, etc. The unit can be placed back into the “RUN” mode via Push Button programming, PC programming or Touch Tone programming.
*Note: Only one wave file event can be played per minute but the CTG-2 can change a schedule, play a wave file and activate the Aux relay at the same programmed time.
Product Support Line...715.386.8666
Fax Back Line...715.386.4345
Due to the dynamic nature of the product design, the information contained in this document is subject to change without notice. Viking Electronics, and its affiliates and/or subsidiaries assume no responsibility for errors and omissions contained in this information. Revisions of this document or new editions of it may be issued to incorporate such changes.
Fax Back Doc 463
Printed in the U.S.A.
ZF302960 Rev 2
13