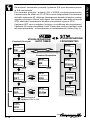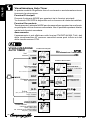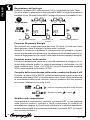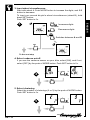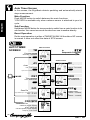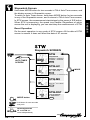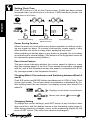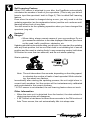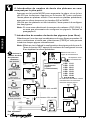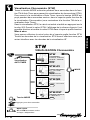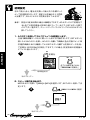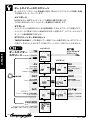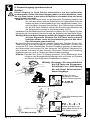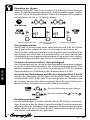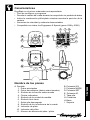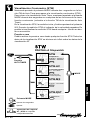
1
MANUALE D’USO
OPERATION MANUAL
MANUEL D'INSTRUCTIONS
操作マニュアル
BEDIENUNGSANLEITUNG
MANUAL DE USO
Per l’installazione dell’ErgoBrain sulla bicicletta fate riferimento
al manuale d’installazione.
Please refer to the Installation Manual for how to assemble the
system on the bicycle.
Pour l'installation d'ErgoBrain sur votre vélo, consulter le Manuel
d'Installation
自転車への取付けは取付マニュアルをご覧ください
Für die Installation des ErgoBrain am Fahrrad verweisen wir auf die Installationsanleitung.
Para instalar el Ergobrain en la bicicleta, tomar como referencia el Manual
de Instalación
Rev. 1.3-07/2000
Introduzione ---------------------------------------------------------- Pag. 2
Attenzione ------------------------------------------------------------ Pag. 2
Importante ------------------------------------------------------------ Pag. 2
Caratteristiche ------------------------------------------------------- Pag. 3
Nomi delle parti ----------------------------------------------------- Pag. 3
Formattazione/Inizializzazione ---------------------------------- Pag.4
Selezione dell’unità di misura della velocità ------------ Pag. 4
Inserimento della circonferenza della ruota anteriore Pag. 5
Selezione cadenza on/off ----------------------------------- Pag. 5
Selezione del numero di ingranaggi ---------------------- Pag. 5
Inserimento del numero di denti degli ingranaggi ----- Pag. 6
Inserimento del numero di denti dei pignoni ----------- Pag. 6
Sincronizzazione della deragliata ------------------------- Pag. 7
Funzioni principali -------------------------------------------------- Pag. 8
Display ----------------------------------------------------------- Pag. 8
Utilizzo dei pulsanti ------------------------------------------- Pag. 8
Visualizzazione Auto Timer ------------------------------- Pag. 10
Visualizzazione Stopwatch ------------------------------- Pag. 11
Regolazione dell’orologio --------------------------------- Pag. 12
Funzione risparmio energia ------------------------------ Pag. 12
Funzione sopra/sotto media ------------------------------ Pag. 12
Controllo Ø ruota e cambio tra ruota A e B ----------- Pag. 12
Funzione di auto apprendimento ------------------------ Pag. 13
Altre Informazioni ------------------------------------------- Pag. 13
Manutenzione ----------------------------------------------------- Pag. 14
Sostituzione della Batteria ------------------------------------- Pag. 14
Soluzione dei problemi ------------------------------------------ Pag. 14
Specifiche Tecniche ---------------------------------------------- Pag. 15
I-
1
ITALIANO
INDICE
ITALIANO
Introduzione
La ringraziamo per aver acquistato l’ErgoBrain Campagnolo, il più sofisticato computer per biciclette da corsa mai realizzato. L’integrazione tra il
computer e i comandi Ergopower fornisce delle funzioni assolutamente
nuove.
L’ErgoBrain è un vero computer da competizione, progettato per essere
usato nelle gare e durante gli allenamenti, pur rimanendo molto facile ed
intuitivo nell’utilizzo.
Questo manuale d’istruzioni spiega come usare l’ErgoBrain. Leggete attentamente i manuali d’uso e d’installazione e conservateli per le future
consultazioni.
ATTENZIONE
PERICOLO!
• Durante la marcia prestate sempre attenzione a ciò che vi circonda.
Non prestate eccessiva attenzione ai dati sul display. Mantenete la
vostra attenzione sulla strada, sul traffico, su eventuali ostacoli etc.
• Tenete tutte le batterie fuori dalla portata dei bambini. In caso di
ingerimento di una batteria contattate immediatamente un medico.
• Conservate questo apparecchio fuori dalla portata dei bambini.
• Indossate sempre il casco, capi di abbigliamento riflettenti o chiari,
e rispettate sempre i segnali stradali e il codice della strada.
Importante
• Periodicamente controllate la posizione e lo stato dei magneti e
dei sensori.
• Non esponete l’unità alla luce solare diretta per lunghi periodi di
tempo.
• Non smontate l’unità principale, i sensori o i trasduttori.
• Non utilizzate prodotti chimici o solventi per pulire l’unità principale e la basetta.
• Se i contatti sull’unità principale vengono messi in cortocircuito,
l’unità viene inizializzata (come succede premendo il pulsante AC).
• Evitate di toccare i contatti; ciò potrebbe creare una scarica
elettrostatica e generare una visualizzazione anomala dei dati.
• Non utilizzate getti d’acqua ad alta pressione per pulire i comandi Ergopower.
I-
2
L’ErgoBrain è il primo computer auto-apprendente:
• Facile da configurare e da programmare
• Permette cambi ruota in gara senza perdere i dati programmati
• Indica la combinazione pignone/ingranaggio oltre a mostrare la posizione della catena
• Sensori di velocità e cadenza staccabili
• Compatibile con tutti gli Ergopower 9 Speed di gamma 1999 e 2000
1
7
8
SET
E
D
AC
5
2
4
6
9
F
11
G
3
1
10
A
B
C
H
H
I
Nomi delle parti
A. Display
1. Dati principali
2. Dati secondari (dati selezionati)
3. Simbolo della funzione selezionata
4. Indicatore sopra/sotto media
5. Simbolo dell’unità di misura
6. Simbolo Auto timer
7. Segnale batteria scarica
8. Simbolo della circonferenza della ruota
9. Indicatore dell’ingranaggio in uso
10. Indicatore del pignone in uso
11. Numero di denti dell’ingranaggio / pignone
I-
3
B. Pulsante S/S
C. Pulsante MODE
D. Pulsante SET
E. Pulsante AC
F. Coperchio batteria
G. Contatti
H. Basetta
I. Staffa
ITALIANO
Caratteristiche
ITALIANO
Formattazione / Inizializzazione
L
Se usate l’ErgoBrain per la prima volta, o dopo aver
sostituito la batteria, dovrete formattare l’unità. Prima
di fare ciò, trovate la circonferenza della vostra ruota
anteriore.
Nota: Le formattazioni successive saranno semplificate. Premendo il pulsante AC rimarranno in memoria i dati precedenti di circonferenza
della ruota anteriore e le informazioni sugli ingranaggi e pignoni,
basterà quindi premere il pulsante SET per ogni passo della procedura di formattazione. Solo per la sincronizzazione dell’ingranaggio, dovrete premere il pulsante S/S.
1. Premete il pulsante AC.
Nota: Tenendo premuto il pulsante SET, premete e rilasciate il pulsante
AC. Sul display appaiono tutte le indicazioni per un secondo dopodiché
appare la schermata di selezione dell’unità di misura. Rilasciate il pulsante SET. Con questa operazione si cancellano tutti i dati e si inizializza
l’unità (la EEPROM ritorna ai suo stato iniziale). Effettuate questa operazione solo quando volete riportare a zero il contachilometri. Dopo
l’inizializzazione, tutti i dati precedenti come la circonferenza della ruota
anteriore e le informazioni su ingranaggi e pignoni vengono cancellati e
riportati allo stato iniziale.
AC
1
Formattazione
SET AC
inizializzazione della
EEPROM (Vedere la
"nota" sopra)
Tutte le scritte si accendono (1 sec.)
Passo successivo
2. Selezionate l’unità di misura della velocità.
Premete il pulsante MODE per passare da [KMH] a [MPH]. Premete il
pulsante SET per confermare.
2
Sposta tra [KMH] e [MPH].
MODE
SET
Passo successivo
I-
4
Iniziate con la ruota A. Premete il pulsante MODE per aumentare il
valore, e il pulsante S/S per diminuirlo.
Per inserire la circonferenza della seconda ruota anteriore (ruota B),
tenete premuto il pulsante SET.
Premete il pulsante SET per confermare.
3
Aumenta valore
MODE
Diminuisce valore
S/S
SET
2sec.
Sposta tra A e B
SET
Passo successivo
4. Selezionate cadenza on/off.
Se utilizzate il sensore di cadenza, selezionate [ON], altrimenti selezionate [OFF] premendo il pulsante MODE. Premete il pulsante SET per
confermare.
4
MODE
SET
5. Selezionate il numero di ingranaggi.
Selezionate il numero di ingranaggi (2 o 3) premendo il pulsante MODE.
Premete il pulsante SET per confermare.
5
MODE
SET
I-
5
ITALIANO
3. Inserite la circonferenza della ruota anteriore.
ITALIANO
6. Inserite il numero di denti degli ingranaggi iniziando da quello
più piccolo.
Premete il pulsante MODE per aumentare il valore, e il pulsante S/S
per diminuirlo. Premete il pulsante SET per confermare, lo schermo
passa all’ingranaggio successivo. Per tornare all’ingranaggio precedente,
premete i pulsanti S/S e MODE contemporaneamente.
Una volta completato l’inserimento degli ingranaggi, lo schermo passa
alla configurazione dei pignoni.
Nota: Se avete selezionato il sensore di cadenza (CDC [ON]), non è
necessaria la configurazione dei pignoni; passate al paragrafo 8.
7. Inserite il numero di denti dei pignoni (pacco pignoni).
Selezionate una delle sette combinazioni di pignoni proposte. Se la
vostra combinazione non è presente selezionate [FREE] e potrete inserire ogni pignone manualmente.
Nota: Effettuate prima la configurazione per i pignoni della ruota A,
tenete premuto il pulsante SET e procedete con la configurazione della ruota B ripetendo la procedura precedente.
6
7
Inserire
il numero di denti
degli ingranaggi
Selezionate tra 7 tipi
di combinazioni
Sposta tra le
combinazioni
Uso dei pulsanti
MODE
Ingranaggio interno
SET
F1
Inserire il numero
di denti dei pignoni
(pacco pignoni)
MODE
Aumenta il
numero di denti
SET
S/S
Diminuisce il
numero di denti
SET
COG
COG
COG
COG
COG
COG
COG
F R
11-21
11-23
12-21
12-23
13-23
13-26
13-28
E E
Selezionando FREE, inserite
manualmente il numero
di denti di ogni pignone.
Ingranaggio centrale
F2
SET
SET
Passa al rapporto
successivo
S/S
Se il sensore CDC è OFF
MODE
Torna al rapporto
precedente
Ingranaggio esterno
F3
Se il sensore CDC è ON
SET
Pignone più
piccolo R1
SET
SET
2sec.
SET
Cambia
Passo successivo
Pignone più grande R9
I-
6
Questa operazione deve essere effettuata mentre si guida la
bicicletta. Quindi per ridurre il rischio di incidenti, effettuate tale
operazione in un luogo ampio, senza ostacoli e non trafficato.
Nota: Se questa non è la prima regolazione e non avete cambiato gli
ingranaggi o regolato la tensione del cavo del deragliatore dall’ultima volta, potete saltare questa procedura. Per saltare la procedura premete il pulsante S/S. Così facendo le regolazioni sono
terminate e lo schermo ritorna alla modalità di misurazione.
Installate l’unità principale sulla bicicletta e iniziate la corsa. Portate il
deragliatore sull’ingranaggio più piccolo e il cambio sul quinto pignone.
Importante: durante questa procedura effettuate le cambiate con
l’Ergopower lentamente e in modo regolare. Il pulsante
S/S deve essere premuto quando la catena è passata
completamente sull’ingranaggio successivo.
Portate il deragliatore sul secondo ingranaggio. Premete il pulsante S/S.
Portate il deragliatore sull’ingranaggio più grande. Premete nuovamente
il pulsante S/S. Ripetete la sequenza precedente portando il deragliatore
dall’ingranaggio più grande al medio al piccolo. Una volta completata la
regolazione lo schermo visualizza la modalità di misurazione.
Nota: Se la scritta "Error" compare sul display, l’unità principale non è
fissata correttamente sulla basetta, o potrebbe esservi un problema al sensore del comando Ergopower.
Importante: Per effettuare le operazioni descritte in questa pagina, utilizzate esclusivamente il pulsante S/S presente sul comando
Ergopower.
8
Partite con
l'ingranaggio interno
e il quinto pignone.
F-1/R-5
Cambiate ingranaggio
S/S
Memorizzate ogni
cambio di ingranaggio
F2 - 3 - 2 - 1
S/S
Alla schermata di misurazione
I-
7
Continuate a cambiare
e premete il pulsante S/S
dopo ogni cambiata.
ITALIANO
8. Sincronizzazione della deragliata
Pericolo!
ITALIANO
Funzioni principali
Nella parte superiore del display ➊ è indicata la velocità istantanea. Nella
parte inferiore ➋ i dati selezionati. In basso a destra gli indicatori dei rapporti ➌➍ mostrano la posizione corrente della catena, e il numero dei
denti dell’ingranaggio e del pignone appaiono alternandosi ➎.
Quando si inizia/smette di pedalare la misurazione inizia/smette. Questa
funzione si chiama Auto Timer (AT) ed è illustrata nella parte sinistra dello
schema nella pagina seguente. Quando sullo schermo è mostrato l’Auto
Timer, il simbolo "ATS/S" si accende.
Indipendente dall’Auto Timer (AT), vi è la funzione Cronometro (STW), in
cui la misurazione inizia/finisce quando viene premuto il pulsante S/S (come
illustrato nella parte destra del disegno nella pagina seguente). Quando
sullo schermo è mostrato il Cronometro, il simbolo "STW" si accende.
Le schermate AT e STW hanno conteggi indipendenti. Mentre una è
visualizzata, il conteggio avviene contemporaneamente sull’altra nascosta.
L’ErgoBrain offre due modi di misurazione, l’Auto Timer con incrementi di
1 secondo e il Cronometro (STW) con incrementi di 0.1 secondo.
Display
1. Dati principali (velocità)
2. Dati secondari (dati selezionati)
3. Indicatore dell’ingranaggio
4. Indicatore del pignone
5. Numero denti del ingranaggio/pignone
6. Indicatore sopra/sotto media
6
1
3
2
5
4
Utilizzo dei pulsanti
L’ErgoBrain è dotato di due pulsanti grandi e due piccoli. I pulsanti presenti sui comandi Ergopower funzionano esattamente come i due pulsanti
grandi sui lati dell’unità principale.
Per spostarsi tra le funzioni, premere il pulsante MODE. Prestate attenzione alla differenza tra "premere" e "tenere premuto per 2 secondi" indicata
nell’illustrazione.
Pulsante MODE
AC
MODE
SET
Premere per due secondi
Premere
S/S
Avvio/arresto del
cronometro (STW)
MODE
S/S
Azzeramento
S/S
MODE
AT e STW si azzerano
in modo independente
I-
8
VISUALIZZAZIONE
AUTO TIMER
Funzioni Principali
VISUALIZZAZIONE
CRONOMETRO
SPD
SPD
Vel. Istantanea
Vel. Istantanea
TM
STW
RESET
Cronometro
Tempo Trascorso
RESET
Funzioni Secondarie
SPD
Vel. Istantanea
AV
Velocità Media
Vel. Istantanea
Vel. Istantanea
MX
STW/AV
Velocità Max
RESET
SPD
Vel. Istantanea
DST
Dist. Percorsa
SPD
SPD
Velocità Media
RESET
RESET
SPD
SPD
ODO
STW/MX
Vel. Istantanea
Contachilometri
Vel. Istantanea
Velocità Max
RESET
RESET
SPD
Vel. Istantanea
G.D.
Sviluppo Metrico
SPD
Vel. Istantanea
CLK
Orologio
Se il sensore di
cadenza CDC è ON
CDC
Cadenza
SPD
Vel. Istantanea
I-
9
SPD
Vel. Istantanea
STW/DST
Dist. Percorsa
RESET
ITALIANO
Per avviare il cronometro, premete il pulsante S/S e per arrestarlo premete S/S nuovamente.
Per azzerare premete i pulsanti S/S e MODE contemporaneamente.
L’azzeramento ha effetto su AT e STW in modo indipendente. Per azzerare i
dati delle schermate AT, effettuate l’azzeramento durante le funzioni contrassegnate col simbolo "Reset" nella figura. Per azzerare i dati delle schermate
STW, effettuate l’azzeramento durante una qualsiasi funzione STW.
Il pulsante SET serve a regolare l’orologio o a modificare altre impostazioni.
Il pulsante AC serve a formattare l’unità. Vi sono due modi per riportare l’unità
allo stato precedente - la formattazione e l’inizializzazione (Vedere Pag. 4).
ITALIANO
Visualizzazione Auto Timer
In questa modalità l’ErgoBrain rileva il movimento e avvia/arresta automaticamente la misurazione.
Funzioni Principali
Premete il pulsante MODE per spostarvi tra le funzioni principali.
*La funzione CDC/SPD è disponibile solo col sensore di cadenza installato.
Funzioni Secondarie
Tenete premuto il pulsante MODE per due secondi per spostarvi tra una funzione principale e la sua funzione secondaria. Non è possibile spostarsi direttamente tra le funzioni secondarie.
Azzeramento
L’azzeramento si può effettuare nelle funzioni TM/DST/AV/MX. Tutti i dati
della visualizzazione AT saranno cancellati senza però influire sui dati
della visualizzazione STW.
VISUALIZZAZIONE Funzioni Principali
AUTO TIMER
TM
Vel. Istantanea
Alla
visualizzazione Cronometro
00:00'00" - 99:59'59"
RESET
Funzioni Secondarie
AV
Velocità Media
0.0 - 110.7 km/h
RESET
MX
Velocità Max
0.0 (4.0) - 110.7 km/h
RESET
Fino a 291ore o 34359 km[miglia]
MODE
DST
Distanza Percorsa
0.00 - 9999.99 km
ODO
Contachilometri
0.0 - 00000.0 km
RESET
G.D.
Sviluppo Metrico
(Dist. percorsa con 1giro della pedivella)
0.64 - 14.99 m
CLK
Orologio
0:00'00" - 23:59'59"
o
1:00'00" - 12:59'59"
CDC/SPD
Cadenza/Vel. Istantanea
Cadenza (Scritta in alto)
0(20) - 299.0 rpm
Vel. Istantanea (Scritta in basso)
0.0(4.0) - 110.7 km/h
I-
10
Tenete premuto il pulsante MODE per due secondi nella funzione TM di
Auto Timer per passare alla visualizzazione cronometro (STW).
Per ritornare alla visualizzazione Auto Timer, tenete premuto il pulsante
MODE per due secondi in qualsiasi delle funzioni della visualizzazione
cronometro (tornerete alla funzione TM della visualizzazione Auto Timer).
Nella visualizzazione STW, la misurazione parte e si arresta premendo il
pulsante S/S. Durante la misurazione STW l’indicatore della velocità lampeggia. E’ possibile avviare/arrestare la misurazione STW in qualsiasi funzione vi troviate.
Azzeramento
Potete effettuare l’azzeramento da qualsiasi funzione STW. Tutti i dati della visualizzazione STW saranno cancellati senza però influire sui dati della visualizzazione AT.
VISUALIZZAZIONE Cronometro
STW
TM
Cronometro
Alla
Visualizzazione
AUTO TIMER
0:00'00"0 - 9:59'59"9
10:00'00" - 99:59'59"
RESET
STW-AV
Velocità Media
0.0 - 110.7 km/h
RESET
Fino a 291ore
o 34359 km[miglia].
STW-MX
Velocità Max.
0.0(4.0) - 110.7 km/h
RESET
STW-DST
Distanza Percorsa
0 - 9999.99 km
RESET
Pulsante MODE
MODE
Premere per due secondi
Premere
Azzeramento
S/S
I-
11
MODE
AT e STW si azzerano
in modo independente
MODE
ITALIANO
Visualizzazione Cronometro (STW)
ITALIANO
Regolazione dell’orologio
Premete il pulsante SET nella funzione CLK in visualizzazione Auto Timer.
Se avete scelto la misurazione della velocità in KMH l’orologio funzionerà in
modalità 24 ore. Se avete scelto MPH l’orologio funzionerà in modalità 12 ore.
S/S
Regolazione
+ MODE
–
S/S
–
+ MODE
TM
CLK
SET
SET
Per regolare l'orologio
Sposta da ore
a minuti
SET
Conferma la regolazione
Funzione Risparmio Energia
Se i pulsanti non vengono azionati per circa 15 minuti o l’unità non riceve
alcun segnale, essa si spegne e mostra solo l’orologio.
Quando si ricomincia a pedalare o viene premuto un pulsante, l’unità si
riporta alla normale visualizzazione (Ia pressione dei pulsanti presenti sui
comandi Ergopower non fa uscire l’unità dalla funzione risparmio energia).
Funzione sopra / sotto media
La freccia dell’andatura indica se la velocità istantanea è maggiore or inferiore della velocità media. La velocità istantanea è confrontata: con AV
nella modalità Auto Timer; con STW-AV (velocità media nella modalità
STW) nella modalità cronometro (STW).
Controllo della circonferenza della ruota e cambio tra Ruota A e B
Premete i pulsanti S/S e MODE contemporaneamente mentre è attiva la
funzione secondaria ODO in visualizzazione Auto Timer. Verrà visualizzata
la circonferenza della ruota corrente. Ulteriori pressioni dei due pulsanti
provocano l’alternanza tra ruota A e B.
ODO
Indica la circonferenza della ruota corrente
S/S
MODE
Sposta tra ruota
S/S
e ruota
MODE
3sec.
Modifica delle impostazioni
Per cambiare le impostazioni, premete il pulsante SET in una qualsiasi
delle funzioni tranne l’orologio e verrà visualizzata la modalità di
formattazione (pagina 4). Dopo avere effettuato le modifiche desiderate,
tornate alla modalità di misurazione premendo il pulsante SET. (L’orologio
non subisce variazioni.)
I-
12
Se il sensore di cadenza (CDC) è installato sulla vostra bicicletta,
l’ErgoBrain calcola automaticamente il numero di denti dei vostri pignoni
(Per questo motivo non è necessario inserire il numero di denti dei pignoni
a Pagina 6). Questa funzione è chiamata Auto-apprendimento.
Anche se si cambia la ruota durante una gara, sarà necessario effettuare
la sola operazione di aggiornamento (come spiegato sotto) e l’unità continuerà l’auto apprendimento senza la perdita di alcun dato.
L’operazione di aggiornamento dovrà essere effettuata anche in caso di
sostituzione dei pignoni.
Aggiornamento *
Pericolo !
Durante la marcia prestate sempre attenzione a ciò che vi
circonda. Non prestate eccessiva attenzione ai dati sul display.
Mantenete la vostra attenzione sulla strada, sul traffico ed
eventuali ostacoli, etc.
L’aggiornamento si effettua durante la marcia. L’aggiornamento può cominciare con la catena in qualsiasi posizione, ma assicuratevi che sia ben
salda, che non salti e che la guarnitura possa ruotare stabilmente. In qualsiasi modo di misurazione, tenete premuto il pulsante S/S per più di due
secondi e l’unità inizierà il l’aggiornamento.
Avvio dell’aggiornamento
2sec.
S/S
Aggiornamento
Nota: all’unità sono necessari circa cinque secondi, a seconda della
velocità con cui procedete, per calcolare il numero di denti di
ciascun pignone. Durante questo calcolo il simbolo della ruota
lampeggia.
Appena iniziato l’aggiornamento potrebbe essere visualizzato un numero
di denti del pignone errato, ma il sistema provvederà istantaneamente alla
ricalibrazione e al calcolo del numero corretto.
* Se il sensore di cadenza (CDC) non è installato, la funzione di auto
apprendimento non è disponibile.
Altre Informazioni
• Se l’unità principale viene tolta dalla basetta, i dati relativi agli ingranaggi/pignoni scompaiono.
• Se durante la funzione TM in visualizzazione Auto Timer si preme il
pulsante SET per circa tre secondi, l’unità si porta automaticamente in
modalità risparmio energia.
I-
13
ITALIANO
Funzione di Auto-apprendimento
ITALIANO
Manutenzione
Verificate periodicamente la posizione e lo stato dei sensori di velocità e
cadenza e dei magneti.
Se l’unità principale o la basetta sono sporche, pulitele con un detergente
neutro diluito usando un panno morbido e asciugatele immediatamente.
Non utilizzate benzene, alcool o altri solventi organici per non danneggiarne la superficie.
Sostituzione della batteria
Pericolo!
Tenete le pile fuori dalla portata dei bambini. In caso di
ingerimento rivolgetevi immediatamente un medico.
CR2032
Se il simbolo della batteria lampeggia, sostituitela con una nuova come illustrato qui a lato.
Utilizzate solo la batteria consigliata. Dopo la sostituzione effettuate
la procedura di formattazione indicata a pagina 4.
Soluzione dei problemi
Sintomi Controlli Rimedi
Lo schermo a cristalli liquidi è scuro e appaiono scritte strane.
E’ stato lasciato per lungo tempo alla luce diretta del sole?
Tenete l’unità all’ombra. I dati non vengono alterati.
Il display risponde lentamente.
La temperatura ambientale è troppo bassa (inferiore ai 0°C, 32°F)?
Ritorna alla normalità con l’aumentare della temperatura. I dati non vengono alterati.
Non appare alcuna scritta.
La batteria è esaurita?
Sostituitela con una nuova (CR2032). (Dopo la sostituzione, ricordatevi di premere il pulsante AC e di formattare l’unità)
Appaiono scritte incomprensibili.
Se le scritte incomprensibili persistono rimuovete e reinstallate la batteria e
formattate l'unità come spiegato a pagina 4.
La velocità (o la cadenza) non viene misurata.
Verificate che non vi sia qualche oggetto nella zona contatti.
Pulite i contatti.
Verificate la posizione dei sensori e dei magneti di velocità e cadenza.
Regolateli in modo corretto. (Fate riferimento al Manuale di Installazione)
Verificate se il cavo del sensore di velocità o cadenza è rotto.
Sostituite il sensore con uno nuovo.
Non vengono visualizzati correttamente la posizione della catena o il numero di denti.
Verificate che non vi sia qualche oggetto nella zona contatti.
Pulite i contatti.
I-
14
Specifiche Tecniche
Funzione
Velocità istantanea
Tempo trascorso
Velocità media
Velocità massima
Distanza percorsa
Distanza totale
Sviluppo metrico
Orologio
Simbolo
Campo / Precisione
0.0(4.0) - 110.7 km/h [mph] / ±0.5 km/h[mph]
TM
0:00’00” - 99:59’59” / 0.003%
AV
0.0 - 110.7 km/h [mph] / ±0.5 km [mph]
MX
0.0(4.0) - 110.7 km/h [mph] / ±0.5 km/h [mph]
DST
0.00 - 9999.99 km [miglia] / ±0.01 km [miglia]
ODO
0.0 - 99999.9 km [miglia] / ±0.1 km [miglia]
G.D.
0.64- 14.99 m [25 - 590 pollici] / ±0.01 m [1 pollice]
0:00’00” - 23:59’59”
[1:00’00” - 12:59’59”] / ±0.003%
Cadenza
0(20.0) - 299.0 rpm / ±1 rpm (sotto i 199rpm)
Cronometro
STW
0:00’00”0 - 99:59’59” / 0.003%
STW•Velocità media
STW-AV
0.0 - 110.7 km/h [mph] / ±0.5 km [mph]
STW•Velocità massima STW-MX
0.0(4.0) - 110.7 km/h [mph] / ±0.5 km [mph]
STW•Distanza percorsa STW-DST 0.00 - 9999.99 km [miglia] / ±0.01 km [miglia]
Funzioni aggiuntive Indicatore
Indica se la velocità istantanea è superiore o
sopra/sotto media inferiore alla velocità media
Calcola automaticamente il numero di denti dei
Auto
Apprendimento pignoni
Sistema di controllo
Microcomputer a 4-bit 1-chip, oscillatore di
controllo a cristalli
Tipo di display
Cristalli liquidi (LCD)
Sistema di rilevazione dei
Sensore magnetico No-contact
segnali di cadenza e velocità
Temperatura d’esercizio
0°C - 40°C [32°F - 104°F]
Temperatura tollerata
–20°C - 50°C [–4°F - 122°F]
Campo circonferenza della ruota
1600 - 2499 mm / Valore iniziale: 2096
Campo numero denti rapporti
Ingranaggi: 30 - 56
Pignoni: 11 - 31
Diametro montaggio a forcella
11Ø - 36Ø
Tipo Batteria
CR2032 x 1
Durata
Circa. 1,5 anni (utilizzo 1ora al giorno)
(La durata della prima batteria installata presso la fabbrica può risultare più breve.)
Dimensioni / Peso
54.0 x 47.5 x 20.7 / 36 g
* La forma e le specifiche sono soggette a modifiche senza previa notifica.
I-
15
ITALIANO
Avete cambiato i pignoni?
Se il sensore di cadenza è attivo, effettuate la procedura di aggiornamento illustrata a pagina 13.
Se il sensore di cadenza non è attivo, premete il pulsante SET e inserite nuovamente la combinazione dei pignoni o il numero dei denti (pagina 6).
Il tempo di cambiata del deragliatore non corrisponde alle indicazioni visualizzate.
Avete regolato il deragliatore o sostituito un ingranaggio?
Premete il pulsante SET e ripetete la sincronizzazione del deragliatore (pagina 7).
[Error] viene visualizzato quando si effettua la sincronizzazione del deragliatore.
Si è rotto uno dei fili dei sensori degli Ergopower?
Sostituite la basetta con una nuova.
INDEX
UK -
1
ENGLISH
Introduction ---------------------------------------------------------- Pag. 2
Warnings ------------------------------------------------------------- Pag. 2
Important ------------------------------------------------------------- Pag. 2
Features -------------------------------------------------------------- Pag. 3
Name of parts ------------------------------------------------------- Pag. 3
Format/Initialization
Select speed scale -------------------------------------------- Pag. 4
Input wheel circumference ---------------------------------- Pag. 4
Select cadence on/off ---------------------------------------- Pag. 5
Select chainring ----------------------------------------------- Pag. 5
Input chainring's number of teeth ------------------------- Pag. 6
Input sprocket's (cog set's) number of teeth ------------ Pag. 6
Set chainring's shift timing ---------------------------------- Pag. 7
Basic Operation
Displays ---------------------------------------------------------- Pag. 8
Button Operation ---------------------------------------------- Pag. 8
Auto Timer Screen ------------------------------------------ Pag. 10
Stopwatch Screen ------------------------------------------ Pag. 11
Setting Clock Time ------------------------------------------ Pag. 12
Power Saving Feature ------------------------------------- Pag. 12
Pace Arrow Feature ---------------------------------------- Pag. 12
Checking Wheel Circumference and Switching
between Wheel A and B ----------------------------------- Pag. 12
Self Learning Feature -------------------------------------- Pag. 13
Other Information ------------------------------------------- Pag. 13
Maintenance ------------------------------------------------------- Pag. 14
Replacing Battery ------------------------------------------------ Pag. 14
Trouble Shooting -------------------------------------------------- Pag. 14
Specifications ------------------------------------------------------ Pag. 15
ENGLISH
Introduction
Thank you very much for purchasing the Campagnolo ErgoBrain, the most
sophisticated road-racing bicycle computer ever made. The ErgoBrain offers some absolutely new functions thanks to the integration with the
Ergopower levers. The ErgoBrain is a real competition computer designed
for athletes' racing and training needs, but very easy and intuitive to use.
This instruction manual explains how to use the ErgoBrain. Please read
this manual completely, as well as the installation manual, and store these
manuals in a safe place for future reference.
Warnings
Danger !
• When riding, always remain aware of your surroundings. Do not
give excessive attention to the data displayed. Maintain your focus
on the road, traffic conditions, obstacles, etc.
• Keep all batteries out of the reach of children. In the event a battery
is swallowed, contact a doctor immediately.
• Keep this device out of the reach of children.
• Always wear a bicycle helmet, bright/reflective clothing, and obey
all traffic symbols, signs and laws when you ride.
Important
• Periodically check the positions and mounting conditions of the
magnet and the speed sensor.
• Do not expose the unit to direct sun light for extended periods of
time.
• Do not disassemble the main unit and sensors.
• Do not apply chemicals (thinner or benzene) to the unit.
• If the contacts on the main unit are shorted, the unit gets initialized (the same as when AC button is pressed).
• Avoid touching the contacts as it might cause static electricity,
resulting in irregular display.
• Do not use a high-pressure water pump when cleaning Ergopower
lever.
UK -
2
Features
1
7
8
SET
E
D
AC
5
2
4
6
9
F
11
G
3
1
10
A
B
C
H
H
I
Name of parts
A. Display
1. Main data
2. Sub data (selected data)
3. Selected function icon
4. Pace arrow
5. Scale unit icon
6. Auto timer icon
7. Low battery alarm
8. Wheel circumference icon
9. Chainring indicator
10. Sprocket indicator
11. Number of teeth of chainring/sprocket
UK -
3
B. S/S button
C. MODE button
D. SET button
E. AC button
F. Battery cover
G. Contacts
H. Bracket
I. Arm
ENGLISH
The ErgoBrain is the first self-learning computer:
• Very easy set-up and programming
• Allows wheel changes during a race without loss of any data
• Displays sprocket/chainring teeth combination beside showing the chain
position
• With detachable speed and cadence sensors
• Compatible with all 9 Speed Ergopowers (both 1999 and 2000 ranges)
ENGLISH
Format/Initialization
When you use the ErgoBrain for the first time, or afL
ter you have replaced the battery, you need to format
the unit. Before doing this, find out your front wheel's
circumference.
Note: From the second time, formatting can be simplified. A press of AC button will retain the former data such as the
wheel circumference and information on chainring/sprocket, so just
press SET button in each process of formatting. Only for the setting
of chainring shift timing, you need to press S/S button.
1. Press AC button.
Note: While holding down SET button, press and release AC button. All display
goes on for one second and then it changes to the scale selection screen.
Then release SET button. With this operation all the data are erased and the
unit is initialized (EEPROM returns to its default state). Perform this operation
only when you need to reset the odometer to zero. By initialization, all the
former data such as the wheel circumference and information on chainring/
sprocket is erased and returns to the default state.
AC
1
Format
SET AC
Initialization of
EEPROM
(See the “Note” above)
All displays illuminate (1 sec.)
To the next step
2. Select speed scale.
Push MODE button to switch between [KMH] and [MPH]. Push SET
button to decide.
2
Switch between [KMH] and [MPH].
MODE
SET
To the next step
UK -
4
3. Input wheel circumference.
Start with wheel A. Push MODE button to increase the digits, and S/S
button to decrease.
To input your second bicycle's wheel circumference (wheel B), hold
down SET button.
Push SET button to fix.
Increases digits
MODE
Decreases digits
S/S
SET
2sec.
Switches between A and B
SET
To the next step
4. Select cadence on/off.
If you use the cadence sensor on your bike, select [ON], and if not,
select [OFF] by the push of MODE button. Push SET button to fix.
4
MODE
SET
5. Select chainring.
Select the number of chainrings (2 or 3) by the push of MODE button.
Push SET button to fix.
5
MODE
SET
UK -
5
ENGLISH
3
6. Input chainring's number of teeth. Start with inner chainring.
ENGLISH
Push MODE button to increase the digits, and S/S button to decrease.
Push SET button to fix, then the screen moves to the next chainring.
To return to the former chainring, push S/S and MODE button simultaneously.
When chainring's setting is completed, the screen moves to the sprocket's setting.
Note: If you have selected CDC sensor [ON], the next sprocket setting
is not required; please move to process 8.
7. Input sprocket's (cog set's) number of teeth.
Select the number of teeth from the seven combinations of the cog set.
If your sprockets' combination is not included in these cog sets combination, select [FREE] and you can input all the sprockets manually.
Note: Sprocket setting should be done individually for wheel A and wheel
B. First, input wheel A's sprocket, and hold down SET button.
The screen moves to wheel B's sprocket setting. Repeat the same
procedure for wheel B.
6
7
Select from 7 types
of combinations
Input chainring's
number of teeth
Switch between
combinations
Button operation
MODE
Inner chainring
SET
F1
Input sprocket's
(cog set's)
number of teeth
MODE
Increases the
number of teeth
SET
S/S
Decreases the
number of teeth
SET
Middle chainring
F2
SET
COG 11-21
COG 11-23
COG 12-21
COG 12-23
COG 13-23
COG 13-26
COG 13-28
FREE
In case of FREE, input
the number of teeth
manually.
SET
Goes to next gear
S/S
If CDC sensor is OFF
MODE
Back to
previous gear
Outer chainring
F3
If CDC sensor is ON
SET
Top gear R1 SET
SET
2sec.
SET
Change
To the next step
Lowest gear R9
UK -
6
8. Set chainring's shift timing.
Danger!
Important:
8123 8 85.4977866.2831847.0685820.7853988
In this page, the operation of S/S button should be done with the lever’s
button.
Start with
the inner chainring
and the fifth sprocket.
F-1/R-5
Shift chainring
Memorize timing
at each shift
S/S
F2 - 3 - 2 - 1
S/S
To measuring screen
UK -
7
Continue shifting and
push S/S button
each time.
ENGLISH
This operation must be performed as you are riding the bicycle.
Therefore, in order to minimize the potential of an accident,
this operation must be performed in a wide, open space which
is free from traffic or other obstacles.
Note: If this is not a “first time” setting, and if you have not changed the
chainrings or adjusted the tension of the front derailleur cable
since last time, you can skip this procedure. To skip this, just
push S/S button. This completes all the setting and the screen
moves to measuring mode.
Install the main unit onto your bicycle and ride it.
First, shift into the inner chainring and the fifth sprocket.
Important: In this procedure, Ergopower shifting should be done
slowly and steadily. S/S button should be pushed when
the chain has securely shifted to the next chainring.
Shift from the inner chainring to the middle. Push S/S button. Shift from
the middle to the outer. Push S/S button again. Repeat this operation
with the shifting down from outer - middle - inner. When shift timing
setting is completed, the screen moves to the measuring screen.
Note: If "Error" display appears on the screen, the main unit is not installed firmly onto the bracket, or there may be a problem with
the sensor of the Ergopower lever.
ENGLISH
Basic Operation
The upper display ➊ shows Current Speed. The lower display ➋ shows
the selected data. In the lower right the gear indicators ➌➍ shows the
current chain positions, and the numbers of teeth of the chainring and
sprocket are shown alternately ➎.
The unit starts/stops measuring when pedaling starts/stops. This is called
Auto Timer (AT) as illustrated in the left part of the drawings in the next
page. When the screen is showing Auto Timer, "ATS/S" icon appears on
the screen.
Independently of Auto Timer (AT), there is Stopwatch (STW) function, which
starts/stops measurement when S/S button is pushed (as illustrated in the
right part of the drawing in the next page). When the screen is showing
Stopwatch, "STW" icon appears on the screen.
AT screen and STW screen is independently counted. When either is on
the screen, the other is simultaneously continuing in the hidden screen.
Thus the ErgoBrain C1 offers two types of measuring modes, Auto Timer
with 1-second increment and Stopwatch with 0.1-second increment.
Displays
1. Main data (speed)
2. Sub data (selected data)
3. Chainring indicator
4. Sprocket indicator
5. Number of teeth of chainring/sprocket
6. Pace arrow
Button Operation
The ErgoBrain has two large buttons and two small buttons. The buttons
of the Ergopower lever function exactly the same as the large buttons at
the side of the main unit.
To switch between each function, push MODE button. Note the difference
between "just push" and "hold down for two seconds" as in the illustration.
MODE button
AC
MODE
SET
Hold down for two seconds
Just push
S/S
MODE
Start/stop of
stopwatch
S/S
Reset operation
S/S
MODE
AT and STW are
reset independently
UK -
8
Main Function
AUTO TIMER
SCREEN
STOPWATCH
SCREEN
SPD
SPD
Current Speed
Current Speed
TM
STW
Timer
RESET
Stopwatch
RESET
Sub Function
SPD
Current Speed
AV
Average Speed
SPD
SPD
Current Speed
Current Speed
MX
STW/AV
Max. Speed
RESET
Average Speed
RESET
RESET
SPD
SPD
SPD
DST
ODO
STW/MX
Current Speed
Trip Distance
Current Speed
Total Distance
Current Speed
Max. Speed
RESET
RESET
SPD
Current Speed
G.D.
Gear Development
When CDC
sensor is on
CDC
Cadence
SPD
Current Speed
UK -
9
SPD
Current Speed
CLK
Clock Time
SPD
Current Speed
STW/DST
Trip Distance
RESET
ENGLISH
To start the stopwatch, push S/S button. To stop it, push the button again.
To reset the data, push S/S button and MODE button simultaneously. Reset operation affects AT and STW independently. To reset the data of AT
screen, do the reset operation while in the function that is marked with
"Reset" symbol in the illustration. To reset the data of STW screen, do the
reset operation in any function of the STW screen.
SET button is used to set the clock time or to change other settings.
AC button is used to format the unit. There are two types of returning the
unit to the former state - formatting and initialization (See page 4).
Auto Timer Screen
In this screen, the ErgoBrain detects pedaling and automatically starts/
stops measurement.
ENGLISH
Main Function
Push MODE button to switch between the main functions.
*CDC/SPD is available only when cadence sensor is attached to your bicycle.
Sub Function
Hold down MODE button for two seconds to switch from a main function to its
sub function. You cannot move sub function from one to another directly.
Reset Operation
Do the reset operation in either of TM/DST/AV/MX. All the data of AT screen
is erased. It does not affect the data of STW screen.
AUTO TIMER
SCREEN
Main Function
TM
Current Speed
to
Stopwatch SCREEN
00:00'00" - 99:59'59"
RESET
Sub Function
AV
Average Speed
0.0 - 110.7 km/h
RESET
MX
Max. Speed
0.0(4.0) - 110.7 km/h
RESET
Upto 291hr or 34359 km[mile]
MODE
DST
Trip Distance
0.00 - 9999.99 km
ODO
Total Distance
0.0 - 00000.0 km
RESET
G.D.
Gear Development
(Trip distance per 1 revolution of the crank)
0.64 - 14.99 m
CLK
Clock Time
0:00'00" - 23:59'59"
or
1:00'00" - 12:59'59"
CDC/SPD
Cadence/Current Speed
Cadence (Upper display)
0(20) - 299.0 rpm
Current Speed (Lower display)
0.0(4.0) - 110.7 km/h
UK -
10
Stopwatch Screen
Reset Operation
Do the reset operation in any mode of STW screen. All the data of STW
screen is erased. It does not affect the data of AT screen.
Stopwatch SCREEN
STW
TM
Stopwatch
to
AUTO TIMER
SCREEN
0:00'00"0 - 9:59'59"9
10:00'00" - 99:59'59"
RESET
STW-AV
Average Speed
0.0 - 110.7 km/h
RESET
Upto 291 hr, or 34359 km[mile].
STW-MX
Max. Speed
0.0(4.0) - 110.7 km/h
RESET
STW-DST
Trip Distance
0 - 9999.99 km
MODE button
MODE
Hold down for two seconds
Just push
Reset operation
S/S
UK -
MODE
11
AT and STW are
reset independently
RESET
MODE
ENGLISH
Hold down MODE button for two seconds in TM of Auto Timer screen, and
the display moves to Stopwatch screen.
To return to Auto Timer screen, hold down MODE button for two seconds
in any of the Stopwatch screen, and it returns to TM of Auto Timer screen.
In STW screen, the measurement starts/stops by the press of S/S button.
When STW is measuring, the speed icon flashes. Regardless of which
screen the unit is displaying, you can start/stop the measurement of STW.
Setting Clock Time
Push SET button in CLK of Auto Timer screen. If KMH has been chosen
for speed scale, the clock time is in 24-hour. If MPH has been chosen, the
clock time is in12-hour.
ENGLISH
S/S
Setting
+ MODE
–
S/S
–
+ MODE
TM
CLK
SET
SET
To clock time setting
SET
Moves from hour
digits to minute
Completes setting
Power Saving Feature
When the main unit is left without any button operation or without receiving any signal for about 15 minutes continuously, power supply is shut
down and the unit will be in sleep state, displaying only clock.
When pedaling is started again or any button is pressed, the unit wakes
up and returns to normal display. (The buttons of the Ergopower levers do
not release the power saving feature.)
Pace Arrow Feature
The pace arrow indicates whether the current speed is higher or lower
than the average speed. In the Auto Timer screen the speed is compared
with AV, and in the Stopwatch screen the speed is compared with STWAV (average speed in the Stopwatch function).
Checking Wheel Circumference and Switching between Wheel A
and B
Push S/S button and MODE button simultaneously in ODO of Auto Timer
screen (sub mode). The current wheel circumference is displayed. By further holding down the two buttons, the display moves from wheel A to
wheel B.
ODO
Displays current wheel circumference
S/S
MODE
Moves from wheel
S/S
to wheel
MODE
3sec.
Changing Setting
To change the current settings, push SET button in any functions other
than clock time, and the display returns to the formatting mode (page 4).
After doing necessary changes, return to the measuring display by the
press of SET button. (The clock time remains unchanged.)
UK -
12
Self Learning Feature
Updating *
Danger !
• When riding, always remain aware of your surroundings. Do not
give excessive attention to the data displayed. Maintain your focus
on the road, traffic conditions, obstacles, etc.
Updating should be done while riding your bicycle. You can start the updating
with any chain position, but be sure that chain is not skidding but in secure
position and the crank is rotating firmly. In any measuring modes, hold down
S/S button for more than two seconds, and the unit starts updating.
Starts updating
2sec.
S/S
Updating
Note: The unit takes about five seconds, depending on the riding speed,
to calculate the number of teeth of each sprocket. While calculating, the wheel icon flashes.
Immediately after starting the updating process, the unit might show incorrect teeth numbers, but the system will be instantaneously calibrated
and recalculated to the correct numbers.
* If CDC sensor is not attached, the self learning feature does not work.
Other Information
• When the main unit is detached from the bracket, the data related to
chainrings/sprockets will disappear.
• If SET button is held down for about three seconds in the TM function of
Auto Timer screen, the unit automatically falls into sleep state.
UK -
13
ENGLISH
When CDC sensor is attached to your bike, the ErgoBrain automatically
calculates the number of teeth of your sprockets. (This is why you did not
have to input the sprockets' teeth in Page 6.) This is called Self Learning
feature.
Even when the wheel is changed during a race, you only need to do the
updating operation (as the explanation below) and the unit continues selflearning without loss of any data.
You also need to do the updating operation when you have changed the
sprockets (cog set).
ENGLISH
Maintenance
Periodically check the position and condition of the speed sensor, cadence
sensor and the magnets.
When the main unit or the bracket is soiled, clean it with diluted neutral
detergent using a soft cloth, and then wipe it dry immediately.
Do not use benzene, alcohol or other organic solvent. It will damage the
surface.
Replacing Battery
Danger!
Keep all batteries out of the reach of children. In the event
a battery is swallowed, contact a doctor immediately.
CR2032
When the battery icon starts
flashing, replace it with a new
one, according to the illustration.
Use the recommended battery
only. After replacing, format the
unit again according to the instructions in page 6.
Troubleshooting
Trouble Check items
Remedy
The liquid crystal screen is dark and unusual display appears.
Was it left for a long time under direct sunlight?
It returns to normal by being left in the shade. It does not affect the data.
Display response is slow.
Was the ambient temperature too low (below 32°F, 0°C)?
It returns to normal when the temperature rises. It does not affect the data.
No display appears.
Has the battery worn out?
Replace it with a new one (CR2032). (After replacing the battery, be sure to press
AC button and format the unit again.)
Meaningless display appears.
If the meaningless display persists, remove and reinstall the battery then format
the unit according to the instructions in page 4.
Current speed (or cadence) cannot be measured.
Check if there is any object on the contacts’ area.
Clean the contacts.
Check the position of the speed/cadence sensor and the speed/cadence magnet.
Adjust them properly. (Refer to the installation manual.)
Check if the cable of the speed/cadence sensor is broken.
Replace the sensor set with a new one.
The screen does not show the correct chain position or the number of teeth.
Check if there is any object on the contacts’ area.
Clean the contacts.
UK -
14
Specifications
Display functions
Current speed
Timer
Average speed
Max. speed
Trip distance
Total distance
Gear deveropment
Clock time
Cadence
Stopwatch
STW•Average speed
STW•Max. speed
STW•Trip distance
Additional features
Icon
Range / Standard accuracy
0.0(4.0) - 110.7 km/h [mph] / ±0.5 km/h[mph]
TM
0:00’00” - 99:59’59” / 0.003%
AV
0.0 - 110.7 km/h [mph] / ±0.5 km [mph]
MX
0.0(4.0) - 110.7 km/h [mph] / ±0.5 km/h [mph]
DST
0.00 - 9999.99 km [mile] / ±0.01 km [mile]
ODO
0.0 - 99999.9 km [mile] / ±0.1 km [mile]
G.D.
0.64- 14.99 m [25 - 590 inch] / ±0.01 m [1 inch]
0:00’00” - 23:59’59”
[1:00’00” - 12:59’59”] / ±0.003%
0(20.0) - 299.0 rpm / ±1 rpm (under 199rpm)
STW
0:00’00”0 - 99:59’59” / 0.003%
STW-AV
0.0 - 110.7 km/h [mph] / ±0.5 km [mph]
STW-MX
0.0(4.0) - 110.7 km/h [mph] / ±0.5 km [mph]
STW-DST 0.00 - 9999.99 km [mile] / ±0.01 km [mile]
Pace arrow Indicates whether the speed is higher or lower
than average speed
Self learning Automatically calculates sprocket’s number of
teeth
4-bit one-chip microcomputer, crystal oscillator
Liquid crystal display
Control system
Display system
Speed/Cadence signal
detection system
Operating temperature range
Storage temperature range
Wheel circumference range
Gear number of teeth range
Noncontact magnetic sensor
0°C - 40°C [32°F - 104°F]
–20°C - 50°C [–4°F - 122°F]
1600 - 2499 mm / Initial value:2096
Chainring's: 30 - 56
Sprocket's (cog set's): 11 - 31
Applicable fork diameter
11Ø - 36Ø
Power supply
CR2032 x 1
Battery life
Approx. 1.5 years (When using 1 hour/day)
The life of the first factory-loaded battery may be shorter than this period.
Dimensions/Weight
54.0 x 47.5 x 20.7 / 36 grams [1.27 oz]
* Design and specifications are subject to change without notice.
UK -
15
ENGLISH
Have you changed the cog set?
If CDC sensor is on, do the updating operation according to the instructions in
page 13.
If CDC sensor is off, push SET button and input the sprocket’s combination or
number of teeth again (page 6).
The screen does not match with the shift timing of the front derailleur.
Have you adjusted front derailleur or replaced the chainring?
Push SET button and set the chainring’s shift timing again (page 7).
[Error] appears on the screen when setting the chainring’s shift timing.
Is the sensor wire of one of the ErgoPower lever broken?
Replace the bracket set with a new one.
INDEX
Ecran ------------------------------------------------------------ Page 8
Utilisation des touches -------------------------------------- Page 8
Visualisation Auto Timer ---------------------------------- Page 10
Visualisation Chronomètre ------------------------------- Page 11
Réglage de l’heure ----------------------------------------- Page 12
Fonction Economie de l’énergie ------------------------ Page 12
Fonction Flèche d’allure ---------------------------------- Page 12
Contrôle de la circonférence de la roue et
changement Roue A /Roue B --------------------------- Page 12
Fonction d’auto-apprentissage ------------------------- Page 13
Informations supplémentaires -------------------------- Page 13
Entretien ----------------------------------------------------------- Page 14
Remplacement de la pile -------------------------------------- Page 14
Problèmes d’utilisation ----------------------------------------- Page 14
Caractéristiques techniques ---------------------------------- Page 15
F
-1
FRANÇAIS
Introduction --------------------------------------------------------- Page 2
Attention ------------------------------------------------------------- Page 2
Important ------------------------------------------------------------ Page 2
Caractéristiques --------------------------------------------------- Page 3
Désignation des composants ----------------------------------- Page 3
Formatage/Initialisation
Sélection de l’unité de mesure de vitesse ------------- Page 4
Introduction de la circonférence de la roue avant ---- Page 5
Sélection de la cadence on/off ---------------------------- Page 5
Sélection du nombre de plateaux ------------------------ Page 5
Introduction du nombre de dents des plateaux ------- Page 6
Introduction du nombre de dents des pignons -------- Page 6
Réglage du temps de déraillage des plateaux -------- Page 7
Utilisation ------------------------------------------------------------ Page 8
Introduction
Nous vous remercions pour avoir porté votre choix sur l’ErgoBrain Campagnolo, le compteur de vélo de route le plus sophistiqué qui ait jamais
été réalisé. L’intégration entre le compteur et les poignées Ergopower permet d’obtenir des fonctions tout à fait innovatrices.
L’ErgoBrain est un véritable compteur de compétition, expressément dessiné pour les courses et les entraînements,et pour pouvoir être utilisé de
façon aisée et intuitive en toute circonstance.
Le présent mode d’emploi et d’installation explique comme se servir de
l’ErgoBrain. Lisez-le avec attention et conservez-le soigneusement pour
pouvoir le consulter à l’avenir.
FRANÇAIS
ATTENTION
DANGER!
• Quand vous êtes sur votre vélo, prétez toujours attention à ce qui
vous entoure. Ne regardez pas trop souvent les données de
l’écran. Portez votre attention sur la route, sur le trafic et sur tous
les obstacles.
• Tenez les piles hors de portée des enfants. En cas d’ingestion
d’une pile, contactez immédiatement un médecin.
• Conservez cet appareil hors de portée des enfants.
• Mettez toujours votre casque, des vêtements réfléchissants ou
de couleurs clairs, et respectez toujours la signalisation routière
ainsi que le code de la route.
Important
• Vérifiez périodiquement la position de montage ainsi que l’état
des aimants et des senseurs.
• Ne lassez pas trop longtemps l’appareil en plein soleil.
• Ne démontez pas l’unité principale ou les senseurs.
• N’ utilisez pas des produits chimiques ou solvants sur l’appareil.
• Si les contacts sont en court-circuit sur l’unité, cette dernière est
alors initialisée (comme ceci se passe lorsqu’on appuie sur le
bouton AC).
• Evitez de toucher les contacts, ça pourrait donner lieu à une décharge électrostatique et créer une visualisation anomale des
données.
• Ne utilisez jamais de jets d'eau ou de l'haute pression pour nettoyer les poignées Ergopower.
F
-2
Caractéristiques
L’ErgoBrain est le premier compteur capable d’auto-apprrentissage:
• Il est facile à configurer et à programmer
• Il permet de changer de roue pendant la compétition sans perdre des
données
• Il indique la combinaison entre pignon/plateauainsi que la position de
la chaîne.
• Ses senseurs de vitesse et de cadence sont détachables
• Il est compatible avec tous les Ergopowers 9 Speed (gamme 1999 et
2000)
1
7 8
SET
D
AC
5
2
4
6
9
F
11
G
3
1
10
A
B
C
H
H
I
Désignation des composants
A. Ecran
1. Affichage principal
2. Affichage secondaire (données sélectionnées)
3. Symbole de la fonction selectionnée
4. Symbole flèche allure
5. Symbole de l’unité de vitesse
6. Symbole auto timer
7. Signal pile à plat
8. Symbole de la circonférence de la roue
9. Indicateur du plateau utilisé
10. Indicateur du pignon utilisé
11. Nombre de dents du plateau/pignon
F
-3
B. Touche S/S
C. Touche MODE
D. Bouton SET
E. Bouton AC
F. Couvercle Pile
G. Contacts
H. Base
I. Support
FRANÇAIS
E
Formatage / Iniatialisation
Si vous utilisez l’ErgoBrain pour la première fois, ou
L
si vous venez de remplacer la pile, il sera nécessaire
de formater l’unité. Commencez tout d’abord par
mesurer la circonférence de la roue avant.
Note: Les formatages suivants seront plus simples. En
appuyant sur le bouton AC, les données précédentes concernant la
circonférence de la roue avant ainsi que les plateaux et les pignons
restent en mémoire. Il suffit donc d’appuyer sur le bouton SET à chaque étape de la procédure de formatage. Vous devrez appuyer sur la
touche S/S uniquement pour régler le temps de déraillage du plateau.
FRANÇAIS
1. Appuyez sur le bouton AC.
NB : En gardant poussé le bouton SET, poussez et rélachez le bouton
AC. Sur l'écran s'affichent toutes les indications pour une seconde,
ensuite il s'affiche l'écran de selection de l'unité de mésure. Relachez
le bouton SET. Avec cette opération on éfface toutes les données et on
initie l'unité (la EEPROM retourne à son état original). Effectuez cette
operation seulement quand vous voulez mettre le compteur à zéro. Après
l’initialisation, toutes les données précédentes comme la circonférence
de la roue avant et les informations concernant les plateaux et les pignons sont effacées et ramenées à leur état initial.
AC
1
Formattation
SET AC
Initialisation de
l'EEPROM
(Voir la "note" dessus)
Les inscriptions s'allument (1 sec.)
Pas successif
2. Selection de l’unité de mesure de la vitesse.
Appuyez sur la touche MODE pour passer de [KMH] à [MPH]. Appuyez
sur le bouton SET pour confirmer.
2
Déplace de [KMH] à [MPH].
MODE
SET
Pas successif
F
-4
3. Introduction de la circonférence de la roue avant.
Commencez par la roue A. Appuyez sur la touche MODE pour augmenter la valeur, et sur la touche S/S pour la diminuer.
Pour insérer la circonférence de la deuxième roue avant (roue B), tenez le bouton SET appuyé.
Appuyez sur le bouton SET pour confirmer.
3
Augmente la valeur
MODE
Diminue la valeur
S/S
SET
2sec.
SET
Pas successif
4. Sélection de lacadence on/off.
Si vous utilisez le senseur de cadence, sélectionnez [ON], sinon sélectionnez [OFF] en appuyant sur la touche MODE. Appuyez sur le bouton SET pour confirmer.
4
MODE
SET
5. Sélection du nombre de plateaux.
Sélectionnez le nombre de plateaux (2 ou 3) en appuyant sur la touche
MODE. Appuyez sur le bouton SET pour confirmer.
5
MODE
SET
F
-5
FRANÇAIS
Echange entre A et B
6. Introduction du nombre de dents des plateaux en commençant par le plus petit.
Appuyez sur la touche MODE pour augmenter la valeur, et sur la touche S/S per la diminuer. Appuyez sur le bouton SET pour confirmer:
l’écran passe au plateau suivant. Pour revenir au plateau précédente,
appuyez en même temps sur les touches S/S et MODE.
Une fois que les plateaux ont été introduits, l’écran passe à la configuration des pignons.
Note: Si vous avez sélectionné le senseur de cadence (CDC [ON]), il
ne sera pas nécessaire de configurer les pignons. Passez au
paragraphe 8.
7. Introduction du nombre de dents des pignons (roue libre).
FRANÇAIS
Sélectionnez l’une des sept combinaisons de roue libres proposées. Si
votre combinaison n’existe pas, sélectionnez [FREE] et vous pourrez
introduire chaque pignon manuellement.
Note: Effectuez tout d’abord la configuration des pignons de la roue A.
Tenez le bouton SET appuyé et continuez en configurant la roue
B en répétant la même procédure.
6
7
Insérez le
nombre de dents
des plateaux
Sélectionnez entre 7
7 type de combinaisons
Se déplacer entre
les combinaisons
Utilisation
des touches
MODE
Plateau petit
F1
Insérez le nombre
de dents des
pignon
(combinaisons)
SET
MODE
Augmente le
nombre de dents
SET
S/S
Diminue le
nombre de dents
SET
COG
COG
COG
COG
COG
COG
COG
F R
11-21
11-23
12-21
12-23
13-23
13-26
13-28
E E
En sélectionnant FREE, insérez
manuellement le nombre de
dents de chaque pignon.
Plateau Moyen
F2
SET
SET
Passe au plateau
successif
S/S
MODE
Retourne au
plateau précedent
Si le senseur CDC est OFF
Plateau grand
F3
SET
Si le senseur CDC est ON
Pignon petit
piccolo R1
SET
SET
2sec.
SET
Cambia
Pas successif
Pignon grand R9
F
-6
8. Réglage du temps de déraillage des plateaux.
Danger!
Important: Pour effectuer les operations décrites dans cette page, ne utilisez
que la touche S/S que vous trouvez sur la poignée Ergopower.
8
Débutez avec le petit
plateau et le ciquème
pignon.
F-1/R-5
Changez plateau
S/S
Memorisez chaque
déraillage de plateu
F2 - 3 - 2 - 1
S/S
A l'affichage de mesuration
F
-7
Poursuivez dans le
déraillement et appuyez sur
la touche S/S après chaque
déraillage.
FRANÇAIS
Cette opération doit être effectuée en roulant. Par conséquent,
effectuez cette opération dans un endroit sans obstacle et isolé
afin de réduire au maximum les risque d’accident.
Note: S’il ne s’agit pas du premier réglage et si vous n’avez pas remplacé vos plateaux ou modifié la tension du câble par rapport à la
dernière fois, vous pouvez sauter ce passage. Pour éviter cette
procédure, appuyez sur la touche S/S. De cette façon,les réglages sont terminés et l’écran visualise les mesures.
Installez l’unité principale sur le vélo et commencez à rouler. Mettez le dérailleur
avant sur le plateau plus petit et le dérailleur arrière sur le cinquième pignon.
Important: durant cette procédure effectuez lentement les déraillages
de façon lente et régulièreà l’aide de l’Ergopower.Vous devez appuyer sur la touche S/S lorsque la chaîne est totalement passée sur le plateau suivant.
Mettez le dérailleur avant sur le deuxième plateau. Appuyez la touche
S/S. Mettez le dérailleur sur le plateau plus grand. Appuyez de nouveau
sur la touche S/S. Répétez le tout en faisant passer le dérailleur du plateau le plus grand au plateau moyen et enfin au plateau le plus petit. Une
fois que le réglage est terminé, l’écran visualise les mesures.
Note: Si "Error" apparait sur l’écran, l’unité principale n’est pas correctement fixée à la base, ou il y a peut-être un problème au niveau du
senseur de la poignée Ergopower.
FRANÇAIS
Utilisation
La vitesse réele est affichée dans la partie supérieure de l’écran. La partie
inférieure ➋ indique les données sélectionnées. En bas, à droite, les indicateurs des pignons ➌➍ affichent la position actuelle de la chaîne Le
nombre de dents du plateau et le nombre de dents du pignon actuels apparaissent en s’alternant ➎.
Quand on commence ou on arrête de pédaler, le calcul commence ou
s’arrête. Cette fonction s’appelle Auto Timer (AT) et est expliquée dans la
partie gauche du schéma de la page suivante. Quand l’Auto Timer est
affiché sur l’écran, le symbole «AS/S» s’ allume.
Indépendante de l’Auto Timer (AT), la fonction Chronomètre (STW), commence et s’arrête dès qu’on appuie sur la touche S/S (comme il est possible de le voir dans la partie droite du dessin de la page suivante). Quand le
Chronomètre est affiché sur l’écran, le symbole "STW" s’allume.
Les fonctions AT e STW sont indépendantes. Le calcul qui se fait lorsque
l’une d’elles est affichée, se fait également pour l’autre qui reste cachée.
L’ErgoBrain offre deux types de calcul:par augmentations de 1 seconde avec
l’Auto Timer et par augmentations de 0.1 seconde avec le Chronomètre (STW).
Ecran
1. Affichage principal (vitesse)
2. Affichage secondaire (données
selectionnées)
3. Indicateur du plateau
4. Indicateur du pignon
5. Nombre de dents du plateau/pignon
6. Flèche de l’allure
6
1
3
2
5
4
Utitilisation des touches
L’ErgoBrain est équipé de quatre touches: deux petites et deux grandes.
Les touches situés sur les poignées Ergopower fonctionnent de la même
façon que les touches grandes placées sur l’unité principale.
Pour se déplacer d’une fonctions à l’autre, appuyer sur la touche MODE.
Faites bien la différence entre “appuyer” et “tenir enfoncé pendant 2 seTouche MODE
MODE
AC
SET
Appuyer pour deux secondes
Appuyer
S/S
MODE
Activer/arrêter le
chronometre (STW)
S/S
Mise à zéro
S/S
MODE
AT et STW se mettent a zéro
de façon indépendent
F
-8
condes ” comme il est montré sur le dessin.
Pour mettre le chronomètre en marche, appuyez sur la touche S/S. Pour
l’arrêter,appuyez de nouveau sur S/S.
Pour remettre à zéro, appuyer sur les touches S/S et MODE en même temps.
Le mise à zéro affecte les fonctions AT et STW de façon indépendante. Pour
remettre les données des affichages AT à zéro, effectuez le mise à zéro
durant les fonctions marqués par le symbole "Reset" sur le dessin. Pour
mettre les données des affichages STW à zéro, effectuez la mise à zéro
durant n’importe quelle fonction STW.
Le bouton SET sert à régler l’heure ou à modifier d’autres programmations.
Le bouton AC sert à formatter l’unité. Il existe deux façons de ramener l’unité
à l’état précédente: le formatage et l’initialisation (voir page 4).
VISUALISATION
CHRONOMETRE
SPD
SPD
Vitesse Réelle
Vitesse Réelle
TM
STW
RESET
Chronomètre
Temps Ecoulé
RESET
Fonctions Secondaires
SPD
Vitesse Réelle
AV
Vit. Moyenne
Vitesse Réelle
Vitesse Réelle
MX
STW/AV
Vit. Maximale
RESET
SPD
Vitesse Réelle
DST
Dist. Parcorue
SPD
SPD
Vit. Moyenne
RESET
RESET
SPD
SPD
ODO
STW/MX
Vitesse Réelle
Distance Totale
Vitesse Réelle
Vit. Maximale
RESET
RESET
SPD
Vitesse Réelle
G.D.
Dével. Mètrique
SPD
Vitesse Réelle
CLK
Heure
Si le senseur de
cadence CDC est ON
CDC
Cadence
SPD
Vitesse Réelle
F
-9
SPD
Vitesse Réelle
STW/DST
Dist. Parcorue
RESET
FRANÇAIS
VISUALISATION
AUTO TIMER
Fonctions Principales
Visualisation Auto Timer
Dans cette modalité, l’ErgoBrain relève les coups de pédale et active/arrête automatiquement le calcul.
Fonctions principales
Appuyez sur la touche MODE pour vous déplacer parmi les principales fonctions.
* La fonction CDC/SPD n’est disponible que si le senseur de cadence est installé.
Fonctions secondaires
Tenez la touche MODE enfocée pendant deux secondes afin de passer d’ une
fonction principale à sa fonction secondaire. Il n’est pas possible de se déplacer
directement parmi les fonctions secondaires.
FRANÇAIS
Mise à zéro
La mise à zéro peut être effectuée dans les fonctions TM/DST/AV/MX. Toutes les données de la visualisation AT seront effacées, sans pour autant
interférer avec les données de la visualisation STW.
VISUALISATION
AUTO TIMER
Fonctions Principales
TM
Vitesse Réelle
A la
visualisation Chronomètre
00:00'00" - 99:59'59"
RESET
Fonctions Secondaires
AV
Vitesse Moyenne
0.0 - 110.7 km/h
RESET
MX
Vitesse Maximale
0.0(4.0) - 110.7 km/h
RESET
Jusqu'à 291heures ou 34359 km[miles]
MODE
DST
Distance Parcorue
0.00 - 9999.99 km
ODO
Distance Totale
0.0 - 00000.0 km
RESET
G.D.
CLK
Développement Mètrique
Heure
(Dist. parcorue avec 1 tour de la manivelle)
0.64 - 14.99 m
0:00'00" - 23:59'59"
o
1:00'00" - 12:59'59"
CDC/SPD
Cadence/Vit. Réelle
Cadence (Affichée en haut)
0(20) - 299.0 rpm
Vitesse Réelle (Affichée en bas)
0.0(4.0) - 110.7 km/h
F
- 10
Visualisation Chronomètre (STW)
Tenez la touche MODE enfoncée pendant deux secondes dans la fonction TM d’ Auto Timer pour passer à la visualisation du chronomètre (STW).
Pour revenir à la visualisation d’Auto Timer, tenez le bouton MODE appuyé pendant deux secondes environ, dans n’importe quelle fonction de
la visualisation Chronomètre (vous reviendrez à la fonction TM de la visualisation Auto Timer).
Dans la visualisation STW, le calcul est activé et arrêté en appuyant sur la
touche S/S. Durant le calcul STW, l’affichage de la vitesse clignote. Il est
possible d’activer et arrêter le calcul STW dans n’importe quelle fonction.
Mise à zéro
VISUALISATION Chronomètre
STW
TM
Cronometro
A la
Visualisation
AUTO TIMER
0:00'00"0 - 9:59'59"9
10:00'00" - 99:59'59"
RESET
STW-AV
Vitesse Moyenne
0.0 - 110.7 km/h
RESET
Jusqu'à 291heures
ou 34359 km[miles].
STW-MX
Vitesse Maximale
0.0(4.0) - 110.7 km/h
RESET
STW-DST
Distance Parcorue
0 - 9999.99 km
Touche MODE
MODE
Appuyer pour deux secondes
Mise à zéro
S/S
F
- 11
MODE
AT et STW se mettent a zéro
de façon indépendent
RESET
MODE
FRANÇAIS
Vous pouvez effectuer le mise à zéro de n’importe quelle fonction STW.
Toutes les données de la visualisation STW seront effacées sans pour
autant interférer avec les données de la visualisation AT.
Réglage de l’heure
Appuyez sur le bouton SET dans la fonction CLK, en visualisation Auto Timer.
Si vous avez choisi le calcul de la vitesse en Km/h, l’heure sera en modalité
24 heures. Si vous avez choisi Mph, l’heure sera en modalité 12 heures.
S/S
Réglage
+ MODE
–
S/S
–
+ MODE
CLK
TM
FRANÇAIS
SET
SET
Pour régler l'heure
SET
Déplace entre
heures et minutes
Confirme le réglage
Fonction Economie d’énergie
Si les touches ne sont pas activées pendant 15 minutes environ ou l’unité
ne reçoit aucun signal, cette dernière s’eteigne et affiche l’heure. Quand
on recommence à pédaler ou quand on appuye sur une touche, l’unité
retourne à la visualisation normale (le fait d’appuyer sur les touches placées dans les poignées Ergopower ne fait pas sortir l’unité de la fonction
Economie d’énergie).
Fonction flèche d’allure
La flèche allure indique si la vitesse réellee est superieure ou inferieure à
la vitesse moyenne. La vitesse réelle est comparée avec: AV en modalité
Auto Timer; STW-AV (vitesse moyenne en modalité STW) en modalité
chronomètre (STW).
Contrôle de la circonférence de la roue et changement RoueA/Roue B.
Appuyez en même temps sur les touches S/S et MODE tant que la fonction secondaire ODO est active en visualisation Auto Timer. La circonférence de la roue actuelle sera visualisée. En appuyant encore sur les touches, la roue A et la roue B s’alternent.
ODO
Affiche la circonférence de la roue actuelle
S/S
MODE
Echange entre roua
S/S
et
MODE
3sec.
Modifications des programmations
Pour modifier les programmations, appuyez sur le bouton SET, dans n’importe quelle fonction à l’exception de la fonction heure: la modalité de
formatage (page 4) est visualisé. Dès que les modifications ont été faites,
retournez aux modalitées de calcul en appuyant sur la touche SET (l’heure
ne sera pas modifiée).
F
- 12
Fonction d’auto-apprentissage
Si le senseur de cadence (CDC) est installé sur votre vélo, l’ErgoBrain
calcule automatiquement le nombre de dents de vos pignons (voilà pourquoi il n’est pas nécessaire d’introduire le nombre de dents à la page 6)
Cette fonction est appellée «Auto-apprentissage».
Même si vous changez de roue durant une course, il vous suffira d’ effectuer une simple opération de mise à jour (comme il est expliqué ci-dessous) et l’unité continuera l’auto-apprentissage sans perdre de données.
L’opération de mise à jour devra être effectuée même en cas de remplacement des pignons.
Départ Mise à jour
2sec.
S/S
Mise à jour
Note: l’unité a besoin d’environ cinq secondes, selon votre allure, afin
de calculer le nombre de dents de chaque pignon. Durant ce
calcul le symbole de la roue clignote.
Quand la mise à jour a commencé, il se peut qu’un faux nombre de dents
soit visualisé, mais le système s’occupe aussitôt du refaire le calcul et de
donner le nombre correct.
* Si le senseur de cadence (CDC) n’est pas installé, la fonction d’auto
apprentissage n’est pas disponible.
Informations supplémentaires
• Si l’unité principale est enlevée de la base, les données concernant les
plateaux et les pignons disparaissent.
• Durant la fonction TM en visualisation Auto Timer, si l’on appuie sur le
bouton SET pendant trois secondes environ, l’unité se met automatiquement en fonction Economie d’energie.
F
- 13
FRANÇAIS
Mise à jour *
Danger !
Quand vous êtes sur votre vélo, prêtez toujours attention à
tout ce qui vous entourne. Ne regardez pas tropsouvent les
données de l’écran. Portez votre attention sur la route, sur le
trafic et sur tous les obsatcle.
La mise à jour s’effectue lorsqu’on est sur le vélo. La mise à jour est possible quelle que soit la position de la chaîne. Assurez vous toutefois qu’elle
ne bouge pas et que le plateau puisse tourner librement. Quel que soit le
type de calcul, tenez la touche S/S enfoncé pendant plus de deux secondes: l’unité commence sa mise à jour.
Entretien
Vérifiez périodiquement la position et l’état des senseurs de vitesse, de
cadence et des aimants.
Si l’unité principale ou la base sont sales, nettoyez-les avec un linge doux et
un détergent neutre dilué et essuyez-les immédiatement.
N’ utilisez jamais de dissolvant, d’alcool ou d’essence afin de ne pas endommager la surface de l’appareil.
Remplacement de la pile
FRANÇAIS
Danger!
Tenez les piles hors de portée des enfants. En cas d’ingestion, adressez-vous immédiatement à un médecin.
CR2032
Si le symbole de la pile clignote,
remplacez-la par une neuve comme
le dessin ci-contre le montre.
N’utilisez que la pile recommandée. Après son remplacement,
effectuez la procédure de formatage expliquée à la page 4.
Problemes d’utilisation
Symptômes
Contrôles
Solutions
L’écran est sombre et des inscriptions bizarres apparaissent.
Avez-vous laissé l’appareil longtemps en plein soleil?
Mettez l’unité à l’ombre. Les données seront modifiées.
L’afficheur réagit trop lentement.
Est-ce que la température ambiante est au-dessous de 0°C/ 32°F?
L’afficheur redevient normal dès que la température remonte. Les données ne
seront nullement modifiées.
Rien n’apparait.
Est-ce que la pile est à plat?
Remplacez-la (CR2032). Après son remplacement, rappelez-vous d’appuyer sur
le bouton AC et de formatter l’unité.
Des inscriptions incompréhensibles apparaissent.
Si les affiches incomprensible persistent enlevez et réinstallez la batterie et
formattez l'unité comme expliqué à page 4.
La vitesse (ou la cadence) n’est pas relevée.
Vérifiez qu’il n’y ait pas d’objet dans les zones à contacts.
Nettoyez les contacts.
Vérifiez la position des senseurs et des aimants de vitesse et de cadence.
Réglez-les de façon correcte (voir mode d’emploi).
Vérifiez que le câble du senseur de vitesse ou cadence ne soit pas cassé.
Remplacer le senseur par un autre.
La position de la chaîne ou le nombre de dents ne sont pas visualisés de façon correcte.
Vérifiez à qu’il n’y ait pas d’objet dans les zones à contacts.
Nettoyez les contacts.
F
- 14
Avez-vous remplacez les pignons?
Si le senseur de cadence est en marche, effectuez la procédure de mise à jour
comme il est expliqué à la page 13.
Si le senseur de cadence n’est pas en marche, appuyez sur le bouton SET et
introduisez à nouveau la combinaison des pignons ou le nombre de dents (page 6).
Le temps de déraillage du dérailleur ne correspond pas aux indications affichés.
Avez-vous réglé le dérailleur ou remplacé le plateau?
Appuyez sur le bouton SET et recommencez le réglage du temps de déraillage
(page 7).
[Error] est visualisé quand on régle le temps de déraillage.
Est-ce-qu’ un des câbles des senseurs Ergopower est cassé?
Remplacez la base.
Caractéristiques techniques
Symbole Plage/ Précision
0.0(4.0) - 110.7 km/h [mph] / ±0.5 km/h[mph]
TM
0:00’00” - 99:59’59” / 0.003%
AV
0.0 - 110.7 km/h [mph] / ±0.5 km [mph]
MX
0.0(4.0) - 110.7 km/h [mph] / ±0.5 km/h [mph]
DST
0.00 - 9999.99 km [mille] / ±0.01 km [mille]
ODO
0.0 - 99999.9 km [mille] / ±0.1 km [mille]
G.D.
0.64-14.99 m [25-590 pouces] / ±0.01m [1 pouce]
0:00’00” - 23:59’59”
[1:00’00” - 12:59’59”] / ±0.003%
Cadence
0(20.0)-299.0rpm/±1rpm (au dessous de 199tr/min)
Chronomètre
STW
0:00’00”0 - 99:59’59” / 0.003%
STW•Vitesse moyenne STW-AV
0.0 - 110.7 km/h [mph] / ±0.5 km [mph]
STW•Vitesse maximale STW-MX
0.0(4.0) - 110.7 km/h [mph] / ±0.5 km [mph]
STW•Distance parcorue STW-DST 0.00 - 9999.99 km [mille] / ±0.01 km [mille]
Fonctions supplémentaires
Indique si la vitesse réelle est supérieure ou
Flèche d’allure
inférieure à la vitesse moyenne.
Auto-apprentissage Calcule automatiquement le nombre de dents
des pignons.
Système de contrôle
Micro ordinateur de 4-bit 1-chip, oscillateur de
contrôle à cristaux
Ecran
Cristaux liquides (LCD)
Système de relevé des contacts
Senseur magnétique «No-contact»
signaux de cadence et vitesse
Température de fonctionnement
0°C - 40°C [32°F - 104°F]
Température tolérée
–20°C - 50°C [–4°F - 122°F]
Plage de circonférence de la roue
1600 - 2499 mm / Valeur de départ: 2096
Plage nombre dents
Plateaux: 30 - 56
développement
Pignons: 11 - 31
Diamètre montage sur la fourche
11Ø - 36Ø
Tipe de pile
CR2032 x 1
Durée
Environ 1 an et demi (utilisation 1 heure par jour)
La durée de vie de la première pile qui est installée en usine peut résulter être plus courte.
Dimensions/Poids
54.0 x 47.5 x 20.7 / 36 grammes [1.27 oz]
* La forme et les caractéristiques peuvent subir des modifications sans avis préalable.
F
- 15
FRANÇAIS
Fonction
Vitesse réelle
Temps écoulé
Vitesse moyenne
Vitesse maximale
Distance parcorue
Distance totale
Développement m.
Heure
目
次
J
-1
JAPANESE
はじめに --------------------------------------------------------------- Pag. 2
ご使用上の注意 ---------------------------------------------------- Pag. 2
エルゴブレインの特徴 --------------------------------------------- Pag. 3
各部の名称 ---------------------------------------------------------- Pag. 3
初期設定
スピード単位の選択 ---------------------------------------- Pag. 4
タイヤ外周長の設定と周長A/Bの選択 ------------------ Pag. 4
ケイデンスセンサー有無の選択 -------------------------- Pag. 5
チェーンリング段数の選択 -------------------------------- Pag. 5
チェーンリングの設定 -------------------------------------- Pag. 6
スプロケットの設定 ------------------------------------------ Pag. 6
チェーンリングシフトタイミングの設定 ------------------- Pag. 7
基本操作
計測画面 ------------------------------------------------------ Pag. 8
ボタン操作 --------------------------------------------------- Pag. 8
オートタイマースクリーン --------------------------------- Pag. 10
ストップウォッチスクリーン ------------------------------- Pag. 11
時計の設定 ------------------------------------------------- Pag. 12
節電機能 ---------------------------------------------------- Pag. 12
ペースアロー ----------------------------------------------- Pag. 12
タイヤ周長値の表示・周長A/Bの切替え -------------- Pag. 12
設定の変更 ------------------------------------------------- Pag. 12
セルフラーニング(自己学習)
機能 --------------------- Pag. 13
その他の情報 ---------------------------------------------- Pag. 13
メンテナンス ------------------------------------------------------- Pag. 14
電池の交換 -------------------------------------------------------- Pag. 14
トラブルシューティング ------------------------------------------ Pag. 14
仕様 ----------------------------------------------------------------- Pag. 15
はじめに
このたびはCampagnoloエルゴブレインをお買上いただき誠にありがとうござい
ます。
エルゴブレインは非常に洗練されたロードレース用コンピュータです。
エル
ゴパワーレバーとの組み合わせで、斬新な機能が加わっています。
アスリートの
レースやトレーニング用に作られた真の競技用コンピュータで、使い方は非常に
簡単です。
この説明書はエルゴブレインの操作について記載しています。
別冊の取付説明書を合わせて最後までよくお読みいただき、
よくご理解いただ
いたうえで大切にお取扱ください。
なおこれらの説明書は保証書とともにいつで
も見ることのできるところに大切に保管してください。
ご使用上の注意
警告
・走行中は画面の表示に気を取られないで、安全走行を心掛けてください。道
JAPANESE
路、交通事情、障害物などに常に注意してください。
・電池交換により取り出した電池は、幼児の手の届かないところに置き、正しく
処理してください。万一飲み込んだときは、すぐに医師と相談してください。
・子供の手の届くところに置かないでください。
・走行中はいつも自転車用のヘルメットを装着し、反射性のウエアーを身に付
け、交通標識、表示、交通ルールを守ってください。
重要
・マグネットとセンサーとの位置関係と取付状態を定期的に点検してください。
・炎天下の放置は避けてください。
・メインユニット・各センサーは分解しないでください。
・シンナーやベンジンを使ってのお手入れはしないでください。
・メインユニットの接点をショートさせるとACボタンを押したときと同じ状態と
なって初期化しますので注意してください。
・まれに静電気のため異常表示になることがあります。接点を不必要に触ると静
電気発生の原因にもなりますのでお避けください。
・高圧ウォーターポンプを使用して、
エルゴパワーレバーを掃除しないでくださ
い。
J
-2
エルゴブレインの特徴
セルフラーニング
(自動学習)
コンピュータです。
・セットアップとプログラムが簡単にできます。
・レース中にタイヤ変更を行ってもデータロスがほとんどありません。
チェーンポジションの表示に加え、
スプロケットとチェーンリングの組合せを表示します。
スピード・ケイデンスセンサーが個別に着脱できます。
9 SpeedErgopowerの全機種と組合せて使用できます。
(99/2000バージョンに対応)
1
7
8
SET
E
D
AC
5
2
6
9
F
11
G
3
1
10
JAPANESE
A
B
C
H
H
I
各部の名称
A ディスプレー
1 メインデータ
2 サブデータ
(選択データ)
3 モードアイコン
4 ペースアロー
5 表示単位
6 オートタイマーアイコン
7 バッテリーアラーム
8 タイヤ周長アイコン
9 チェーンリングインジケーター
10 スプロケットインジケーター
11 ギア歯数
J
-3
4
B
C
D
E
F
G
H
I
S/Sボタン
MODEボタン
SETボタン
ACボタン
電池ブタ
接点
ブラケット
アーム
初期設定
初めて使うときと、電池を交換した後は次の手順にした
L
がって初期設定を行います。設定には前輪のタイヤ周長
が必要です。
あらかじめタイヤ周長を求めておきます。
参考: 設定が2度目以降の場合は簡略化できます。ACボタンだけで初期化す
ると全ての設定項目が前回の値になっているので、SETボタンを押す
だけで次へ進めます。
チェーンリングシフトタイミングのみS/Sボタンを
押してください。
1. ACボタンを押してエルゴブレインを初期化します。
注意:積算距離データを0に戻したいときは次の操作をします。SETボタンを
押しながらACボタンを押し、ACボタンを離して画面が全点灯後スピード単
位選択画面なるのを確認してからSETボタンを離すと前回のデータを消し
て初期化(EEPROMの初期化)
できます。
この場合、設定項目の初期値は
JAPANESE
デフォルト値となります。
AC
1
初期化
SET AC
全ての内容を消すときは
「EEPROMの初期化」
1秒間全点灯
次のステップへ
2. スピード単位を決めます。
MODEボタンを押して[KMH]か[MPH]を選択します。SETボタンを押して決
定します。
2
KMH または MPH を選択
MODE
SET
次のステップへ
J
-4
3. タイヤ周長をプリセットします。
求めていた前輪のタイヤ周長を入力します。
まず周長Aから入力します。
MODEボタンは数値をプラスします。
S/Sボタンは数値をマイナスします。
2つ目の周長をプリセットするときはSETボタンを長押しすると周長Bに変わ
り、同様に入力できます。
SETボタンを押すと決定します。
3
数値をプラス
MODE
数値をマイナス
S/S
SET
2sec.
AとBの切替え
SET
4. ケイデンスセンサーを選択します。
ケイデンスセンサーを装着したときは[ON]を、装着していないときは[OFF]を
MODEボタンで選択します。
SETボタンで決定します。
4
MODE
SET
5. チェーンリングの枚数を選択します。
MODEボタンで2枚か3枚かを選択します。
SETボタンで決定します。
5
MODE
SET
J
-5
JAPANESE
次のステップへ
6. チェーンリングの歯数を入力します。内側のリングから始めます。
MODEボタンは数値をプラスします。
S/Sボタンは数値をマイナスします。
SETボタンを押すと決定し、次のギアの入力に移動します。
S/SボタンとMODEボタンを同時に押すと1つ前のギアに戻ります。
チェーンリングの設定が終わるとスプロケットへ移ります。
参考: CDCセンサーを[ON]にしたときはスプロケットの設定は不要になり
スキップされます。8.へ進みます。
7. スプロケット(コグセット)の歯数を入力します。
スプロケットの入力は7種類のコグセットから選択します。
コグセットに含まれ
ない場合はFREEを選択すると全ギアを手入力できます。
注意: スプロケットはタイヤ周長AとBで個別に設定する必要があります。
片方の周長でコグセットを選択してから、SETボタンを長押しして周長を切
替え、もう一方の周長でもコグセットを選択してください。
JAPANESE
6
7
チェーンリング
の設定
チェーンリング
・スプロケット
共通ボタン操作
7種のコグセットまたは
FREEから選択
コグセット
の切替え
MODE
チェーンリング
1枚目
SET
スプロケット
の設定
MODE
数値をプラス
SET
S/S
数値をマイナス
チェーンリング
2枚目
SET
SET
COG
COG
COG
COG
COG
COG
COG
F R
11-21
11-23
12-21
12-23
13-23
13-26
13-28
E E
FREE選択の場合は
一枚づつ入力
SET
次のギアへ
CDCセンサー[OFF]
を選択したとき
S/S
MODE
前のギアへ戻る
チェーンリング
3枚目
CDCセンサー[ON]
を選択したとき
SET
スプロケット1
SET
SET
2秒間
SET
タイヤ周長
切替え
次のステップへ
スプロケット9
J
-6
警告
この操作は自転車に乗りながら行ってください。事故がおこる
のを防ぐため、この操作は交通量の少ない、障害物の無い、広
い場所で行ってください。
8. チェーンリングシフトタイミングの設定を行います。
参考: 設定が2回目以降の場合で、
チェーンリングの交換や、
ディレーラー・
ワイヤーの調整をしていないときはこの設定はスキップできます。
この設定をスキップするにはシフト操作を行わずにS/Sボタンを押し
てください。初期設定が完了し、計測画面へ移動します。
エルゴブレイン本体を自転車に装着して自転車を走らせます。
チェーンリングを1枚目
(内側)
、
スプロケットを5枚目に入れてからタイミング
の設定を行います。
重要: シフト位置を計りますのでエルゴパワーのレバー操作はゆっくりと
確実に行ってください。S/Sボタンはディレーラーが切替った時点
で操作します。
チェーンリングを1枚目から2枚目にシフトしてからS/Sボタンを押します。同様
に順次→3枚→2枚→1枚目とエルゴレバーとS/Sボタン操作を繰り返します。
ていないかエルゴパワーレバーのセンサーに問題があります。
重要: ここからのS/Sボタン操作はエルゴ
パワーレバーのボタンで行ってく
ださい。
8
初めのチェーンポジションを
スプロケットを5枚目
(固定)
チェーンリング1枚目で設定開始
F-1/R-5
チェーンリングシフト操作
S/S
タイミングの記憶
F2 - 3 - 2 - 1
順次2-3-2-1枚目と
チェーンリングのシフト
S/Sボタン操作を繰返す
計測画面へ
J
-7
S/S
JAPANESE
タイミングの設定が完了すると計測画面の走行時間TMに変わります。
注意:「Error」
が表示されるときは本体がしっかりとブラケットに装着され
基本操作(計測画面)
このエルゴブレインC1は画面の上段にメインデータとしてスピード1を、下段に
サブデータの選択データ2を表示します。画面右下にはギアインジケータで現
在のチェーンポジションを表示34し、
チェーンリングとスプロケットのギア歯数
を交互に表示5します。走行中はペースアロー6で平均速度と現在スピードの
比較を矢印で表示します。
自転車が走りだすと自動的にタイマーがカウントを始め計測を開始し、止まると
計測をストップします。
これをオートタイマー
(AT)
スクリーンとよび次のページの
図の左側のデータを計測・表示します。
オートタイマー
(AT)
スクリーンを表示し
アイコンが点灯します。
ているときは
これとは別にS/Sボタンの操作でストップウォッチ(STW)の計測をオンオフできる
ストップウォッチ
(STW)
スクリーンがあります。STWのカウントと共に図の右側の
データが計測できます。STWスクリーンを表示中はSTWアイコンが点灯します。
それぞれのスクリーンは表示していなくても計測は行われます。
このようにエルゴブレインC1には1秒まで計れる自動タイマーと、1/10まで計測
できるストップウォッチの独立した2つのタイマーがあることになります。
JAPANESE
計測データ
1. メインデータ
(主にスピード)
2. サブデータ
(選択データ)
6
1
3. チェーンリングインジケーター
2
4. スプロケットインジケーター
3
5
5. ギア歯数表示
6. ペースアロー
4
ボタン操作
エルゴブレイン本体には大きなボタンが2つ、小さいボタンが2つあります。大き
な2つのボタンはエルゴパワーレバーのボタンと全く同じ働きをします。
各計測データを見るにはMODEボタンを押して表示を切替えます。MODEボタ
ンを押すと図の矢印のように進みますが、普通に押すか長押し
(2秒間)
するか
で進み方が違います。
MODEボタン
AC
MODE
SET
2秒間押し続ける
普通に押す
S/S
ストップウォッチの
スタートストップ
MODE
S/S
リセット操作
S/S
MODE
[ATスクリーン]と[STWスクリーン]
は個別にリセット
J
-8
ストップウォッチ
(STW)
を作動させるにはS/Sボタンを押します。
もう一度押すと
STWは停止します。
計測データをリセットするにはS/SボタンとMODEボタンを同時に押します。
リセット操作はATスクリーンとSTWスクリーンは別々に行います。
ATスクリーン
は図の
「リセットマーク」
のある表示でリセット操作を行うとリセットされます。
STW
スクリーンの各データはSTWスクリーンを表示して操作を行うとリセットされます。
SETボタンは時刻を設定したり設定内容を変更するときに押します。
ACボタンはエルゴブレインを初期化するボタンです。2通りの初期化方法が選
べます。
メインモード
オートタイマー
スクリーン
SPD
SPD
走行速度
走行速度
TM
走行時間
ストップウォッチ
スクリーン
STW
リセット
リセット
ストップウォッチ
AVS
平均速度
リセット
走行速度
走行距離
リセット
G.D.
CDCセンサー
取付時のみ
走行速度
J
-9
リセット
STW/AVS
平均速度 リセット
SPD
SPD
ODO
STW/MXS
積算距離
走行速度
ギアデベロップメント
SPD
最高速度
SPD
走行速度
CDC
MXS
走行速度
SPD
ケイデンス
走行速度
走行速度
SPD
DST
SPD
SPD
走行速度
CLK
時計
走行速度
最高速度
リセット
SPD
走行速度
STW/DST
走行距離
リセット
JAPANESE
サブモード
SPD
オートタイマー(AT)スクリーン
オートタイマースクリーンは自転車の走行・停止をエルゴブレインが判断し自動
で計測をスタート・ストップします。
メインモード
MODEボタンを押すとメインモードの機能が順次切替ります。
※CDC/SPDはケイデンスセンサー装着時のみ表示します。
サブモード
メインモードからMODEボタンを2秒間長押しするとサブモードに切替ります。
メインモードに戻るにはもう1度MODEボタンを押します。サブモードからサブ
モードへは直接移動できません。
ATスクリーンデータのリセット
TM/DST/AV/MXデータを表示している時にリセット操作を行うと、ATスクリーン
の各データがリセットされます。STWスクリーンのデータはリセットされません。
JAPANESE
メインモード
TM
オートタイマー
走行時間
スクリーン 00:00'00"〜99:59'59"
ストップウォッチ
スクリーンへ
リセット
サブモード
AV
平均速度
0.0〜110.7 km/h
リセット
MX
最高速度
0.0〜110.7 km/h
リセット
291時間または34359 km[mile]
まで計測可能
MODE
DST
走行距離
0.00〜9999.99 km
ODO
積算距離
0.0〜00000.0 km
リセット
G.D.
ギアデベロップメント
(クランク一回転当りの進む距離)
0.64〜14.99 m
CLK
時計
0:00'00"〜23:59'59"
または
1:00'00"〜12:59'59"
CDC/SPD
ケイデンス/速度
ケイデンス
(上段)0(20)〜299.0 rpm
走行速度(下段)0.0(4.0)〜110.7 km/h
J
- 10
ストップウォッチ(STW)スクリーン
ATスクリーンの走行時間TM表示からMODEボタンを2秒間長押しするとストッ
プウォッチ
(STW)
スクリーンになります。
どのSTWモードでもMODEボタンを長押しするとATスクリーンの走行時間TM表
示へ戻ります。
STWスクリーンの各モードはS/Sボタン操作によって計測をスタート・ストップし
ます。STWの計測中はスピード単位が点滅します。STWのスタート・ストップや計
測はどのスクリーンにあっても表示切替えとは関係なく実行されます。
STWスクリーンデータのリセット
STWスクリーンを表示している時にリセット操作を行うとSTWスクリーンの各
データがリセットされます。ATスクリーンのデータはリセットされません。
ストップウォッチスクリーン
JAPANESE
STW
TM
ストップウォッチ
オートタイマー
スクリーンへ
0:00'00"0〜9:59'59"9
10:00'00"〜99:59'59"
リセット
STW-AV
平均速度
0.0〜110.7 km/h
リセット
291時間または34359 km[mile]
まで計測可能
STW-MX
最高速度
0.0〜110.7 km/h
リセット
STW-DST
走行距離
MODEボタン
MODE
2秒間押し続ける
普通に押す
リセット操作
S/S
J
- 11
MODE
[ATスクリーン]と[STWスクリーン]
は個別にリセット
0〜9999.99 km
リセット
MODE
時刻の設定
オートタイマースクリーン
(サブモード)
の時計
表示でSETボタンを押します。
時刻表示はスピード単位をKMHにしたときは24時間表示、MPHにしたときは12
時間表示で時刻を設定します。
S/S
設定
–
+ MODE
S/S
–
+ MODE
CLK
TM
SET
SET
時刻設定へ
SET
分へ切替え
設定完了
節電機能
JAPANESE
エルゴブレインは15分間無信号の状態が続くとスリープ状態に入ります。
スリープ
中は時計表示だけとなります。走行を開始するか本体のボタン操作を行うと解除
します。
(エルゴパワーレバーのボタンでは解除できません)
ペースアロー
現在スピードと平均速度を比較し、上下の矢印で表示します。
オートタイマース
クリーンの時はAV
(平均速度)
と、
ストップウォッチスクリーンの時はSTW-AV
(ス
トップウォッチ平均速度)
との関係を比較します。
タイヤ周長値の表示と周長A/Bの切替え
オートタイマースクリーン
(サブモード)
のODO表示でS/SボタンとMODEボタン
を同時に押します。周長値が表示され、更に押し続けると周長Aと周長Bが切替
わると同時にコグセットの設定が変更されます。
ODO
タイヤ周長値の表示
S/S
MODE
タイヤ周長
S/S
の切替え
MODE
3秒間
設定内容の変更
時計表示を除く全ての計測画面でSETボタンを押すと、一旦設定してある設定
の内容を変更できます。SETボタンを押すと計測単位選択画面になります。初期
設定と同じ手順になりますので、替えたい部分を変更して計測画面に戻します。
この設定の変更を行っても、時刻は維持され、再設定する必要はありません。
J
- 12
セルフラーニング(自己学習)機能
エルゴブレインはCDCセンサーを装着していると、走行することでスプロケット
の歯数を自動的に算出します。
これをセルフラーニングとよびます。設定時にス
プロケットの歯数を入力する必要がありません。
またレース途中のタイヤ交換時
ではセルフラーニングの更新をするだけで自動設定され、データロスがほとんど
ありません。
スプロケット
(コグセット)
を交換したときはセルフラーニングの更新をする必要
があります。
●セルフラーニングの更新
セルフラーニングは自転車を走らせながら実行します。
どのチェーンポジション
でも行えますが空回りせずにスムーズにクランクが回っていることが重要です。
表示を計測画面にしS/Sボタンを2秒以上押し続けると更新を開始します。
警告
走行中は画面の表示に気を取られないで、安全走行を心掛けて
ください。道路、交通事情、障害物などに常に注意してくださ
い。
セルフラーニングの更新開始
参考: 走行速度にもよりますが歯数の算出時間は約5秒程度かかり、計算中は
タイヤ周長アイコンが点滅します。
タイヤ周長を切替えたり、設定画面に戻してもセルフラーニングされます。
セルフラーニングの更新直後は一時的に実際の歯数と合わない場合がありま
すが、瞬時に再計算されます。
CDCセンサーを装着していない場合はセルフラーニングは働きません。
その他の情報
・エルゴブレイン本体をブラケットから外すと、
ギア関係の表示は消灯します。
・オートタイマースクリーンのTM(走行時間)
表示の時、SETボタンを押し続け
ると強制的にスリープ状態になります。
(本体検査用機能です)
J
- 13
JAPANESE
2秒間
S/S
メンテナンス
日常のお手入れは次のように行ってください。
・定期的にSPDセンサー・CDCセンサーと各マグネットとの位置関係と取付状
態を点検してください。
・エルゴブレイン本体やブラケット等が汚れたときは、水で洗い流すか薄めた中
性洗剤をしめらせた柔らかい布で拭いた後乾拭きしてください。ベンジン・アル
コール等の有機溶剤は表面を傷めますので使用しないでください。
・エルゴブレイン本体やブラケットの接点が濡れたときは放置せずに乾いた布
でふき取ってください。放置してサビが発生した場合、計測不良の原因になり
ますので注意してください。
電池の交換
警告
取出した電池は、幼児の手の届かないところに置き、
その地域で
定められた方法で正しく処置してください。万一飲み込んだときは
すぐに医師と相談してください。
電池アイコンが点灯したときは早め
に電池を交換してください。交換は
JAPANESE
CR2032
図のように行います。
電池は専用電池を使用し、交換後
は本書4ページからの初期設定を
おこなってください。
トラブルシューティング
トラブル
チェック項目
対策
液晶表示画面が黒ずみ、正しい表示以外の部分が見える。
直射日光に長時間さらしませんでしたか?
日陰にはいれば元に戻ります。データに影響はありません。
表示の動きが鈍くなる。
周囲温度が低温(0℃以下)
になっていませんか?
温度が上がれば元に戻ります。データに影響はありません。
まったく表示がでない。
電池が消耗していませんか?
新しい電池(CR2032)
と交換します。
(交換後は、ACボタンで初期化し再設定します。)
意味のない表示が出る。
ACボタンを押し初期化します。ACボタンを押しても初期化しない場合は一旦電池を抜
いて、再度電池を入れます。4ページからの
「初期設定」
をします。
スピード
(ケイデンス)
が計測できない。
エルゴブレイン本体あるいはブラケットの接点に何か付着していませんか?
接点をクリーニングします。
スピード
(ケイデンス)
センサーとスピード(ケイデンス)
マグネットの位置は正しいですか?
センサーとマグネットの位置を調整します。
(取付説明書参照)
スピード(ケイデンス)
センサーのコードが断線していませんか?
断線しているセンサーセットを新しいものと交換します。
J
- 14
チェーンポジションやギア歯数が正しく表示しない。
本体あるいはブラケットの接点に何か付着していませんか?
接点をクリーニングします。
スプロケットを交換しませんでしたか?
CDCセンサーを装着している場合はセルフラーニングの更新
(13ページ)
してください。
CDCセンサーを装着していない場合はSETボタンを押して初期設定に戻りスプロケッ
トを設定しなおしてください。
(6ページ)
フロントディレーラーの切替えタイミングと表示が一致しない。
フロントディレーラーを調整したり、チェーンリングを交換しませんでしたか?
SETボタンを押して初期設定に戻りチェーンリングシフトタイミングの設定をやり直して
ください。
(7ページ)
仕様
チェーンリングシフトタイミング設定の時「Error」
と表示される。
エルゴパワーレバーのセンサーコードが断線している。
ブラケットセットを新しいものと交換します。
ErgoBrain C-1製品仕様
ケイデンス
ストップウォッチ
STW連動平均速度
STW連動最高速度
STW連動走行距離
付加機能
制御方式
表示方式
スピード・ケイデンス
信号検知方式
使用温度範囲
保存温度範囲
タイヤ周長セット範囲
ギア歯数セット範囲
表示範囲/標準精度
0.0(4.0)〜110.7 km/h [mph] / ±0.5 km/h[mph]
TM
0:00’00”〜99:59’59” / 0.003%
AV
0.0〜110.7 km/h [mph] / ±0.5 km [mph]
MX
0.0(4.0)〜110.7 km/h [mph] / ±0.5 km/h [mph]
DST
0.00〜9999.99 km [mile] / ±0.01 km [mile]
ODO
0.0〜99999.9 km [mile] / ±0.1 km [mile]
G.D.
0.64〜14.99 m [25〜590 inch] / ±0.01 m [inch]
0:00’00”〜23:59’59”
または1:00’00”〜12:59’59” / ±0.003%
0(20.0)〜299.0 rpm / ±1 rpm (199 rpm以下)
STW
0:00’00”0〜99:59’59” / 0.003%
STW-AV
0.0〜110.7 km/h [mph] / ±0.5 km [mph]
STW-MX
0.0(4.0)〜110.7 km/h [mph] / ±0.5 km [mph]
STW-DST
0.00〜9999.99 km [mile] / ±0.01 km [mile]
ペースアロー
平均速度に対し早いか遅いかを矢示
セルフラーニング CDCセンサーによりスプロケットを自動設定
4ビットワンチップマイクロコンピュータ・水晶発振器
液晶表示
無接触磁気センサー
0°C〜40°C [32°F〜104°F]
–20°C〜50°C [–4°F〜122°F]
1600〜2499 mm/初期値:2096 A/B切替え式
チェーンリング: 30〜56
スプロケット:
7種のコグセットから選択または手入力 11〜31
センサー取付パイプ径 11Ø〜36Ø
電源/電池寿命
CR2032×1/約1.5年(1日1時間使用した時)
*モニター用電池はこれより短くなります。
本体寸法/重量
54.0×47.5×20.7/約36グラム
仕様および外観は、改良のため予告無く変更することがあります。
J
- 15
JAPANESE
表示機能
スピード
走行時間
平均速度
最高速度
走行距離
積算距離
ギアデベロップメント
時計
INHALT
Einleitung ---------------------------------------------------------------- S. 2
Achtung ------------------------------------------------------------------ S. 2
Wichtig ------------------------------------------------------------------- S. 2
Merkmale ---------------------------------------------------------------- S. 3
Gerätebeschreibung -------------------------------------------------- S. 3
Formatierung/Initialisierung ----------------------------------------- S..4
Maßeinheit für die Geschwindigkeit wählen -------------------- S. 4
Umfang des Vorderrads eingeben --------------------------- S. 5
Trittfrequenz On/Off wählen ----------------------------------- S. 5
Anzahl der Zahnkränze wählen ------------------------------ S. 5
Zähneanzahl der Zahnkränze eingeben ------------------- S. 6
Zähneanzahl der Ritzel eingeben ---------------------------- S. 6
Umwerfvorgang synchronisieren ----------------------------- S. 7
Hauptfunktionen ------------------------------------------------------- S. 8
Display -------------------------------------------------------------- S. 8
Verwendung der Tasten ----------------------------------------- S. 8
Auto Timer-Anzeige -------------------------------------------- S. 10
Stoppuhr-Anzeige ---------------------------------------------- S. 11
Energiesparfunktion ------------------------------------------- S. 12
Funktion über/unter mittlerer Geschwindigkeit --------- S. 12
Kontrolle Rad-Ø und Wechsel zwischen Rad A u. B -- S. 12
Automatische Erkennungsfunktion ------------------------ S. 13
Sonstige Informationen --------------------------------------- S. 13
Unterhalt und Pflege ------------------------------------------------ S. 14
Batterie ersetzen ---------------------------------------------------- S. 14
Probleme und ihre Lösung ---------------------------------------- S. 14
Technische Merkmale ---------------------------------------------- S. 15
D
-1
DEUTSCH
Einstellen der Uhrzeit ----------------------------------------- S. 12
Einleitung
Wir danken Ihnen, dass Sie einen Campagnolo ErgoBrain, den modernsten je entwickelten Bordcomputer für Rennräder, gekauft haben. Durch
das Integrieren von Computer und Ergopower-Schalthebeln werden absolut neue Funktionen angeboten.
Der ErgoBrain ist eine echter Wettkampfcomputer, der für die Verwendung bei Rennen und beim Training entwickelt wurde, und dabei doch im
Gebrauch immer einfach und intuitiv bleibt.
In dieser Bedienungsanleitung wird erläutert, wie der ErgoBrain gebraucht
wird. Lesen Sie die Bedienungsanleitung und die Installationsanleitung
aufmerksam durch und bewahren Sie beide gut auf, damit sie dort im
Zweifelsfalle jederzeit nachschlagen können.
ACHTUNG
GEFAHR!
DEUTSCH
• Passen Sie während der Fahrt immer auf den Verkehr und die
Umgebung auf. Schenken Sie Ihre Aufmerksamkeit nicht zu oft
den Daten im Display. Ihre Aufmerksamkeit sollte vielmehr auf
den Straßenverkehr, auf evtl. Hindernisse usw. gerichtet bleiben.
• Bewahren Sie alle Batterien für Kinder unerreichbar auf. Sollte
eine Batterie einmal unabsichtlich verschluckt werden, so ist
umgehend ein Arzt aufzusuchen.
• Bewahren Sie dieses Gerät für Kinder unerreichbar auf.
• Tragen Sie stets einen Sturzhelm sowie reflektierende oder helle
Kleidung, beachten Sie immer die Verkehrssignale und halten
Sie die Straßenverkehrsordnung ein.
Wichtig
• Kontrollieren Sie in regelmäßigen Intervallen Position und Zustand der Magnete und Sensor.
• Lassen Sie die Einheit nicht über lange Zeit dem direkten Sonnenlicht ausgesetzt.
• Demontieren Sie nicht die Basiseinheit, die Sensoren oder die
Transduktoren.
• Verwenden Sie keine chemischen Produkte oder Lösungsmittel
zum Reinigen von Basiseinheit und Montageeinheit.
• Bei Kurzschliessen der Kontakte an der Haupteinheit wird die
Einheit initialisiert (wie es auch durch Drücken der Taste AC geschieht).
• Vermeiden Sie das Berühren der Kontakte; denn dies könnte eine
elektrostatische Entladung zur Folge haben und so zu einer falschen Datenanzeige führen.
• Verwenden Sie zum Reinigen der Ergopower-Schalthebel niemals den Wasserstrahl eines Hochdruckreinigers.
D
-2
Merkmale
Der ErgoBrain ist der erste Computer mit automatischer Erkennungsfunktion:
• Er ist einfach zu gebrauchen und zu programmieren.
• Er gestattet den Radwechsel bei Rennen, ohne dass die programmierten Daten verloren gehen.
• Er zeigt die Kombination Zahnkranz/Ritzel und zudem die Kettenposition an.
• Er hat abnehmbare Geschwindigkeits- und Trittfrequenzsensor.
• Er ist kompatibel mit allen Ergopower 9 Speed der Serie 1999 und 2000
1
7
8
SET
E
D
AC
5
2
4
6
9
F
11
G
3
1
10
A
B
C
H
H
I
DEUTSCH
Gerätebeschreibung
A. Display
1. Hauptdaten
2. Zusatzdaten (gewählte Daten)
3. Symbol der gewählten Funktion
4. Pfeilindikator über/unter mittlerer Geschwindigkeit
5. Symbol für Masseinheit
6. Auto Timer-Symbol
7. Signal Batterie leer
8. Symbol für Radumfang
9. Indikator für den aktuellen Zahnkranz
10. Indikator für das aktuelle Ritzel
11. Zähneanzahl von Zahnkranz / Ritzel
D
-3
B. S/S-Taste
C. MODE-Taste
D. SET-Taste
E. AC-Taste
F. Batteriedeckel
G. Kontakte
H. Montageeinheit
I. Befestigungsbügel
Formatierung / Initialisierung
Wenn Sie den ErgoBrain das erste Mal oder nach eiL
nem Batteriewechsel benutzen, müssen Sie die Einheit formatieren. Bevor Sie dies tun, sollten Sie den
Umfang Ihres Vorderrads kennen.
Hinweis: Die nachfolgenden Formatierungen werden dann
einfacher sein. Wenn Sie die AC-Taste drücken,
bleiben der Umfang des Vorderrads und die Informationen über Zahnkränze und Ritzel gespeichert und Sie müssen dann für jeden
Formatierungsschritt nur die SET-Taste drücken. Nur für das Synchronisieren des Zahnkranzes müssen Sie die Taste S/S drücken.
1. AC-Taste drücken.
Anmerkung: SET-Taste gedrückt halten und gleichzeitig die AC-Taste betätigen und wie-der loslassen. Auf dem Display erscheinen eine Sekunde lang
sämtliche Anzeigesymbole, wonach die Bildfläche für de Auswahl der
Masseinheit angezeigt wird. SET-Taste los-lassen. Durch den soeben beschriebenen Vorgang werden alle Eingaben gelöscht und der Computer wird
neu initialisiert (der EEPROM-Speicher wird auf die Ausgangsein-stellungen
zurückgesetzt). Tun Sie dies nur, wenn Sie den Kilometerzähler auf Null stellen wollen. Nach der Initialisierung werden alle vorherigen Daten wie Umfang des Vorderrads und Informationen über die Zahnkränze und Ritzel gelöscht und auf den Anfangsstatus zurückgestellt.
AC
1
Formatierung
DEUTSCH
SET AC
Initialisierung der
EEPROM
(sehen Sie Hinweis
hier oben)
Alle Zeichen werden angezeigt (1Sek.)
Nächster Schritt
2. Maßeinheit für die Geschwindigkeit wählen.
Drücken Sie die MODE-Taste, um von [KMH] auf [MPH] zu wechseln.
Drücken Sie die SET-Taste zur Bestätigung.
2
MODE
Wechsel zwischen
[KMH] und [MPH].
SET
Nächster Schritt
D
-4
3. Umfang des Vorderrads eingeben.
Beginnen Sie mit dem Rad A. Drücken Sie die MODE-Taste, damit der
Wert zunimmt und die S/S-Taste, damit er abnimmt.
Um den Umfang des zweiten Vorderrads (Rad B) einzugeben, halten
Sie die SET-Taste gedrückt.
Drücken Sie die SET-Taste zur Bestätigung.
3
Wert nimmt zu
MODE
Wert nimmt ab
S/S
SET
2sec.
Wechsel zwischen A und B
SET
Nächster Schritt
4. Trittfrequenz On/Off wählen
Wenn Sie den Trittfrequenzsensor verwenden, wählen Sie [ON], sonst
[OFF], indem Sie die MODE-Taste drücken. Drücken Sie die SET-Taste
zur Bestätigung.
MODE
SET
5. Anzahl der Zahnkränze wählen.
Wählen Sie die Anzahl der Zahnkränze (2 oder 3), indem Sie die MODETaste drücken. Drücken Sie die SET-Taste zur Bestätigung.
5
MODE
SET
D
-5
DEUTSCH
4
6. Zähneanzahl der Zahnkränze beginnend beim kleinsten
Zahnkranz eingeben
Drücken Sie die MODE-Taste, um den Wert zu erhöhen und die S/STaste, um ihn zu senken. Drücken Sie die SET-Taste zur Bestätigung,
dann wechselt das Display zum nächsten Zahnkranz. Wenn Sie zum
vorherigen Zahnkranz zurückkehren wollen, drücken Sie gleichzeitig
die S/S-Taste und die MODE-Taste.
Wenn die Eingabe der Zahnkränze abgeschlossen ist, geht die Anzeige zur Konfiguration der Ritzel über.
Hinweis: Wenn Sie den Trittfrequenzsensor (CDC [ON]) eingeschaltet haben, ist die Ritzelkonfiguration nicht erforderlich und
Sie können direkt zu Punkt 8 übergehen.
7. Zähneanzahl der Ritzel (Ritzelpaket) eingeben.
Wählen Sie eine der sieben vorgegebenen Ritzelkombinationen. Sollte
Ihre Ritzelkombination nicht vorhanden sein, so wählen Sie [FREE] und
dann können Sie jedes einzelne Ritzel manuell eingeben.
Hinweis: Führen Sie zuerst die Konfiguration der Ritzel für Rad A aus,
halten Sie dann die SET-Taste gedrückt und fahren Sie mit
der Konfiguration von Rad B auf die gleiche Weise wie beim
vorherigen Vorgang fort.
6
7
Unter 7 verschiedenen
Kombinationen wählen
Zähneanzahl
der Zahnkränze
eingeben
DEUTSCH
Verwendung
der Tasten
Kombinationen
absuchen
MODE
Innerer Zahnkranz
SET
F1
Zähneanzahl der
Ritzel (Ritzelpaket)
eingeben
MODE
Zähneanzahl
erhöhen
SET
S/S
Zähneanzahl
senken
COG
COG
COG
COG
COG
COG
COG
F R
11-21
11-23
12-21
12-23
13-23
13-26
13-28
E E
Bei Wahl von FREE die
Zähneanzahl jedes Ritzels
manuell eingeben.
Mittlerer Zahnkranz
F2
SET
SET
SET
Wenn der CDC-Sensor
OFF ist
Weiter zur nächsten
Übersetzung
S/S
MODE
Zurück zur vorigen
Übersetzung
Äußerer Zahnkranz
F3
Wenn der CDC-Sensor
SET
ON ist
Kleinstes
Ritzel R1
SET
SET
2sec.
SET
Wechsel
Nächster Schritt
Größtes Ritzel R9
D
-6
8. Umwerfvorgang synchronisieren
Gefahr!
Dieser Vorgang ist beim Fahren auszuführen. Um das Unfallrisiko
herabzusetzen, sollten Sie diesen Vorgang daher nur dann ausführen, wenn
Sie viel Platz haben, wenn keine Hindernisse vorhanden sind und wenn
wenig Verkehr herrscht.
Hinweis: Falls es sich hierbei nicht um die allererste Einstellung handelt und
Sie seit dem letzten Mal die Zahnkränze nicht gewechselt oder die
Spannung des Umwerferkabelzugs nicht nachgestellt haben, können Sie diesen Vorgang überspringen. Zum Überspringen drücken
Sie die S/S-Taste. Dadurch werden die Einstellungen beendet und
die Anzeige kehrt wieder in den Messmodus zurück.
Installieren Sie die Basiseinheit am Rennrad und fahren Sie los. Stellen Sie den
Umwerfer auf den kleinsten Zahnkranz und die Schaltung auf das fünfte Ritzel.
Wichtig: Während dieses Vorgangs sollten Sie langsam und gleichmäßig
mit dem Ergopower schalten. Die S/S-Taste muss jedesmal
gedrückt werden, wenn die Antriebskette ganz auf den nächsten Zahnkranz gewechselt hat.
Bringen Sie den Umwerfer auf den zweiten Zahnkranz. Drücken Sie die S/STaste. Bringen Sie den Umwerfer auf den größten Zahnkranz. Drücken Sie
erneut die S/S-Taste. Wiederholen Sie diese Vorgänge genauso in absteigender Reihenfolge und bringen Sie den Umwerfer vom größten Zahnkranz auf
den mittleren und dann auf den kleinsten Zahnkranz. Sobald die Einstellung
abgeschlossen ist, wird im Display der Messmodus angezeigt.
Hinweis: Falls der Text „Error“ im Display erscheint, ist die Basiseinheit nicht
richtig an der Montageeinheit befestigt oder es könnte ein Problem
am Sensor des Ergopower-Schalthebels vorliegen.
Mit dem inneren
Zahnkranz und dem
fünften Ritzel beginnen.
F-1/R-5
Zahnkranz wechseln
Jeden Zahnkranzwechsel
speichern
S/S
F2 - 3 - 2 - 1
Weiter wechseln und
nach jedem Wechsel die
S/S-Taste drücken
Zur Messanzeige
D
-7
S/S
DEUTSCH
Wichtig: Benutzen Sie ausschließlich
die S/S-Taste am ErgopowerSchalthebel zur Ausführung
der auf dieser Seite beschriebenen Vorgänge.
8
Hauptfunktionen
Im oberen Teil des Displays ➊ wird die Ist-Geschwindigkeit angegeben.
Im unteren Teil ➋ sehen Sie hingegen die gewählten Daten. Unten rechts
zeigen die Indikatoren für die Übersetzungen ➌➍ die aktuelle Kettenposition an, während die Zähneanzahl des Zahnkranzes abwechselnd mit
der Zähneanzahl des Ritzels ➎ angezeigt wird.
Wenn Sie mit dem Treten der Pedale beginnen/aufhören, beginnt/stoppt
auch die Messung. Diese Funktion wird Auto Timer (AT) genannt, sie wird
im linken Teil des auf der nächsten Seite dargestellten Schemas erläutert.
Wenn im Display die Funktion Auto Timer angezeigt wird, erscheint das
Symbol „ATS/S“.
Unabhängig vom Auto Timer (AT) gibt es die Stoppuhrfunktion (STW), bei
der die Messung dann beginnt/stoppt, wenn die S/S-Taste gedrückt wird
(wie im rechten Teil der Zeichnung auf der nächsten Seite dargestellt).
Wird die Stoppuhrfunktion angezeigt, so erscheint das Symbol „STW“.
Die Displays AT und STW führen ihre Zählungen unabhängig voneinander durch. Während eine Funktion angezeigt wird und zählt, erfolgt gleichzeitig ausgeblendet die Zählung der anderen Funktion.
Der ErgoBrain verfügt über zwei Messarten: den Auto Timer mit Schrittabständen von 1 Sekunde und die Stoppuhr (STW) mit Schrittabständen
von 0.1 Sekunde.
DEUTSCH
Display
6
1. Hauptdaten (Geschwindigkeit)
1
2. Zusatzdaten (gewählte Angaben)
3. Zahnkranz-Indikator
2
4. Ritzel-Indikator
5. Zähneanzahl von Zahnkranz/Ritzel
6. Pfeilindikator unter/über mittlerer Geschwindigkeit.
3
5
4
Verwendung der Tasten
Der ErgoBrain besitzt zwei große und zwei kleine Tasten. Die an den Ergopower-Schalthebeln vorhandenen Druckknöpfe haben genau die gleiche
Funktion wie die beiden großen Tasten an den Seiten der Basiseinheit.
Wenn Sie sich zwischen den einzelnen Funktionen bewegen wollen, drükken Sie die MODE-Taste. Achten Sie auf den in der Abbildung gezeigten
Unterschied zwischen „drücken“ und „2 Sekunden lang gedrückt halten“.
MODE-Taste
AC
SET
MODE
Zwei Sekunden lang drücken
Drücken
S/S
MODE
Start/Stopp der
Stoppuhr (STW)
S/S
Nullstellung
S/S
MODE
Nullstellung erfolgt
unabhängig für AT und STW
D
-8
Zum Starten der Stoppuhr drücken Sie die S/S-Taste, um die Stoppuhr
anzuhalten, drücken Sie S/S erneut.
Zur Nullstellung drücken Sie gleichzeitig die S/S-Taste und die MODETaste. Die Nullstellung erfolgt für AT und STW unabhängig voneinander.
Um die AT-Daten auf Null zu stellen, ist die Nullstellung in denjenigen
Funktionen auszuführen, die in der Darstellung mit dem Symbol „Reset“
bezeichnet sind. Die Nullstellung der STW-Angaben hingegen können Sie
in jeder beliebigen STW-Funktion ausführen.
Die SET-Taste dient zum Einstellen der Uhrzeit oder zum Ändern anderer
Einstellungen. Die AC-Taste dient zum Formatieren der Einheit. Es gibt
zwei Möglichkeiten, um die Einheit auf den vorhergehenden Status zurückzusetzen - die Formatierung und die Initialisierung (siehe hierzu S. 4).
Hauptfunktionen
AUTO TIMERANZEIGE
STOPPUHRANZEIGE
SPD
SPD
Ist-Geschwindigkeit
Ist-Geschwindigkeit
TM
STW
RESET
Stoppuhr
Zeitdauer
RESET
Zusatzfunktionen
SPD
SPD
SPD
Ist-Geschwindigkeit
Ist-Geschwindigkeit
AV
MX
STW/AV
Ist-Geschwindigkeit
Mittlere Geschw.
Höchstgeschw.
RESET
Ist-Geschwindigkeit
DST
Tagesstrecke
RESET
SPD
SPD
ODO
STW/MX
Ist-Geschwindigkeit
Kilometerzähler
Ist-Geschwindigkeit
Höchstgeschw.
RESET
RESET
SPD
SPD
G.D.
CLK
Ist-Geschwindigkeit
m/Kurbelumdrehung
Ist-Geschwindigkeit
Uhr
bei CDC-Sensor ON
CDC
Trittfrequenz
SPD
Ist-Geschw.
D
-9
SPD
Ist-Geschwindigkeit
STW/DST
Tagesstrecke
RESET
DEUTSCH
SPD
Mittlere Geschw.
RESET
Auto Timer-Anzeige
In diesem Modus erkennt der ErgoBrain die Bewegung des Rennrads und
startet/stoppt die Messung automatisch.
Hauptfunktionen
Drücken Sie die MODE-Taste, um die Hauptfunktionen nacheinander aufzurufen.
*Die Funktion CDC/SPD ist nur bei installiertem Trittfrequenzsensor verfügbar.
Zusatzfunktionen
Halten Sie die MODE-Taste zwei Sekunden lang gedrückt, um von einer
Hauptfunktion zu deren Zusatzfunktion zu wechseln. Es ist nicht möglich,
direkt von einer Zusatzfunktion zur anderen zu springen.
Nullstellung
Die Nullstellung kann in den Funktionen TM/DST/AV/MX erfolgen. Alle
Daten der AT-Anzeige werden gelöscht, auf die Daten der STW-Anzeige
hat dies jedoch keine Auswirkung.
AUTO TIMERANZEIGE
Hauptfunktionen
TM
Ist-Geschwindigkeit
Zur Stoppuhr-Anzeige
00:00'00" - 99:59'59"
RESET
Zusatzfunktionen
AV
Mittlere Geschw.
0.0 - 110.7 km/h
DEUTSCH
RESET
MX
Höchstgeschw.
0.0 (4.0) - 110.7 km/h
RESET
Bis 291 Std. oder 34359 km (Meilen)
MODE
DST
ODO
Tagesstrecke
Kilometerzähler
0.00 - 9999.99 km
0.0 - 00000.0 km
RESET
G.D.
CLK
m/Kurbelumdrehung
Uhrzeit
(Strecke/ 1 Kurbelumdrehung)
0.64 - 14.99 m
0:00'00" - 23:59'59"
o
1:00'00" - 12:59'59"
CDC/SPD
Trittfrequenz/Ist-Geschw.
Trittfrequenz (Angabe oben)
0(20) - 299.0 rpm
Ist-Geschwindigkeit (Angabe unten)
0.0(4.0) - 110.7 km/h
D
- 10
Stoppuhr-Anzeige (STW)
Wenn Sie die MODE-Taste in der Funktion TM von Auto Timer zwei Sekunden lang gedrückt halten, wechseln Sie zur Stoppuhr-Anzeige (STW).
Um wieder zur Auto Timer-Anzeige zurückzukehren, halten Sie die MODETaste in einer beliebigen Funktion der Stoppuhr-Anzeige zwei Sekunden lang
gedrückt (Sie kehren so zur Funktion TM der Auto Timer-Anzeige zurück).
In der STW-Anzeige startet und stoppt die Messung durch Drücken der S/
S-Taste. Während der STW-Messung blinkt der Geschwindigkeitsindikator.
Die STW-Messung kann von jeder beliebigen Funktion aus gestartet/gestoppt werden.
Nullstellung
Die Nullstellung können Sie von jeder beliebigen STW-Funktion aus durchführen. Alle Daten der STW-Anzeige werden dann gelöscht, dies hat auf
die Daten der AT-Anzeige jedoch keinen Einfluss.
Stoppuhr-ANZEIGE
STW
TM
Stoppuhr
Zur
AUTO TIMERAnzeige
0:00'00"0 - 9:59'59"9
10:00'00" - 99:59'59"
RESET
STW-AV
Mittlere Geschw.
0.0 - 110.7 km/h
RESET
STW-MX
Höchstgeschwindigkeit
0.0(4.0) - 110.7 km/h
RESET
STW-DST
Tagesstrecke
0 - 9999.99 km
RESET
MODE-Taste
MODE
Zwei Sekunden lang drücken
Drücken
Nullstellung
S/S
D
MODE
- 11
Nullstellung erfolgt
unabhängig für AT und STW
MODE
DEUTSCH
Bis 291 Std.
oder 34359 km (Meilen)
Einstellen der Uhrzeit
Drücken Sie die SET-Taste in der Funktion CLK in der Auto Timer-Anzeige.
Wenn Sie die Geschwindigkeitsmessung in KMH gewählt haben, funktioniert die Uhr im 24-Stunden-Modus. Haben Sie hingegen MPH gewählt,
so funktioniert die Uhr im 12-Stunden-Modus.
S/S
Einstellung
+ MODE
–
S/S
–
+ MODE
CLK
TM
SET
SET
Zum Einstellen der Uhr
Wechsel von Stunden
zu Minuten
SET
Einstellung bestätigen
Energiesparfunktion
Wenn etwa 15 Minuten lang keine Taste gedrückt wird oder die Einheit
kein Signal erhält, schaltet sie sich aus und zeigt nur die Uhrzeit an.
Wenn Sie dann wieder die Pedale zu treten beginnen oder eine Taste drükken, schaltet sich die Einheit auf Normalanzeige (nur durch Drücken der
Druckknöpfe an den Ergopower-Schalthebeln ist es jedoch nicht möglich,
von der Energiesparfunktion der Einheit zur Normalfunktion zu wechseln).
DEUTSCH
Funktion über/unter mittlerer Geschwindigkeit
Der Pfeilindikator gibt an, ob die Ist-Geschwindigkeit höher oder niedriger
ist als die mittlere Geschwindigkeit. Die Ist-Geschwindigkeit wird mit Folgendem verglichen: mit AV im Auto Timer-Modus; mit STW-AV (mittlere
Geschwindigkeit im STW-Modus) des Stoppuhr-Modus (STW).
Kontrolle des Radumfangs und Wechsel zwischen Rad A und B
Drücken Sie gleichzeitig die S/S-Taste und die MODE-Taste, während die
Zusatzfunktion ODO in der Auto Timer-Anzeige aktiv ist. Daraufhin wird
der Umfang des aktuellen Rads angezeigt. Wenn Sie beide Tasten wiederholt drücken, wechseln Sie zwischen Rad A und Rad B.
ODO
Gibt den Umfang des aktuellen Rads an
S/S
MODE
Wechsel zwischen Rad
S/S
und Rad
MODE
3sek.
Einstellungen ändern
Um die Einstellungen zu ändern, drücken Sie die SET-Taste in jeder beliebigen Funktion außer der Uhrzeit, daraufhin wird der Formatierungsmodus
angezeigt (Seite 4). Nachdem Sie die gewünschten Änderungen gemacht
haben, kehren Sie durch Drücken der SET-Taste zur Messfunktion zurück.
(Die Uhrzeit wird dadurch nicht geändert.)
D
- 12
Automatische Erkennungsfunktion
Wenn der Trittfrequenzsensor (CDC) an Ihrem Fahrrad installiert ist, berechnet der ErgoBrain automatisch die Zähneanzahl Ihrer Ritzel (Deshalb
müssen Sie in diesem Fall nicht, wie in Seite 6 beschrieben, die Zähneanzahl der Ritzel eingeben). Diese Funktion wird als automatische
Erkennungsfunktion bezeichnet.
Auch wenn Sie während eines Rennens das Rad wechseln, müssen Sie
lediglich den Aktualisierungsvorgang (wie unten erklärt) durchführen und
die Einheit fährt mit der automatischen Erkennungsfunktion fort, ohne dass
irgendwelche Daten verloren gehen. Der Aktualisierungsvorgang muss
auch beim Ersetzen der Ritzel ausgeführt werden.
Aktualisierung *
Gefahr !
Achten Sie während der Fahrt immer auf alles, was um Sie herum
passiert. Schenken Sie den Daten im Display nicht zuviel
Aufmerksamkeit. Ihre Aufmerksamkeit sollte immer auf die Straße,
auf den Verkehr, auf evtl. Hindernisse usw. gerichtet bleiben.
Das Aktualisieren erfolgt beim Fahren. Das Aktualisieren können Sie mit
der Antriebskette in jeder beliebigen Position beginnen. Achten Sie jedoch darauf, dass die Kette fest sitzt, dass sie nicht springt und dass sich
die Kettenradgarnitur stabil drehen kann. Halten Sie in jedem Messmodus
die S/S-Taste mehr als 2 Sekunden lang gedrückt und die Einheit beginnt
mit der Aktualisierung.
Aktualisierung starten
2sec.
Aktualisierung
Hinweis:
Je nach Ihrer Fahrgeschwindigkeit benötigt die Einheit etwa
fünf Sekunden, um die Zähneanzahl jedes Ritzels zu berechnen. Während dieser Berechnung blinkt das Radsymbol.
Ganz am Anfang der Aktualisierung kann es vorkommen, dass eine falsche Zähneanzahl des Ritzels angezeigt wird, das System sorgt jedoch
sofort für die Neueinstellung und die Berechnung der korrekten Anzahl.
* Bei nicht installiertem Trittfrequenzsensor (CDC) ist die automatische
Erkennungsfunktion nicht verfügbar.
Weitere Informationen
• Wenn die Basiseinheit von der Montageeinheit abgenommen wird, verschwinden die Daten für die Zahnkränze.
• Wenn Sie während der TM-Funktion in der Auto Timer-Anzeige die SETTaste etwa 3 Sekunden lang drücken, schaltet sich die Einheit automatisch in die Energiesparfunktion.
D
- 13
DEUTSCH
S/S
Unterhalt und Pflege
Prüfen Sie in regelmäßigen Abständen Position und Zustand des
Geschwindigkeitsfühlers und des Trittfrequenzsensors sowie der Magnete.
Wenn die Basiseinheit oder die Montageeinheit verschmutzt sind, reinigen Sie sie mit einem verdünnten, neutralen Reinigungsmittel und einem
feuchten Tuch und trocknen Sie sie danach sofort ab.
Verwenden Sie zum Reinigen niemals Waschbenzol, Alkohol oder andere
organische Lösungsmittel, damit die Oberfläche der Einheiten nicht beschädigt wird.
Batterie ersetzen
Gefahr!
Bewahren Sie Batterien immer für Kinder unerreichbar auf. Bei
unabsichtlichem Verschlucken ist sofort ein Arzt aufzusuchen.
Wenn das Batteriesymbol blinkt, ersetzen Sie die Batterie durch eine
neue, so wie auf der nebenstehenden
CR2032
Darstellung angegeben.
Verwenden Sie nur eine Ersatzbatterie vom empfohlenen Typ. Führen Sie nach dem Ersetzen der Batterie den auf Seite 4 beschriebenen
Formatierung-svorgang aus.
DEUTSCH
Probleme und ihre Lösung
Anzeichen Prüfen
Abhilfe
Das Flüssigkristalldisplay ist dunkel und es erscheinen eigenartige Zeichen.
Wurde das Display lange Zeit direktem Sonnenlicht ausgesetzt?
Lassen Sie die Einheit eine Zeitlang im Dunklen. Die Daten werden hierdurch
nicht beeinträchtigt.
Das Display reagiert nur langsam.
Ist die Außentemperatur zu tief (unter 0°C, 32°F)?
Sobald die Temperatur wieder ansteigt, reagiert das Display wieder normal. Die
Daten werden hierdurch nicht beeinträchtigt.
Es wird gar nichts angezeigt.
Ist die Batterie leer?
Ersetzen Sie die Batterie (CR2032). (Denken Sie nach dem Ersetzen daran, die
AC-Taste zu drücken und die Einheit zu formatieren.)
Im Display erscheinen unverständliche Zeichen.
Wenn die unverständlichen Zeichen nicht verschwinden, nehmen Sie die Batterie heraus und setzen Sie sie wieder ein und formatieren Sie daraufhin die Einheit wie auf Seite 4 beschrieben.
Die Geschwindigkeit (oder der Trittfrequenz) wird nicht gemessen.
Überprüfen Sie, ob der Kontaktbereich frei von Fremdkörpern ist.
Reinigen Sie die Kontakte.
Überprüfen Sie die Position der Sensor und Magnete für Geschwindigkeit und Trittfrequenz.
Stellen Sie Sensor und Magnete korrekt ein. (Sehen Sie hierzu in der Installationsanleitung nach.)
Prüfen Sie, ob am Geschwindigkeitsfühler oder am Trittfrequenzsensor ein Kabelbruch vorliegt.
Ersetzen Sie den Sensor.
Kettenposition oder Zähneanzahl werden nicht korrekt angezeigt.
Überprüfen Sie, ob der Kontaktbereich frei von Fremdkörpern ist.
Reinigen Sie die Kontakte.
D
- 14
Haben Sie die Ritzel gewechselt?
Wenn der Trittfrequenzsensor aktiv ist, führen Sie den auf Seite 13 beschriebenen Aktualisierungsvorgang aus.
Wenn der Trittfrequenzsensor nicht aktiv ist, drücken Sie die SET-Taste und geben Sie die Ritzelkombination oder die Zähneanzahl neu ein (Seite 6).
Die Zeit für den Umwerferwechsel entspricht nicht den angezeigten Angaben.
Haben Sie den Umwerfer nachgestellt oder einen Zahnkranz ersetzt?
Drücken Sie die SET-Taste und wiederholen Sie die Einstellung der Zeit für den
Umwerfvorgang (Seite 7).
[Error] wird angezeigt, wenn die Zeit für den Umwerfvorgang eingestellt wird.
Ist einer der Drähte der ErgoPower-Sensor gebrochen?
Ersetzen Sie die Montageeinheit.
Technische Merkmale
Funktion
Ist-Geschwindigkeit
Zeitdauer
Mittl. Geschw.
Höchstgeschw.
Tagesstrecke
Gesamtstrecke
m/Kurbelumdrehg.
Uhrzeit
- 15
DEUTSCH
Bereich / Präzision
0.0(4.0) - 110.7 km/h [mph] / ±0.5 km/h[mph]
TM
0:00’00” - 99:59’59” / 0.003%
AV
0.0 - 110.7 km/h [mph] / ±0.5 km [mph]
MX
0.0(4.0) - 110.7 km/h [mph] / ±0.5 km/h [mph]
DST
0.00 - 9999.99 km [Meilen] / ±0.01 km [Meilen]
ODO
0.0 - 99999.9 km [Meilen] / ±0.1 km [Meilen]
G.D.
0.64- 14.99 m [25 - 590 Zoll] / ±0.01 m [1 Zoll]
0:00’00” - 23:59’59”
[1:00’00” - 12:59’59”] / ±0.003%
Trittfrequenz
0(20.0) - 299.0 Upm / ±1 Upm (unter 199Upm)
Stoppuhr
STW
0:00’00”0 - 99:59’59” / 0.003%
STW• Mittlere Geschw. STW-AV
0.0 - 110.7 km/h [mph] / ±0.5 km [mph]
STW•Höchstgeschw.
STW-MX
0.0(4.0) - 110.7 km/h [mph] / ±0.5 km [mph]
STW•Tagesstrecke
STW-DST 0.00 - 9999.99 km [Meilen] / ±0.01 km [Meilen]
Zusatzfunktionen
Gibt an, ob die Ist-Geschwindigkeit höher oder
Indikator über/unter mittl. Geschw. tiefer ist als die mittlere Geschwindigkeit
Autom. Erkennungsfunktion
Berechnet automatisch die Zähneanzahl der
Ritzel
Steuersystem
4-Bit-Mikrocomputer mit 1 Chip, KristallSteueroszillator
Displaytyp
Flüssigkristallanzeige (LCD)
Messverfahren für Trittfrequenz- und No-contact Magnetfühler
Geschwindigkeitssignale
Betriebstemperatur
0°C - 40°C [32°F - 104°F]
Zul. Temperatur
–20°C - 50°C [–4°F - 122°F]
Radumfangbereich
1600 - 2499 mm / Anfangswert: 2096
Bereich Zähneanzahl
Zahnkränze: 30 - 56
Übersetzungen
Ritzel: 11 - 31
Montagedurchmesser an Gabel
11Ø - 36Ø
Batterietyp
CR2032 x 1
Lebensdauer
Etwa 1,5 Jahre (bei 1 Stunde Gebrauch pro Tag)
Die Lebensdauer der ersten, noch im Werk installierten Batterie kann auch kürzer sein.
Abmessungen / Gewicht
54.0 x 47.5 x 20.7 / 36 Gramm [1.27 oz]
* Bei Form und technischen Merkmalen behalten wir uns Änderungen ohne Voranmeldung vor.
D
Symbol
INDICE
E
-1
ESPAÑOL
Introducción ---------------------------------------------------------- Pag. 2
Atención -------------------------------------------------------------- Pag. 2
Importante ------------------------------------------------------------ Pag. 2
Características ------------------------------------------------------ Pag. 3
Nombre de las piezas --------------------------------------------- Pag. 3
Formateado/Inicialización
Selección escala velocidad -------------------------------- Pag. 4
Introducción circunferencia rueda ------------------------ Pag. 5
Seleccionar cadencia on/off -------------------------------- Pag. 5
Seleccionar engranajes ------------------------------------- Pag. 5
Introducción número de plato ------------------------------ Pag. 6
Introducción combinación piñón --------------------------- Pag. 6
Ajuste cambio de plato -------------------------------------- Pag. 7
Operaciones básicas ---------------------------------------------- Pag. 8
Pantallas --------------------------------------------------------- Pag. 8
Botón de operaciones ---------------------------------------- Pag. 8
Pantalla Auto Timer ----------------------------------------- Pag. 10
Pantalla Stopwatch ----------------------------------------- Pag. 11
Ajuste Hora --------------------------------------------------- Pag. 12
Función ahorro de energía ------------------------------- Pag. 12
Función flechas ---------------------------------------------- Pag. 12
Control circunferencia rueda y ajuste entre
rueda A y B --------------------------------------------------------------------- Pag. 12
Función de auto aprendizaje ----------------------------- Pag. 13
Otras informaciones ---------------------------------------- Pag. 13
Manutención ------------------------------------------------------- Pag. 14
Sustitución de la pila --------------------------------------------- Pag. 14
Como resolver problemas -------------------------------------- Pag. 14
Especificaciones -------------------------------------------------- Pag. 15
Introducción
Le agradecemos por haber comprado ErgoBrain Campagnolo,el más
sofisticado ordenador para bicicleta de carreras jamás realizado. La
integración entre el ordenador y los mandos Ergopower ofrece funciones
absolutamente nuevas.
ErgoBrain es un verdadero ordenador de competición, proyectado para
utilizarlo en carrrera y durante los entrenamientos, de utilización fácil e
intuitiva.
Este manual de instruciones explica como usar ErgoBrain. Leer
atentamente el manual de uso e instalación y conservarlo para sucesivas
consultas.
ATENCION
PELIGRO!
• Durante la marcha prestar siempre atención a todo lo que os rodea.
No prestar excesiva atención a los datos de la pantalla. Mantened
vuestra atención sobre la carretera , tráfico y eventuales obstaculos
etc.
• Mantener las pilas fuera del alcance de los niños. En caso de
ingestión de una pila contactad inmediatamente un médico.
• Conservar este aparato fuera del alcance de los niños.
• Ponerse siempre el casco, vestir prendas reflectantes o claras, y
respetar siempre las señales de tráfico y el código de circulación.
ESPAÑOL
Importante
• Periodicamente controlar la posición de montaje y el estado de
los imanes y de los sensores.
• No esponerla unidad a la luz solar directa prolongadamente.
• No desmontar la unidad principal o los sensores.
• No utilizar productos químicos o disolventes sobre la unidad.
• Si los sensores de la unidad principal se ponen en cortocircuito,
ésta se reinicializa (de la misma forma que al pulsar el botón AC).
• Evitar tocar los contactos; ello podría crear una descarga
electroestática y generar una visualización anómala de los datos.
• No utilizar lazaderas de agua a alta presión para limpiar los mandos Ergopower.
E
-2
Características
ErgoBrain es el primer ordenador auto-aprendente
• Fácil de configurar y programar
• Permite el cambio de rueda durante la competicón sin perdida de datos
• Indica la combinación piñón/plato mientras muestra la posición de la
cadena
• Sensores de velocidad y cadencia desmontables
• Compatible con todos los Ergopower 9 Speed (gama 1999 y 2000)
1
7
8
SET
E
D
AC
5
2
4
6
9
F
11
G
3
1
10
A
B
C
H
H
I
Nombre de las piezas
E
-3
B. Pulsante S/S
C. Pulsante MODE
D. Pulsante SET
E. Pulsante AC
F. Tapa pila
G. Contactos
H. Base
I. Soporte
ESPAÑOL
A. Pantalla
1. Datos principales
2. Datos secundarios (datos seleccionados)
3. Simbolo de la función seleccionada
4. Flecha indicadora
5. Símbolo de la unidad de medida
6. Símbolo Auto timer
7. Señal pila descargada
8. Símbolo de la circunferecia de la rueda
9. Indicador de plato
10. Indicador del piñón
11. Número de dientes del plato / piñón
Formateado / Inicialización
Se si utiliza ErgoBrain por primera vez, o después de haL
ber sustituido la pila, debéis formatear la unidad. Antes,
calculad la circunferencia de vuestra rueda anterior.
Nota: Las funciones de inicialización sucesivas serán simplificadas. Apretando el pulsante AC quedan en la
memoria los datos precedentes de circunferencia de la rueda anterior y
la información sobre platos y piñones, en tal caso será suficiente apretar
el pulsante SET para cada fase del proceso de formateado. Solo para el
ajuste del tiempo de cambio de plato, debéis apretar el pulsante S/S.
1. Apretar el pulsante AC.
Nota: Manteniendo apretado el pulsante SET, apretar y soltar el pulsante
AC. En la panta-lla aparecerán todas las indicaciones durante un segundo para después aparecer la pan-talla de selección de la unidad de
medida. Soltar el pulsante SET. Con esta operación se cancelarán todos los datos y se reinicializa la unidad (la EEPROM restablece los
valores iniciales). Efectuar esta operación solo cuando se quiera poner a
cero el cuentakilómetros. Después de la inicialización, todos los datos anteriores como la circunferencia de la rueda anterior y la información a cerca
de platos y piñones quedan eliminadas y vuelven a su estado inicial.
AC
1
Formatear
SET AC
Inicialización de la
EEPROM
(Ver "nota" superior)
Visualización de todos los carácteres (1 sec.)
Siguiente paso
ESPAÑOL
2. Seleccionar la unidad de medida de la velocidad.
Apretad el pulsante MODE para pasar de [KMH] a [MPH]. Apretad el
pulsante SET para confirmar.
2
Elejir entre [KMH] y [MPH].
MODE
SET
Siguiente paso
E
-4
3. Introducción de la circunferencia de la rueda anterior.
Iniciad con la rueda A. Apretad el pulsante MODE para aumentar el
valor, y el pulsante S/S para disminuirlo.
Para introducir la circunferencia de la segunda rueda anterior (rueda
B), mantened apretado el pulsante SET.
Apretad el pulsante SET para confirmar.
3
Aumentar dígitos
MODE
Disminuir dígitos
S/S
SET
2sec.
Elejir entre A y B
SET
Siguiente paso
4. Seleccionar cadencia on/off.
Si se utiliza el sensor de cadencia, seleccionad [ON], si no seleccionad
[OFF] apretando el pulsante MODE. Apretad el pulsante SET para confirmar.
4
MODE
SET
Seleccionad el número de platos (2 o 3) apretando el pulsante MODE.
Apretad el pulsante SET para confirmar.
5
MODE
SET
E
-5
ESPAÑOL
5. Seleccionar el número de platos.
6. Introducir el número de dientes de los platos iniciando por el
más pequeño.
Apretad el pulsante MODE para aumentar el valor, y el pulsante S/S
para disminuirlo. Apretad el pulsante SET para confirmar, la pantalla
pasa al plato sucesivo. Para volver al plato precedente, apretad los
pulsantes S/S y MODE contemporaneamente.
Una vez completada la introducción de los platos, la pantalla pasa a la
configuración de los piñones.
Nota: Si se ha seleccionado el sensor de cadecia (CDC [ON]), no es
necesaria la configuración de los piñones; pasad al párrafo 8.
7. Introducir el número de dientes de los piñones (combinación).
Seleccionad una de las siete combinaciones de piñones propuestas.
Si vuestra combinación no existe seleccionad [FREE] y podréis introducir cada piñón manualmente.
Nota: Efectuad primero la configuración para los piñones de la rueda
A, mantened apretado el pulsante SET y proceded con la configuración de la rueda B repitiendo el proceso precedente.
6
7
Ajuste del
número de dientes
de los platos
Elejir entre 7 tipos
de combinaciones
Elejir
combinación
Función Pulsantes
MODE
Plato interior
F1
Ajuste del número
de dientes del piñón
(combinaciones)
SET
MODE
Aumenta el
número de dientes
SET
S/S
Disminuye el
número de dientes
SET
Plato medio
F2
COG
COG
COG
COG
COG
COG
COG
FR
11-21
11-23
12-21
12-23
13-23
13-26
13-28
EE
Si se elije FREE, introducir
el número de dientes
manualmente.
SET
ESPAÑOL
SET
Pasa al siguiente
plato
S/S
Si CDC está OFF
MODE
Vuelve al plato
anterior
Plato exterior
F3
SET
Si CDC está ON
Piñon
SET
pequeño R1
SET
2sec.
SET
Cambio
Siguiente paso
Piñon grande R9
E
-6
8. Ajuste del tiempo de cambio de los platos.
Peligro!
Esta operación debe de ser efectuada mientras se conduce la
bicicleta. En tal caso para reducir el riesgo de accidente, efectuad
dicha operación en un lugar amplio, sin obstaculos ni tráfico.
Nota: Si este no es el primer ajuste y no habéis cambiado los platos o
ajustado la tensión del cable del desviador desde la última vez,
podéis saltaros este proceso. Para saltar el proceso apretar el
pulsante S/S. De este modo el ajuste finaliza y la pantalla visualiza
el modo de medida.
Instalad la unidad principal en la bicicleta e iniciad la marcha. Colocar
el desviador en el plato más pequeñoo y el cambio en el quinto piñón.
Importante: durante este proceso efectuad las fases de cambio
con el Ergopower lentamente de modo regular. El
pulsante S/S debe apretarse cuando la cadena haya pasado completamente al plato sucesivo.
Colocad el desviador en el segundo plato. Apretad el pulsante S/S.
Colocad el desviador en el plato más grande. Apretad nuevamente el
pulsante S/S. Repetid la secuencia precedente llevando el desviador
desde el plato más grande al medio al pequeño. Una vez completado
el ajuste la pantalla visualiza el modo de medida.
Nota: Si el mensaje"Error" aparece en la pantalla, la unidad principal
no ha sido colocada correctamente en la base, o podría existir
un problema en el mando Ergopower.
Importante: Para efectuar las operaciones
descritas en esta página, utilizar únicamente el pulsante S/S
del mando Ergopower.
8
Iniciar con el plato
pequeño y el quinto piñon.
F-1/R-5
S/S
Memorizar el momento
de cada cambio
F2 - 3 - 2 - 1
Continuar cambiando y
pulsar S/S cada vez.
S/S
A pantalla medición
E
-7
ESPAÑOL
Cambiar plato
Utilización base
En la parte superior de la pantalla➊ se indica la velocidad instantanea. En la
parte inferior ➋ los datos seleccionados. En la parte inferior derecha los
indicadores del desarrollo➌➍ muestran la posición actual de la cadena, y el
número de dientes del plato y del piñón actuales aparecen alternandose ➎.
Cuando se inicia/finaliza de pedalear la medición inicia/finaliza. Esta función se llama Auto Timer (AT)y se ilustra en la parte izquierda del esquema de la página siguiente. Cuando en la pantalla se muestra Auto Timer,
el símbolo "ATS/S" se enciende.
Indipendiente del Auto Timer (AT), se encuentra la función Cronómetro (STW),
en la cual la medición inicia/finaliza cuando se apreta el pulsante S/S (como
está ilustrado en la parte derecha del esquema en la página siguiente). Cuando en la pantalla se muestra el Cronómetro, el simbolo "STW" se enciende.
Las pantallas AT y STW realizan mediciones independientes. Mientras
una se visualiza, la medición se realiza contemporaneamente en la otra
pantalla no visualizada.
ErgoBrain ofrece dos modos de medición, el Auto Timer con incremento
de 1 segundo y el Cronómetro (STW) con incremento de 0.1 segundos.
Pantalla
1. Datos principales (velocidad)
2. Datos secundarios (datos seleccionados)
1
3. Indicador de plato
4. Indicador del piñón
2
5. Número de dientes de plato/piñón
6. Flecha de marcha
6
3
5
4
Utilización de los pulsantes
ESPAÑOL
ErgoBrain está dotado de dos pulsantes grandes y dos pequeños. Los
pulsantes situados en los mandos Ergopower funcionan exactamente como
los dos pulsantes grandes a los lados de la unidad principal.
Para desplazarse a traves de las funciones, apretar el pulsante MODE.
Prestad atención a la diferencia entre "apretar" y "mantener apretado por
2 segundos" indicada en la ilustración.
Pulsante MODE
MODE
AC
SET
Apretar dos segundos
Apretar
S/S
Avvio/arresto de
stopwatch
MODE
S/S
Operación de reajuste
S/S
MODE
AT y STW se reajustan
independientemente
E
-8
Para poner en marcha el cronómetro, apretad el pulsante S/S y para pararlo apretad S/S nuevamente.
Para poner a cero apretad los pulsantes S/S y MODE contemporaneamente.
La puesta a cero tiene efecto sobre AT y STW de manera independiente.
Para poner a cero los datos de las pantallas AT, efectuad la puesta a cero
durante las funciones señaladas con el simbolo "Reset" en el esquema.
Para la puesta a cero de los datos de las pantallaSTW, efectuad la puesta
a cero durante cualquier función STW.
El pulsante SET sirve para ajustar el reloj o para modificar otras impostazioni.
El pulsante AC sirve para formatear la unidad. Hay dos maneras para
retornar la unidad al estado precedente - la formatación e inicialización
(Consultar Pag. 4).
Funcíon Principal
PANTALLA
AUTO TIMER
PANTALLA
STOPWATCH
SPD
SPD
Veloc. Actual
Veloc. Actual
TM
STW
RESET
Stopwatch
Timer
RESET
Funcíon Secundaria
SPD
SPD
SPD
Veloc. Actual
Veloc. Actual
AV
MX
STW/AV
Veloc. Actual
Velocidad Media
Velocidad Max
RESET
SPD
Veloc. Actual
DST
Kilom. Parcial
Velocidad Media
RESET
RESET
SPD
SPD
ODO
STW/MX
Veloc. Actual
Distancia Total
Veloc. Actual
Velocidad Max
RESET
RESET
SPD
G.D.
CLK
Veloc. Actual
Desarrollo Métrico
Si CDC
está ON
CDC
Cadencia
SPD
Veloc. Actual
E
-9
Veloc. Actual
Reloj
SPD
Veloc. Actual
STW/DST
Kilom. Parcial
RESET
ESPAÑOL
SPD
Visualización Auto Timer
En este modo ErgoBrain reconoce el movimiento e inicia/finaliza
automaticamente la medición.
Funciones Principales
Apretar el pulsante MODE para moverse entre las funciones principales.
*La función CDC/SPD funciona solo con el sensor de cadencia instalado.
Funciones Secundarias
Mantened apretado el pulsante MODE durante dos segundos para pasar de una función principal a su función secundaria. No es posible
pasar directamente entre las funciones secundarias.
Puesta a cero
La puesta a cero se puede efectuar en las funciones TM/DST/AV/MX.
Todos los datos de la visualización AT se eliminarán sin influir sobre los
datos de la visualización STW.
PANTALLA
AUTO TIMER
Función Principal
TM
Velocidad Actual
A
Pantalla Stopwatch
00:00'00" - 99:59'59"
RESET
Función Secundaria
AV
Velocidad Media
0.0 - 110.7 km/h
RESET
MX
Velocidad Max.
0.0(4.0) - 110.7 km/h
RESET
Desde 291horas o 34359 km[millas]
MODE
DST
ODO
Distancia Parcial
Distancia Total
0.00 - 9999.99 km
0.0 - 00000.0 km
ESPAÑOL
RESET
G.D.
Desarrollo Métrico
(Dist. recorrida en una pedalada completa)
0.64 - 14.99 m
CLK
Reloj
0:00'00" - 23:59'59"
o
1:00'00" - 12:59'59"
CDC/SPD
Cadencia/Vel. Istantanea
Cadenza (Visualización superior)
0(20) - 299.0 rpm
Velocidad Actual(Visualización inferior)
0.0(4.0) - 110.7 km/h
E
- 10
Visualización Cronómetro (STW)
Mantened apretado el pulsante MODE durante dos segundos en la función TM de Auto Timer para pasar a la visualización cronómetro (STW).
Para volver a la visualización Auto Timer, mantened apretado el pulsante
MODE durante dos segundos en cualquiera de las funciones de la visualización cronómetro (volveréis a la función TM de la visualización Auto
Timer).
En la visualización STW, la medición inicia y finaliza apretando el pulsante
S/S. Durante la medición STW el indicador de la velocidad parpadea. Es
posible iniciar/finalizar la medición STW desde cualquier función en donde os encontréis.
Puesta a cero
Podéis realizar la puesta a cero desde qualquier función STW. Todos los
datos de la visualización STW se eliminan sin influir sobre los datos de la
visualización AT.
PANTALLA Stopwatch
STW
TM
Stopwatch
A
Pantalla
AUTO TIMER
0:00'00"0 - 9:59'59"9
10:00'00" - 99:59'59"
RESET
STW-AV
Velocidad Media
0.0 - 110.7 km/h
RESET
Desde 291horas
o 34359 km[millas].
MODE
STW-MX
Velocidad Max.
0.0(4.0) - 110.7 km/h
RESET
0 - 9999.99 km
Pulsante MODE
MODE
Apretar dos segundos
Apretar
Operación de reajuste
S/S
E
MODE
- 11
AT y STW se reajustan
independientemente
RESET
ESPAÑOL
STW-DST
Distancia Total
Ajuste del reloj
Apretad el pulsante SET en la función CLK en visualización Auto Timer.
Si habéis elejido la medición de la velocidad en KMH el reloj funcionará en
modo 24 horas. Si habéis elejido MPH el reloj funcionará en modo 12 horas.
S/S
Ajuste
+ MODE
–
S/S
–
+ MODE
CLK
TM
SET
SET
Al ajuste orario
De horas
a minutos
SET
Completar ajuste
Función Ahorro de Energía
Si los pulsantes no se accionan durante 15 minutos o la unidad no recibe
alguna señal, esta se apaga y muestra solo el reloj.
Cuando se inicia de nuevo a pedalear o se apreta un pulsante, la unidad
vuelve a la visualización normal (Ia presión de los pulsantes presentes
en los mandos Ergopower no hace que la unida salga de la función ahorro de energía).
Función Flecha Indicadora de Marcha
La flecha “Pace” indica si la velocidad instantanea es mayor o inferior a la
velocidad media. La velocidad instantanea se confronta: con AV en el
modo Auto Timer; con STW-AV (velocidad media en el modo STW) en el
modo cronómetro (STW).
Control de la circunferencia de la rueda y cambio entre Rueda A y B
ESPAÑOL
Apretad los pulsantes S/S y MODE contemporaneamente mientras esta
activada la función secundaria ODO en visualización Auto Timer. Se
visualizará la circunferencia de la rueda actualmente en uso. La presión
continua de los dos pulsantes provoca la alternancia entre las ruedas A y B.
ODO
Visualización circunferencia actual
S/S
MODE
Cambiar de rueda
S/S
a
MODE
3sec.
Modificación de los datos memorizados
Para cambiar los datos memorizados, apretad el pulsante SET en cualquiera de las funciones excepto el reloj y se visualizará el modo de
formateado (página 4). Después de haber efectuado las modificaciones
deseadas, volved al modo de medición apretando el pulsante SET. (El
reloj no sufre variaciones.)
E
- 12
Función de Auto-aprendizaje
Si el sensor de cadencia (CDC) está instalado en vuestra bicicleta,
ErgoBrain calcula automáticamente el número de dientes de vuestros
piñones (Por ello no es necesario introducir el número de dientes de los
piñones en Página 6). Esta función se llama Auto-apredizaje.
Aunque si se cambia la rueda durante una competición, será necesario
efectuar una sola operación de actualización (como se explica abajo) y la
unidad continuará el auto aprendizaje sin la perdida de algún dato.
La operación de actualización deverá efectuarse también en caso de sustitución de los piñones.
Actualización *
Peligro !
Durante la marcha prestad siempre atención a todo lo que os
rodea. No prestad excesiva atención a los datos en la pantalla.
Mantened vuestra atención sobre la carretera, al tráfico y a
eventuales obstáculos, etc.
La actualización se efectuá durante la marcha. La actualización es posible con la cadena en cualquier posición, pero aseguraos de que esté bien
fijada, que no salte y que las bielas puedan girar correcctamente. En cualquier modo de medición, mantened apretado el pulsante S/S durante más
de dos segundos y la unidad iniciará la actualización.
Inicio de la actualización
2sec.
S/S
Actualización
Otras Informaciones
• Si la unidad principal se extrae de la base, los datos relativos a los
platos/piñones desaparecerán.
• Si durante la función TM visualizada Auto Timer se aprieta el pulsante
SET durante tres segundos, la unidad pasa automaticamente al modo
ahorro de energía.
E
- 13
ESPAÑOL
Nota: la unidad necesita aproximadamente cinco segundos, según la
velocidad con la que rodáis, para calcular el número de dientes
de cada piñón. Durante este cálculo el símbolo de la rueda parpadea.
Apenas iniciada la actualización podría visualizarse un número de dientes del piñón erróneo, pero el sistema procede instantaneamente con la
calibración y el cálculo del número correcto.
* Si el sensor de cadencia (CDC) no está instalado, la función de auto
aprendizaje no será disponible.
Manutención
Periodicamente verificad la posición y el estado de los sensores de velocidad y cadencia y de los imanes.
Si la unidad principal o la base estuvieran sucias, limpiarlas con un detergente neutro diluido usando un paño suave y secarlas inmediatamente.
No utilizar gasolina, alcohol u otros disolventes orgánicos para no dañar
la superficie.
Sustitución de la pila
Peligro!
Mantened la pila fuera del alcance de los niños. En caso de
ingestión dirigirse inmediatamente a un médico.
CR2032
Si el simbolo de la pila parpadea,
sustituirla con una nueva como
está ilustrado a continuación.
Utilizad solo la pila aconsejada.
Después de la sustitucóon efectuad el proceso de formateado
indicado en la página 4.
ESPAÑOL
Causas y remedios
Síntomas ControlesRemedios
La pantalla de cristal liquido está oscura y aparecen carácteres extraños.
Se ha dejado durante largo tiempo a la luz directa del sol?
Mantener la unidad a la sombra. Los datos no se alteran.
La pantalla responde lentamente.
La temperatura ambiente es demasiado baja (inferior a los 0°C, 32°F).Vuelve a
la normalidad con el aumento de la temperatura. Los datos no se alteran.
No aparece ningún caracter.
La pila está acabada?
Sustituir con una nueva (CR2032). (Después de la sustitución, acordarse de
apretar el pulsante AC y de formatear la unidad)
Aparecen carácteres incomprensibles.
Si persiste la visualización anómala de datos desmontar y volver a instalar la pila
y formatear la unidad como se describe en la página 4
La velocidad (o la cadencia) no se mide.
Verificar que no haya ningún objeto en la zona de contactos;
Limpiar los contactos.
Verificar la posición de los sensores y de los imanes de velocidad y cadencia.
Ajustarlos de modo correcto. (Consultar el Manual de Instalación)
Verificar si el cable del sensor de velocidad o cadencia está roto.
Sustituir el sensor con uno nuevo.
No se visualizan correctamente la posición de la cadena o el número de dientes.
Verificar que no haya ningún objeto en la zona de contatos.
Limpiar los contactos.
E
- 14
Habéis cambiado los piñones?
Si el sensor de cadencia está conectado, efectuar el proceso de actualización
ilustrado en la página 13.
Si el sensor de cadencia no está conectado, apretar el pulsante SET e introducir
nuevamente la combinación de piñones o el número de dientes (página 6).
El tiempo de cambio del desviador no corresponde a las indicaciones visualizadas.
Habéis ajustado el desviador o sustituido un plato?
Apretar el pulsante SET y repetir el ajuste del tiempo de cambio (página 7).
[Error] se visualiza cuando se efectua el ajuste del tiempo de cambio.
Se ha roto uno de los cables de los sensores del ErgoPower?
Sustituir la base con una nueva.
Especificaciones Técnicas
Función
Velocidad instantánea
Tiempo transcurrido
Velocidad media
Velocidad máxima
Distancia recorrida
Distancia total
Desarrollo métrico
Simbolo
* La forma y las especificaciones están sujetas a modificaciones sin previo aviso.
E
- 15
ESPAÑOL
Campo / Precisión
0.0(4.0) - 110.7 km/h [mph] / ±0.5 km/h[mph]
TM
0:00’00” - 99:59’59” / 0.003%
AV
0.0 - 110.7 km/h [mph] / ±0.5 km [mph]
MX
0.0(4.0) - 110.7 km/h [mph] / ±0.5 km/h [mph]
DST
0.00 - 9999.99 km [millas] / ±0.01 km [millas]
ODO
0.0 - 99999.9 km [millas] / ±0.1 km [millas]
G.D.
0.64- 14.99 m [25 - 590 pulgadas] / ±0.01 m [1
pulgadas]
Reloj
0:00’00” - 23:59’59”
[1:00’00” - 12:59’59”] / ±0.003%
Cadencia
0(20.0) - 299.0 rpm / ±1 rpm (sotto i 199rpm)
Cronómetro
STW
0:00’00”0 - 99:59’59” / 0.003%
STW•Velocidad media STW-AV
0.0 - 110.7 km/h [mph] / ±0.5 km [mph]
STW•Velocidad máxima STW-MX
0.0(4.0) - 110.7 km/h [mph] / ±0.5 km [mph]
STW•Distancia recorrida STW-DST 0.00 - 9999.99 km [millas] / ±0.01 km [millas]
Funciones adjuntas Flecha «pace» Indica si la velocidad instantanea es superior o
inferior a la velocidad media
Auto Apredizaje Cálcula automaticamente el número de
dientes del piñón
Sistema de control
Microcomputer a 4-bit 1-chip ,oscillador de
control de cristal
Tipo de pantalla
Cristal liquido (LCD)
Sistema de lectura de la
Sensor magnético No-contact
señal de cadencia y velocidad
Temperatura de ejercicio
0°C - 40°C [32°F - 104°F]
Temperatura tolerada
–20°C - 50°C [–4°F - 122°F]
Campo circunferencia de la rueda
1600 - 2499 mm / Valor inicial: 2096
Campo número dientes desarrollos Platos: 30 - 56
Piñones: 11 - 31
Diámetro montaje horquilla
11Ø - 36Ø
Tipo Batería
CR2032 x 1
Duración
Circa. 1,5 anni (utilización 1hora al día)
La duración de la batería original de fábrica normalmente es más corta.
Dimensiones / Peso
54.0 x 47.5 x 20.7 / 36 gramos [1.27 oz]
NOTES
This device complies with Part 15 of the FCC Rules. Operation is subject to
the following two conditions: (1) This device may not cause harmful interference, and (2) this device must accept any interference received, including
interference that may cause undesired operation.
Modifications
The FCC requires the user to be notified that any changes or modifications
made to this device that are not expressly approved by CAMPAGNOLO S.R.L.
may void the user’s authority to operate the equipment.
TABELLA COMPARATIVA DIMENSIONI / CIRCONFERENZA DELLA
COPERTURA
SETTING VALUES CROSS REFERENCE TABLE
QUERVERWEISTABELLE MIT SOLLWERTEN
タイヤ周長表
TABLE DE REFERENCE DES VALEURS DE REGLAGE
TABLA DE MEDIDAS
Tire Size
24 x 1
24 x 3/4 Tubular
24 x 1-1/8 Tubular
24 x 1-1/4
24 x 1.75
24 x 2.00
24 x 2.125
26 x 1(559mm)
26 x 1(650C)
26 x 1.25
26 x 1-1/8 Tubular
26 x 1-3/8
26 x 1-1/2
26 x 1.40
26 x 1.50
26 x 1.75
26 x 1.95
26 x 2.00
26 x 2.1
26 x 2.125
L(mm)
1753
1785
1795
1905
1890
1925
1965
1913
1952
1953
1970
2068
2100
2005
1985
2023
2050
2055
2068
2070
Tire Size
26 x 2.35
27 x 1
27 x 1-1/8
27 x 1-1/4
27 x 1-3/8
650 x 35A
650 x 38A
650 x 38B
700 x 18C
700 x 19C
700 x 20C
700 x 23C
700 x 25C
700 x 28C
700 x 30C
700 x 32C
700C Tubular
700 x 35C
700 x 38C
700 x 44C
L(mm)
2083
2145
2155
2161
2169
2090
2125
2105
2070
2090
2086
2096
2105
2136
2170
2155
2130
2168
2180
2224
CAMPAGNOLO S.R.L.
VIA DELLA CHIMICA, 4
36100 VICENZA - ITALIA
PHONE: +39-0-444-225500
FAX: +39-0-444-225400
Website: www.campagnolo.com
E-mail: [email protected]
CAMPAGNOLO LATINO
AMERICANA CML. LTDA.
AV. DR. ANTONIO ÁLVARO 330 CJ.72
SANTO ANDRÉ - CEP 09030-520
SÃO PAULO/SP - BRASIL
PHONE: +55-11-444-9123
FAX: +55-11-449-2344
E-mail: [email protected]
CAMPAGNOLO DEUTSCHLAND GMBH
AN DER SCHUSTERINSEL 15
51379 LEVERKUSEN - GERMANY
PHONE: +49-2171-72430
FAX: +49-2171-724315
E-mail: [email protected]
CAMPAGNOLO IBERICA S.L.
PINTOR JESUS APELLANIZ, 17
01008 VITORIA - SPAIN
PHONE: +34-(9)-45-222504
FAX: +34-(9)-45-244007
E-mail: [email protected]
CAMPAGNOLO FRANCE SARL
B.P. 148 - 42163 ANDREZIEUX
BOUTHEON CEDEX - FRANCE
PHONE: +33-477-556305
FAX: +33-477-556345
E-mail: [email protected]
SERVICE AND TECHNICAL
INFORMATION:
CAMPAGNOLO USA INC.
2105-L CAMINO VIDA ROBLE
CARLSBAD - CA 92009 - USA
PHONE: +1-760-9310106
FAX: +1-760-9310991
E-mail: [email protected]
CENTRAL (ITALY)
PHONE: +39-0-444-225600
E-mail: [email protected]
GERMANY
PHONE: +49-2171-724320
E-mail: [email protected]
USA
PHONE: +1-760-9310106
E-mail: [email protected]
Printed on recycled paper
066600000 3